Title: Cisco Jabber Guest for Android SDK Developer Guide
Version: V
Publisher: DevNet, Cisco's Developer Program
Publisher Address: Cisco Systems, Inc., 150 W Tasman Dr, San Jose, CA 95134, USA
Published Date: Dec 20, 2016
Introduction
Overview
Jabber Guest for Android allows external (public) users to call internal enterprise endpoints and engage in two-way video communications over the public Internet. When configured correctly, the Jabber Guest web server allows guests to establish video calls that reach inside the firewall to contact support, experts, and other services from their Android device. This functionality is enabled through the Jabber Guest Software Development Kit (SDK) for Android. The Jabber Guest SDK for Android coordinates and simplifies the implementation, use, and quality of two-way video calls from within your application. This document covers the software and resources a developer would need to use the Jabber Guest SDK to integrate into their Android mobile applications.
Audience
This document is intended for developers or information technology professionals using or familiar with Cisco telecommunications equipment who want to integrate with their Jabber Guest web server by using a mobile device. The document assumes the reader is comfortable with Java for Android, common Android design patterns, and object-oriented design in general.
Terminology
This section covers terminology in use within the SDK and components of the SDK itself.
Call Bar

The Call Bar is a view that has on-screen controls for the user to modify the state of an active call. By default, these buttons include things like Mute, Stop, Keypad, and End Call.
Remote View

A Remote View is a view that represents the called party’s video during an active call.
Self View

A Self View is a view that represents the local user’s transmitted video during an active call. The Self View can be presented full-screen during the set up of a call to allow the user to see themselves prior to initiating the call. During a call, the Self View is often shown as a smaller view over the Remote View to allow the user to continue to see what the called party can see.
URI
A URI is a Uniform Resource Identifier that is used to identify and potentially pass arguments of the targeted called party.
Components
For full descriptions and method or properties definitions, refer to the API Reference documentation for more information.
JabberGuestCall
The JabberGuestCall class is a singleton that consolidates the lifecycle and interaction with a Jabber Guest call. It represents all of the capabilities and state of the active or pending call. For example, muting and unmuting video is controlled through this class. Getting information such as whether or not video is active or what state the call is in can be accessed through this state through registered notifications. In addition, call statistics are also available.
CallFragment
The CallFragment class is a packaged collection of visual components working together to give developers a quick and easy way to integrate common Jabber Guest call functionality into their application. It includes a RemoteView, SelfView, DataView and ControlBarView in a common configuration.
PreviewFragment
Similar to the CallFragment class, the PreviewFragment class is intended for developers to quickly include a baseline of functionality when using the Jabber Guest SDK for Android. This class give developers a way to show a SelfView with a call button.
Requirements
This section describes the requirements for implementing a Jabber Guest for Android solution.
Jabber Guest Server
The version of SDK to be used must match the server version that will be servicing clients.
Supported Devices
The miminum Android software requirements for any device is Android 4.0.3 (API Level 15) or later.
The minimum Android hardware requirements are as follows:
- 1.5 Ghz dual-core processor or better (quad-core processor recommended)
- Screen size of 480 x 800 or better
Jabber Guest SDK does not support the Tegra2 chipset.
Cisco specifically supports Cisco Jabber Guest for Android SDK for the following Android devices:
- Samsung Galaxy SII
- Samsung Galaxy SIII
- Samsung Galaxy S4
- Samsung Galaxy S4 mini
- Samsung Galaxy S5
- Samsung Galaxy S6
- Samsung Galaxy S6 edge
- Samsung Galaxy S6 edge +
- Samsung Galaxy Note II
- Samsung Galaxy Note III
- Samsung Galaxy Rugby Pro
- Samsung Galaxy Note Pro 12.2
- Google Nexus 5
- Google Nexus 7 (2013)
- Google Nexus 10
- Sony Xperia Z1
- Sony Xperia ZR/A
- Sony Xperia Z2
- Sony Xperia Z4
- LG G2
- LG G4
- Motorola Moto G
- Motorola RAZR MAXX
If you encounter problems with unsupported Android devices, consult the Cisco Support Forums at http://supportforums.cisco.com if you encounter problems with unsupported devices.
Due to the media-heavy nature of the SDK, development and use on an actual device is required. No known emulator will properly capture and render audio and video with the Jabber Guest SDK.
Android Software Development Kit (SDK)
For development, the Jabber Guest for Android SDK requires a current Android SDK be installed and that a minimum Android platform API level of 15 is available for use. If you do not have the API 15 package installed, go to the Android SDK Manager and install the SDK Platform for Android 4.0.3 (API 15). This also means that any device support is limited to Android 4.0.3 and later.
Required Manifest Entries
Ensure your manifest specifies the following uses-feature and uses-permissions sections to guarantee the functionality and capabilities required by Jabber Guest.
Required Android Features
Feature usage statements in the manifest are required to ensure the proper OpenGL version and hardware features needed for Jabber Guest to operate correctly.
OpenGL
OpenGL is required to guarantee a high-quality video display.
<uses-feature android:glEsVersion=“0x00020000” />
Camera Features
Because Jabber Guest uses the camera, several features involving the camera are required of a device.
<uses-feature android:name=“android.hardware.camera” android:required=false />
<uses-feature android:name=“android.hardware.camera.autofocus” android:required=false />
<uses-feature android:name=“android.hardware.camera.any” />
Audio Features
In addition to camera features, Jabber Guest uses the microphone to record audio from a device. Ensure your manifest specifies the following uses-feature sections:
<uses-feature android:name=“android.hardware.microphone” />
<uses-feature android:name=“android.hardware.audio.low_latency” android:required=false />
Required Android Permissions
If you would like to embed Jabber Guest functionality into your application, a group of permissions must be agreed to by the user for Jabber Guest to work properly.
Recording and Transmission
The CAMERA and RECORD_AUDIO permissions are needed to capture audio and video and the permission to access the INTERNET is used to negotiate and transport the video and audio streams to the {JABBER_GUEST_PROXY} over the internet.
<uses-permission android:name=“android.permission.CAMERA” />
<uses-permission android:name=“android.permission.RECORD_AUDIO” />
<uses-permission android:name=“android.permission.INTERNET” />
Network State
Jabber Guest uses the ACCESS_NETWORK_STATE permission to react and operate properly to conditions where the network is unavailable or is changing.
<uses-permission android:name=“android.permission.ACCESS_NETWORK_STATE”/>
Bluetooth
To access and use Bluetooth devices for audio recording and playback, Jabber Guest needs the BLUETOOTH and MODIFY_AUDIO_SETTINGS permissions.
<uses-permission android:name=“android.permission.BLUETOOTH”/> <uses-permission android:name=“android.permission.MODIFY_AUDIO_SETTINGS” />
Read Phone State
The READ_PHONE_STATE is used by Jabber Guest to get the unique device ID of the device.
<uses-permission android:name=“android.permission.READ_PHONE_STATE” />
Broadcast Sticky
The BROADCAST_STICKY permission is used by the internal SDK components to communicate important state change information.
<uses-permission android:name=“android.permission.BROADCAST_STICKY” />;
Emergency Number Notice
IMPORTANT NOTICE
911 NOTICE
During an emergency, softphone technology may not provide the most timely or accurate location data if used for a 911 emergency call. Calls may be misdirected to the wrong emergency response center or the emergency response center may make errors when determining your location. USE A SOFTPHONE ONLY AT YOUR OWN RISK DURING AN EMERGENCY.
Installation
This section describes some basic installation procedures.
Downloading the SDK and Sample Apps
Current versions of the SDK are available at http://jabberdeveloper.com. You will need to login with your Cisco credentials to access and download the SDK.
Unpacking the SDK and Sample Apps
The SDK currently comes as a zip archive. After download, extract the contents of the SDK into its own named directory. For example, on Windows systems this might be C:\SDK\jabber-guest-sdk-for-android-0.0.95\ while on OS X systems it could be /Developer/SDK/jabber-guest-sdk-for-android-0.0.50/. The content includes 3 folders - docs, samples and sdk. The sdk supports both Android Studio and Eclipse. If developer uses Android Studio, he can import Android Studio aar library, if developer uses Eclipse, he can import Eclipse android library project. The PreviewSample and RemoteShareSample project are Eclipse project while others are Android Studio project.
Including the SDK and Sample Apps if you are using Eclipse
Pre-requisites
Eclipse
To start with the Jabber Guest SDK in Eclipse, it must first be imported as a project library. To import the SDK project and all the sample applications follow these steps:
- Select File > Import and then, from the import source dialog, select Android > Existing Android Code into Workspace.
- Click Next.
- On the Import Projects dialog page, make sure the Select root directory checkbox is checked and click Browse to locate where you have unpacked the SDK.

- Browse to the root directory of the unpacked SDK and click OK. If everything is correct, you should see eight projects in the Projects section of the Import Projects dialog page.
- To install the SDK elements, check samples/PreviewSample, samples/RemoteShareSample and sdk/eclipse, remember change the project names. Don’t check other projects since they are Android Studio projects. If any are greyed out and cannot be checked, it means you have already imported that project or there is a conflict with the project name.
- When the projects are checked for import, click Finish to import.

Including the SDK and Sample Apps if you are using Android Studio.
Pre-requisites
Android Studio
To import the SDK project and all the sample applications, following these steps:
- From the Quick Start menu, select Import project (Eclipse ADT, Gradle, etc.).
- On the Select Eclipse or Gradle Project to Import dialog, browse to where you unpacked the SDK and go to the samples directory. Select the root directory of the sample you want to open.
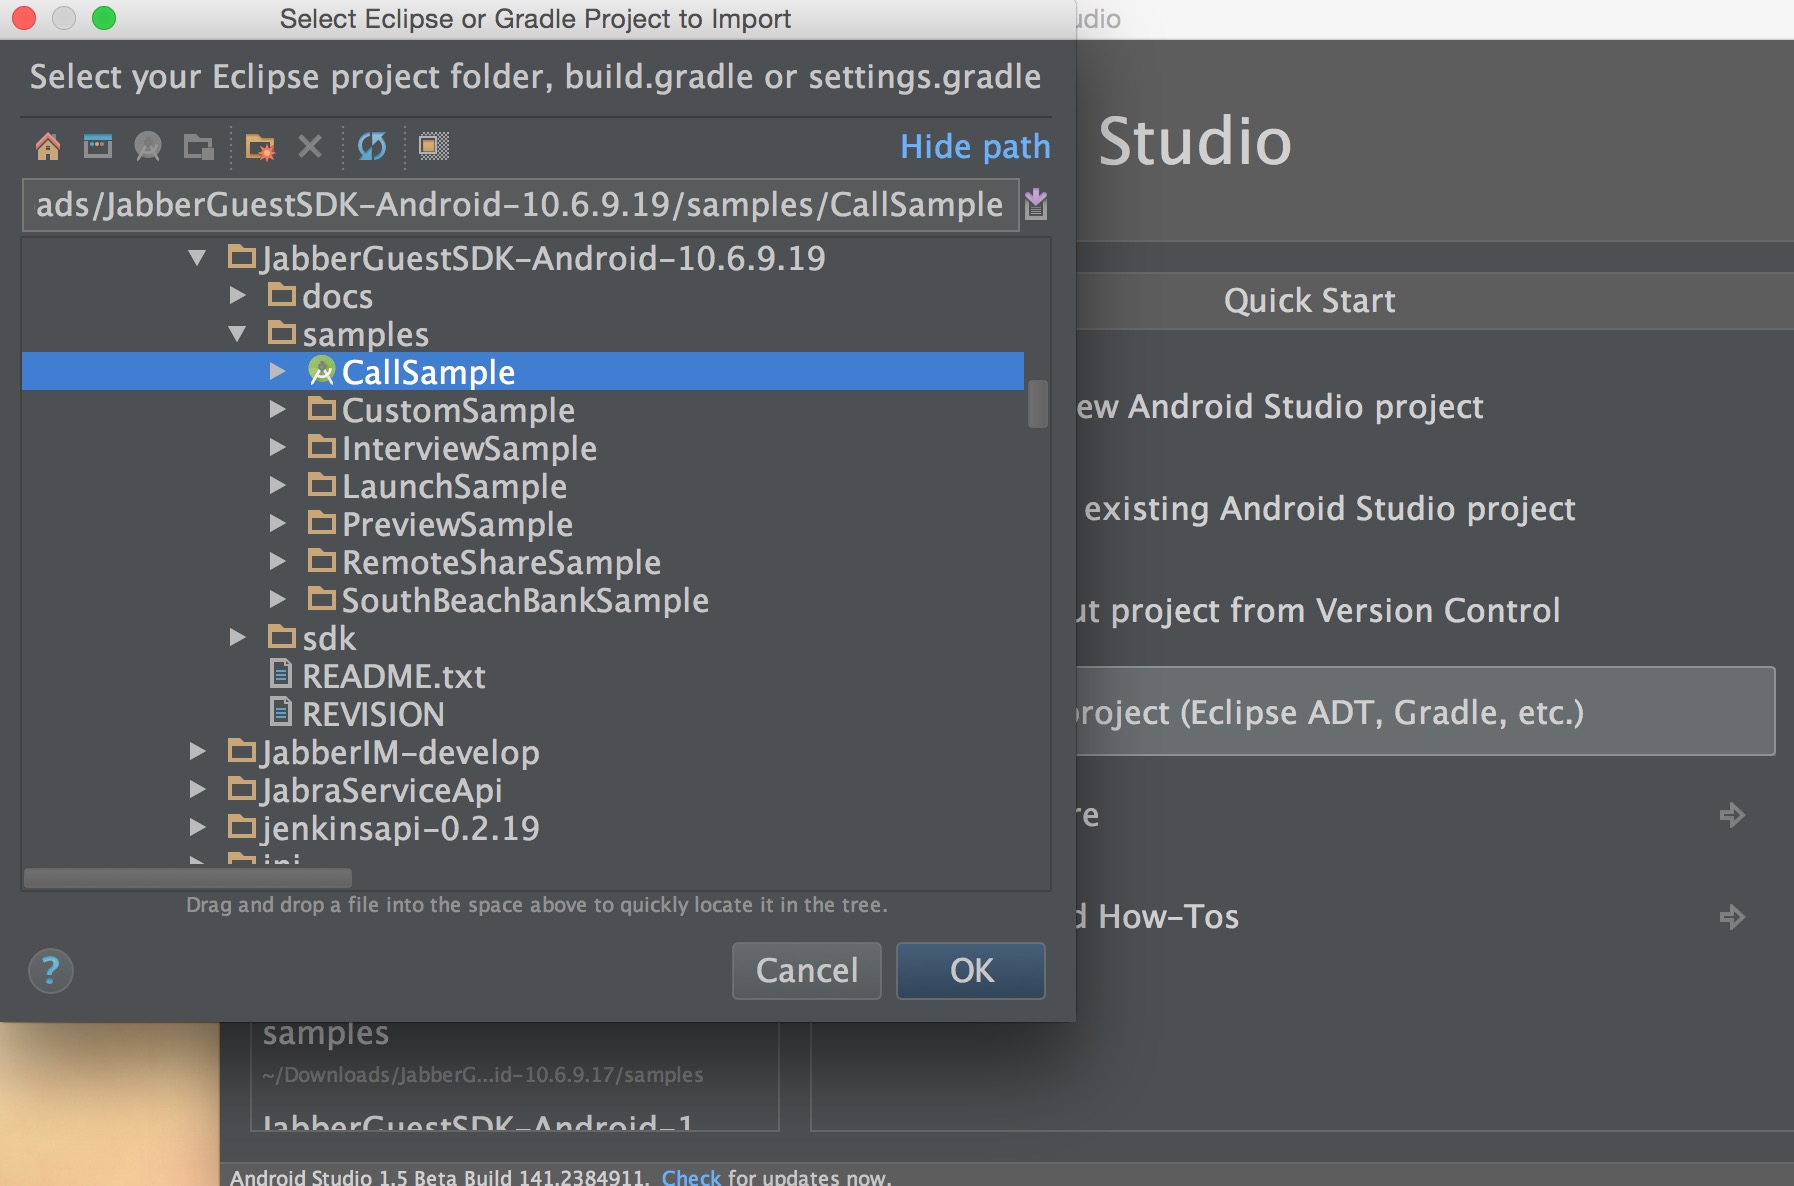
- Click OK.
- Right Click on app, Select New Module menu, in New Module dialog, click Import .JAR/.AAR Package, select the jcf-release.aar to create a new module.
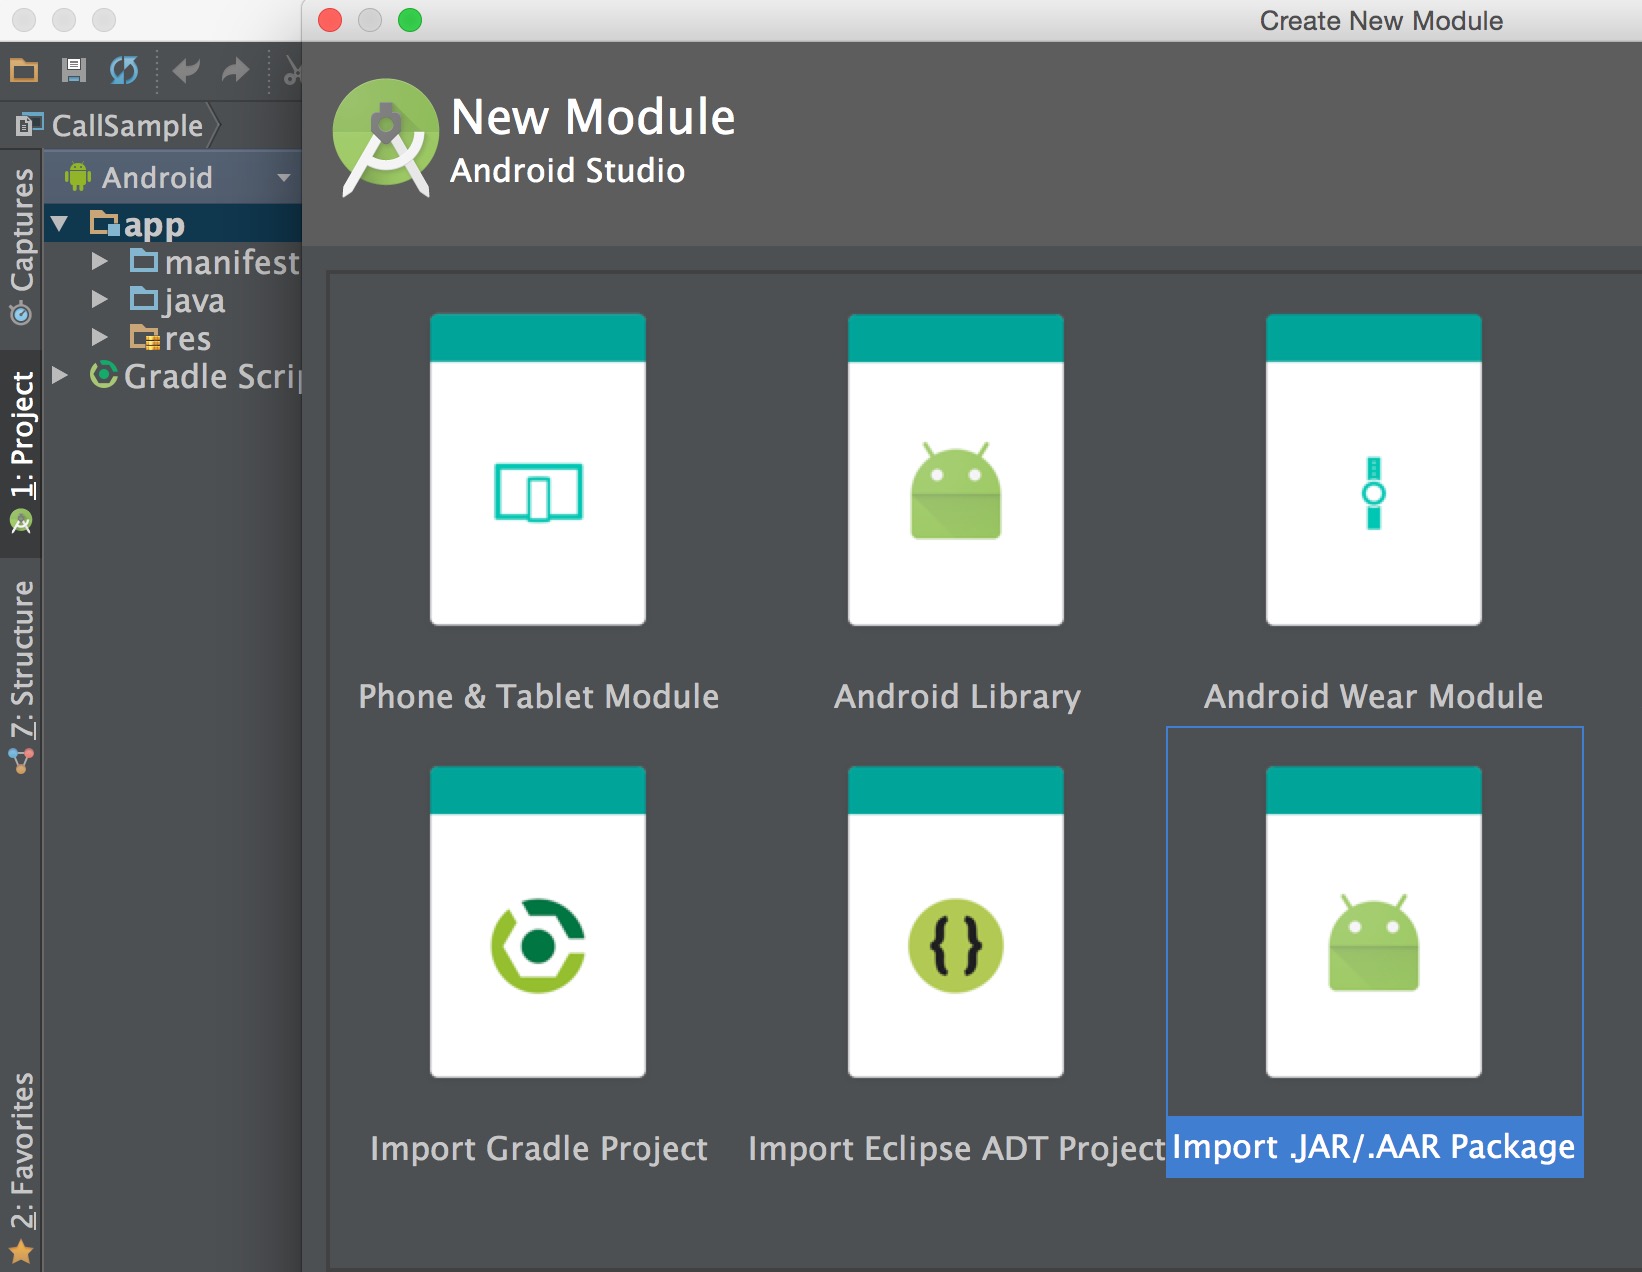
- Repeat above step to import sdk-release.aar as a new module.
- Right Click on app, Select Open Module Settings menu, click app/Dependencies, add + Module dependency, and select jcf-release and sdk-release module.

- The sample app should now compile and run on your device.


Including the SDK Within Your Own Apps if you are using Eclipse
If you have any existing Android projects open in Eclipse and would like to include the SDK in those projects, follow these steps:
- Select your open project in Eclipse and either select Project > Properties from the main menu or alternate-click on the Project itself and select Properties from the context menu. If your project nature is correctly set to Android, your project dialog will contain Android and Android Lint Preferences sections.

- Within the Android section, click Add from the bottom Library panel and then select “sdk” from the offered library projects. If “sdk” is not shown, ensure the Jabber SDK project is imported and open.


- Click OK and the Jabber Guest for Android SDK library should now be referenced by your project.
Including the SDK within Your Own Apps using Android Studio
If you have any existing Android Studio projects open and would like to include the SDK in those projects, It is the same as **Including the SDK and Sample Apps if you are using Android Studio.*. follow these steps:
- Select your open project in Android Studio and go to File > New > Import Module.
- On the New Module screen select Import .JAR/.AAR Package and click Next.
- Find the jcf-release.aar and sdk-release.aar to create 2 New Module
- Right Click on your project folder, Select Open Module Settings menu, add Module dependency by choosing above 2 Modules in Choose Modules dialog.
- The sdk should now be available to your application.
Usage
Strategies for Using Jabber Guest on a Mobile Device
A core design tenet of the Jabber Guest for Android SDK is design flexibility. Using the common patterns of Android, every effort was made to make implementation simple and straightforward. For example, you are free to approach integration in three main ways.
- Rely on the existing Jabber Guest client application provided by Cisco to handle the video call.
- Use the larger CallFragment and PreviewFragment components to integrate Jabber Guest quickly into your application.
- Take the sub-components themselves, like the RemoteView, SelfView, and ControlBarView, and create your own custom solution.
Cross Launching the Jabber Guest Client
In situations where developing your own integration is difficult or impossible, you can still rely on the default Jabber Guest client application to establish a video or audio call. This is done by having the end user install the Jabber Guest client—which is available from the Google Play Store—and call the appropriate intent to launch a Jabber Guest call. This is called cross launching.
Pros
- Integration at the system level
- URI-based integration
- No code inclusion
- No special permissions needed
Cons
- Jabber Guest client is not pre-installed on most devices
- Cisco Branded
Using Jabber Guest SDK Components
Another strategy for integrating Jabber Guest technology involves reusing the common components already available within the SDK.
Pros
- Integration at the system level
Cons
- More configuration is needed to brand or theme your application
Creating Your Own Custom User Interface
The most flexible approach for using the Jabber Guest SDK is to use the component pieces however you see fit within your own application.
Pros
- Full customization of branding and theming within your application
- Allows for unique and special-purposed usage within your application interface
Cons
- Your application would have to request the required permissions
- There is custom code to write
- It may not match your application theme
Using an Activity versus Fragments
There is no special requirement to use Activities in favor of Fragments or vice versa. This should allow the ability to include Jabber Guest SDK components into older designs that are composed of mostly Activities. For new development, we suggest to use Fragments for dynamic, modern user interfaces.
Using Cross Launching to Place a Call
To cross launch from within your application, the first step involves checking that the Jabber Guest client application is actually installed on the device. If the client is not available, the application can inform the user and then route to the Play Store to allow them to install the required application package. Once the Jabber Guest client is installed and available, a simple URI passed by using an intent can start the video call.
Checking for the existence of Jabber Guest
To handle the existence or lack of Jabber Guest on the device, consider using the Android Package Manager to query for the Jabber Guest package.
final String packageName = "com.cisco.jabber.guest";

          String packageVersion;

          PackageManager pm = this.getPackageManager();
          try {
              PackageInfo pi = pm.getPackageInfo(packageName, PackageManager.GET_META_DATA);
              packageVersion = pi.versionName;
          } catch (NameNotFoundException e) {
              // The Jabber Guest client application is not installed, route accordingly
          }
          // The Jabber Guest client application is installed and packageVersion contains the version
This code is from the Launch Sample and shows how to query for the com.cisco.jabber.guest package name and version. This package name identifies the Jabber Guest client.
try {
              startActivity(new Intent(Intent.ACTION_VIEW, Uri.parse("market://details?id=" + packageName)));
          } catch (android.content.ActivityNotFoundException e) {
              startActivity(new Intent(Intent.ACTION_VIEW, Uri.parse("https://play.google.com/store/apps/details?id=" + packageName)));
          }
If the com.cisco.jabber.guest package is not available the application could direct the user directly to the Play Store through the code in the right hand panel.
Placing a Call Using the CallFragment
The simplest and most straightforward usage of the SDK is to include the pre-built CallFragment into your application to handle placing and displaying the active call within your application. This is done by wiring your existing layout and events to include the CallFragment when a call needs to be placed. The JabbeGuestCall instance is initialized and the URI of the called party is used to connect the video call.
Review the CallSample sample included with the SDK for more insight on how to use a CallFragment
Using the PreviewFragment
Using another of the SDK components, the PreviewFragment, allows the user to set up their local view before connecting a call. If you would like to give users the opportunity to preview themselves through a SelfView, you should consider including the PreviewFragment as the first step of a call flow.
Review the PreviewSample sample included with the SDK for more insight on how to use a PreviewFragment
Including Individual Views into Your Layouts
To get the fullest amount of flexibility in your use of Jabber Guest a developer can include the component pieces directly within their own layouts.
Transitions
Background Service: CallService
If you have a JabberGuestCall instance instantiated in your app, and your app is dismissed to the background, Android may garbage collect that JabberGuestCall instance along with your app while it remains in the background. If this happens and your app was not in an active call, this is ok because you can always re-create a new JabberGuestCall instance when returning to the foreground. However, if you were in an active call when the app was dismissed to the background, and if the JabberGuestCall instance managing that call is garbage collected, then the active call will be immediately terminated. Re-creating a new JabberGuestCall instance in this case when returning to the foreground will not automatically redial and try to start another call.
One way to work around this is to spin up a background service while your calls are active,
and make sure that background service holds on to its own copy of your JabberGuestCall instance.
While this doesn’t guarantee that the JabberGuestCall instance won’t still be garbage collected
(even background services in Android can still be stopped in some cases), it does present a
greater probability that your call will not be dropped arbitrarily if your app is running in
the background during an active call.
For your convenience, the JabberGuest SDK for Android does provide such a service for you to use, CallService. The CallService class monitors an active call and provides a number of other benefits. It is optional, but recommended that this service is started whenever there is an active call. Additionally, if your app activities extend from JabberGuestCallActivity, then this CallService will be automatically used.
For more information on how to use CallService in your app, please refer to the CallService class in the API Reference.
Registering and Unregistering BroadcastReceivers with JabberGuestCall
If you are going to handle notifications from JabberGuestCall, it is recommended to register your BroadcastReceivers when your component is coming to the foreground, and to unregister your BroadcastReceivers when you are going to the background, to reduce resource usage. In most cases, processing notifications from JabberGuestCall does not need to happen while the application is in the background.
It is also recommended to setup one InvalidCertificateHandler in the onResume() method of your activity (or fragment) to handle the invalid certificate event. For further information please refer to the Certificates section of the developer guide.
Note that the PreviewFragment and CallFragment classes have BroadcastReceivers built-in, and they already handle the logic for proper registration and unregistration.
Video/Audio Handling in Background
During a call, JabberGuestCall by default will not change the Audio or Video mute states when the app is pushed into the background. You can always choose to change the mute state of the transmitted Audio or Video from the Android device during a call based on your app being in the background or foreground. If desired, you will have to add this logic into your application.
    //To simply mute the Audio and Video
              JabberGuestCall.getInstance().muteAudio();
              JabberGuestCall.getInstance().muteVideo();
Certificates
JabberGuestCall provides callbacks that can be overridden to prompt users of your app if they wish to continue placing a call when the certificate provided is invalid. By default, the abstract BaseFragment class provides an implementation where users will be prompted with an AlertDialog if such an event takes place. This functionality is used by the CallFragment and PreviewFragment fragment sub-classes of BaseFragment, and also by the JabberGuestCallActivity activity class which uses the CallFragment and PreviewFragment classes directly. This behavior can be overridden by implementing your own invalid certificate handling.
If you are using the high-level JabberGuestCallActivity activity class, or the CallFragment and PreviewFragment fragment classes, then you can not override the default invalid certificate behavior. You can simply skip this section.
JabberGuestInvalidCertificateCallBack
This interface allows you to control your app’s behavior when encountering an invalid certificate.
To override this behavior you will first need to define a custom implementation of the JabberGuestInvalidCertificateCallback interface, and override the onInvalidCertificate method in your implementation. From inside this method, you can accept the certificate by calling the acceptInvalidCertificate method on your current JabberGuestCall instance, or you can reject the certificate by calling the rejectInvalidCertificate method on your current JabberGuestCall instance.
Once you have defined your own custom JabberGuestInvalidCertificateCallback implementation, you will need to be sure to register and unregister an instance of this implementation with the JabberGuestCall class, via the registerInvalidCertificateHandler and unregisterInvalidCertificateHandler static methods, respectively. Typically, this is done inside your activity’s onResume and onPause methods.
Here is an example that demonstrates how to override the certificate handling behavior to always accept all invalid certificates in an Android activity:
    // Class to handle invalid certificate notifications
              private class JabberGuestCertificateHandler implements JabberGuestInvalidCertificateCallback {

                  @Override
                  public void onInvalidCertificate(String certFingerprint,
                      String identifierToDisplay,
                      String certSubjectCN, String referenceID,
                      List<String> invalidReason, String subjectCertificateData,
                      List<String> intermediateCACertificateData,
                      boolean allowUserToAccept) {

                      // For this sample we are accepting all certificates
                      JabberGuestCall.getInstance().acceptInvalidCertificate(referenceID, subjectCertificateData);
                  }
              }
              JabberGuestCertificateHandler mCertificateHandler = new JabberGuestCertificateHandler();

              @Override
              protected void onResume() {
              super.onResume();
              ...

              JabberGuestCall.registerInvalidCertificateHandler(mCertificateHandler);

              ...

              }

              @Override
              protected void onPause() {
              super.onPause();
              ...

              JabberGuestCall.unregisterInvalidCertificateHandler(mCertificateHandler);
              ...

              }
Video License
The Jabber Guest SDK for Android uses H.264 AVC video, which requires activation of license agreement by each user. If your application uses any of our included SDK components that use this functionality (SelfView, PreviewView,** PreviewFragment*, or **JabberGuestCallActivity*), the user will be prompted to activate the video license with a DialogFragment. Once the user activates the video license, they will not be prompted to do so again for subsequent calls. If the app is uninstalled or reinstalled, the video license will need to be reactivated.
If your application does not use any of those SDK components, you will have to provide the JabberGuestCall instance with a valid activity context where this dialog can be displayed prior to calling start() or setSelfTextureView(TextureView textureView) on your JabberGuestCall instance; see the documentation for the registerContext(Context context) method of the JabberGuestCall class for more details. Failure to register a context with your JabberGuestCall instance prior to calling start() or setSelfTextureView(TextureView textureView) will result in an error being logged, and your calls will not be allowed to proceed.
If your company has it’s own license agreement for H.264 AVC video from MPEG LA, and you wish to disable the display of the video license DialogFragment, place the following code in your app before calls are made to start() or setSelfTextureView(TextureView textureView) on your JabberGuestCall instance:
JabberGuestCall.disableVideoLicenseActivation(getApplicationContext());
See the Jabber Guest SDK for Android samples for examples of where to place this call.
If you disable the built-in activation capability of the Jabber Guest SDK for Android, you do so at your own risk and are responsible for any royalties or other fees associated with your use of the H.264 video codec.
Error Handling
Error Notifications
Errors are communicated from the SDK through Android’s LocalBroadcastManager. For more information about LocalBroadcastManager and how it is used, you can read the LocalBroadcastManager section from Android’s Developer Guide
Registering and Unregistering a BroadcastReceiver for Notifications
In the JabberGuestCall class, we allow classes to register and listen for 4 types of event notifications: call control events, call state changed events, new call instance available events, and error events.
Developers should use JabberGuestCall.registerReceiver(Context context, BroadcastReceiver receiver) to register your BroadcastReceiver to receive notifications for all four type of events. Alternatively, use JabberGuestCall.registerReceiver(Context context, BroadcastReceiver receiver, IntentFilter filter) to receive notifications for only a given subset of events. There is also a corresponding JabberGuestCall.unregisterReceiver(BroadcastReceiver mBroadcastReceiver) api to unregister your BroadcastReceiver.
When your BroadcastReceiver receives a notification for an event, the notification will include an intent which contains more information about the nature of that notification. For example, when receiving an error notification, you can get the bundle from the intent and retrieve the error information using the documented keys. For more details about the events and the keys, please refer to the JabberGuestCall class in the API Reference.
    BroadcastReceiver mBroadcastReceiver = new BroadcastReceiver() {

                  @Override
                  public void onReceive(Context context, Intent intent) {
                      String action = intent.getAction();
                      if (JabberGuestCall.ACTION_CALL_ERROR_EVENT.equals(action)) {
                          processCallErrorEvent(intent);
                      }
                  }
              };

              // Error information can be retrieved from the bundle object of the intent.
              void processCallErrorEvent(Intent intent) {
                  Bundle errorBundle = intent.getExtras();
                  long category = errorBundle.getLong(JabberGuestCall.ARG_CATEGORY_LABEL);
                  int title = errorBundle.getInt(JabberGuestCall.ARG_USER_TITLE_LABEL);
                  int code = errorBundle.getInt(JabberGuestCall.ARG_CODE_LABEL);
                  string internalMessage = errorBundle.getString(JabberGuestCall.ARG_INTERNAL_MESSAGE_LABEL);
                  int userMessage = errorBundle.getInt(JabberGuestCall.ARG_USER_MESSAGE_LABEL);
                  Serializable callState = errorBundle.getSerializable(JabberGuestCall.ARG_CALL_STATE_VALUE);
              }

              @Override
              protected void onStart() {
                  super.onStart();

                  // Register to receive events from JabberGuestCall
                  JabberGuestCall.registerReceiver(this, mBroadcastReceiver);
              }

              @Override
              protected void onStop() {
                  super.onStop();

                  // Unregister to remove receiver from receiving the broadcast messages.
                  JabberGuestCall.unregisterReceiver(mBroadcastReceiver);
              }
The example in the right hand panel shows how you can create a BroadcastReceiver, register that BroadcastReceiver to JabberGuestCall to receive notifications, handle those notifications to receive error information, and finally unregister that BroadcastReceiver.
    IntentFilter errorFilter = new IntentFilter();
              errorFilter.addAction(ACTION_CALL_ERROR_EVENT);

              JabberGuestCall.registerReceiver(context, receiver, errorFilter);
Developers can register for just the error event notifications with the code in the right hand panel.
Logs
The SDK also provides a logging class so users can modify what logging levels are included in LogCat logs from the SDK, as well as facilitate adding logs of your own. The JabberGuestCall.setGlobalLoggingEnabled (boolean enable) method can be used to enable or disable global logging(introduced in Jabber Guest for Android SDK 10.6.11)
    // To include the Log class in your client.
              import com.cisco.jabber.guest.util.Log;
Troubleshooting
This section describes some basic troubleshooting procedures.
Enabling Logging
By default, Jabber Guest SDK will log all WARN, ERROR and ASSERT log statements. To modify what Jabber Guest logs, use the Jabber Guest log utility. The com.cisco.jabber.guest.util.Log.setLogLevel(int level) method can be used to set the log level at runtime. To get the current log level, use the getLogLevel() method. At runtime, the logs for just the client application can be set via adb using the command: adb shell setprop log.tag.JabberGuestSDK DEBUG
Resources
Other resources available to Jabber Guest developers.
Jabber Developer Web Site
For all the latest in news and updates, be sure to visit http://jabberdeveloper.com.