webex-audio-tts
Webex Text-to-Speech Announcement Uploader
A modern web application that allows users to create and upload text-to-speech announcements to Webex calling services. This tool integrates with ElevenLabs for text-to-speech conversion and can be used for various services such as auto attendant, music on hold, or call queue announcements.
Features
- 🔐 Secure Webex OAuth authentication
- 🎯 Multiple location support for announcement deployment
- 🌓 Light/Dark mode with system preference detection
- 🎨 Modern UI with responsive design
- 🔄 Real-time status updates
- 📱 Mobile-friendly interface
Technologies Used
- React
- TypeScript
- React Router for navigation
- Tailwind CSS for styling
- shadcn/ui component library
- Webex APIs
- ElevenLabs API for text-to-speech conversion
Prerequisites
Before you begin, ensure you have:
- Node.js installed (v14 or higher)
- A Webex developer account with API access
- Webex OAuth Intergration with the following API scopes:
spark-admin:telephony_config_writespark-admin:locations_read
Installation
Development
- Clone the repository:
git clone https://github.com/sieteunoseis/webex-audio-tts.git
- Install dependencies:
npm run install-all
- Create a
.envfile in the frontend directory and add your Webex credentials:
VITE_WEBEX_CLIENT_ID=your-client-id
VITE_WEBEX_REDIRECT_URI=http://localhost:5173/oauth
VITE_WEBEX_SCOPE=spark-admin:telephony_config_write spark-admin:locations_read
- Create a
.envfile in the backend directory and add the following:
ELEVENLABS_API_KEY=elevenlabs-api-key
WEBEX_CLIENT_ID=webex-client-id
WEBEX_REDIRECT_URI=http://localhost:5173/oauth
WEBEX_CLIENT_SECRET=webex-client-secret
WEBEX_ORG_ID=webex-org-id
SAVE_WAV_FILES=true
Note: Development mode uses port 5173 for the frontend. In production, the application will run on port 3000 or whatever port you specify in the docker-compose file.
- Start the development server:
npm run dev
The application will be available at http://localhost:5173
Production
- Download docker-compose.yml file from this repository
wget -O docker-compose.yaml https://raw.githubusercontent.com/sieteunoseis/webex-audio-tts/refs/heads/main/docker-compose.yaml
2. Create a frontend.env file with the following content
touch frontend.env
| Variable Name | Explanation | Example | Required |
|---|---|---|---|
| VITE_WEBEX_CLIENT_ID | Client ID from your Webex Developer account | Yes | |
| VITE_WEBEX_REDIRECT_URI | OAuth callback URL for authentication | http://localhost:3000/oauth | Yes |
| VITE_WEBEX_SCOPE | Space-separated list of required API permissions | spark-admin:telephony_config_write spark-admin:locations_read | Yes |
| VITE_BRANDING_NAME | Organization name for branding purposes in NavBar | Automate Builders |
no |
| VITE_BRANDING_URL | URL for organization branding/website in NavBar | http://automate.builders |
no |
3. Create a backend.env file with the following content
touch backend.env
| Variable Name | Explanation | Example | Required |
|---|---|---|---|
| ELEVENLABS_API_KEY | API key for ElevenLabs text-to-speech service | Yes | |
| WEBEX_CLIENT_ID | Client ID from your Webex Developer account | Yes | |
| WEBEX_CLIENT_SECRET | Client Secret from your Webex Developer account | Yes | |
| WEBEX_REDIRECT_URI | OAuth callback URL for authentication | http://localhost:3000/oauth | Yes |
| WEBEX_ORG_ID | Your Webex Organization ID | Yes | |
| SAVE_WAV_FILES | Toggle to save generated audio files locally | true | No |
4. Run the application via Docker Compose
docker-compose up -d
5. Access the app
http://localhost:3000
6. Optionally add local volume to persist data
# Create directories if they don't exist
mkdir -p ./data

# Set permissions (replace 1000:1000 with your actual UID:GID if different)
chown -R 1000:1000 ./data
chmod 755 ./data
Add the following line to the docker-compose.yml file for the backend service.
user: "${UID:-1000}:${GID:-1000}"
volumes:
  - ./data:/usr/src/app/data
Note: that the data directory will be used to store the audio files and the db directory will be used to store the sqlite database.
Configuration
Webex Setup
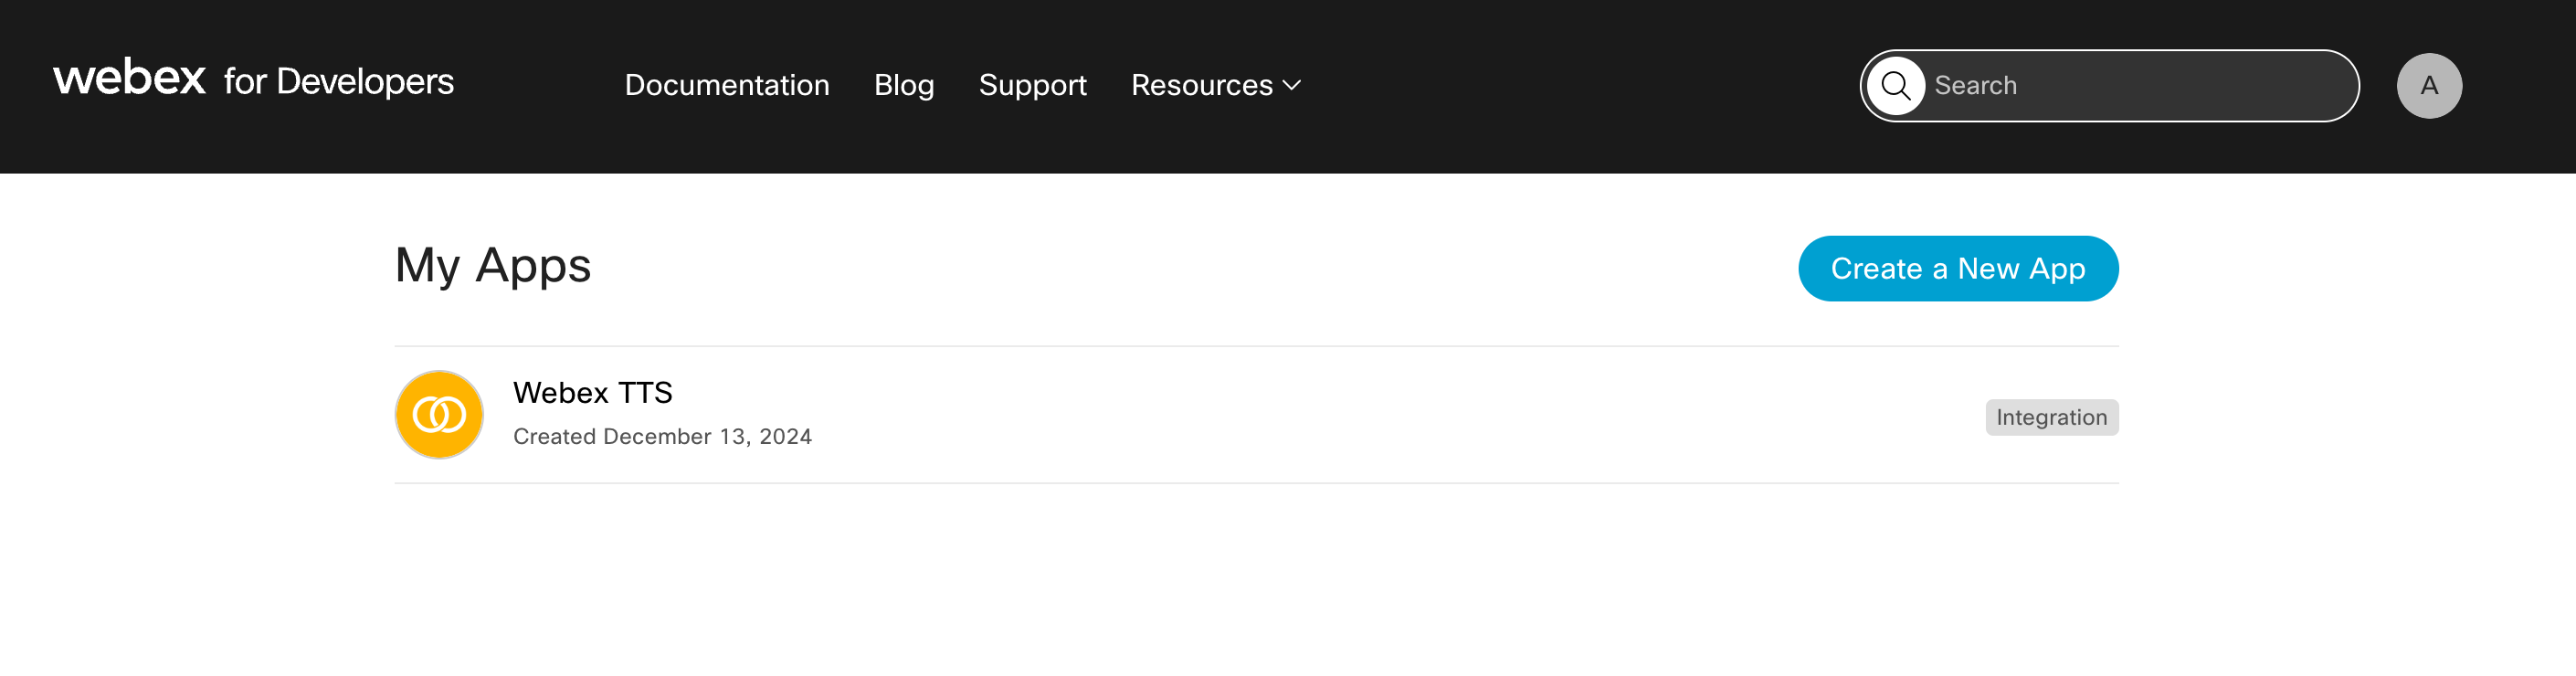
- Create a Webex Developer account at developer.webex.com
- Create a new app integration here
- Set the Redirect URI to
http://localhost:5173/oauthor your production URL - Enable the following scopes:
spark-admin:telephony_config_writespark-admin:locations_read
- Set the Redirect URI to
- Copy the Client ID and Client Secret for use in
frontend.envandbackend.envfile(s)
Usage
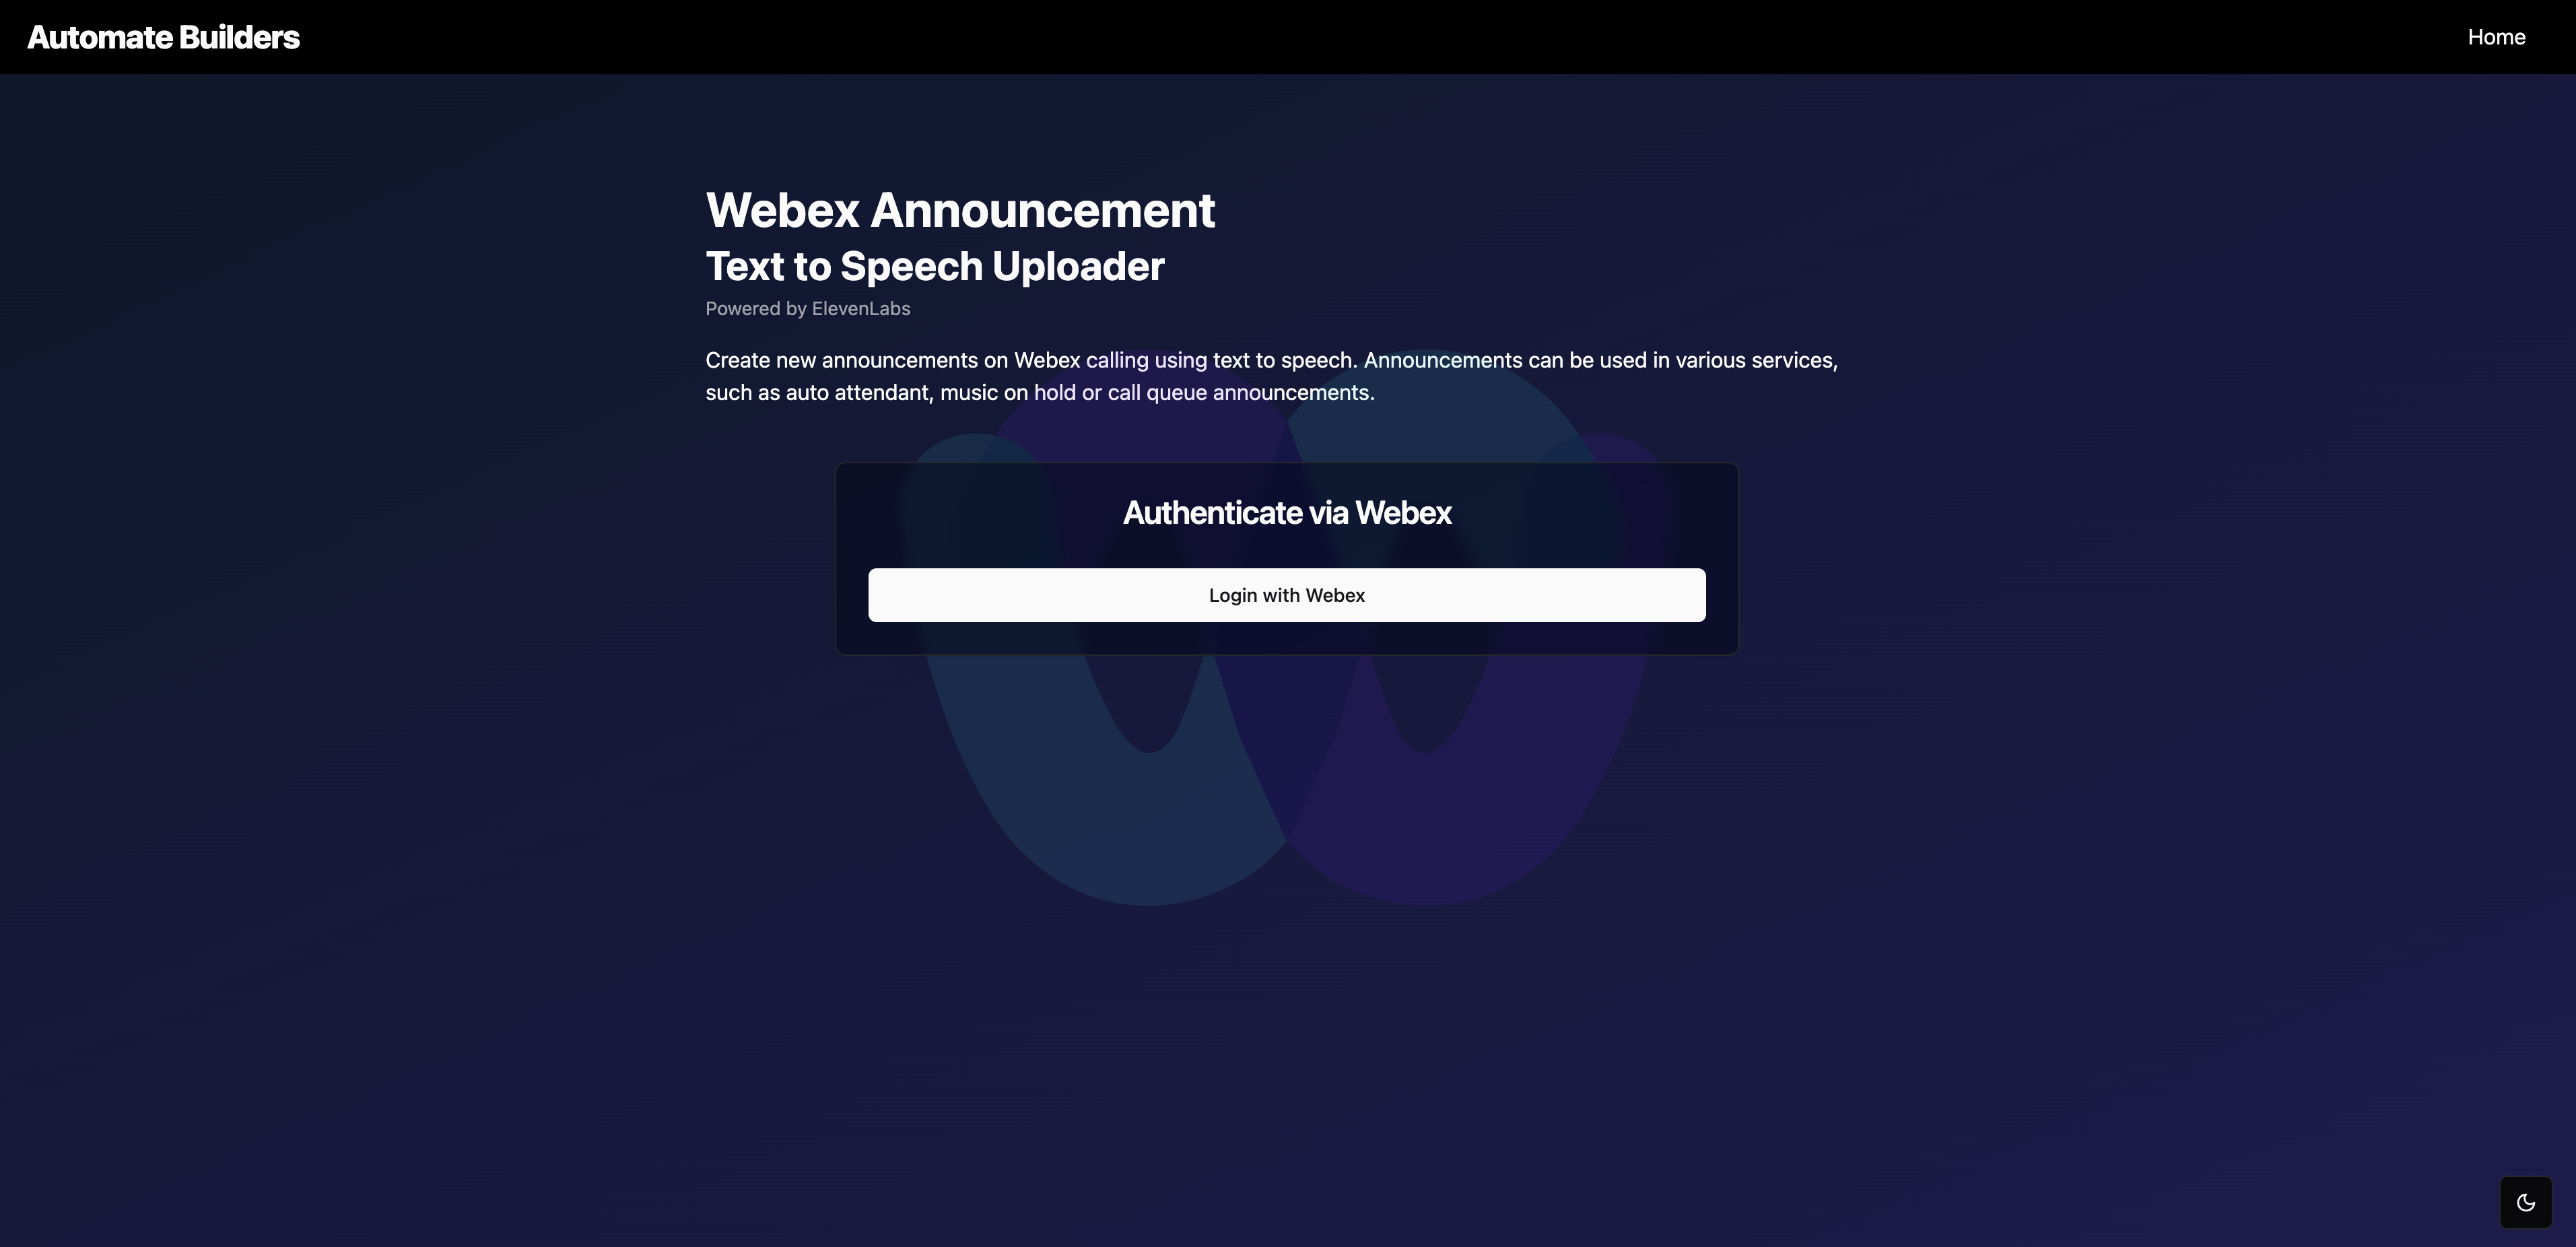
- Launch the application
- Click "Login with Webex" to authenticate
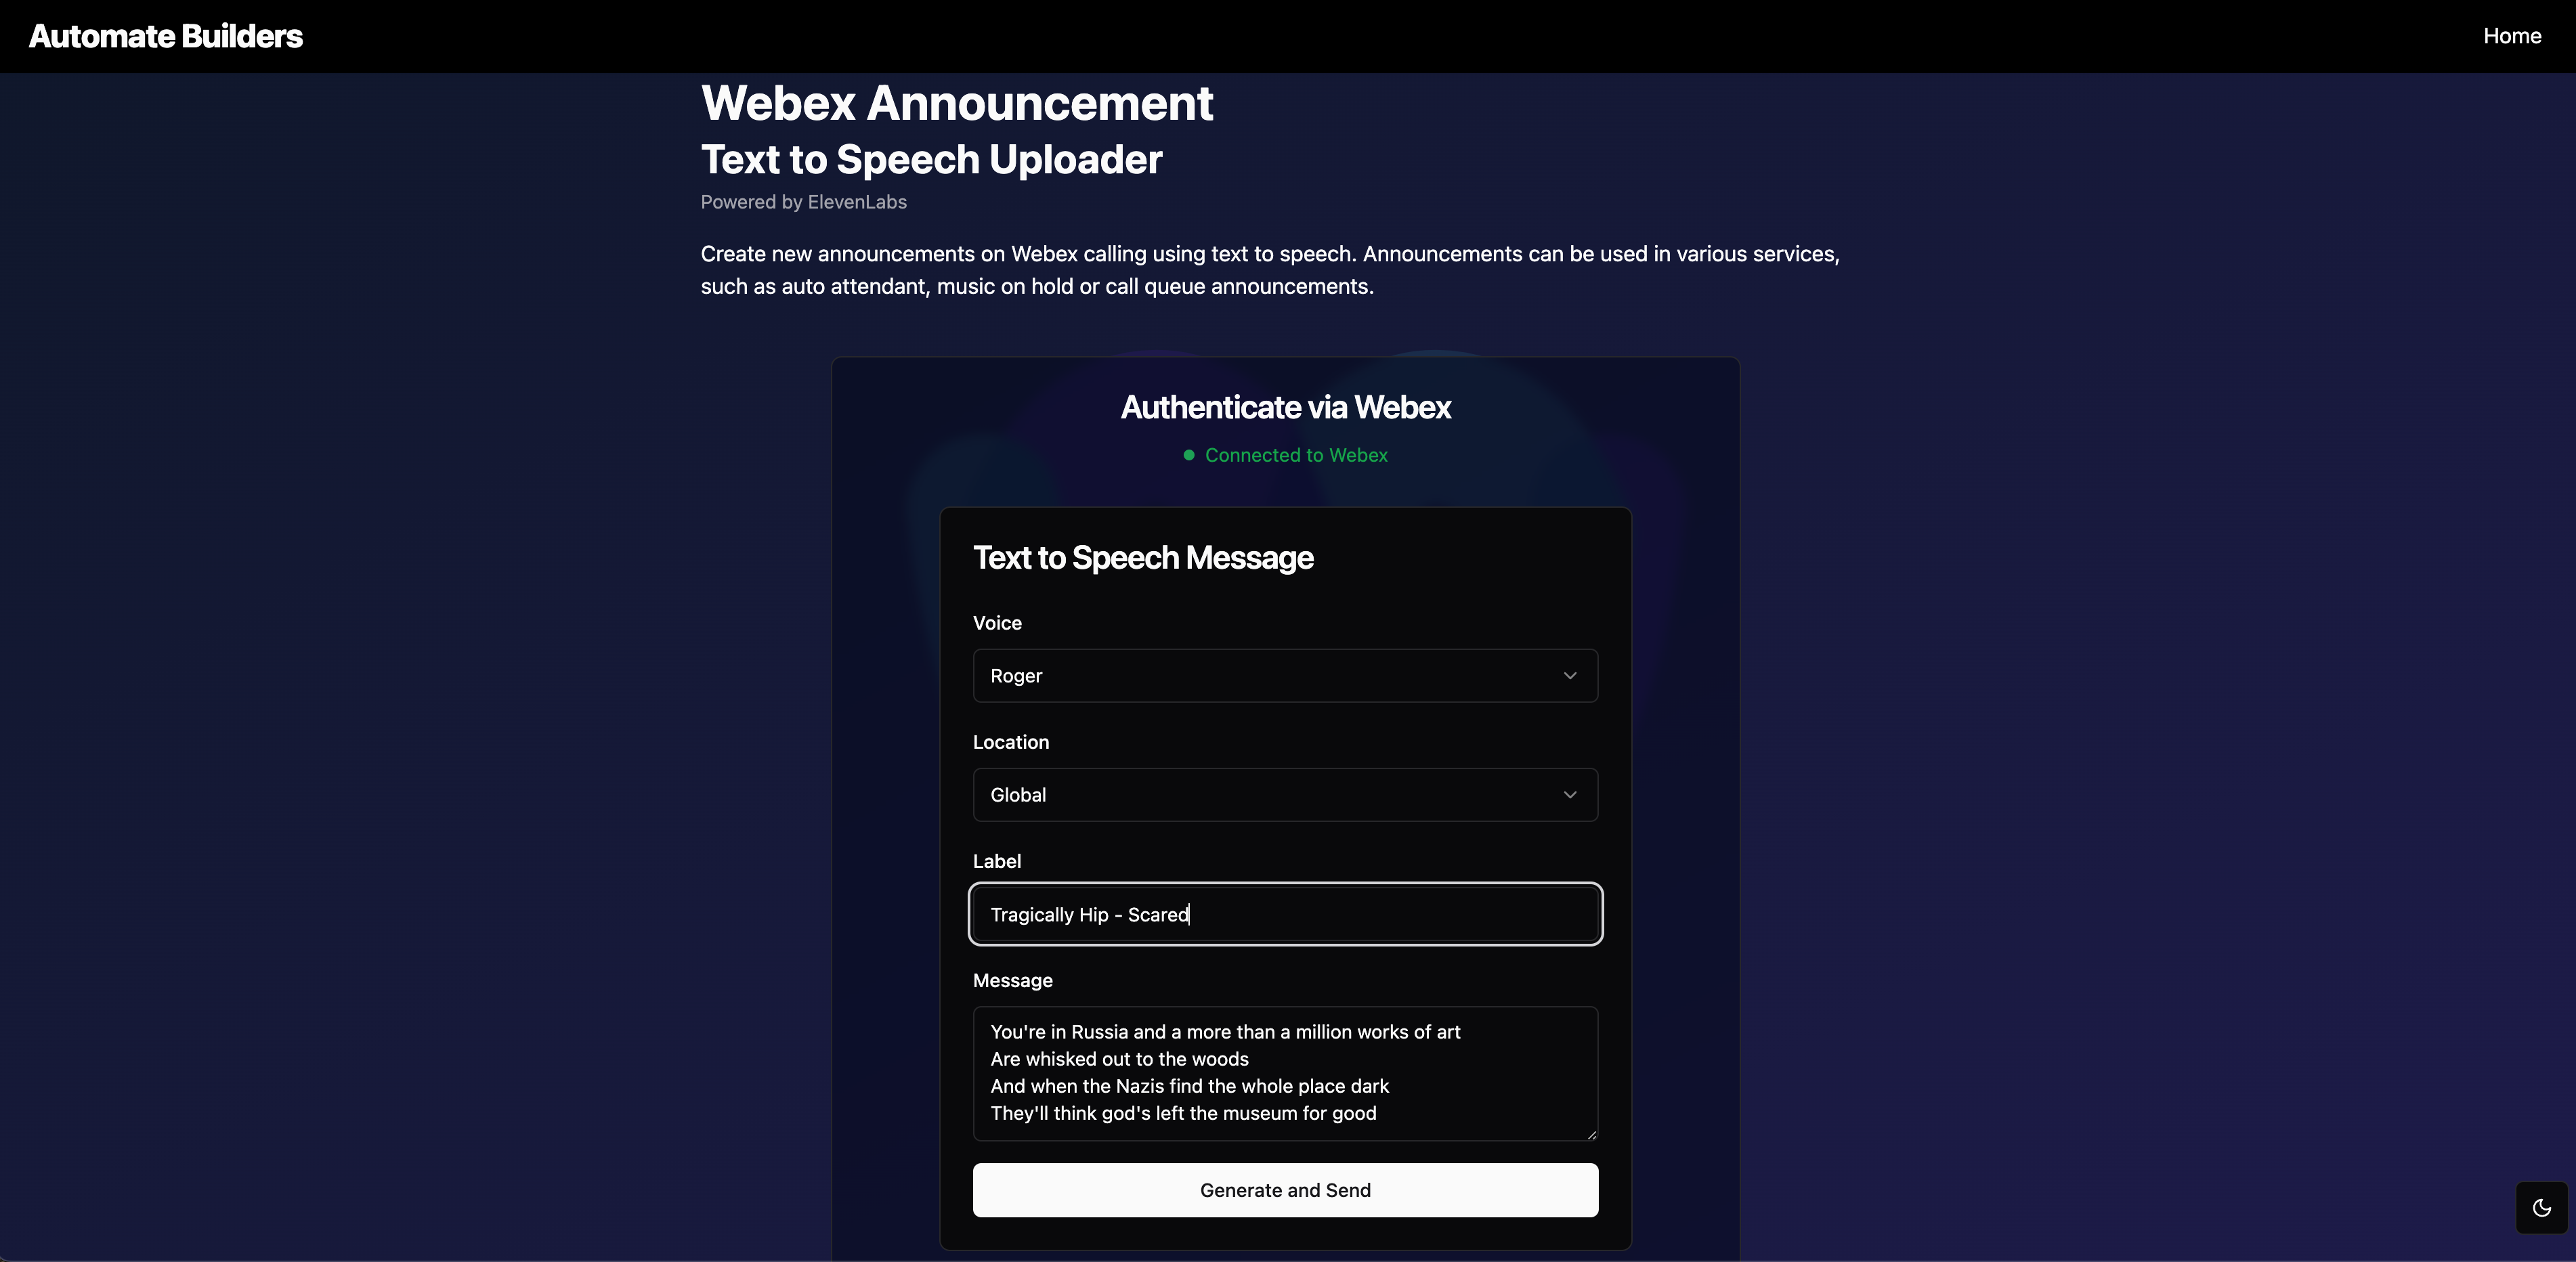
- Select ElevenLabs voice to use for text-to-speech conversion
- Select the location you wish to upload the file to from the dropdown
- Enter a label for the announcement
- Enter your announcement text
- Upload the announcement to Webex Announcement Repository
Project Structure
webex-audio-tts
├─ README.md
├─ backend
│  ├─ .dockerignore
│  ├─ Dockerfile
│  ├─ data
│  ├─ package-lock.json
│  ├─ package.json
│  └─ server.js
├─ docker-compose.yaml
├─ frontend
│  ├─ .dockerignore
│  ├─ Dockerfile
│  ├─ README.md
│  ├─ components.json
│  ├─ config.js
│  ├─ eslint.config.js
│  ├─ generate-config.sh
│  ├─ index.html
│  ├─ nginx.conf
│  ├─ package-lock.json
│  ├─ package.json
│  ├─ postcss.config.js
│  ├─ public
│  │  └─ favicon.ico
│  ├─ src
│  │  ├─ App.jsx
│  │  ├─ components
│  │  │  ├─ BackgroundLogo.jsx
│  │  │  ├─ NavBar.jsx
│  │  │  ├─ WebexTTSForm.jsx
│  │  │  ├─ mode-toggle.tsx
│  │  │  ├─ theme-context.tsx
│  │  │  ├─ theme-provider.tsx
│  │  │  └─ ui
│  │  │     ├─ button.tsx
│  │  │     ├─ card.tsx
│  │  │     ├─ dialog.tsx
│  │  │     ├─ dropdown-menu.tsx
│  │  │     ├─ input.tsx
│  │  │     ├─ navigation-menu.tsx
│  │  │     ├─ select.tsx
│  │  │     ├─ textarea.tsx
│  │  │     ├─ toast.tsx
│  │  │     └─ toaster.tsx
│  │  ├─ config
│  │  │  └─ ConfigContext.jsx
│  │  ├─ hooks
│  │  │  └─ use-toast.ts
│  │  ├─ index.css
│  │  ├─ lib
│  │  │  ├─ select-styles.js
│  │  │  └─ utils.ts
│  │  ├─ main.jsx
│  │  ├─ pages
│  │  │  ├─ Error.jsx
│  │  │  └─ Home.jsx
│  │  └─ vite-env.d.ts
│  ├─ tailwind.config.cjs
│  ├─ tsconfig.app.json
│  ├─ tsconfig.json
│  ├─ tsconfig.node.json
│  └─ vite.config.ts
├─ package-lock.json
├─ package.json
├─ screenshots
│  ├─ app_home_logged_in.png
│  ├─ app_home_login.png
│  ├─ webex_calling_announcements.png
│  ├─ webex_calling_features.png
│  └─ webex_developer_app.png
└─ scripts
   └─ git-template-remote.sh
Contributing
- Fork the repository
- Create your feature branch (
git checkout -b feature/AmazingFeature) - Commit your changes (
git commit -m 'Add some AmazingFeature') - Push to the branch (
git push origin feature/AmazingFeature) - Open a Pull Request
License
This project is licensed under the MIT License - see the LICENSE file for details.
Screenshots
Application Home Page
Application Home Page (Logged In)
Webex Developer App
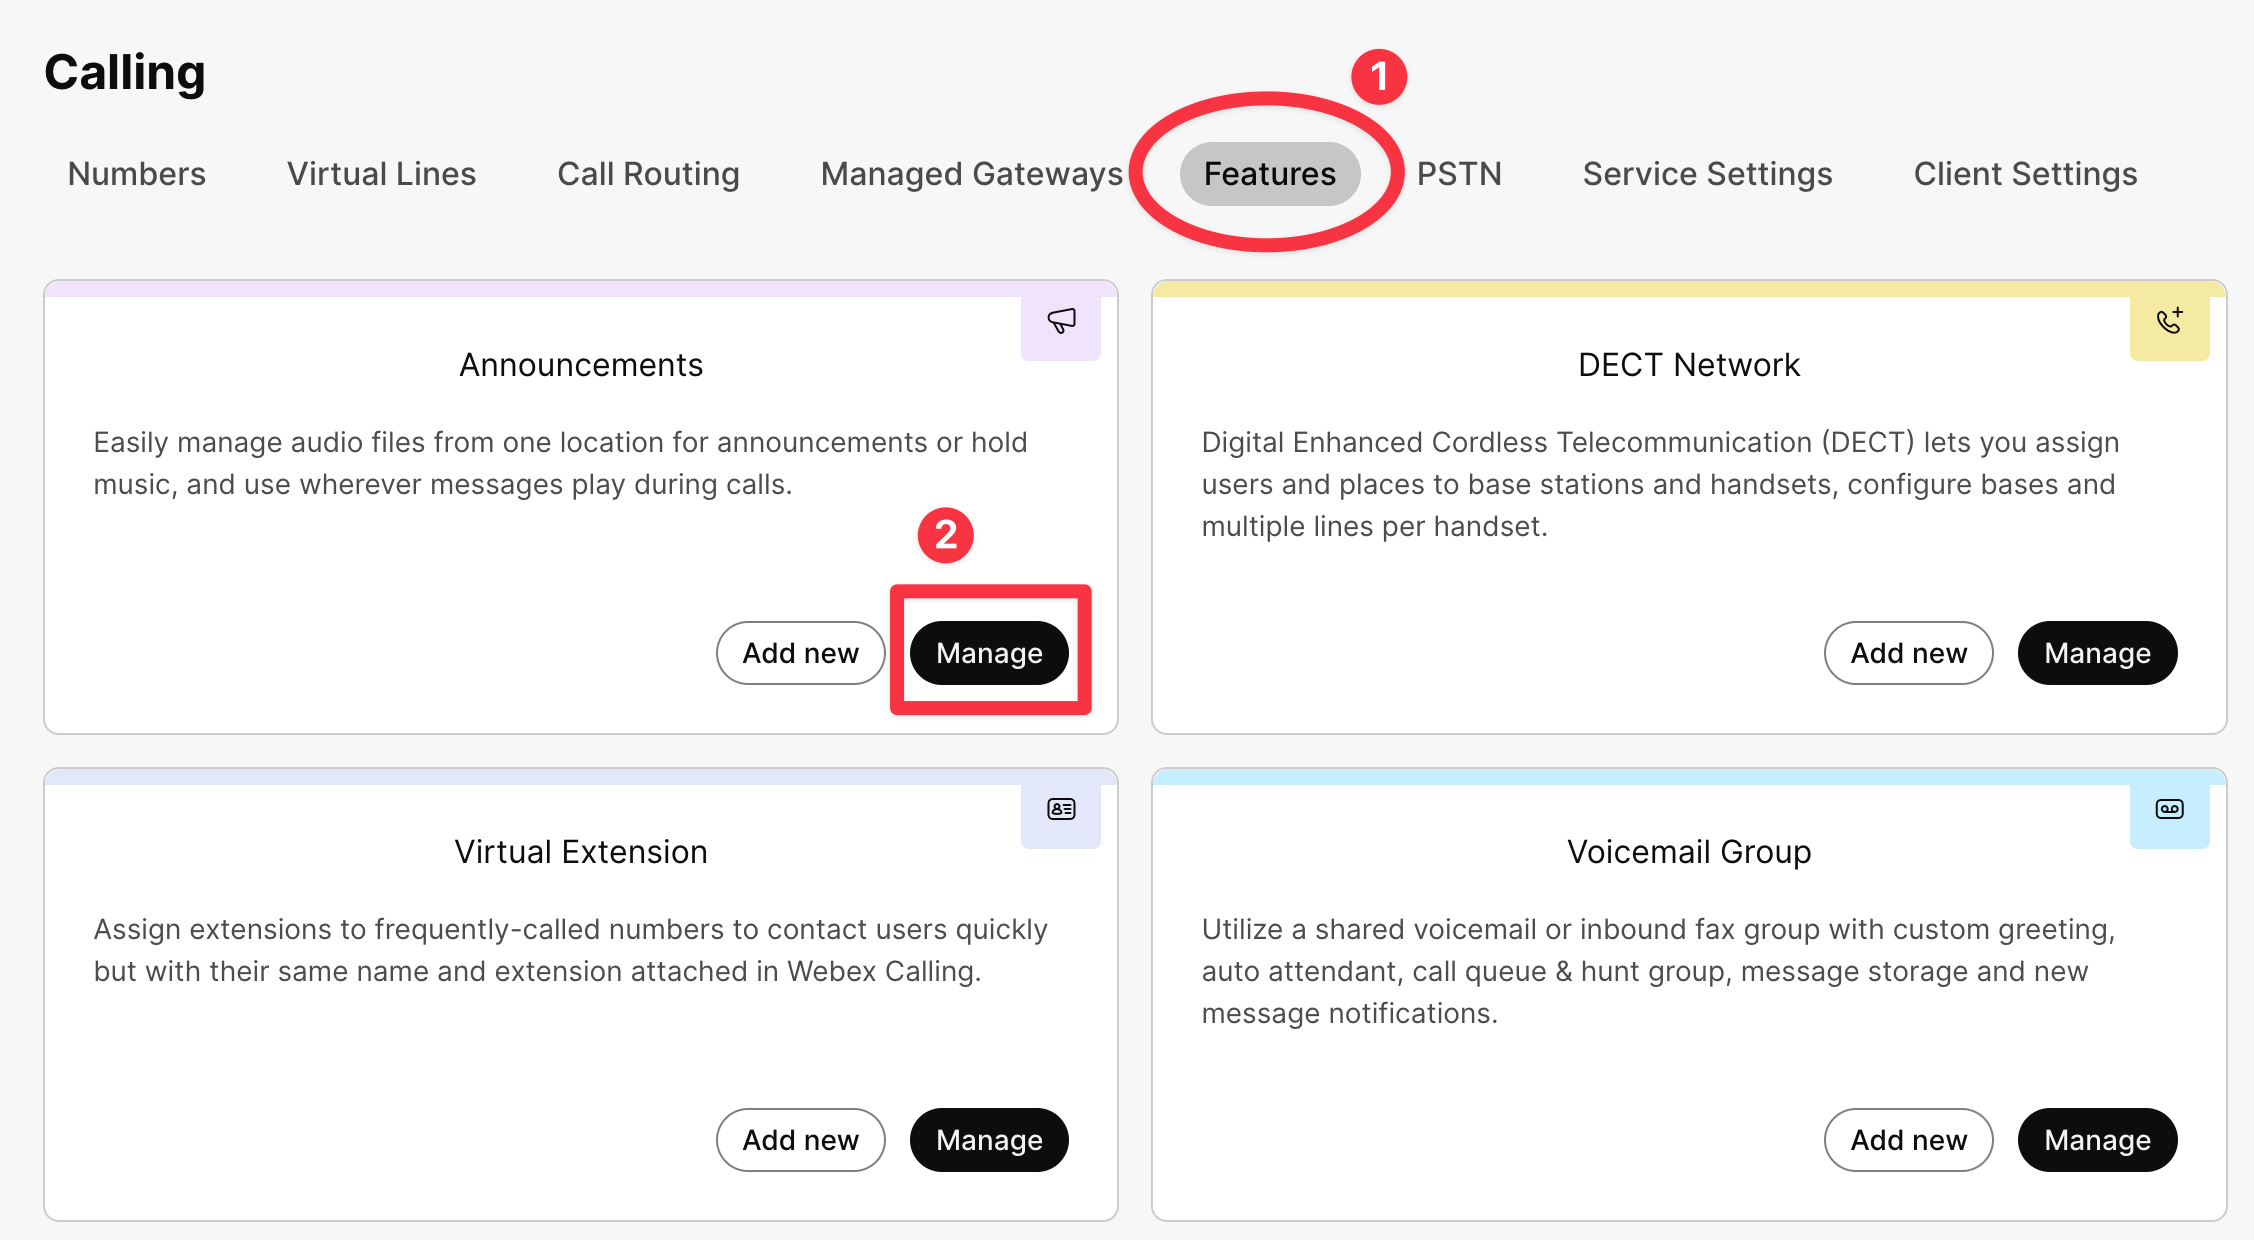
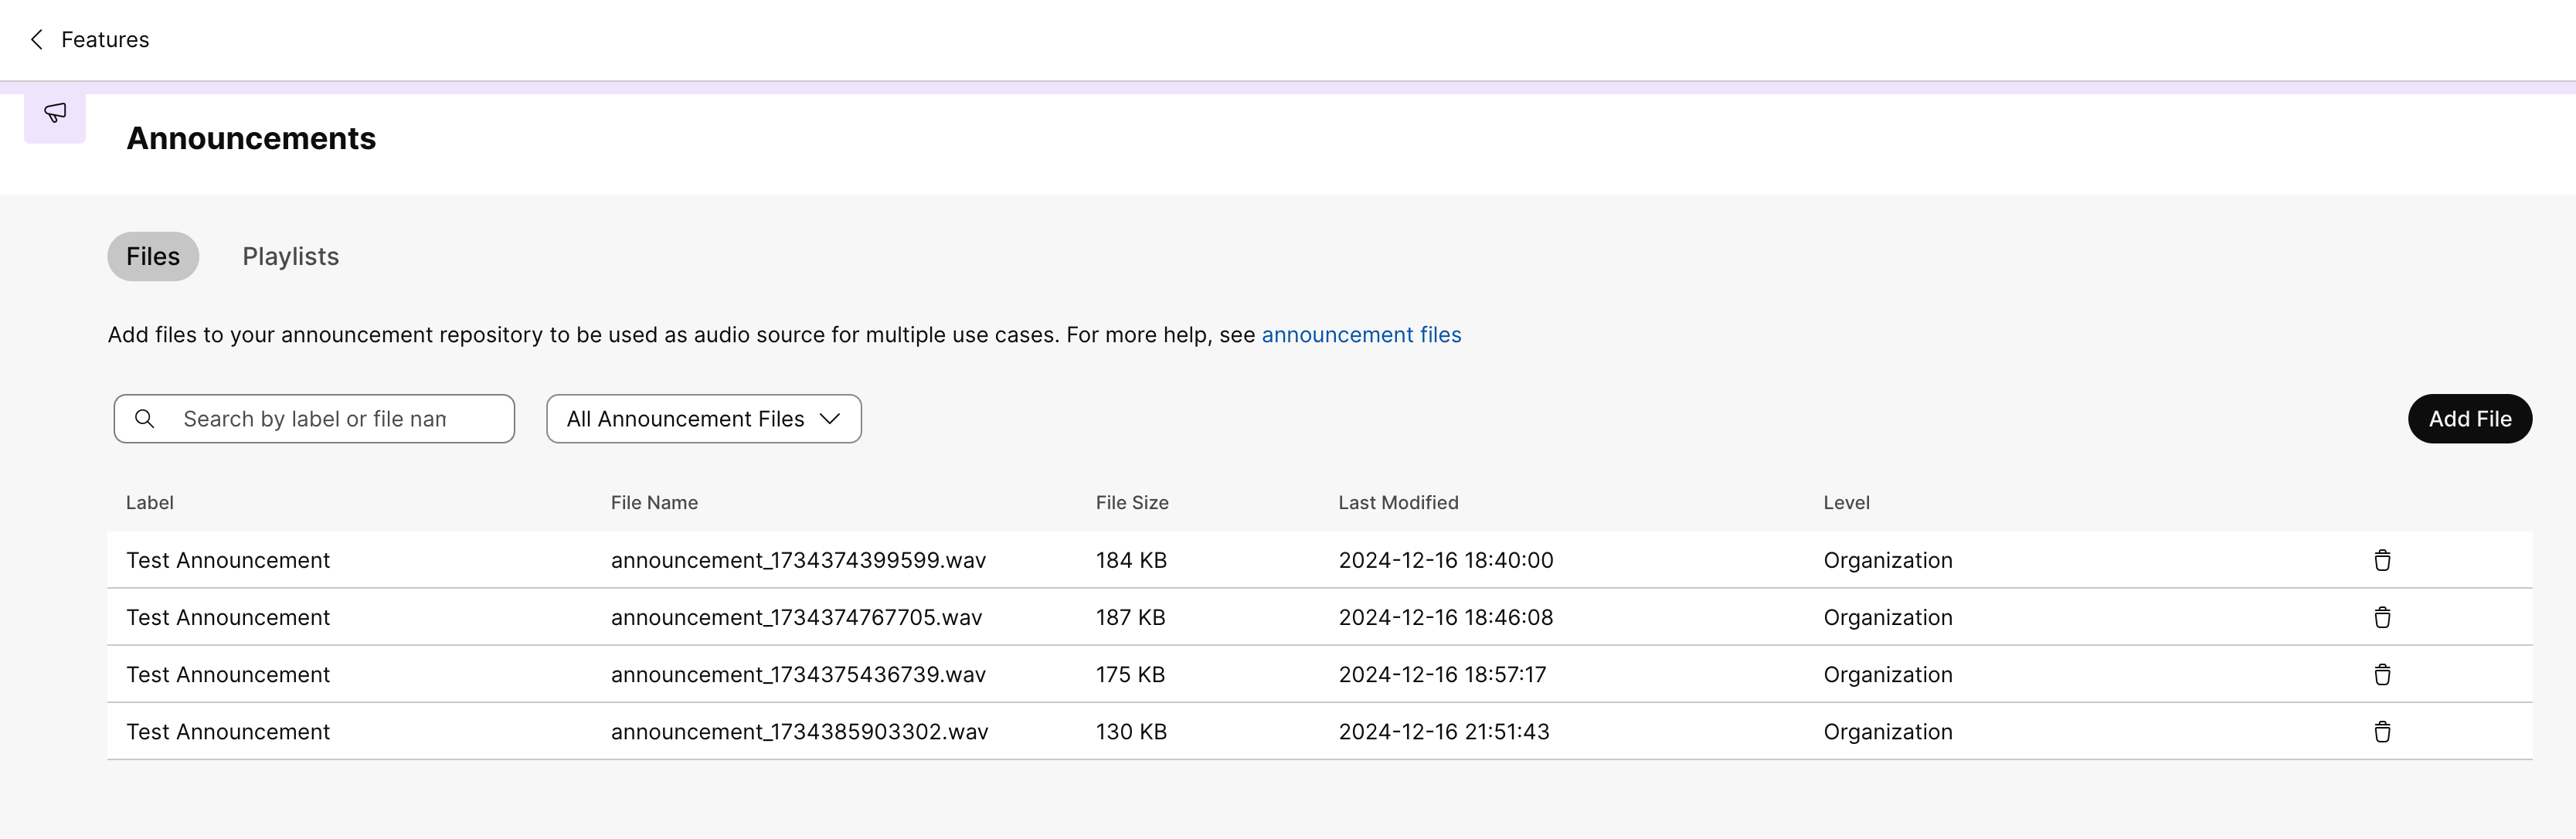
Webex Calling Features - Announcements
Found on Control Hub > Calling > Features > Announcements > Manage
Troubleshooting
Frontend container is not able to reach backend container.
Try pinging from frontend to backend container:
docker exec webex-tts-frontend ping webex-tts-backend
Backend container is not able to save the audio files.
docker exec webex-tts-backend ls -l /usr/src/app/data
Try to create a file in the data directory and check the permissions.
docker exec webex-tts-backend touch /usr/src/app/data/test.txt
Acknowledgments
- shadcn/ui for the component library
- Webex APIs for communication services
- ElevenLabs for text-to-speech capabilities
Giving Back
If you would like to support my work and the time I put in creating the code, you can click the image below to get me a coffee. I would really appreciate it (but is not required).
![]()
Owner
Contributors
Github contributorCategories
CollaborationProducts
WebexProgramming Languages
TypeScriptLicense
Other
Code Exchange Community
Get help, share code, and collaborate with other developers in the Code Exchange community.View CommunityCisco provides Code Exchange for convenience and informational purposes only, with no support of any kind. This page contains information and links from third-party websites that are governed by their own separate terms. Reference to a project or contributor on this page does not imply any affiliation with or endorsement by Cisco.