Ansible
In this section of the lab you will configure all the Ansible components so that the CI/CD pipeline will automatically configure OSPF interfaces on the two Cisco Nexus 9000v virtual switches. Ansible will act as the configuration management tool for the CI/CD pipeline.
group_vars
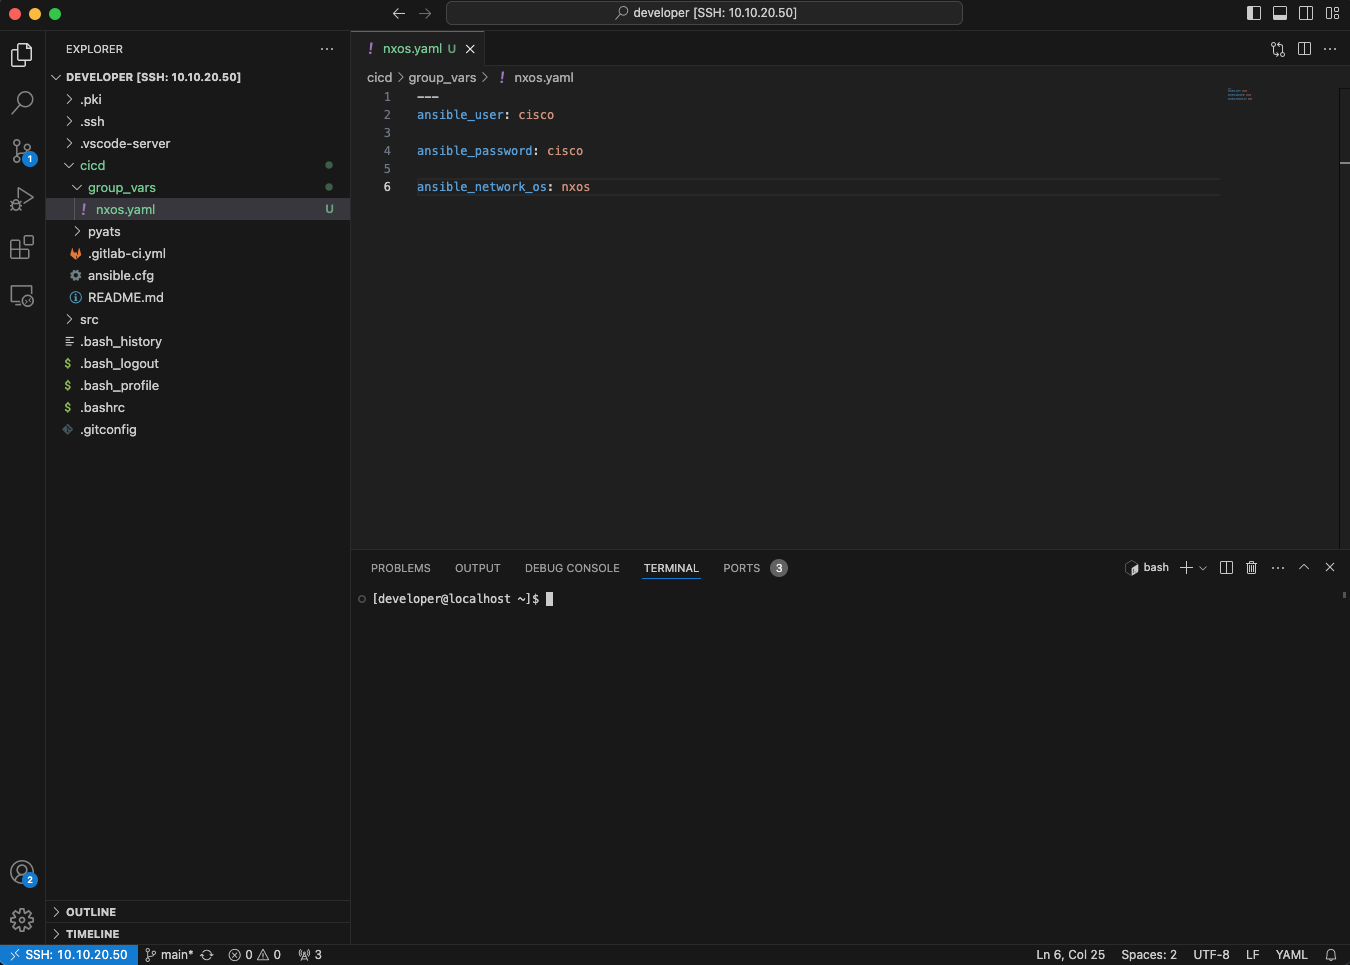
Let's start by creating a new folder called group_vars within the cicd folder. As you might know, the group_vars folder has a special meaning in Ansible. This folder contains variables, such as usernames and passwords, that apply to a group of devices. In this new group_vars folder, create a new file called nxos.yaml and populate it with the following entries. Make sure to include the three dashes, ---, at the top of the file.
---
ansible_user: cisco

ansible_password: cisco

ansible_network_os: nxos
These entries specify the username, password and type of network operating system that Ansible will use to establish SSH connections to the two Nexus 9000v virtual switches running in Cisco CML.
host_vars
Next, create a new folder called host_vars also within the cicd folder. The host_vars folder has a special role with Ansible as well. It contains specific individual device variables that can be referenced when creating Ansible playbooks. In this new host_vars folder, create two new files called 10.10.20.177.yml and 10.10.20.178.yml. Each of these files will contain OSPF configuration variables pertaining to each individual virtual switch.
Populate the 10.10.20.177.yml file with the following entries:
---
ospf_process_id: 1
router_id: 192.168.0.1

configure_ospf:
    - nxos_ospf_interface: loopback0
      nxos_ospf_number: 1
      nxos_ospf_area: 0.0.0.0
      nxos_ip: 192.168.0.1/32
    - nxos_ospf_interface: vlan101
      nxos_ospf_number: 1
      nxos_ospf_area: 0.0.0.0
      nxos_ip: 172.16.101.2/24
    - nxos_ospf_interface: vlan102
      nxos_ospf_number: 1
      nxos_ospf_area: 0.0.0.0
      nxos_ip: 172.16.102.2/24
    - nxos_ospf_interface: vlan103
      nxos_ospf_number: 1
      nxos_ospf_area: 0.0.0.0
      nxos_ip: 172.16.103.2/24
    - nxos_ospf_interface: vlan104
      nxos_ospf_number: 1
      nxos_ospf_area: 0.0.0.0
      nxos_ip: 172.16.104.2/24
    - nxos_ospf_interface: vlan105
      nxos_ospf_number: 1
      nxos_ospf_area: 0.0.0.0
      nxos_ip: 172.16.105.2/24
As you can see, the first Nexus 9000v virtual switch is configured with an OSPF process ID of 1, a router ID matching the IPv4 address of interface Loopback0, 192.168.0.1, and six interfaces (Loopback0 and VLAN interfaces from 101 to 105) configured to be part of the OSPF advertisements sent through the network.
The second YAML file, 10.10.20.178.yml will contain OSPF configuration information for the second Nexus 9000v virtual switch and should be populated with the following information:
---
ospf_process_id: 1
router_id: 192.168.0.2

configure_ospf:
    - nxos_ospf_interface: loopback0
      nxos_ospf_number: 1
      nxos_ospf_area: 0.0.0.0
      nxos_ip: 192.168.0.2/32
    - nxos_ospf_interface: vlan101
      nxos_ospf_number: 1
      nxos_ospf_area: 0.0.0.0
      nxos_ip: 172.16.101.3/24
    - nxos_ospf_interface: vlan102
      nxos_ospf_number: 1
      nxos_ospf_area: 0.0.0.0
      nxos_ip: 172.16.102.3/24
    - nxos_ospf_interface: vlan103
      nxos_ospf_number: 1
      nxos_ospf_area: 0.0.0.0
      nxos_ip: 172.16.103.3/24
    - nxos_ospf_interface: vlan104
      nxos_ospf_number: 1
      nxos_ospf_area: 0.0.0.0
      nxos_ip: 172.16.104.3/24
    - nxos_ospf_interface: vlan105
      nxos_ospf_number: 1
      nxos_ospf_area: 0.0.0.0
      nxos_ip: 172.16.105.3/24
Similar to the first virtual switch, the second Nexus 9000v is also configured with an OSPF process ID of 1, a router ID matching the IPv4 address of its Loopback0 interface and six interfaces (Loopback0 and VLAN interfaces from 101 to 105) that will be as part of the OSPF network.
The folder structure of the cicd folder should look like below thus far:

hosts
Next, in the cicd folder create a new file called hosts. This file contains the IPv4 addresses of the two Nexus switches and creates a grouping of these two devices called nxos
[nxos]
10.10.20.177
10.10.20.178
You will reference this grouping in the next step when you create the Ansible playbook that configures the two virtual switches for OSPF.
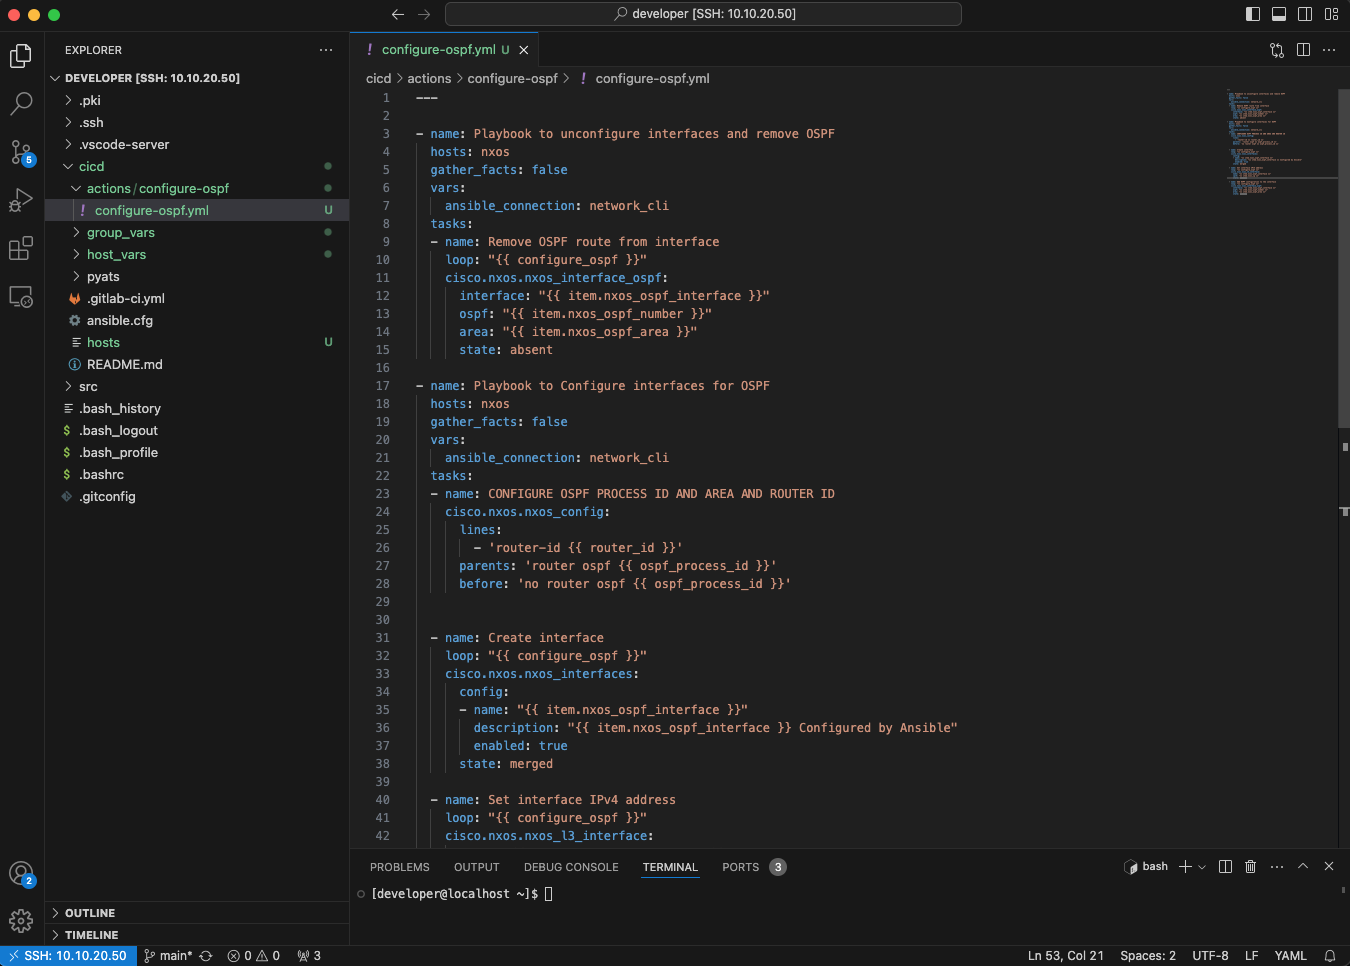
configure-ospf.yml
Under the cicd folder create a new folder called actions. In this newly created folder, create a new folder called configure-ospf and within this folder create a new file called configure-ospf.yml. Creating this folder structure gives you the option to easily extend the functionality of the pipeline by simply creating additional folders such as configure-bgp, configure-eigrp, etc. within the actions folder.
Populate the configure-ospf.yml file with the following YAML text:
---

- name: Playbook to unconfigure interfaces and remove OSPF
  hosts: nxos
  gather_facts: false
  vars:
    ansible_connection: network_cli
  tasks:
  - name: Remove OSPF route from interface
    loop: "{{ configure_ospf }}"
    cisco.nxos.nxos_interface_ospf:
      interface: "{{ item.nxos_ospf_interface }}"
      ospf: "{{ item.nxos_ospf_number }}"
      area: "{{ item.nxos_ospf_area }}"
      state: absent

- name: Playbook to Configure interfaces for OSPF
  hosts: nxos
  gather_facts: false
  vars:
    ansible_connection: network_cli
  tasks:
  - name: CONFIGURE OSPF PROCESS ID AND AREA AND ROUTER ID
    cisco.nxos.nxos_config:
      lines:
        - 'router-id {{ router_id }}'
      parents: 'router ospf {{ ospf_process_id }}'
      before: 'no router ospf {{ ospf_process_id }}'


  - name: Create interface
    loop: "{{ configure_ospf }}"
    cisco.nxos.nxos_interfaces:
      config:
      - name: "{{ item.nxos_ospf_interface }}"
        description: "{{ item.nxos_ospf_interface }} Configured by Ansible"
        enabled: true
      state: merged

  - name: Set interface IPv4 address
    loop: "{{ configure_ospf }}"
    cisco.nxos.nxos_l3_interface:
      name: "{{ item.nxos_ospf_interface }}"
      ipv4: "{{ item.nxos_ip }}"
      state: present

  - name: Add OSPF configuration to the interface
    loop: "{{ configure_ospf }}"
    cisco.nxos.nxos_interface_ospf:
      interface: "{{ item.nxos_ospf_interface }}"
      ospf: "{{ item.nxos_ospf_number }}"
      area: "{{ item.nxos_ospf_area }}"
      state: present
This Ansible playbook uses the cisco.nxos collection to first remove the OSPF configuration from the interfaces and then re-apply the OSPF configuration based on the host_vars YAML files.
First thing to notice is the hosts key in the playbook. The hosts that this playbook will run against are contained in the nxos group that was defined in the hosts file. This means that this playbook will run on the hosts with IPv4 addresses of 10.10.20.177 and 10.10.20.178. The credentials to connect to these devices will be retrieved by Ansible from the group_vars nxos.yaml file. And the configuration that will be applied to these devices will be retrieved from the YAML files in the host_vars folders.
As interfaces on these two virtual switches get configured for OSPF and also removed from the OSPF configuration is important to notice that the playbook starts by removing the OSPF configuration from all interfaces first. Why is this the case? If you were to only add interfaces to the OSPF configuration then you could skip this first step of the playbook but since in real life you both add and remove OSPF interface configurations, this is the only way that addresses OSPF configuration removal.
You can also see extensive usage of variables as defined in the 10.10.20.177.yml and 10.10.20.178.yml files in this playbook. The loop keyword is basically a for loop that iterates over all interfaces, one interface at a time. Variables are included in the Ansible playbook between curly braces, {{variable}}. For example, configure_ospf variable in the playbook, references the configure_ospf section defined in the YAML files created under the host_vars folder. As Ansible iterates over each interface with the loop command, the item keyword is needed to reference and access the value of the variables defined in the host_vars YAML files.
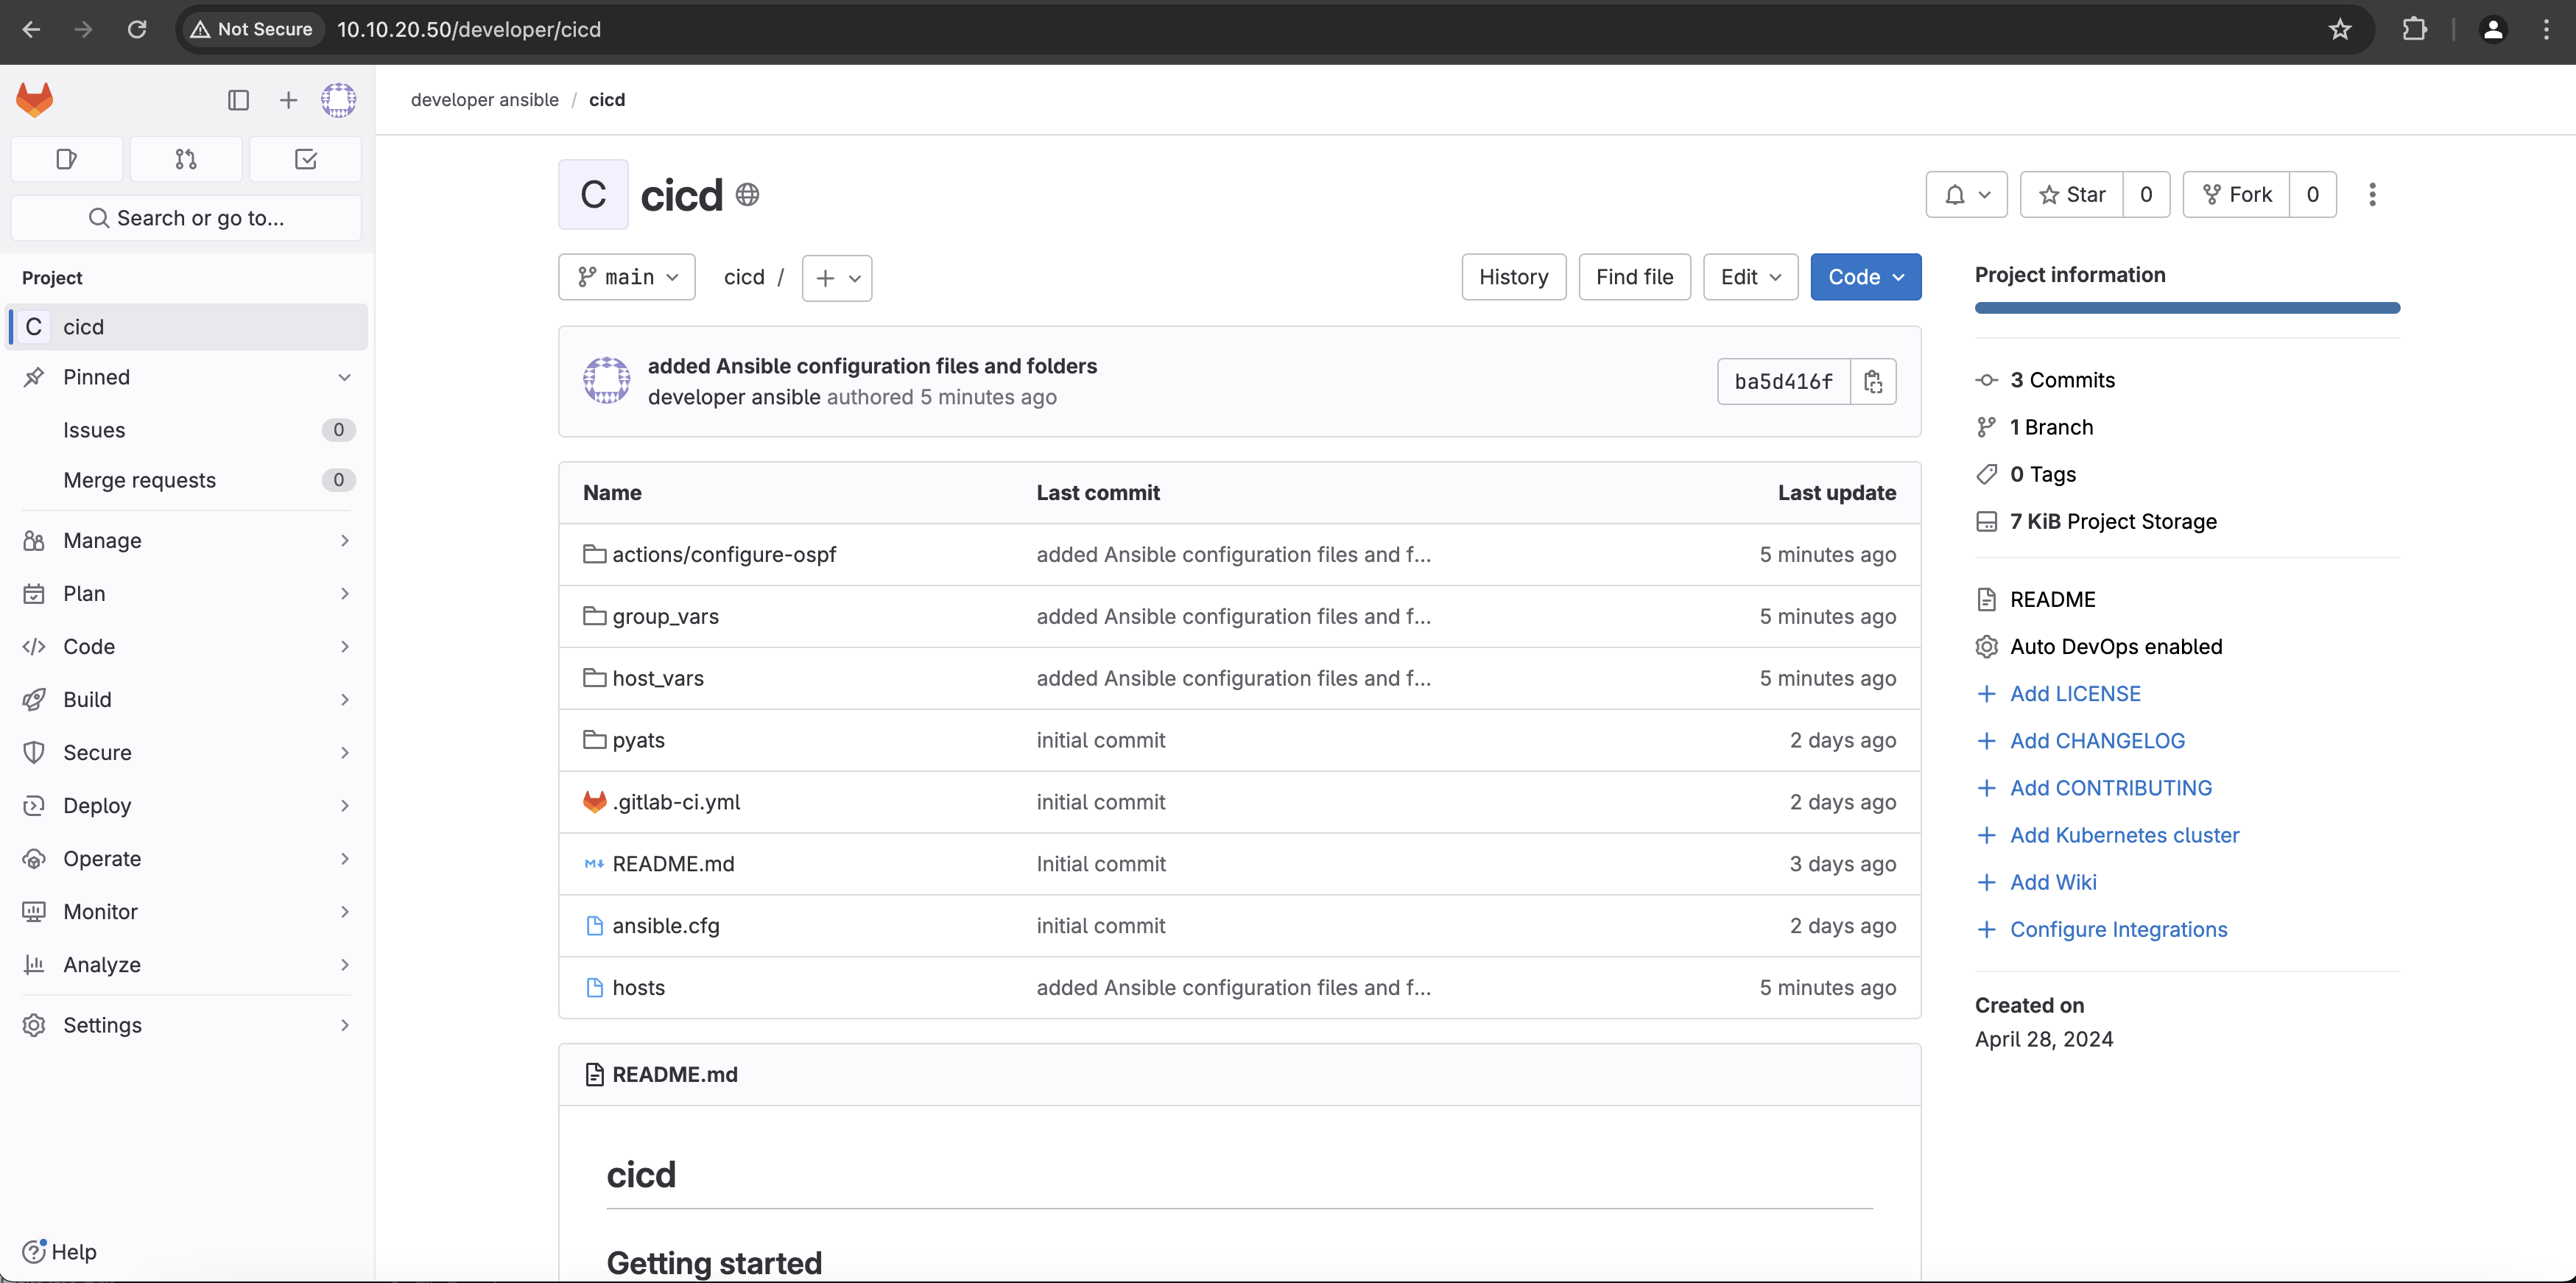
After all the changes and new files and folders created so far, it is time to upload this new data centrally into the GitLab cicd repo. As mentioned before, the cicd folder on the CentOS virtual machine you are connected to is a copy of the cicd repo that is hosted by GitLab on the same virtual machine. You can verify the status of this repo in GitLab by connecting to http://10.10.20.50 using the username developer and the password C1sco12345. Once logged in, select the developer ansible\cicd project and the following information should be displayed:

As you can see, the Ansible folders, files and playbook that you created are not yet uploaded to GitLab. Back in Visual Studio Code, issue the git status command in the terminal window. You should see a status similar to the following one:
[developer@gitlab cicd]$ git status
# On branch main
# Untracked files:
#   (use "git add <file>..." to include in what will be committed)
#
#       actions/
#       group_vars/
#       host_vars/
#       hosts
nothing added to commit but untracked files present (use "git add" to track)
You can see that git has detected that there are untracked files present but they have not been added to commit. In order to add all these files and folders to commit, issue the git add . command in the terminal window in the cicd folder. Issue a new git status command right after git add . and you should see the following output:
[developer@gitlab cicd]$ git add .
[developer@gitlab cicd]$ git status
# On branch main
# Changes to be committed:
#   (use "git reset HEAD <file>..." to unstage)
#
#       new file:   actions/configure-ospf/configure-ospf.yml
#       new file:   group_vars/nxos.yaml
#       new file:   host_vars/10.10.20.177.yml
#       new file:   host_vars/10.10.20.178.yml
#       new file:   hosts
#
All the new files and folders are now in staging and are ready to be commited for tracking. Issue the git commit -m "added Ansible configuration files and folders" command in the terminal to track changes on these files.
[developer@gitlab cicd]$ git commit -m "added Ansible configuration files and folders"
[main ba5d416] added Ansible configuration files and folders
 5 files changed, 120 insertions(+)
 create mode 100644 actions/configure-ospf/configure-ospf.yml
 create mode 100644 group_vars/nxos.yaml
 create mode 100644 host_vars/10.10.20.177.yml
 create mode 100644 host_vars/10.10.20.178.yml
 create mode 100644 hosts
All the files are now commited for tracking and ready to be uploaded centrally to the GitLab server. Issue the git push command next, to upload the new files to GitLab. Provide the developer username and C1sco12345 password to authenticate to GitLab and upload the files.
[developer@gitlab cicd]$ git push
Counting objects: 12, done.
Delta compression using up to 2 threads.
Compressing objects: 100% (7/7), done.
Writing objects: 100% (11/11), 1.44 KiB | 0 bytes/s, done.
Total 11 (delta 1), reused 0 (delta 0)
To http://10.10.20.50/developer/cicd.git
   b2d6102..dae6ece  main -> main
Refresh the web browser connection to http://10.10.20.50/developer/cicd and you should see the new Ansible folders and files have been successfully uploaded to GitLab.
Next, let's have a look at Cisco pyATS.