Cisco pyATS
For more than 20 years, Cisco has invested in automated testing. As part of this on-going effort, countless libraries and scripts were created for internal use. Unfortunately this meant they weren't shared with Cisco customers.
Today, pyATS is here to break this status quo. With the core framework released and available to our customers through Cisco DevNet, it means:
- development teams and customers can collaborate with total transparency in test automation
- customers can use any test libraries generated during product development for their own DevOps & automation
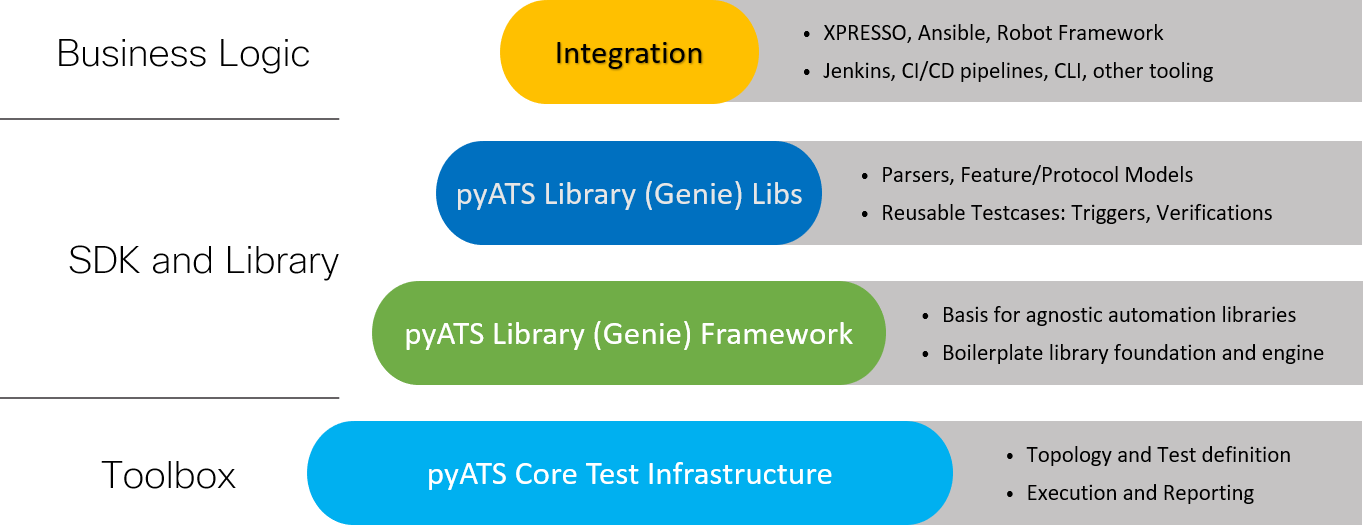
What is the pyATS ecosystem?
pyATS and the pyATS Library together define an ecosystem that streamlines and standardizes how you set up and run automated network tests. pyATS and the pyATS Library provide sanity, feature, solution, system, and scale test automation for any type of device or virtual device. pyATS is currently used with devices such as routers and switches, access points, firewalls, Linux servers, phones, cable CPEs, and many more.
Originally developed for internal Cisco engineers, the pyATS ecosystem is at the core of Cisco’s Test Automation Solution. It’s currently used by Cisco engineering, DevNet engineers, network engineers, and developers.
The pyATS ecosystem empowers your team to create and run consistent, repeatable, iterative, and reusable tests. pyATS provides the test framework, and the pyATS Library offers ready-to-use test components. The pyATS ecosystem is available under Apache License Version 2.0.
The following diagram describes the ecosystem in more detail.
The pyATS ecosystem can learn and profile an entire feature’s configuration and operational status. For example, with just a few commands, you can profile your system before and after a configuration change and get a detailed summary of exactly what changed.
What is pyATS?
pyATS is the test framework foundation for the ecosystem. pyATS specializes in data-driven and reusable testing for Agile, rapid development iterations.
This powerful, highly-pluggable Python® framework enables developers to start with small, simple and linear test cases, and then scale up to large, complex and asynchronous test suites.
What is the pyATS Library?
The pyATS Library (a.k.a. Genie) provides all the tools needed for network test automation, including:
- a pool of reusable parsers
- a pool of reusable triggers
- a pool of reusable APIs
- a simple command line interface (no Python knowledge needed), and
- many more useful libraries.
When to use the pyATS Library?
Use the pyATS Library when you want to automate your day-to-day DevOps activities, perform stateful validation of your network devices, or build a safety net of scalable, data-driven and reusable test cases around your network requirements. You can:
- Profile the current state of your network and take a snapshot for later comparison.
- Set up automated monitoring of the operational state of your devices.
- Automate configuration and upgrade tasks.
- Introduce changes – such as new products or releases – and see the effects on your network.
- Use the power of our Pythonic library to efficiently write your own, reusable, OS-agnostic scripts.
pyATS and CI/CD
The pyats folder that is found under the cicd folder, is already populated with the required folder structure and files needed for the CI/CD pipeline. The main purpose of pyATS for the CI/CD use case is to provide an operational snapshot of the environment before the OSPF configuration changes are performed by Ansible and after those configuration changes are done. With pyATS you are able to verify operational data, such as routing table entries, source of the route entry, routing protocol neighborships and much more.
The first step when using pyATS is to create the testbed environment YAML file. Double check and make sure the devnet_sandbox.yaml file contains the following data:
testbed:
  name: devnet_sandbox
  credentials:
    default:
      username: cisco
      password: cisco
devices:
  dist-sw01:
    alias: uut
    os: nxos
    type: nxos
    connections:
      defaults:
        via: ssh
      ssh:
        ip: 10.10.20.177
        port: 22
        protocol: ssh
  dist-sw02:
    os: nxos
    type: nxos
    connections:
      defaults:
        via: ssh
      ssh:
        ip: 10.10.20.178
        port: 22
        protocol: ssh
The job.py and subsection_datafile.yaml files contain the pyATS connection logic to the nxos devices. The pre_trigger_datafile.yaml and post_trigger_datafile.yaml files specify what data pyATS should extract from the devices it connects to.
The pre_trigger_datafile.yaml file uses the pyATS Blitz class to take an operational snapshot of the OSPF configuration of both Nexus 9000v virtual switches and save those snapshots in JSON files in a predefined folder location.
The pyATS Blitz is a YAML-driven template that makes it easy to run a test case without having any previous knowledge of programming. This tool is called Blitz because it’s lightning fast — does the following actions:
- Configure a device.
- Parse the device output to verify if the device state is as expected.
- Unconfig or modify the initial configuration.
- Learn a feature and verify the result of the action
- Calling different apis and use their outputs on other actions and other devices
- Yang integration
- It is fully customizable and new actions can be added
For the purposes of the CI/CD pipeline, you will use pyATS Blitz to:
- verify OSPF neighborships, by connecting to the devices and running the
show ip ospf neighbors detailcommand and verifying that OSPF connections are established, - verify routing tables by running the
show ip routecommand and verifying that specific OSPF routes have been learned and added to the routing table - saving the output of these commands in the
pre_snapshotsfolder.
Observe the multi-threaded and parallelism support of the pyATS framework. Verify that the pre_trigger_datafile.yaml contains the same data as below:
vars:
  device1: dist-sw01
  device2: dist-sw02

Pre_Snapshots:
  groups: ["nxos"]
  source:
    pkg: genie.libs.sdk
    class: triggers.blitz.blitz.Blitz
  test_sections:
    - verify_ospf_neighborship:
        - parallel:
            - parse:
                device: "%{vars.device1}"
                command: show ip ospf neighbors detail
                include:
                  - contains_key_value("neighbors", "192.168.0.2")
            - parse:
                device: "%{vars.device2}"
                command: show ip ospf neighbors detail
                include:
                  - contains_key_value("neighbors", "192.168.0.1")
    - verify_advertised_ospf_routes:
        - parallel:
            - parse:
                device: "%{vars.device1}"
                command: show ip route
                include:
                  - contains_key_value("routes", "192.168.0.2/32").contains_key_value("source_protocol","ospf")
            - parse:
                device: "%{vars.device2}"
                command: show ip route
                include:
                  - contains_key_value("routes", "192.168.0.1/32").contains_key_value("source_protocol","ospf")
    - pre_snapshot_ospf:
        - parallel:
            - learn:
                device: "%{vars.device1}"
                feature: ospf
                save:
                  - variable_name: "pre_ospf_%{vars.device1}"
            - learn:
                device: "%{vars.device2}"
                feature: ospf
                save:
                  - variable_name: "pre_ospf_%{vars.device2}"
        - parallel:
            - api:
                device: uut
                function: save_dict_to_json_file
                arguments:
                  data:
                    - "%VARIABLES{pre_ospf_%{vars.device1}}"
                  filename: "pre_snapshots/pre_ospf_%{vars.device1}.json"
            - api:
                device: uut
                function: save_dict_to_json_file
                arguments:
                  data:
                    - "%VARIABLES{pre_ospf_%{vars.device2}}"
                  filename: "pre_snapshots/pre_ospf_%{vars.device2}.json"
Running the post_trigger_datafile.yaml file as a pyATS job, takes an operational snapshot of the OSPF configuration of the two virtual switches after the Ansible playbook that configures the OSPF interfaces is run. This gives the option to verify that the new interfaces that have been configured for OSPF have been successfully learned by the neighbors and that the new routes are present in the routing tables. This takes operational checks to the next level, since we know that after the Ansible playbook is run the changes have either been applied successfully or not but we don't know if the new routes have been propagated through the network. pyATS provides that critically important operational information.
Verify that the contents of the post_trigger_datafile.yaml in the pyats folder are as below:
vars:
  device1: dist-sw01
  device2: dist-sw02

Post_Snapshots:
  groups: ["nxos"]
  source:
    pkg: genie.libs.sdk
    class: triggers.blitz.blitz.Blitz
  test_sections:
    - verify_ospf_neighborship:
        - parallel:
            - parse:
                device: "%{vars.device1}"
                command: show ip ospf neighbors detail
                include:
                  - contains_key_value("neighbors", "192.168.0.2")
            - parse:
                device: "%{vars.device2}"
                command: show ip ospf neighbors detail
                include:
                  - contains_key_value("neighbors", "192.168.0.1")

    - verify_advertised_ospf_routes:
        - parallel:
            - parse:
                device: "%{vars.device1}"
                command: show ip route
                include:
                  - contains_key_value("routes", "192.168.0.2/32").contains_key_value("source_protocol","ospf")
            - parse:
                device: "%{vars.device2}"
                command: show ip route
                include:
                  - contains_key_value("routes", "192.168.0.1/32").contains_key_value("source_protocol","ospf")
    - post_snapshot_ospf:
        - loop:
            loop_variable_name: feature
            value:
              - ospf
            actions:
              - parallel:
                  - learn:
                      device: "%{vars.device1}"
                      feature: "%VARIABLES{feature}"
                      save:
                        - variable_name: "post_%VARIABLES{feature}_%{vars.device1}"
                  - learn:
                      device: "%{vars.device2}"
                      feature: "%VARIABLES{feature}"
                      save:
                        - variable_name: "post_%VARIABLES{feature}_%{vars.device2}"
              - parallel:
                  - api:
                      device: uut
                      function: save_dict_to_json_file
                      arguments:
                        data:
                          - "%VARIABLES{post_ospf_%{vars.device1}}"
                        filename: "post_snapshots/post_%VARIABLES{feature}_%{vars.device1}.json"
                  - api:
                      device: uut
                      function: save_dict_to_json_file
                      arguments:
                        data:
                          - "%VARIABLES{post_ospf_%{vars.device2}}"
                        filename: "post_snapshots/post_%VARIABLES{feature}_%{vars.device2}.json"
    - load_snapshots_for_both_pre_and_post:
        - loop:
            loop_variable_name: device
            value:
              - "%{vars.device1}"
              - "%{vars.device2}"
            actions:
              - api:
                  device: "%VARIABLES{device}"
                  function: load_dict_from_json_file
                  arguments:
                    filename: "pre_snapshots/pre_ospf_%VARIABLES{device}.json"
                  save:
                    - variable_name: "pre_ospf_%VARIABLES{device}"
              - api:
                  device: "%VARIABLES{device}"
                  function: load_dict_from_json_file
                  arguments:
                    filename: "post_snapshots/post_ospf_%VARIABLES{device}.json"
                  save:
                    - variable_name: "post_ospf_%VARIABLES{device}"
Next, let's configure the GitLab CI/CD pipeline.