Configuring a new interface
Now that the pipeline is configured and running, you will create a new interface on each of the two virtual switches, Loopback100, configure it for OSPF and make sure is propagated throughout the network.
host_vars
In order to configure OSPF, as you have seen so far, you will need to edit the host files in the host_vars folder and add an extra interface on both virtual switches.
Add interface Loopback100 with an IPv4 address of 192.168.100.1/24 to the 10.10.20.177.yml file and make sure your file looks like the one below:
---
ospf_process_id: 1
router_id: 192.168.0.1

configure_ospf:
    - nxos_ospf_interface: loopback0
      nxos_ospf_number: 1
      nxos_ospf_area: 0.0.0.0
      nxos_ip: 192.168.0.1/32
    - nxos_ospf_interface: vlan101
      nxos_ospf_number: 1
      nxos_ospf_area: 0.0.0.0
      nxos_ip: 172.16.101.2/24
    - nxos_ospf_interface: vlan102
      nxos_ospf_number: 1
      nxos_ospf_area: 0.0.0.0
      nxos_ip: 172.16.102.2/24
    - nxos_ospf_interface: vlan103
      nxos_ospf_number: 1
      nxos_ospf_area: 0.0.0.0
      nxos_ip: 172.16.103.2/24
    - nxos_ospf_interface: vlan104
      nxos_ospf_number: 1
      nxos_ospf_area: 0.0.0.0
      nxos_ip: 172.16.104.2/24
    - nxos_ospf_interface: vlan105
      nxos_ospf_number: 1
      nxos_ospf_area: 0.0.0.0
      nxos_ip: 172.16.105.2/24
    - nxos_ospf_interface: loopback100
      nxos_ospf_number: 1
      nxos_ospf_area: 0.0.0.0
      nxos_ip: 192.168.100.1/32
Add a new loopback interface, Loopback100, on the second virtual switch as well by editing the 10.10.20.178.yml file. For this interface assign an IPv4 address of 192.168.100.2/24.
---
ospf_process_id: 1
router_id: 192.168.0.2

configure_ospf:
    - nxos_ospf_interface: loopback0
      nxos_ospf_number: 1
      nxos_ospf_area: 0.0.0.0
      nxos_ip: 192.168.0.2/32
    - nxos_ospf_interface: vlan101
      nxos_ospf_number: 1
      nxos_ospf_area: 0.0.0.0
      nxos_ip: 172.16.101.3/24
    - nxos_ospf_interface: vlan102
      nxos_ospf_number: 1
      nxos_ospf_area: 0.0.0.0
      nxos_ip: 172.16.102.3/24
    - nxos_ospf_interface: vlan103
      nxos_ospf_number: 1
      nxos_ospf_area: 0.0.0.0
      nxos_ip: 172.16.103.3/24
    - nxos_ospf_interface: vlan104
      nxos_ospf_number: 1
      nxos_ospf_area: 0.0.0.0
      nxos_ip: 172.16.104.3/24
    - nxos_ospf_interface: vlan105
      nxos_ospf_number: 1
      nxos_ospf_area: 0.0.0.0
      nxos_ip: 172.16.105.3/24
    - nxos_ospf_interface: loopback100
      nxos_ospf_number: 1
      nxos_ospf_area: 0.0.0.0
      nxos_ip: 192.168.100.2/32
pyATS
In order to check if the new interfaces have been successfully configured and the new routes are advertised and learned by OSPF neighbors, modify the post_trigger_datafile.yaml file under the verify_advertised_ospf_routes section and make sure the include section is changed to contains_key_value("routes", "192.168.100.2/32").contains_key_value("source_protocol","ospf") for device1 and contains_key_value("routes", "192.168.100.1/32").contains_key_value("source_protocol","ospf") for device2. This way you can check that the new loopback interfaces have been propagated between the two virtual switches.
vars:
  device1: dist-sw01
  device2: dist-sw02

Post_Snapshots:
  groups: ["nxos"]
  source:
    pkg: genie.libs.sdk
    class: triggers.blitz.blitz.Blitz
  test_sections:
    - verify_ospf_neighborship:
        - parallel:
            - parse:
                device: "%{vars.device1}"
                command: show ip ospf neighbors detail
                include:
                  - contains_key_value("neighbors", "192.168.0.2")
            - parse:
                device: "%{vars.device2}"
                command: show ip ospf neighbors detail
                include:
                  - contains_key_value("neighbors", "192.168.0.1")

    - verify_advertised_ospf_routes:
        - parallel:
            - parse:
                device: "%{vars.device1}"
                command: show ip route
                include:
                  - contains_key_value("routes", "192.168.100.2/32").contains_key_value("source_protocol","ospf")
            - parse:
                device: "%{vars.device2}"
                command: show ip route
                include:
                  - contains_key_value("routes", "192.168.100.1/32").contains_key_value("source_protocol","ospf")
    - post_snapshot_ospf:
        - loop:
            loop_variable_name: feature
            value:
              - ospf
            actions:
              - parallel:
                  - learn:
                      device: "%{vars.device1}"
                      feature: "%VARIABLES{feature}"
                      save:
                        - variable_name: "post_%VARIABLES{feature}_%{vars.device1}"
                  - learn:
                      device: "%{vars.device2}"
                      feature: "%VARIABLES{feature}"
                      save:
                        - variable_name: "post_%VARIABLES{feature}_%{vars.device2}"
              - parallel:
                  - api:
                      device: uut
                      function: save_dict_to_json_file
                      arguments:
                        data:
                          - "%VARIABLES{post_ospf_%{vars.device1}}"
                        filename: "post_snapshots/post_%VARIABLES{feature}_%{vars.device1}.json"
                  - api:
                      device: uut
                      function: save_dict_to_json_file
                      arguments:
                        data:
                          - "%VARIABLES{post_ospf_%{vars.device2}}"
                        filename: "post_snapshots/post_%VARIABLES{feature}_%{vars.device2}.json"
    - load_snapshots_for_both_pre_and_post:
        - loop:
            loop_variable_name: device
            value:
              - "%{vars.device1}"
              - "%{vars.device2}"
            actions:
              - api:
                  device: "%VARIABLES{device}"
                  function: load_dict_from_json_file
                  arguments:
                    filename: "pre_snapshots/pre_ospf_%VARIABLES{device}.json"
                  save:
                    - variable_name: "pre_ospf_%VARIABLES{device}"
              - api:
                  device: "%VARIABLES{device}"
                  function: load_dict_from_json_file
                  arguments:
                    filename: "post_snapshots/post_ospf_%VARIABLES{device}.json"
                  save:
                    - variable_name: "post_ospf_%VARIABLES{device}"
git
With these three files updated with the new loopback interface information, you are ready to upload the files to GitLab and trigger the pipeline again. By default, the CI/CD pipeline triggers automatically when a new change is detected in any of the files in the repo.
With git status check that the changes you performed are picked up by git.
[developer@gitlab cicd]$ git status
# On branch main
# Changes not staged for commit:
#   (use "git add <file>..." to update what will be committed)
#   (use "git checkout -- <file>..." to discard changes in working directory)
#
#       modified:   host_vars/10.10.20.177.yml
#       modified:   host_vars/10.10.20.178.yml
#       modified:   pyats/post_trigger_datafile.yaml
#
no changes added to commit (use "git add" and/or "git commit -a")
Add the files to staging with git add . and check status again.
[developer@gitlab cicd]$ git add .
[developer@gitlab cicd]$ git status
# On branch main
# Changes to be committed:
#   (use "git reset HEAD <file>..." to unstage)
#
#       modified:   host_vars/10.10.20.177.yml
#       modified:   host_vars/10.10.20.178.yml
#       modified:   pyats/post_trigger_datafile.yaml
Next, run the git commit command and specify a message, such as added interface loopback 100.
developer@gitlab cicd]$ git commit -m "added interface loopback100"
[main 8d0f84a] added interface loopback100
 3 files changed, 12 insertions(+), 4 deletions(-)
And finally, git push to upload the updated files to GitLab and trigger the pipeline again.
[developer@gitlab cicd]$ git push
Username for 'http://10.10.20.50': developer
Password for 'http://developer@10.10.20.50':
Counting objects: 13, done.
Delta compression using up to 2 threads.
Compressing objects: 100% (7/7), done.
Writing objects: 100% (7/7), 622 bytes | 0 bytes/s, done.
Total 7 (delta 5), reused 0 (delta 0)
To http://10.10.20.50/developer/cicd.git
   9bf14dc..e64862f  main -> main
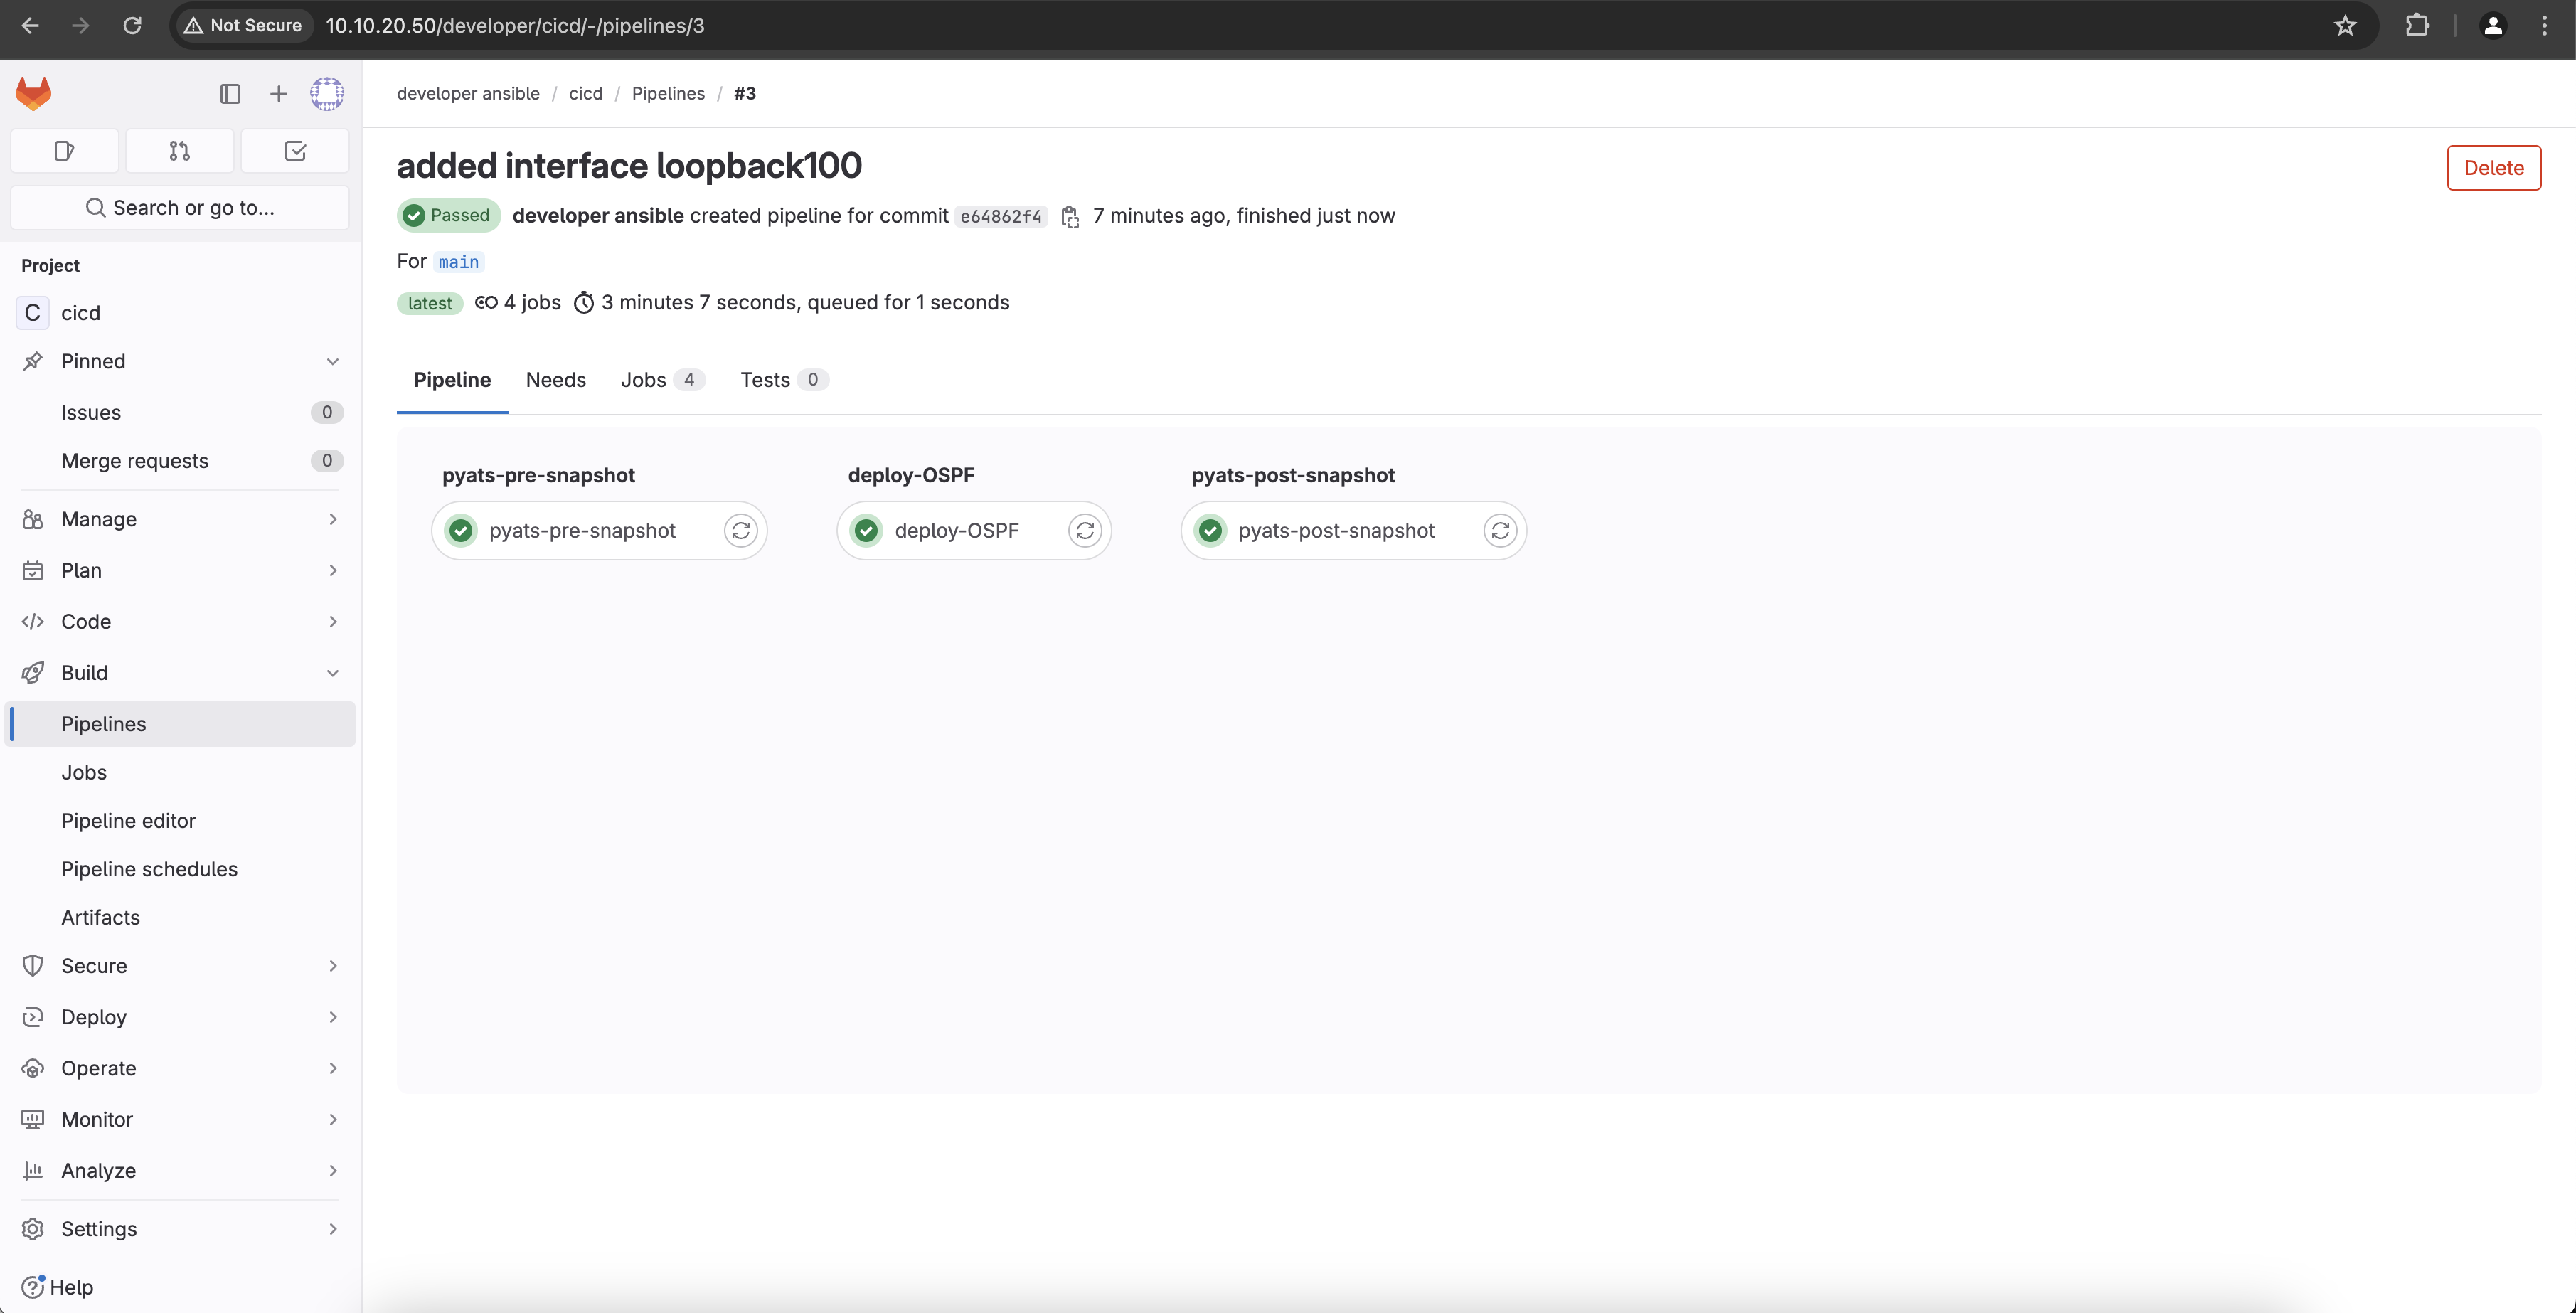
If everything went well, you should see a status similar to the one below in GitLab:
If the pipeline is taking a long time on stage 2 of the pipeline, deploy-OSPF, or fails at that stage, navigate to http://10.10.20.50/developer/cicd/-/pipelines and press the Clear runner caches button before running the pipeline again.
CLI verification
You can double check that the new interfaces have been configured by connecting via SSH to the two virtual switches. Connect to the first switch by issuing ssh cisco@10.10.20.177 from the terminal. As you remember when you created the group_vars folder and the nxos.yaml file, the password is cisco.
[developer@gitlab cicd]$ ssh cisco@10.10.20.177
User Access Verification
Password:

Cisco NX-OS Software
Copyright (c) 2002-2023, Cisco Systems, Inc. All rights reserved.
Nexus 9000v software ("Nexus 9000v Software") and related documentation,
files or other reference materials ("Documentation") are
the proprietary property and confidential information of Cisco
Systems, Inc. ("Cisco") and are protected, without limitation,
pursuant to United States and International copyright and trademark
laws in the applicable jurisdiction which provide civil and criminal
penalties for copying or distribution without Cisco's authorization.

Any use or disclosure, in whole or in part, of the Nexus 9000v Software
or Documentation to any third party for any purposes is expressly
prohibited except as otherwise authorized by Cisco in writing.
The copyrights to certain works contained herein are owned by other
third parties and are used and distributed under license. Some parts
of this software may be covered under the GNU Public License or the
GNU Lesser General Public License. A copy of each such license is
available at
http://www.gnu.org/licenses/gpl.html and
http://www.gnu.org/licenses/lgpl.html
***************************************************************************
*  Nexus 9000v is strictly limited to use for evaluation, demonstration   *
*  and NX-OS education. Any use or disclosure, in whole or in part of     *
*  the Nexus 9000v Software or Documentation to any third party for any   *
*  purposes is expressly prohibited except as otherwise authorized by     *
*  Cisco in writing.                                                      *
***************************************************************************
dist-sw01# sh run int loop100

!Command: show running-config interface loopback100
!Running configuration last done at: Fri May  3 07:35:25 2024
!Time: Fri May  3 07:39:38 2024

version 10.4(2) Bios:version

interface loopback100
  description loopback100 Configured by Ansible
  ip address 192.168.100.1/32
  ip router ospf 1 area 0.0.0.0

dist-sw01#
You can see that dist-sw01 has been indeed configured with a new loopback 100 interface. Double check the second virtual switch also, by issuing the ssh cisco@10.10.20.178 from the terminal. The password in this case is also cisco.
[developer@gitlab cicd]$ ssh cisco@10.10.20.178
User Access Verification
Password:

Cisco NX-OS Software
Copyright (c) 2002-2023, Cisco Systems, Inc. All rights reserved.
Nexus 9000v software ("Nexus 9000v Software") and related documentation,
files or other reference materials ("Documentation") are
the proprietary property and confidential information of Cisco
Systems, Inc. ("Cisco") and are protected, without limitation,
pursuant to United States and International copyright and trademark
laws in the applicable jurisdiction which provide civil and criminal
penalties for copying or distribution without Cisco's authorization.

Any use or disclosure, in whole or in part, of the Nexus 9000v Software
or Documentation to any third party for any purposes is expressly
prohibited except as otherwise authorized by Cisco in writing.
The copyrights to certain works contained herein are owned by other
third parties and are used and distributed under license. Some parts
of this software may be covered under the GNU Public License or the
GNU Lesser General Public License. A copy of each such license is
available at
http://www.gnu.org/licenses/gpl.html and
http://www.gnu.org/licenses/lgpl.html
***************************************************************************
*  Nexus 9000v is strictly limited to use for evaluation, demonstration   *
*  and NX-OS education. Any use or disclosure, in whole or in part of     *
*  the Nexus 9000v Software or Documentation to any third party for any   *
*  purposes is expressly prohibited except as otherwise authorized by     *
*  Cisco in writing.                                                      *
***************************************************************************
dist-sw02# sh run int loop100

!Command: show running-config interface loopback100
!Running configuration last done at: Fri May  3 07:35:28 2024
!Time: Fri May  3 07:43:15 2024

version 10.4(2) Bios:version

interface loopback100
  description loopback100 Configured by Ansible
  ip address 192.168.100.2/32
  ip router ospf 1 area 0.0.0.0

dist-sw02#
Next you will navigate to the CML instance, connect two new interfaces between the two virtual switches and use the pipeline to configure them with IPv4 addresses and OSPF parameters.