Introduction
Cisco Unified Communication (UC) Single Sign-On (SSO) integration allows application users to login to an enterprise SSO solution for access to Cisco Unified Communication products and related APIs.
Utilizing the UC SSO API generally involves two main steps:
- Obtaining an access token access token access token from the SSO system via user interaction with a web browser window.
- Using the access token with a specific UC API to make a request.
This document focuses on obtaining a SSO access token from the UC/SSO system, and provides a walk-through via a simple browser-based application example.
Note: It is also possible to use UC SSO APIs from native applications (for example, PC or mobile) by using a browser component (webview) using a similar design pattern.
For details on accessing specific UC APIs once an SSO token is obtained, see API-specific SSO Calls.
The following Cisco UC products/APIs support SSO:
Cisco Unified Communications Manager v10.5+
- User Data Services (UDS)
Cisco Unity Connection v10.5+
- Cisco Unity Connection Messaging Interface (CUMI)
SSO Overview
- Single Sign On (SSO) simplifies the login process for Users and Administrators in Cisco Unified Communications products (Unified Communications Manager and Unity Connection releases 10).
- SSO offers an easier, more consistent way for users and administrators to authenticate access to secured resources.
- Instead of each interface requiring a separate user name and password login, a single credential allows access to all enabled product interfaces.
- Think of SSO as supplying the skeleton key skeleton key to every enabled, authorized service and API in the UC environment.
What Are the Advantages of Using SSO?
There are a number of advantages to using SSO:
- Only one password to remember
- Simplifies access for Users & Administrators by acting as a central clearing house for all credential validation
- Centralizes Credential Management - less likely for logins to fall out-of-sync
- Eliminates password resets - credentials are tied to an abstracted identity, not hard-coded to username/password username/password combinations
- Secure - supports X509 certificates, HTTPS, and layered security mechanisms
Which SSO Identity Providers are Supported?
Cisco currently supports the following Identity Provider products for use with Cisco Unified Communications Manager and Cisco Unity Connection releases v10.5(1) and higher:
- OpenAM
- Microsoft Active Directory Federation Services
- Ping Identity
- Oracle Identity Manager
Additional SAMLv2 providers may be supported in future releases.
How Does Cisco UC SSO Support Different Account Types?
Applications can authenticate with UC APIs by providing a username/password, or, if SSO is enabled, they may be able to provide a valid SSO token in place of a username/password combination after successfully logging in to the Identity Provider (IdP).
The possible credential types that can be used with a particular API depend on the type of user account (Application User or End User on UC Manager, User/Service on Unity Connection), and the system SSO status (enabled or disabled.)
UCM Application User
| API | SSO Enabled | SSO Disabled |
|---|---|---|
| UDS | User/Pass | User/Pass |
UCM End User
| API | SSO Enabled | SSO Disabled |
|---|---|---|
| UDS | User/Pass or Token | User/Pass |
Unity Connection User/Service
| API | SSO Enabled | SSO Disabled |
|---|---|---|
| CUMI | User/Pass or Token | User/Pass |
Learning More About SSO
This document only covers how to use SSO with Cisco Unified Communication; it does not cover SSO fundamentals or concepts. The Cisco implementation of SSO is straightforward and easy to quickly setup and use without you having to understand the fundamentals of SSO. However, if you would like to learn more about the fundamentals of SSO, we recommend that you research the following topics:
- Security Assertion Markup Language (SAML)
- Identity Provider (IdP)
- Assertion Consumer Service (ACS)
- Open Authentication (OAuth)
- Lightweight Directory Address Protocol (LDAP)
An Example SSO Application
To run a real SSO example application, you will do the following:
- Prepare your environment
- Understand redirects and same-origin issues
- Run the example application
Preparing Your Environment
Successfully accessing UC SSO APIs from an application assumes that some general system services and configurations are in place:
- HTTPS - All connections involved with SSO are secured with HTTPS. Applications and browsers must be configured with the correct certificates in order to connect securely. (For lab/testing, you may be able to temporarily accept certificates in the browser).
- DNS - HTTPS certificates and the URLs involved in the SSO sequence use hostnames (vs. IP addresses). The UC, IdP and application hosts must be configured in DNS. (For lab/testing, you may be able to use your PC's hosts hosts file to map hostnames to IPs locally)
- UC SSO - SSO should be fully configured and working with UC, e.g. end users can access UC web apps like the Self Care Portal Self Care Portal using their SSO credentials.
Note: Configuration of UC services for SSO is outside the scope of this document. For more information, refer to the UCM/CUC maintenance and operations guides:
Understanding Redirects and Same-Origin Issues
For security reasons, web browsers prevent Javascript served by one origin origin from accessing data served by another origin (an origin is a combination of scheme - such as, HTTPS HTTPS - hostname, and port.) For example Javascript on a page served from https://app.example.com cannot access the DOM of a popup window served from https://ucmanager.example.com (for example, to retrieve a token.)
The complete UC service SAML/OAuth SSO request sequence normally involves several HTTP interactions (302/Found redirects, Basic Auth challenge/response, scripted POST of a hidden HTLM form, etc.) which involve requests served from different origins origins (for example, the UC server and the Identity Provider.) By default, the final HTTP location (and token info) is served from the UC service host (this normally prevents Javascript access to the token from other browser windows).
In order to facilitate this process, UCM and CUC allow the administrator to configure one or more 3rd party redirect URLs redirect URLs to which the SSO sequence can be redirected after successful login. The application provides this redirect URL as a parameter when it initiates the SSO login sequence. The redirect URL should point to a web page hosted on the application web server, which will typically include some Javascript which extracts the SSO access_token access_token data and provides it back to a parent browser window.
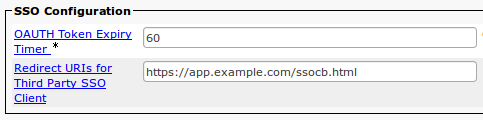
The application redirect URL is configured in either UCM or CUC in the Enterprise Parameters area, via the Redirect URIs for Third Party SSO Client parameter (multiple comma-separated URLs are allowed).
Note: The CUCM /singleSignOn resource - which provides the SSO enablement status and SSO request URL - supports CORS requests only in CUCM v11.0(1)+ (see CSCuq68311)
Example - Get Ready, Go!
Note: The complete code for this sample project is available on GitHub: CiscoDevNet/uc-sso-sample
Let's prepare and then run the example app.
Get Ready...
Confirm that SSO is available and running in your environment. Take note of the SSO service URL (we refer to this instance of Unified Communications Manager as UCMserver UCMserver).
Make sure the UC service host, SSO Identity Provider host, and application server host can be resolved via DNS (manual entries in the hosts hosts file can help during testing).
Get a valid SSO login that will work with your Identity Provider (IdP). This will be referred to as your Username/password Username/password.
Confirm that you have a web server capable of serving HTTPS requests for files you supply. We refer to this webserver as Myappserver Myappserver.
Copy ssocb.html (this is your default child web page child web page file name, referred to here as childWebPage childWebPage) to the correct directory under your Myappserver Myappserver instance. We refer to the full URL of your ssocb.html location as the redirectURL redirectURL because this is the file that will be served by your webserver when the SSO redirection call is made during successful execution of the login procedure (more on this later).
The SSO redirect URL pointing to childWebPage childWebPage (default is ssocb.html) must be configured in UC Manager (or Unity Connection) via Enterprise Parameters->Redirect URIs for Third Party SSO Client.
Copy ssopu.html (this is your default parent web page parent web page file name, referred to here as parentWebPage parentWebPage) to the correct directory under your Myappserver Myappserver instance.
Turn off pop-up blocking in your browser.
Go!
You are now ready to run the SSO example application in your browser, and retrieve a valid SSO access token in 3 simple steps!
Load the example app page, for example by browsing to:
https://<Myappserver>/<parentWebPage>Note: You may need to accept multiple certificates (or import them into the browser/system permanently) from the app server, UC host, and Identity Provider during execution of the SSO demo. Accept all prompts you receive during the process.
Fill in parameters
Now you will enter the name of your UCM server and the URL of your redirection target:
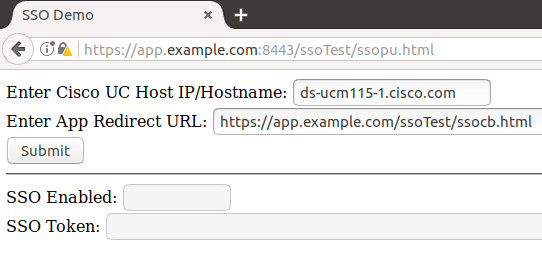
After you have correctly filled in these fields, click Submit.
Log in
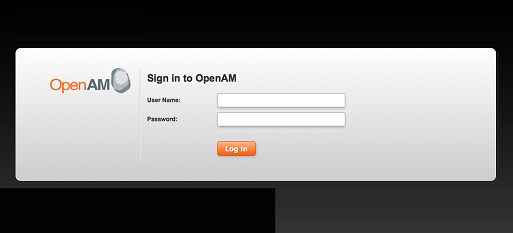
Provide the User Name and Password when prompted.
Access the SSO token
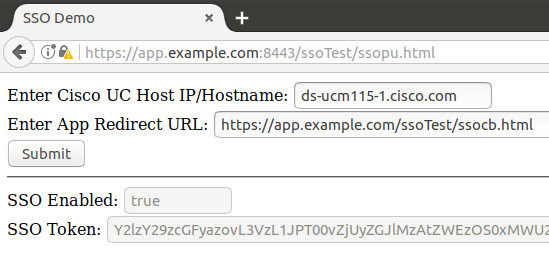
The popup window should close, and the access token value will be displayed in the parent page.
Note: You can now use the returned access token to access secured resources, like APIs.
Example Application Details
The example project demonstrates the basic concepts that can used in retrieving a UC SSO token using a HTML/Javascript browser-based application. The four main steps involved are:
- Check the CUCM SSO enablement status and retrieve the base SSO request URL
- Build the the complete SSO request URL with the required parameters.
- Launch a new browser window and set the location to the SSO request URL (the user interacts with this window to login).
- When the SSO sequence is complete, pass the SSO token from the child window back to the parent browser window.
Step 1: Check SSO Status and Retrieve the SSO Request URL
// Read variable values from the HTML fields
ucHost=document.getElementsByName("ucHost")[0].value;
redirectUrl=document.getElementsByName("redirectUrl")[0].value;
// Check if SSO is enabled
var xmlhttp=new XMLHttpRequest();  //Create XML request object
xmlhttp.open("GET","https://"+ucHost+"/ssosp/ws/public/singleSignOn");  // Prepare a GET request to the SSO status URL
The application retrieves the current enablement status of SSO, by retrieving the well-known URL: /ssosp/ws/public/singleSignOn
if (xmlhttp.status==200){  // HTTP status code is 200 (OK)
  var xml=xmlhttp.responseXML; //Extract the XML from the response
  var ssoStatus=xml.getElementsByTagName("Status")[0].getAttribute("enabled"); // Get the value of the 'enabled' attribute from the <Status> element
  document.getElementsByName("ssoEnabled")[0].value=ssoStatus; // Display the SSO enabled status
  if (ssoStatus == "true"){
    ssoUri=xml.getElementsByTagName("Uri")[0].textContent; // Get the value of the Oauth launch base URL
    launchOauth(); // If SSO enabled, call the popup window oauth launch function
  }
}
This request returns some XML, which includes a Status element, with an enabled attribute (true or false). Assuming SSO is enabled and ssoStatus == true, then the Uri element will contain the URL to which SSO requests should be sent (this could be on another CUCM node, though the URL itself should always be at: :8443/ssosp/oauth/authorize_ 8443)
The app stores the SSO URL in a variable and launches Step #2 via: launchOauth()
Step 2: Build the SSO Request URL
//Build the request URL
var requestUrl = ssoUri + "?" + //Base URL
  "scope=UnifiedCommunications:readwrite&" +
  "response_type=token&" +
  "redirect_uri=" + encodeURIComponent(redirectUrl)+"&" + //App's redirect URL
  "client_id=C69908c4f345729af0a23cdfff1d255272de942193e7d39171ddd307bc488d7a1"; //3rd party app client_id
The SSO request URL is used to initiate the SSO login sequence. In this example, the URL is launched in a popup window, where the user interactively logs in to the SSO system.
The base SSO URL is retrieved in the previous step, but there are several additional URL parameters that need to be appended to complete the request URL. The first four parameters are always the same for all applications:
Static Parameters:
response_type=tokentoken_type=Bearerscope="UnifiedCommunications:readwrite"- `client_id=C69908c4f345729af0a23cdfff1d255272de942193e7d39171ddd307bc488d7a1
Note: The
client_idis pre-configured for use by all 3rd party applications.
The final parameter is the application's Redirect URL. See the section Understanding Redirects and Same-Origin Issues for details.
Final request URL
Your final request URL will look like something like the below:
https://<returnedSSOserver>:8443/ssosp/oauth/authorize?response_type=token&client_id=C69908c4f345729af0a23cdfff1d255272de942193e7d39171ddd307bc488d7a1&token_type=BearerStep 3: Obtain the Token via WebView/Browser
//Open a child window for user interaction
      var popup = (window.open('','','height=500,width=500,scrollbars=1'));
      popup.document.write('Authorizing...');
      //Start the SSO login sequence using the request URL
      popup.location = requestUrl;
Submit the request
Any necessary redirection to the IdP happens automatically through the ssosp/OAuth/authorize API.
The IdP prompts the user for a valid username/password
Correct username/password are entered, and an access token is returned.
Step 4: Retrieve the Token via callback
<html>
      <head>
      <title>Authorization Complete</title>
      </head>
      <body></body>
      <script type="text/javascript">
      //As soon as the page loads, make the callback to the parent window
              window.onload = function(e) {
        //The SSO token information is available in a URL fragment of the location
                  window.opener.parentCallback(location.hash);
        window.close() };
      </script>
      </html>
Once the child window has completed the SSO sequence it will have loaded the HTML page from the Redirect URL. The Javascript on this page extracts the SSO token (and other SSO details, see below) from the page’s browser URL fragment (location.hash) and calls a Javascript function inside the parent window, which displays the token in a textbox.
SSO Token Parameters:
access_token- Returned token used when issuing API requests that utilize SSO credentials.token_type- AlwaysBearerexpires_in- Number of seconds the returned token is valid.
Retrieve the access_token
//Called from the child window by a script in the final redirect URL page
      function parentCallback(hash) {
      //Parse the access_token value from the URL fragment string
          var start,end;
      start = hash.indexOf('#access_token')+14;
      end = hash.indexOf('&');
      //Update the input box with the token value
          document.getElementsByName('Token')[0].value=hash.substring(start,end);
      }
This code fragment gets the access_token from the returned URL.
API-specific SSO Calls
Now that you know how to get a valid access token from your IdP, you can allow your users to use SSO on any of the following APIs:
Follow the instructions in the API specific documents to learn how to apply the token.