Device Assets: Upload Custom Source
Upload device inventory to Cisco XDR Device Insights using CSV, JSON, or JSONL files via the Custom Source Devices API.
Prerequisites
Active Cisco XDR organization
Admin role in your organization
API credentials (client ID and client secret) from the XDR console
Authentication
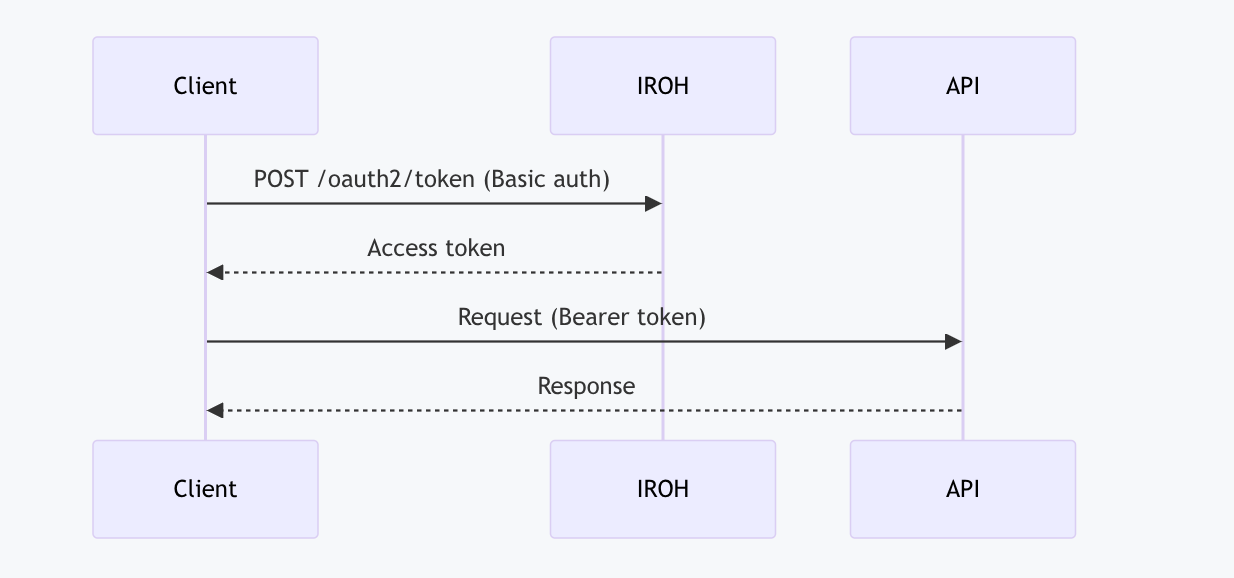
The API uses OAuth 2.0 client credentials flow. Just like any other XDR API, you obtain a JWT access token from IROH and include it as a Bearer token in all API requests. If you want to understand how the Access Token is generated from the Client ID and Client Secret credentials, take a look at the Authentication page.
Overview of API endpoints
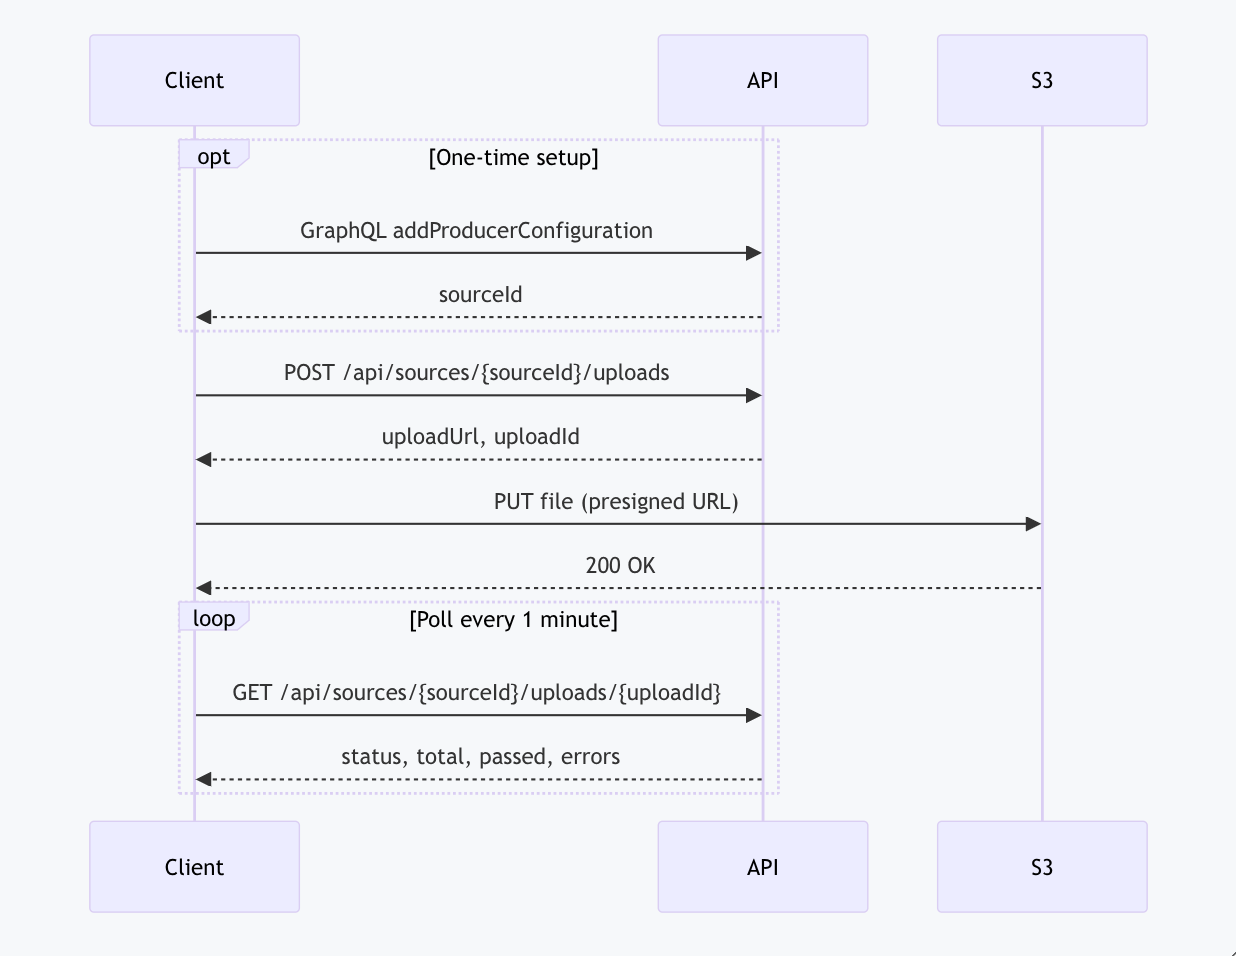
This provides an overview of the various API endpoints used for this feature. For details of each, please see the sections below, or use the CLI tool for end-to-end automation.
Base URL:
- US:
https://insights-api.us.security.cisco.com/ - EU:
https://insights-api.eu.security.cisco.com/ - APJC:
https://insights-api.apjc.security.cisco.com/
Part A: Management API (GraphQL)
Used for the one-time setup of your custom source.
- Endpoint:
<base-url>/graphql - Action: Use
addProducerConfigurationto create a source.
Example Mutation:
mutation {
  addProducerConfiguration(input: { producerType: "Custom", name: "My Devices" }) {
    producerId
  }
}
Save the returned producerId (e.g., CUSTOM__abc-123) to use in the Upload API.
Part B: Data Ingestion API (REST)
Used for the file upload workflow.
| Step | Method | Endpoint |
|---|---|---|
| 1. Create Upload | POST |
/api/sources/{sourceId}/uploads?format=<csv-json-jsonl> |
| 2. Upload File | PUT |
<uploadUrl> (returned from Step 1) |
| 3. Poll Status | GET |
/api/sources/{sourceId}/uploads/{uploadId} |
Workflow Details:
- Create Upload: Send a
POSTrequest to initialize the task. You will receive anuploadIdand a temporary, presigneduploadUrl. - Upload File: Perform a
PUTrequest to theuploadUrlwith your file content. Set theContent-Typeheader based on your format (text/csv,application/json, orapplication/x-ndjson). - Poll Status: Periodically
GETthe status endpoint using youruploadId. Continue polling until the status reachescompletedorfailed.
Supported Formats
- CSV: Requires a header row. Use dot notation for nested fields (e.g.,
labels.0). - JSON: Array of objects.
- JSONL: One JSON object per line.
Mandatory Field: Every record must include an extId (Unique device identifier).
CLI Tool (recommended for automation)
A standalone reference script (see the CLI Tool Script page) is provided for end-to-end automation. It handles authentication, source creation, file upload, and status polling in a single command.
Requirements: Node.js 18+ with ts-node or Bun
npx ts-node scripts/source-upload.ts \\
  \--api-url https://insights-api.us.security.cisco.com/api \\
  \--iroh-url https://visibility.amp.cisco.com \\
  \--client-id YOUR\_CLIENT\_ID \\
  \--client-secret YOUR\_CLIENT\_SECRET \\
  \--source-name "My Devices" \\
  \--file devices.csv
Arguments:
--api-url— Insights API base URL (or envXDR_API_URL)--iroh-url— IROH authentication URL (or envXDR_IROH_URL)--client-id— OAuth client ID (or envXDR_CLIENT_ID)--client-secret— OAuth client secret (or envXDR_CLIENT_PASSWORD)--source-name— Custom source name (created automatically if it doesn't exist)--file— Path to CSV, JSON, or JSONL file (format detected from extension)--poll-interval— Status poll interval in seconds (default: 5)--log-level—debug,info,warn, orerror(default:info)
Output: JSON result to stdout with status, total, passed, and any errors.
Exit codes:
0— Success (completed, possibly with per-record errors)1— Failure (auth error, validation error, or task failed)
The script auto-creates the custom source if it doesn't exist and retries transient failures with exponential backoff.
One-Time Setup: Create a Custom Source
Before uploading files, create a custom source. This only needs to be done once — reuse the same sourceId for subsequent uploads. The CLI tool does this automatically.
Example response:
{
  "data": {
    "addProducerConfiguration": {
      "producerId": "CUSTOM\_\_abc-123-def-456",
      "producerType": "Custom",
      "name": "My Custom Source",
      "description": "Device inventory from my internal systems"
    }
  }
}
Save the producerId — use it as sourceId in the upload API.
Upload API
For custom integrations, use the REST API directly. The workflow has three steps: create upload, upload file, poll status. For full request examples, see the reference script.
Create Upload
POST <base-url>/api/sources/{sourceId}/uploads?format=csv
The format query parameter accepts csv, json, or jsonl (default: csv).
Example response (key fields):
{
  "uploadId": "550e8400-e29b-41d4-a716-446655440000",
  "uploadUrl": "https://s3.amazonaws.com/bucket/path?X-Amz-Algorithm=AWS4-HMAC-SHA256&...",
  "urlValidUntil": 1705000900000,
  "taskValidUntil": 1705087200000,
  "maxFileSizeBytes": 10485760,
  "maxDeviceCount": 10000,
  "sourceId": "CUSTOM\_\_abc-123-def-456",
  "status": "new"
}
uploadUrl— Presigned S3 URL for file upload (valid for 15 minutes)uploadId— Use this to poll status in the next stepmaxFileSizeBytes/maxDeviceCount— Validate your file against these before uploading
Upload File
Upload your file to the presigned URL using PUT.
Content types by format:
CSV:
text/csvJSON:
application/jsonJSONL:
application/x-ndjson
HTTP 200 indicates successful upload. Processing begins automatically.
Poll Status
Poll until status is completed or failed. Recommended interval: 1 minute.
Example response (completed):
{
  "uploadId": "550e8400-e29b-41d4-a716-446655440000",
  "status": "completed",
  "total": 150,
  "passed": 148,
  "errors": \[
    {
      "index": 42,
      "content": "device-xyz,hostname42,invalidOS,...",
      "message": "Unsupported os type: invalidOS. Use one of windows,macOS,android,... only"
    },
    {
      "index": 89,
      "content": "device-abc,hostname89,windows,...",
      "message": "lastUpdated: 123 is not a valid number. Use number of milliseconds since the UNIX epoch only (must be greater than 946684800000)"
    }
  \],
  "sourceId": "CUSTOM\_\_abc-123-def-456",
  "taskValidUntil": 1705087200000
}
Example response (failed):
{
  "uploadId": "550e8400-e29b-41d4-a716-446655440000",
  "status": "failed",
  "total": 0,
  "passed": 0,
  "errors": \[\],
  "sourceId": "CUSTOM\_\_abc-123-def-456",
  "failure": "csv header does not include mandatory property: extId",
  "taskValidUntil": 1705087200000
}
File Formats
All formats require the extId field on every device record. Format is specified via the format query parameter when creating the upload.
CSV
Header row required. Array fields use dot notation with zero-based indices.
extId,name,osType,labels.0,labels.1,value
device-001,laptop-1,windows,production,finance,8
device-002,laptop-2,macOS,engineering,,5
device-003,desktop-1,centos,ops,,3
JSON
Array of objects.
[
  {"extId": "device-001", "name": "laptop-1", "osType": "windows", "labels": \["production", "finance"\], "value": 8},
  {"extId": "device-002", "name": "laptop-2", "osType": "macOS", "labels": \["engineering"\], "value": 5},
  {"extId": "device-003", "name": "desktop-1", "osType": "centos", "labels": \["ops"\], "value": 3}
]
JSONL
One JSON object per line.
{"extId": "device-001", "name": "laptop-1", "osType": "windows", "labels": \["production", "finance"\], "value": 8}
{"extId": "device-002", "name": "laptop-2", "osType": "macOS", "labels": \["engineering"\], "value": 5}
{"extId": "device-003", "name": "desktop-1", "osType": "centos", "labels": \["ops"\], "value": 3}
Column Reference
Required:
extId— Unique device identifier in your system
Device properties:
name— Device hostname or friendly nameosType— Operating system (see allowed values below)osVersion— OS version string (e.g., "10.0.19044")osBuild— OS build numberhardwareId— Hardware UUIDserialNumber— Device serial numberimei— IMEI (mobile devices)created— Creation timestamp in milliseconds (Unix epoch)lastUpdated— Last update timestamp in milliseconds (Unix epoch, must be > 946684800000)isCompromised— Boolean (true/false)isManaged— Boolean (true/false)
Array fields (use .N indexing in CSV, native arrays in JSON/JSONL):
macAddresses— MAC addressesinternalIps— Internal IP addressesexternalIps— External IP addressesusers— Associated usernamesappUsers— Application usernamesemails— Associated email addresseslabels— Custom labels (created automatically if they don't exist)browsers— Browser objects withbrowserFamily,browserVersion,flashVersion,javaVersion,lastUsed
Custom fields:
value— Integer 1-10 (asset value)
Allowed osType values: windows, macOS, android, iOS, iPadOS, networkGateway, centos, rhel, rocky, ubuntu, oracle, chromeOS, emailSecurityAppliance, webSecurityAppliance
Reference
Limits
Max file size: 10 MB
Max device count: 10,000 per upload
Presigned URL validity: 15 minutes
Upload task TTL: 24 hours
Per-record errors shown: up to 5 (remaining count indicated)
Status Values
new— Upload created, waiting for fileuploaded— File received, queued for processingparsing— File being parsed and validatedcompleted— Processing finished (checkerrorsarray for per-record failures)failed— Job-level failure (seefailurefield for error message)
Error Responses
401 Unauthorized — Token is invalid, expired, or missing. Obtain a new token and retry.
403 Forbidden — Token is valid but lacks required permissions. Ensure your API client has admin role.
400 Bad Request — Invalid request. Check that:
sourceIdmatches the formatCUSTOM__<uuid>formatis one ofcsv,json,jsonlSource belongs to your organization and is a custom source
404 Not Found — Resource not found. Verify the sourceId or uploadId exists and belongs to your organization.
Troubleshooting
Token rejected — Verify
Authorization: Bearer <token>format, check token hasn't expired, ensure API client is enabledFile upload returns 403 — Presigned URL expired (valid for 15 minutes). Create a new upload to get a fresh URL.
Upload stuck in "new" — File was not uploaded or upload failed. Check if
urlValidUntilhas passed. Create a new upload and retry.Devices not appearing — Check
errorsarray in the completed status. Common causes: missingextId, invalidosType,lastUpdatednot a valid past timestamp.Upload status returns 404 — Task may have expired (24-hour TTL). Verify the
uploadIdis correct.