Getting Started
This section describes how to quickly get started and make your first API request using one of the following methods:
- Interactive API explorer
- Automation
- Python SDK
Each method requires you to generate an Access Token, inspect a text object to extract observables (for example, internetbadguys.com), and enrich the observables by retrieving their verdict (for example, malicious).
Base URL for API Requests
Before you get started, every Cisco XDR API request, except for the OAuth token generation API, will begin with the following base URL :
In order to make a Cisco XDR API request, you will need to use specific base URLs depending on your organization region and which API service is being used. This is currently not yet the same for all services. Also, if you are using an organization that is in the Europe or Asia Pacific, Japan, and China region, you will need to adjust the base URL accordingly. The following is a list of base URLs for specific Cisco XDR APIs, based on the region and service:
North America
- Cisco XDR Platform: https://visibility.amp.cisco.com/iroh/
- Cisco XDR Private Intelligence: https://private.intel.amp.cisco.com/ctia/
- Cisco XDR Automation: https://automate.us.security.cisco.com/api/
Europe
- Cisco XDR Platform: https://visibility.eu.amp.cisco.com/iroh/
- Cisco XDR Private Intelligence: https://private.intel.eu.amp.cisco.com/ctia/
- Cisco XDR Automation: https://automate.eu.security.cisco.com/api/
Asia Pacific, Japan, and China
- Cisco XDR Platform: https://visibility.apjc.amp.cisco.com/iroh/
- Cisco XDR Private Intelligence: https://private.intel.apjc.amp.cisco.com/ctia/
- Cisco XDR Automation: https://automate.apjc.security.cisco.com/api/
Authorization for API Requests
In addition to the base URL, an Authorization header must be added to every API request with the following format:
Authorization: Bearer <Access Token>
For details about authentication, including how to generate an access token, see Authentication.
API Request Using the Interactive API Explorer
Interactive API Explorer
This API documentation has an interactive API explorer, which you can use to make your first API request. It has a pre-filled set of Client ID and Client Secret. These credentials will allow you to immediately authenticate make Cisco XDR API requests.
Note: This is a read-only credentials and will only work with
GETrequests.
Each request will have a complete description of all the required parameters and also allow you to instantly try it out in the online console. Code Snippets are also provided for you to quickly build scripts.
Generate an Access Token
In the interactive API explorer, the Access Token is automatically generated using the pre-filled Client ID and Client Secret so you do not need to generate it yourself.
If you want to understand how the Access Token is generated from the Client ID and Client Secret credentials, take a look at the Authentication page.
Make an API request
Open the Private-Intel - API Version Details API endpoint page.

Click Run to run the API request.
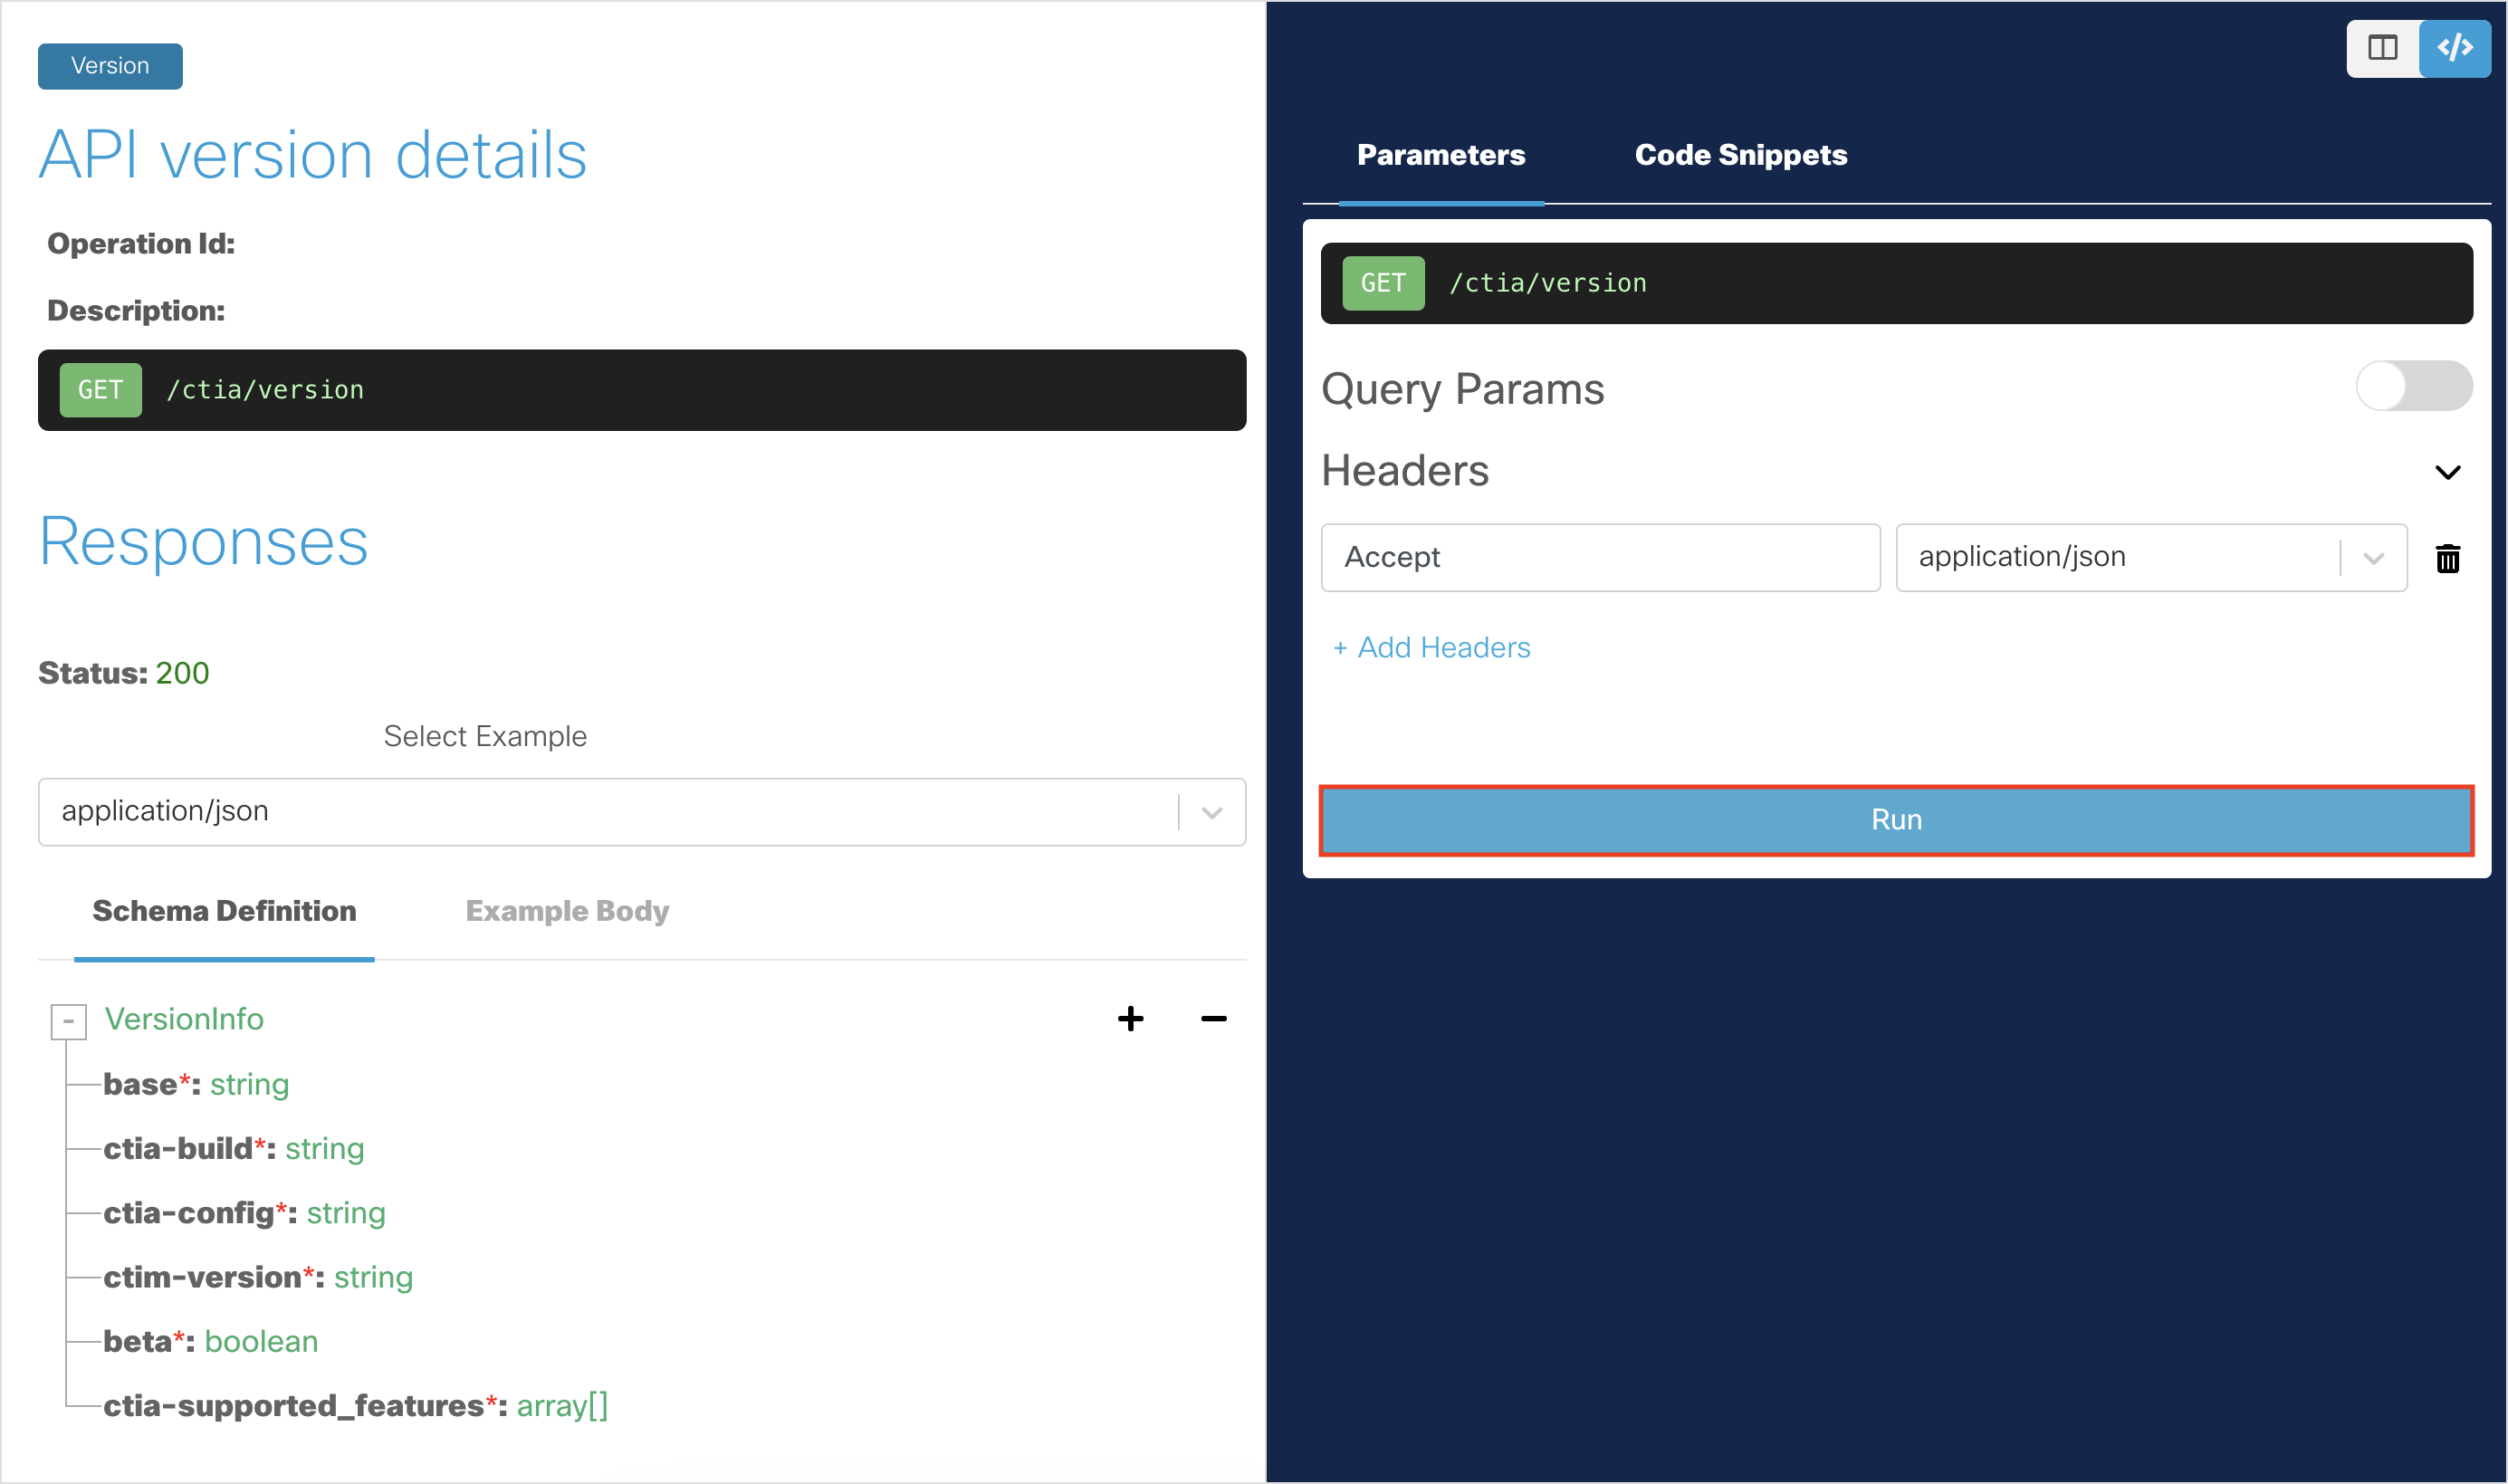
You should get a
200 OKresponse, indicating that the API request was successful. The returned data indicates the current CTIA version.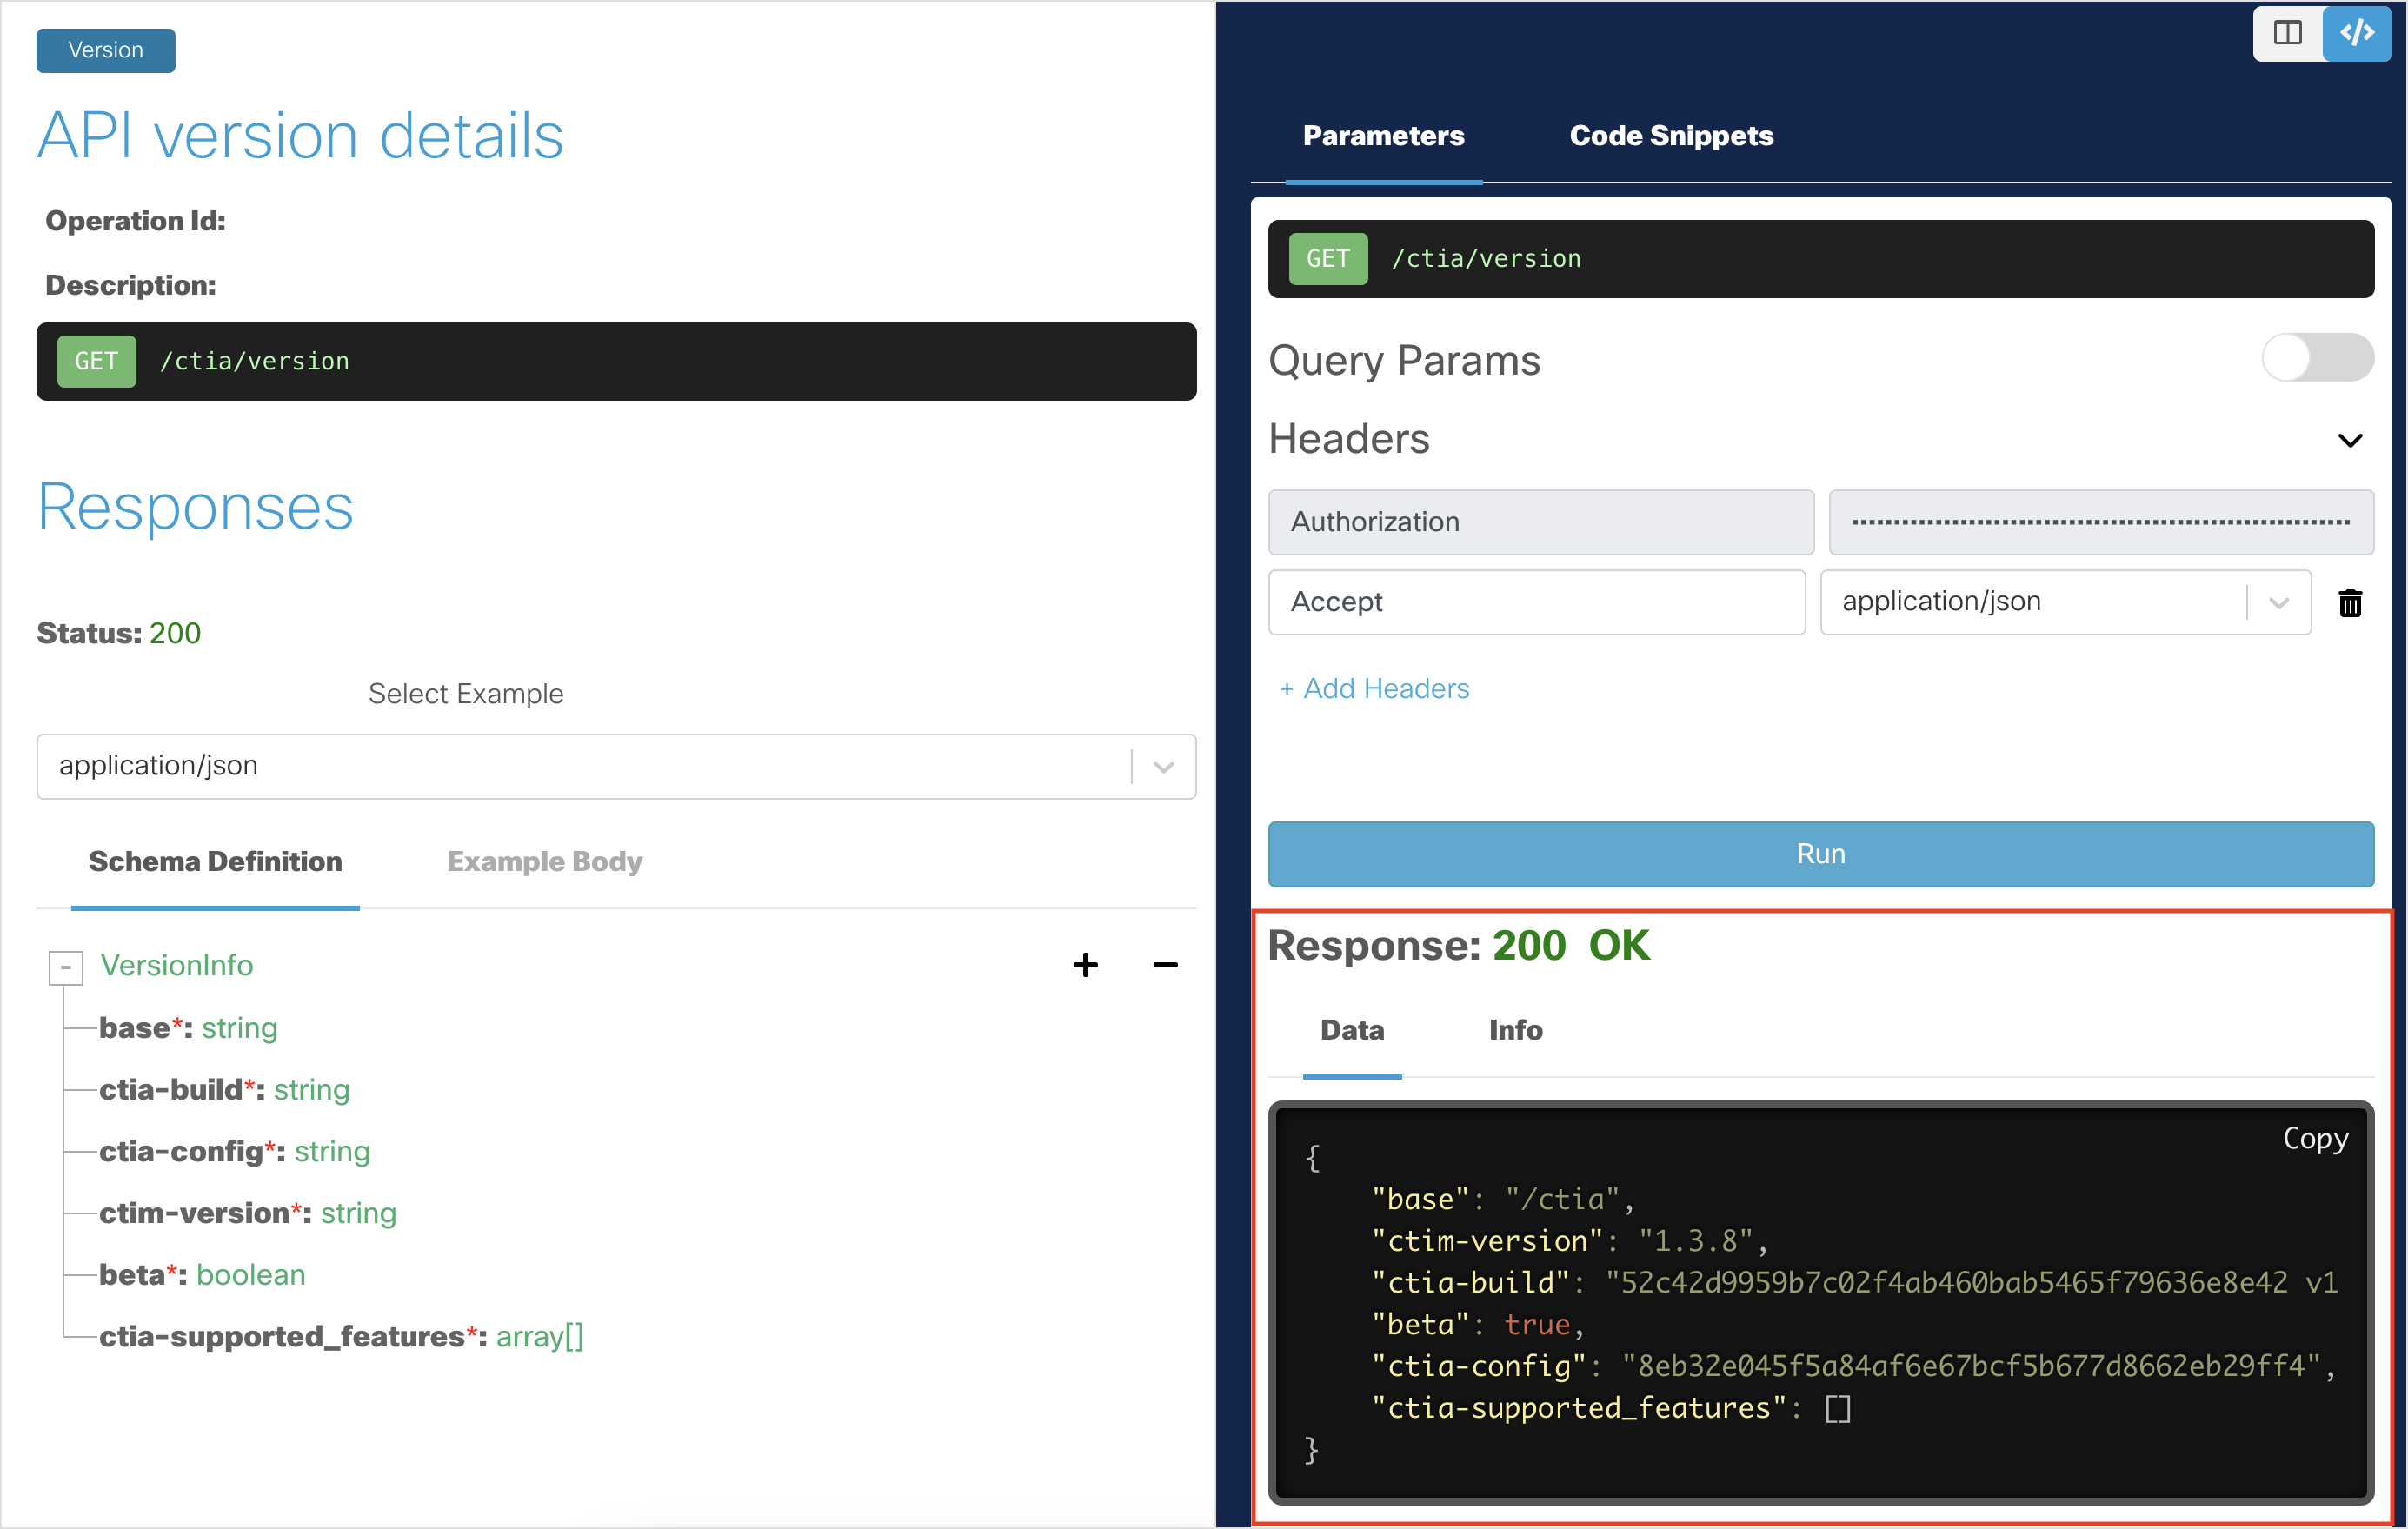
Inspect a Text Object to Extract Observables
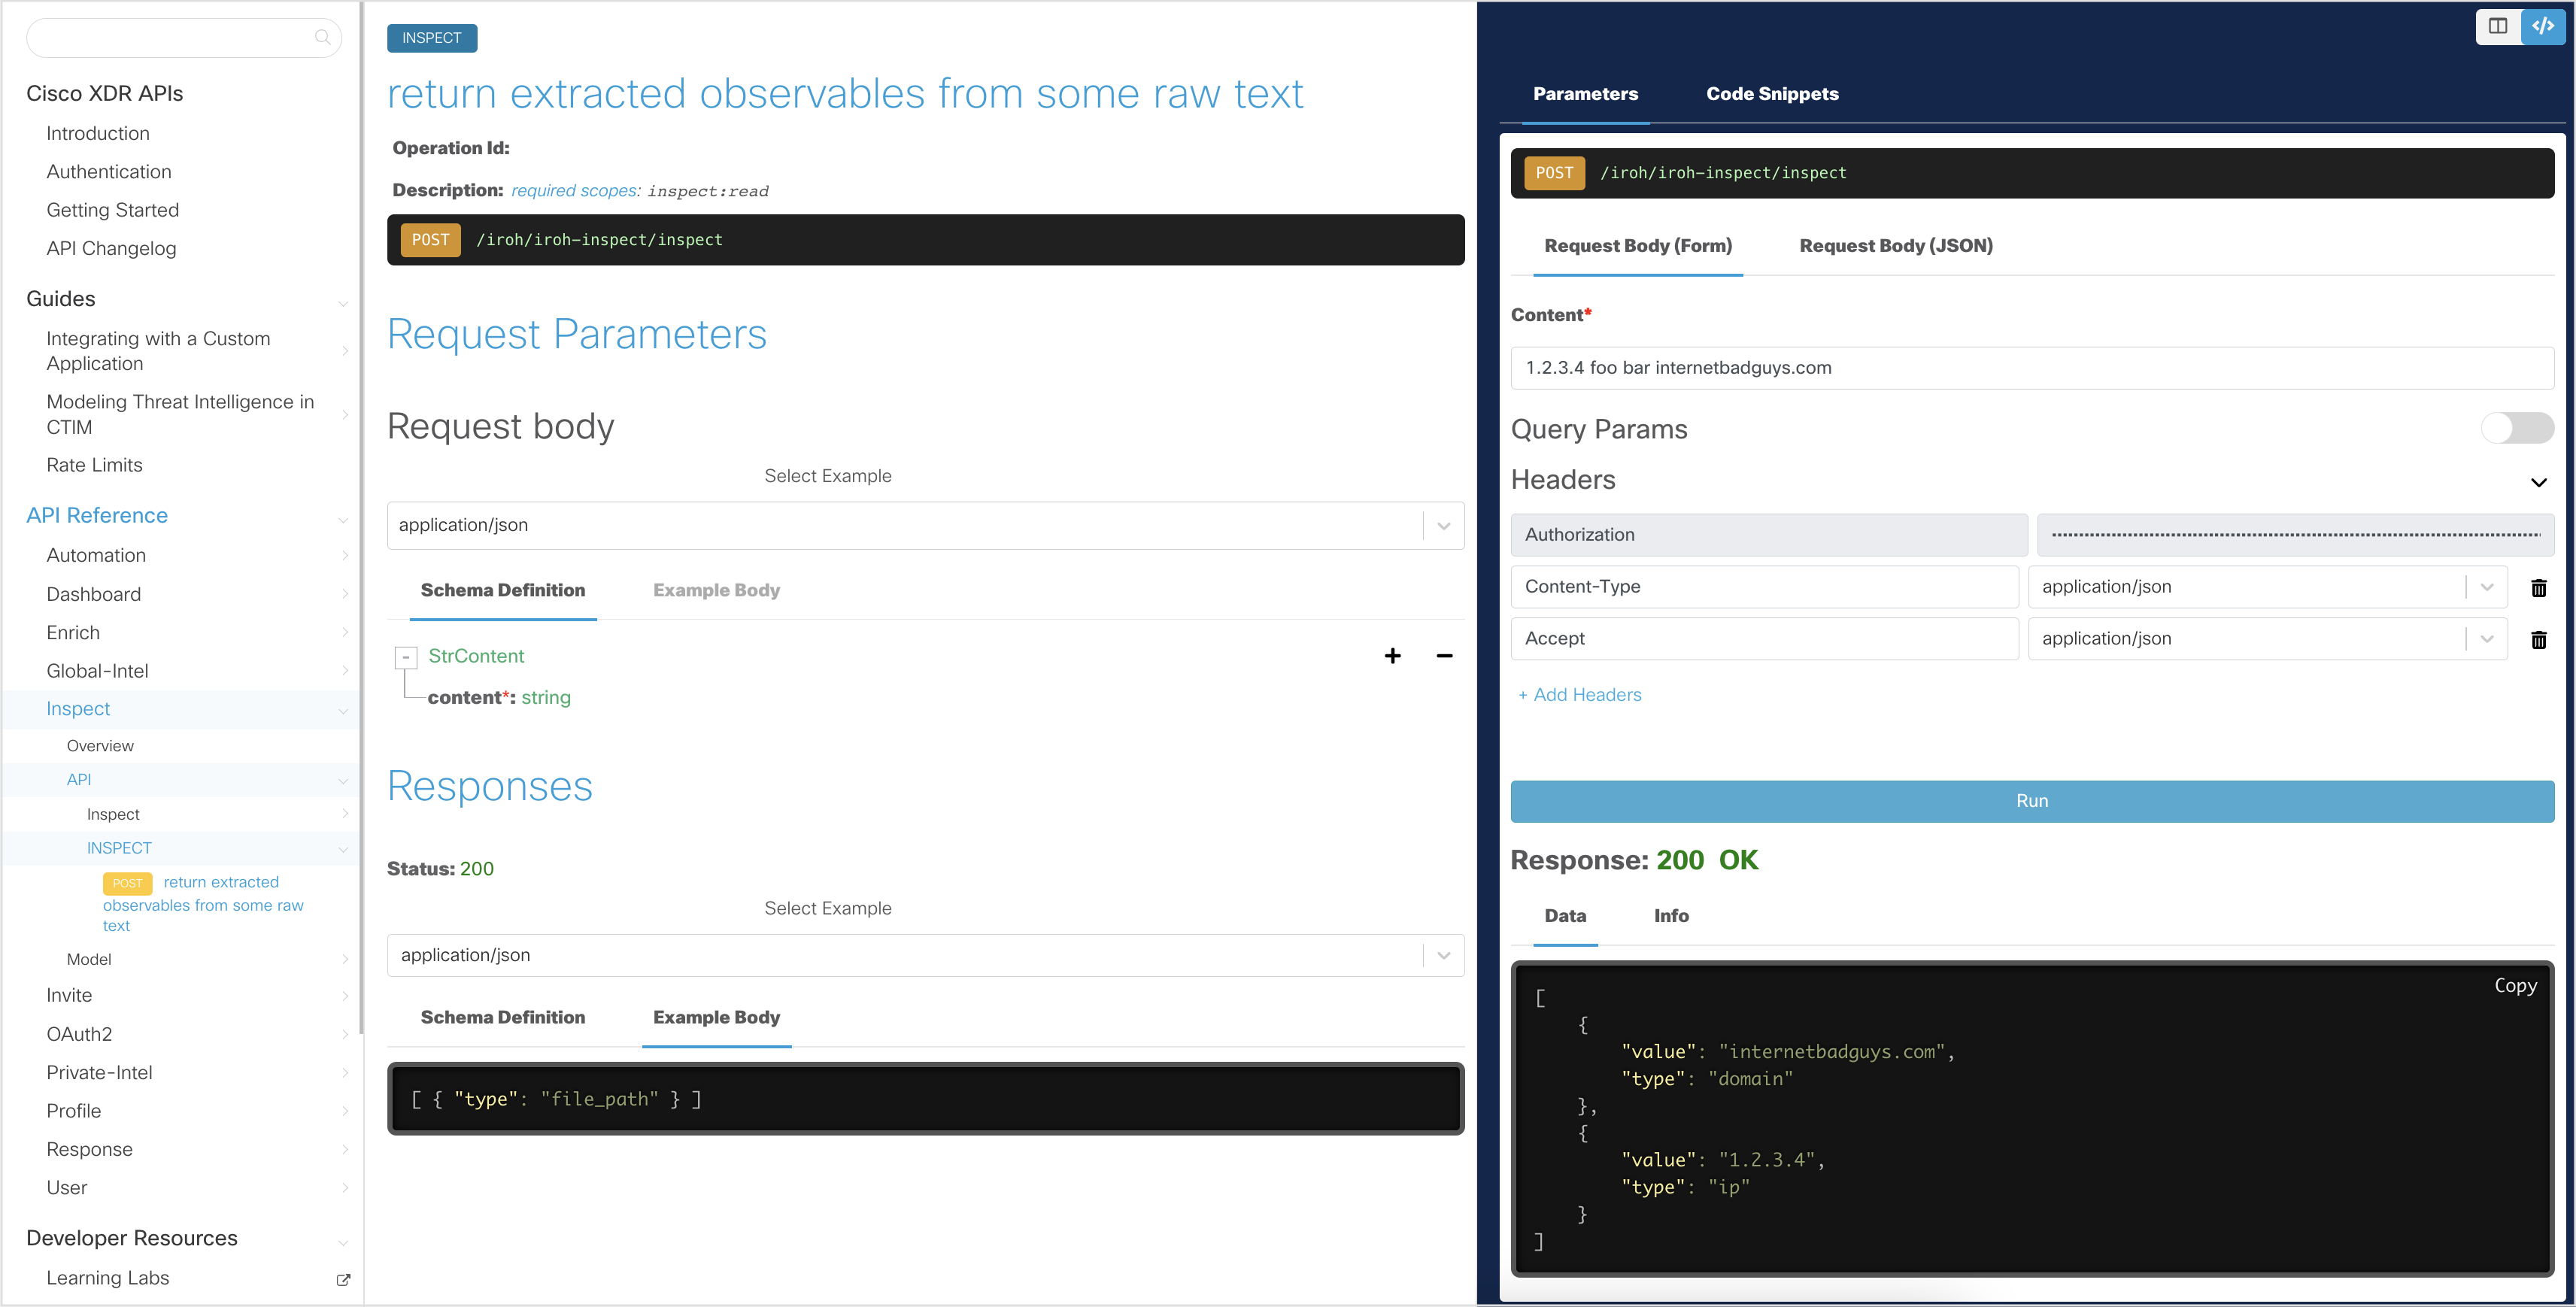
Open the Inspect - Return Extracted Observables API endpoint page.
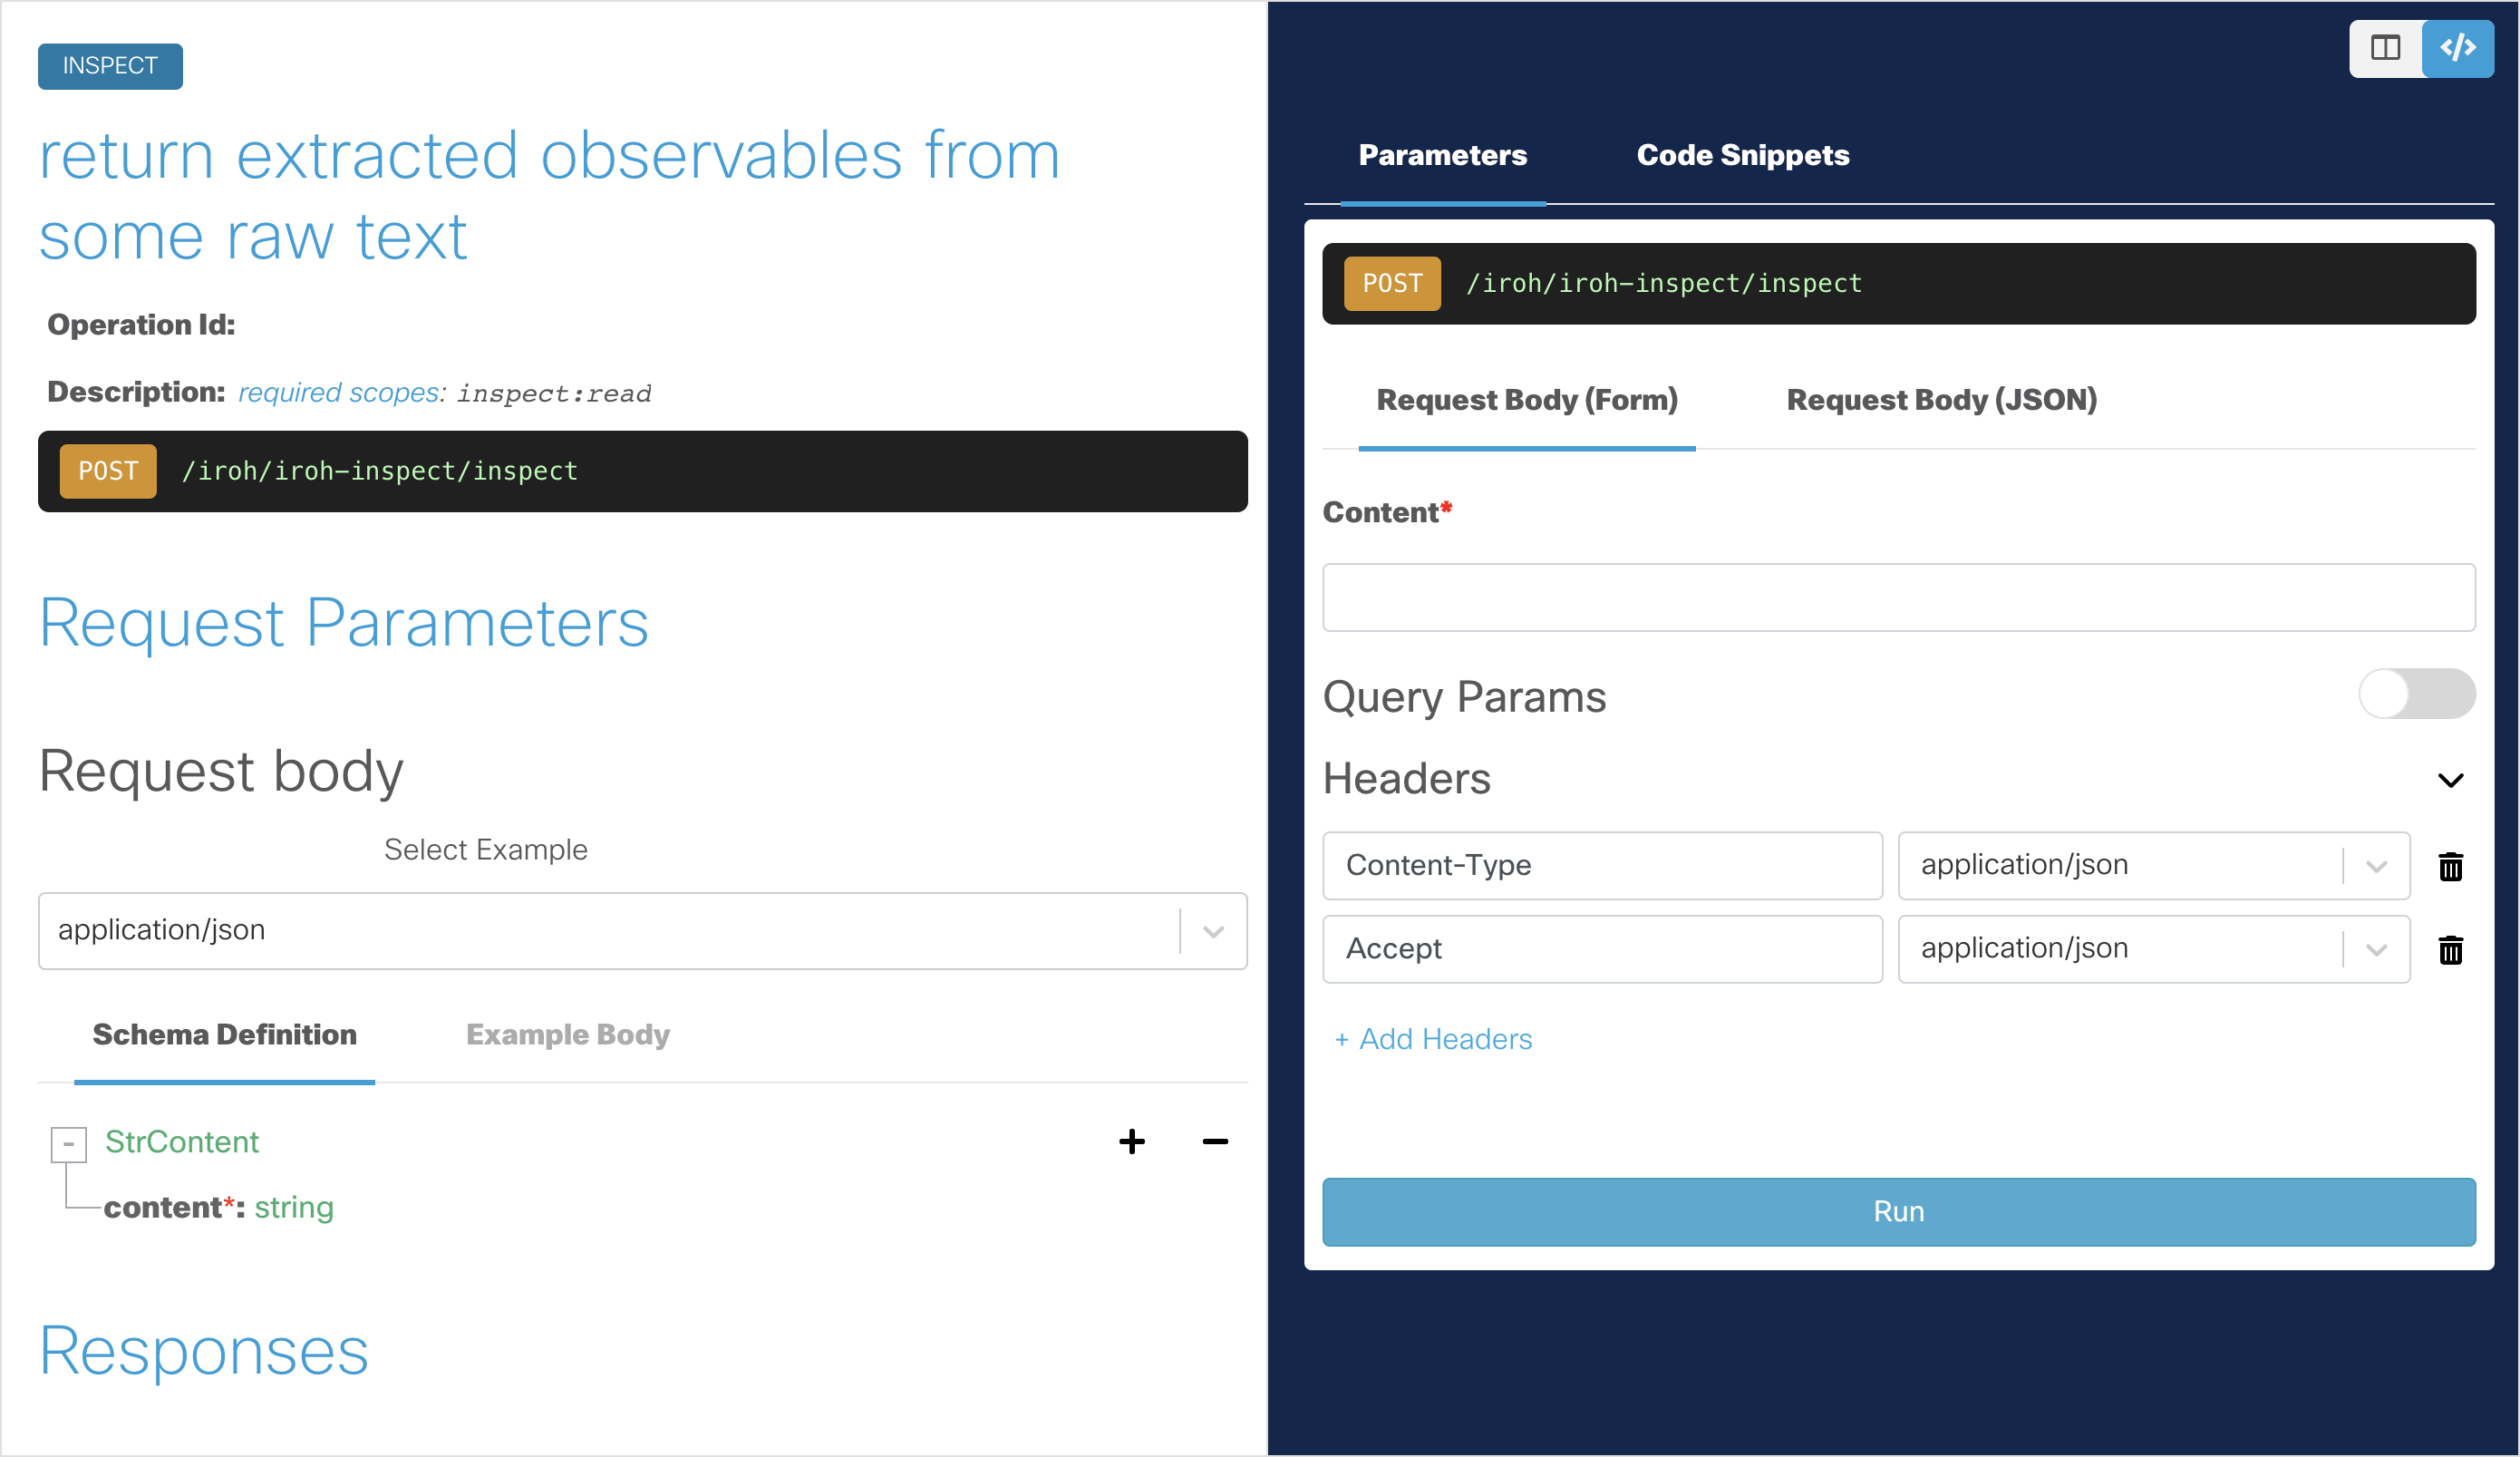
To make our next API request, type any text in the Content field for the request body, but make sure to include observable details such as ip address and hostnames. For example,
1.2.3.4 foo bar internetbadguys.com.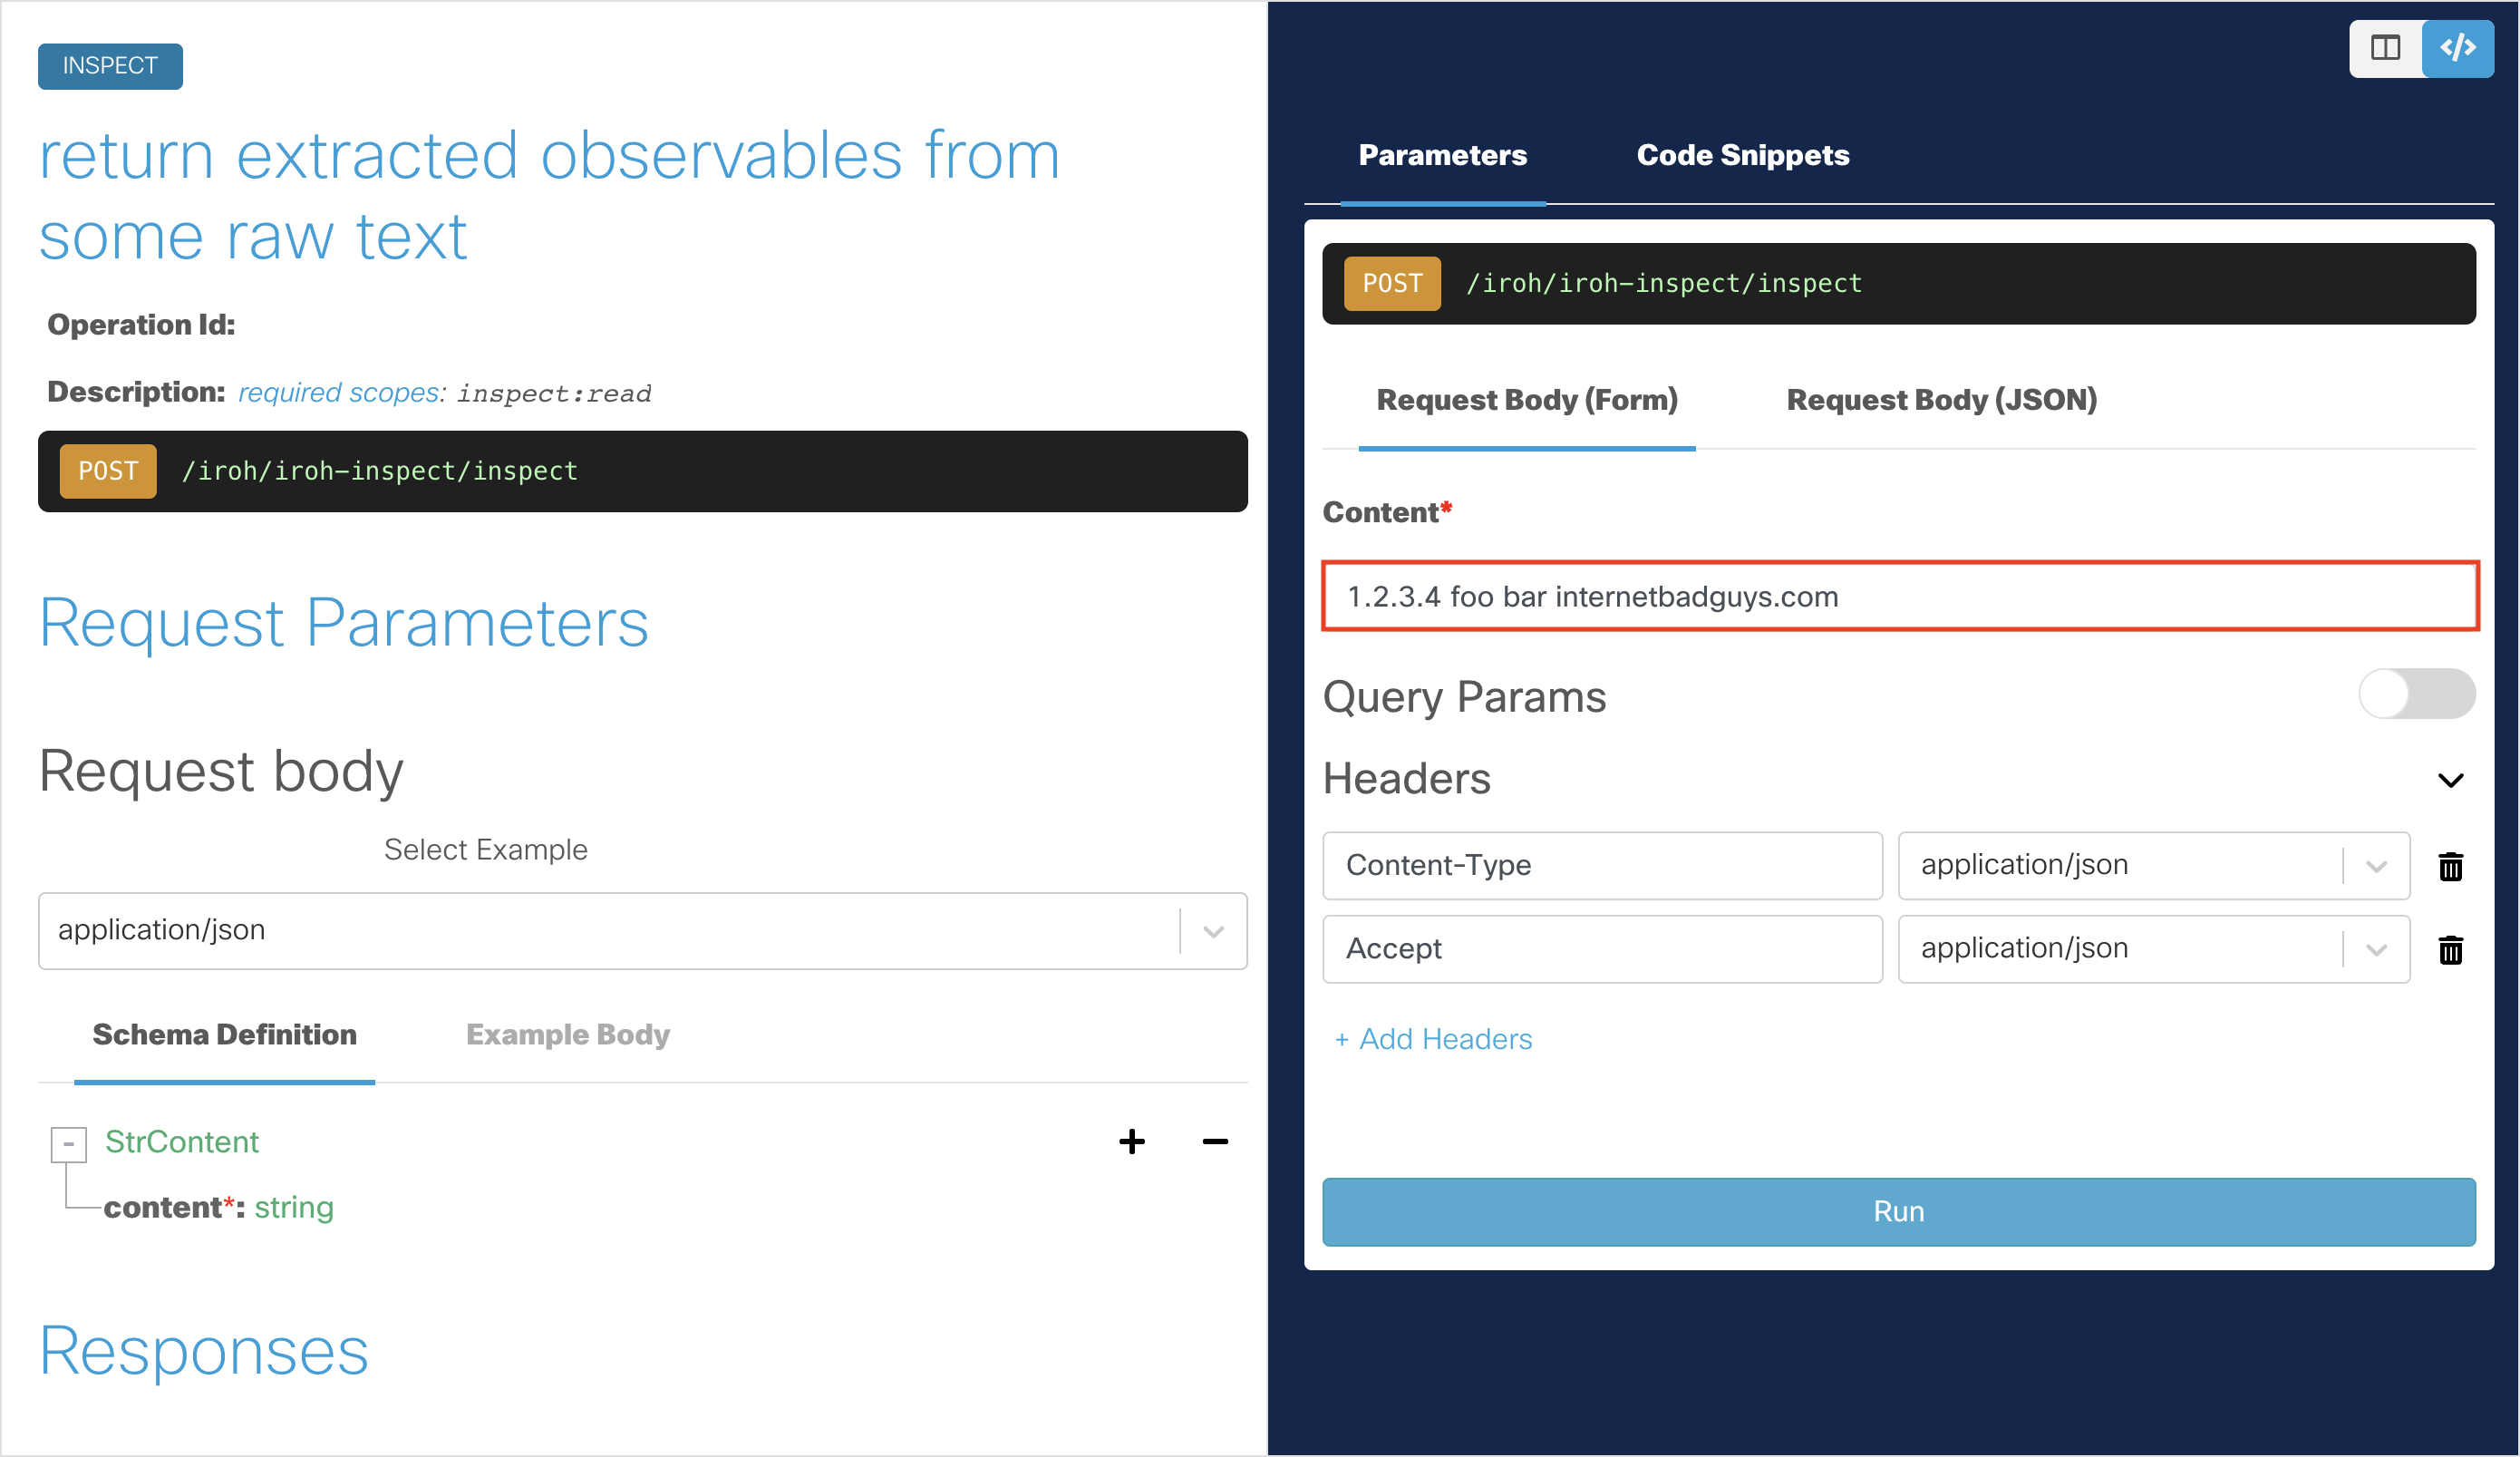
Click Run to run the API request.

You should get a
200 OKresponse, indicating that the API request was successful. The returned data should automatically parse out the observables.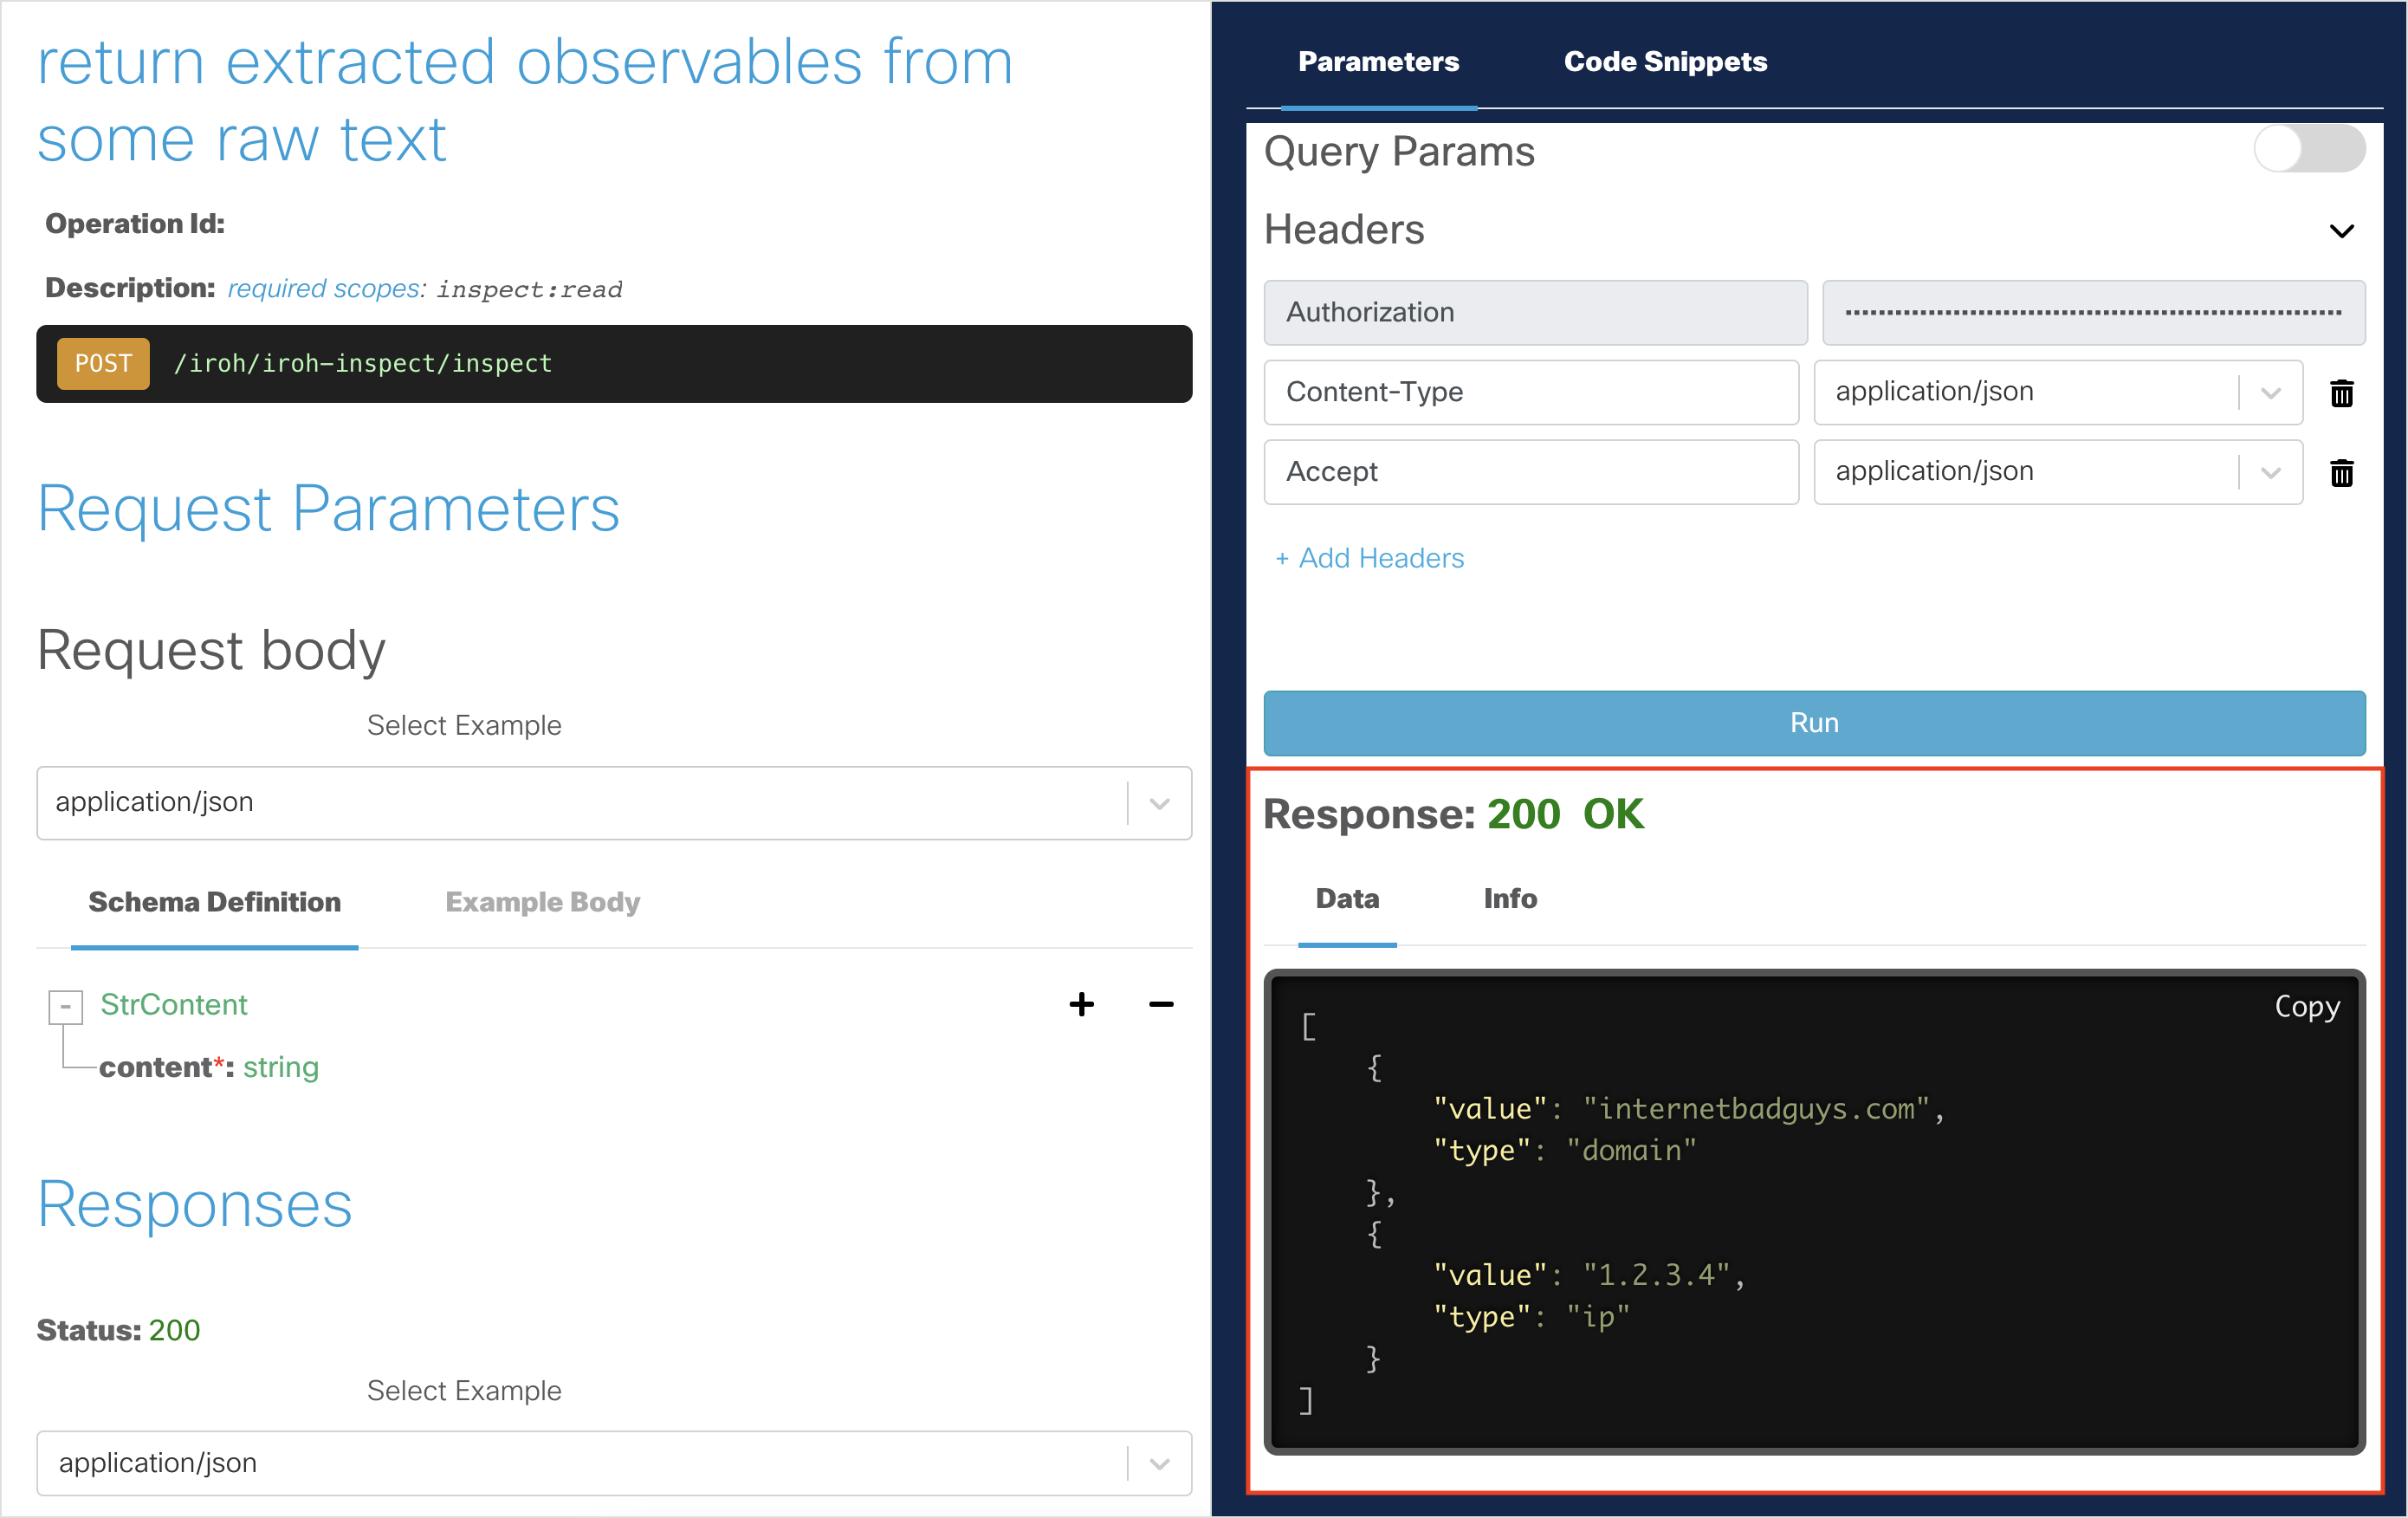
- If you get a
400 Bad Requestresponse, you need to enter some text in the Content field. - If you get a
401 Unauthorizedresponse, you may need to re-authorize.- Click the Configuration button and a dialog box will appear.
- Click the Logout button.
- Click the Authorize button.
- Click the Save button. The dialog box will close.
- Click the Run button again in the interactive API explorer.
- If you get a
Enrich the Observables by Retrieving the Verdict
Open the Enrich - Deliberate - Get Observable Verdicts API Endpoint page.
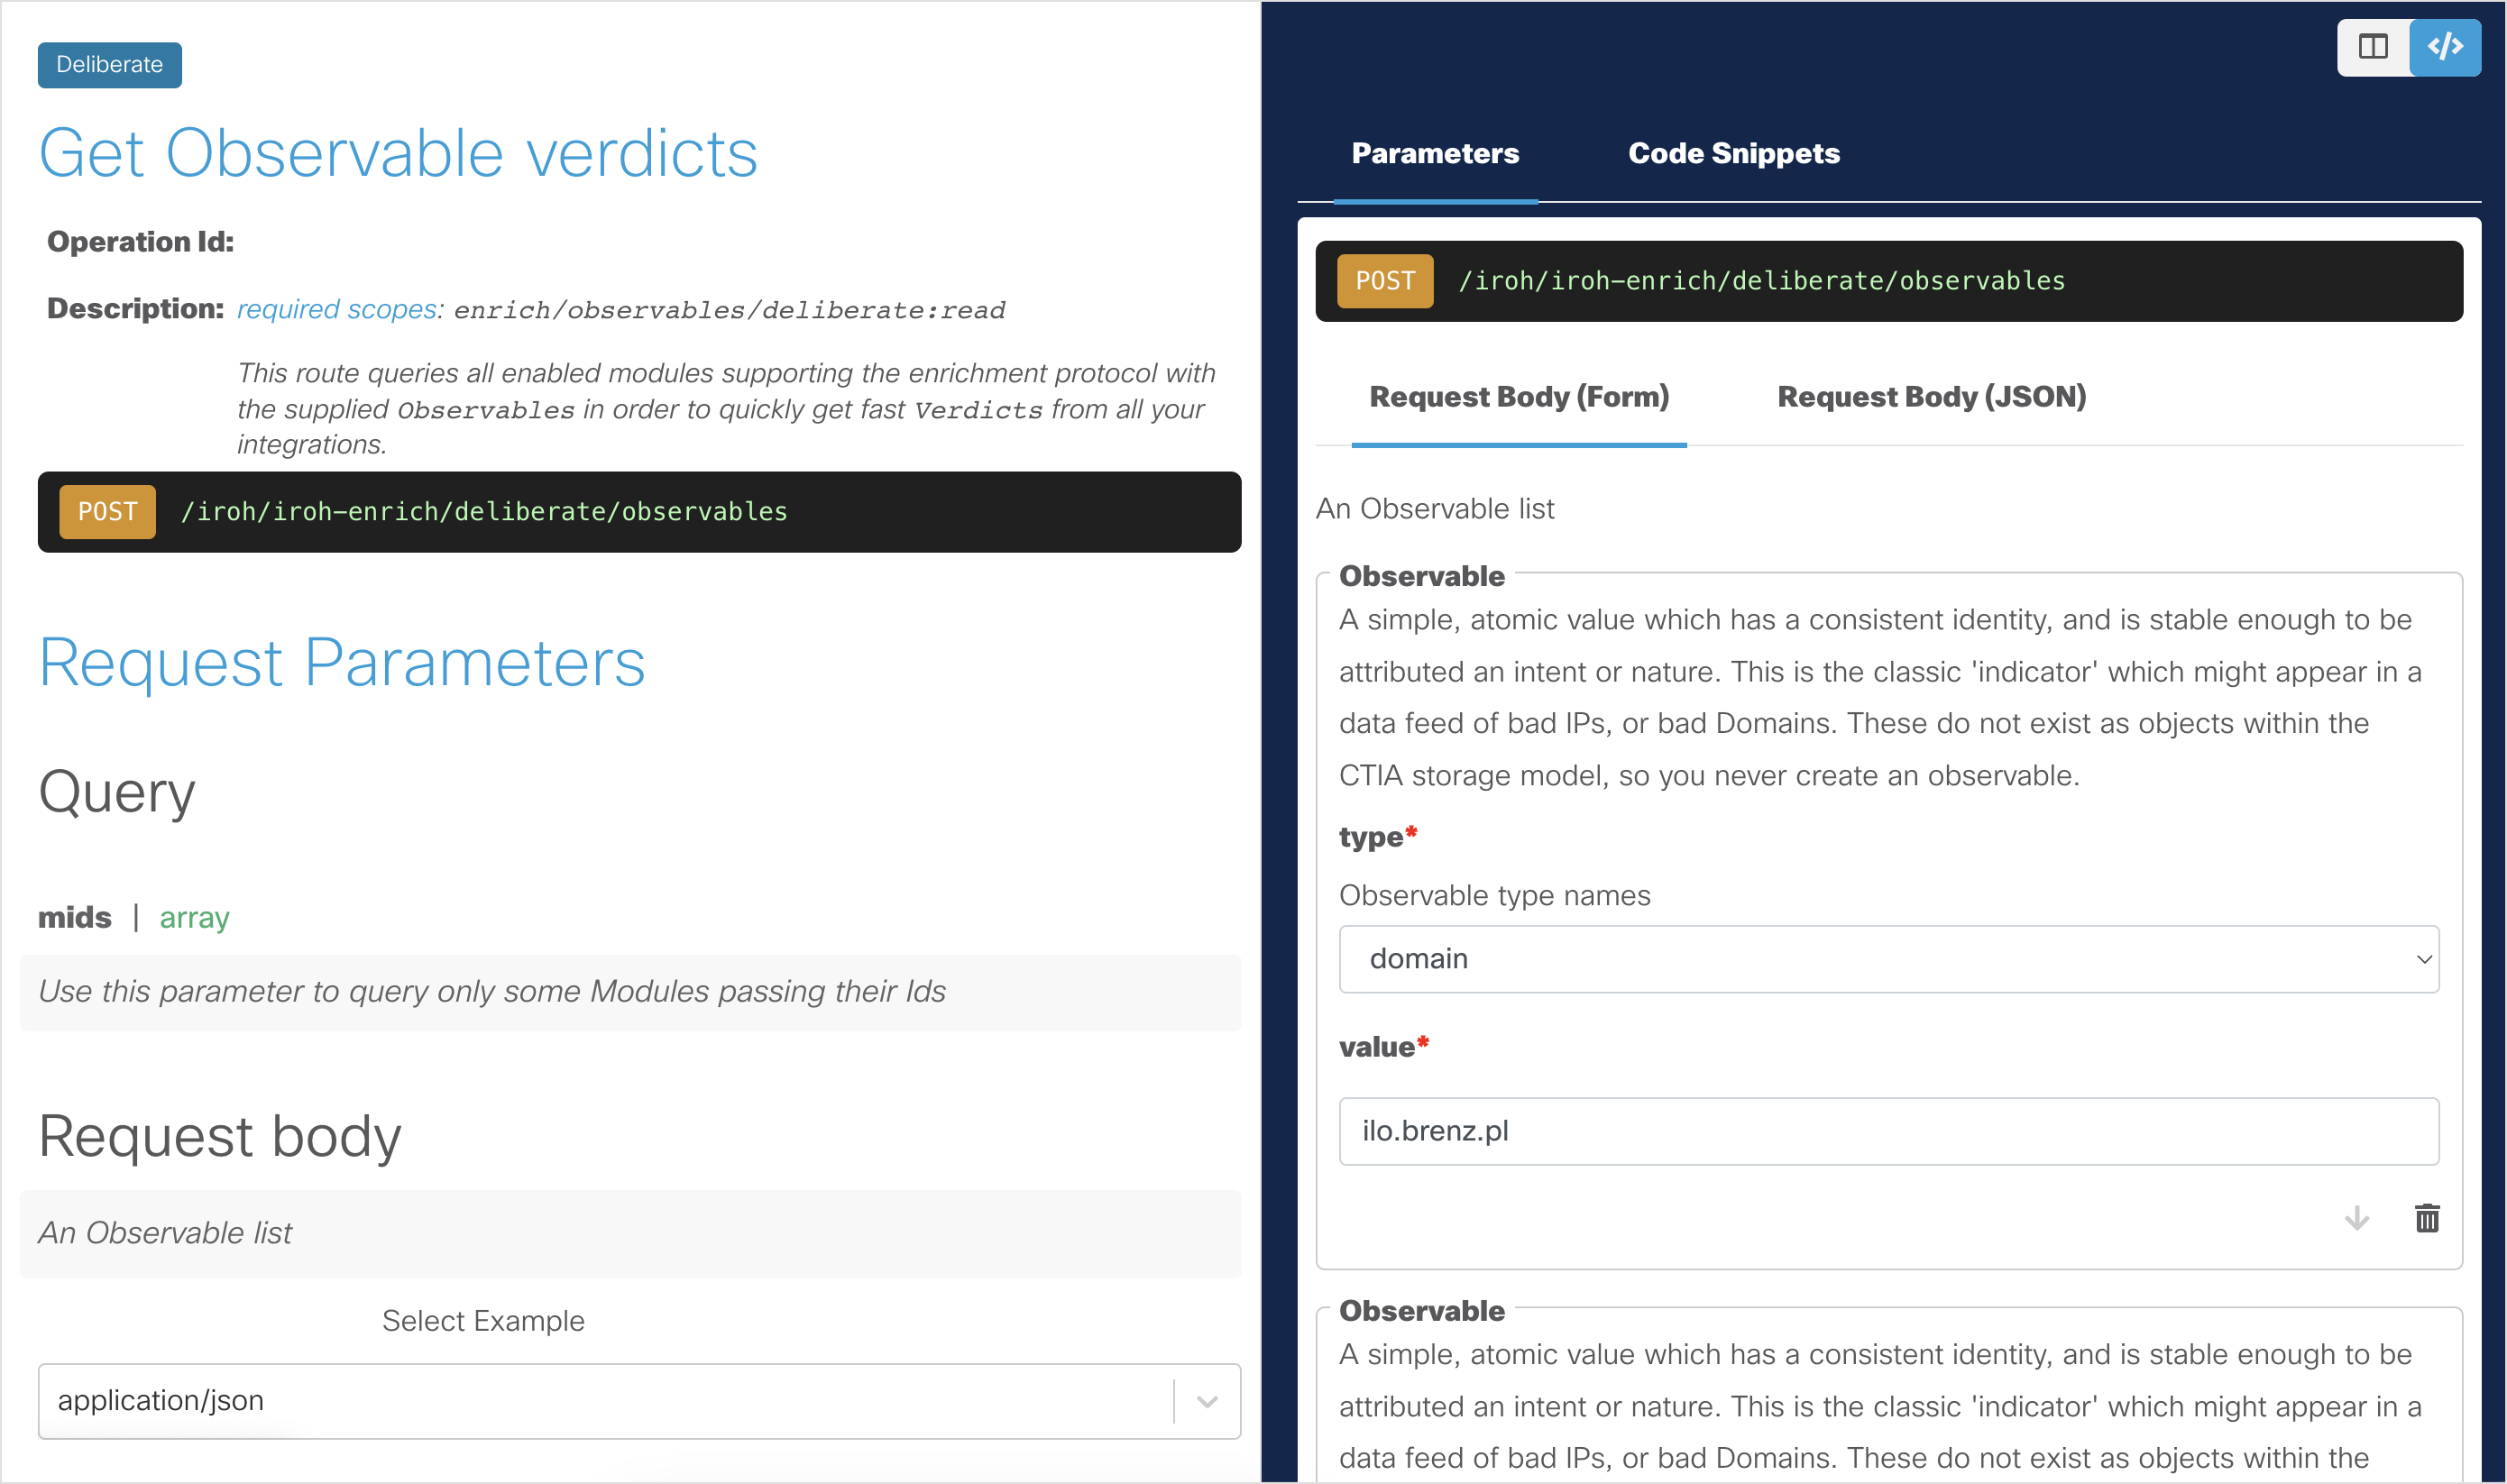
To make the API request, click the Request Body (JSON) tab and paste the output from our previous API request (Step 5 in the Inspect a Text Object to Extract Observables section). Below is the JSON in case you are starting at this step:
[
    {
        "value": "internetbadguys.com",
        "type": "domain"
    },
    {
        "value": "1.2.3.4",
        "type": "ip"
    }
]
Uncheck any query params if checked. You do not need them for this API request.
Click Run to run the API request.
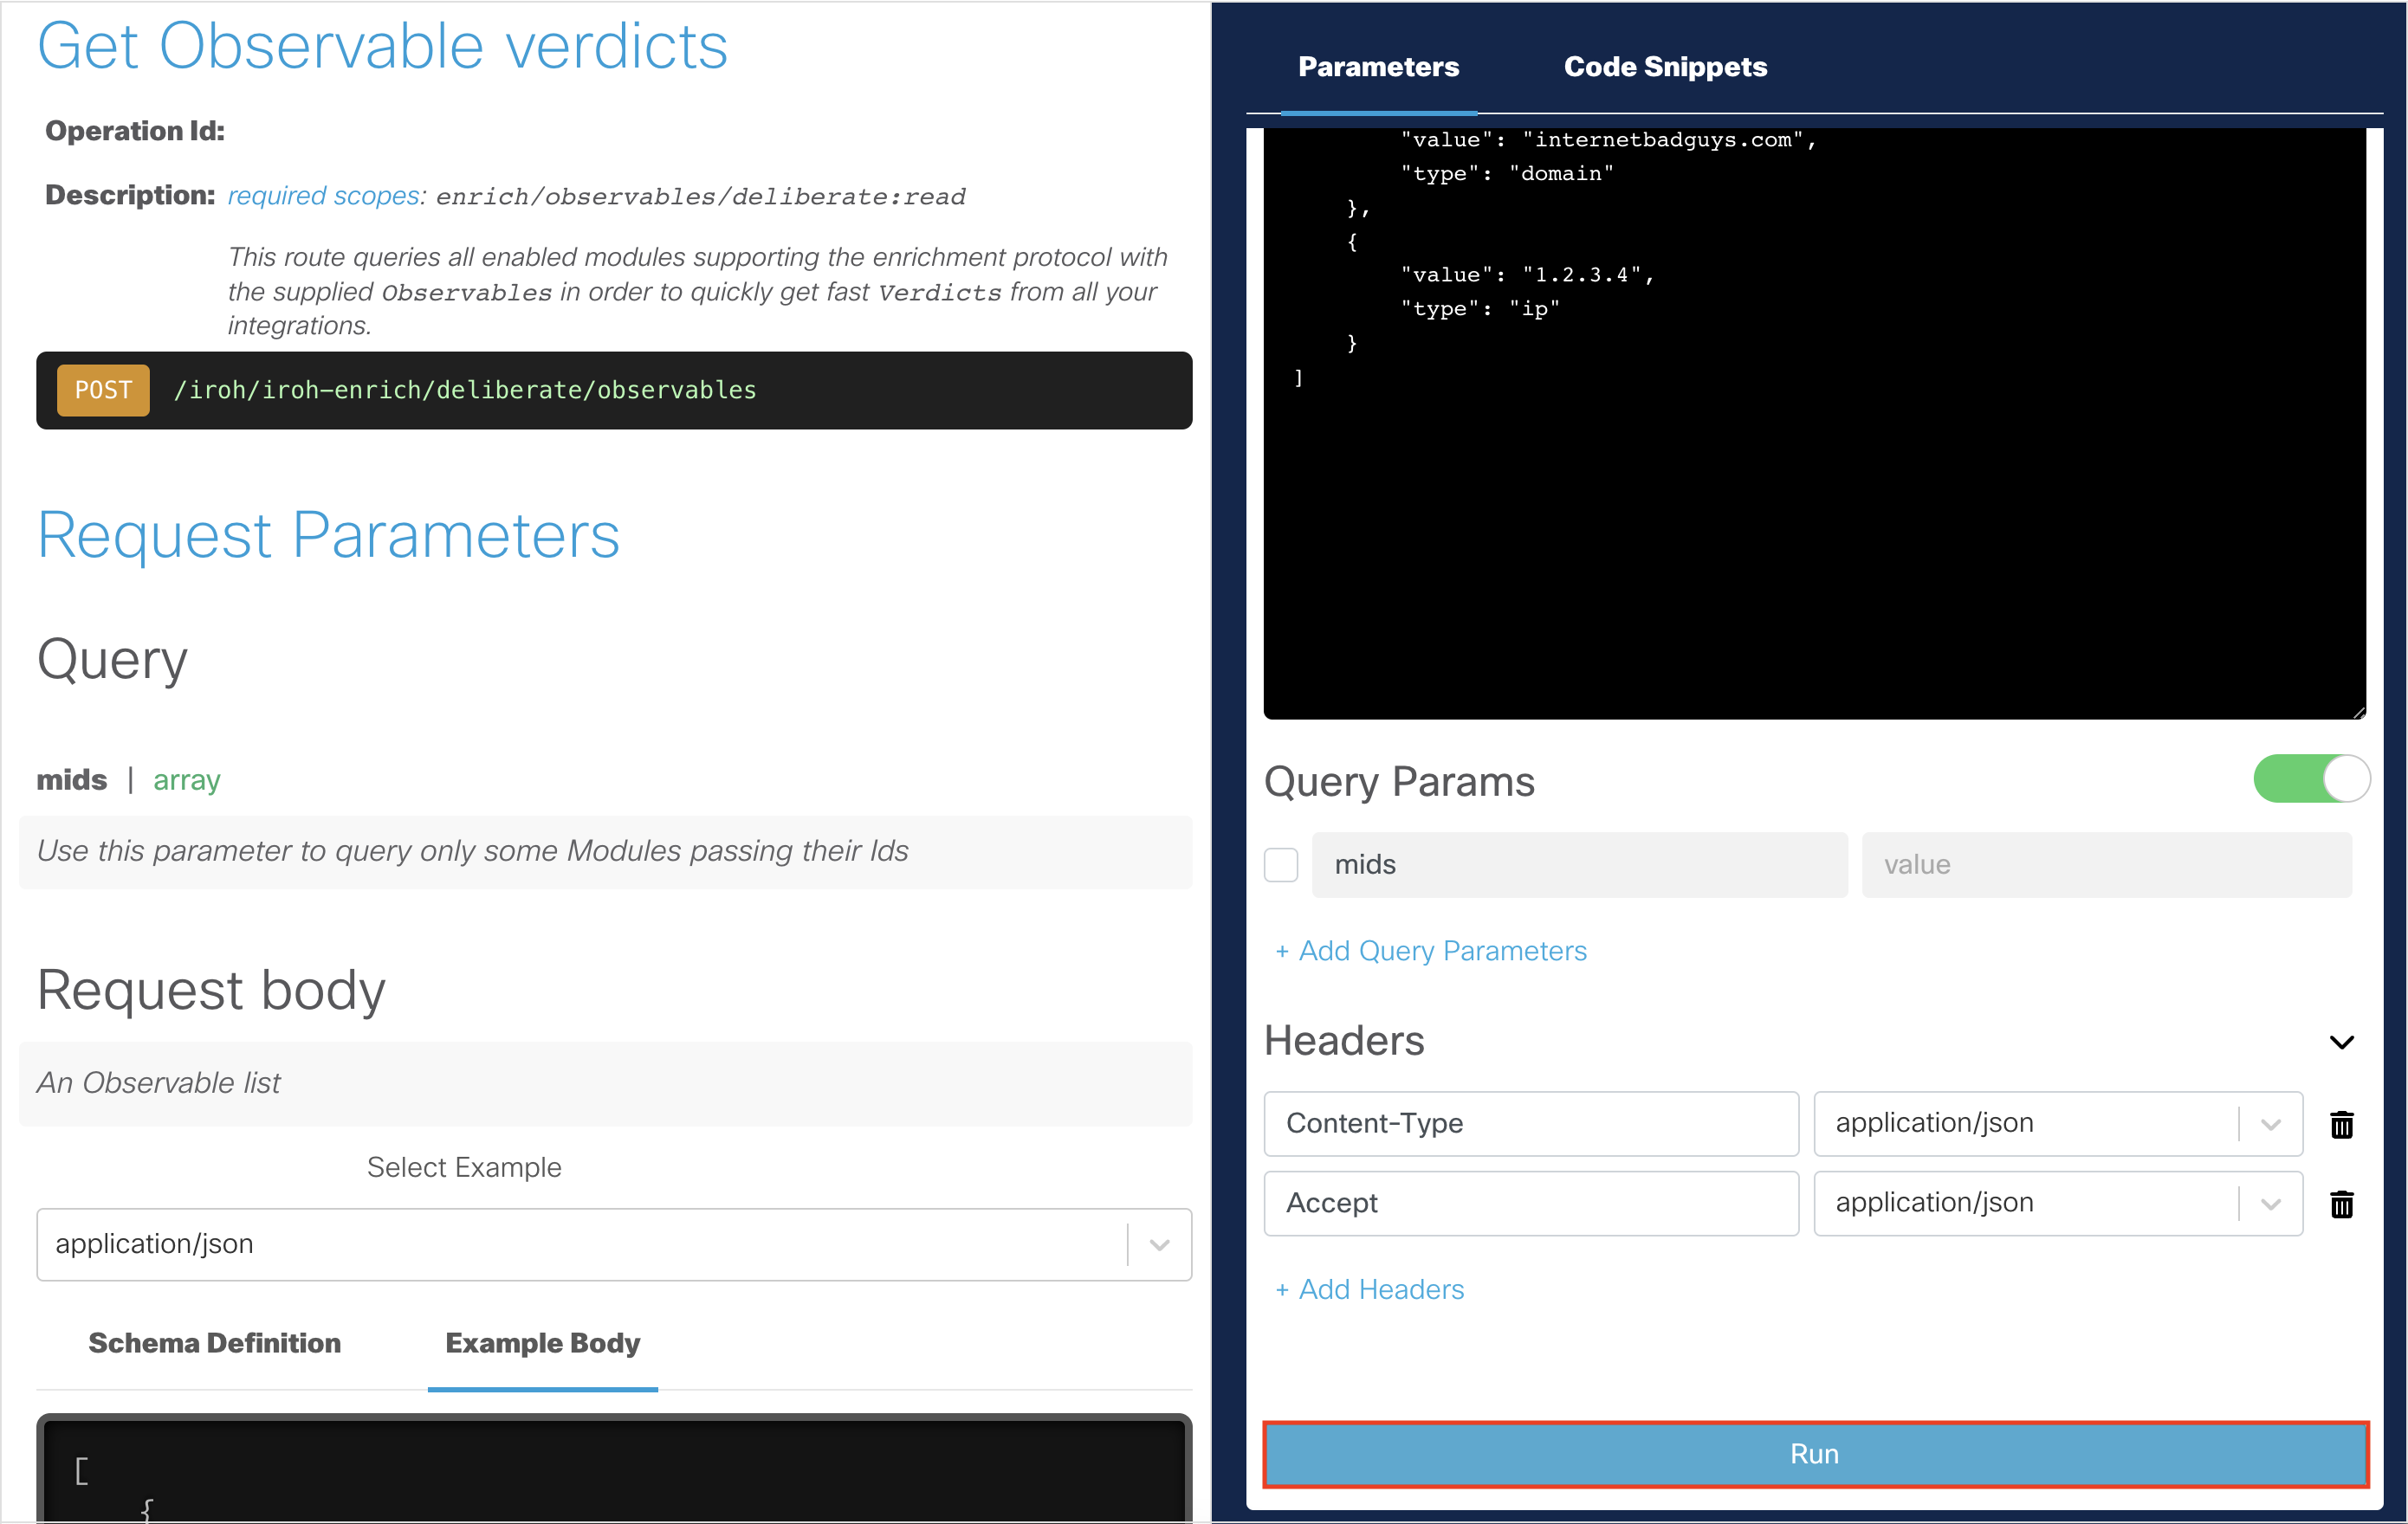
You should get a
200 OKresponse, indicating that the API request was successful.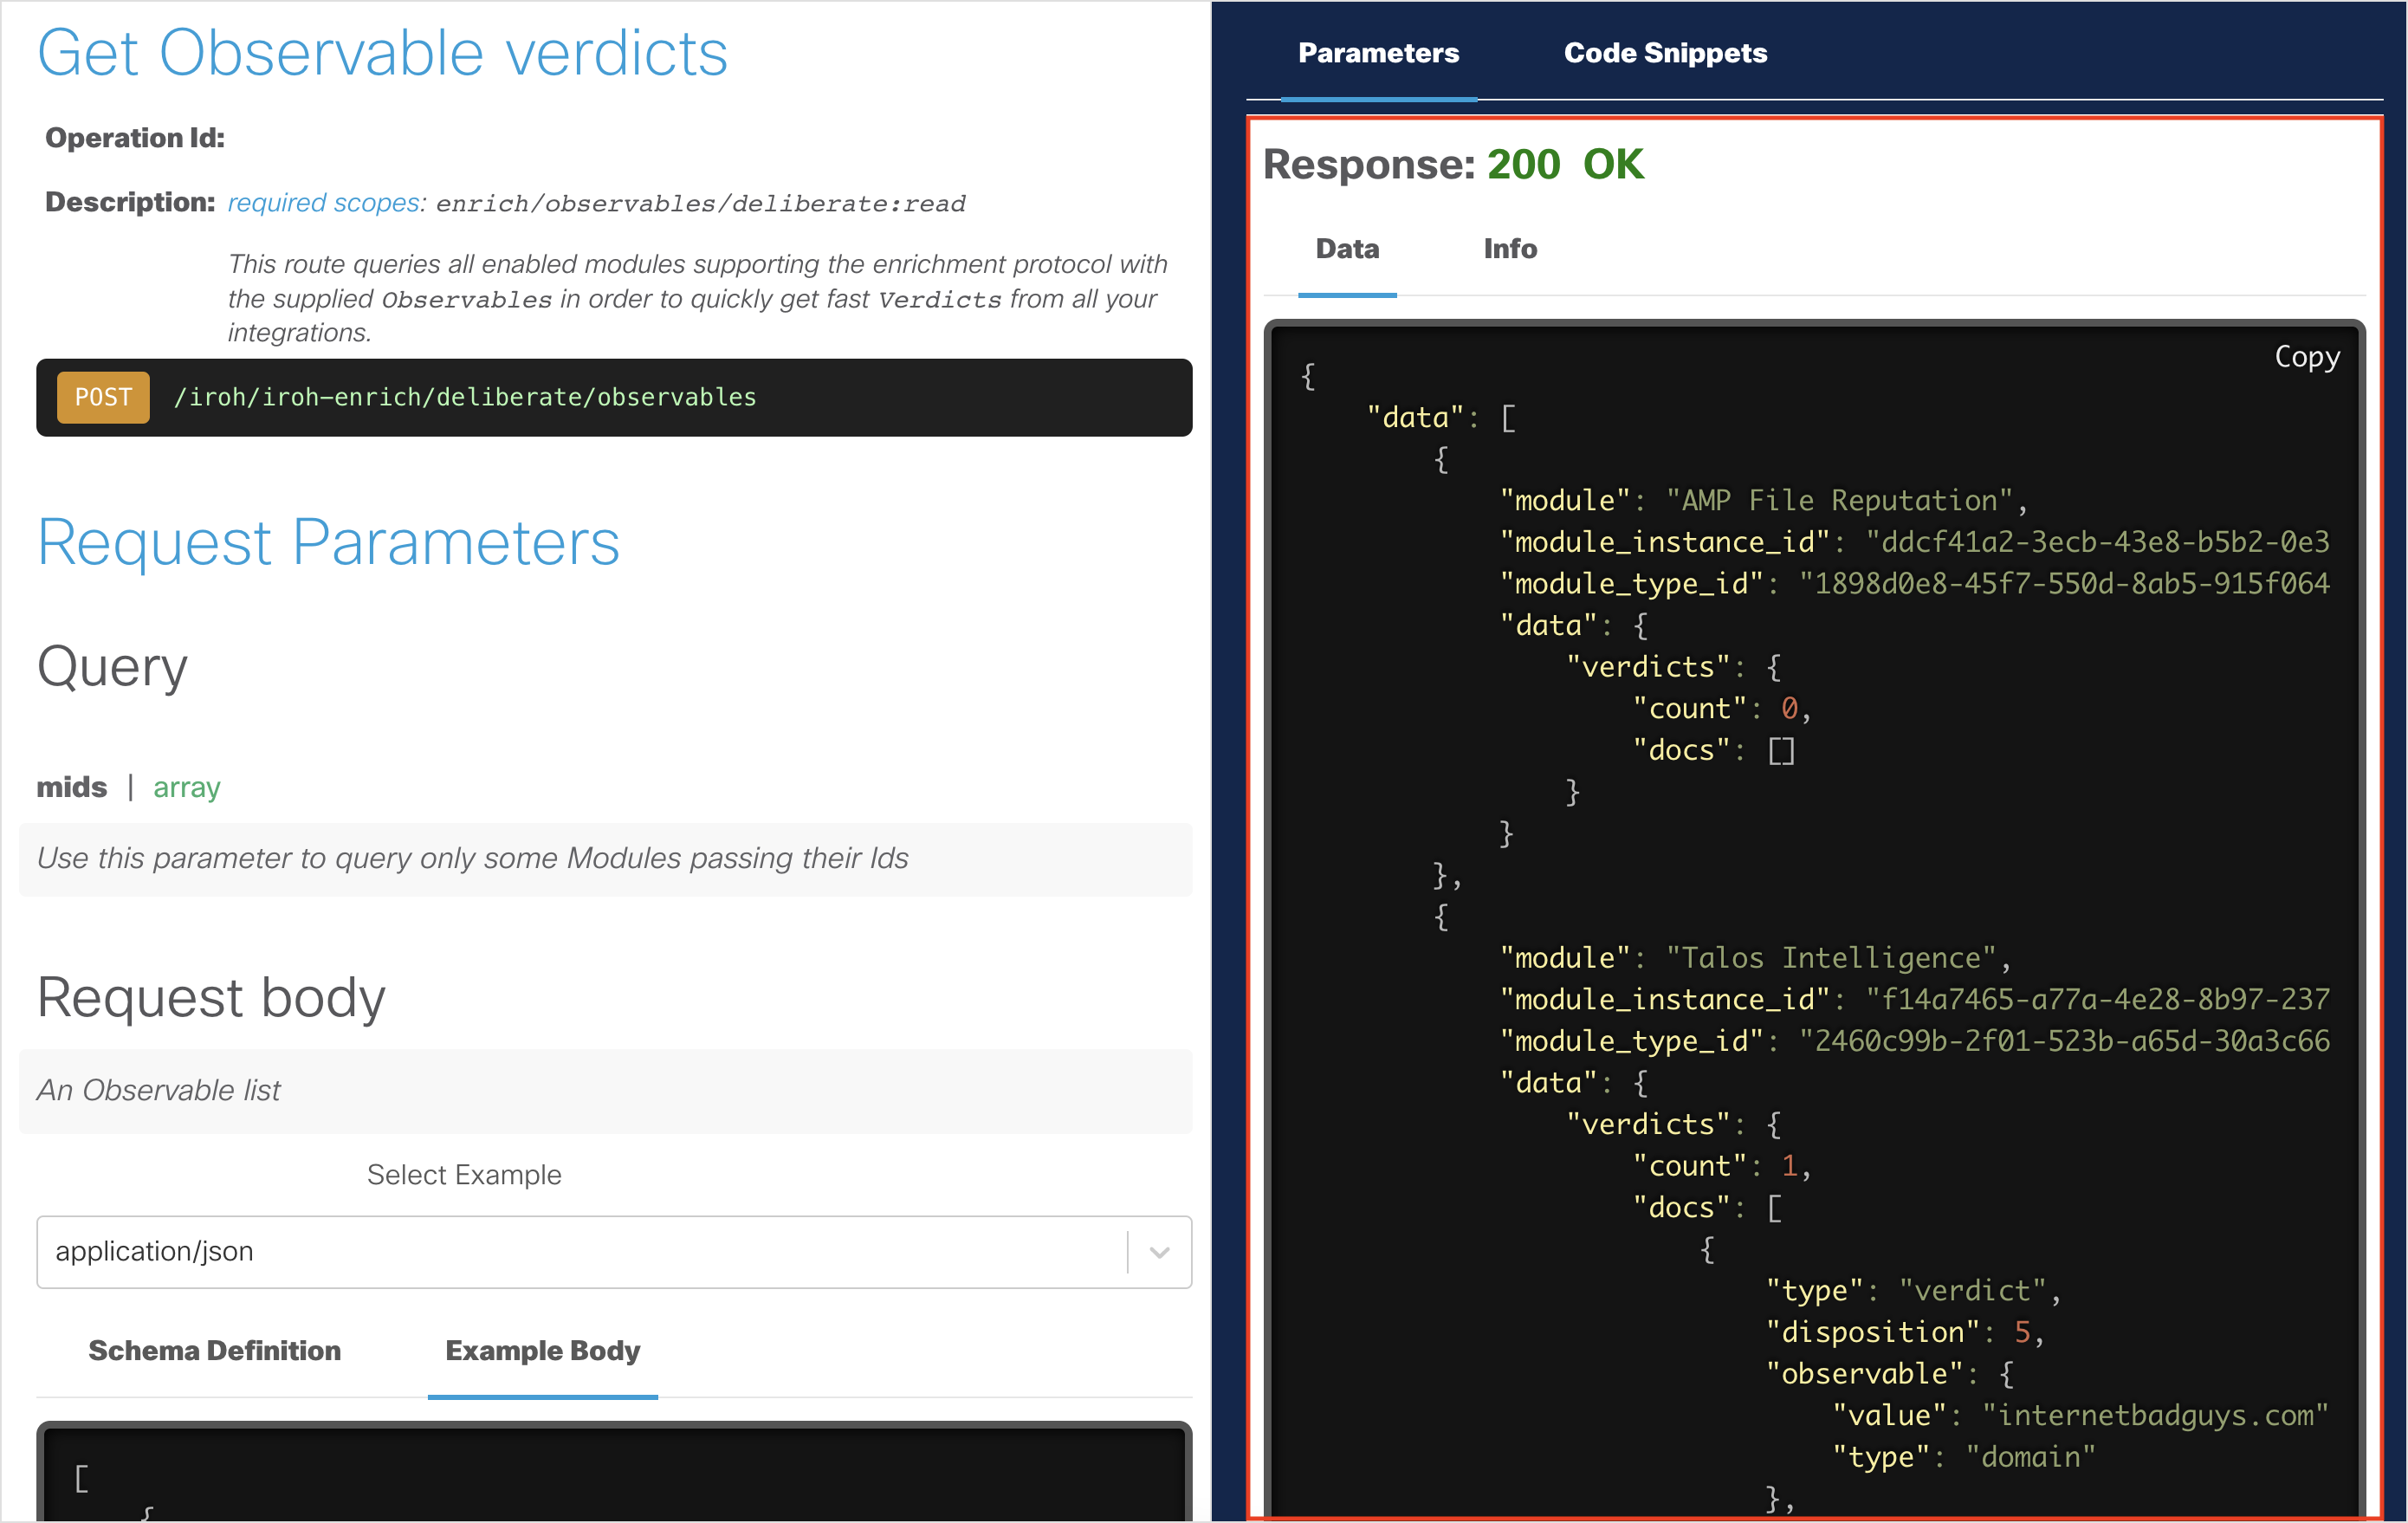
- If you get a
400 Bad Requestresponse, you need to enter some text in the Request Body (JSON) tab. - If you get a
401 Unauthorizedresponse, you may need to re-authorize.- Click the Configuration button and a dialog box will appear.
- Click the Logout button.
- Click the Authorize button.
- Click the Save button. The dialog box will close.
- Click the Run button again in the interactive API explorer.
- If you get a
Inspect the returned data.
- It should automatically return the Verdicts of the Observables for you.
- Observe the Verdict for
internetbadguys.com.
API Request Using Cisco XDR Automation
Cisco XDR automation provides a no-to-low code approach for building automated workflows. These workflows can interact with various types of resources and systems. With Cisco XDR Automation, you can leverage Cisco and third-party multi-domain systems, applications, databases, and network devices in your environment to create workflows. In this section, we will walk you through making API requests with this platform.
Note: There are three default XDR targets to interact with the Cisco XDR APIs for all users. You do not need to generate an access token.
Inspect a Text Object To Extract Observables
Open a browser and go to your Cisco XDR Automation instance. This will be a different URL depending on the region your account is in:
US: https://xdr.us.security.cisco.com/automate/workflows
EU: https://xdr.eu.security.cisco.com/automate/workflows
APJC: https://xdr.apjc.security.cisco.com/automate/workflows
Log in with one of the login options.
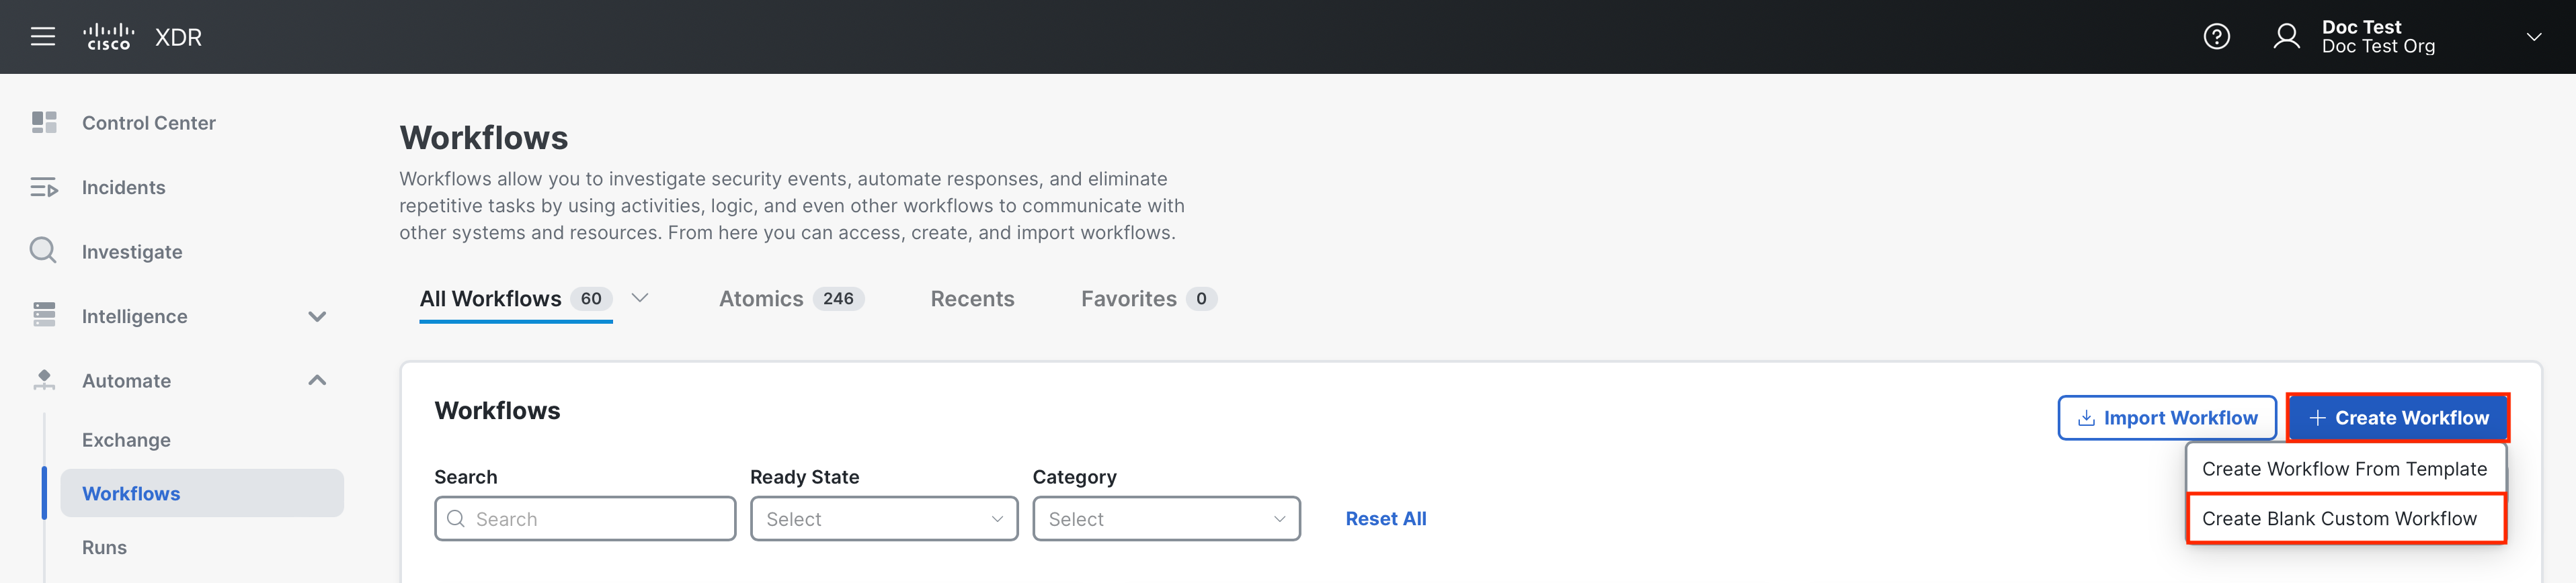
On the Workflows page, click Create Workflow > Create Blank Custom Workflow.
In the Workflows Editor, enter a workflow name in the Display Name field.
In the Activities panel, search for the Threat Response - Inspect for Observables activity and drag and drop it onto the canvas.
In the Properties panel, click the Override workflow target radio button in the Target area and choose Platform APIs from the Target drop-down list.
In the Text to Inspect field, enter any text. For example,
1.2.3.4 foo bar internetbadguys.com.Click Validate to verify that the workflow is valid.
Click Run to execute the workflow and inspect the output to ensure that the workflow ran successfully.
Enrich the Observables by Retrieving the Verdict
You can now create a new workflow or add a new block to your existing workflow.
In the Activities panel, search for the Threat Response - Enrich Observable activity and drag and drop it onto the canvas.
In the Properties panel, click the Override workflow target radio button in the Target area and choose Platform APIs from the Target drop-down list.
In the Observable Type field, enter
domainand in the Observable Value field, enterinternetbadguys.com. Normally, you can also enter the output of you previous Activity blocks by using the Browse Variables icon.Click Validate to verify that the workflow is valid.
Click on Run to execute the workflow and inspect the output to ensure that the workflow ran successfully and view the verdict for this observable.
API Request Using Python SDK
Note: The Cisco Threat Response Python SDK is a module which also can be leveraged for most of the Cisco XDR APIs. Please be aware that this is a legacy SDK that is not actively maintained.
Before you begin, you must install the Cisco Threat Response Python SDK using one of the below methods:
Local
  pip install --upgrade .
  pip show threatresponse
GitHub
  pip install --upgrade git+https://github.com/CiscoSecurity/tr-05-api-module.git[@branch_name_or_release_version]
  pip show threatresponse
PyPi
  pip install --upgrade threatresponse[==release_version]
  pip show threatresponse
Generate an Access Token
Follow the steps to generate an access token:
In an editor of your choice, create a new file.
Copy the below code block into the new file:
from threatresponse import ThreatResponse

client = ThreatResponse(
        client_id='<YOUR TR CLIENT ID>',  # required
        client_password='<YOUR TR CLIENT PASSWORD>',  # required
        region='<YOUR TR REGION>',  # optional
        logger=<SOME LOGGER INSTANCE>,  # optional
        timeout=<SOME TIMEOUT>, # optional
        proxy='<SOME PROXY URL>',  # optional
        environment='<SPECIFIC ENVIRONMENT>' # optional
)
Edit the copied code block by filling out the required fields and filling out or removing the optional fields.
Save the file as a
.pyfile (for example,my_xdr_sdk_script.py):
Note:
client_idandclient_passwordare credentials that must be from an existing API client for accessing the Cisco XDR APIs. For more information on how to create an API client, see the API Clients topic in Cisco XDR help. Make sure to properly set some scopes which will grant the client different (ideally minimum) privileges.regionmust be either:''or'us'(default),'eu','apjc'depending on your region. Other regions are not supported yet.loggermust be an (already configured) instance of the built-inlogging.Loggerclass (or one of its descendants).timeoutmust be a number (intorfloat) specifying the default amount of time (in seconds) to wait for the server to send data before giving up and raising an exception. Can be overwritten by explicitly specifyingtimeouton each request to any endpoint.proxymust be a proxy URL in the format:http[s]://[username[:password]@]host[:port].environmentmust be a dict in the format:{ 'visibility': 'https://www.example.com', 'private_intel': 'https://www.example.come', 'global_intel': 'https://www.example.com', }By default the following configuration will be used:
{
    'visibility': 'https://visibility{region}.amp.cisco.com',
    'private_intel': 'https://private.intel{region}.amp.cisco.com',
    'global_intel': 'https://intel{region}.amp.cisco.com',
}
Inspect a Text Object to Extract Observables
The
Inspectallows you to find an observable in a concrete string. Add the following code block to your Python script:response = client.inspect.inspect({'content': '1.2.3.4 foo bar internetbadguys.com'})Save and then execute your Python script and review the results.
Enrich the Observables by retrieving their Verdict
The
Enrich Observereturns summary for an observable. Add the following code block to your Python script:response = client.enrich.observe.observables( [{'type': 'domain', 'value': 'internetbadguys.com'}] )Save and then execute your Python script and review the results.