Cisco Secure Access Add-On for Splunk Guide
The Cisco Secure Access Add-On for Splunk is a web application that enables the integration of the Cisco Umbrella and Cisco Secure Access event data with the Splunk data platform.
This guide describes how to install and configure the Cisco Secure Access Add-On for Splunk in your instance of Splunk.
The Cisco Secure Access Add-On for Splunk is available at:
https://splunkbase.splunk.com/app/7569
What's New
Version 1.0.55 includes the following changes:
- Fixed an issue that could stall event ingestion at the UTC date boundary.
- Added the Date Boundary Grace Period setting. You can select 30 minutes, 1 hour, 1 hour 30 minutes, or 2 hours (recommended) to control how long the add-on rescans the previous UTC day's S3 folder for late-arriving files after
00:00UTC. Current-day ingestion continues during this period.
For the complete list of release changes, see Changelog: Cisco Secure Access Add-On for Splunk.
Event Log Headers
An event log header identifies the fields in an event log file. When you configure Secure Access or Umbrella to export event logs to an AWS S3 bucket, include headers in the exported files.
The add-on uses the headers to identify and extract event fields. If a new field appears in an existing event type, the add-on uses the header to extract that field without requiring you to reconfigure the input.
Log headers and automatic discovery provide different capabilities:
- Log headers allow the add-on to identify and extract fields within an event type.
- Enable Automatic Discovery allows the add-on to detect a new event type and create its child input.
Installation of the Add-On in Distributed Deployments
You can install the add-on in a distributed deployment of Splunk Enterprise, or any deployment where you use forwarders to retrieve your data. Depending on your environment and preferences, and the requirements of the add-on, you can install the add-on in multiple environments.
We recommend that you only install the add-on using the Splunk heavy forwarder and Splunk indexes.
| Splunk Platform Component | Notes |
|---|---|
| Heavy Forwarder | Recommended. |
| Indexer | Supported if no heavy forwarders are enabled. |
Get Started: Install and Configure the Cisco Secure Access Add-On for Splunk
The add-on supports two data-ingestion methods: Push Security Events and Alerts through a Splunk HTTP Event Collector (HEC) endpoint and exported event data from an AWS S3 bucket. You can configure either method or both. We recommend that you configure Push first so that Splunk receives actionable events and alerts. Then, if you need S3 data, use Event Logs for continuous collection, Event Log Snapshots for a specific historical UTC window, or both.
| Step | Action | More Information |
|---|---|---|
| 1 | Confirm that your environment meets the add-on requirements. | See Prerequisites. |
| 2 | Install the add-on and accept the terms and conditions. | See Download and Install the Add-On and Accept the Terms and Conditions. |
| 3 | Configure Push Security Events and Alerts first so that Splunk receives actionable events and alerts. | See Configure Push Security Events and Alerts. |
| 4A | Add the AWS account that the add-on uses to retrieve data from an S3 bucket. | See Add Your AWS Accounts. Complete this step before step 4B. |
| 4B | (Optional) Configure the Date Boundary Grace Period for Event Logs, and configure one or both S3 collection options:
|
See Configure the Date Boundary Grace Period, Add Event Logs for Umbrella or Secure Access, and Add an Event Log Snapshot. |
| 5 | Verify each data-ingestion method that you configured. If collection fails, inspect the automatically generated child inputs for Event Logs or Event Log Snapshots. | For Push data, see Verify the Data in Splunk. For Event Logs, see Add Event Logs for Umbrella or Secure Access. |
Walkthrough: Cisco Secure Access Add-On for Splunk
Prerequisites
- An instance of Splunk Enterprise or Splunk Cloud Platform that supports Splunk platform versions 10.5, 10.4, 10.3, 10.2, 10.1, or 10.0.
- Splunk Common Information Model (CIM) version 8.x or 6.x if you use CIM mappings.
- A subscription for Cisco Umbrella or Cisco Secure Access.
- To receive Push Security Events and Alerts, an HTTPS Splunk HEC endpoint that Secure Access can reach.
- To retrieve event logs or snapshots from S3:
- An AWS account associated with the configured AWS S3 bucket.
- The credentials and bucket information for your own or a Cisco-managed AWS S3 bucket.
- AWS S3 Access key credentials (AWS Access key ID and secret).
- AWS S3 region.
- AWS S3 bucket name.
- AWS S3 directory prefix.
- Administrative privileges for your Splunk instance and a supported Python runtime. The add-on supports Python 3.9 and 3.13.
Note: You cannot use the Cisco Secure Access Add-On for Splunk with the Splunk Free license.
Download and Install the Add-On
- Navigate to Splunkbase at
https://splunkbase.splunk.com/. - Search for Cisco Secure Access Add-on for Splunk.
- Download the latest Cisco Secure Access Add-On for Splunk software package (
cisco-secure-access-add-on-for-splunk_1055.tar.gz). - Install the Cisco Secure Access Add-On software package on your instance of Splunk.
Accept the Terms and Conditions
In your instance of Splunk, locate the Splunk navigation bar, click Apps, and then select Cisco Secure Access Add-on for Splunk.
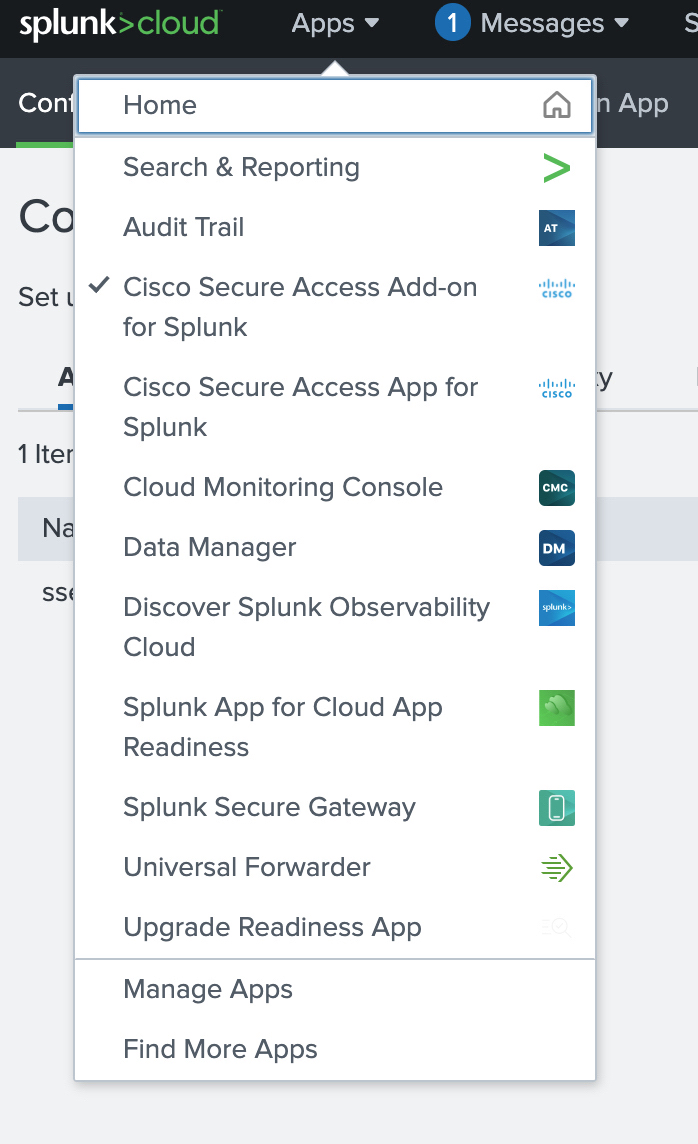
Navigate to Application Settings.
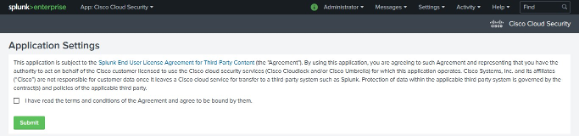
Click I have read the terms and conditions of the Agreement and agree to be bound by them.
Click Submit.
Configure Push Security Events and Alerts
Configure the Cisco Secure Access Add-On for Splunk to receive Secure Access Push Security Events and Alerts through the Splunk HTTP Event Collector (HEC). You can use one HEC token and webhook for both data types. The add-on assigns the appropriate Splunk sourcetype to incoming data.
Complete these tasks in order to configure and verify the integration:
- Create an HEC Token.
- Configure a Secure Access Webhook.
- Configure Security Events or Alerts.
- Verify the Data in Splunk.
Before you begin, obtain the HEC endpoint for your Splunk deployment. Verify that Secure Access can reach this endpoint.
Create an HEC Token
Follow these steps to create an HEC token in the add-on:
In your Splunk instance, from Apps, select Cisco Secure Access Add-on for Splunk.
The Cisco Secure Access Add-On for Splunk opens on the Configuration page.
Select Push Security Events / Alerts.
Select Add.
Configure the token:
Name—Enter a unique token name.
Index—Select the Splunk index where the add-on stores incoming security events and alerts.
If the index that you want to use does not exist, select Create Index, configure the following fields, and then select Save:
- Index Name—Enter a unique index name.
- Index Data Type—Select Events.
- Max Size of Entire Index—Keep the default value or enter the maximum index size, in MB.
Description—(Optional) Describe how the token is used.
Select Add.
In the Token column, select the Copy token to clipboard icon.
Store the token securely. You use this token when you configure the Secure Access webhook.
Configure a Secure Access Webhook
- In Secure Access, create a webhook for a third-party integration. For general webhook requirements, see Overview of Push Security Events.
- Configure the webhook with the HEC endpoint for your Splunk deployment.
- In Password, enter the HEC token that you copied from the add-on.
- Save the webhook.
The webhook is now available for Push Security Events, alert rules, or both.
Configure Security Events or Alerts
Complete the configuration for the data that you want Secure Access to send.
| Data | Configuration |
|---|---|
| Push Security Events | Follow Overview of Push Security Events. Select the Splunk event format, select all event types or specific event types, and associate the webhook with the third-party integration. |
| Alerts | Follow Set Up an Alert Rule in Secure Access for Splunk. Select the webhook when you configure the alert rule. |
Verify the Data in Splunk
- In your Splunk instance, from Apps, select Cisco Secure Access Add-on for Splunk.
- Select Search.
- Search the index that you selected when you created the HEC token.
Splunk receives an initial validation event. As additional data arrives, the add-on automatically assigns the appropriate sourcetype and extracts the event fields.
Walkthrough: Push Security Events and Alerts
Note: The video shows an earlier name for this feature. In the current add-on interface, the feature is named Push Security Events / Alerts.
Add and Manage AWS Accounts
Configure the AWS account that the add-on uses to retrieve Event Logs and Event Log Snapshots from an S3 bucket. You can use a Cisco-managed or self-managed S3 bucket.
The credentials that you need depend on who manages the bucket.
| S3 bucket type | What you configure |
|---|---|
| Cisco-managed | Use the AWS access key and secret provided for the Cisco-managed bucket. To enable automatic credential rotation, also configure a separate Secure Access API key and secret in the add-on. |
| Self-managed | Create and manage the S3 bucket in your AWS account. Configure Secure Access Log Management to export data to the bucket, and provide the AWS credentials that the add-on uses to access it. You are responsible for rotating these credentials. |
Important: AWS S3 credentials and Secure Access API credentials are separate. The AWS credentials allow the add-on to read the S3 bucket. The Secure Access API credentials allow the add-on to rotate credentials for a Cisco-managed S3 bucket.
Add an AWS Account
Before you begin, obtain the AWS access key ID, secret access key, and region for the S3 bucket.
In your Splunk instance, from Apps, select Cisco Secure Access Add-on for Splunk.
The Cisco Secure Access Add-On for Splunk opens on the Configuration page.
Select AWS Accounts.
Select Add.
Enter values for these fields:
- Name—Enter a unique name for the AWS account configuration.
- AWS Access Key Id—Enter the AWS access key ID that allows access to the S3 bucket.
- AWS Secret Access Key—Enter the corresponding AWS secret access key.
- AWS Region—Enter the region that contains the S3 bucket, for example,
us-west-1.
Select Add.
The AWS account appears on the AWS Accounts tab. You can select this account when you configure Event Logs or an Event Log Snapshot.
Configure Automatic Credential Rotation
Configure automatic rotation only for a Cisco-managed S3 bucket. Secure Access API credentials allow the add-on to obtain replacement AWS credentials and update the configured account automatically.
Note: Version 1.0.54 applies the configured proxy settings to Key Rotation API flows as well as S3 input.
Before you begin, obtain a Secure Access API key and secret that are authorized to rotate the credentials for the Cisco-managed S3 bucket.
- In your Splunk instance, from Apps, select Cisco Secure Access Add-on for Splunk.
- Select AWS Accounts.
- Locate the account for the Cisco-managed S3 bucket.
- In Configure & Auto-rotate Keys, select Configure API Keys.
- Enter the Secure Access API key and secret.
- Enable automatic rotation, and then save the configuration.
The add-on uses the Secure Access API credentials to rotate the AWS credentials for the Cisco-managed S3 bucket. Automatic rotation does not apply to a self-managed S3 bucket.
Regenerate Credentials Manually
Regenerate credentials when you need to rotate the AWS credentials immediately. You might also use this option when other authorized integrations access the same Cisco-managed S3 bucket.
Important: After you regenerate the credentials, update every other integration that uses the previous AWS credentials.
- On the AWS Accounts tab, locate the account for the Cisco-managed S3 bucket.
- In Regenerate Keys, select Regenerate Keys.
- Copy the regenerated AWS access key and secret.
- Store the credentials securely and update any other authorized integrations that access the bucket.
The add-on updates its AWS account configuration with the regenerated credentials.
Configure the Date Boundary Grace Period
Configure how long the add-on continues to scan the previous UTC day's S3 folder after 00:00 UTC for files that arrive late. The add-on also scans the current day's folder during this period, so current-day ingestion continues. This setting applies to Event Logs, not Event Log Snapshots.
In your Splunk instance, from Apps, select Cisco Secure Access Add-on for Splunk. The Cisco Secure Access Add-On for Splunk opens on the Configuration page.
Select Add-on Global Settings.
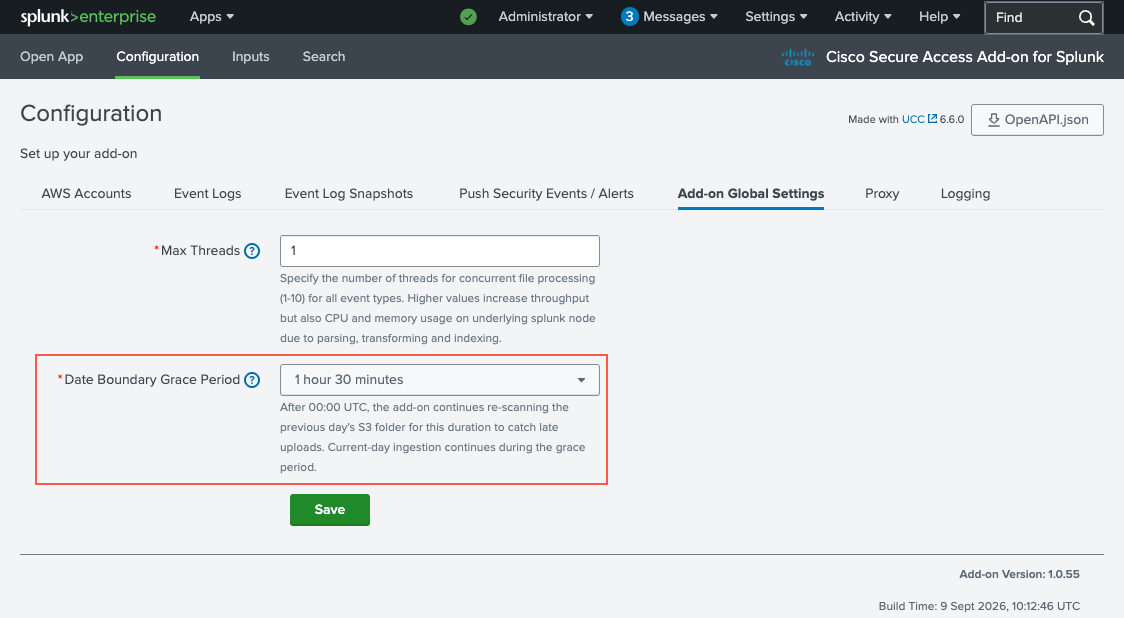
Select one of the following options for Date Boundary Grace Period:
- 30 minutes
- 1 hour
- 1 hour 30 minutes
- 2 hours (recommended)
Select Save.
Add Event Logs for Umbrella or Secure Access
Configure Event Logs to continuously retrieve Umbrella or Secure Access event data from an AWS S3 bucket. The add-on processes each line in a log file as a separate Splunk event.
Use Event Logs for ongoing collection. To retrieve events from a completed historical time window, use Add an Event Log Snapshot.
Before you begin:
- Configure Secure Access or Umbrella to export event logs to an AWS S3 bucket and include headers in the exported files. For more information, see Event Log Headers.
- Add and configure the AWS account that the add-on uses to access the S3 bucket.
Important: If you upgrade the add-on, reenter the AWS Secret Access Key.
Important: After you create an Event Logs configuration, you cannot change Default Start Date & Time (UTC). The field is read-only when you edit the configuration.
The event-type settings provide these capabilities:
- Select All creates inputs for every event type that the add-on currently detects in the bucket. We recommend this option unless you need only specific event types.
- Specific types creates inputs only for the event types that you select.
- Enable Automatic Discovery creates inputs when the add-on detects new log types in the bucket.
- Log headers allow the add-on to detect and extract new fields in the log files. For more information, see Event Log Headers.
Follow these steps to configure continuous event collection:
In your Splunk instance, from Apps, select Cisco Secure Access Add-on for Splunk.
The Cisco Secure Access Add-On for Splunk opens on the Configuration page.
Select Event Logs.
Select Add.
Enter values for these fields:
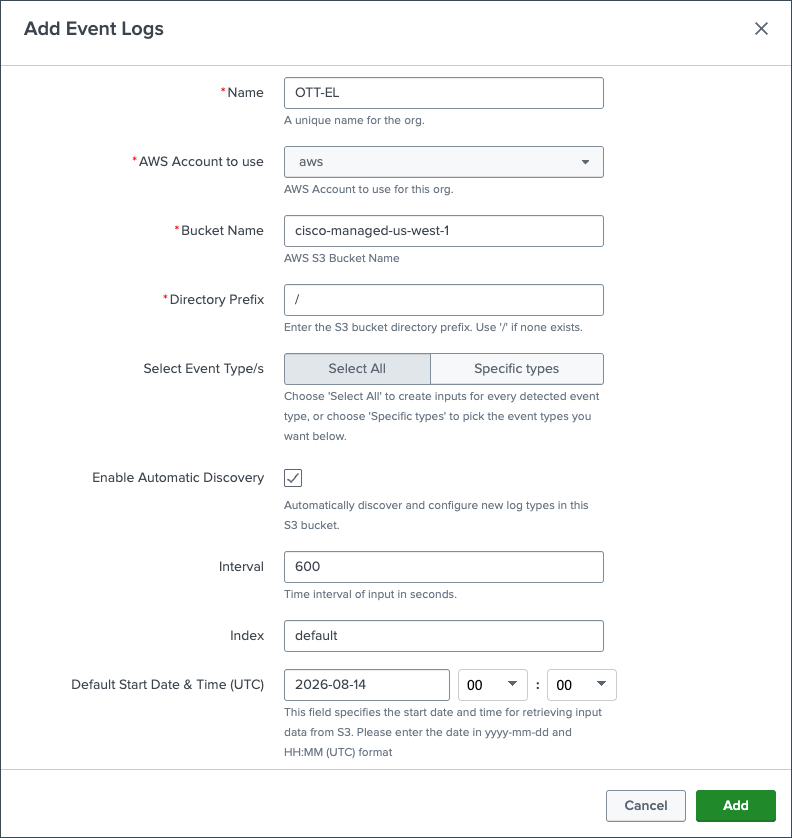
- Name—Enter a unique name for the Event Logs configuration.
- AWS Account to use—Select the AWS account that you configured in the add-on.
- Bucket Name—Enter the name of the AWS S3 bucket, for example,
cisco-managed-us-west-1. - Directory Prefix—Enter the S3 bucket directory prefix, for example,
/dnslogs. If no directory prefix exists, enter/. - Select Event Type/s—Select one of these options:
- Select All—Create inputs for every detected event type.
- Specific types—Create inputs only for the event types that you select.
- Enable Automatic Discovery—(Optional) Check this option to discover new log types and configure their inputs automatically.
- Interval—Enter how frequently, in seconds, the add-on retrieves data. We recommend
600seconds. - Index—Enter the Splunk index where the add-on stores the events. We recommend that you do not use the
defaultindex. - Default Start Date & Time (UTC)—Select the date and time, in UTC, when the add-on starts retrieving events. The current date is selected by default, the time defaults to
00:00, and past dates are unavailable. The date uses theYYYY-MM-DDformat.
Select Add.
The add-on creates a child input for each applicable event type. You do not need to create the child inputs from the Inputs page.
Select Search.
Search the configured index to verify that Splunk receives the event data.
Use the Event Logs tab to manage the configuration. Use Inputs only to inspect the status of automatically generated inputs or troubleshoot collection problems.
Add an Event Log Snapshot
Add an event log snapshot to retrieve events from a specific historical time window in an AWS S3 bucket. You can add filters to retrieve only rows that match specified field values.
Note: The end of the snapshot window must be later than the start and strictly earlier than the current time.
In your Splunk instance, from Apps, select Cisco Secure Access Add-on for Splunk.
The Cisco Secure Access Add-On for Splunk opens on the Configuration page.
Select Event Log Snapshots.
Select Add.
Enter values for these fields:
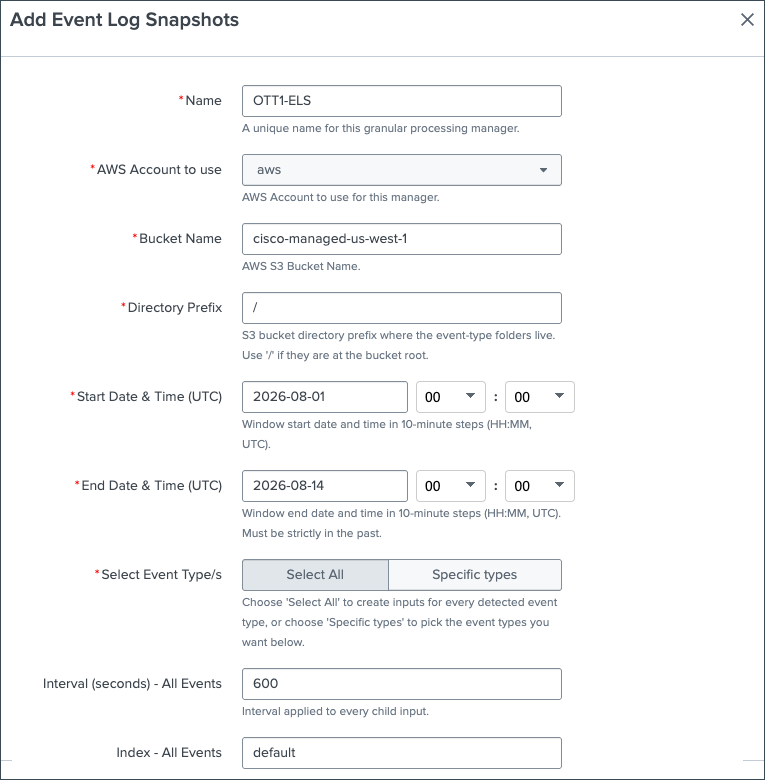
- Name—Enter a unique name for the event log snapshot.
- AWS Account to use—Select an AWS account that you configured in the add-on.
- Bucket Name—Enter the AWS S3 bucket name.
- Directory Prefix—Enter the S3 bucket directory prefix where the event-type folders are stored. If the folders are at the bucket root, enter
/. - Start Date & Time (UTC)—Select the beginning of the historical time window. The time uses 10-minute increments.
- End Date & Time (UTC)—Select the end of the historical time window. The time uses 10-minute increments, and the value must be strictly in the past.
- Select Event Type/s—Select one of these options:
- Select All—Create inputs for every detected event type.
- Specific types—Select the event types that you want to retrieve.
- Interval (seconds) - All Events—Enter the interval to apply to every child input. The default is
600seconds. - Index - All Events—Enter the Splunk index where the add-on stores the retrieved events.
(Optional) Configure filters:
Leave Filters empty to retrieve all rows in the selected time window.
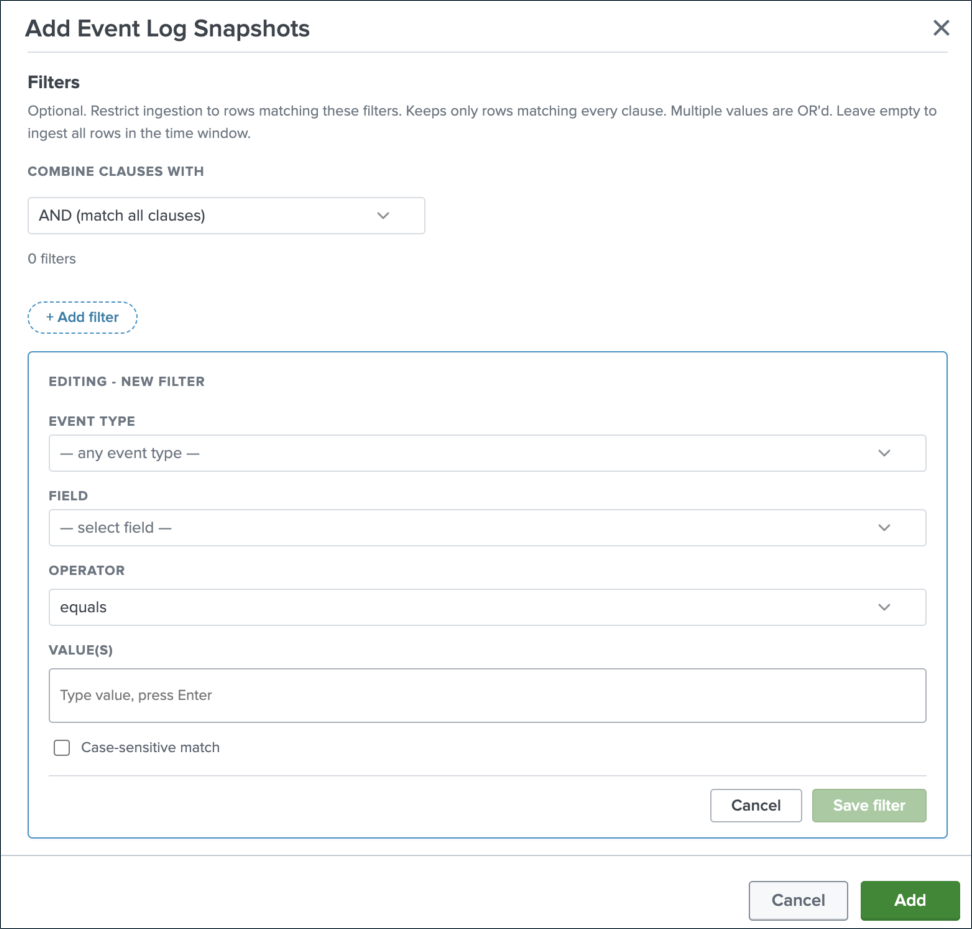
- From COMBINE CLAUSES WITH, select AND to require every clause to match or OR to require any clause to match.
- Select Add filter.
- Configure the filter:
- EVENT TYPE—Select an event type, or select any event type to apply the filter to all event types.
- FIELD—Select the event field to evaluate.
- OPERATOR—Select the comparison operator.
- VALUE(S)—Enter a value and press Enter. Enter additional values as needed. Multiple values in one clause are combined with OR.
- Case-sensitive match—Check this option to match uppercase and lowercase letters exactly.
- Select Save filter.
- Repeat these steps to add more filter clauses.
Select Add.
The snapshot appears on the Event Log Snapshots tab. The add-on creates child inputs for the selected event types.
Manage Event Log Snapshots
Use the Inputs page to activate, deactivate, edit, clone, or delete an event log snapshot input.
In your Splunk instance, from Apps, select Cisco Secure Access Add-on for Splunk.
The Cisco Secure Access Add-On for Splunk opens on the Configuration page.
Select Inputs.
Locate Event Log Snapshots in the Input Type column.
To activate or deactivate the input, set Status to Active or Inactive.
To edit, clone, or delete the input, select the edit, clone, or delete icon in Actions.
Contact Support
- If you have questions about configuring the data inputs for Umbrella in the Cisco Secure Access Add-On, contact Cisco Umbrella Support.
- If you have questions about configuring the data inputs for Secure Access in the Cisco Secure Access Add-On, contact Cisco Support.