Getting started with Cisco Unified Contact Center Express
Get a Unified CCX system
Unified CCX is available in three packages (Standard - available for 11.0 and below, Enhanced, Premium) tailored to meet different customer contact requirements. CTI Protocol, Configuration APIs, and the Unified CCX Editor are available with all three license packages.
I already have a Unified CCX system
If you already have a working Unified CCX system, you can skip this section.
I need a Unified CCX system
DevNet provides FREE 24 X 7 hosted labs for integrating and working with Cisco technologies such as Cisco Unified Contact Center Express. Unified CCX with a premium license is available in multiple versions via reservation based DevNet Sandboxes:
Reservation based sandboxes are private preconfigured lab with all resources dedicated to you for the duration of the reservation. You have the ability to install your own application and share the lab with other users.
Getting started with using the CTI Protocol
Unified CCX provides CTI Protocols for performing agent and supervisor actions programmatically. Bridge mode allows developers to receive all agent and supervisor messages to build a reporting/monitoring application. The CTI Protocol Developer Guide explains the details of each CTI protocol message.
The Unified CCX CTI Protocol can be used to:
- Integrate agent and supervisor actions into existing applications
- Build a custom agent and supervisor desktop
- Build a reporting/monitoring application
How do I get started?
The CTI Protocol Developer Guide gives an overview on how to open a session with the CTI Server, maintain session, handle CTI events, and make third party requests to server. Since the guide is fairly large, here are some suggested chapters:
- Defining Unified CCX CTI Messages
- Managing Sessions
- Managing Configuration Data
- Managing Agent States
After reading the above chapters, in your application, you need to do the following:
- Establish a TCP connection to the Unified CCX server.
- Use the OPEN_REQ message to initialize a communications session with Unified CCX.
- Your application should receive an OPEN_CONF message to signify a successful connection.
- You can now send different CTI Protocol messages depending if you want to receive configuration information, request agent state changes, etc.
- When your application is done sending these messages, you need to close the session by sending the CLOSE_REQ.
- Your application should receive a CLOSE_CONF to signify a successful disconnect.
- Close the TCP connection.
Getting started with using the Configuration API
Unified CCX provides Configuration REST APIs for performing administrative configuration to the Unified CCX system. These REST APIs are easy to use, modeled after HTTP, and works in thick and thin client integrations. The Configuration API Developer Guide explains the details for each of the APIs.
The Unified CCX Configuration APIs can be used to:
- Build an administrator application similar to the Unified Administrator Console
- Automate the configuration of the Unified CCX system.
Try them out!
The best way to learn about the Configuration REST APIs is to use them and see how easy it is. Before diving into programmatically calling the REST APIs, it is good to get a better understanding of the APIs by trying them out manually using a REST client. There are many REST client tools available, and you can use whichever tool you are most comfortable with, but Postman will be used for the examples on this page.
- Install a REST client:
- Download and install Postman by going to http://www.getpostman.com.
- Perform the following steps to configure Postman to accept self-signed certificates:
- In Postman, at the upper-right corner, click the wrench icon and choose Settings from the drop-down menu.
- In the Request section, set SSL certificate verification to OFF.
- Dismiss the Settings window by clicking X in the upper-right corner of the window.
- Make your first Configuration REST API call
- In Postman, open a new tab or click the Reset button to clear any previously entered data.
- Construct a REST GET request for the
/agentstatsresource.In the field marked Enter request URL here, put the URL for the Configuration API
/agentstatsresource:http://<uccx-server>/adminapi/agentstatswhereis the FQDN of the UCCX server. From the request method dropdown menu, select GET.
Select the Authorization tab, and select Basic Auth. A form containing username and password fields appear.
For the Basic Auth username value, enter the UCCX administrator username
For the Basic Auth password value, enter the UCCX administrator password
Click the Update request button to generate an authorization header.
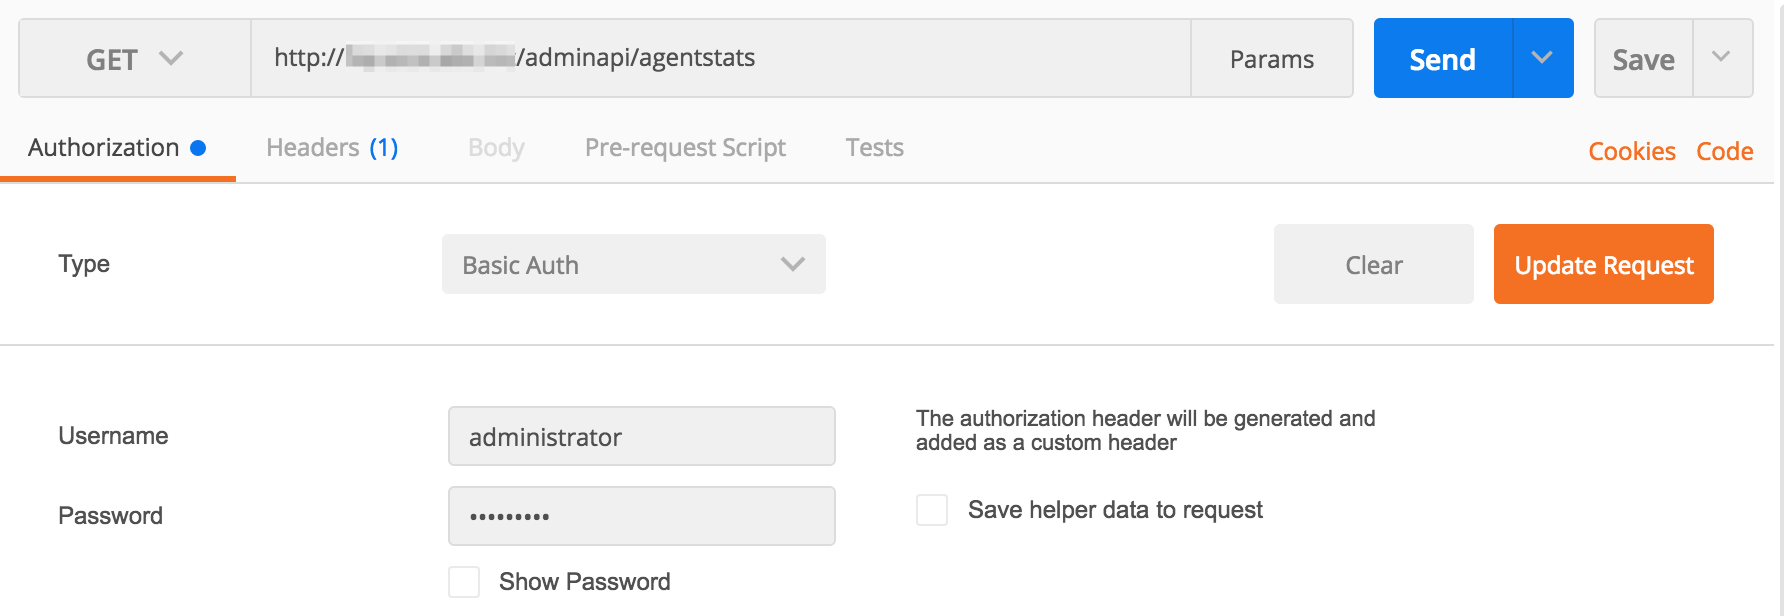
Click the Send button to launch the request.
If the request is successful, you should get a HTTP status of 200 OK and see some XML formatted data with the agent statistics. Since there aren't any agents logged in, all of the values should be 0.
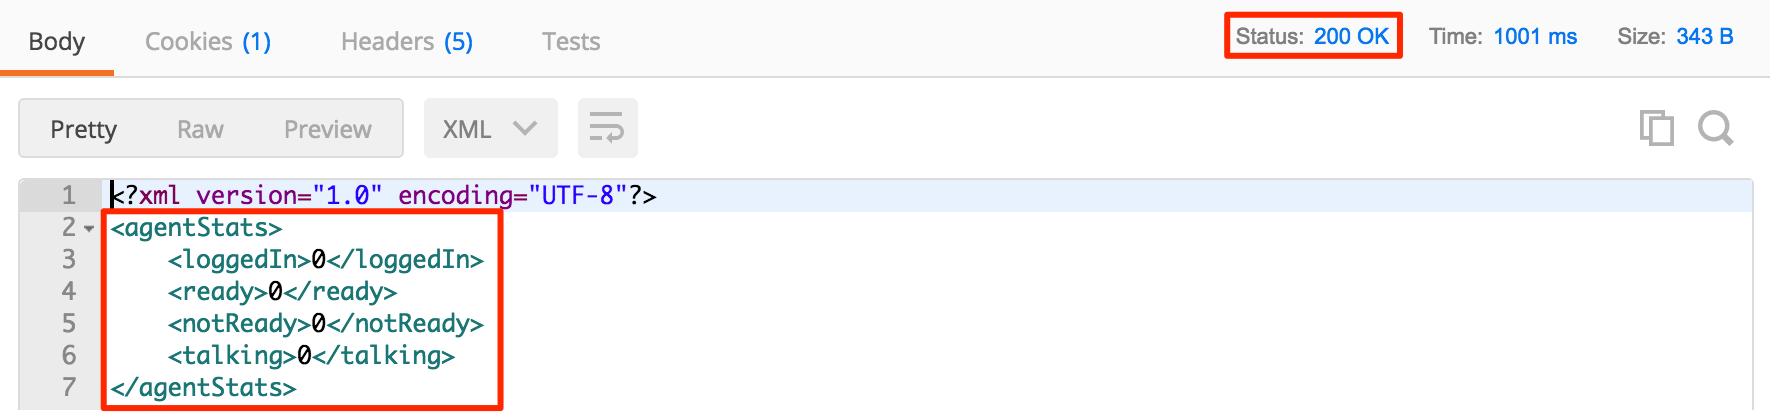
Optional: Login an agent using the Finesse and redo these steps. Your HTTP response body should be look like this:
<?xml version="1.0" encoding="UTF-8"?>
<agentStats>
      <loggedIn>1</loggedIn>
      <ready>0</ready>
      <notReady>1</notReady>
      <talking>0</talking>
</agentStats>
Getting started with using the Scripting
Unified CCX allows customers to build custom scripts for
Try them out!
- Verify that your client machine meets the technical specifications necessary to install the Cisco Unified CCX Editor.
- Download the Cisco Unified CCX Editor from the Cisco Unified CCX Administration web interface:
Using a Windows client, open a new browser window and go to https://<UCCX_FQDN>/appadmin to open the Cisco Unified CCX Administration web interface.
Log into the Cisco Unified CCX Administration web interface by entering the Unified CCX Administrator username and password.
From the Cisco Unified CCX Administration menu bar, choose Tools > Plug-ins.
The Plug-ins web page appears.
Click the Cisco Unified CCX Editor hyperlink.
The Download Cisco Unified CCX Editor web page appears.
Click Download and execute the Cisco Unified CCX Editor installer.
Depending on your browser and its configuration, either a File Download dialog
box or a Save As dialog box appears.
Using either the File Download dialog box or the Save As dialog box, choose a directory in which to store the executable file that contains the Cisco Unified CCX Editor
Click Save.
The Cisco Unified CCX Editor executable file begins downloading.
- Install the Cisco Unified CCX Editor on your Windows computer:
In the directory where you stored the downloaded Cisco Unified CCX Editor executable file, double-click Cisco Unified CCX Editor.exe.
The InstallAnywhere Wizard appears and begins extracting files for the
installation. (This process may take a few minutes.)
At the Introduction prompt, click Next.
The Choose Install Folder dialog box appears.
Perform one of the following actions:
Click Next to accept the default directory option, C:\Program Files\wfavvid_<UCCX_VERSION> for Windows XP and C:\Program Files (x86)\wfavvid__<UCCX_VERSION> for Windows 7.
The Select Components dialog box appears.
Perform the following procedure to choose a different destination:
Click Choose....
The Browse For Folder dialog box appears.
Browse to the desired location, and then click OK.
The Browse For Folder dialog box closes, and the destination appears in the Where Would You Like To Install? dialog box.
Click Next.
The Pre-Installation Summary dialog box appears.
Review the Installation Summary.
Click Next to start the install.
The Installing Cisco Unified CCX Editor_<UCCX VERSION> dialog box appears and the Cisco Unified CCX Editor is installed at the chosen destination. (This process may take a few minutes.)
The Install Complete dialog box appears when the installation is finished.
Restart the system by clicking Done in the Install Complete dialog box.
The system will restart.
- Open the Cisco Unified CCX Editor by doing the following:
Select Start > Programs > Cisco Unified CCX Editor_<UCCX VERSION> > Cisco Unified CCX Editor.
The Editor Login dialog box appears.
Choose one of the following login options:
- To connect directly to the Unified CCX server: Enter a valid User Identification, Password, and Cisco Unified CCX Server for a Cisco Unified CCX cluster and click Log On.
The Name and Password value for the Cisco Unified CCX Editor is the same
your Cisco Unified CCX Administration Name and Password value. * To use the Cisco Unified CCX Editor separate from the Unified CCX server: Click Log On Anonymously.
- Make a copy of a sample script and try out the different steps available! Sample scripts are located under:
- C:\Program Files\wfavvid_<UCCX_VERSION>\Scripts\system\default for Windows XP
- C:\Program Files (x86)\wfavvid_<UCCX_VERSION>\Scripts\system\default for Windows 7.
How do I get help?
Unified CCX FAQs
Take a look at the Unified CCX Frequently Asked Questions to see if your question is already answered.
Unified CCX Forums
If you have questions about developing with, post your question to the appropriate forum: