Http Forward Step
Use the Http Forward step to forward an HTTP or HTTPS request to an internal URI deployed under the document repository \default\webapps\ROOT (the default web applications folder) or \default\webapps\<your web apps> folder. The URI can be a JSP page, which would permit dynamic content generation, or any other resource like an HTML page for static content generation.
Internal URI paths are defined starting at the \default\webapps\ROOT folder. For example, a JSP page stored as:
-
/default/webapps/ROOT/hello.jsp would be referenced using the URI path hello.jsp.
-
/default/webapps/ROOT/help/help.jsp would be referenced using the URI path /help/help.jsp.
It is also possible to store war files under /default\webapps/ folder which would be automatically expanded by the internal web server and define new web applications that would be referenced using the URI path <war file name>/<resource filename>.
Use the HTTP Forward step to use Java Server Pages to generate dynamic output to a browser.
The HTTP Forward step lets you define local variables that you can pass to the JSP. When the HTTP Forward step executes, these variables are passed as parameters to the JSP. The JSP uses these parameters to format the output that is sent to the user.
You can use the HTTP Forward step instead of the Keyword Transform Document step (see the Keyword Transform Document Step if you are already using JSP or if you need the full capabilities of the Java programming language.
A script should use only one of the following steps from the Http Contact palette to respond to an HTTP or HTTPS request:
-
Http Redirect
-
Http Forward
-
Http Include
-
Send Http Response
If you use the Http Forward step, you should not use either a Http Redirect or Send Response step in the same sequence within a script, because using any one of these three steps moves the Http Contact into a final state when the response is returned back to the browser. The script cannot attempt to send another response back because one has already been sent. If, however, a script has some conditional logic, you can use one of these three steps in one condition and another in another condition.
Note | You can also use the Reject and Terminate steps from the Contact palette as responses to an HTTP or HTTPS request. For more information, see“Contact Steps” section on page 2-34.. |
With JSP, you can access the parameter value by creating a parameter bean and by retrieving the parameter passed by the HTTP Forward step. The following example, which you create using a text editor, shows how to access and retrieve the parameter name.
Note | This file would be uploaded to the Document repository’s default/webapps/ROOT folder. |
Sample JSP file (hello.jsp) for Accessing a Parameter
<html>
<body>

<!-- Create the "parameters" bean -->
<jsp:useBean id="parameters" type="java.util.Dictionary" scope="request"/>

<!-- Retrieve the parameter "name" -->
Hello <%= parameters.get("name") %>

</body>
</html>
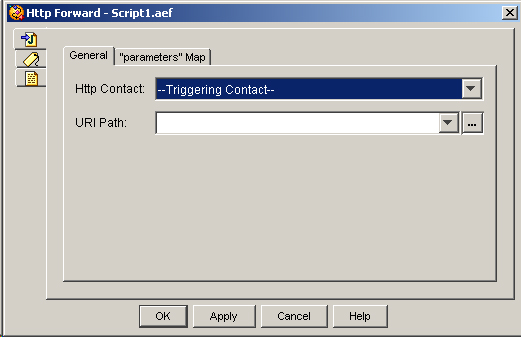
Figure shows the customizer window, General tab for the HTTP Forward step.
The following table describes the properties of the HTTP Forward customizer window—General tab:
|
Properties / Buttons |
Description |
||
|---|---|---|---|
|
Http Contact |
Contact variable that triggers the execution of the step. Default is Triggering Contact, unless another contact is specified. |
||
|
URI Path |
Supports HTTP and HTTPS triggers. Relative URI path from either the ROOT or user-installed web applications.
|
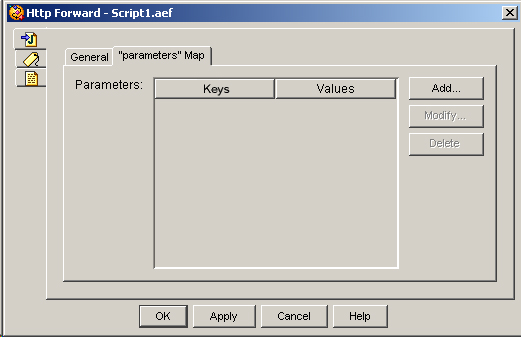
Figure shows the Http Forward Customizer Window "parameters" Map tab.
The following table describes the parameters of the HTTP Forward customizer window—"parameters" Tab:
|
Property |
Description |
||
|---|---|---|---|
|
Parameters (Keys and Values) |
Keywords in the JSP form and the corresponding variables to be mapped to the keywords in the JSP form. The JSP page expects to receive this information in the form of a java.util.Hashtable stored in the parameters HTTP Request Header. The keys of the hash table will correspond to the keywords and the value is the variable’s value at the time the step is executed. |
||
|
Add / Modify (buttons) |
Use these buttons to access the Parameter dialog box. Use the dialog to specify the following:
When done, click OK.
|
||
|
Delete (button) |
To remove JSP information, highlight a value in the list and click Delete. |