Network Automation With Crosswork APIs
Cisco Crosswork provides APIs to perform nearly every function that can be performed using the product GUI, as well as some functions that cannot be performed, or are difficult to perform, from the GUI.
To demonstrate these capabilities, this document presents several practical scenarios, with API calls and, where relevant, example request responses. These will help you get an understanding of how you can use Crosswork API to manage your organization's network on a routine basis.
Please note: All of the figures in this document demonstrating API use were created using Postman and Cisco Crosswork Change Automation and Health Insights version 3.2. In many cases, you will need to modify the Body contents shown in each figure to meet the requirements of your environment.
End-to-End Device Management Using APIs
The workflow illustrated in the figure below lists all the stages required to manage network devices from start to finish -- from onboarding a new device to Cisco Crosswork and Cisco Network Services Orchestrator, to retiring the device.
In the following examples, we will assume that our intent is simple: Bring a new device, recently installed on the network, under Crosswork management. Then monitor it using Key Performance Indicators (KPIs), and watch for alerts from the KPIs. You can troubleshoot problems using Change Automation Playbooks. For each step in the workflow, we will present the corresponding APIs to achieve this intention.
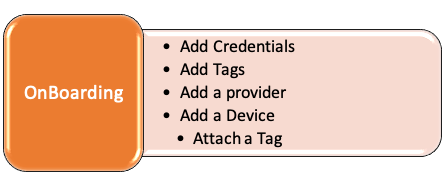
Section 1: OnBoarding Devices
In this section, we will perform the steps needed to onboard a device to Crosswork using only API calls.
Step 1: Generate Ticket and Token
All API requests must be authenticated. The Crosswork user whose credentials you use must have admin access to the server in order to execute API requests.
To get this authorization, we must first generate a ticket using a POST request and the Crosswork crosswork/sso/v1/tickets API. We will need to supply the Crosswork username and password with the request, as shown in the figure below.
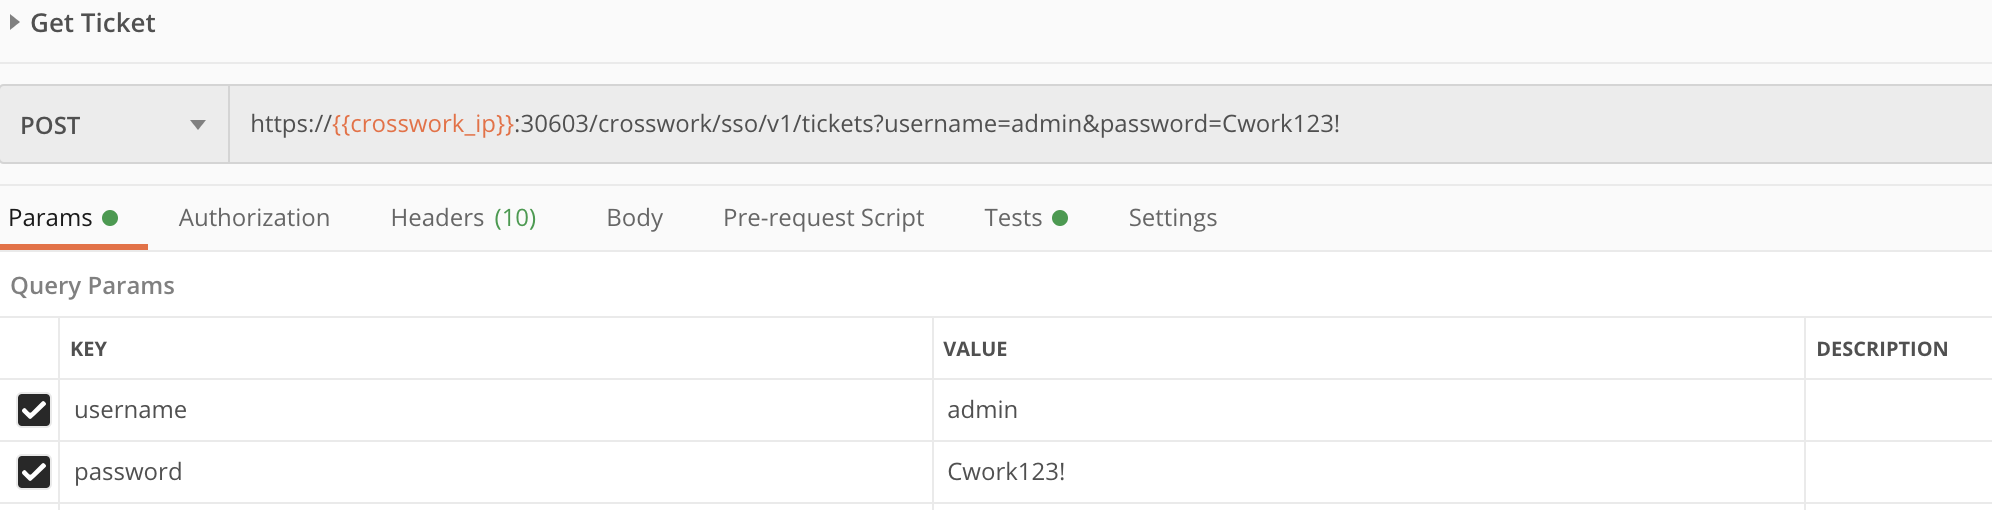
We can then use another POST request and the same tickets API, this time supplying the {{ticket}} variable in the request, instead of the username and password. We can then copy and use the token from the result to authenticate our later Crosswork API requests.

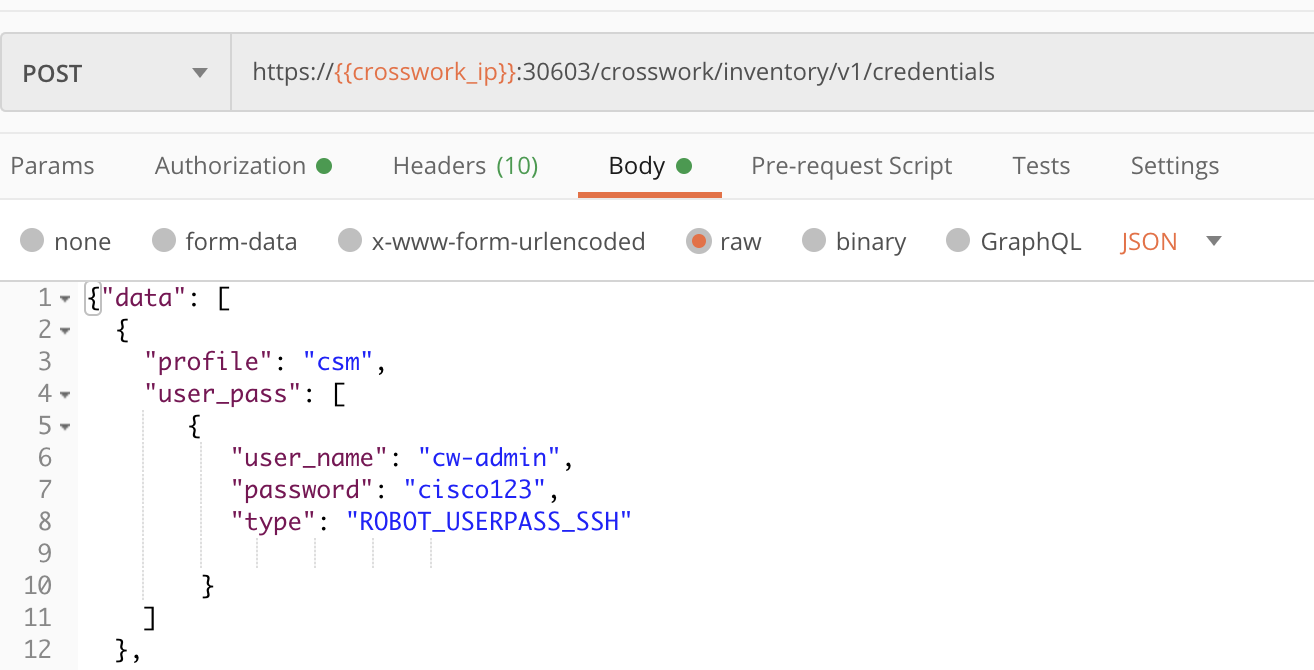
Step 2: Add Credential Profiles
Crosswork uses Credential Profiles to store the IDs and passwords used to authorize access to devices, providers and the other systems and devices with which Crosswork communicates. The following figure demonstrates how to form a POST request using the crosswork/inventory/v1/credentials API. Values for the profile name, user_name, password and type parameters are required. You will need to modify the Body contents shown in the figure to meet the requirements of your environment.
You can re-use the Credential Profile with many devices if they share the same IDs and passwords. If you need to onboard multiple new devices with differing credentials, you can repeat this request with different values to create as many Credential Profiles as you need.
Step 3: Add tags
Crosswork uses Tags to identify and group devices. The following figure shows how to form a POST request using the crosswork/inventory/v1/tags API to create tags. Values for the tag name and category parameters are required.

Step 4: Add a Provider
Crosswork providers perform special services for Crosswork users, such as managing segmented routes or maintaining additional inventory information. In this step, we will create a Cisco NSO provider. The following figure shows how to form a POST request using the crosswork/inventory/v1/providers API to create a new provider. Values are required for the provider name, credential profile, category and connectivity_info parameters in the request body.

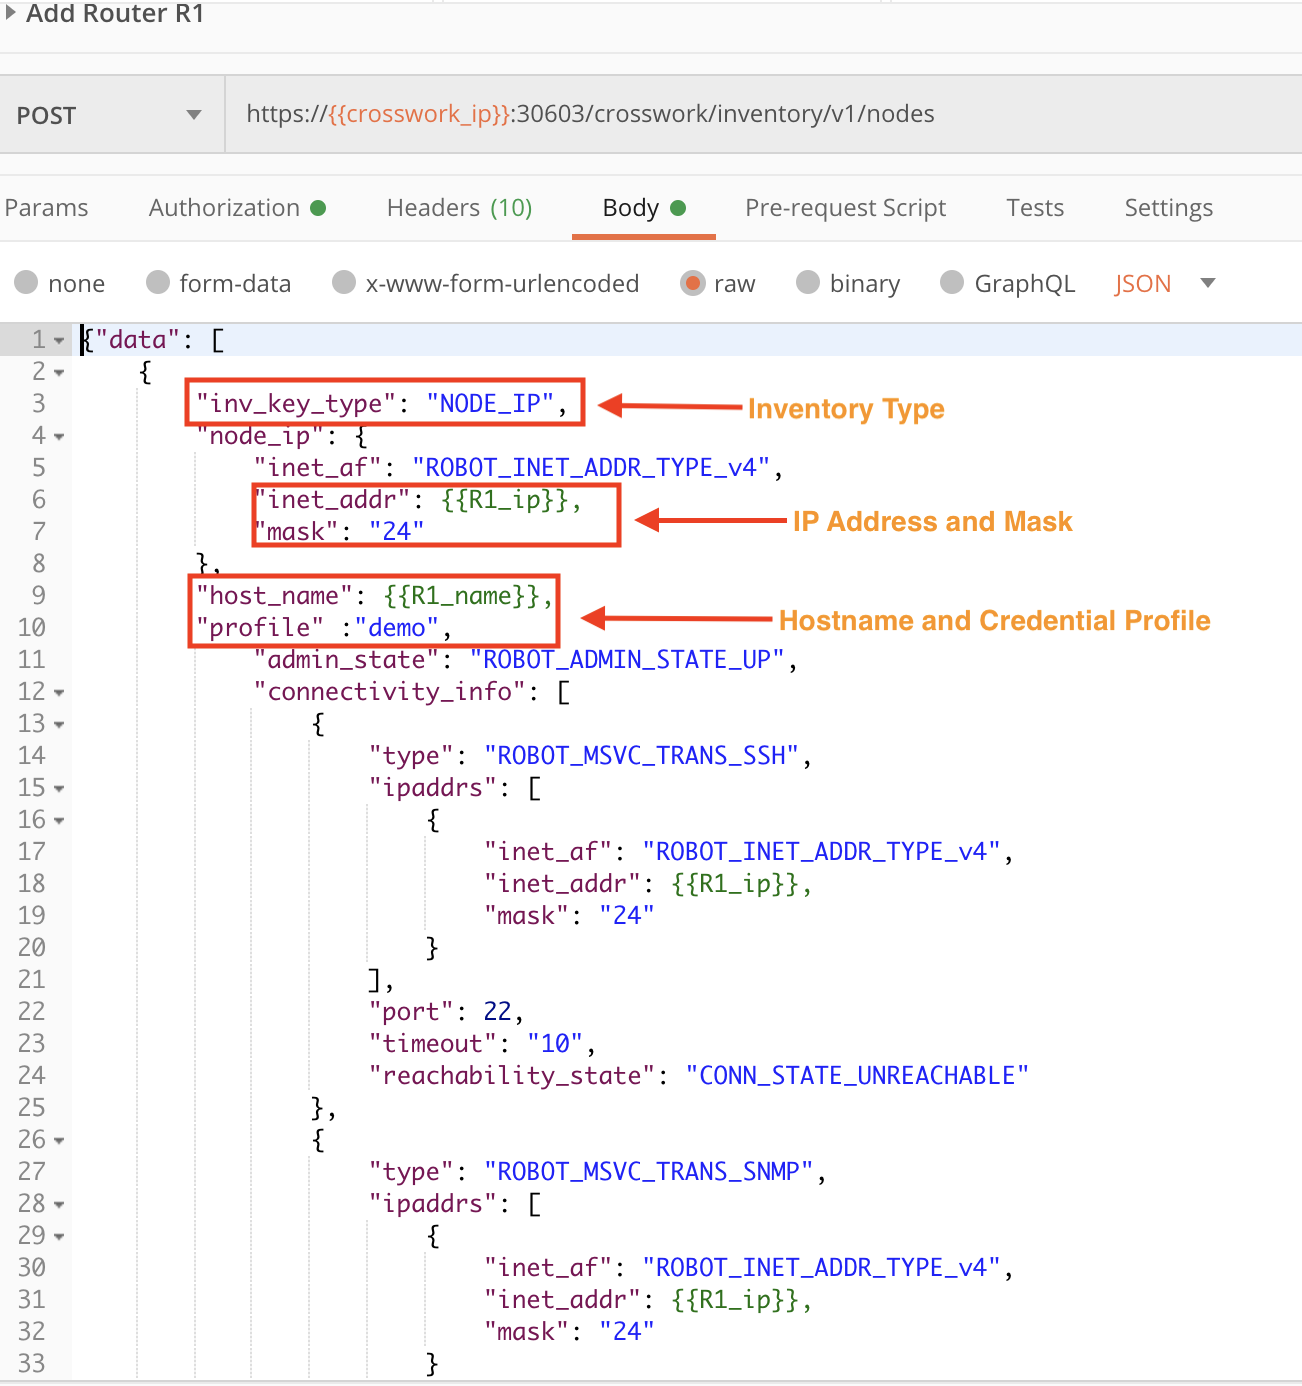
Step 5: Onboard the Device
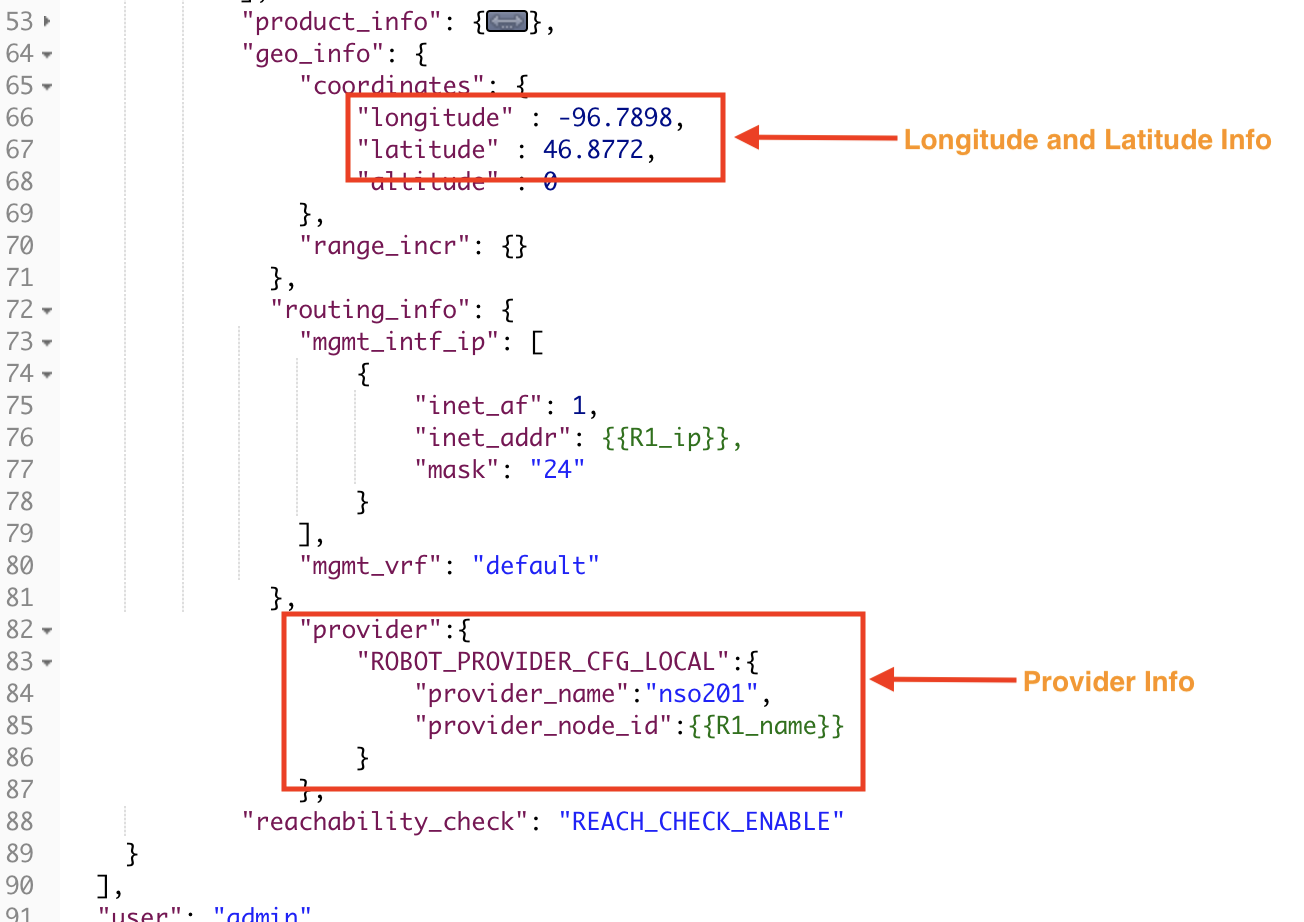
In this step we will onboard a device using an API call. The following figures show how to form a POST request using the crosswork/inventory/v1/nodes API. Values are required for the Credential profile name, the host_name, the device's IP address inet_addr and mask, the respective port for each IP address, the latitude and longitude of the device's geographical location (for use in map visualizations), the device's mgmt_vrf, and the provider_name and provider_node_id.
Step 6: Tag the Device
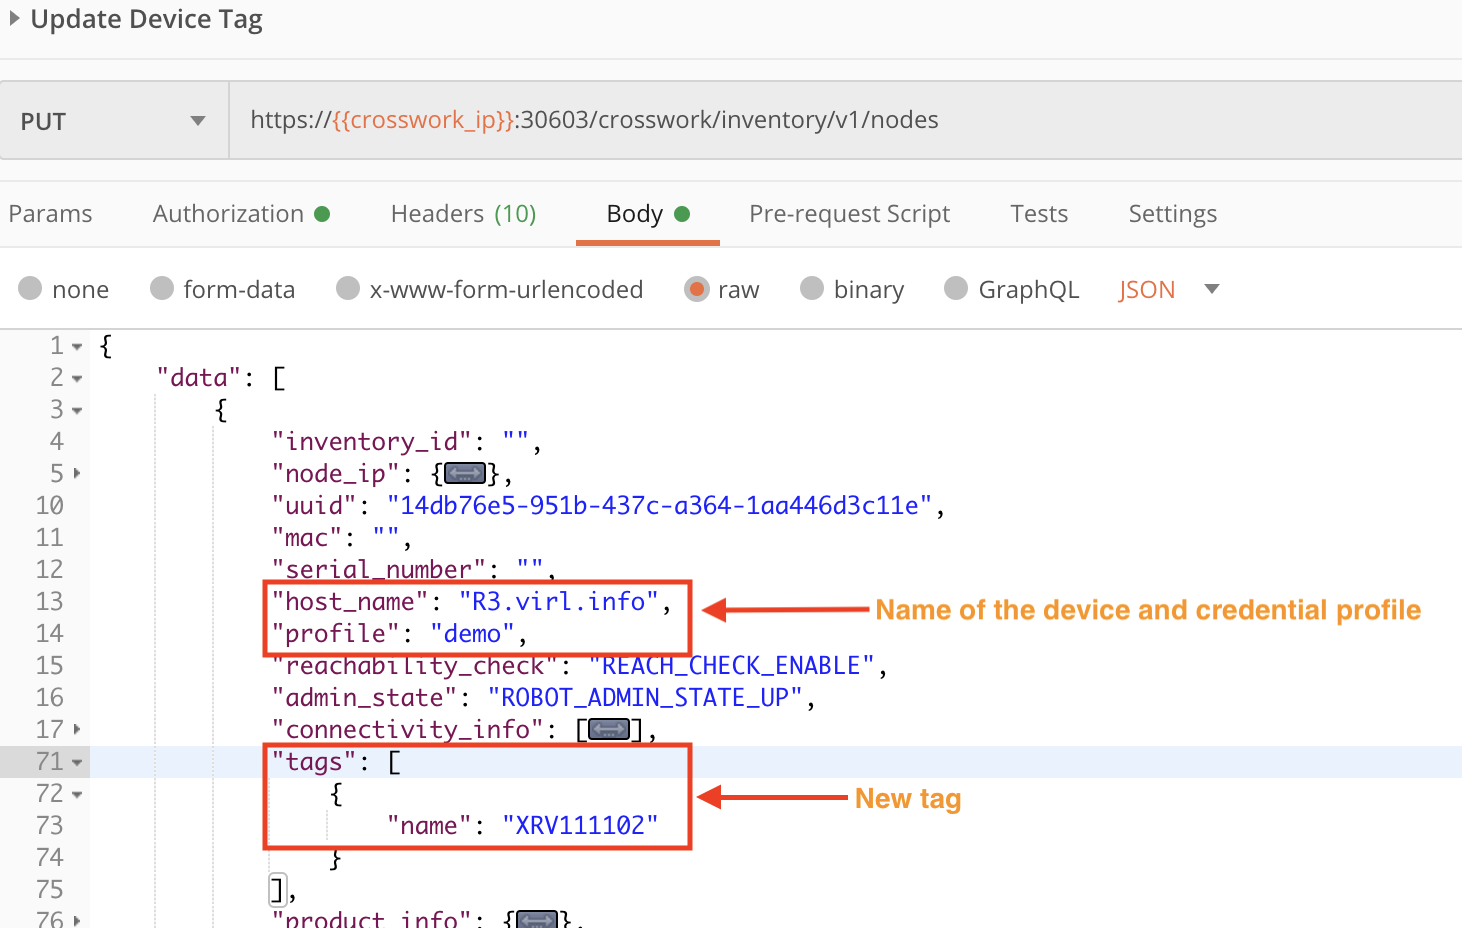
It is always a good idea to tag devices, as tags make it easier to find and group new devices in the Crosswork GUI. Tags are also handy when using APIs to operate on more than one device at a time. The following figure demonstrates how to form a PUT request using the crosswork/inventory/v1/nodes API. Values are required for the the device's host_name, the name of the Credential profile used to access the device, and the name of the tag to apply.
Section 2: Map the Device to Crosswork Data Gateway
Crosswork is a distributed system. It uses instances of the Crosswork Data Gateway (CDG) to share network device and related information across the installed Crosswork applications, such as Crosswork Network Controller or Optimization Engine. Depending on the size of the Crosswork implementation, there may be only one CDG instance or many of them. Each onboarded device must be mapped to a specific CDG instance before it can be considered as being under Crosswork management.
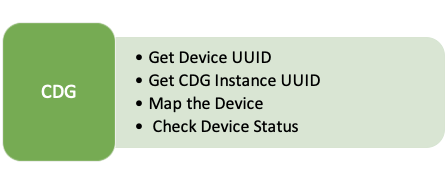
In this section, we will use the Crosswork APIs to map, or attach, the onboarded device to a CDG instance. We will check the device status both before and after the mapping, so we can see the change in management status. The figure below shows the steps involved in performing these tasks.
Step 1: Get the Device UUID
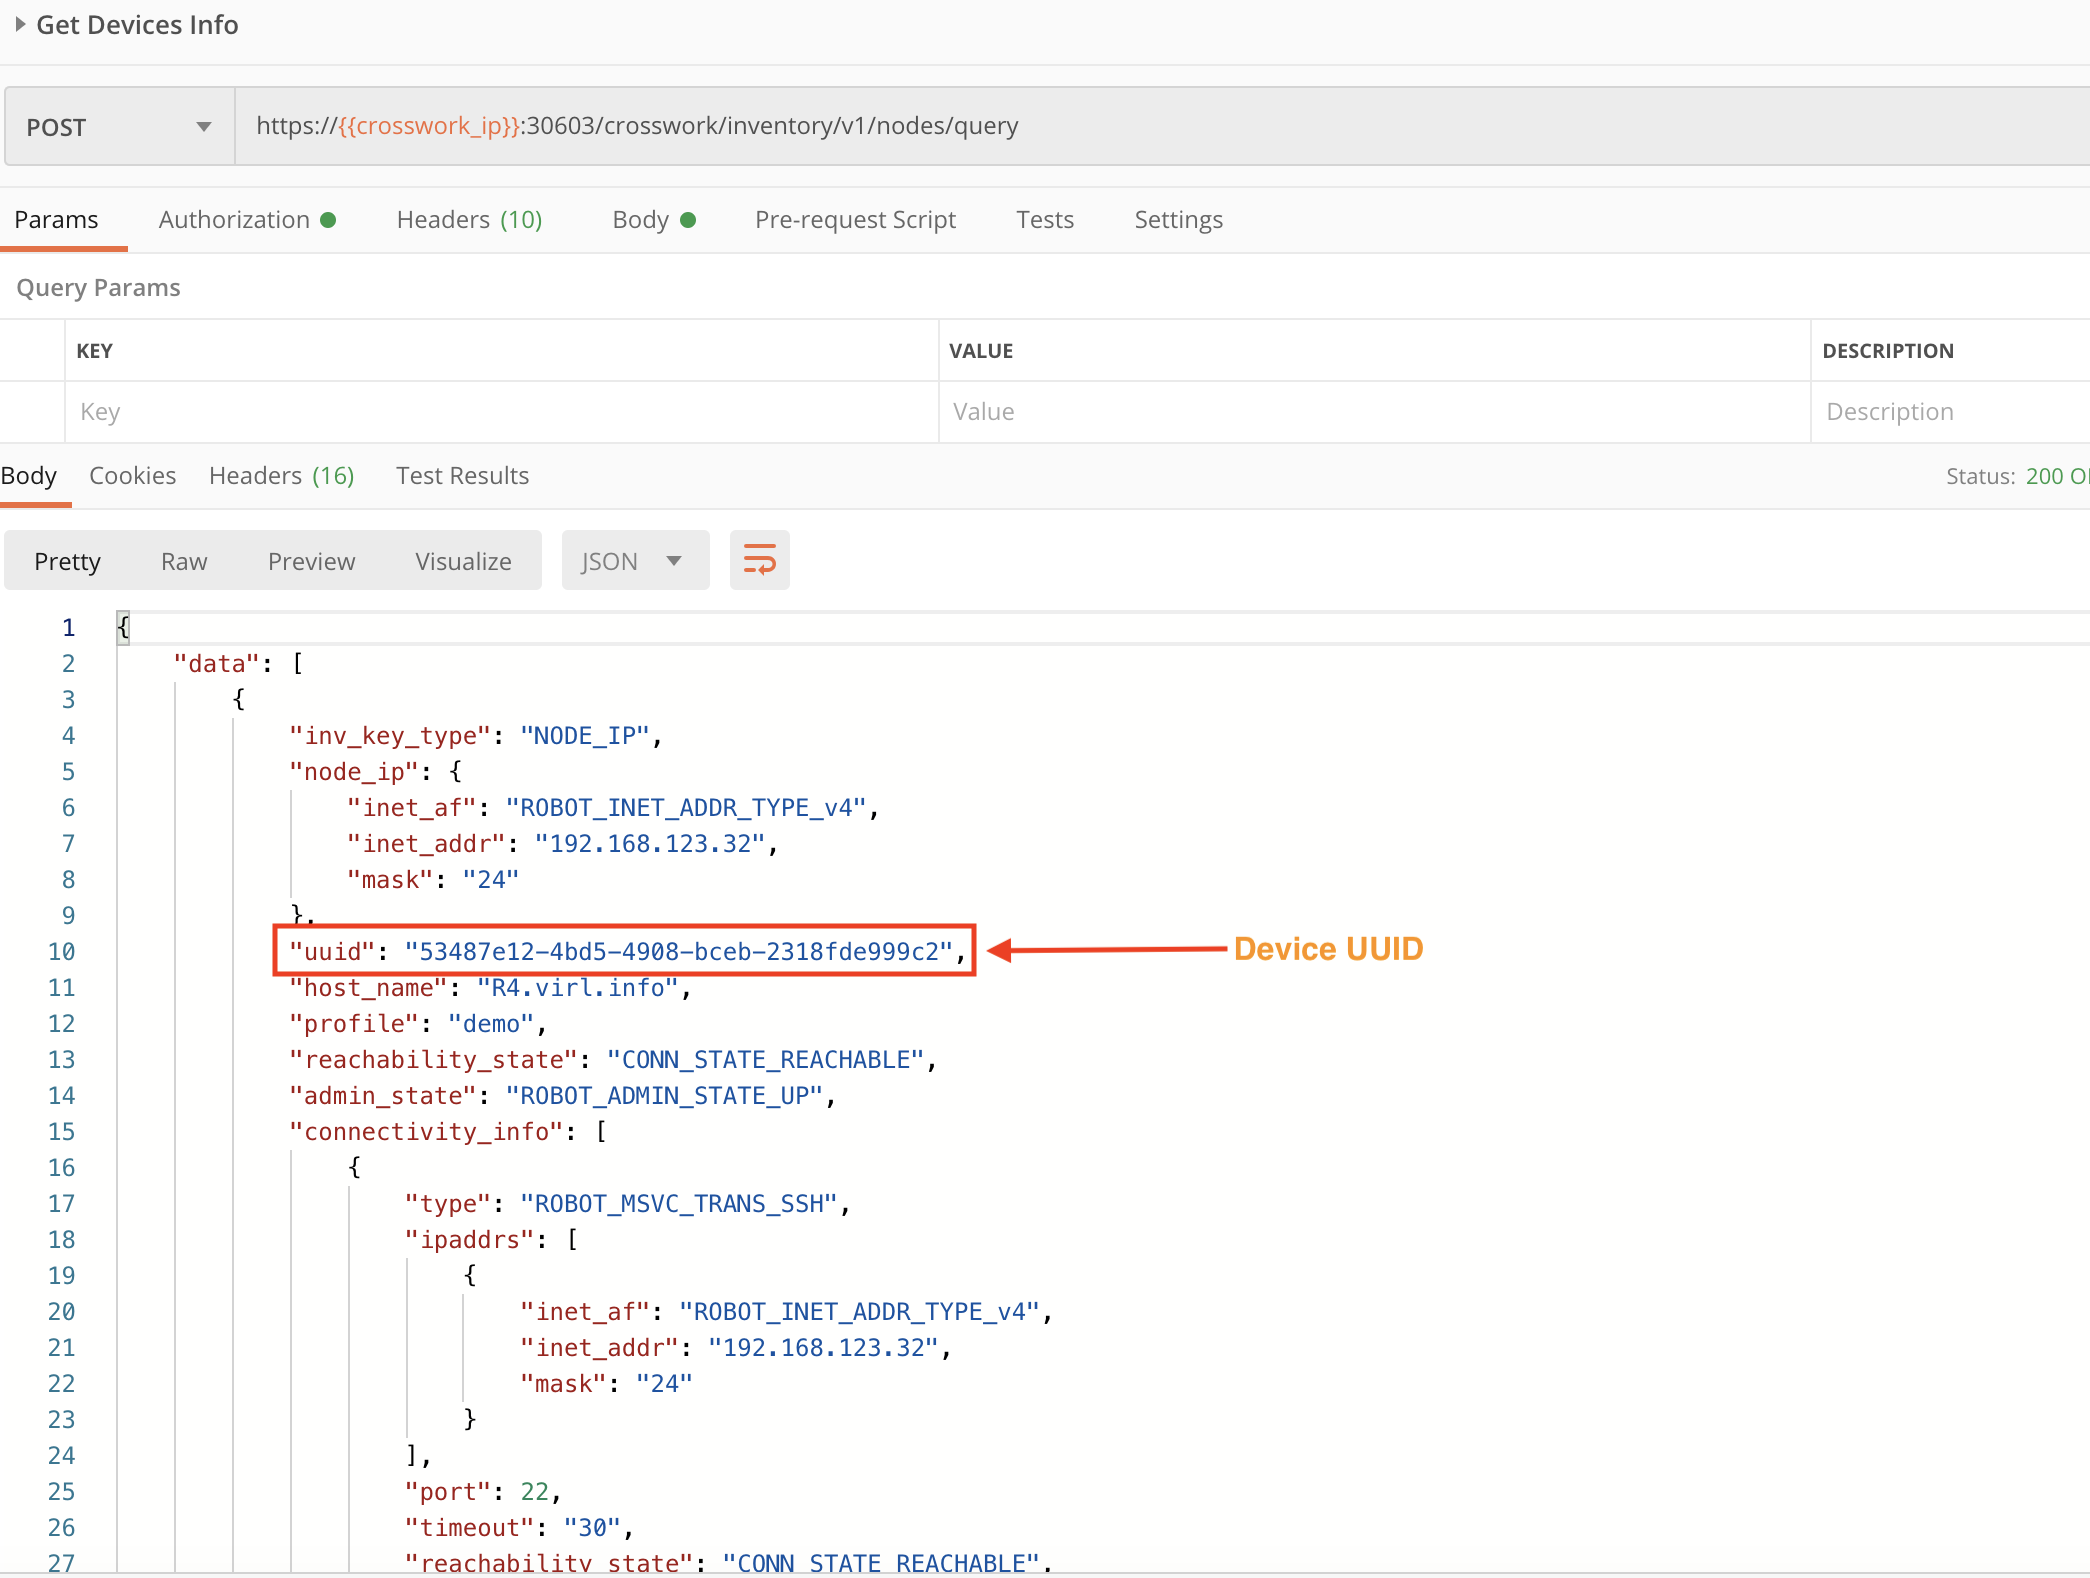
Crosswork assigns a unique device identifier (UUID) to every device when it is first onboarded. We will need this UUID to map the device to a Data Gateway instance. The following figure shows how to form a POST request using the crosswork/inventory/v1/query API to get the device UUID (along with other device information). You will need to copy the device UUID from the request response for use in the following steps.
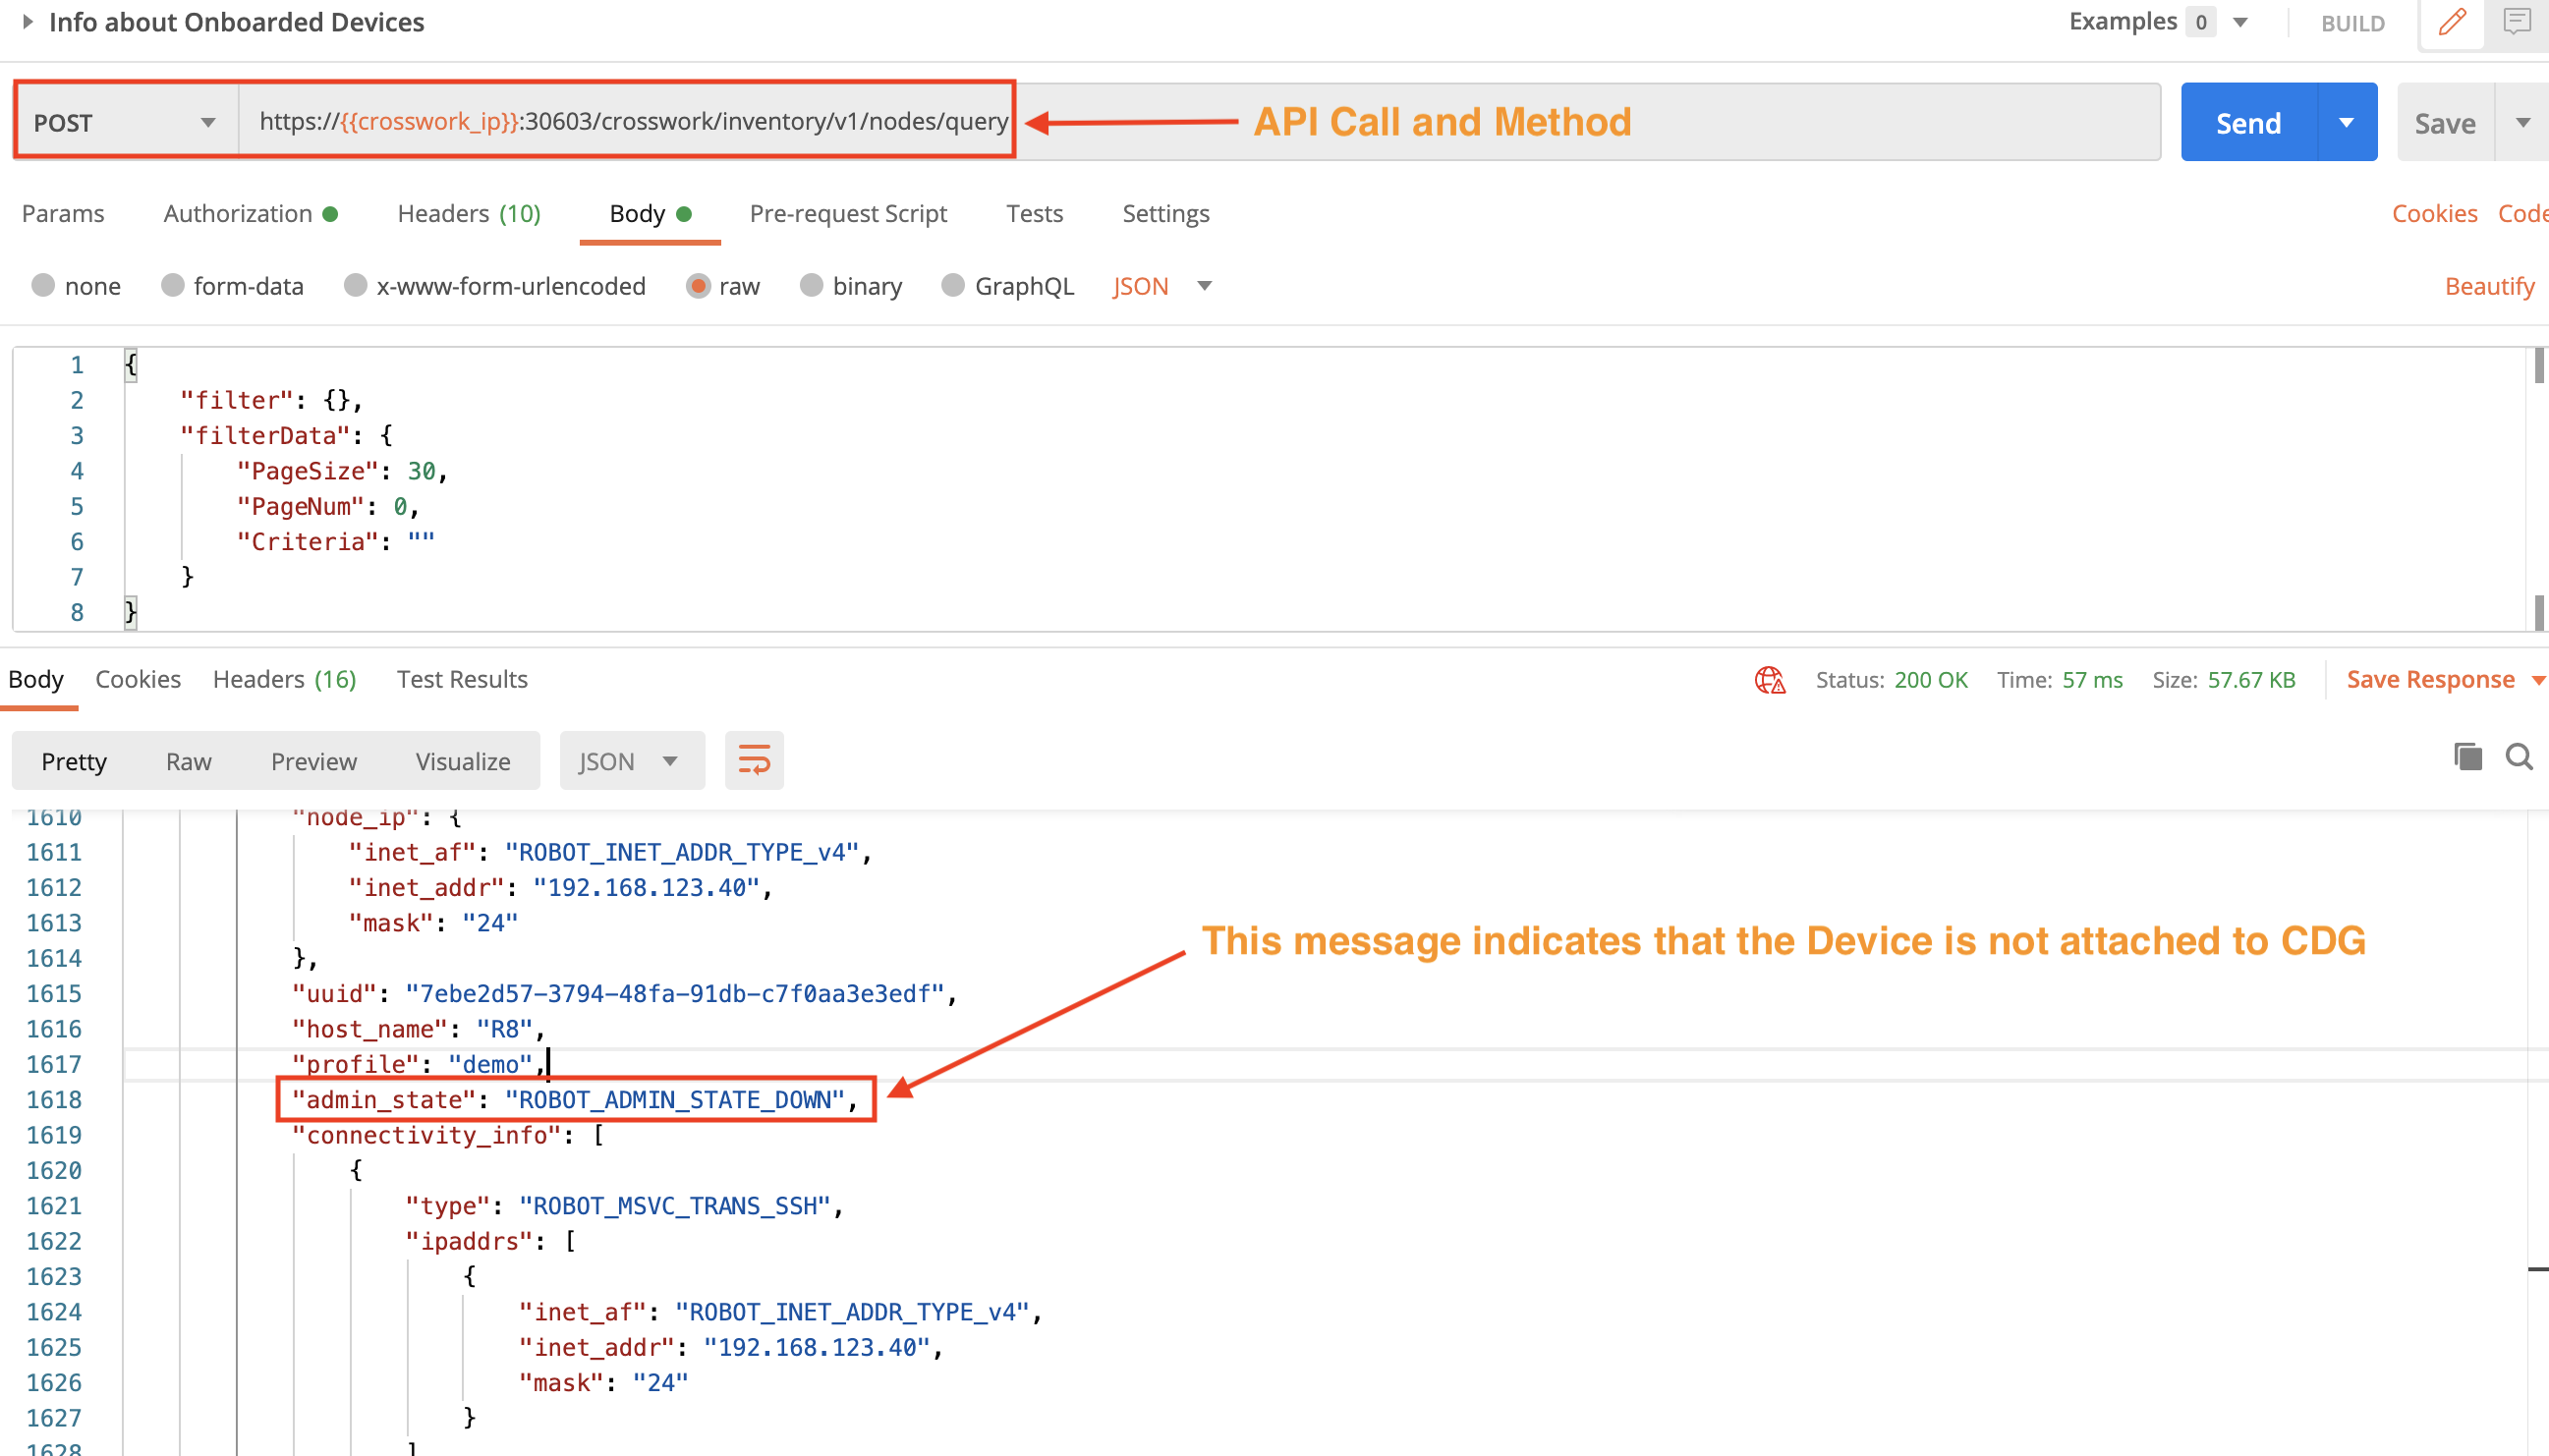
Step 2: Check the Device Status Before Mapping
Let's use the device UUID in another POST request with the crosswork/inventory/v1/nodes/query API to query the device status, as shown in the figure below. The "down" admin_state value in the response indicates that this device is not yet mapped to a Data Gateway instance.
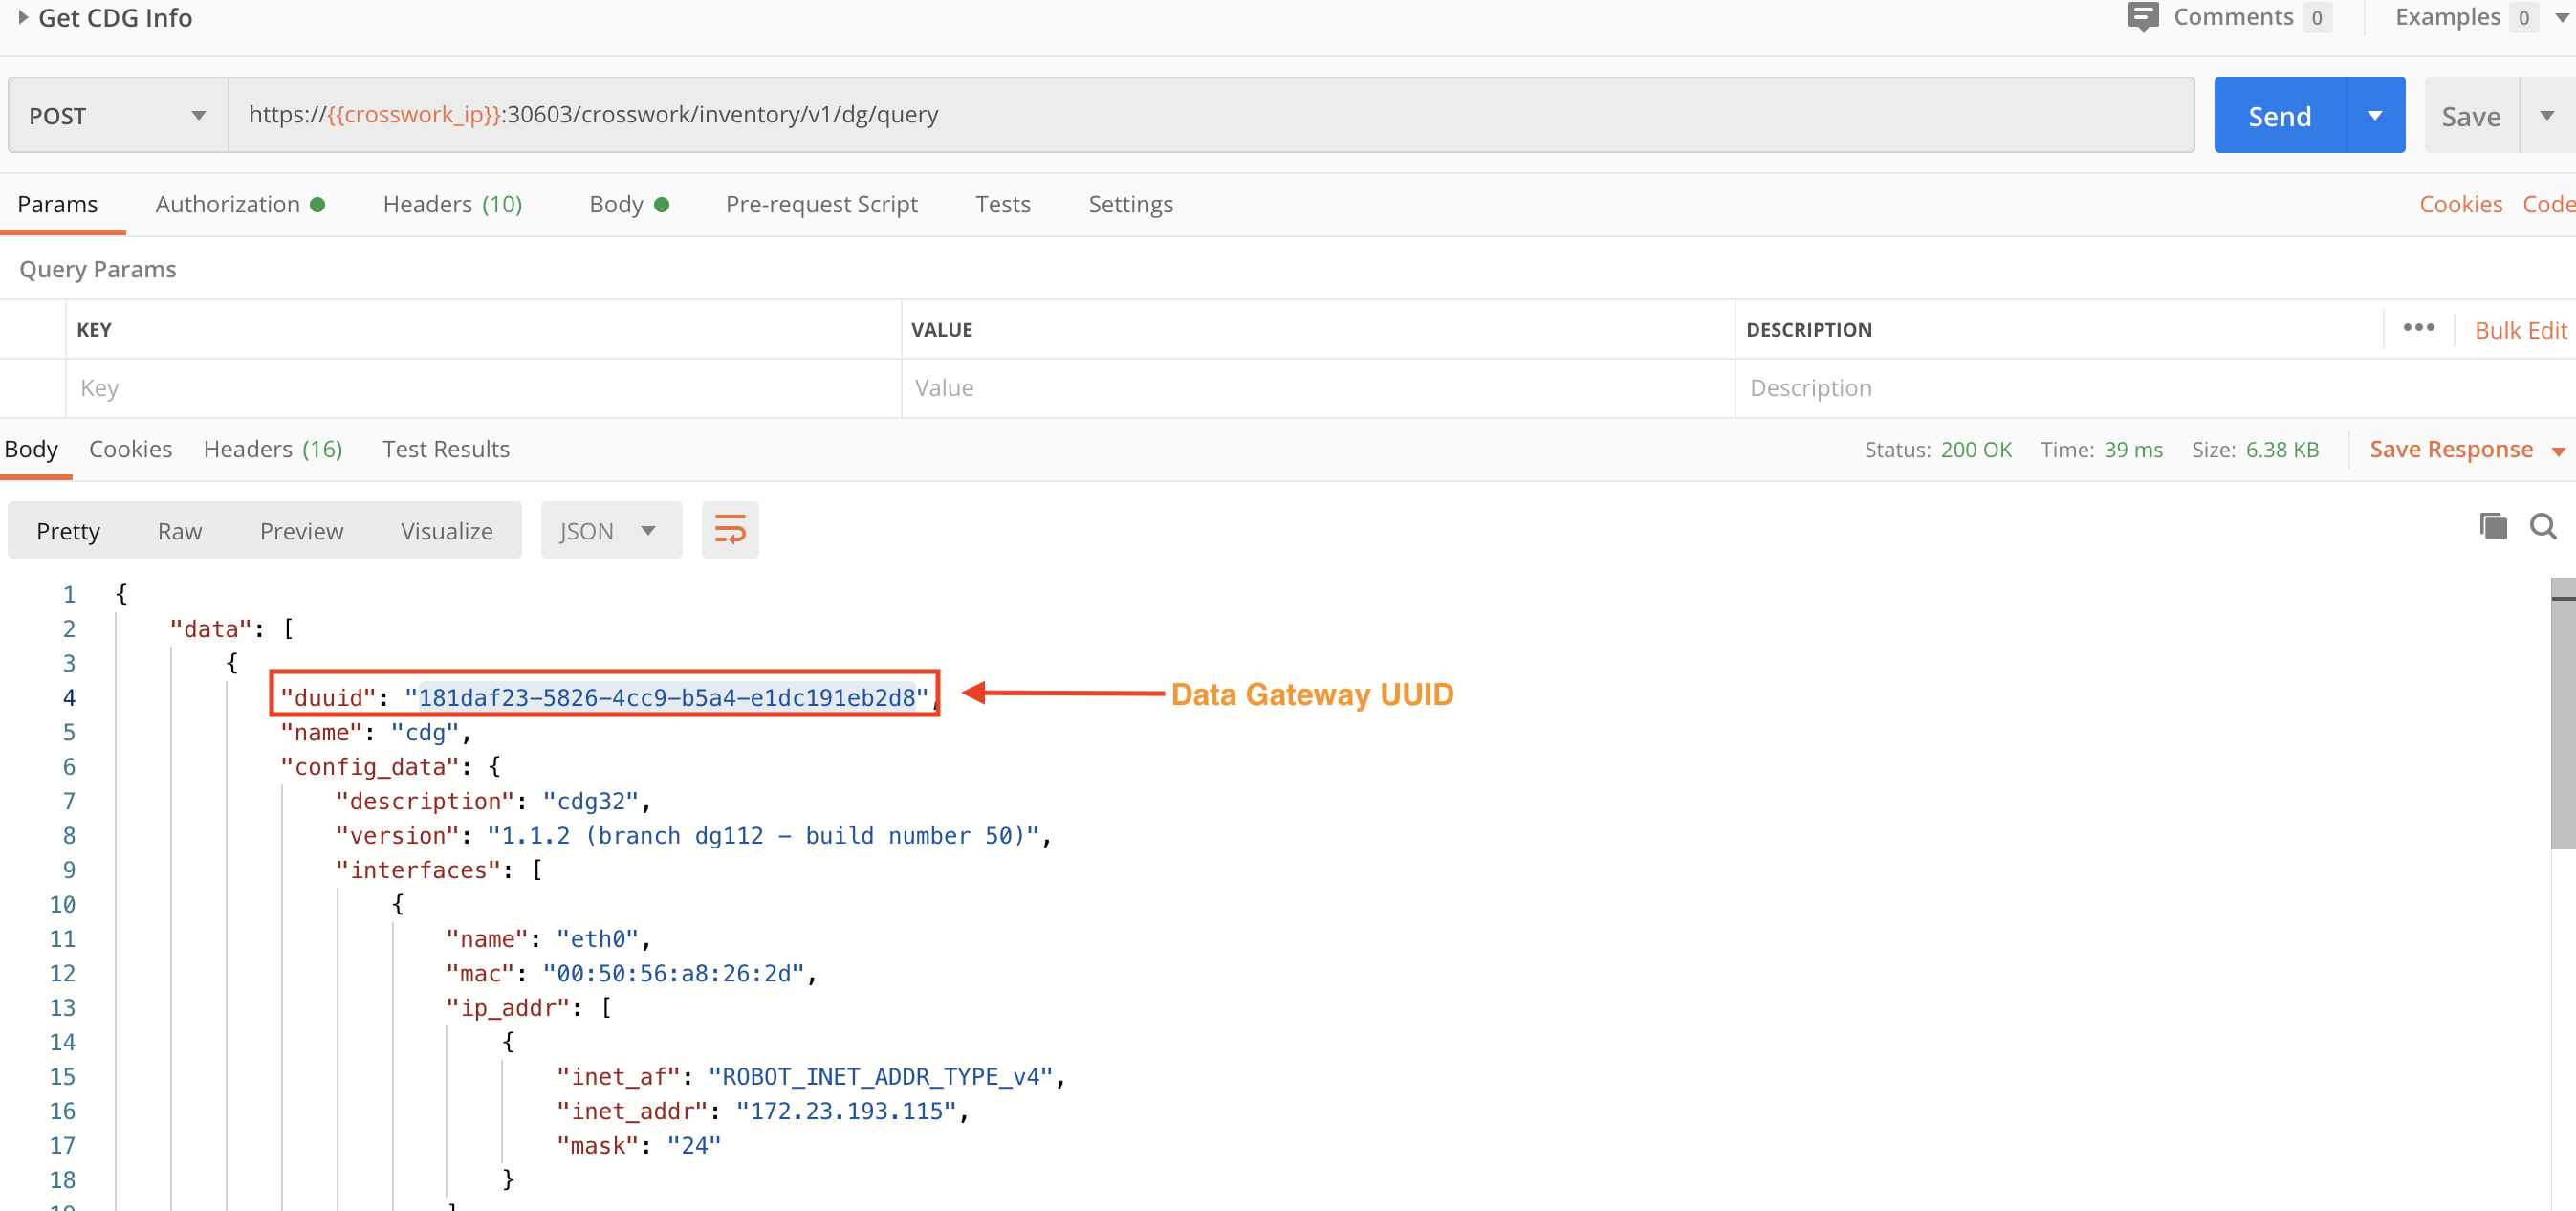
Step 3: Get the CDG Instance UUID
We also need the CDG instance UUID. We will use the Crosswork Data Gateway crosswork/inventory/v1/dg/query API to get the CDG instance UUID. We will copy the UUID of the CDG instance to which we want to attach the device, for use in the next step.
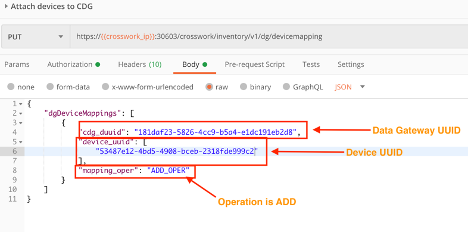
Step 4: Map the Device to the CDG Instance
Now that we have UUID information for both the device and the Data Gateway, we can use a PUT request and the crosswork/inventory/v1/dg/devicemapping API to attach the device to the CDG instance, as shown in the figure below. The mapping-oper value of ADD_OPER is required.
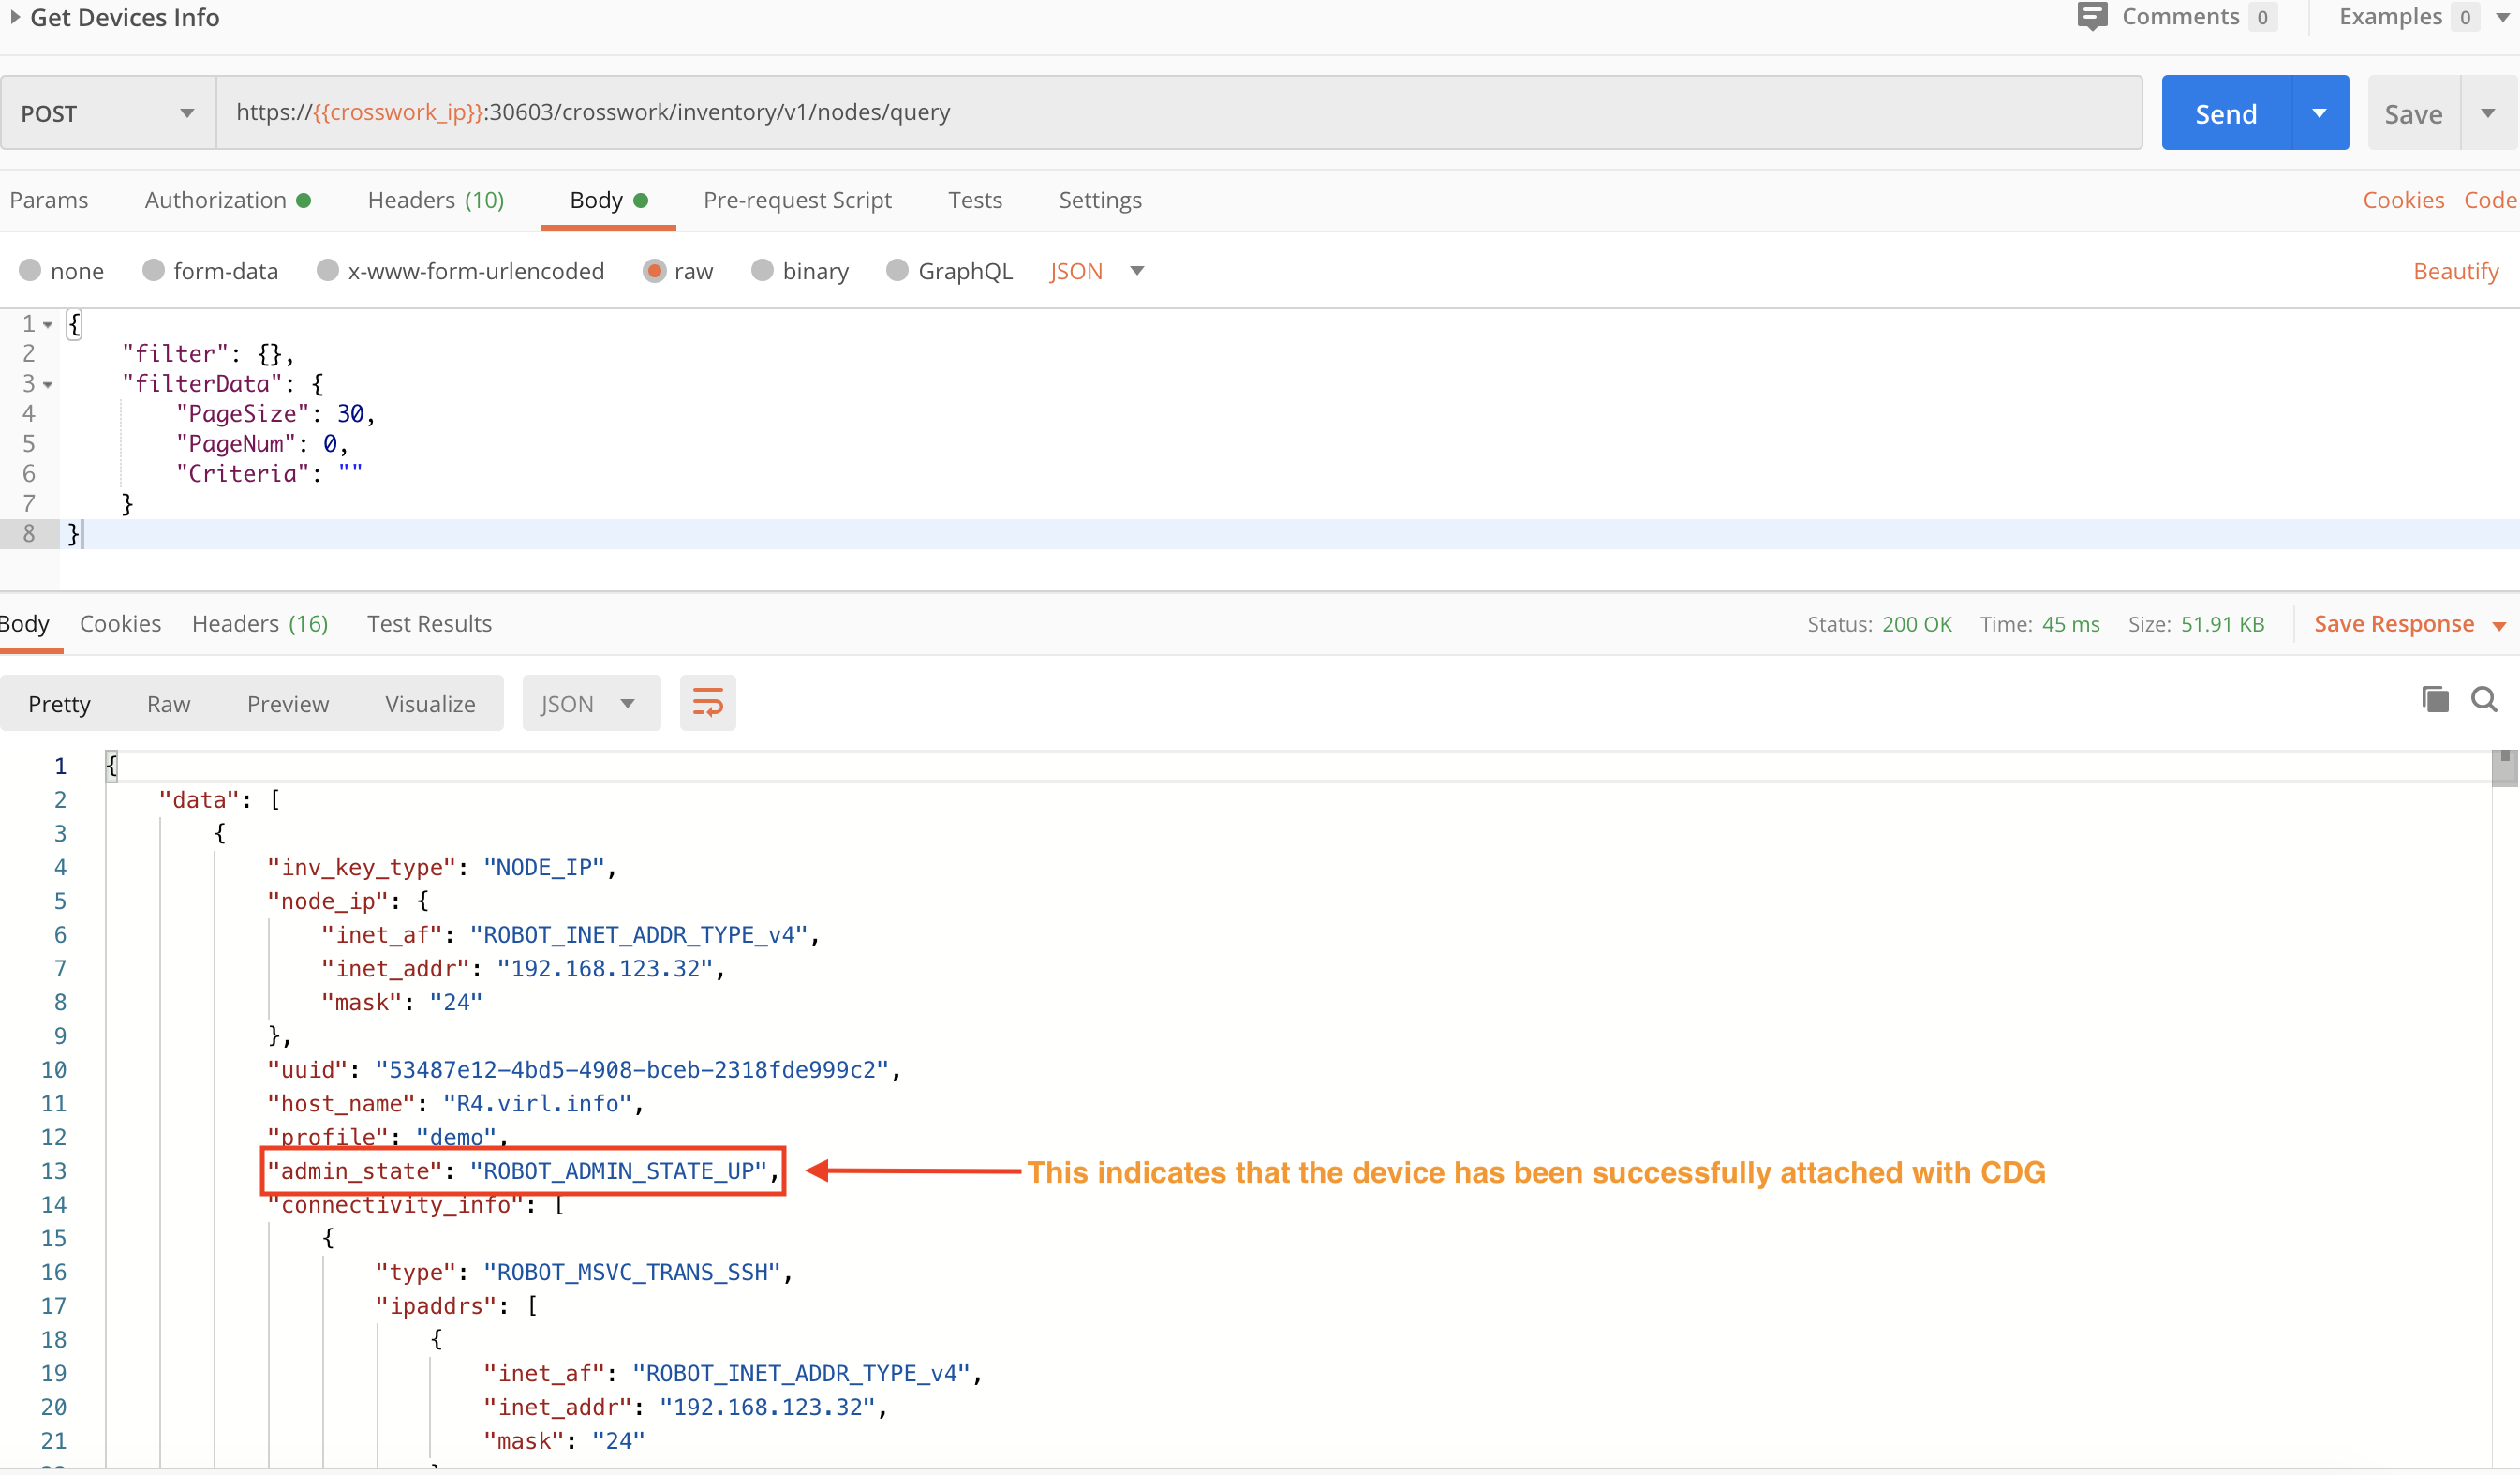
Step 5: Check the Device Status After Mapping
Another POST request and the crosswork/inventory/v1/nodes/query API will show us the device status after mapping. The "Up" admin_state shown in the response in the figure below indicates that this device is now under Crosswork management.
Section 3: Monitor Devices Using Health Insights
In this section, we demonstrate how to use Crosswork Health Insights APIs to monitor device health and send alerts to network operators when anomalous behavior or performance problems occur. Our intent is to create a KPI Profile, enable it on the devices, collect the data, and run the alerting logic (we check for alerts in the next section).
Step 1: Create a KPI Profile
Before we can create a KPI profile, we need answers to the following questions:
-Which sensor paths are to be monitored? -Are there KPIs available to monitor this? -If so, what are the details of these KPIs?
Once we identify the appropriate KPIs, we can create a KPI profile specifying details of the monitoring.
KPI customization is outside the scope of this document, but is helpful when you do not have a KPI to monitor a particular sensor path. For more on this, see the Custom KPIs section.
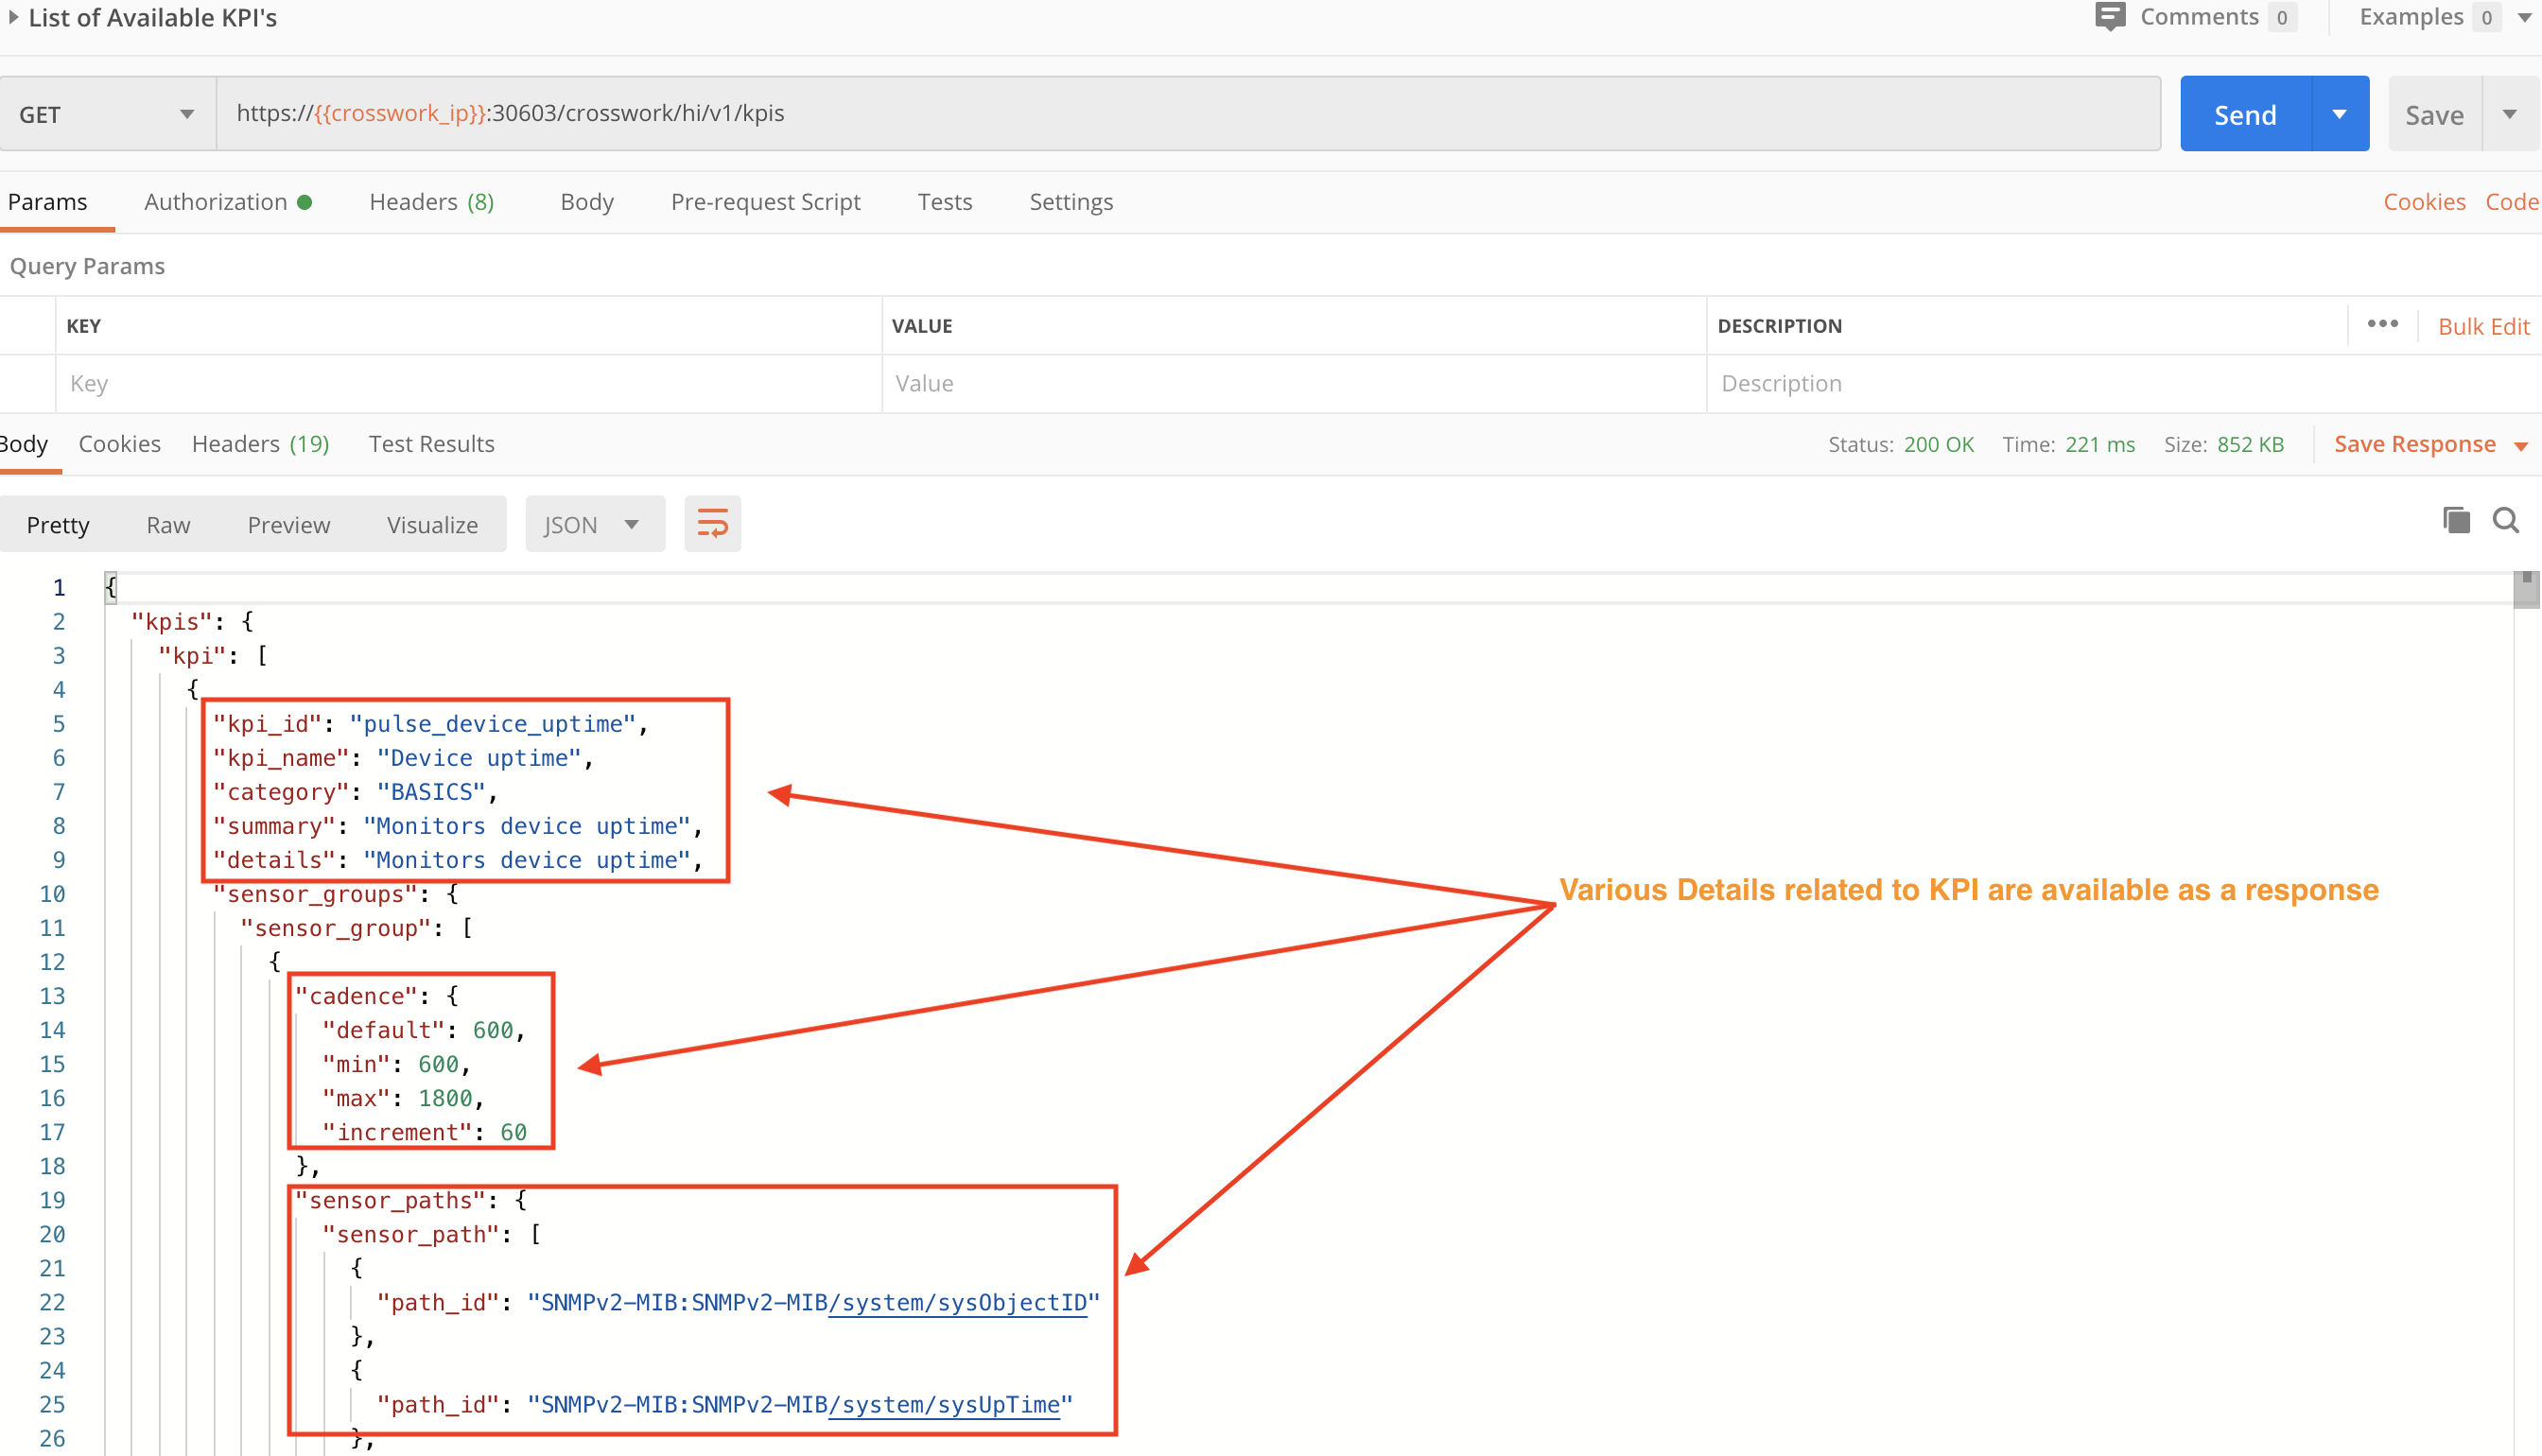
Step 1A: Query Health Insights for Available KPIs
We will use a GET request with the crosswork/hi/v1/kpiprofilemgmt/query API to fetch the list of available KPIs and their details.
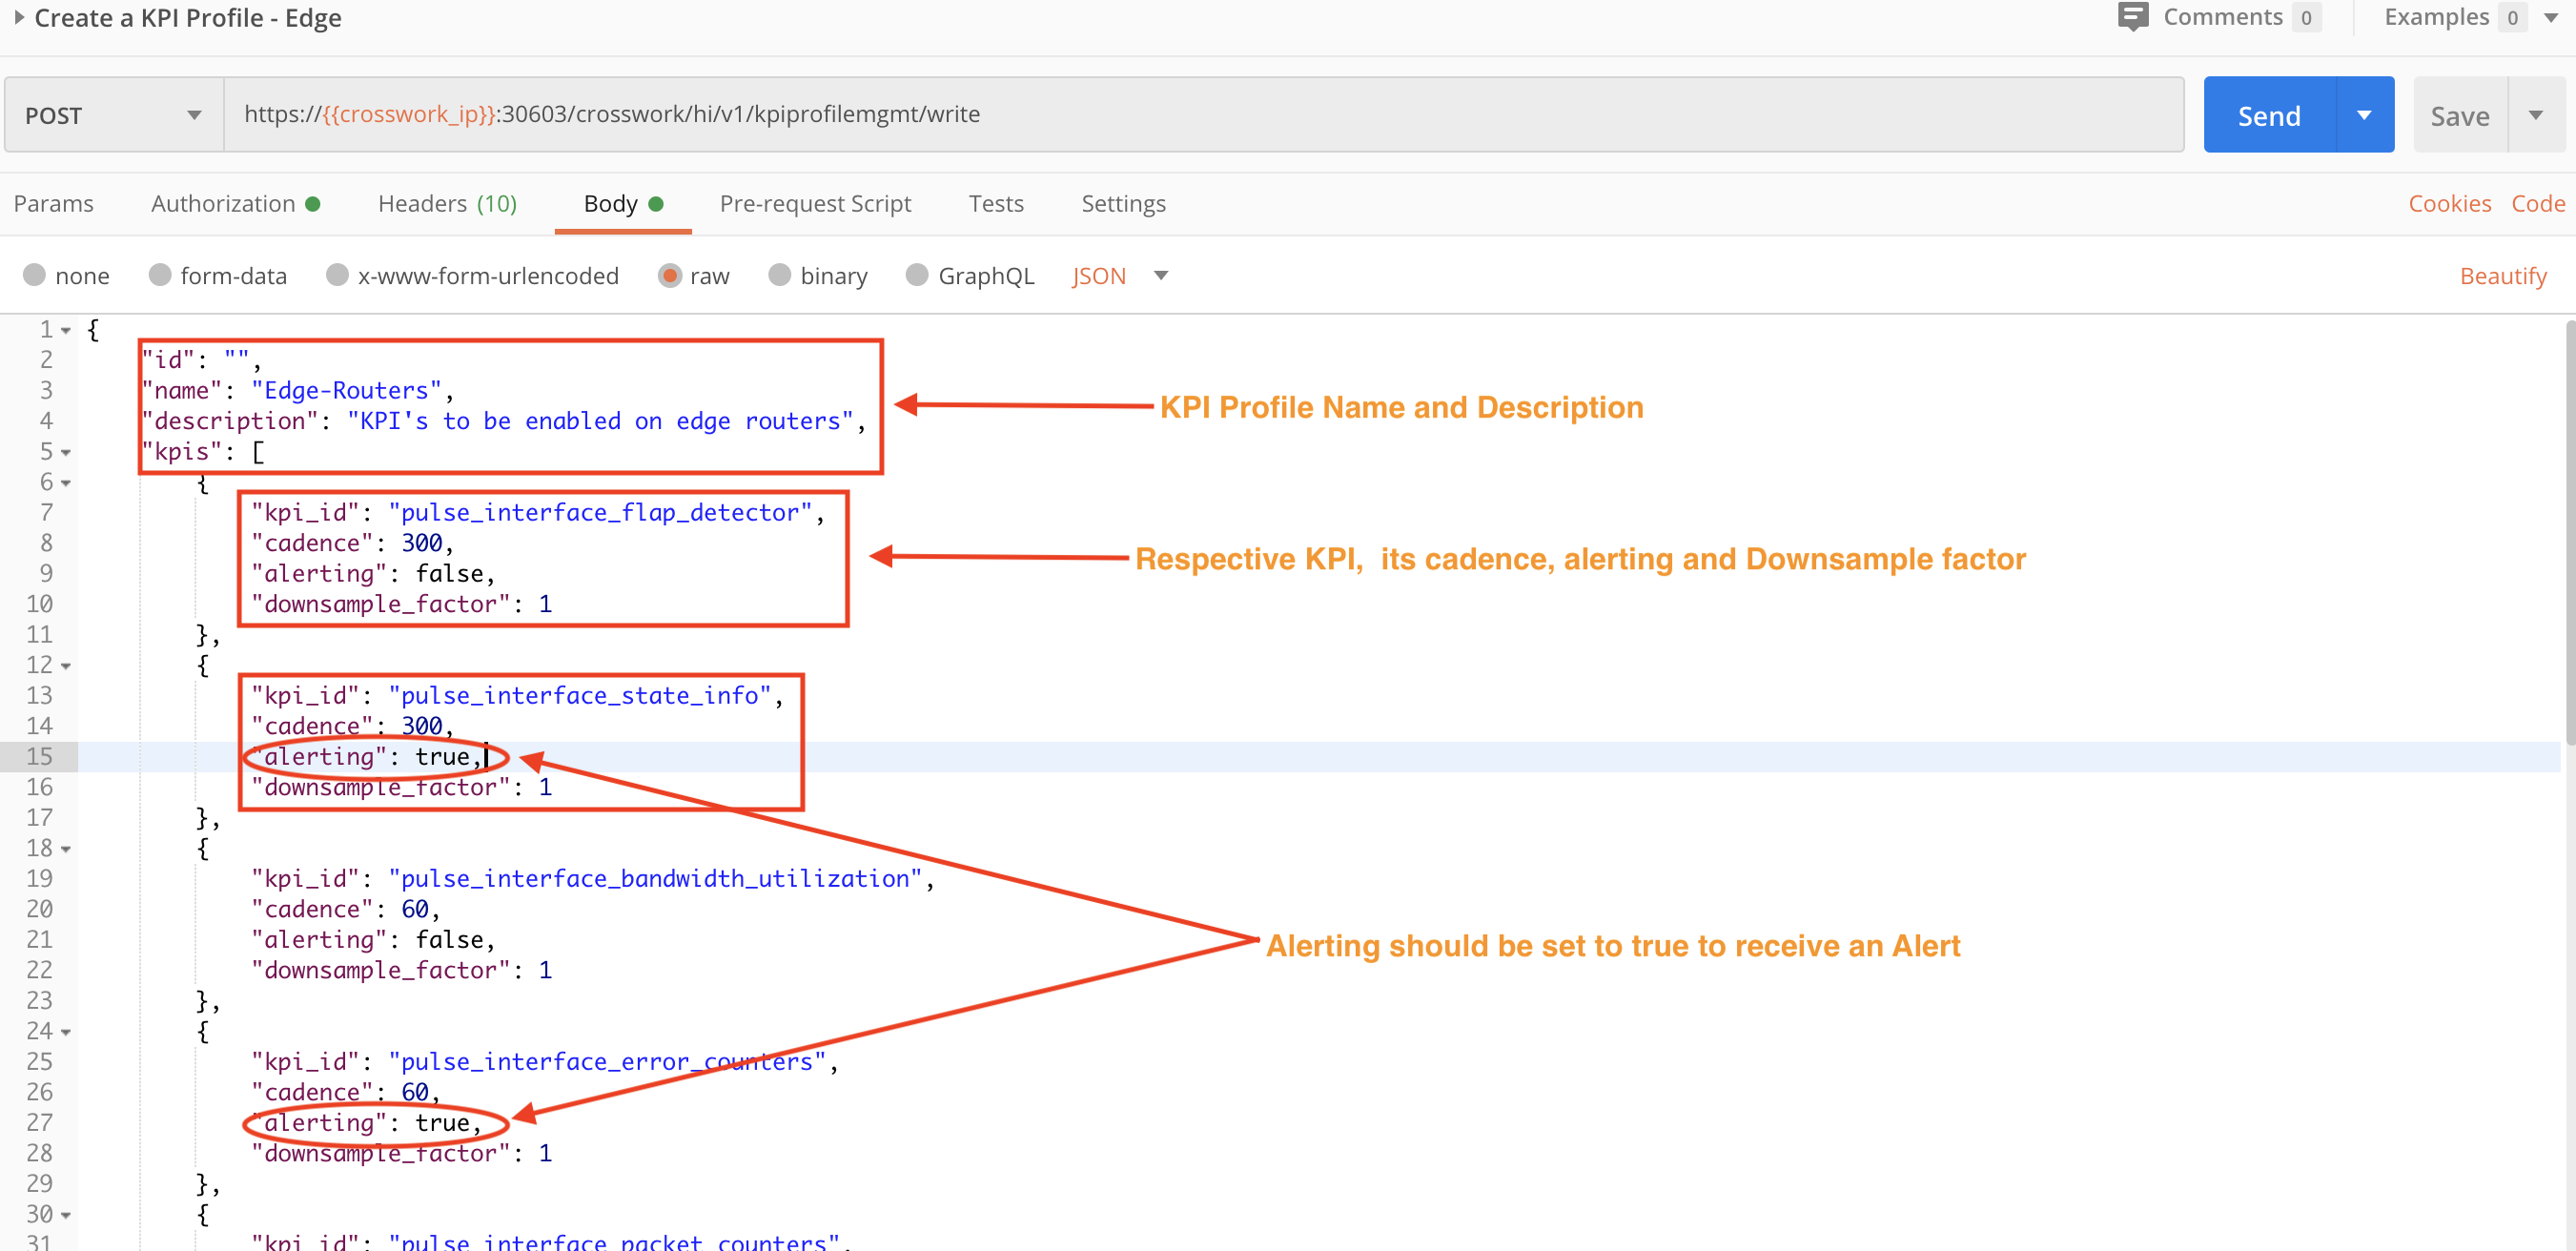
Step 1B: Create a KPI Profile
We will use a POST request with the crosswork/hi/v1/kpiprofilemgmt/write API to create a KPI profile on the Crosswork system. Our profile will be enabled for edge routers.
Step 2: Enable the KPI Profile
You can enable the KPI profile using either the unique name of a single device or the Crosswork Tag applied to one or more devices. Although not required, it is a recommended practice to synchronize the Cisco NSO and device configurations and check the device status before enabling the KPI profile. We also recommend that you check the KPI job status after enabling the KPI Profile. The required and best-practice steps are demonstrated in this section.
Step 2A: Sync the NSO and Device Configurations
Use two POST requests with the NSO running/devices/_operations/check-sync and running/devices/_operations/sync-from APIs to check and then sync the NSO and device configurations.


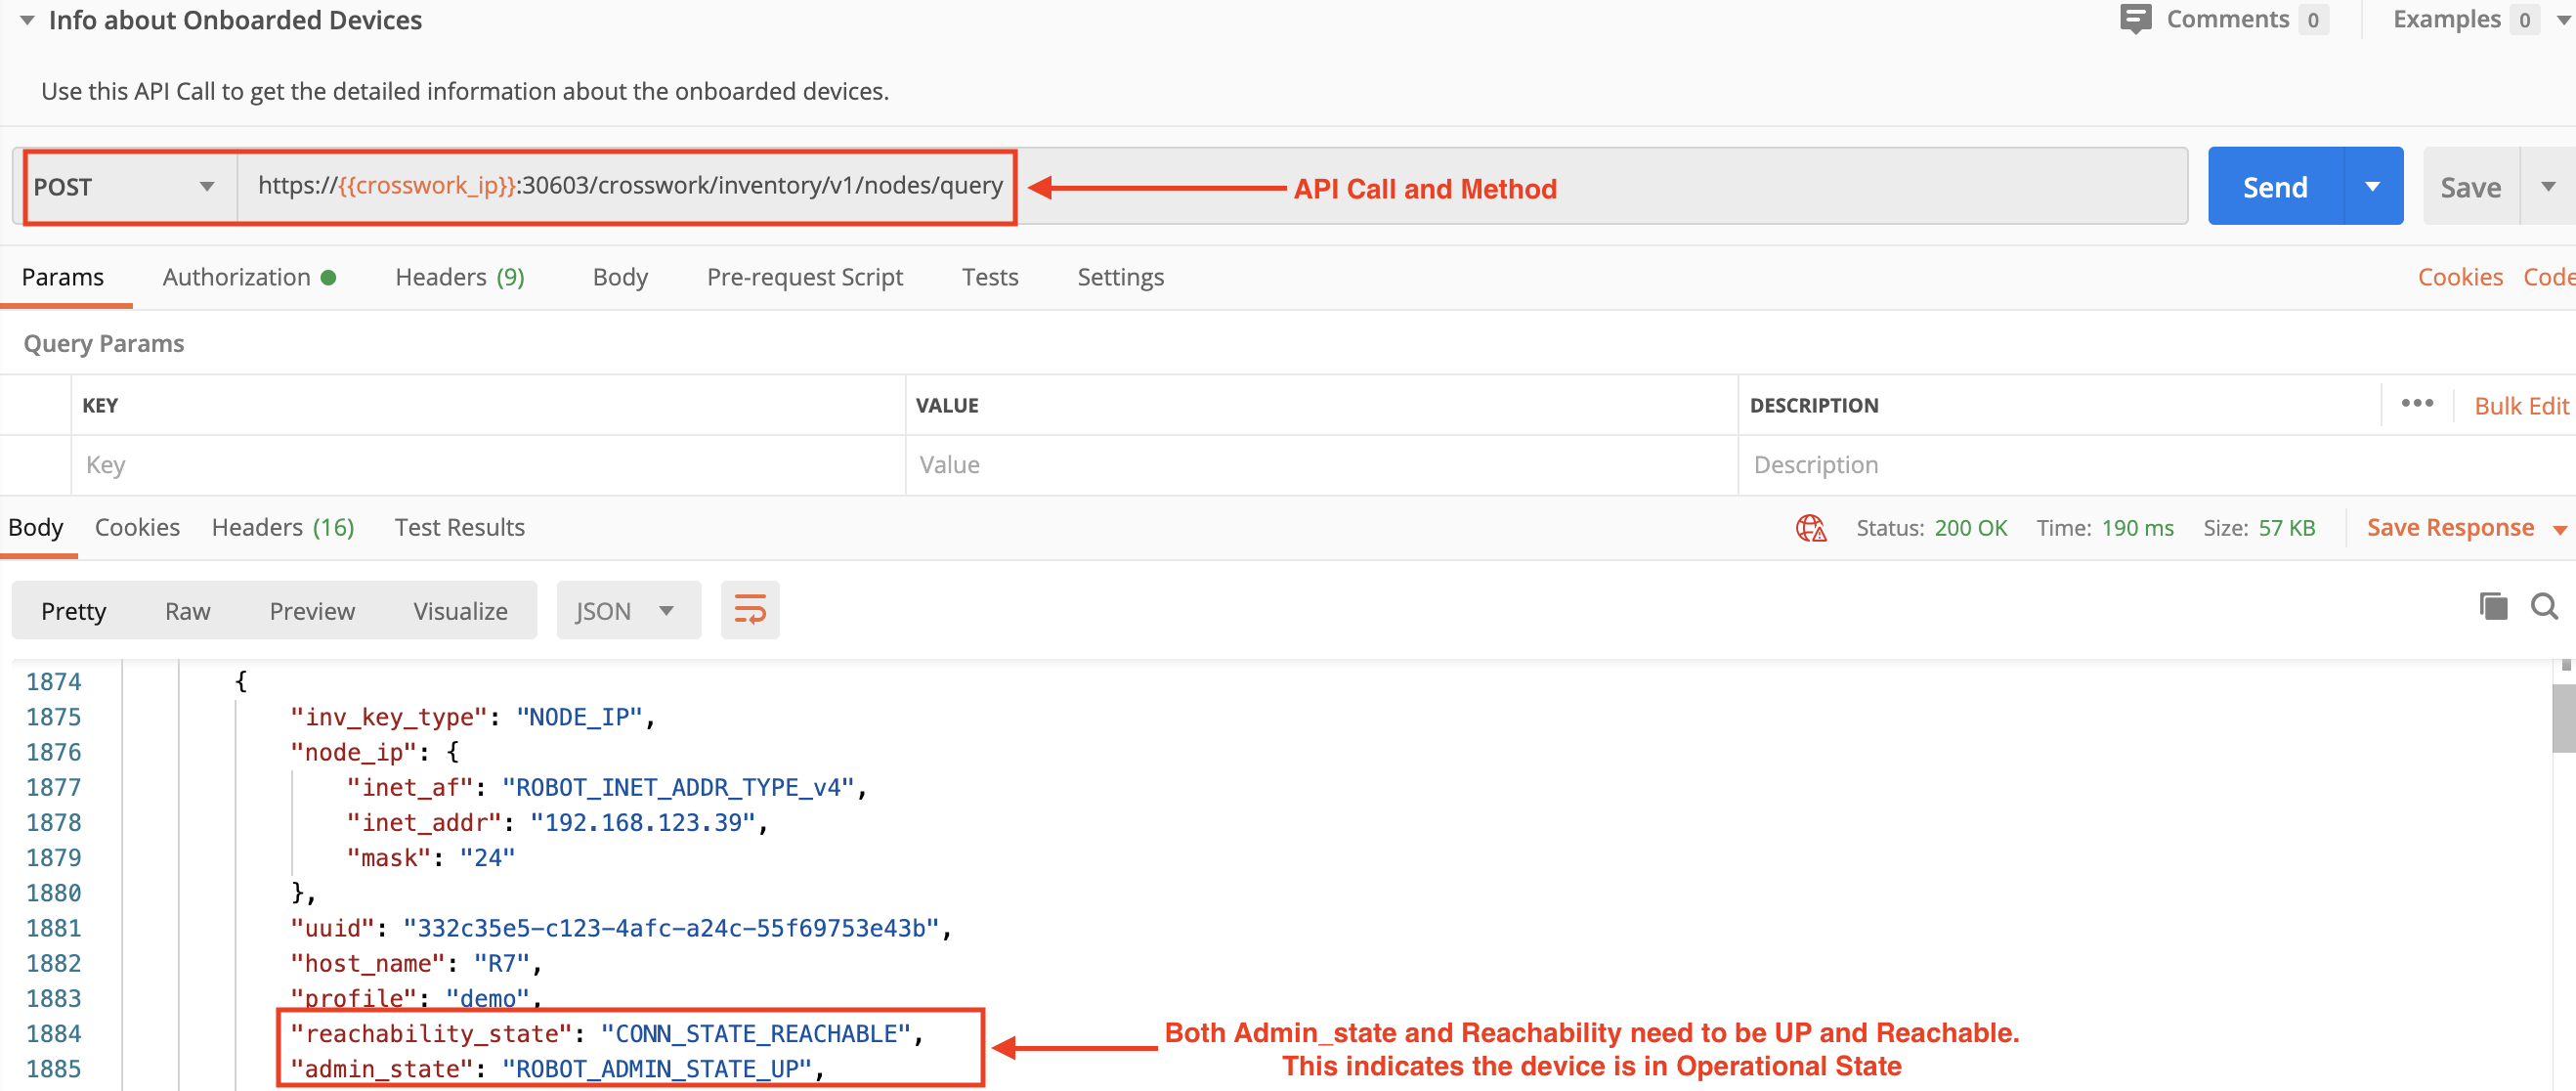
Step 2B: Check the Device Status
Use a POST request and the crosswork/inventory/v1/nodes/query to check the device status. The admin status should be up and the Reachability state must be Reachable or the KPI enablement will fail.
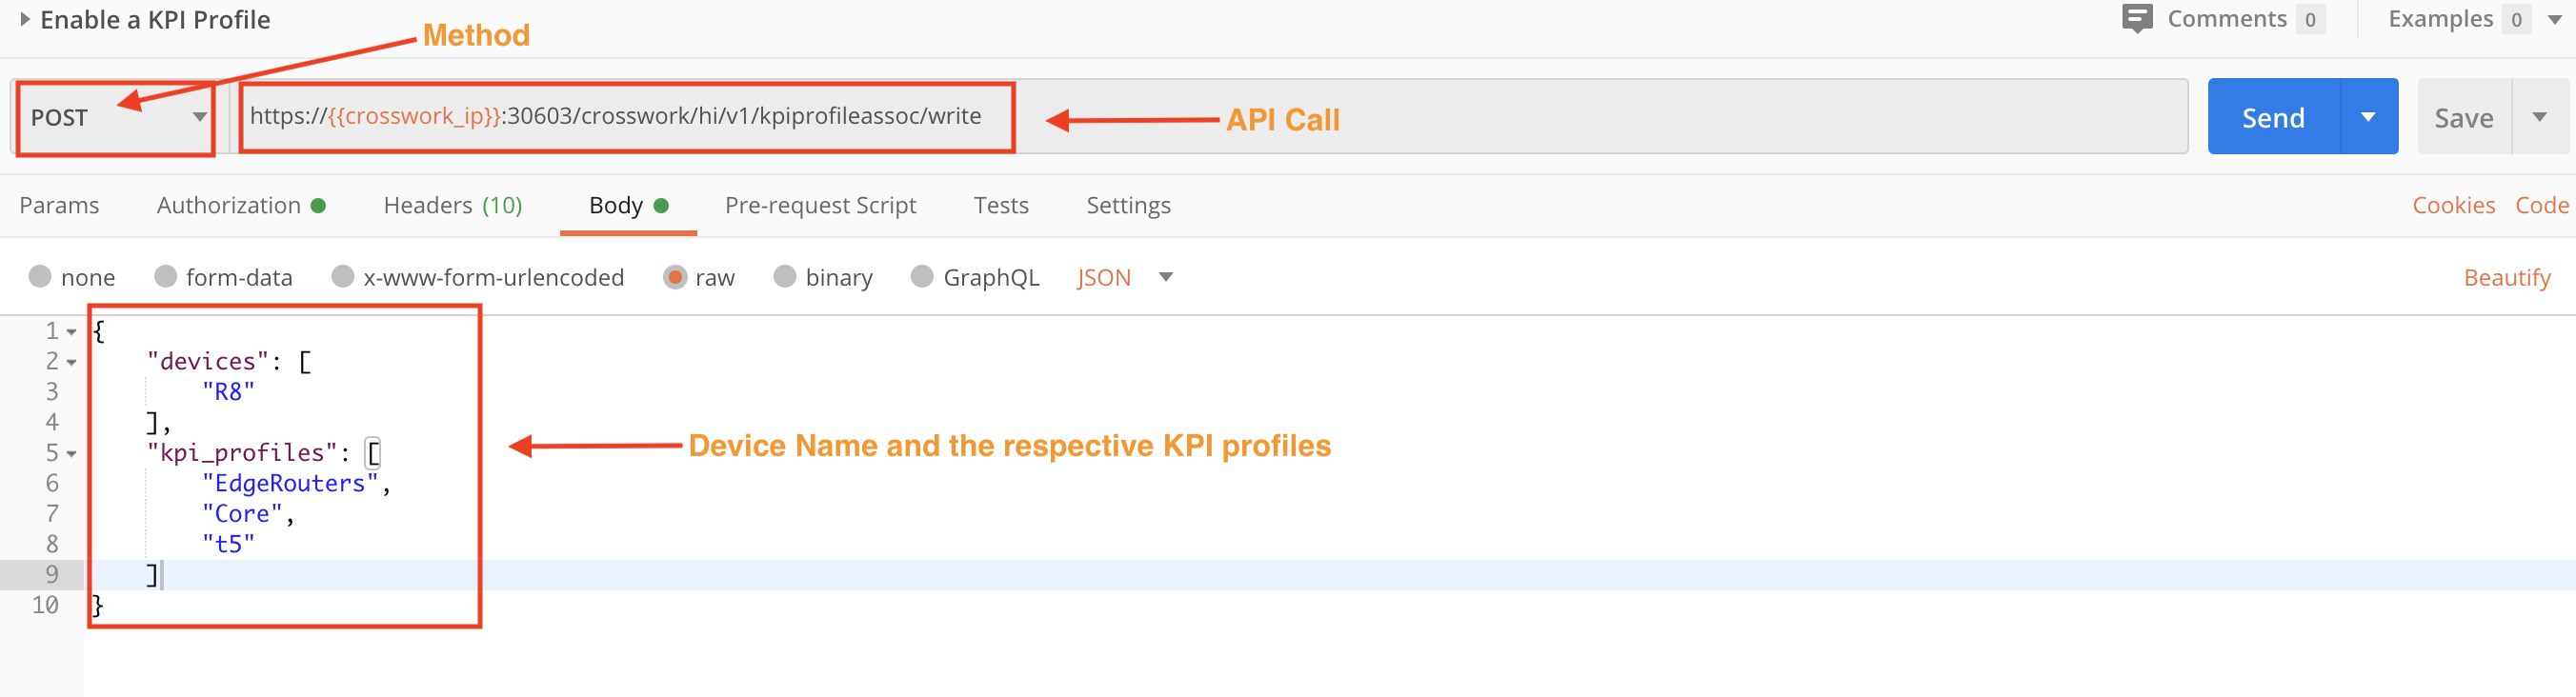
Step 2C: Enable the KPI Profile Using the Device Name
Use a POST request and the /crosswork/hi/v1/kpiprofileassoc/write API to enable the KPI Profile using the name of a unique device.
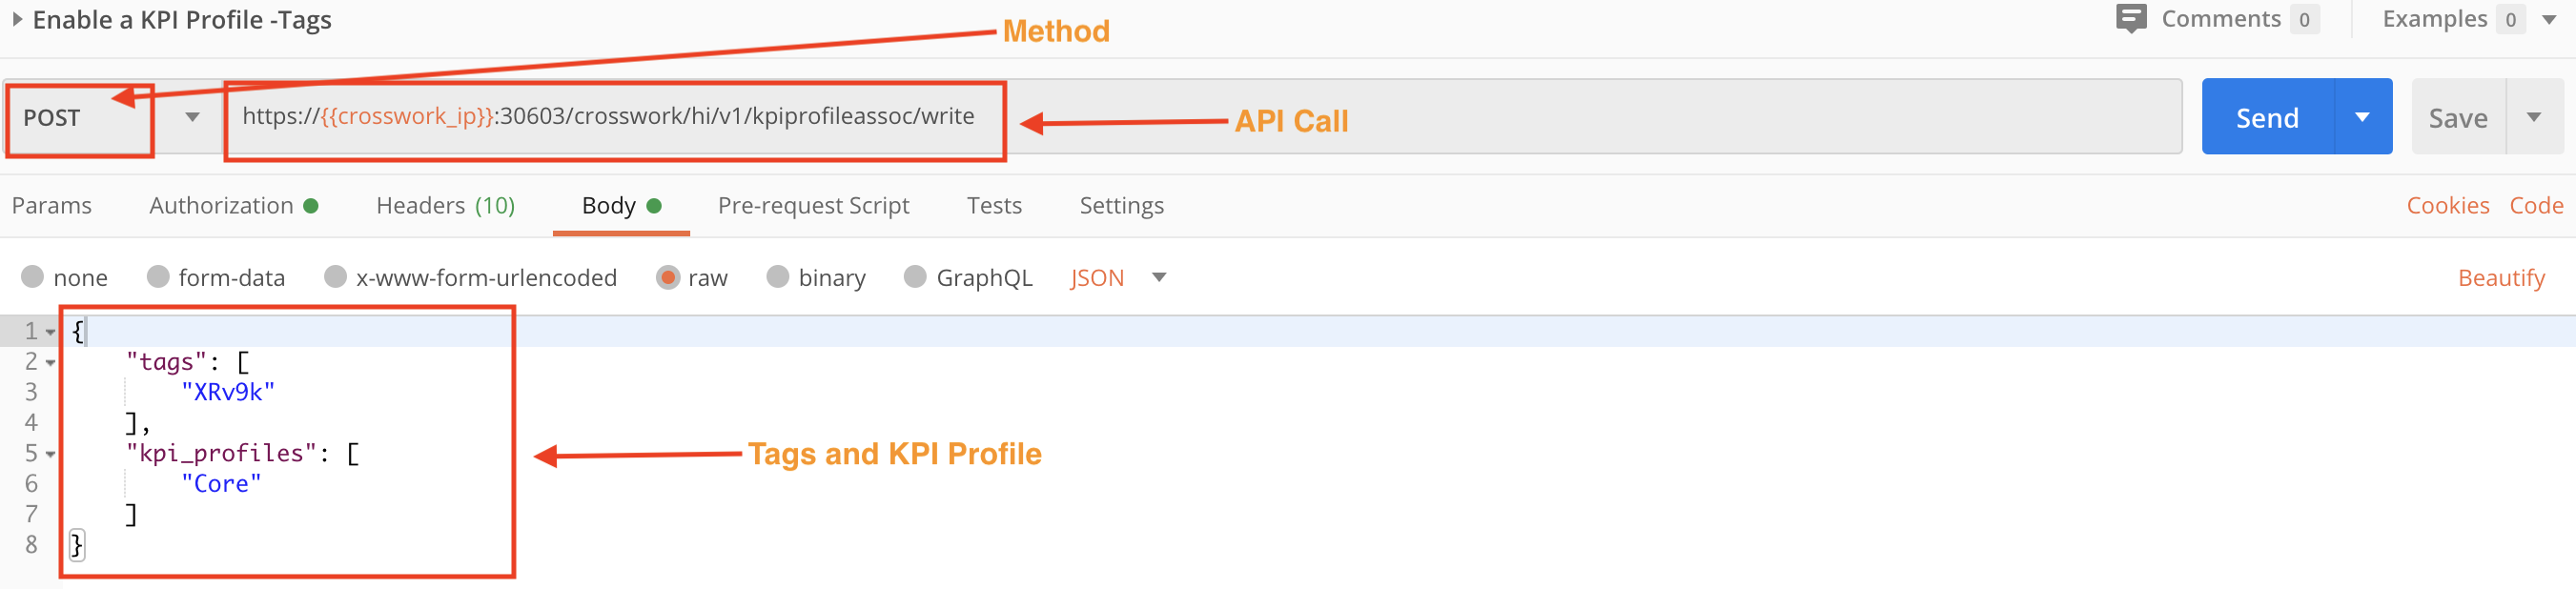
Step 2D: Enable the KPI Profile Using Tags
Use a POST request and the /crosswork/hi/v1/kpiprofileassoc/write API to enable the KPI Profile on all devices with the specified tag.
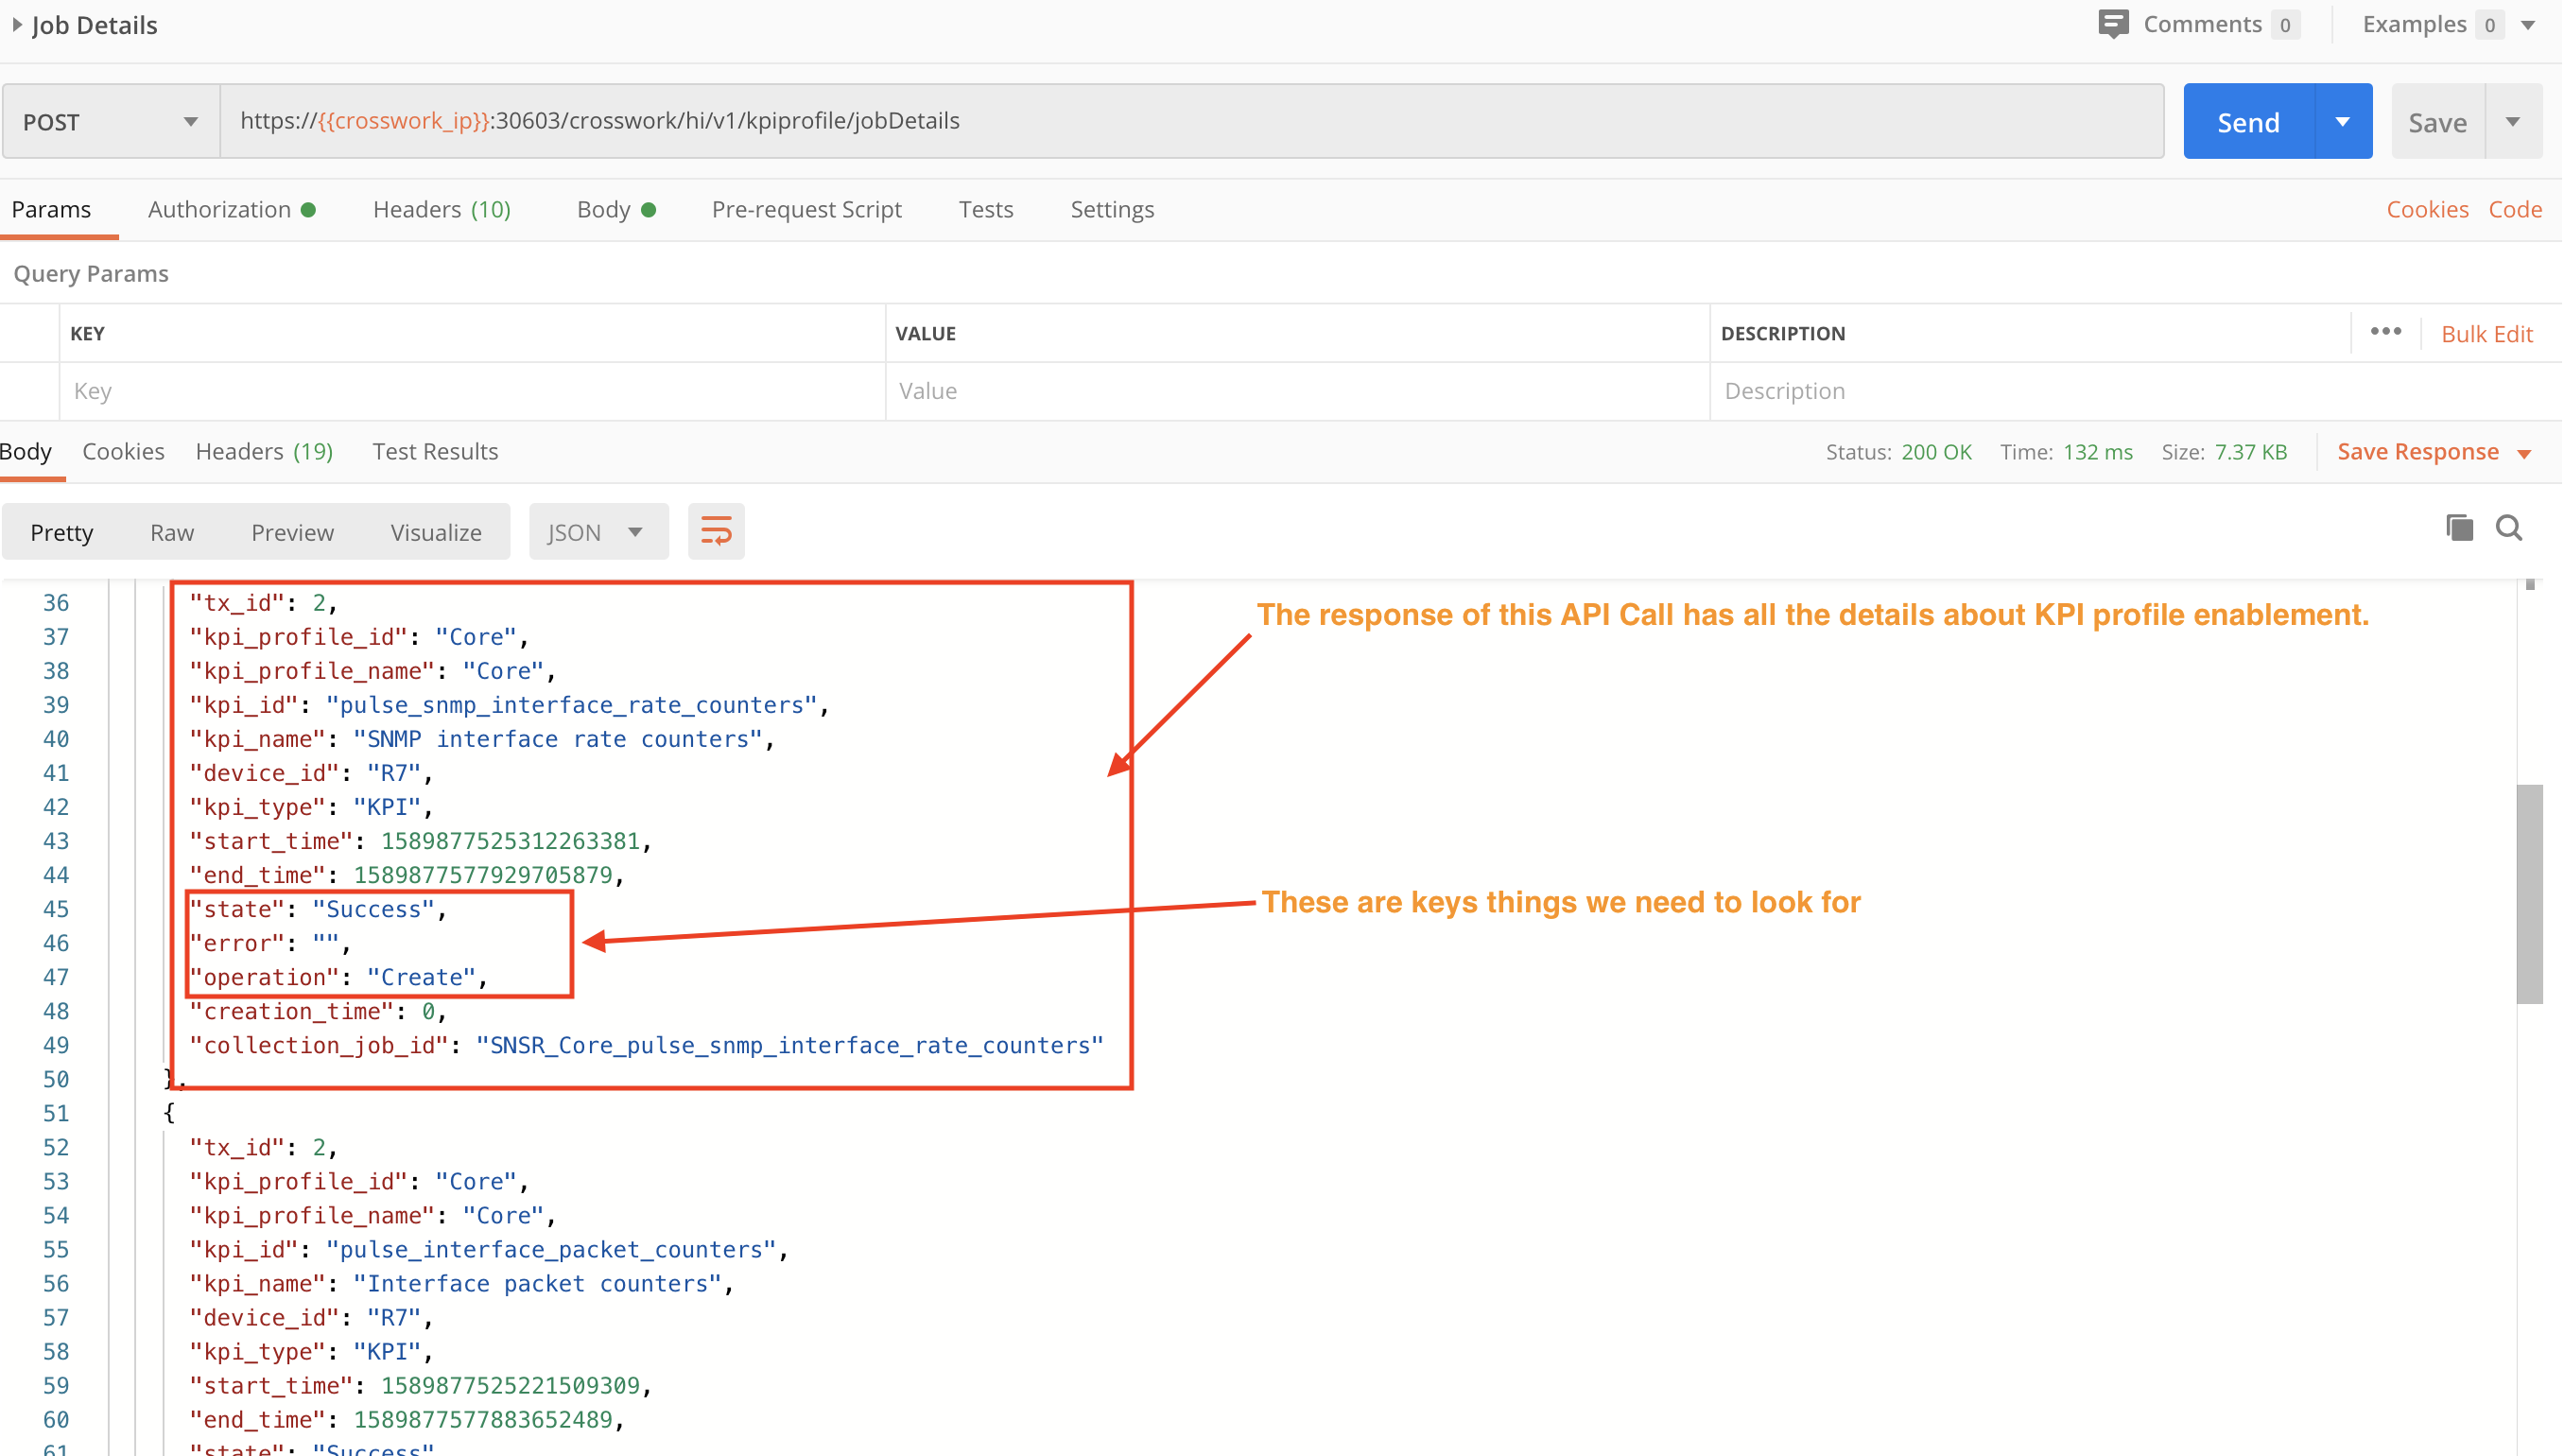
Step 3: Check the Job Status of the Respective KPI Profile
Use a POST request and the crosswork/hi/v1/kpiprofile/jobDetails to check the device status.
Section 4: Alert Checkpoint
In this section, we check the Crosswork system for any alerts on the devices with the respective KPI profiles enabled.

You have many options on how to check for and get the details of current KPI alerts. Here are a few examples:
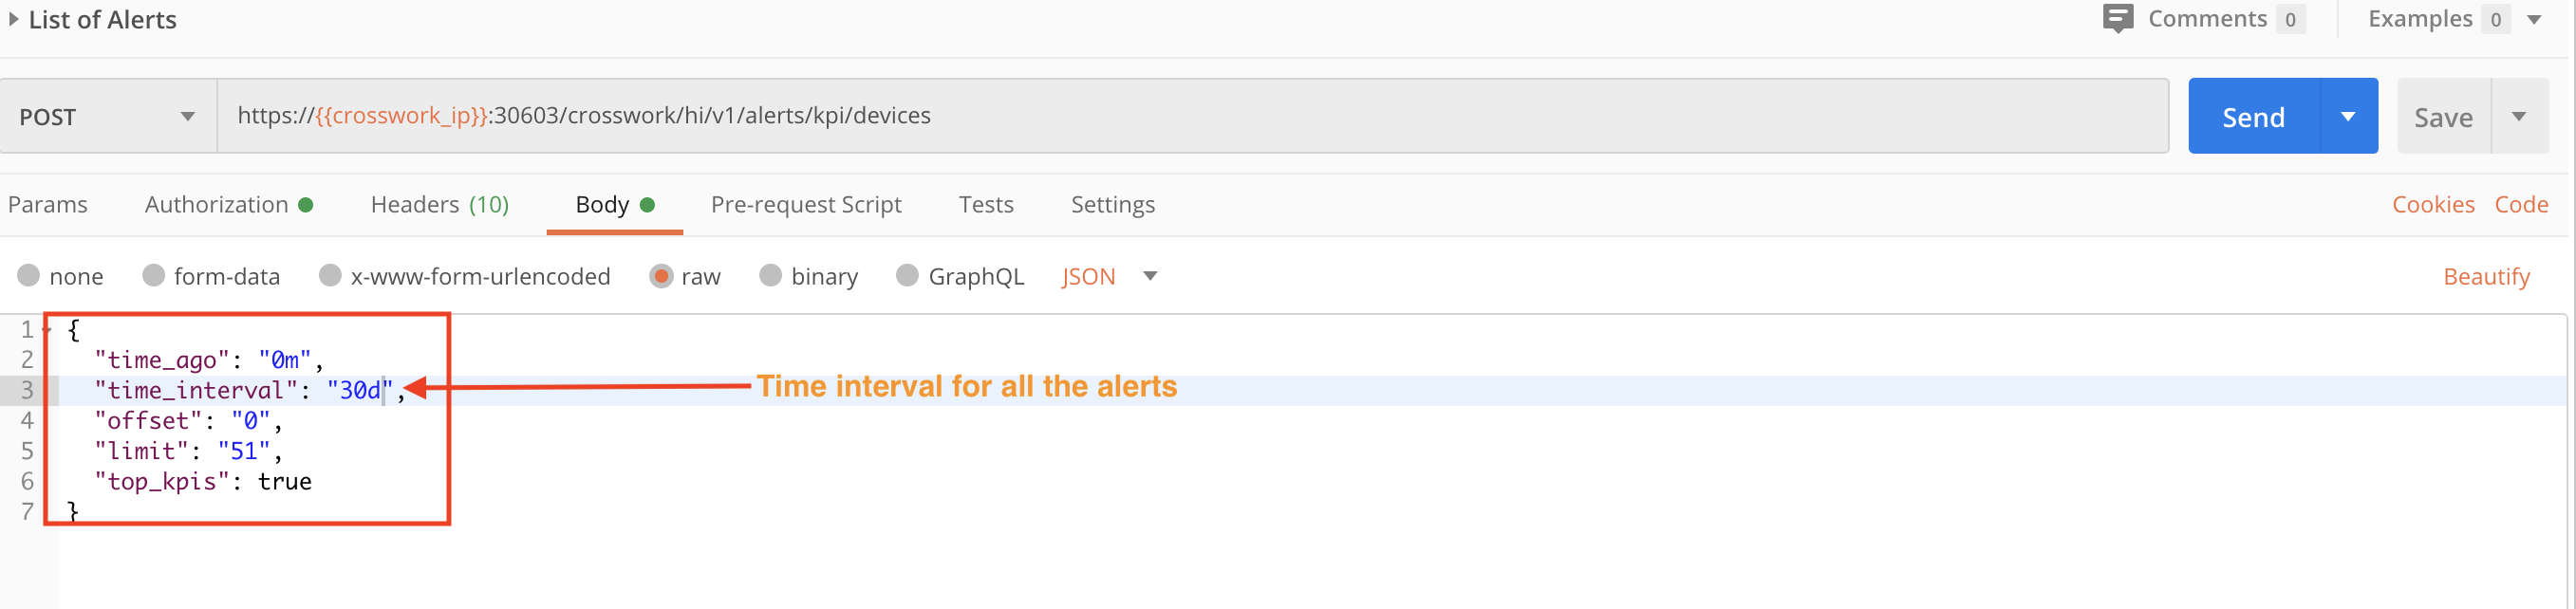
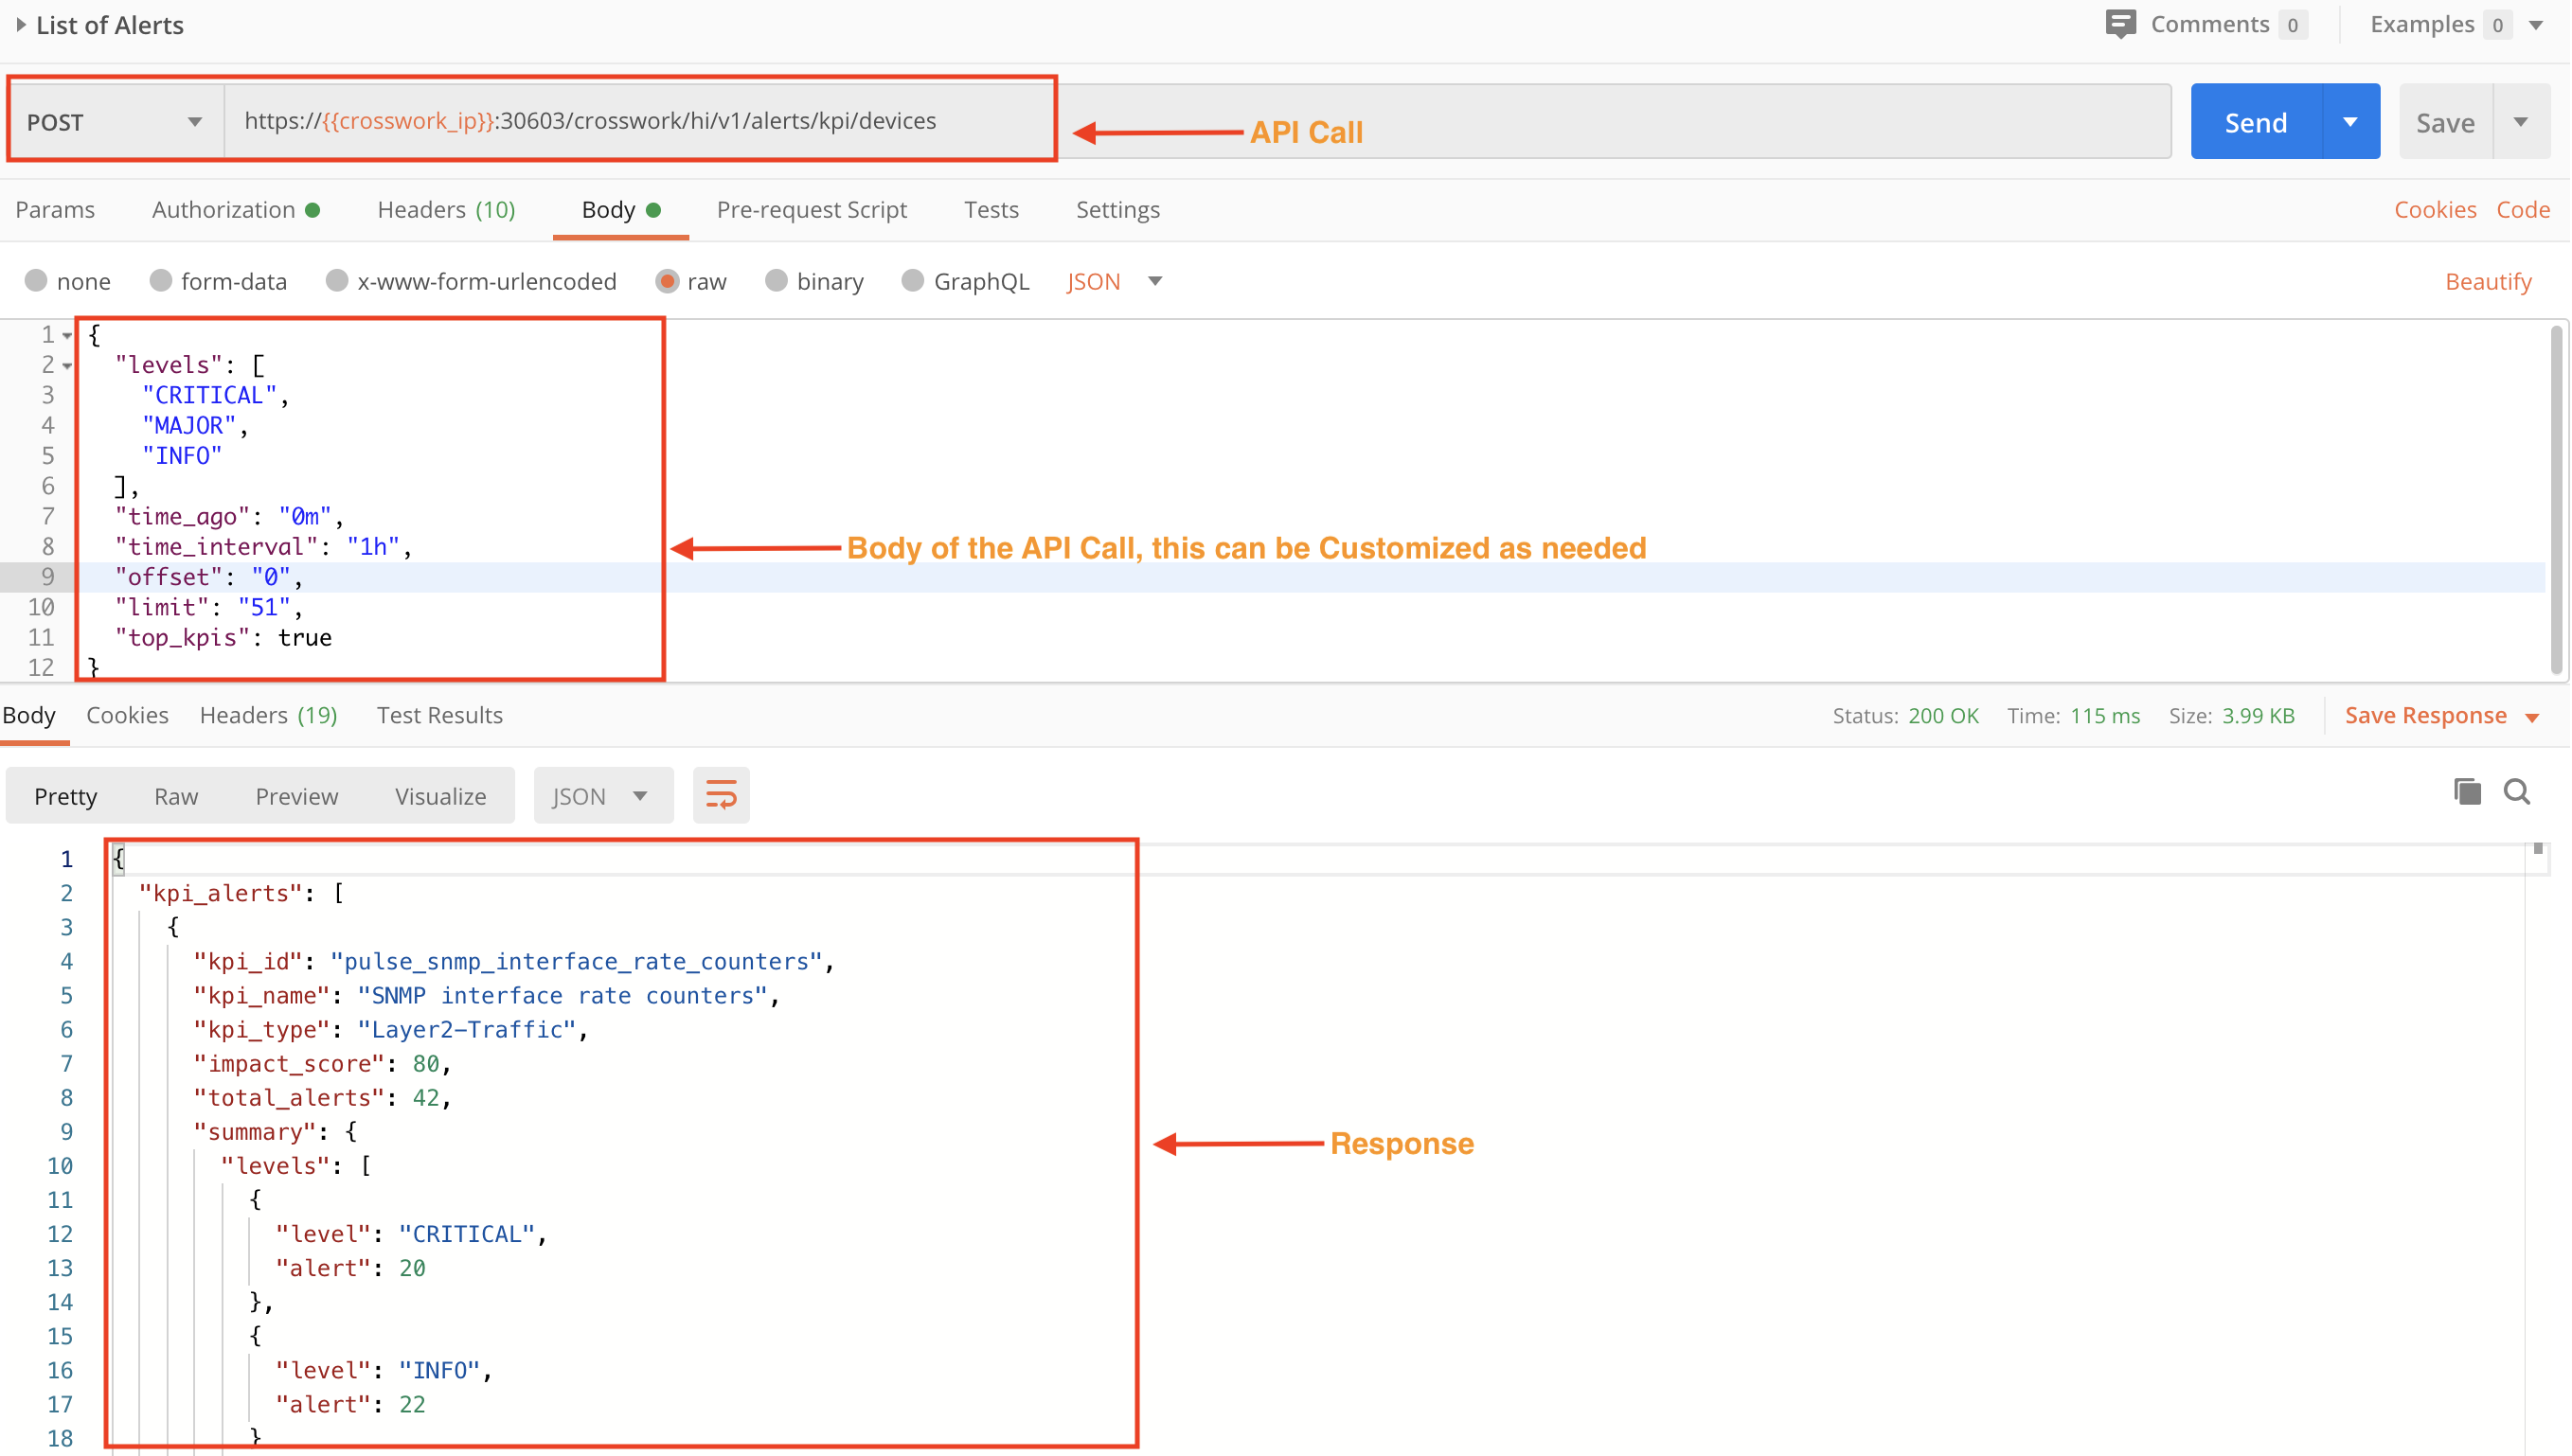
In the figure below, we use a POST request and the crosswork/hi/v1/alerts/kpi/devices API to get a list of all the Alerts in the system for the last month.
In this figure we use the same API in a POST request. In the request Body, we specify values for time_interval and devices to get all the alerts for the last hour for a specific device.
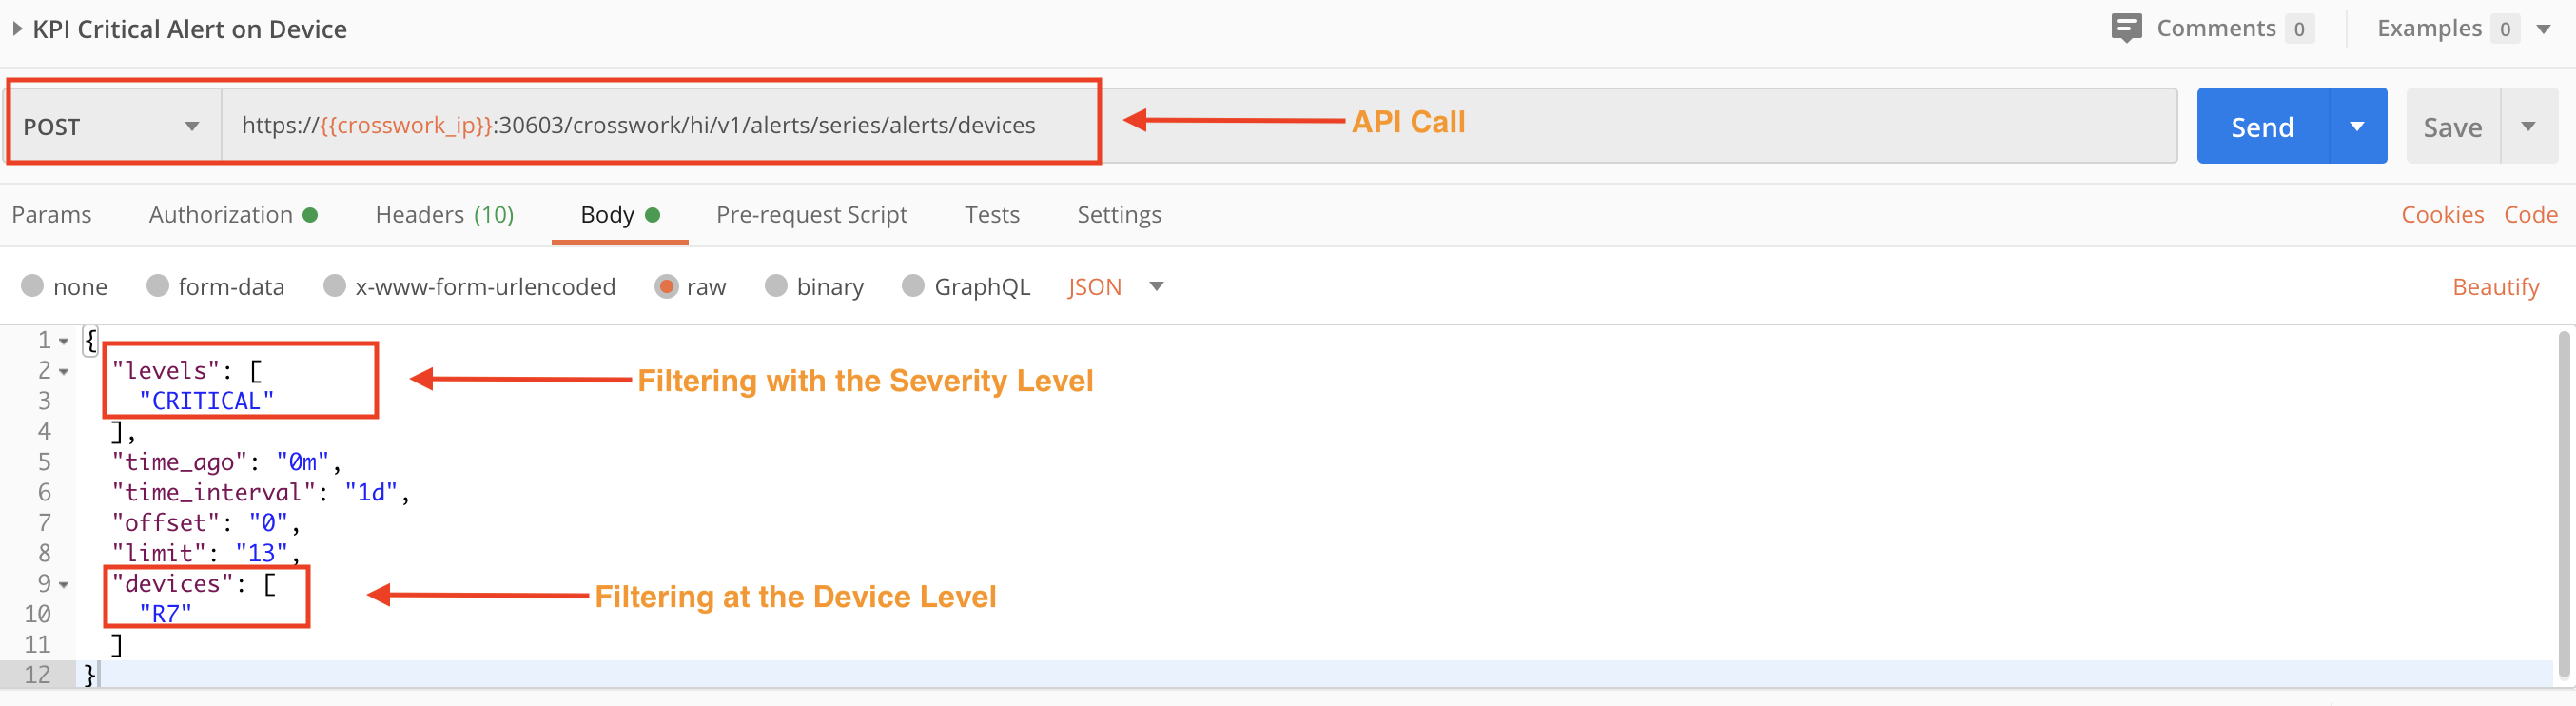
The following POST request's levels and devices values filter the alerts for a specific severity level and device.
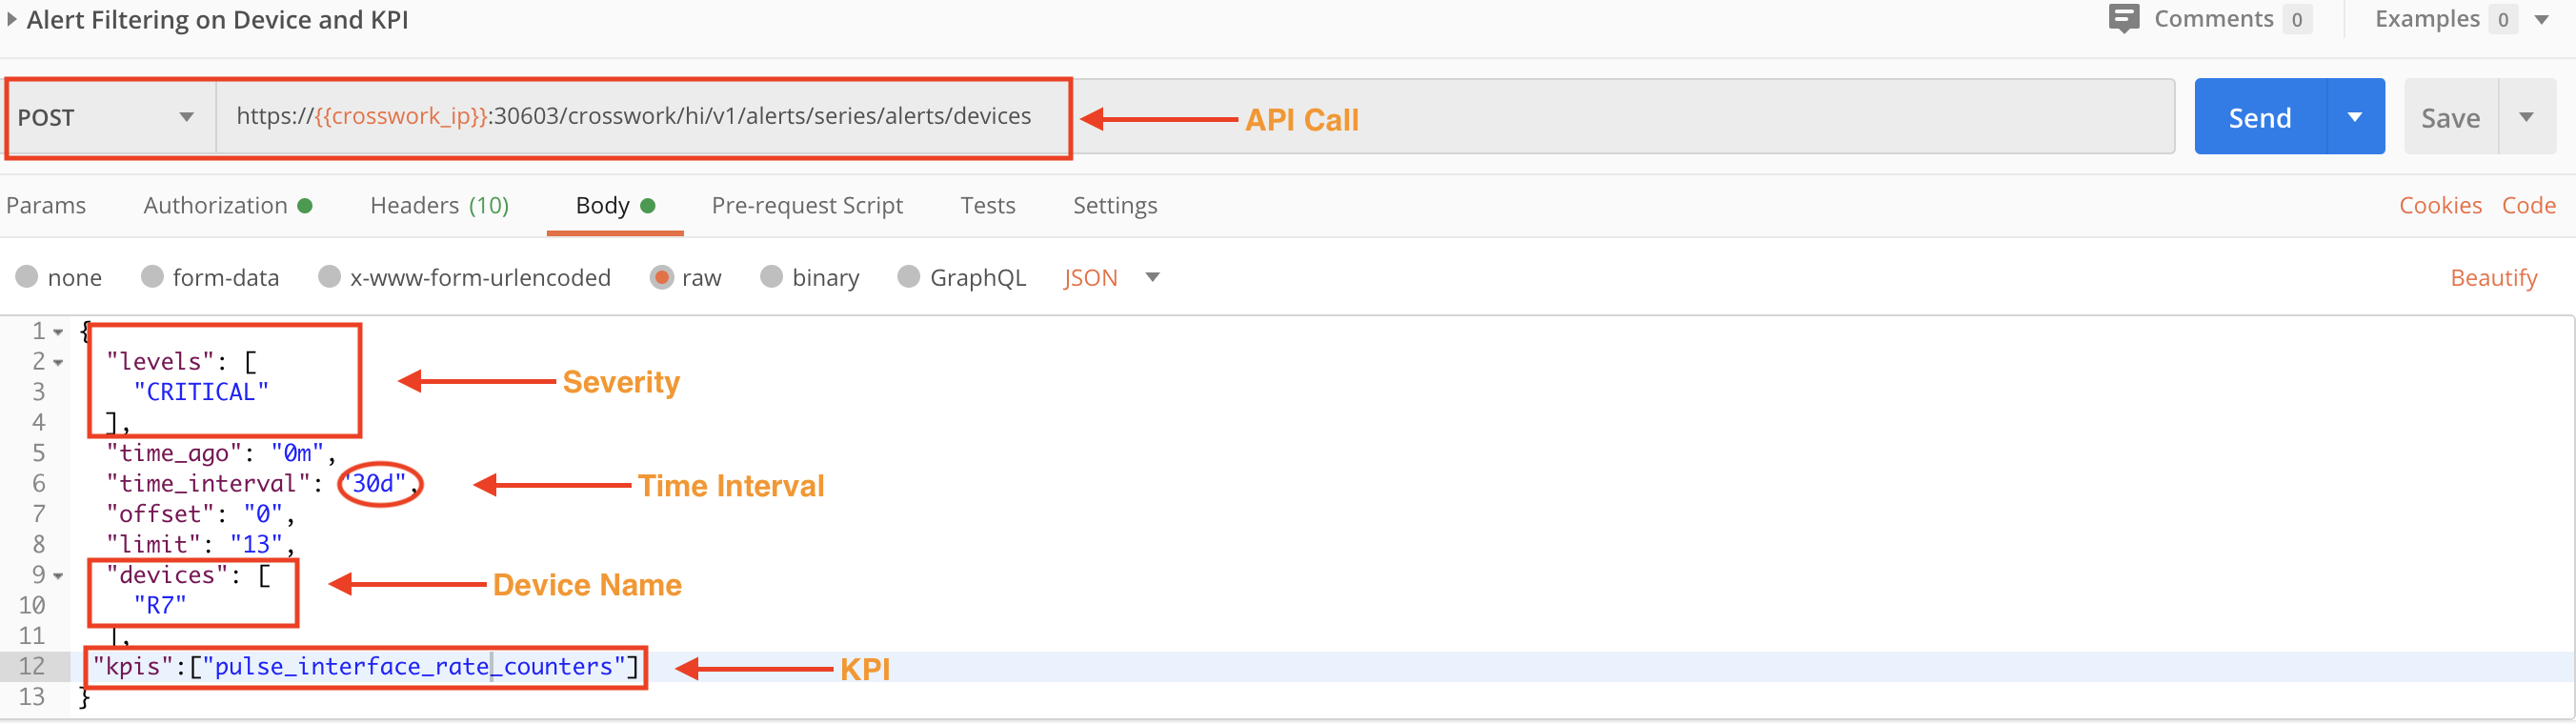
The following POST request's levels, devices and kpis values filter the alerts for a specific severity level, device, and the name of the KPI raising the alert.
Section 5: Automate Configuration Changes Using APIs
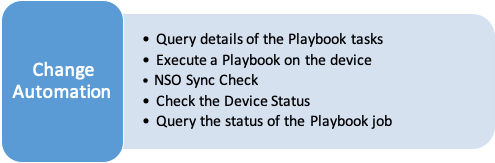
In this section, we will use APIs to access Change Automation Playbooks and use them to automate configuration changes on a device. Our intent here will be to understand which Playbooks are available to us, understand the tasks inside each Playbook that are performed when it is executed, select and execute one of these Playbooks, and then check the Playbook job status.
Step 1: Learn About the Available Playbooks and Their Tasks
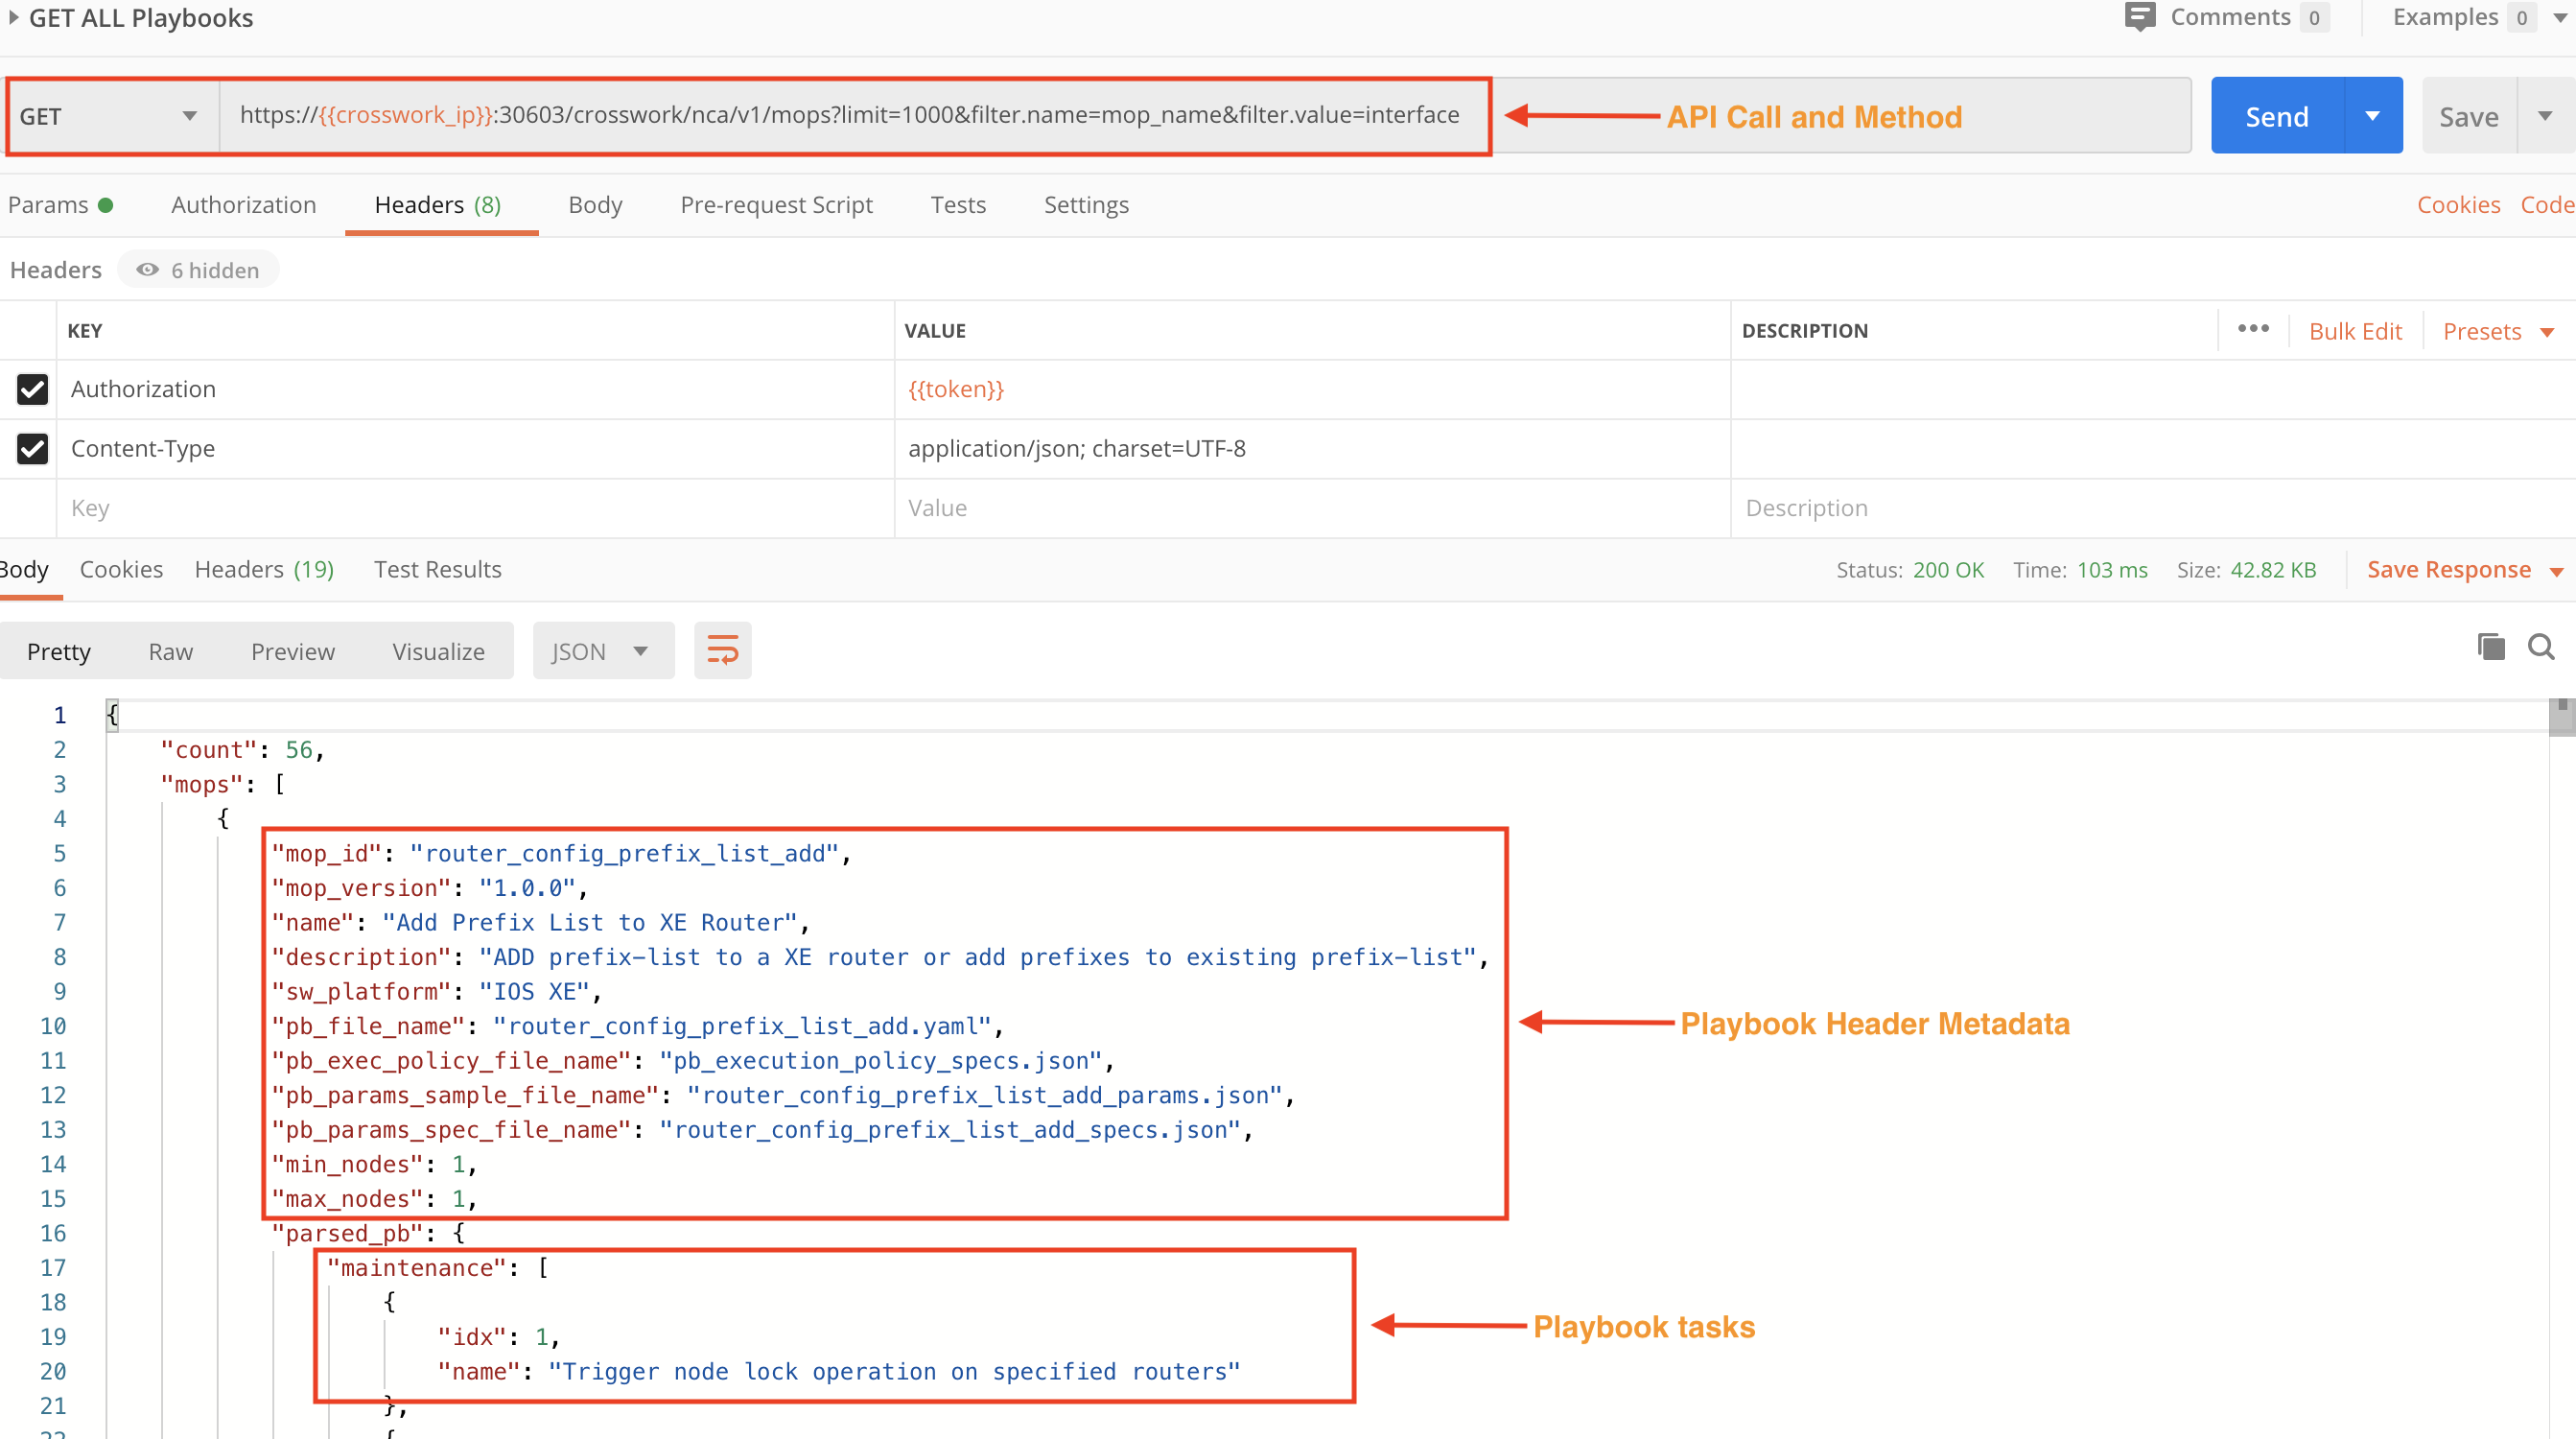
Use the crosswork/nca/v1/mops API in a GET request, along with values for the API's limit, filter.name and filter.value parameters, to get all the available Playbooks on the system, along with the tasks involved. The figure below shows the API call and part of the response.
Step 2: Learn More About a Specific Playbook and its Tasks
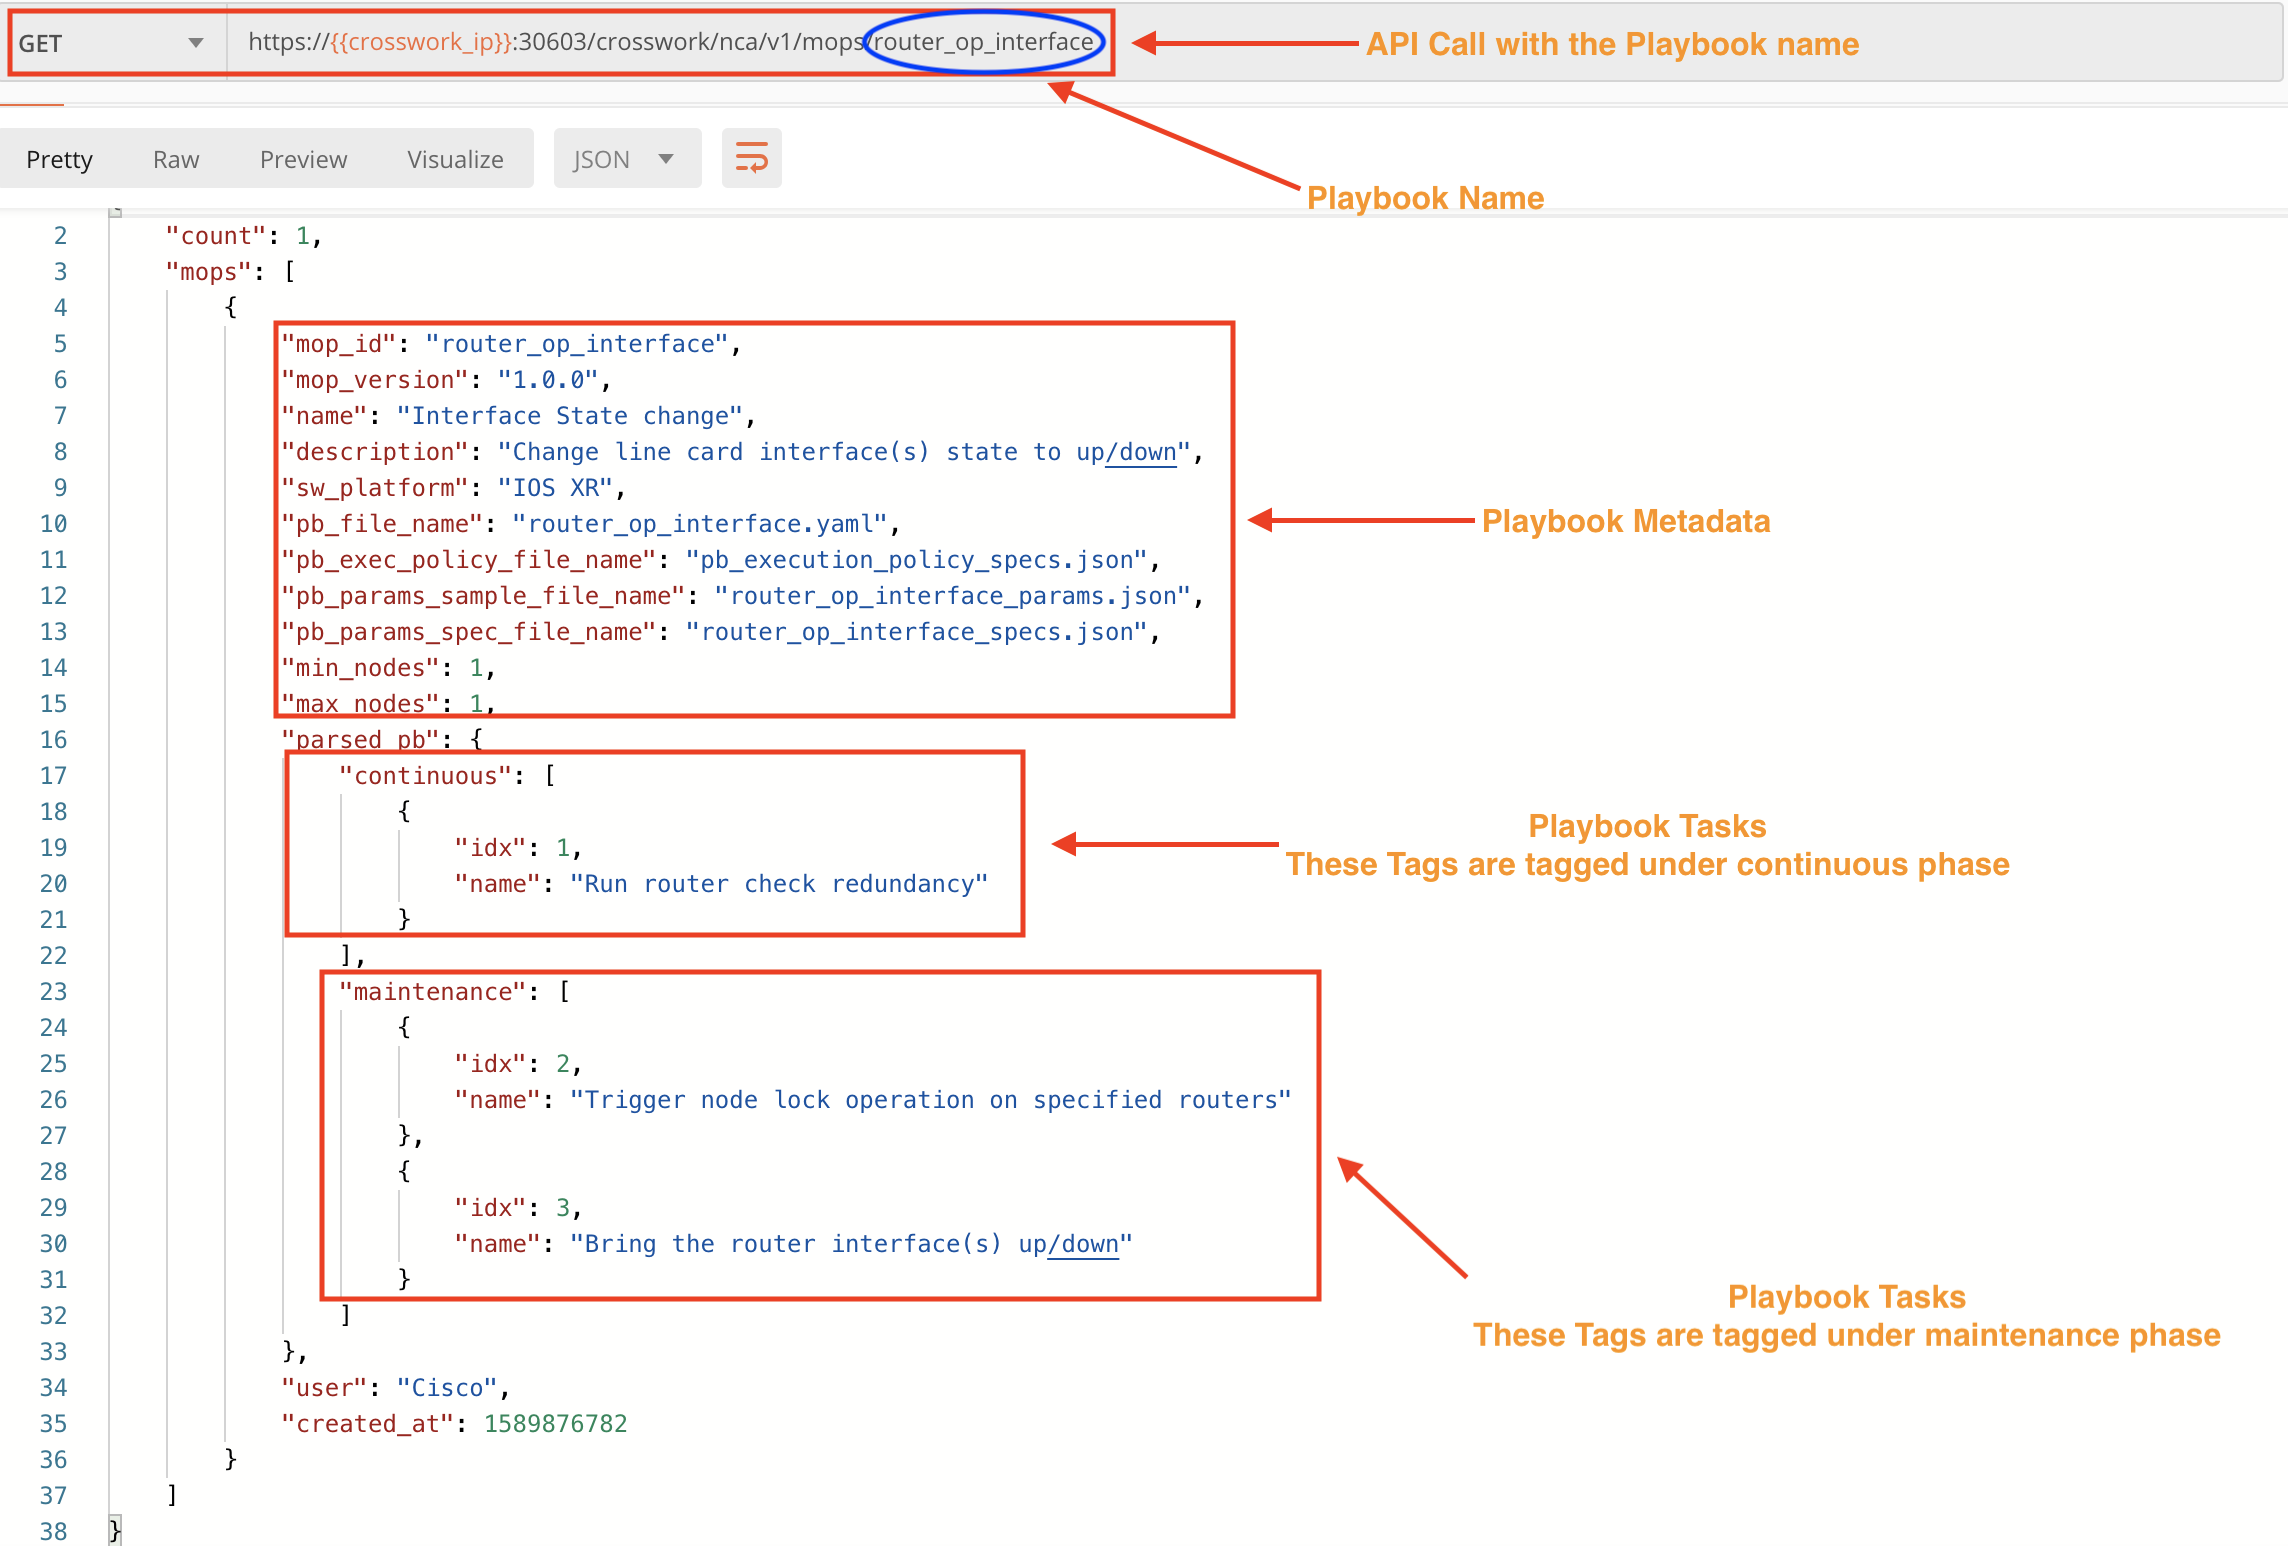
For details about one specific Playbook and its tasks, use a GET request with the /crosswork/nca/v1/mops API, specifying the Playbook name after the API (/router_op_interface in the example below), followed by the /specs? parameter. The figure below shows part of the response.
Step 3: Execute a Playbook Using APIs
We can execute a Playbook residing on the system using APIs where the body of call will be the parameters that are required for successful execution. As with KPIs, it is an optional, but recommended practice to synchronize the Cisco NSO and device configurations and check the device status before executing the selected Playbook. We also recommend that you check the Playbook job status after running it. The required and best-practice steps are demonstrated in the following steps.
Step 3A: Sync NSO and Device Configurations
Use two POST requests with the NSO running/devices/_operations/check-sync and running/devices/_operations/sync-from APIs to check and then sync the NSO and device configurations.
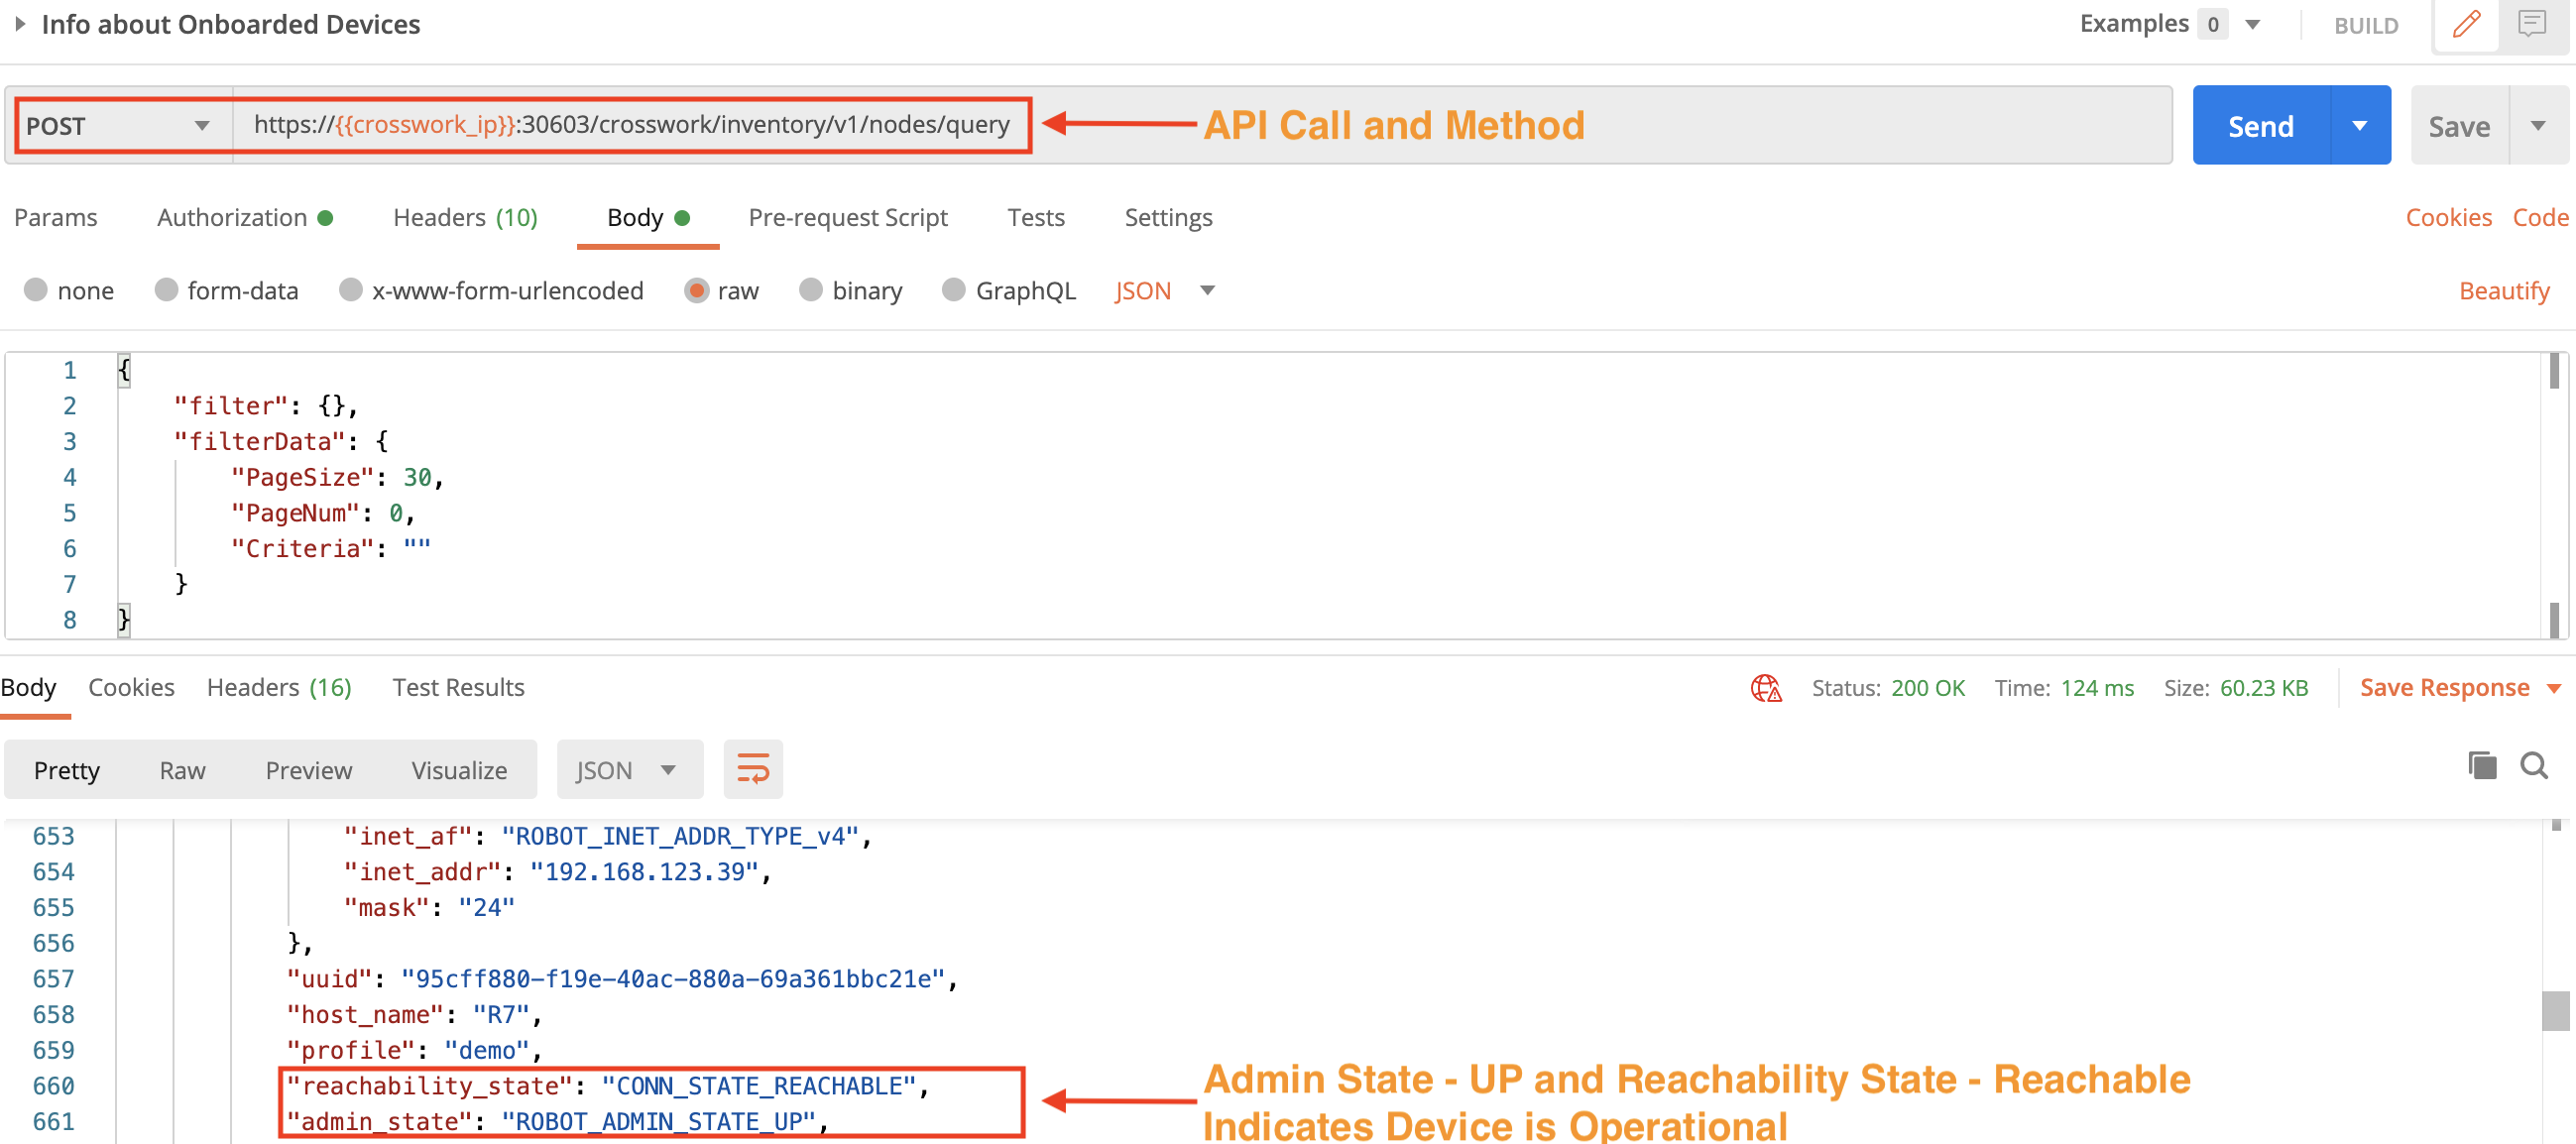
Step 3B: Check the Device Status
Use a POST request and the crosswork/inventory/v1/nodes/query API to check the device status. The admin status should be up and the Reachability state must be Reachable or the Playbook run will fail.
Step 3C: Execute the Playbook
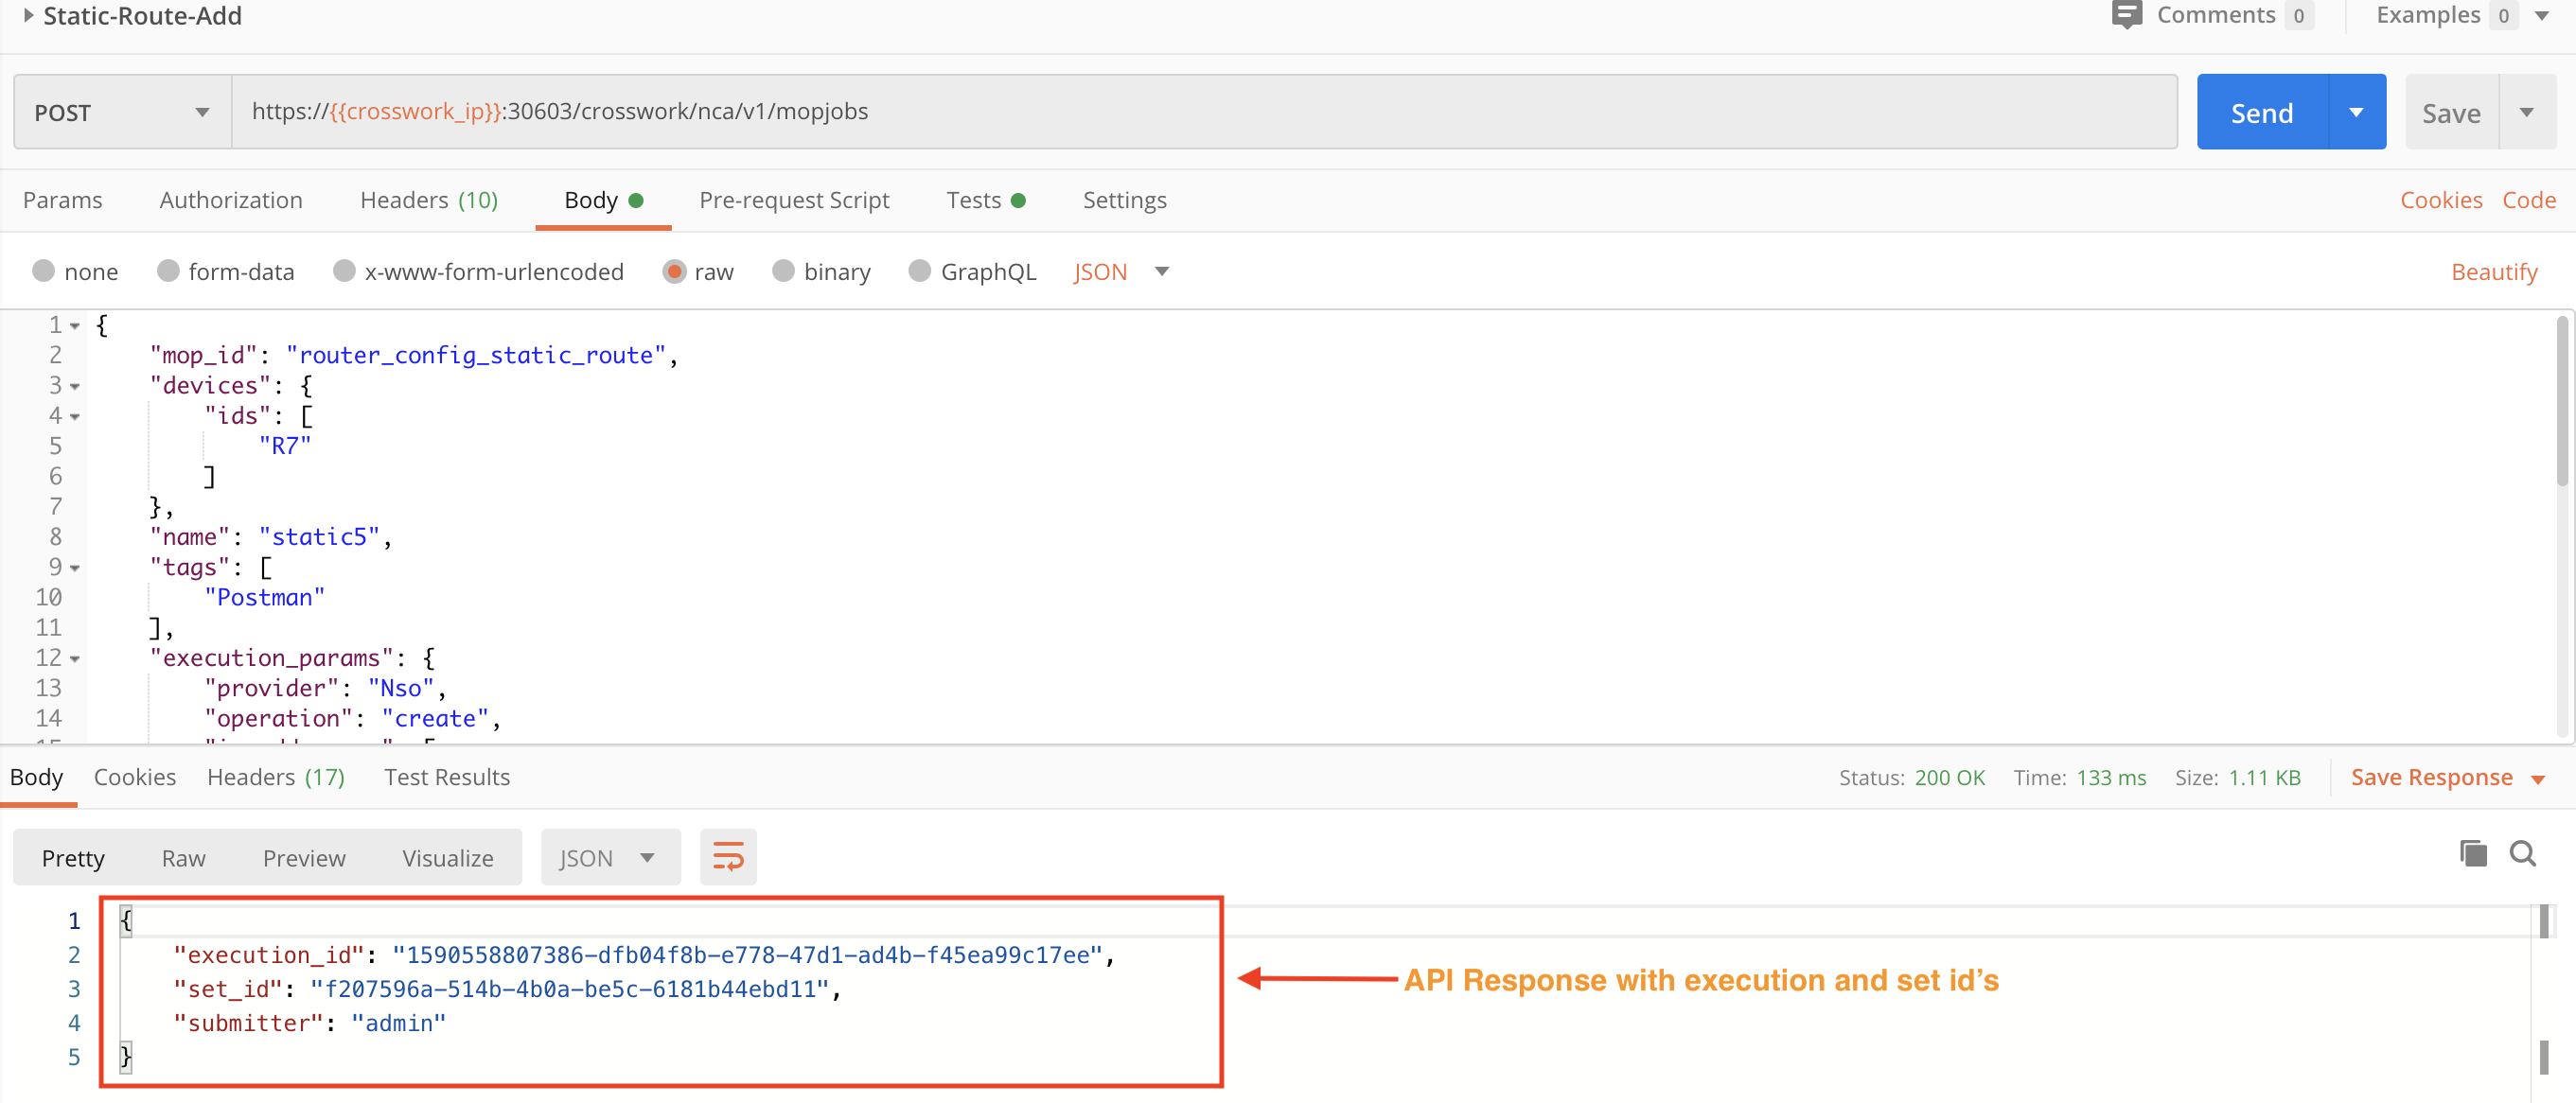
In the following figure, we use the crosswork/nca/v1/mopjobs API in a POST request to execute a Playbook. In this example, the Playbook creates a static route. Values are required for the Playbook and device names, execution parameters, and the execution policy.

Step 3D: Check the Status of the Executed Playbook
When we execute a Playbook using APIs, the response to the status check has information like execution_id, set_id and submitter. We will need the execution_id value for use in the next step.
Step 3E: Get Job Details for the Executed Playbook
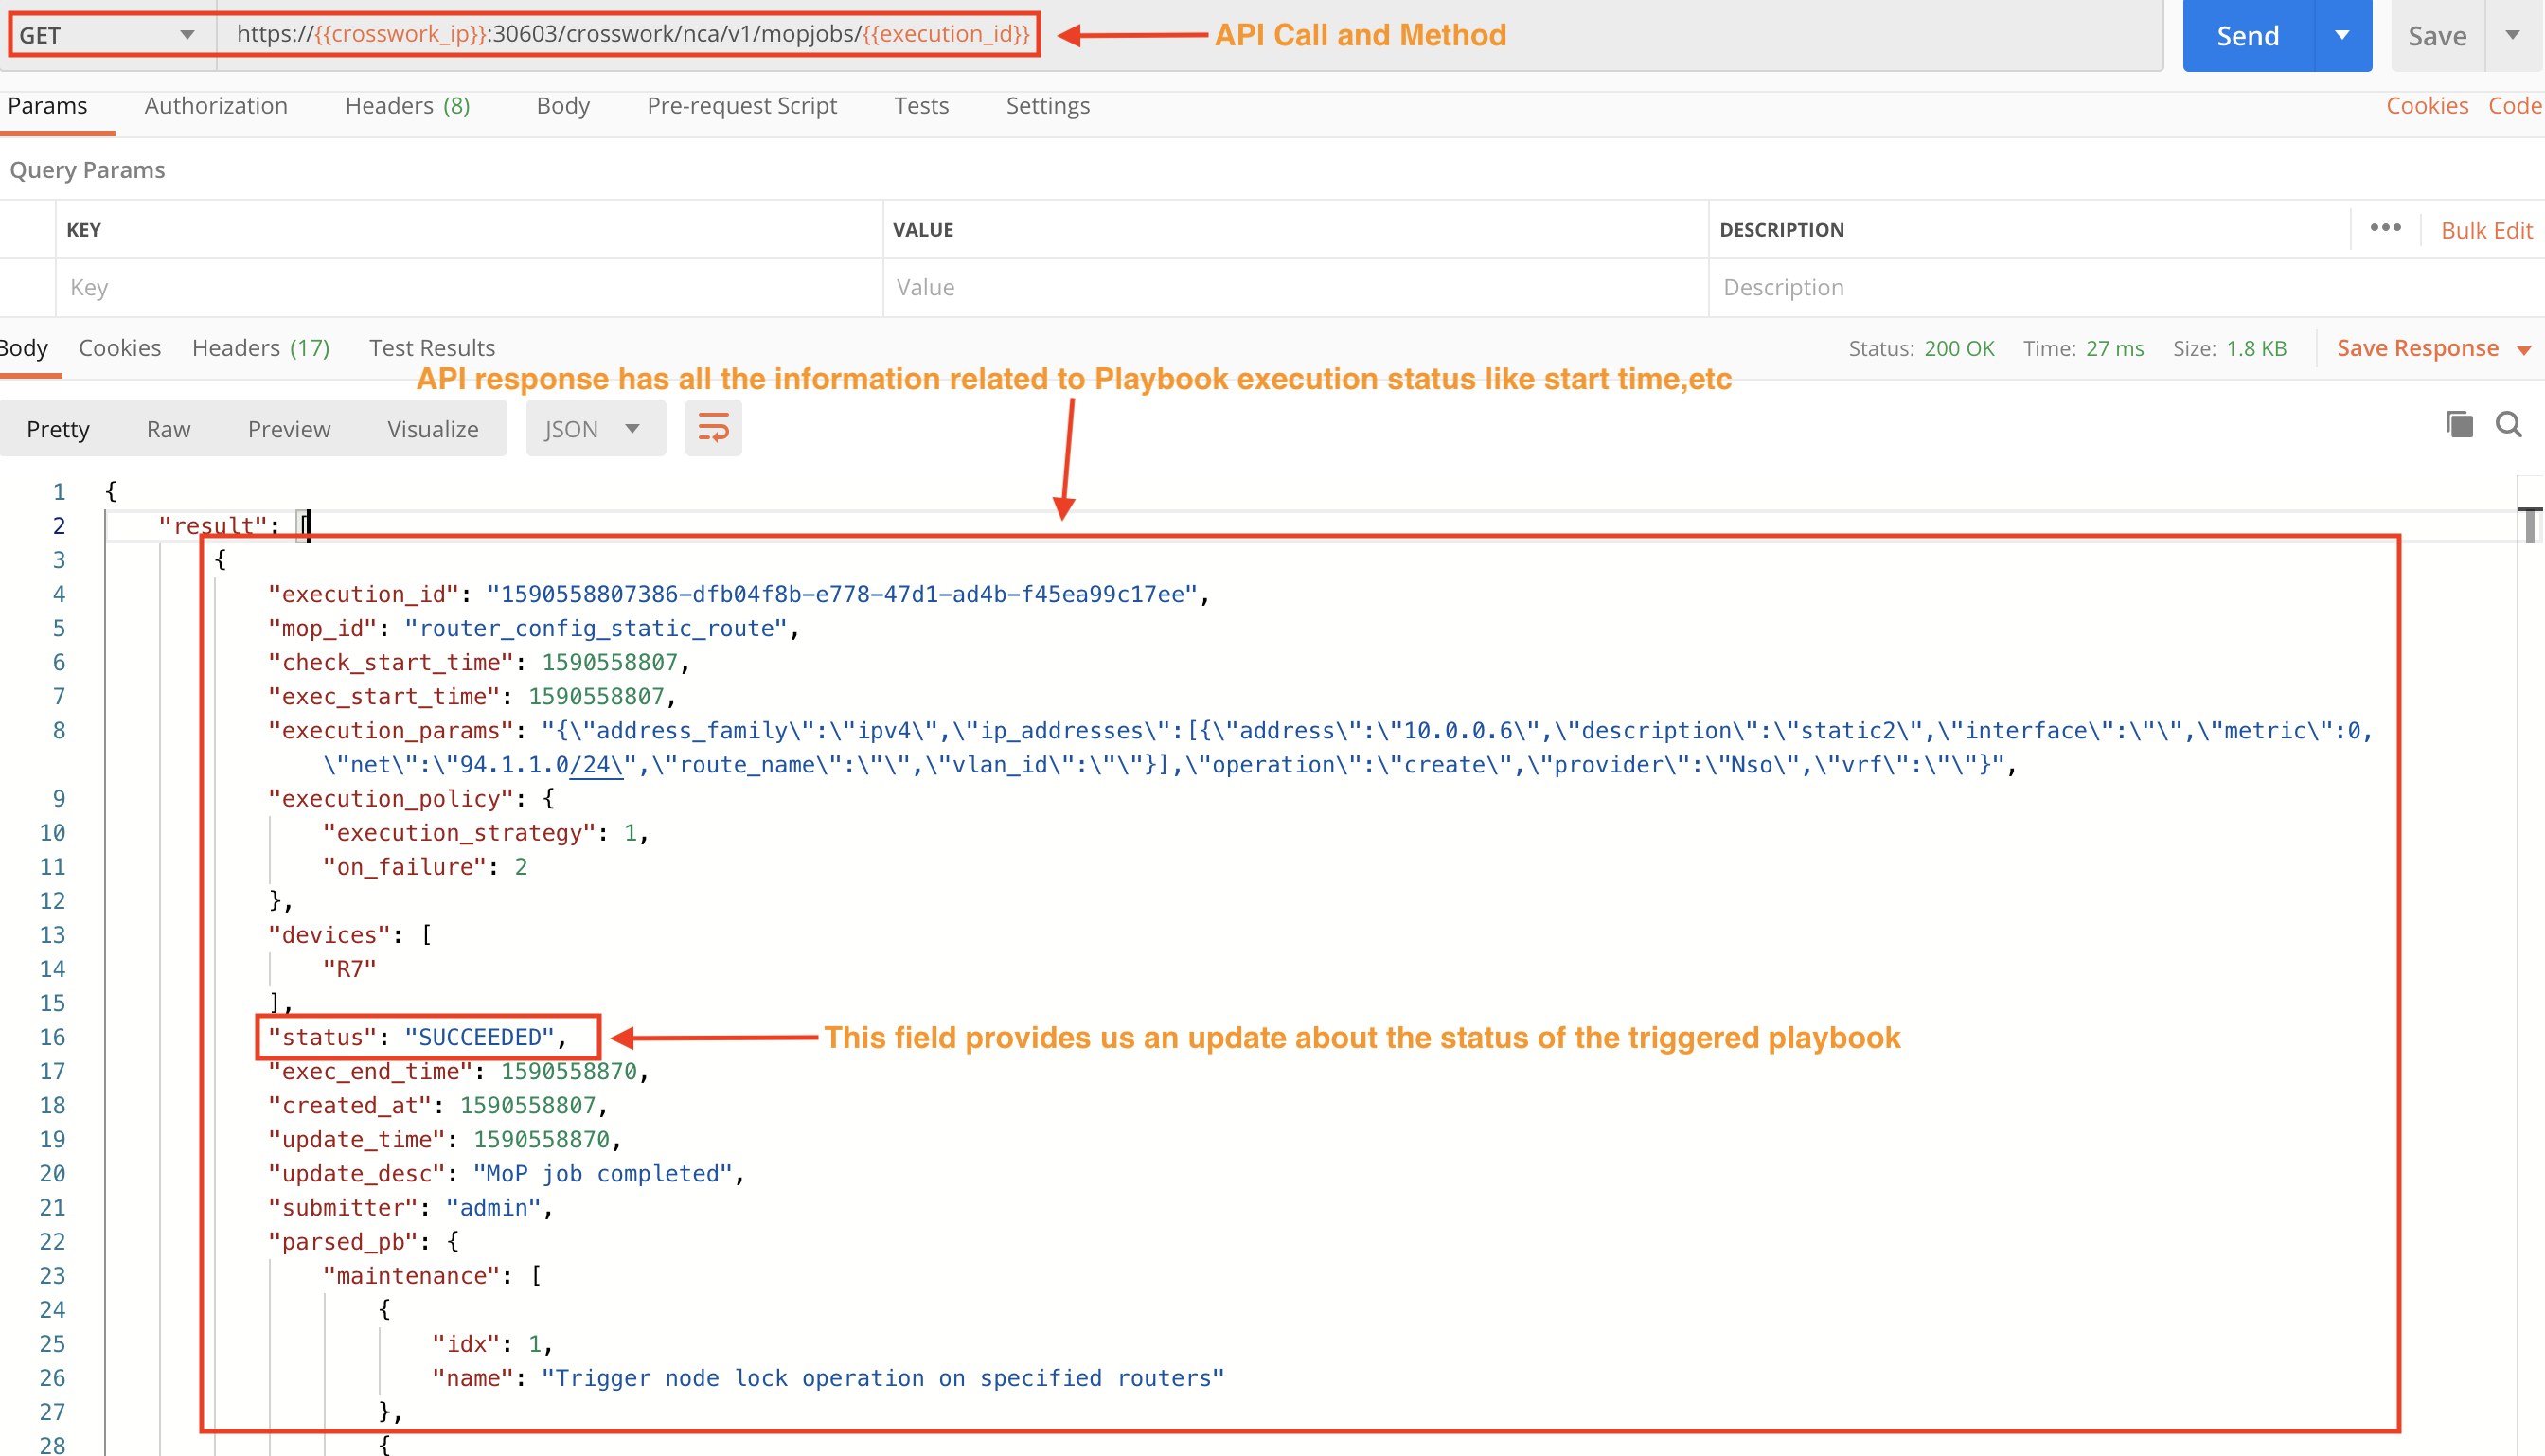
Copy the execution_id value from the previous API response and use it in the next API call to get the details of the job.
Section 6: Retire Devices
In this section, we will see how to use Crosswork APIs to retire (or delete) a device gracefully. Our intent will be to disable any running device KPI profiles and detach the device from Crosswork Data Gateway, then delete it from the Crosswork device inventory. Checking the device and KPI disablement jobs are not required steps, but are recommended for best results.
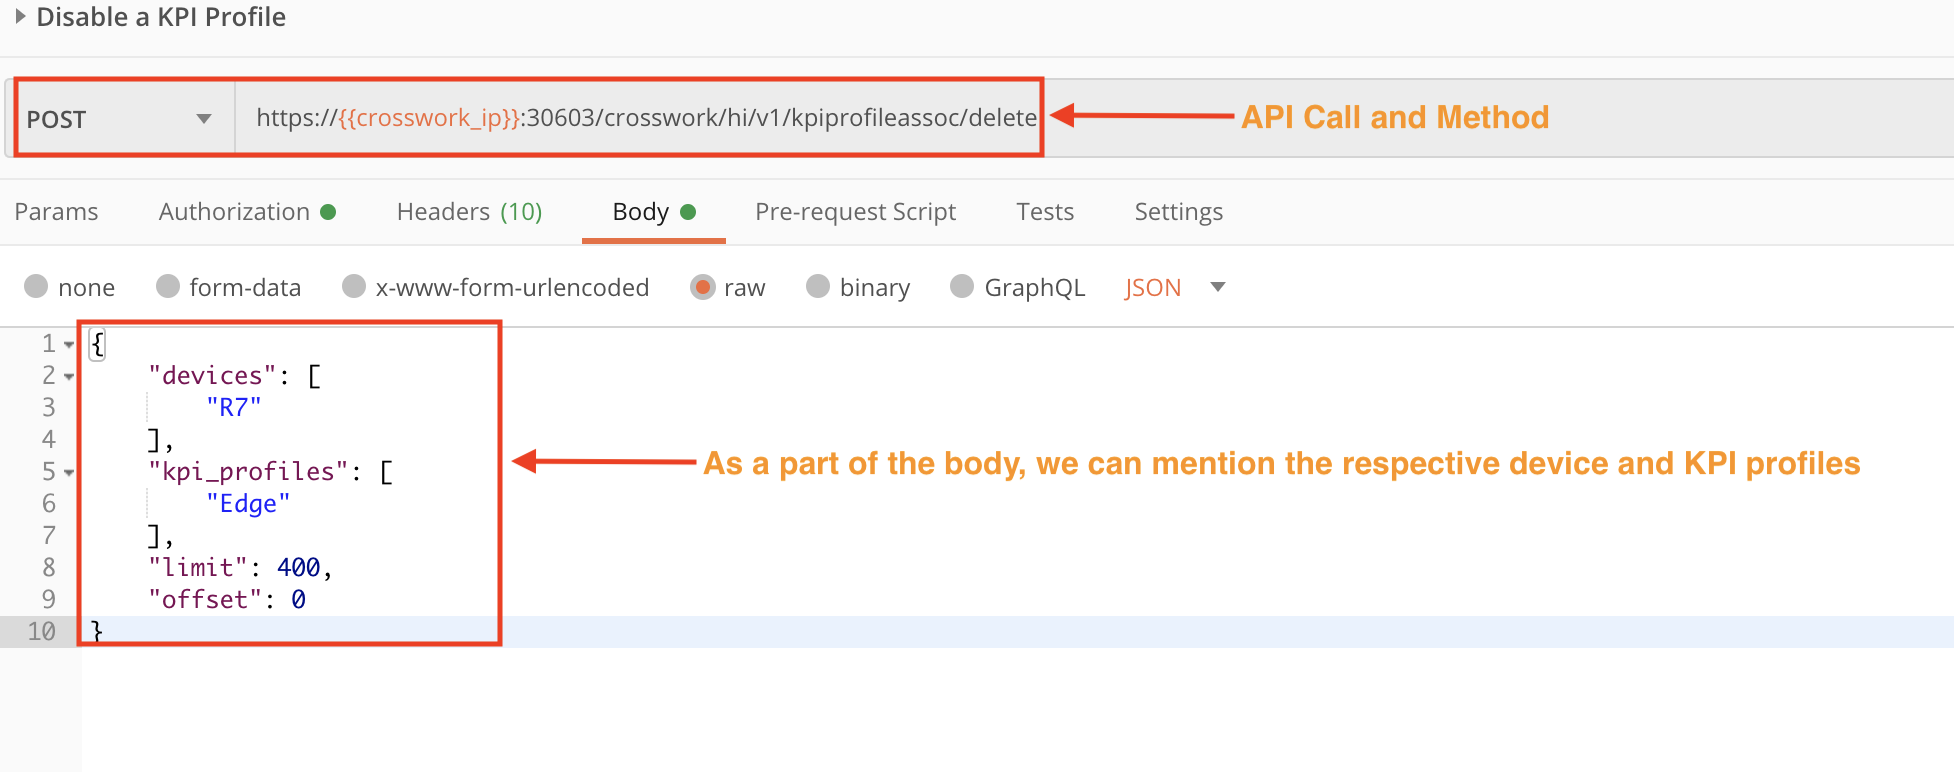
Step 1: Disable KPI Profiles on Devices
Use the crosswork/hi/v1/kpiprofileassoc/delete API in a POST request to disable all the KPI profiles monitoring the respective device.
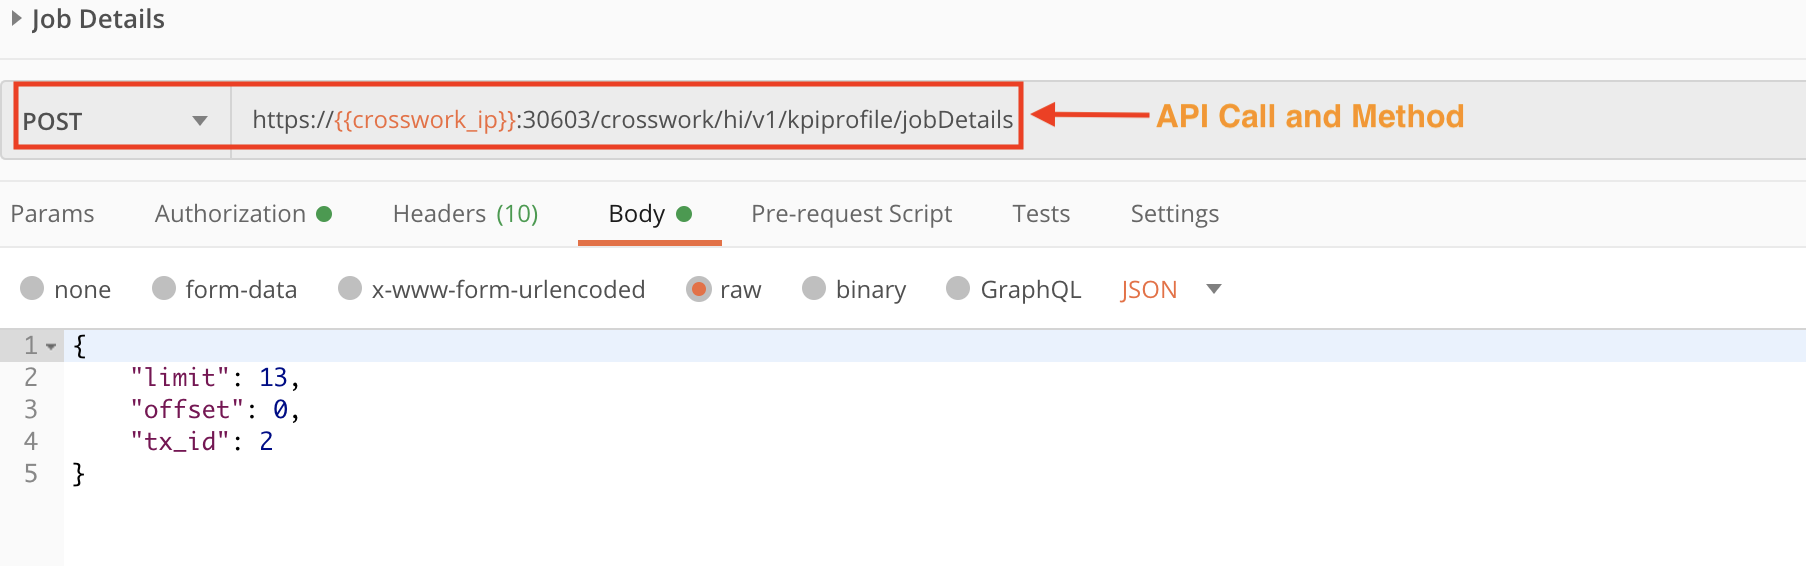
Step 2: Get Details on the KPI Disablement Job
Use the crosswork/hi/v1/kpiprofile/jobDetails API in a POST request to check the status of the disablement of the KPI profiles on the specified device.
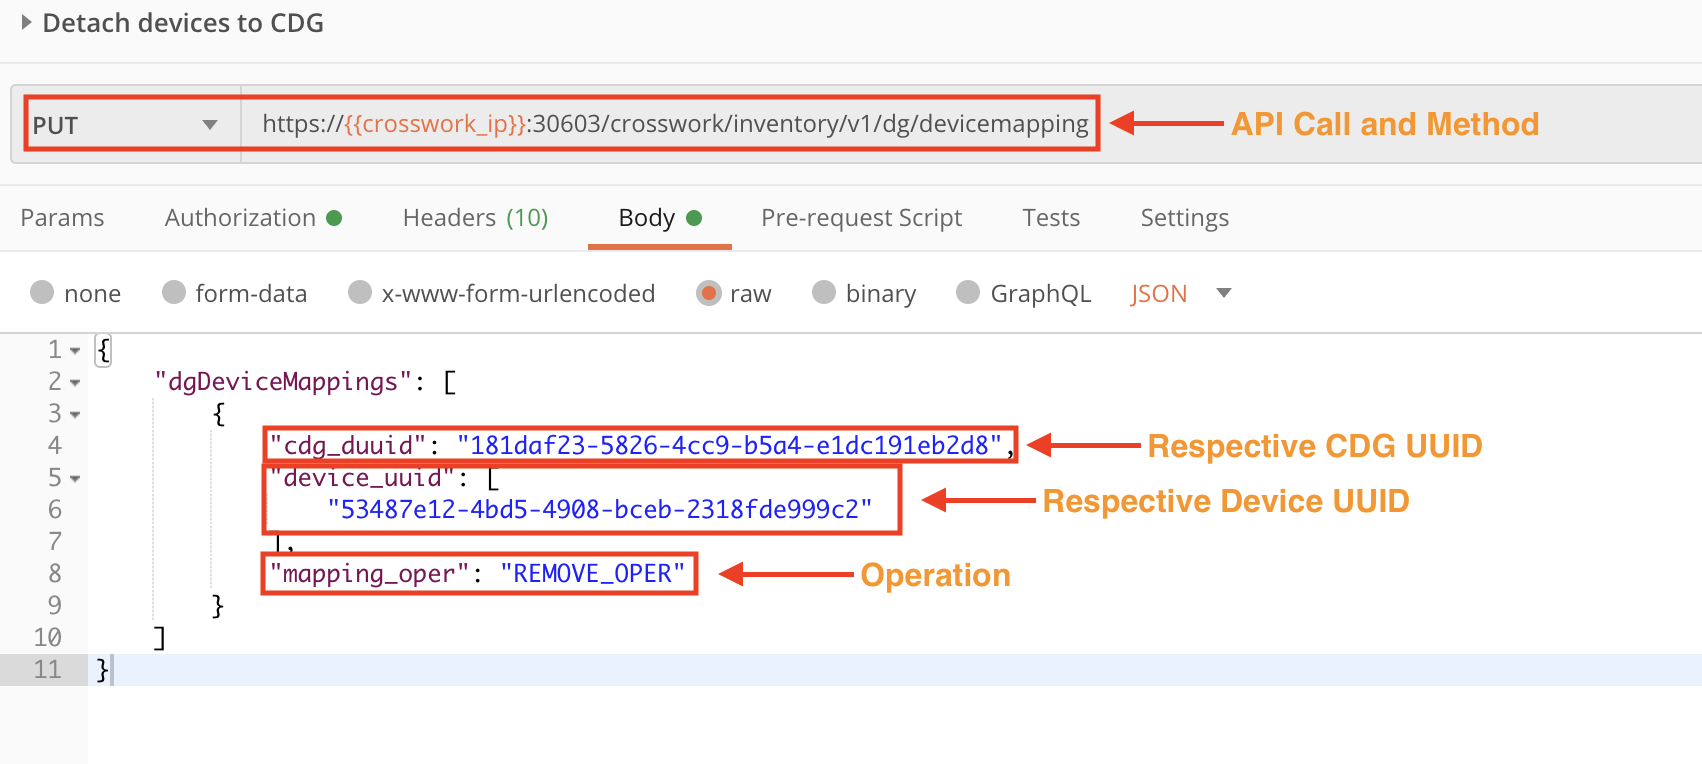
Step 3: Detach the Device from Crosswork Data Gateway
Use the crosswork/inventory/v1/dg/devicemapping API in a PUT request to detach the device from the enrolled CDG.
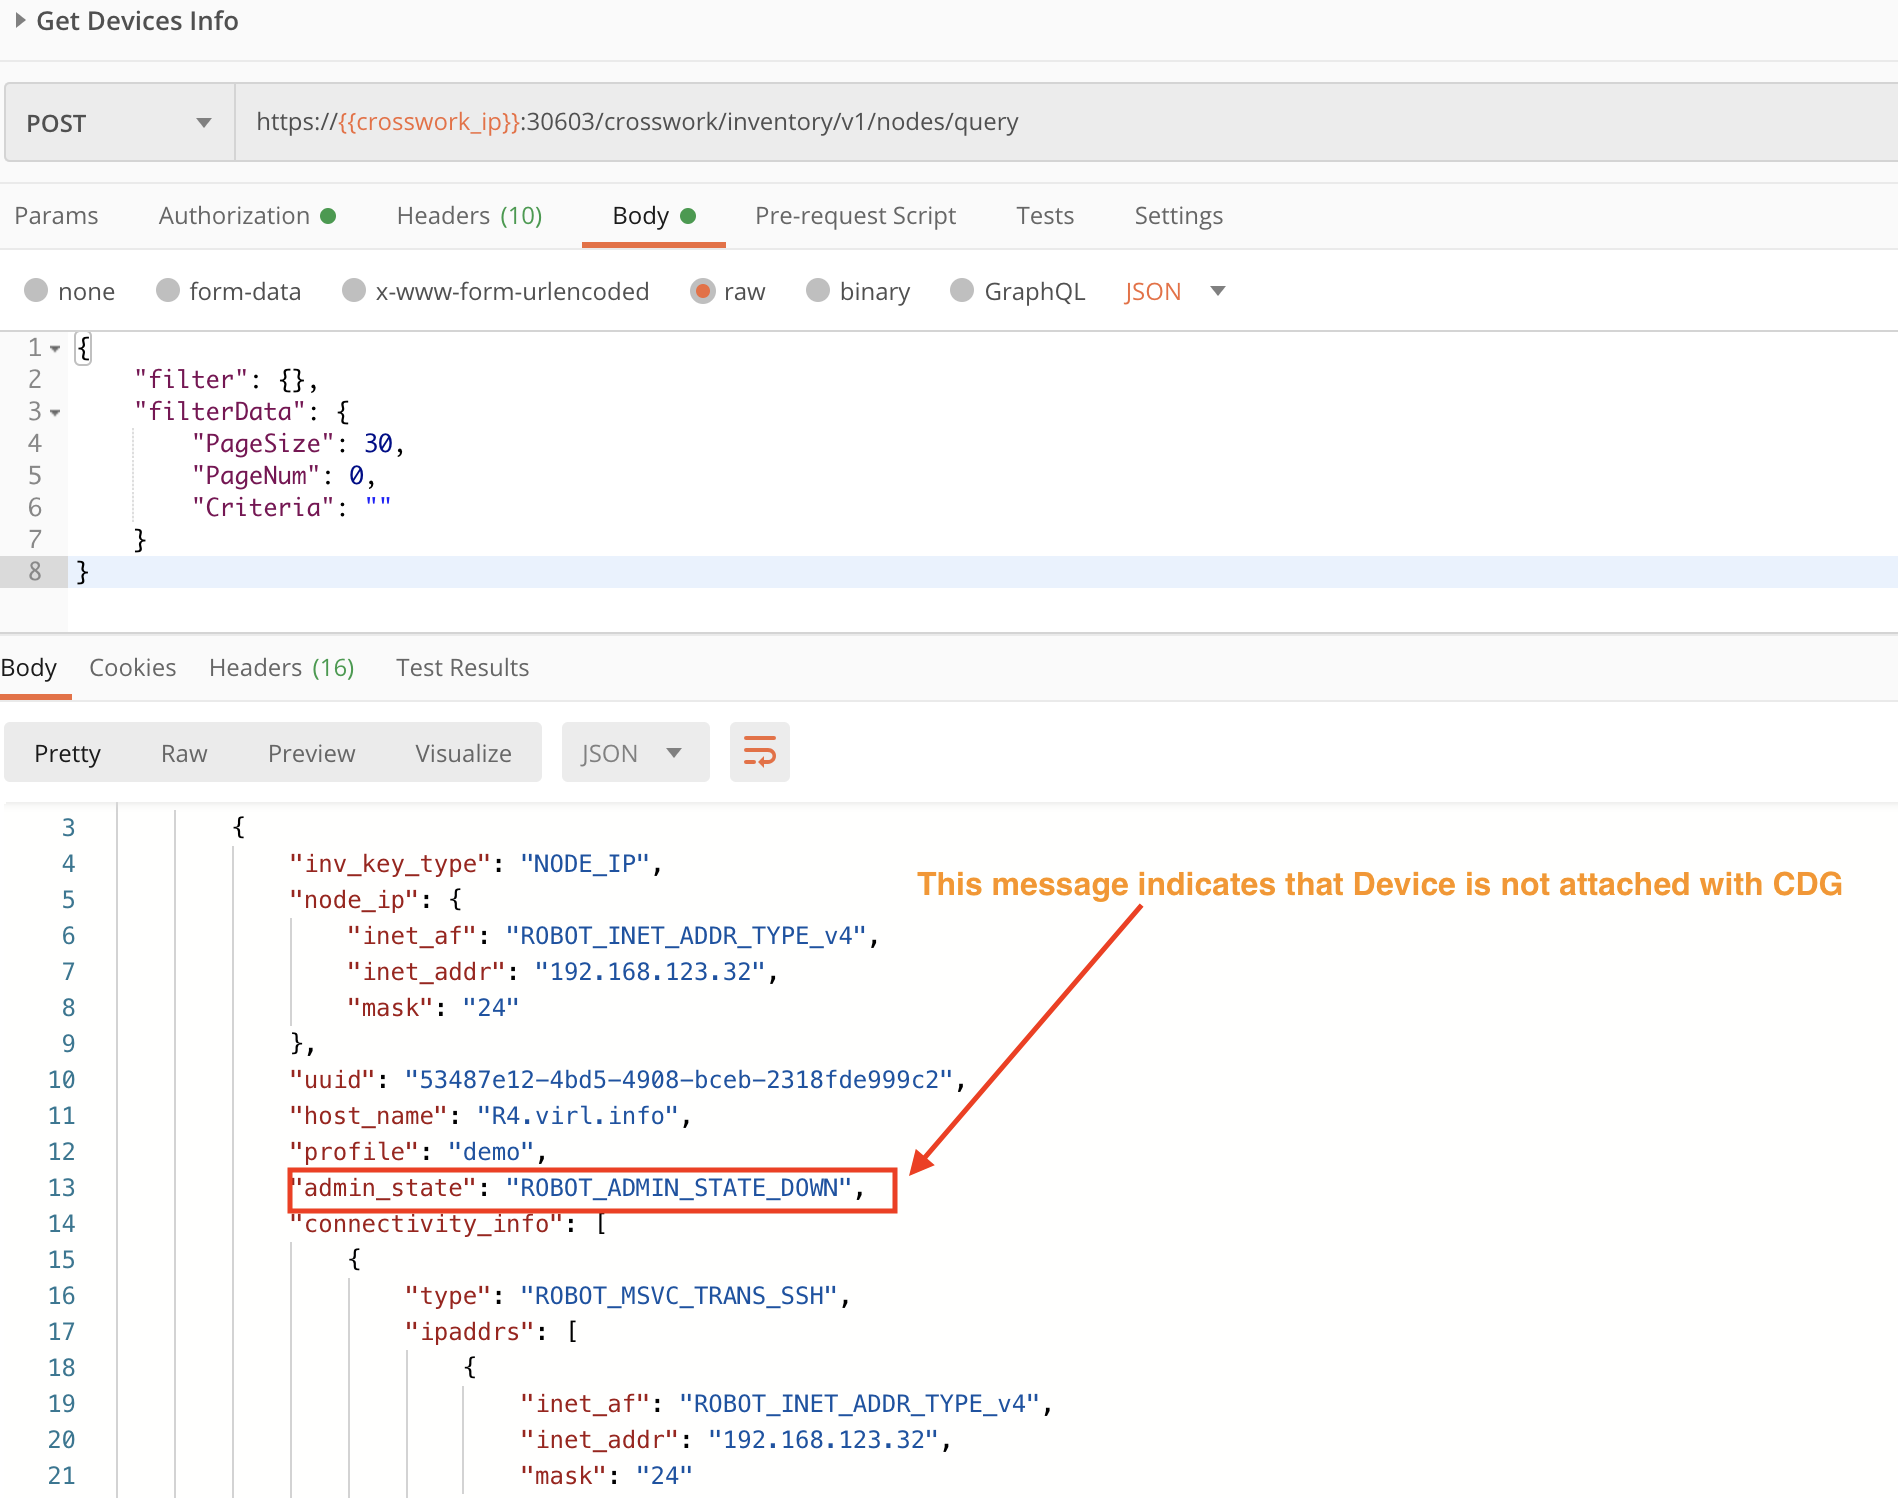
Step 4: Check the Device Status
Use the crosswork/inventory/v1/nodes/query API in a POST request to check the device status. After detaching the device from CDG, the response to the request should show the device's admin_state as ROBOT_ADMIN_STATE_DOWN, as in the figure below.
Step 5: Delete the Device from Crosswork Device Management
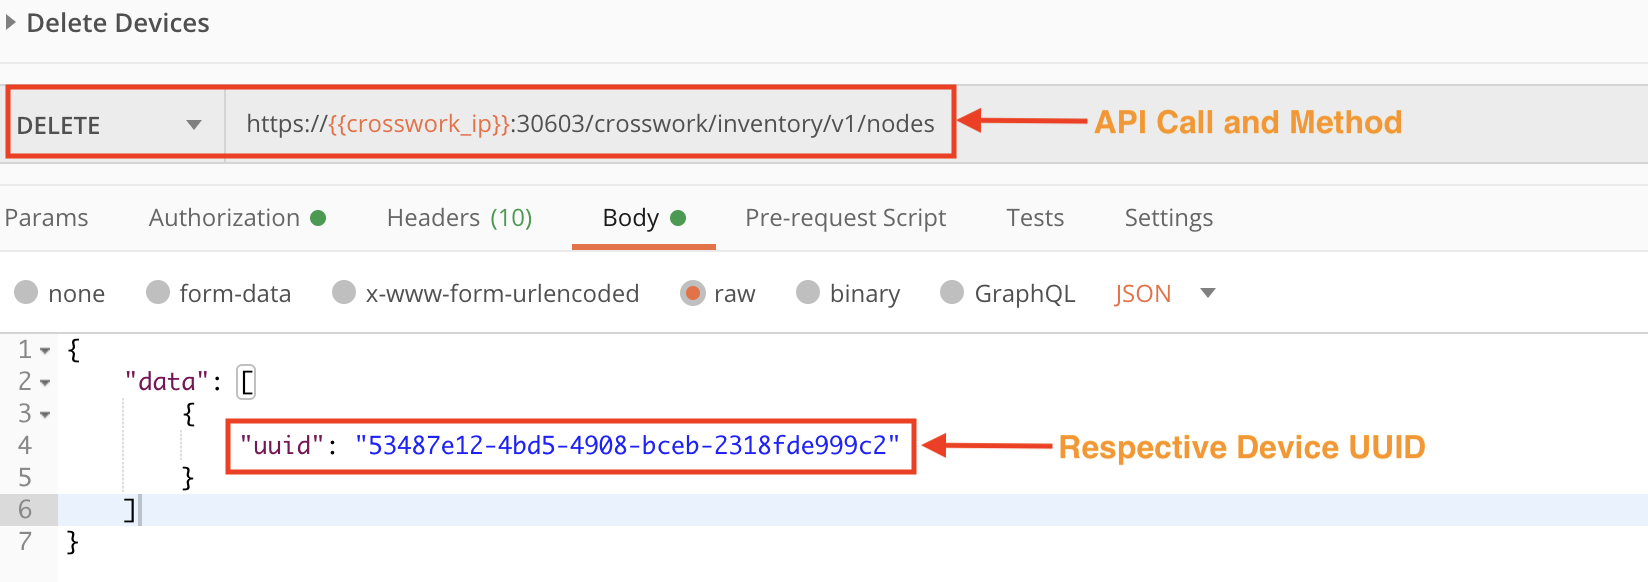
After the successful execution of the above steps, we can now use the crosswork/inventory/v1/nodes API in a DELETE request to delete the device from Crosswork gracefully.
Access Crosswork Change Automation and Health Insights Features
In this section, we demonstrate how to use Crosswork APIs to perform special functions offered in these Crosswork applications.
Section 1: Perform Closed-Loop Remediation
Crosswork Change Automation and Health Insights helps users accelerate network troubleshooting by allowing them to link the Health Insights KPIs that detect problems with the Change Automation Playbooks that can remediate them. We call this "closed-loop remediation", because the linkage between detection and remediation is not fully automated. A network operator will still need to decide if a linked Playbook is appropriate to run in response to a detected problem, and trigger the Playbook if it is appropriate.
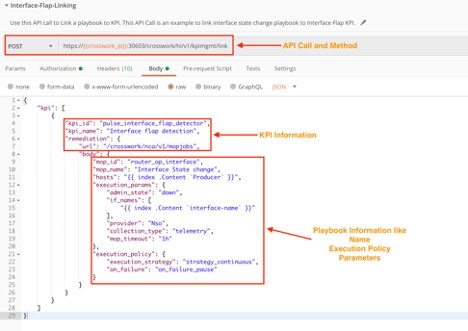
Use the crosswork/hi/v1/kpimgmt/link API in a POST request to link a KPI and a Playbook. In this example, we link an interface flap detector KPI with an interface change Playbook.
Section 2: Create Composite KPIs
Crosswork Health Insights allows users to create composite KPIs. Composite KPIs differ from normal KPIs in that they can generate alerts based on a specified logical connection among the output of multiple KPIs.
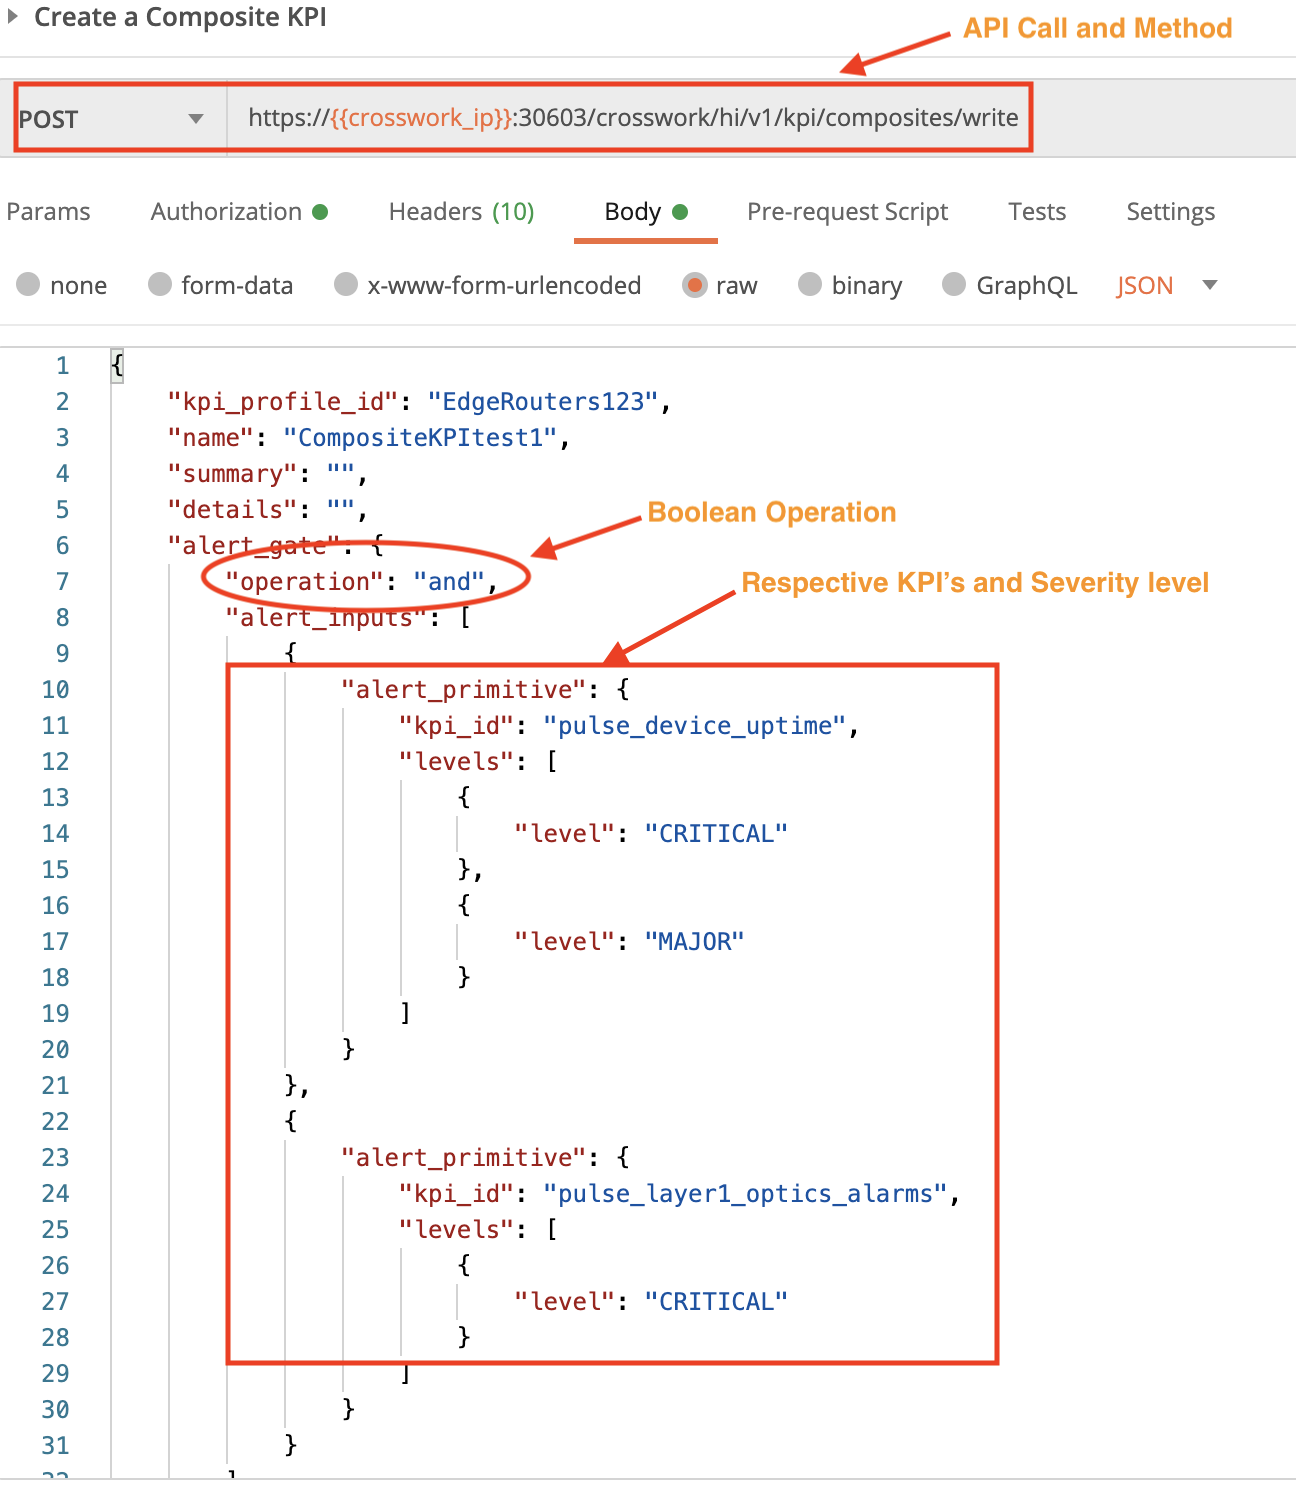
Use the crosswork/hi/v1/kpi/composite/write API in a POST request to create a composite KPI. In this example, the composite KPI generates an alert only when the pulse_device_uptime KPI is raising CRITICAL or MAJOR alerts, and the pulse_layer1_optics_alarms KPI is raising CRITICAL alerts.
Section 3: Use Customized KPIs and Playbooks
The Crosswork Change Automation and Health Insights applications allow users to export Playbooks and KPIs. Users can customize them, and then share them by importing the custom Playbooks and KPIs to the system. In this section, we will demonstrate how to do this using APIs. You can use the response of the exported KPI or Playbook as an input to, for example, a custom Python script.
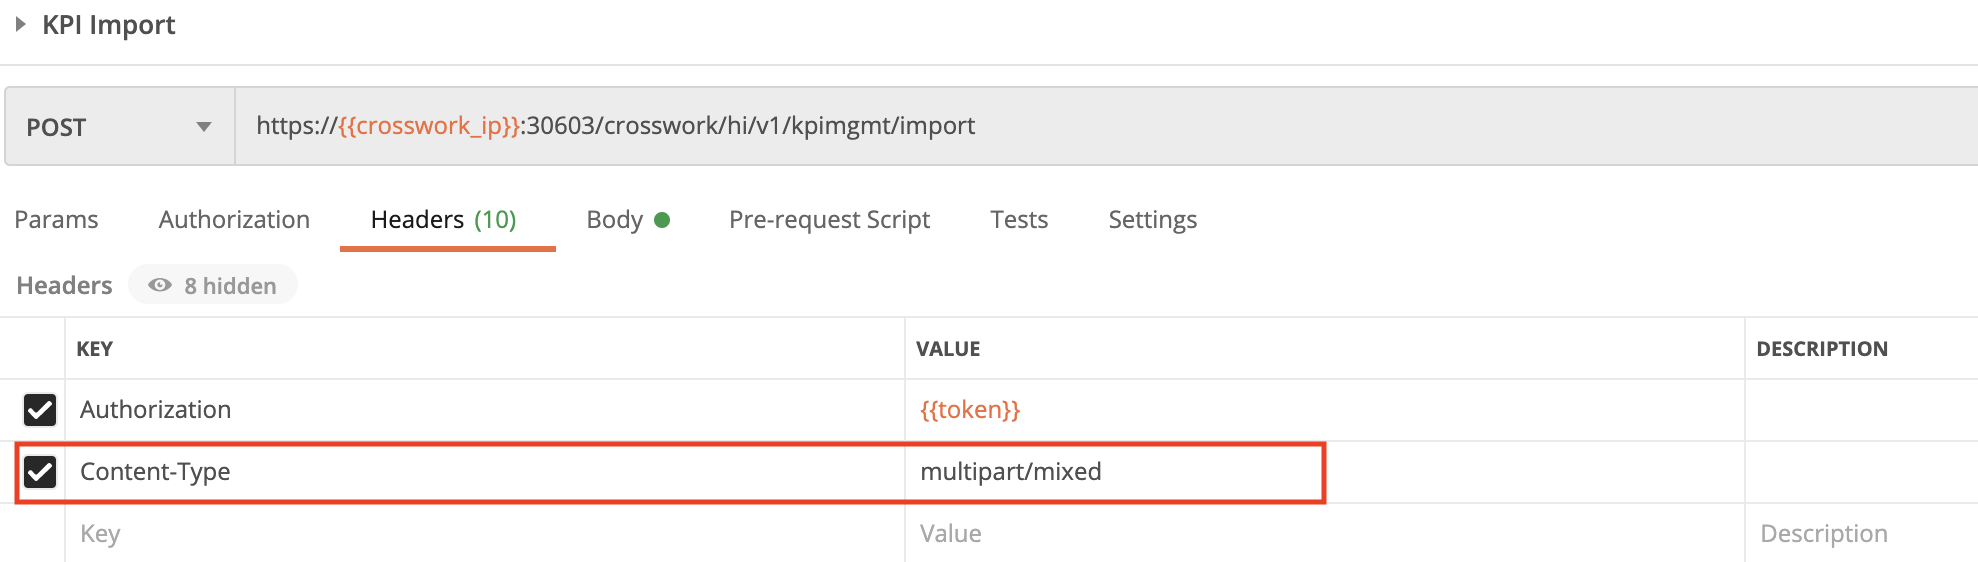
Step 1: Import KPIs
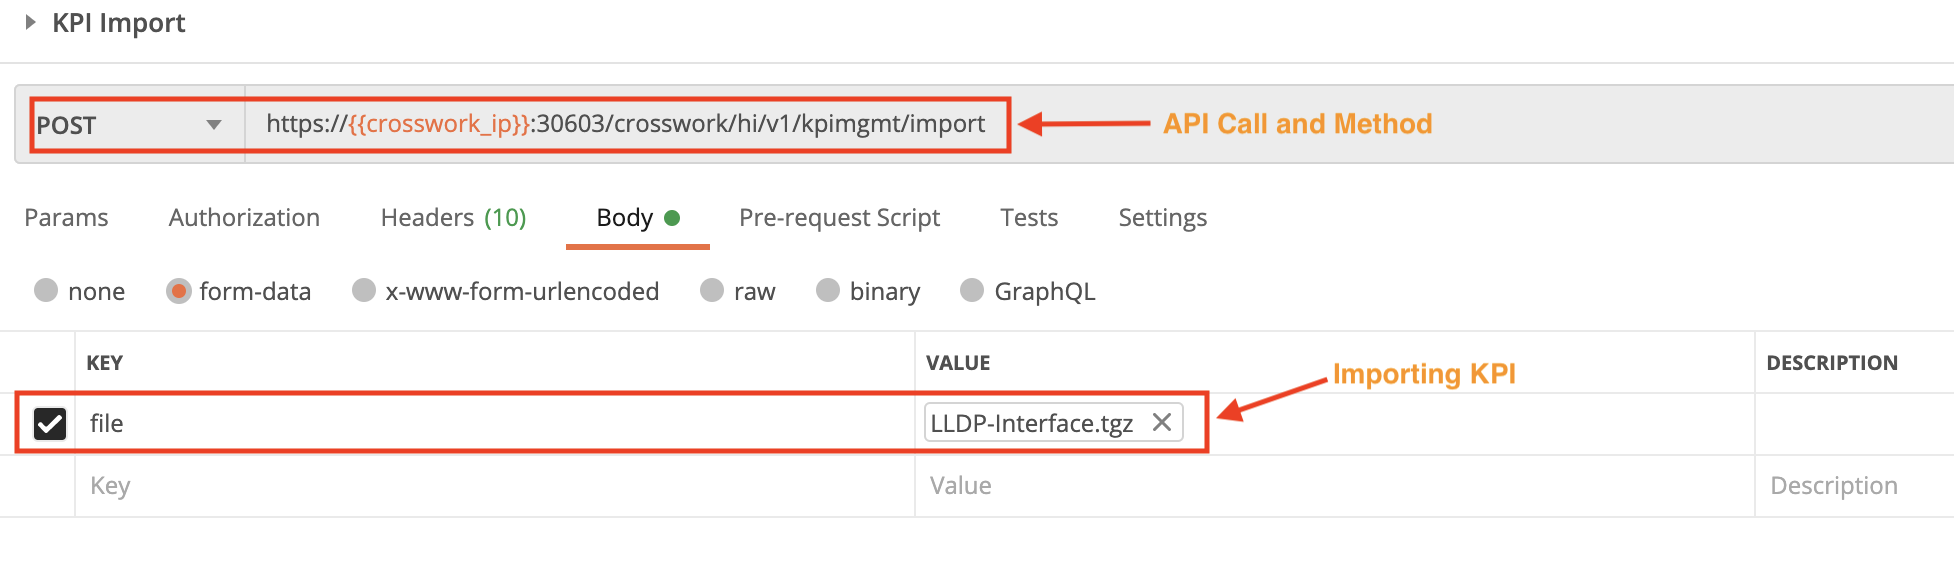
Use the crosswork/hi/v1/kpimgmt/import API in a POST request to import a custom KPI. You must specify the custom KPI file name in the request Body, and the Content-type in the Header.
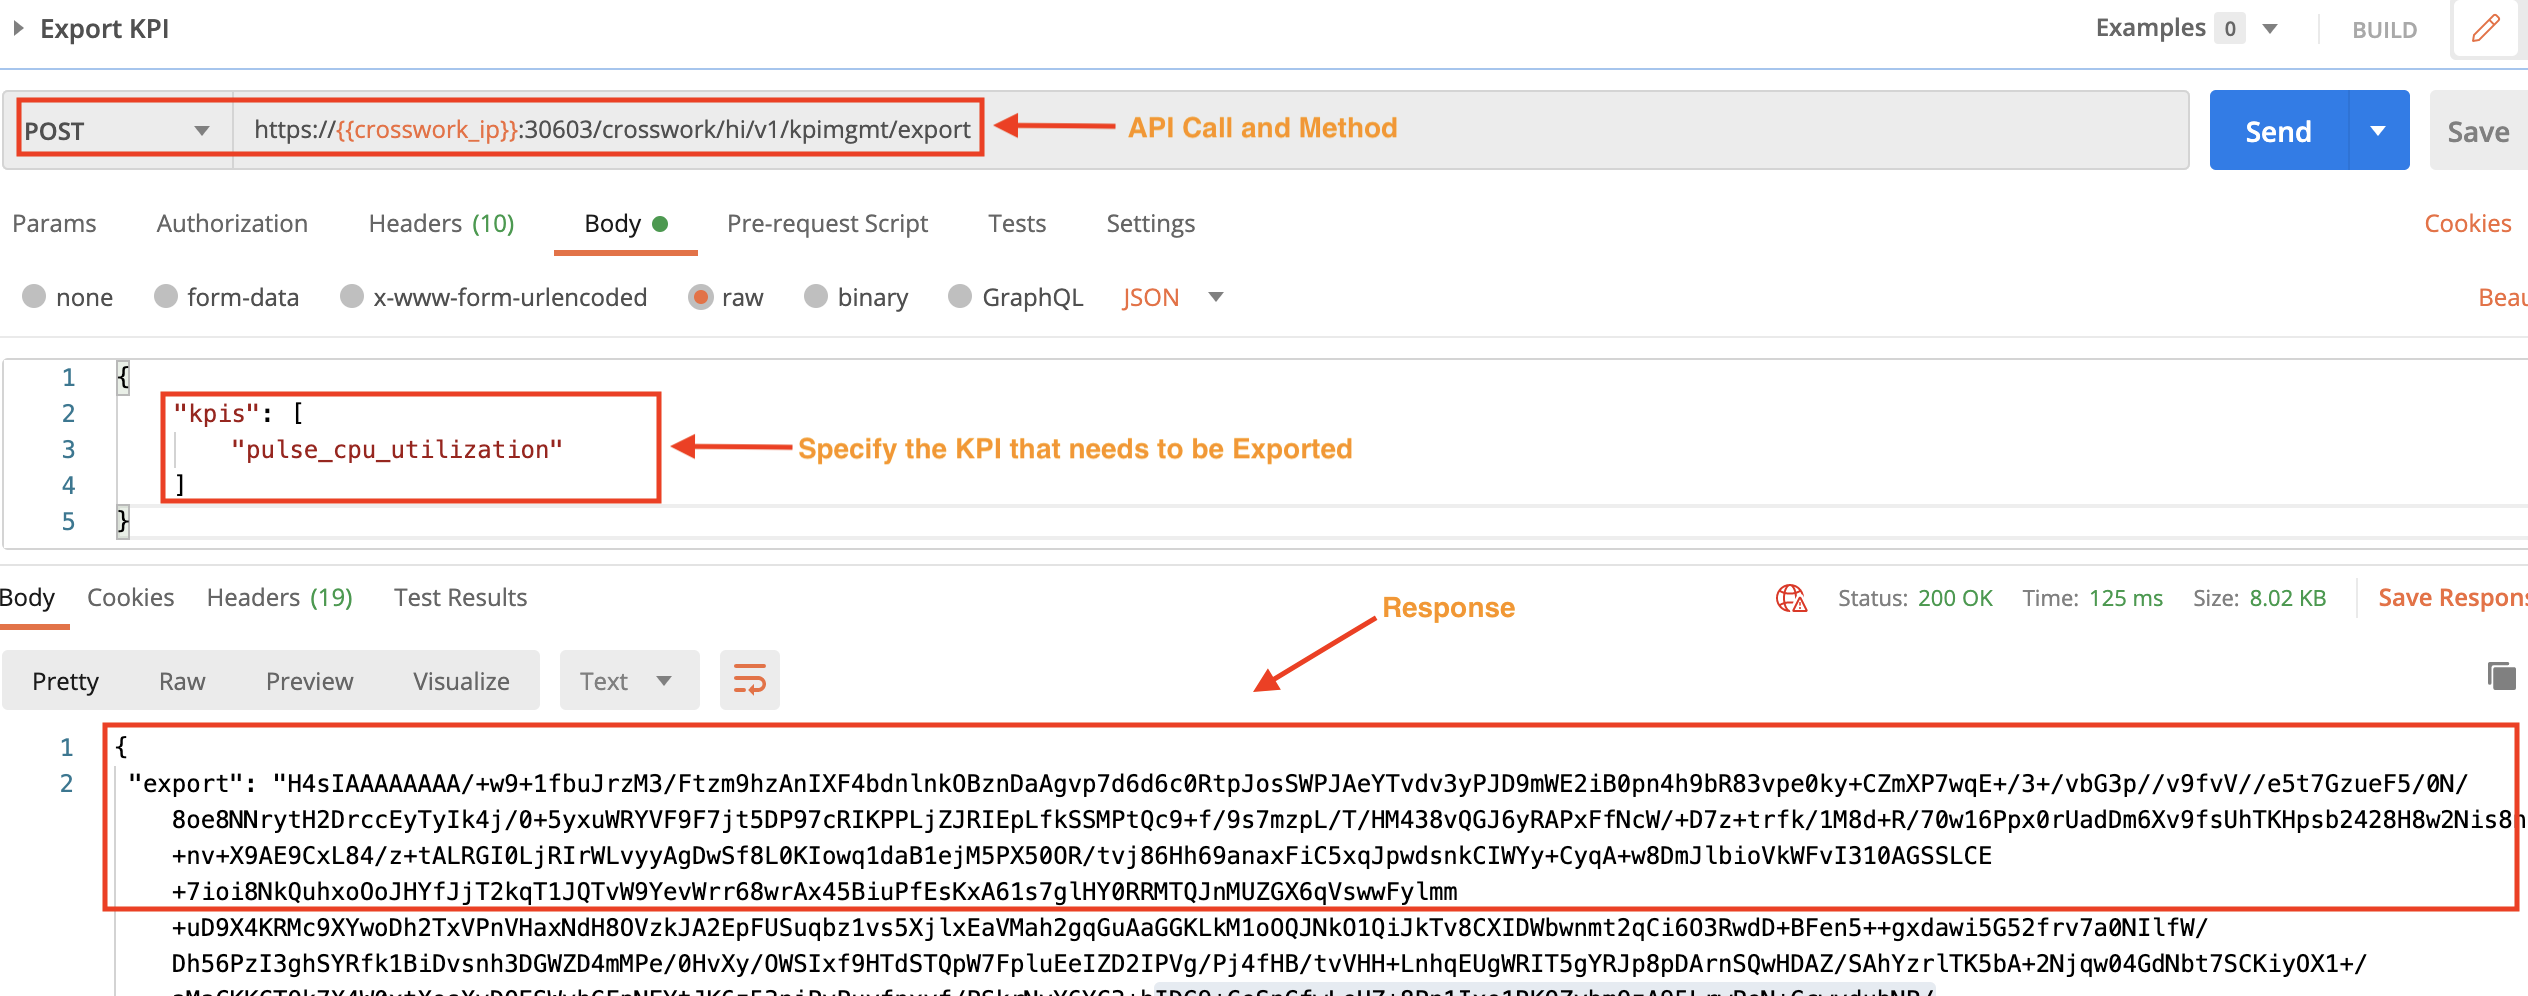
Step 2: Export KPIs
Use the crosswork/hi/v1/kpimgmt/export API in a POST request to export a KPI. You must specify the kpis name in the request Body. You can copy the request response and provide it as input to a custom Python script that has the information on the location where the exported KPI must be saved.
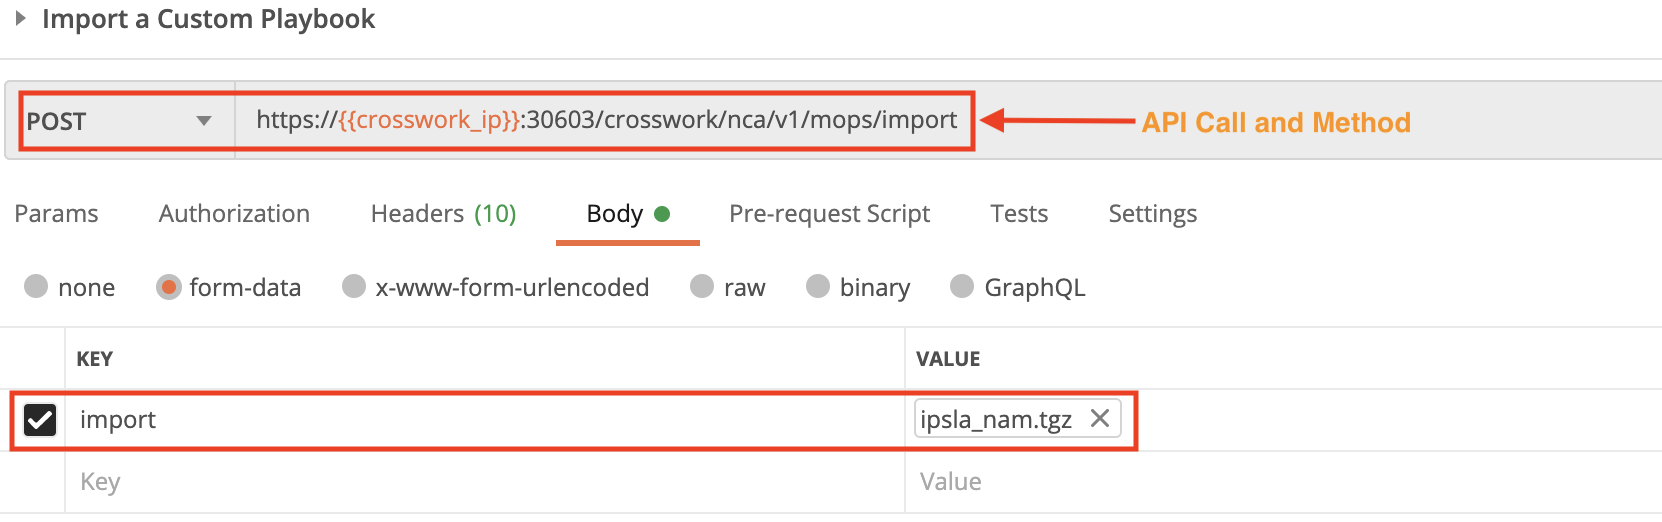
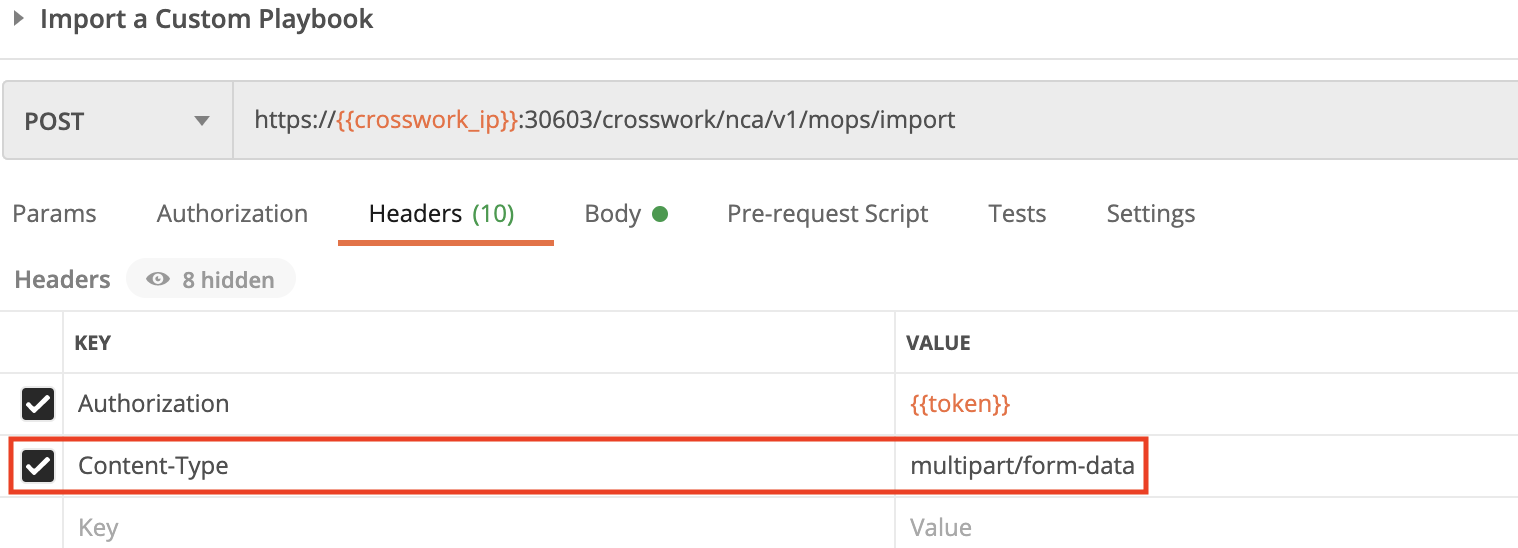
Step 3: Import Playbooks
Use the crosswork/nca/v1/mops/import API in a POST request to import a custom Playbook. You must specify the custom Playbook import file name in the request Body, and the Playbook's mop_id in the Header.
Step 4: Export Playbooks
Use the crosswork/nca/v1/mops/export API in a POST request to export a Playbook. You must specify the kpis name in the request Body. You can copy the request response and provide it as input to a custom Python script that has the information on the location where the exported KPI must be saved.
Section 4: Access Health Insights' KPI Recommendation Engine
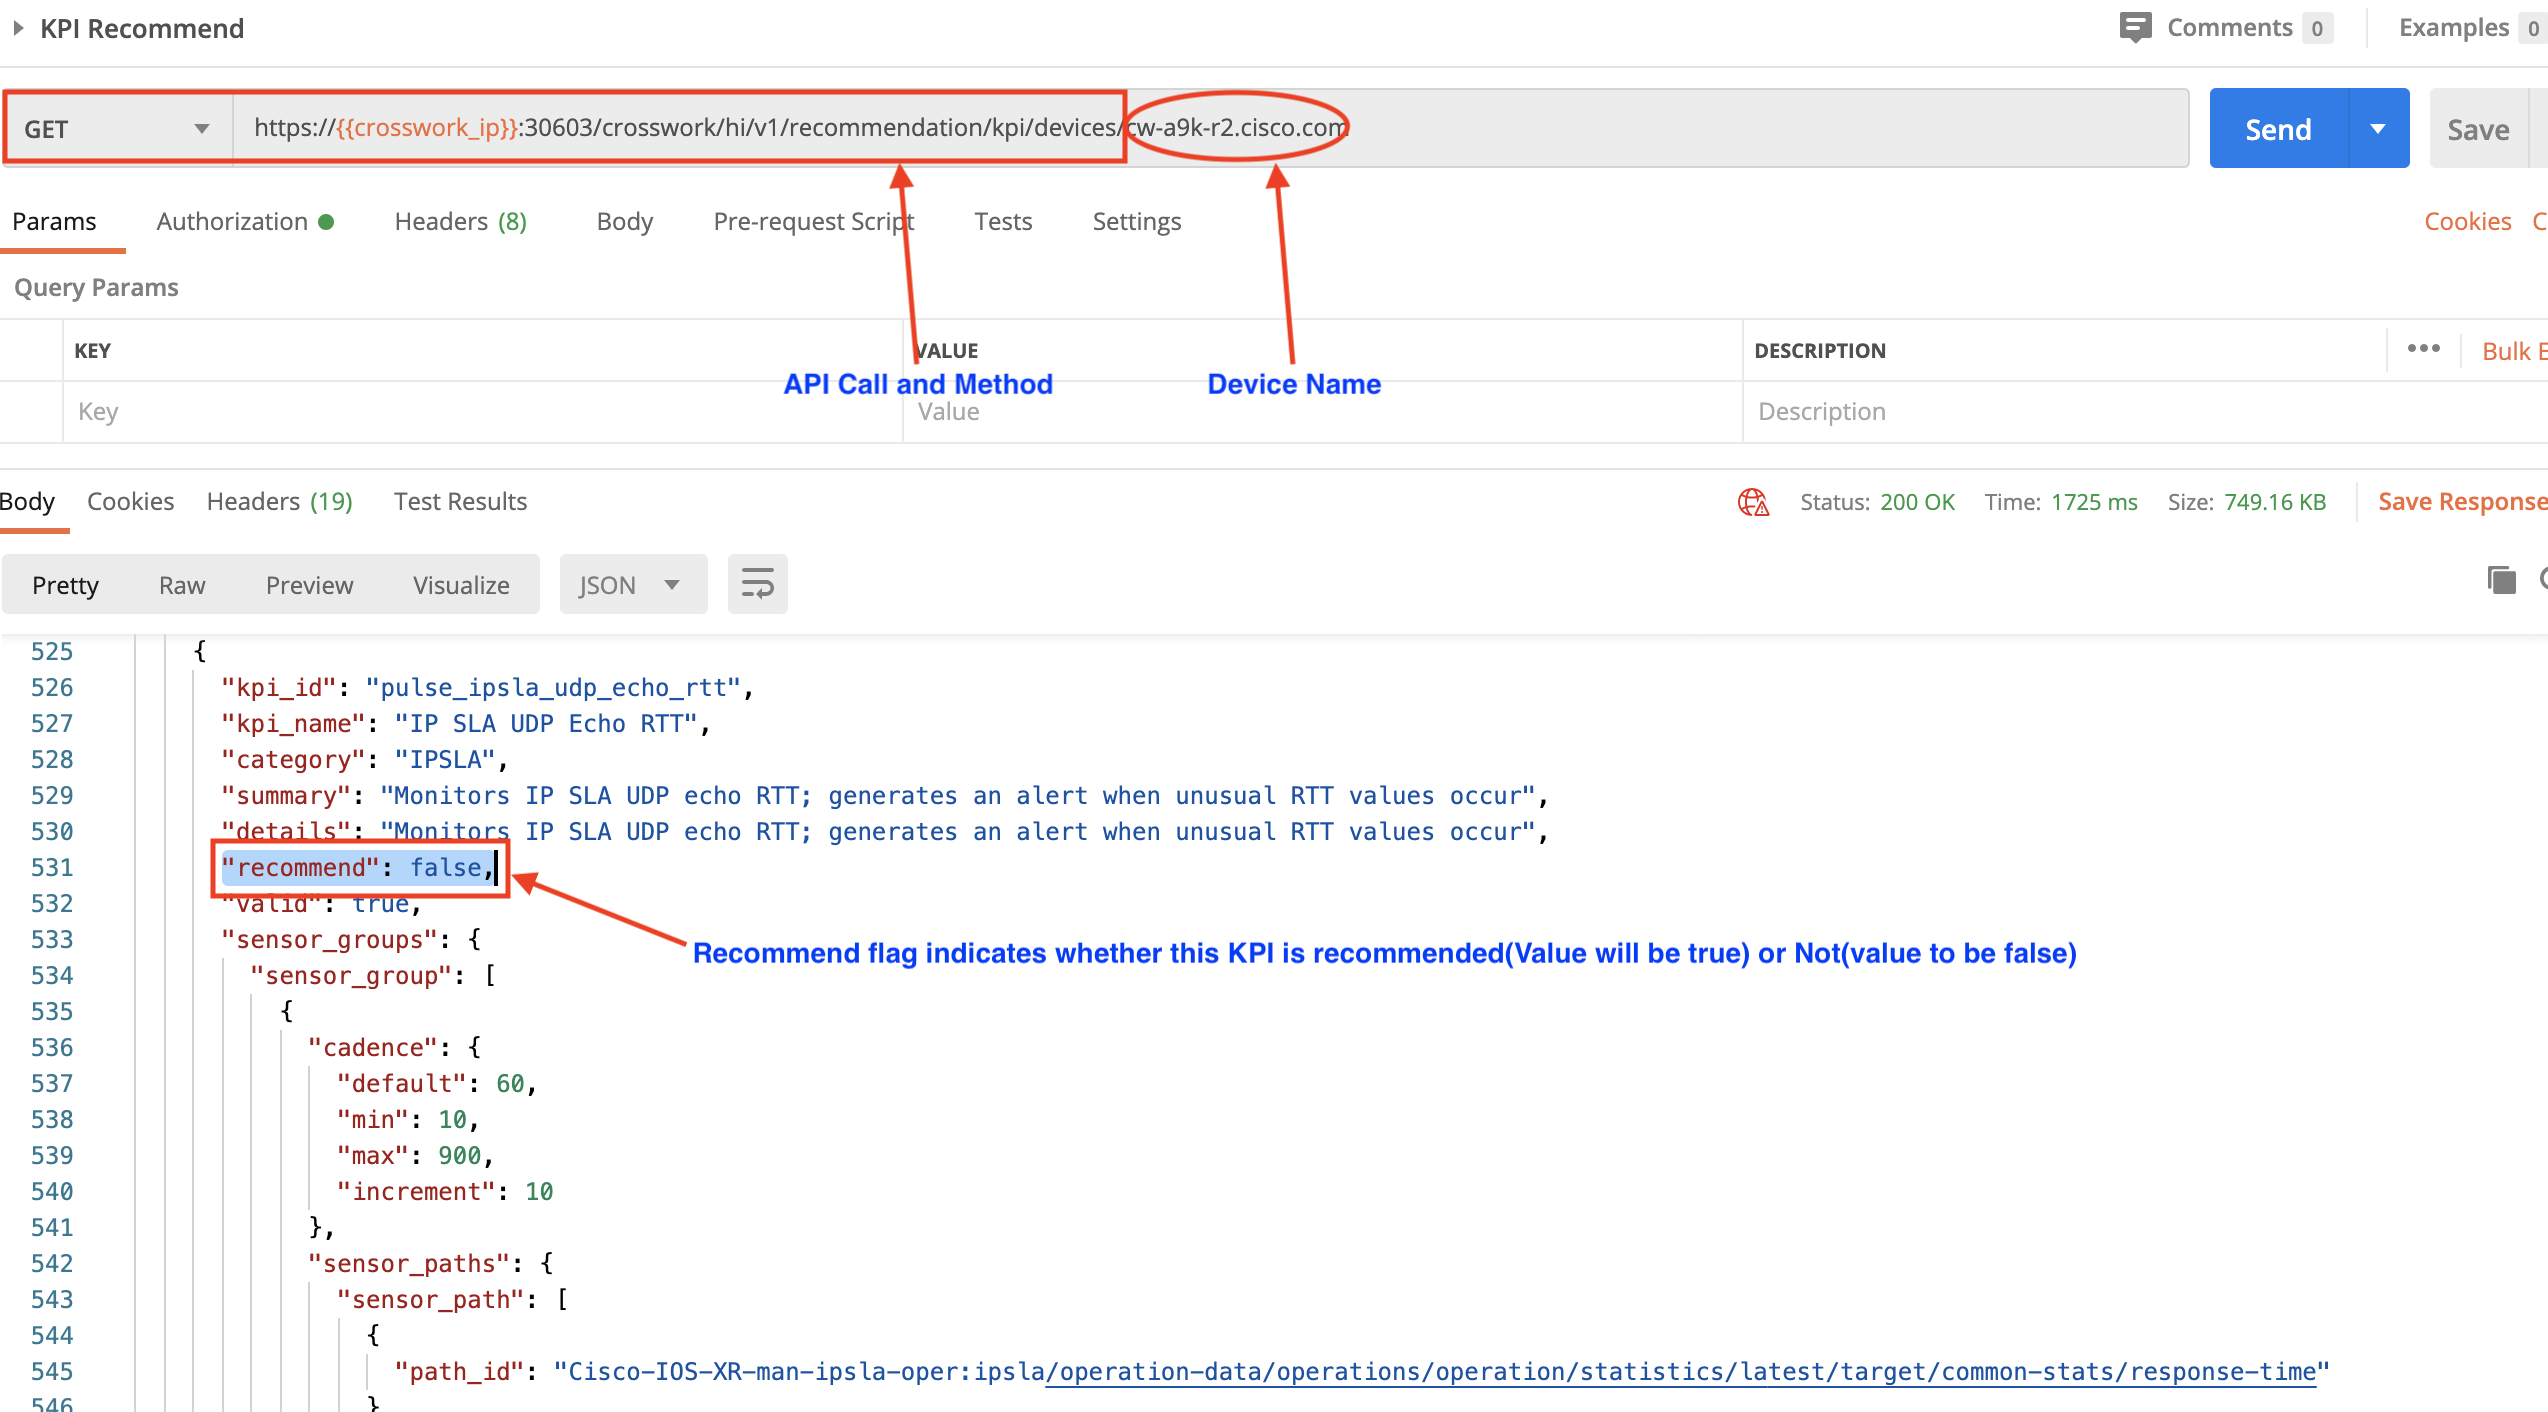
The Crosswork Health Insights application features a KPI recommendation engine. This engine can generate a list of recommended KPIs to run on a device, based solely on the underlying hardware and the running configuration present on the device. While these recommendations are part of the Health Insights GUI, you can use APIs to get the recommended KPI list for a specific device that has been onboarded to Crosswork.
Note that, when using APIs to access the recommendation engine, the request response will return a list of all the KPIs in the system. You will have to inspect the Boolean recommend value for each KPI to see which are recommended and which are not.
For example: In the following figure, we have used the crosswork/hi/v1/recommendation/kpi/devicesAPI in a GET request to get KPI recommendations for a device we have specified as part of the request. One of the KPIs returned in the response body, pulse_ipsla_udp_echo_rtt, is relevant to the device because the hardware supports IPSLA. But since IPSLA is not actually configured on the device, the recommend flag is set to false.

Our device does have a CPU, however, so KPIs for CPU-related functions are relevant. Elsewhere, in the same request response, we can see that the KPI ID pulse_cpu_threshold has its recommend flag set to true.

Work with the Crosswork System
Crosswork offers APIs you can use to get information about the health of the Crosswork system as a whole. In this section, we demonstrate how to use these APIs, as well as APIs to collect system logs, post them to an endpoint, and add a new user or user role.
Section 1: Check the Health of Crosswork Applications and Services
This section presents examples of Crosswork API calls you can use to get information about the health of applications and services running on your Crosswork system.
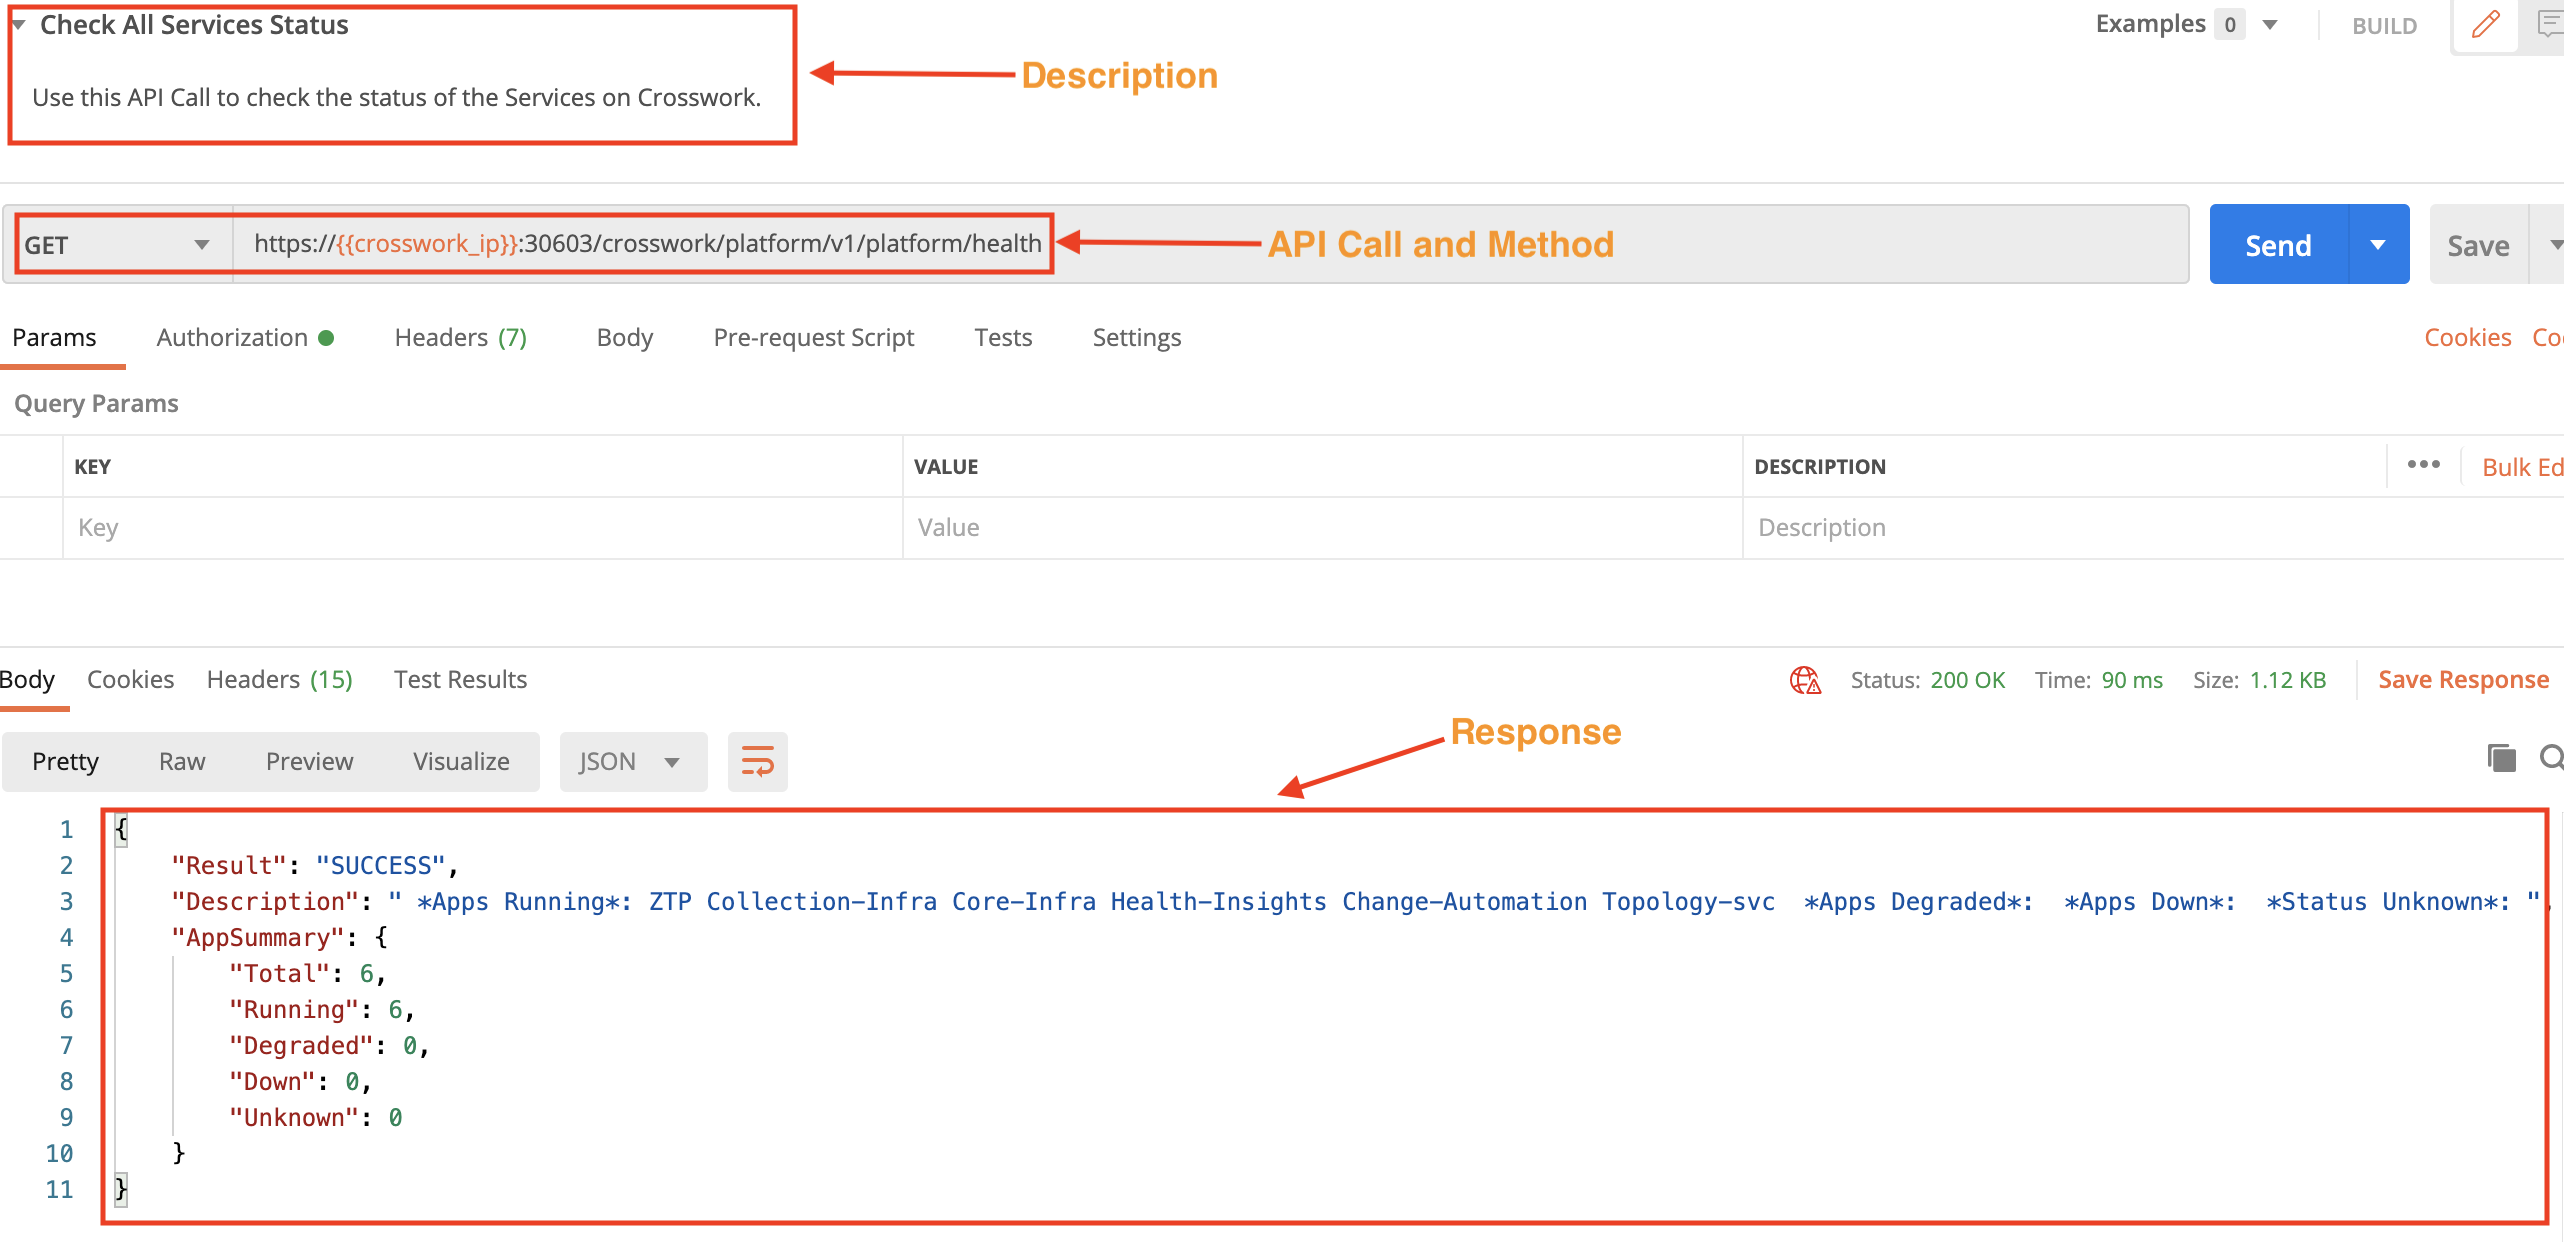
Check the Status of Crosswork Services
Use the crosswork/platform/v1/platform/health API in a GET request to check the status of all Crosswork services. You can get the names of all the running services from this request's response.
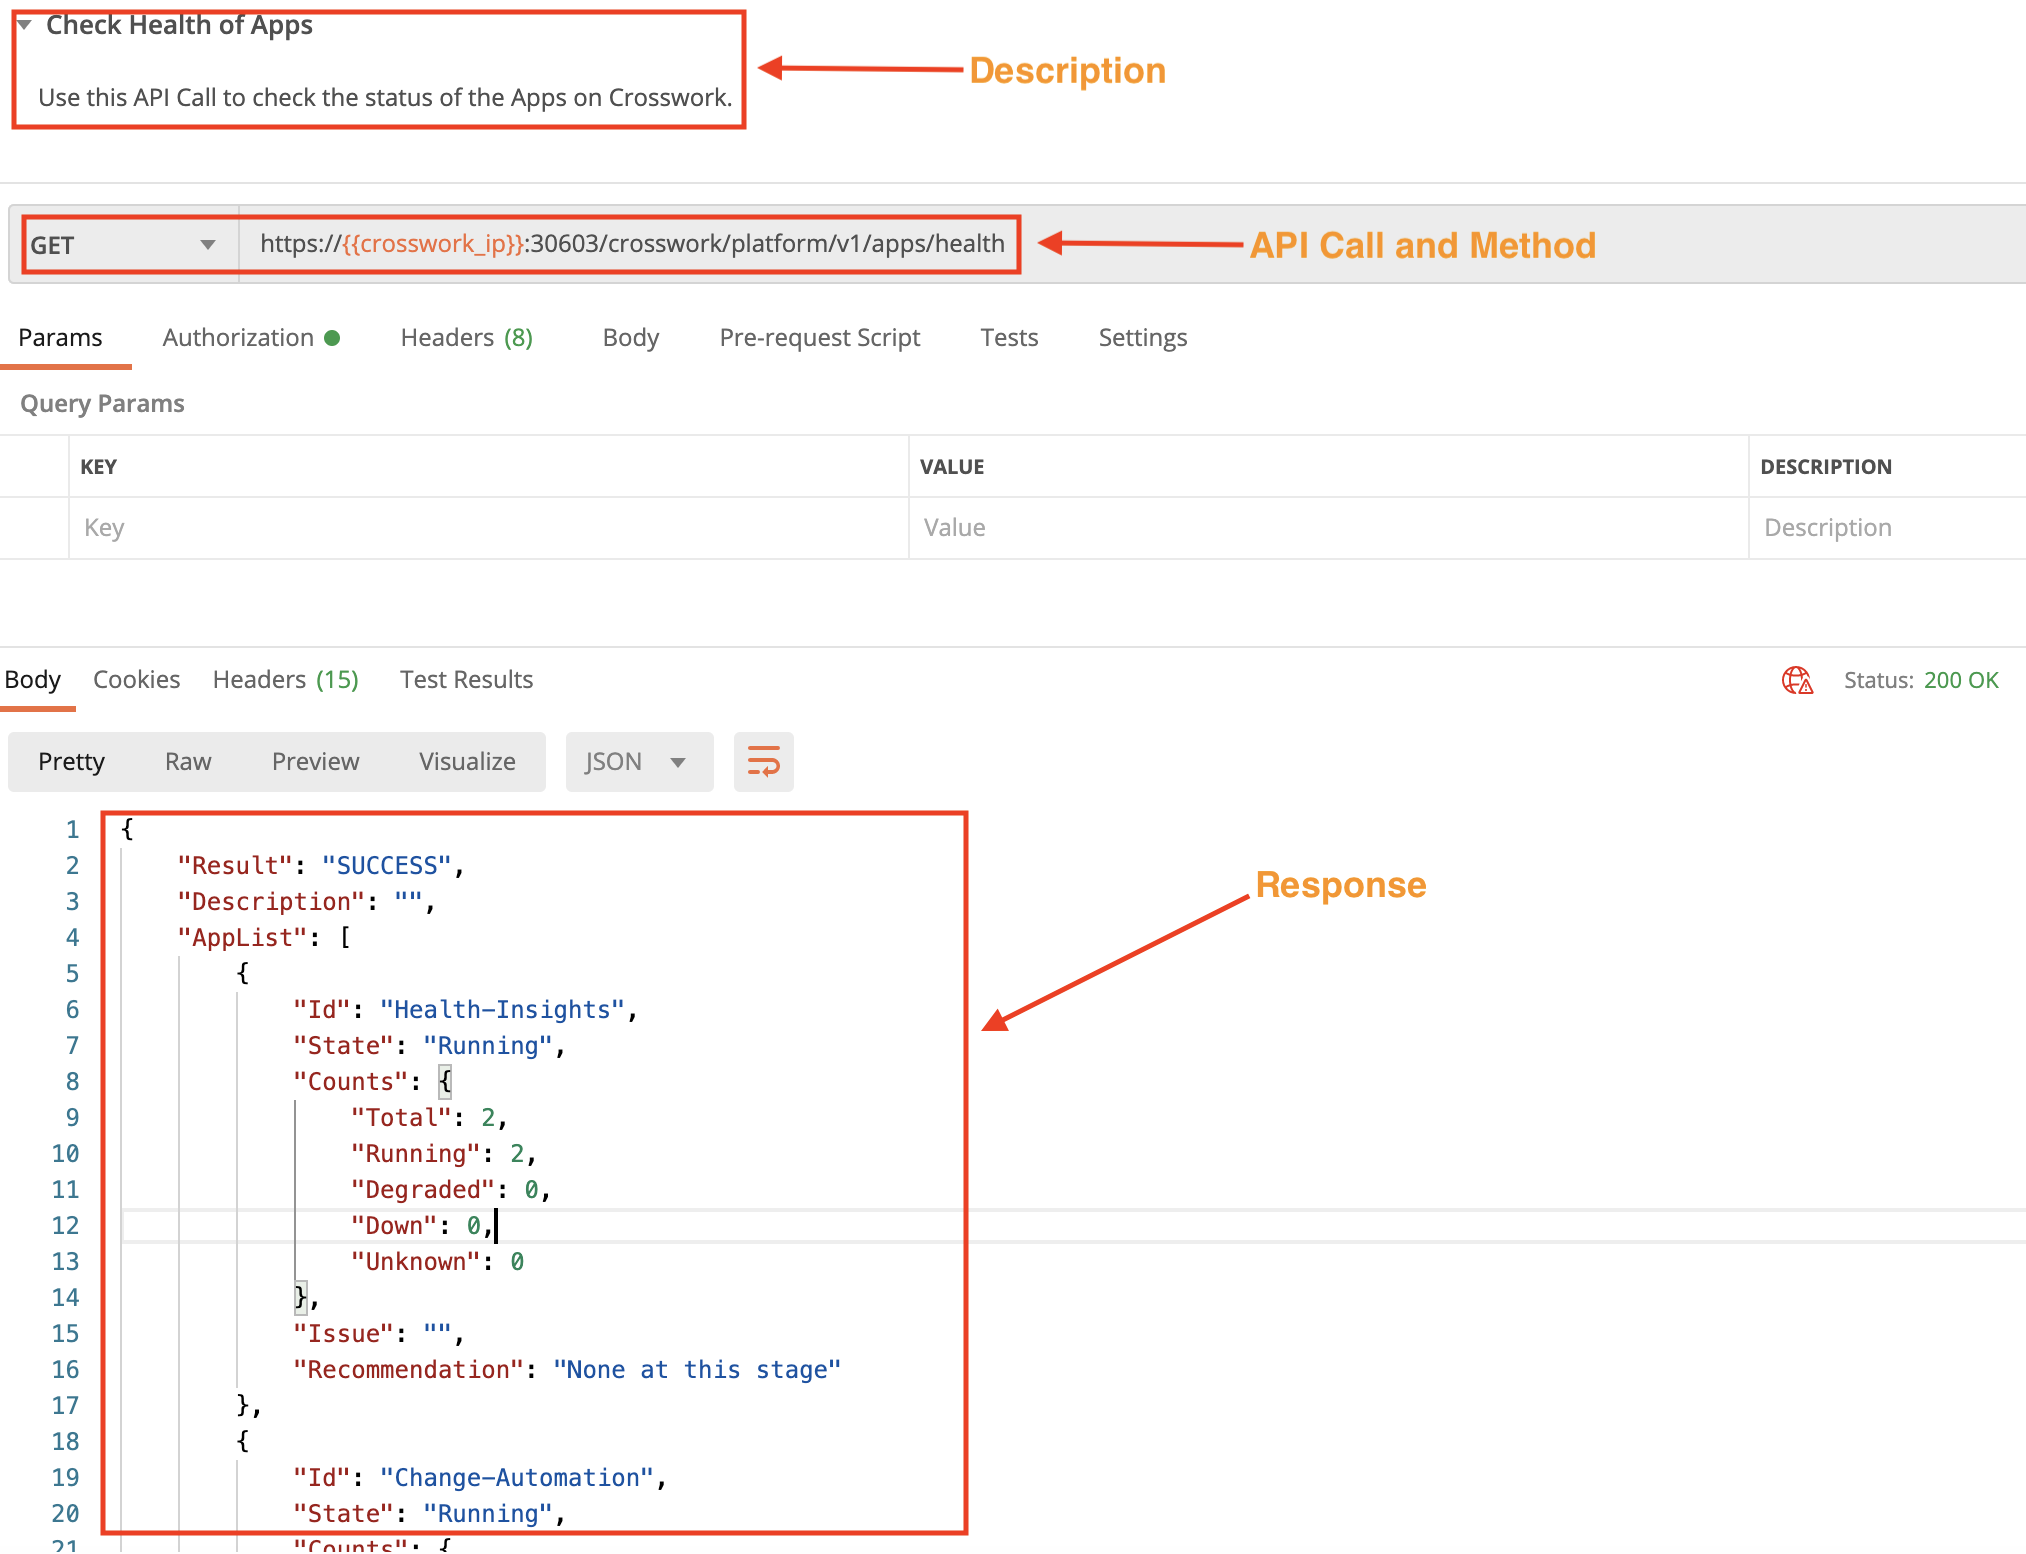
Check the Status of Crosswork Applications
Use the crosswork/platform/v1/apps/health API in a GET request to check the status of all Crosswork applications.
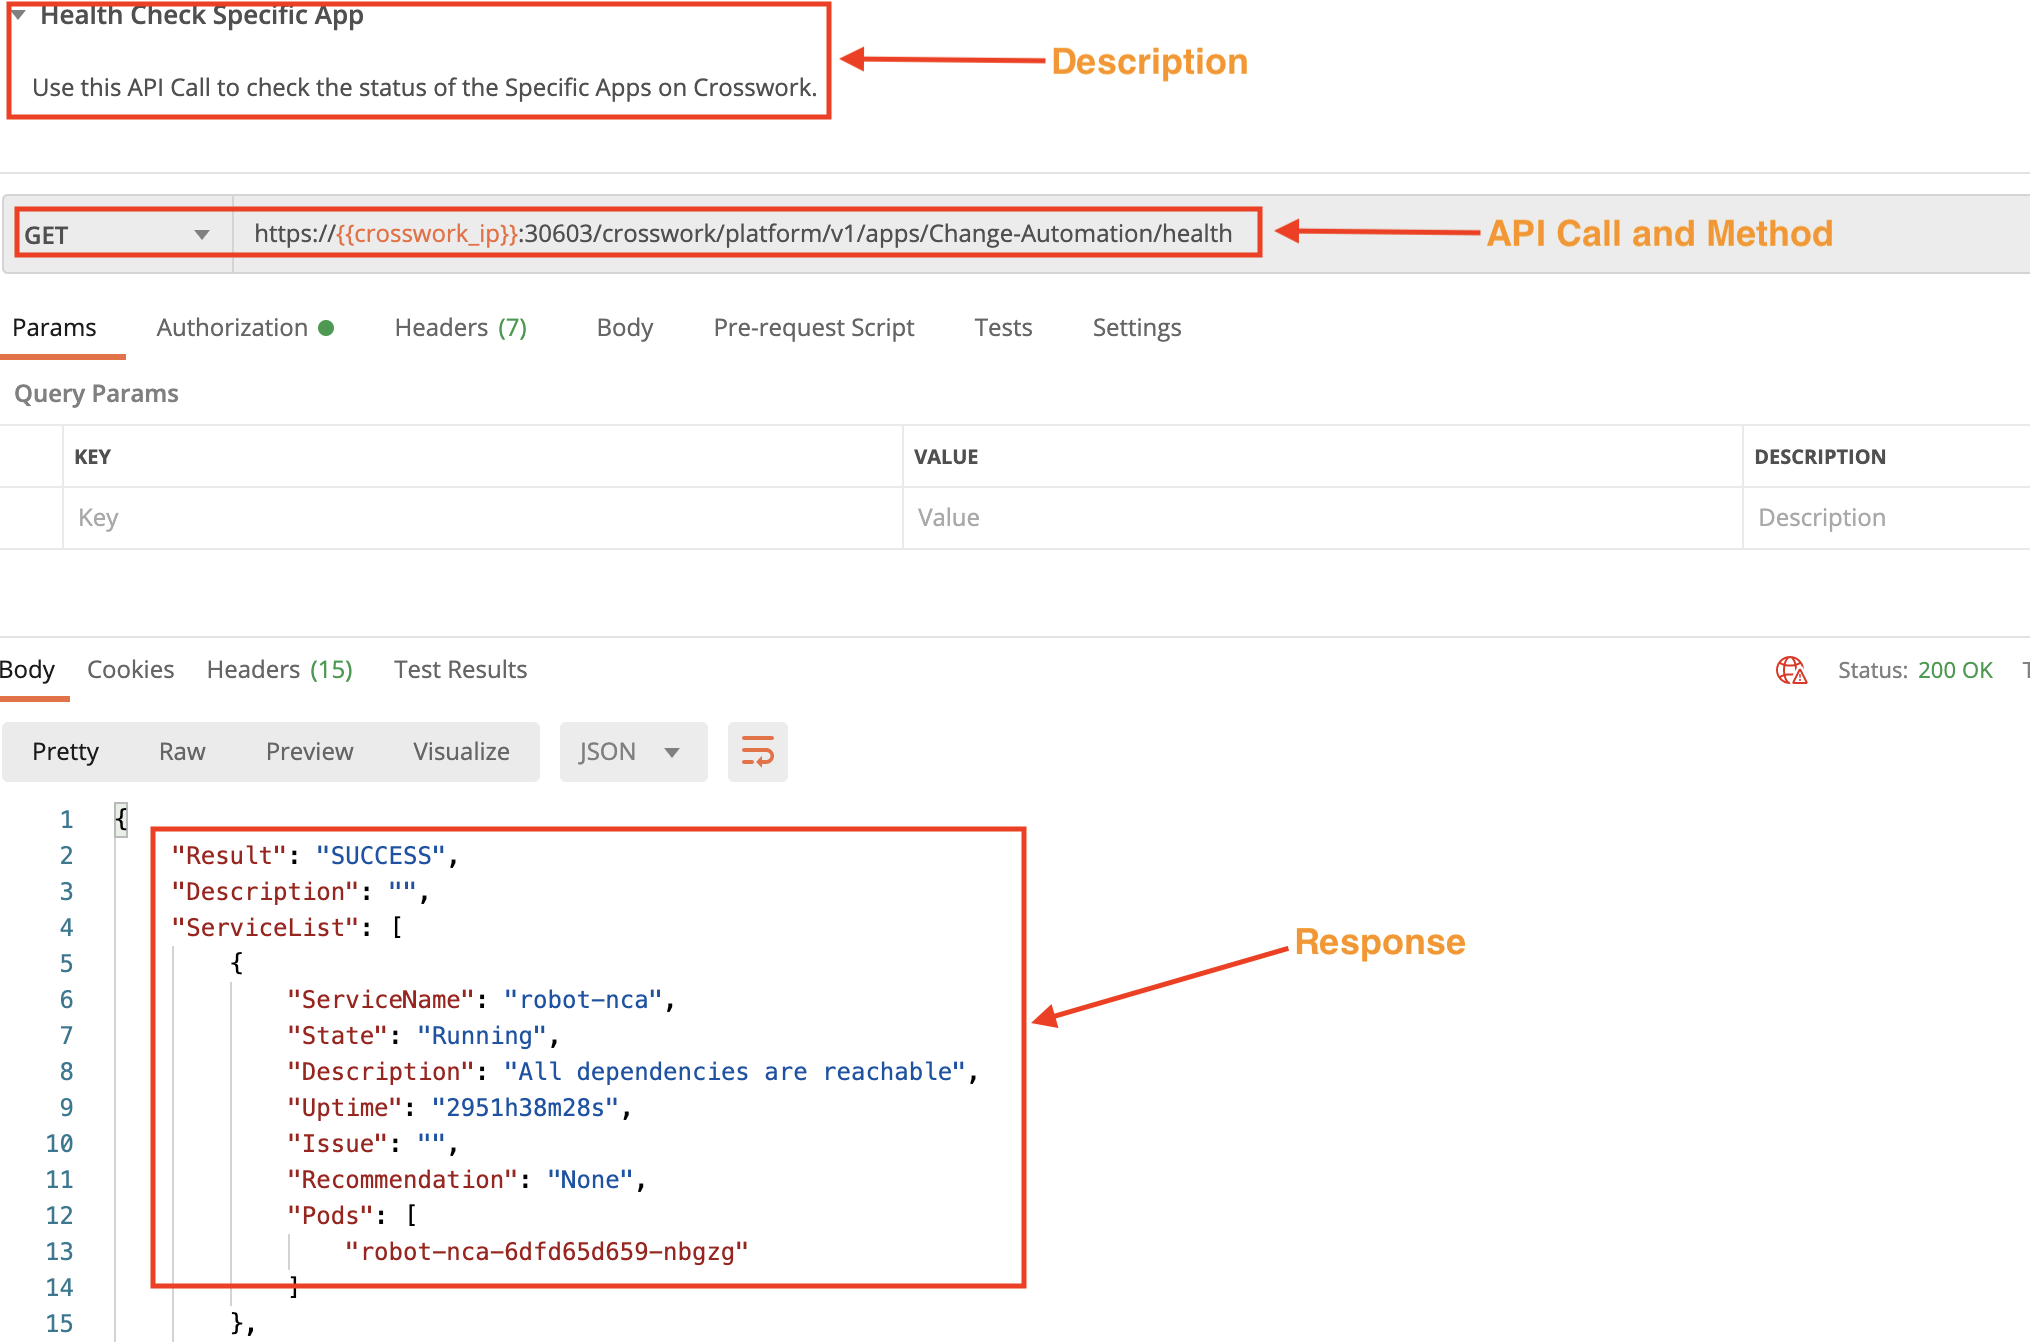
Check the Status of a Specific Crosswork Application
In this example, we use the crosswork/platform/v1/apps/Topology-svc/health API in a GET request to check the status of a specific Crosswork application. Pass the application ID between the apps and health parameters. Use the crosswork/platform/v1/apps/health API in a GET request to get the internal IDs of the applications.
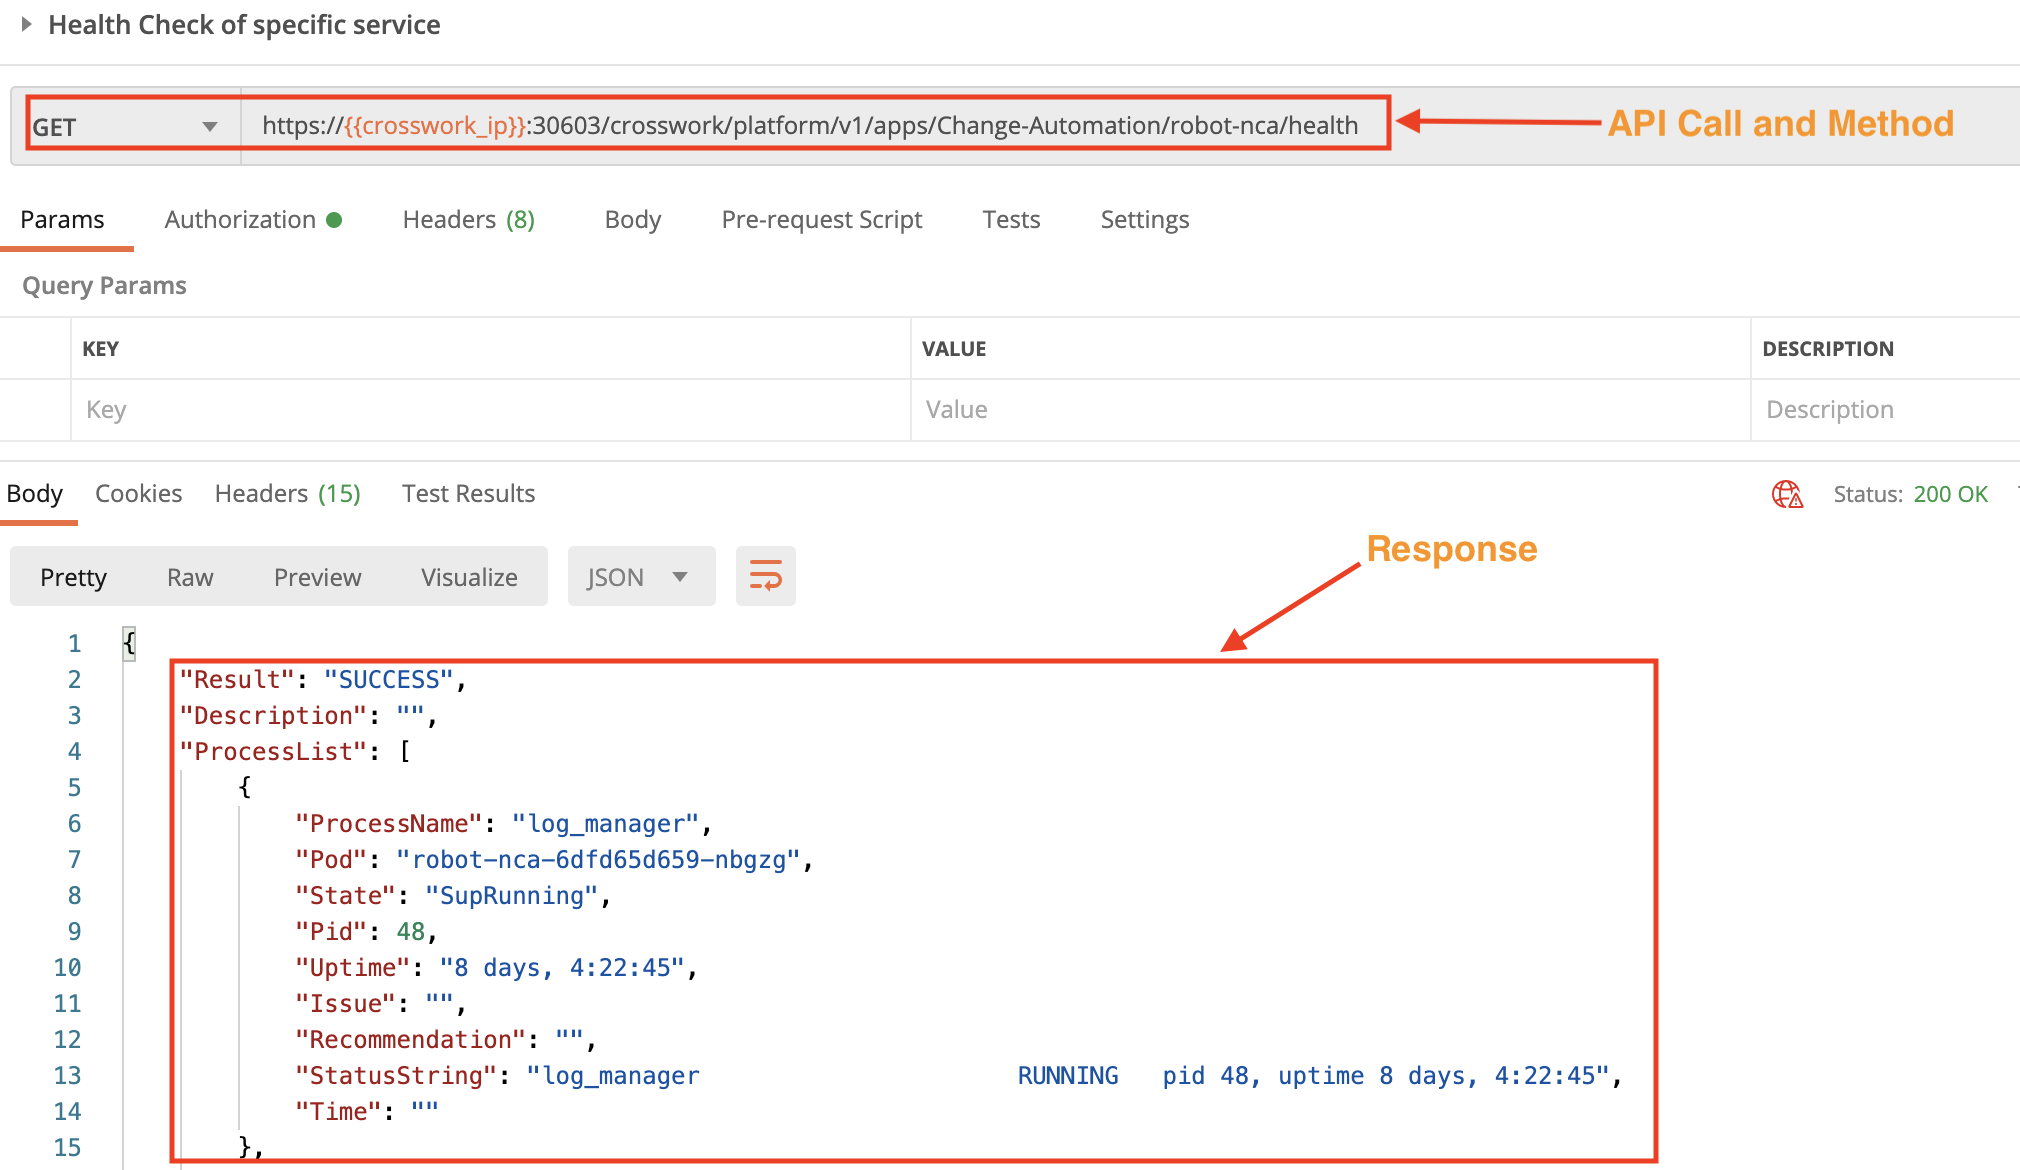
Get the Status of a Specific Crosswork Service
In this example, we use the crosswork/platform/v1/apps/Collection-infra/robot-nca/health API in a GET request to check the status of a specific Crosswork service. Pass the service ID between the apps and health parameters. Use the crosswork/platform/v1/health API in a GET request to get the internal IDs of the services.
Section 2: Control Crosswork Services
This section shows examples of Crosswork API calls you can use to start and restart Crosswork services. With these APIs, you must pass the service ID in the request body. You can get a list of service IDs by using the crosswork/platform/v1/health API in a GET request.
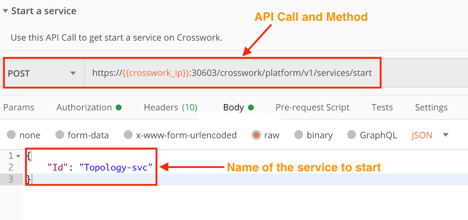
Start a Crosswork Service
Use the crosswork/platform/v1/services/start API in a POST request to start a Crosswork service.
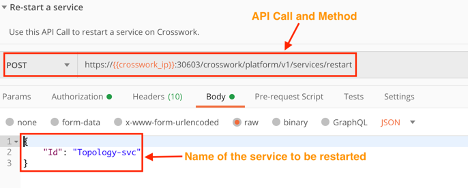
Restart a Crosswork Service
Use the crosswork/platform/v1/services/restart API in a POST request to start a Crosswork service.
Section 3: Work with Crosswork Users and Roles
This section shows examples of API calls you can use to create and delete Crosswork users and user roles.
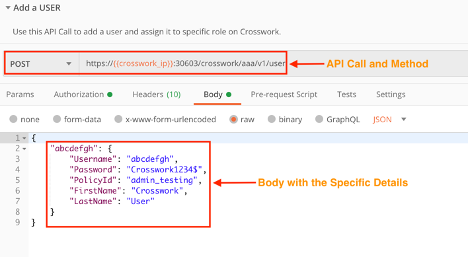
Add a User
Use the crosswork/aaa/v1/user API in a POST request to create a new user. You must pass the required user details in the request body.
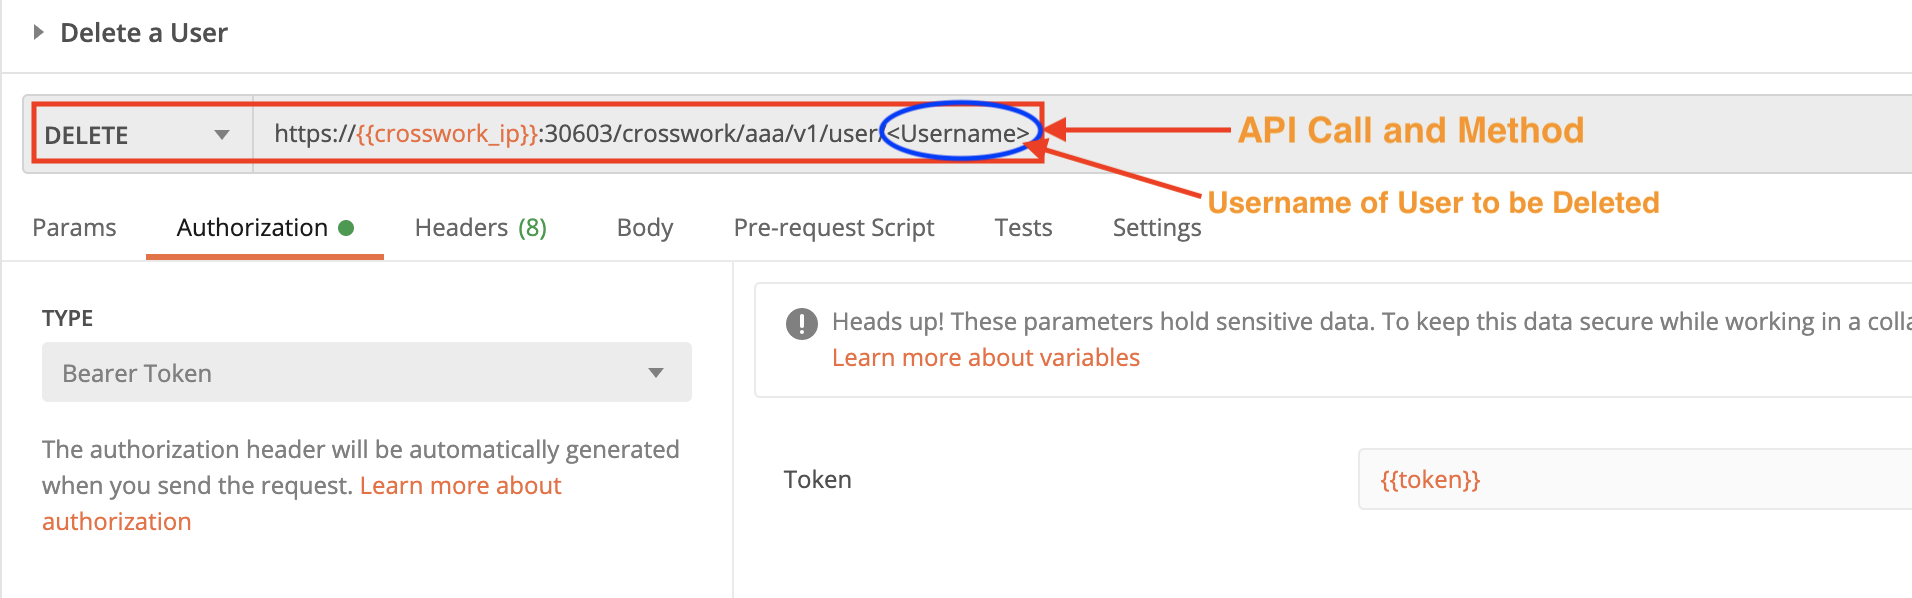
Delete a User
Use the crosswork/aaa/v1/user/<username> API in a DELETE request to delete an existing user. You must pass the user name in the DELETE request.
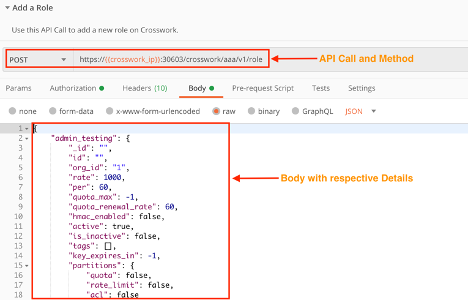
Add a User Role
Use the crosswork/aaa/v1/role API in a POST request to create a new user role. You pass the required role details in the request body.
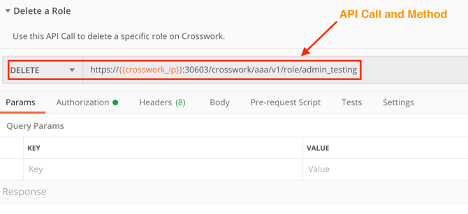
Delete a User Role
Use the crosswork/aaa/v1/role/<rolename> API in a DELETE request to delete a user role. You must pass the user role name in the DELETE request.
Section 4: Access Crosswork System Logs
This section shows examples of API calls you can use to collect and download Crosswork's internal system logs.
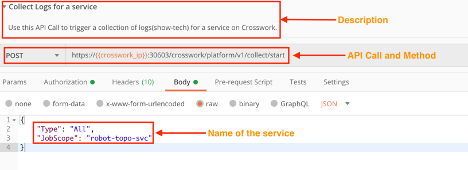
Collect Logs of Specific Crosswork Services
Use the crosswork/platform/v1/collect/start API in a POST request to collect logs for a specified service.
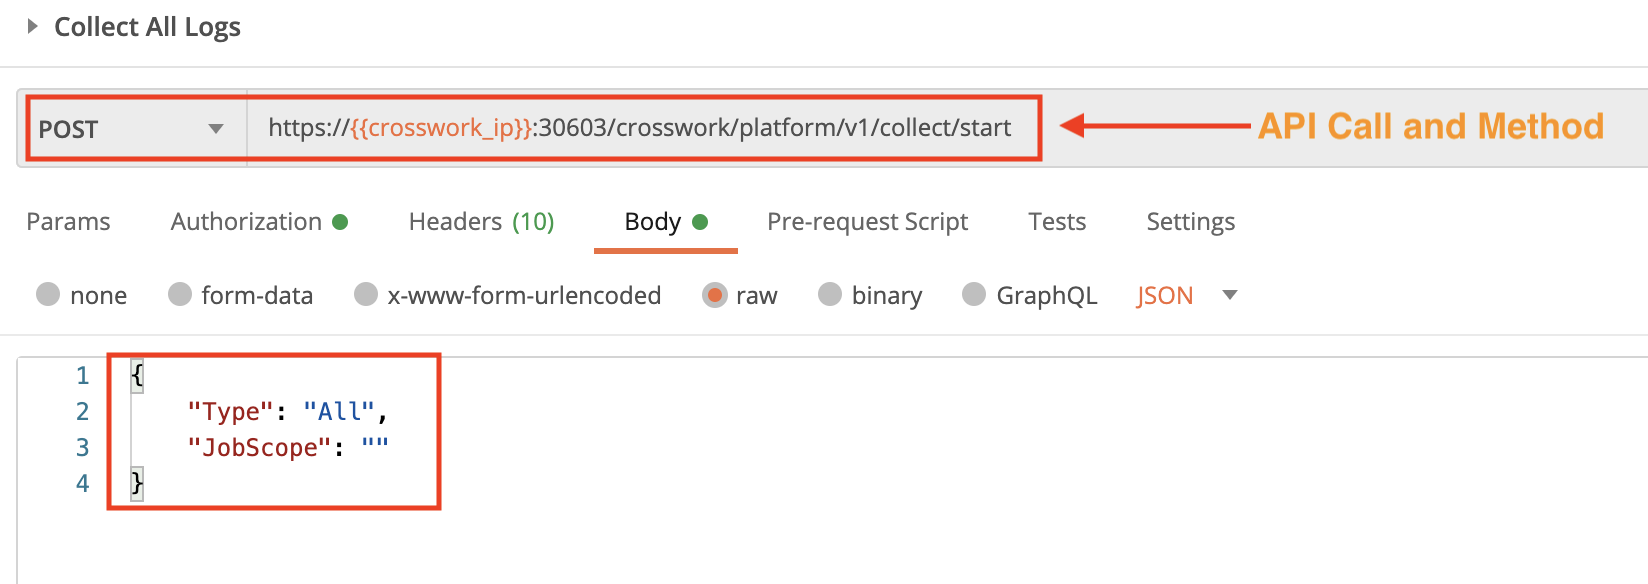
Collect Logs of All Crosswork Services
Use the crosswork/platform/v1/collect/start API in a POST request to collect all the service logs.
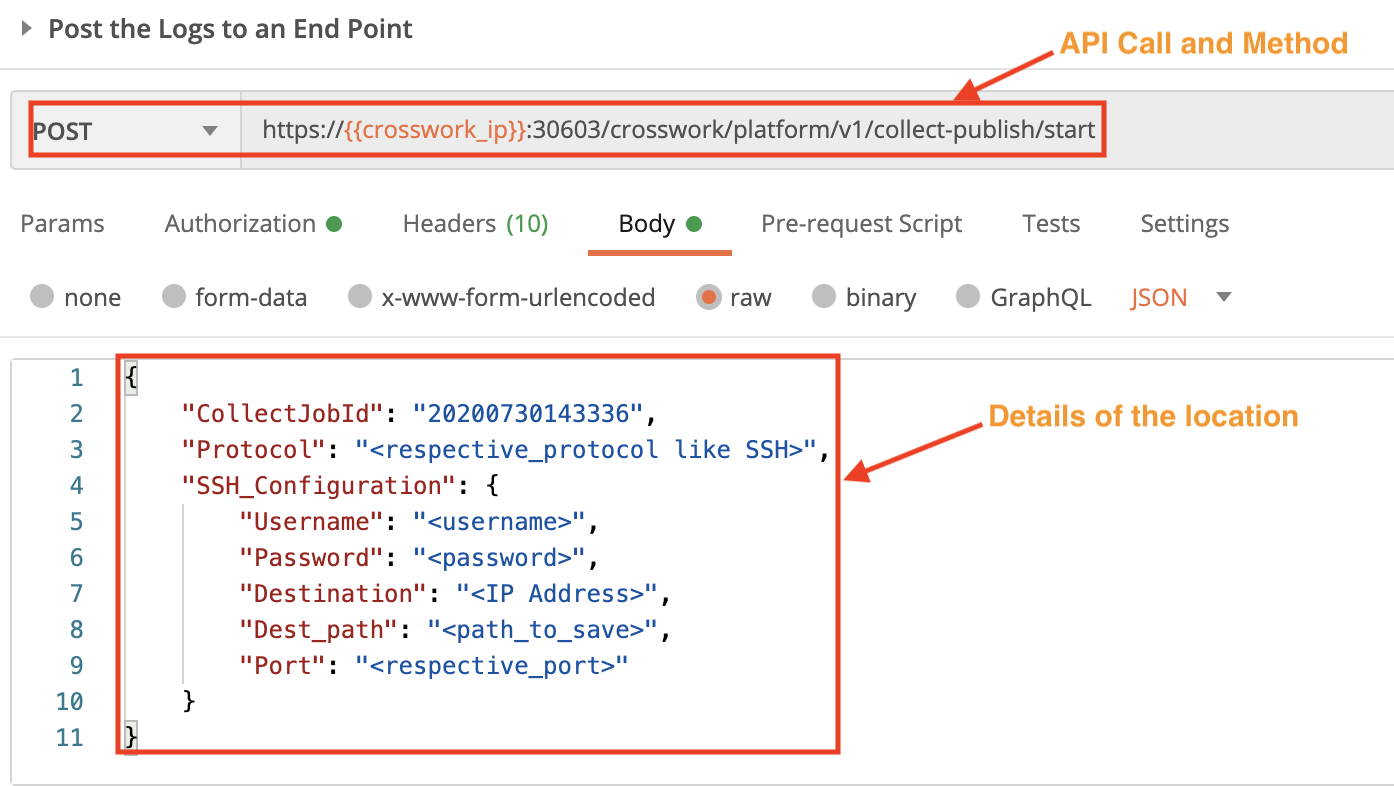
Post Crosswork Service Logs to an Endpoint
Use the crosswork/platform/v1/collect-publish/start API in a POST request to publish the collected service logs to an endpoint. The destination fields are required.
Additional References
- Writing Custom Playbooks.
- Writing Custom KPIs.
- Using Custom YANGs and MIBs with Cisco Crosswork Applications
- Using the CNC Service Extensibility Framework
- Download API Reference Documentation. Documentation for each version of each Crosswork API.
- Download Postman Collections for Crosswork APIs