Customization Scripts Using Crosswork Planning Design RPC/OPM Python Library Package
Crosswork Planning offers a Design RPC/OPM Python Library package, downloadable here, allowing users to run Design RPC and OPM Python Library scripts on Linux by connecting to the designapi service hosted on the Crosswork Planning VM.
This document outlines the steps to get started with the library package and provides example request responses where relevant.
Note: This document uses Postman and Cisco Crosswork Planning version 7.2 for all REST examples. Modify the Body contents to suit your environment.
Authentication Using SSL Certificates
TLS and SSL certificates secure communication between the OPM-service server and client. These certificates provide digital identification for authentication and verify the communication partner's identity. Refer to the Authentication section to set up SSL certificate authentication.
Getting Started with the Library Package
The Design RPC/OPM Python Library package supports only the Linux environment. You must set up the environment before attempting development or building the examples. Here are the steps to follow to set up the environment:
Note: The team validated the Crosswork Planning 7.2 Design RPC/OPM Python Library package on Ubuntu 24.04 with Python 3.12.3.
Step 1: Install Python 3.12
To use the library package, you must install Python 3.12 or later, and it must be a 64-bit version.
Step 2: Unzip the Library Package
tar -xvzf cp_design_opm_sdk.tgz
Step 3: Update Environment
The environment variables that you need to set to use the Crosswork Planning Design RPC/OPM Python Library package in Python scripts are:
export CARIDEN_HOME=/my/installation/home/cw-planning # Replace by actual folder where the Library package is unzipped
export PYTHONPATH=$PYTHONPATH:$CARIDEN_HOME/lib/python
export LD_LIBRARY_PATH=$LD_LIBRARY_PATH:$CARIDEN_HOME/lib:$CARIDEN_HOME/lib/python
Step 4: Generate Client Certificates
Use the "generate_client_certs" script provided in the cp_design_opm_sdk.tgz to generate the client certificate. You can pass an optional password as an argument to encrypt the client key.
Note: The script requires Python package cryptography version 39.0.2 or later.
user@machine:~/opm-client$ cd $CARIDEN_HOME
user@machine:~/opm-client$ ls
docs  etc  generate_client_certs  lib
user@machine:~/opm-client$  ./generate_client_certs --password
Password:
The system creates certificates in the {CARIDEN_HOME}/etc/certs directory.
user@machine:~/opm-client$ ls -lhrt  $CARIDEN_HOME/etc/certs
total 16K
-rw-rw-r-- 1 akhil akhil 1.9K Jul 31 19:28 designapi_user_key.pem
-rw-rw-r-- 1 akhil akhil 1.4K Jul 31 19:28 designapi_user_cert.pem
-rw-rw-r-- 1 akhil akhil 4.1K Aug  7 06:42 ca_cert.pem
user@machine:~/opm-client$
generate_client_certs assumes that python3 is present in /usr/bin/python3. If not, run the script using the corresponding python3:
user@machine:~/opm-client$ cd $CARIDEN_HOME
user@machine:~/opm-client$ ls
docs  etc  generate_client_certs  lib
user@machine:~/opm-client$ python3 generate_client_certs --password
Password:
Step 5: Upload Client Certificates/Onboard Clients
In this section, we perform the steps needed to onboard an OPM service client to Crosswork Planning using only library.
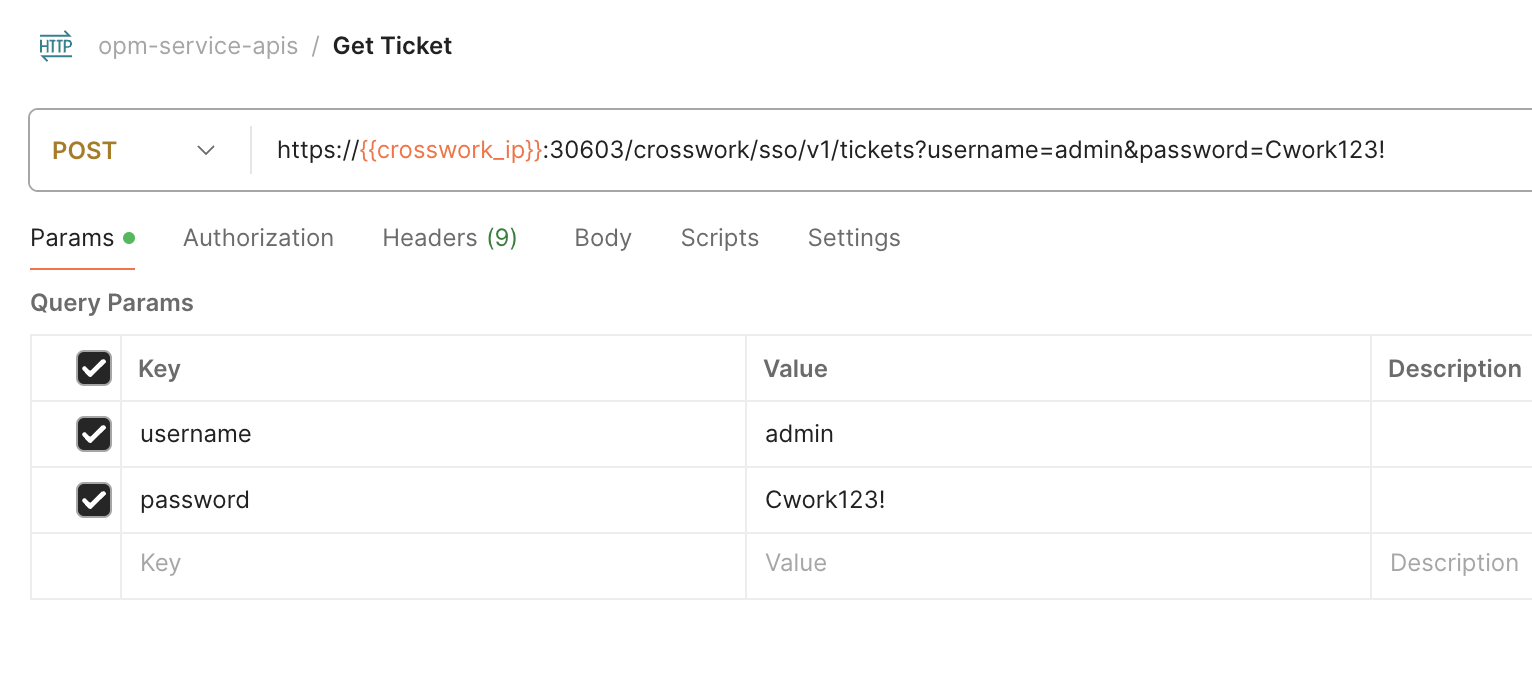
5.1: Generate Ticket and Token
Authenticate all library requests. The Crosswork user whose credentials you use must have admin access to the server to execute library requests.
To get this authorization, first generate a ticket using a POST request to the Crosswork crosswork/sso/v1/tickets API. Supply the Crosswork username and password with the request, as shown in the following figure:
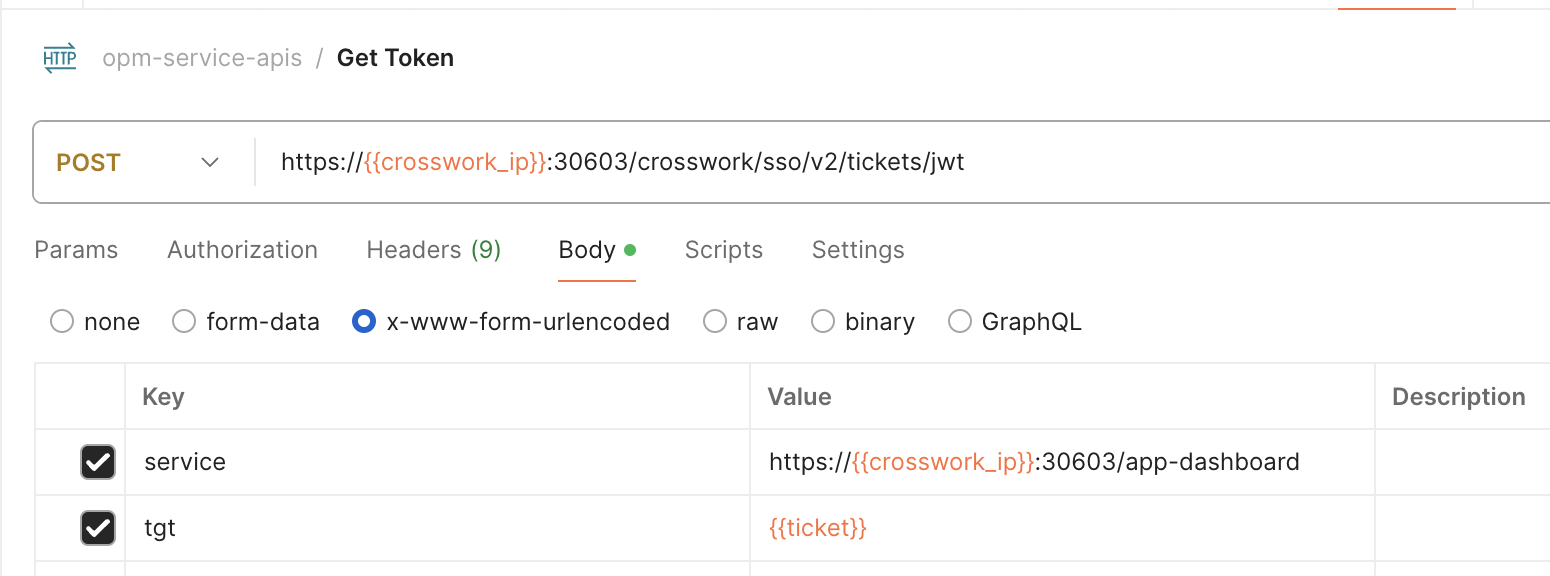
Use a POST request with the same tickets API, providing the {{ticket}} variable instead of the username and password. Copy the token from the result to authenticate future Crosswork requests.
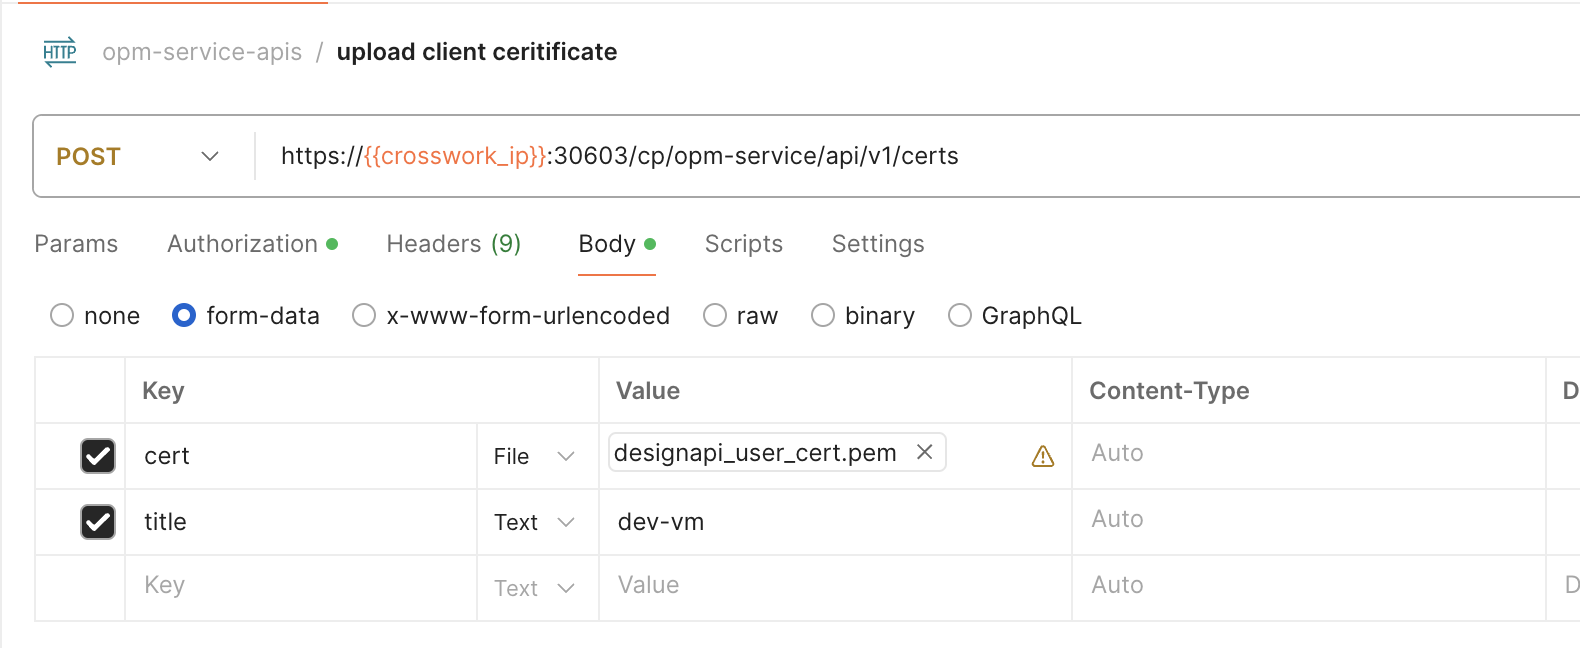
5.2: Upload Client Certificate
In this step, we onboard a client to opm-service by uploading the client certificate generated in Step 4: Generate Client Certificates.
To upload the client certificate, use a POST request to the cp/opm-service/api/v1/certs API.
5.3 Add Server Certificate to Client's truststore
Use GET request to the cp/opm-service/api/v1/certs/server API to get the server's certificate.
Add the server certificate to client's truststore by appending the server certificate to {CARIDEN_HOME}/etc/certs/ca_cert.pem
 .
.
Step 6: Start the Service
Use the cp/opm-service/api/v1/start API in a POST request to start the designapi service.

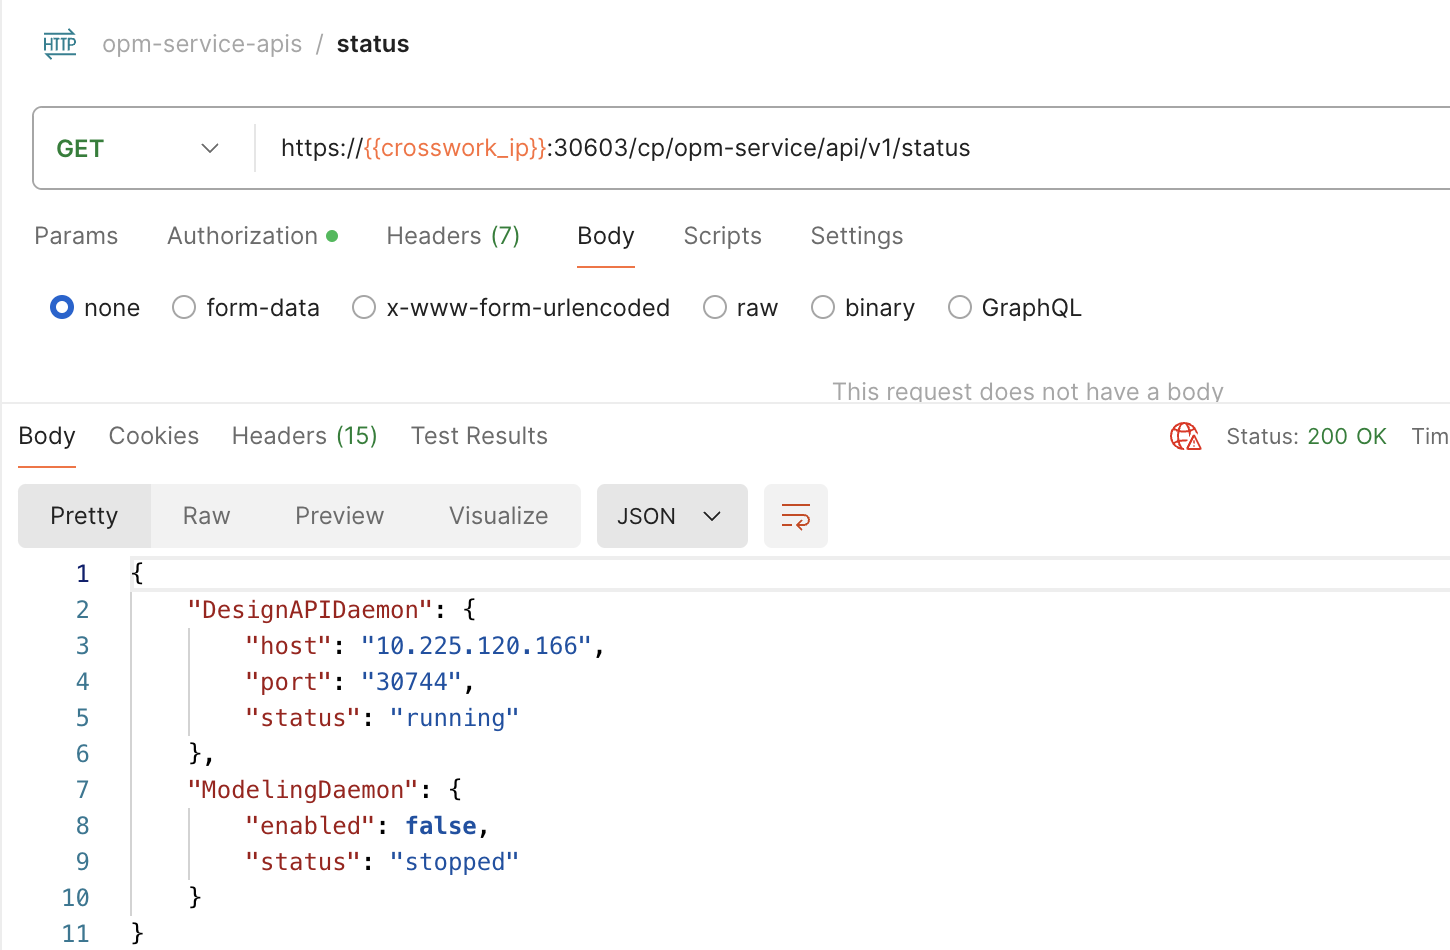
Step 7: Check the Service Status before Using the Design RPC and OPM Python Library
Use the cp/opm-service/api/v1/status API in a GET request to query the service status and make sure that it is running.
Example Design RPC, OPM Python Library Scripts
Let us now load a plan file into the service instance, and print the names of all the nodes in the file:
If a password encrypted the client private key, export it along with the environment variables from Step 3: Update Environment.
export DESIGN_CLIENT_KEY_PASS=<password-used-to-generate-certificates>
Use the Crosswork VM IP as host, 30744 as port, and protocol=ssl for the RPC communication.
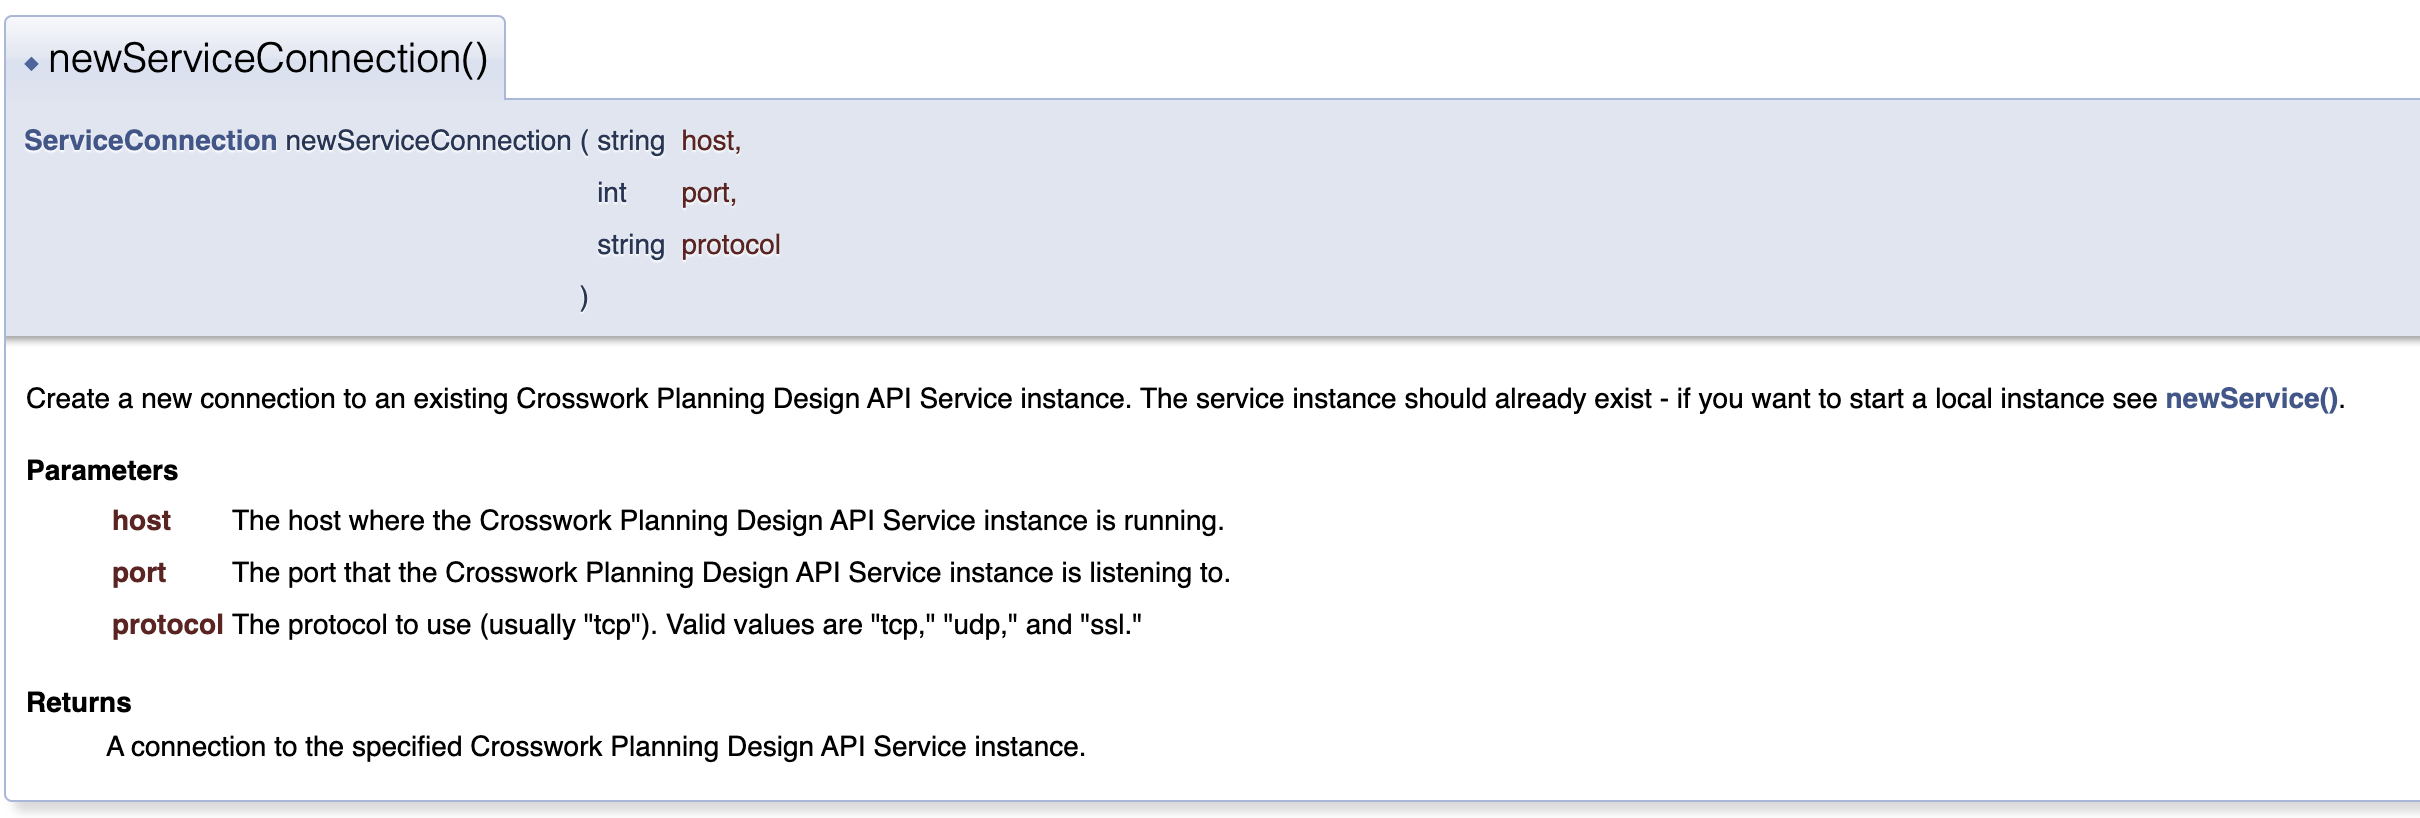
Using Design RPC Python Library
Use com::cisco::wae::design::ServiceConnectionManager::newServiceConnection() to connect to the designapid instance running on Crosswork Planning VM by providing Crosswork Planning VM's IP address as host, port=30744 and protocol=ssl.
com::cisco::wae::design::PlanManager::newPlanFromBytes should be used for reading a plan file since the planfile will be in a filesystem that is local to the client application.
import com.cisco.wae.design
import sys

plan_file = sys.argv[1]
host = sys.argv[2]
port = sys.argv[3]
protocol = 'ssl'

with open(plan_file, 'rb') as f:
    conn = com.cisco.wae.design.ServiceConnectionManager.newServiceConnection(host, port, protocol)
    plan = conn.getPlanManager().newPlanFromBytes(f.read())
    for nodeKey, node in plan.getNetwork().getNodeManager().getAllNodes().items():
        print((node.getName()))
Using OPM Python Library
Use the com.cisco.wae.opm.network.open_plan() API to open a local planfile by providing the Crosswork Planning VM's IP (host), port 30744, and protocol SSL.
from com.cisco.wae.opm.network import open_plan
import sys

plan_file = sys.argv[1]
host = sys.argv[2]
port = sys.argv[3]
protocol = 'ssl'

with open_plan(plan_file, host, port, protocol) as plan:
        model = plan.model
        for node in model.nodes:
            print(node.name)
Using Modeling Daemon
Crosswork Planning also provides modeling daemon (WMD) to which you can specify to load a collector network. WMD keeps a working model of the network, and subscribers can get a copy of that model for themselves.
The OPM Python Library includes the WMDClient class, which provides helper methods to connect to the modeling daemon (WMD) and retrieve the network model loaded by WMD.
TLS secures the connection between WMDClients and the WMD server. SSL certificates generated in Step 4: Generate Client Certificates secure the connection.
Starting WMD
Use the cp/opm-service/api/v1/modelingdaemon/start API in a POST request to start the modeling daemon. The network parameter is a required parameter.

Example Script using WMDClient
from com.cisco.wae.opm.wmdClient import WMDClient
import logging
import sys

logger = logging.getLogger(__name__)

class WMDClientProxy(WMDClient):
    def __init__(self, app):
        super(WMDClientProxy, self).__init__(app, wmd_host=sys.argv[1])
        self.network = None

    def start_wmd_client(self):
        self.start()

    def stop_wmd_client(self):
        self.stop_listen()

    def get_model_from_wmd(self):
        try:
            with self.get_opm_network(refresh=True) as (network, service):
                return network.clone()
        except Exception as err:
            self.log.error("Failed to get WMD network %s" % str(err))
            raise err


class Application(object):
    def __init__(self) -> None:
        self.log = logger

app = Application()
wmd_client = WMDClientProxy(app)
wmd_client.start_wmd_client()
network = wmd_client.get_model_from_wmd()
model = network.model
for node in model.nodes:
    print(node.name)
wmd_client.stop_wmd_client()
Known Limitations
This section describes known limitations and restrictions when using Design RPC and OPM Python Library:
After any operations related to certificate, like changing client certificate, adding new client certificate, generating new server certificate, and so on, restart the service for the certificate change to take effect.
Use the cp/opm-service/api/v1/stop followed by the cp/opm-service/api/v1/start POST APIs to stop and start the service after the certificate changes.The following error appears when exiting the connection or script:
warning: deprecated property: IceSSL.CertAuthFile
You can ignore this warning, as it does not impact functionality.
- You see the following error when exiting the connection or script:
error: communicator not destroyed during global destruction
You can ignore this error, as it does not impact functionality.