Authentication
The CX Cloud API is available only to customers and partners with access to at least one CX Cloud account. To authenticate API requests, you need an API access token. You can generate this token by completing an OAuth2 client credentials grant flow. This process involves a single request and response, with no user interaction required. Registering an application in the Cisco API Developer Portal provides all the details that are required to complete authentication.
Regarding application registrations:
- You can register multiple applications, but you can associate only one application's key (that is, Client ID) with your CX Cloud profile.
- You need to associate your application key with your CX Cloud profile once. It will give you access to all the CX Cloud accounts available to you in CX Cloud
- You can add any CX Cloud API resource to the same application.
- Each registration defines the identity, role, access, and permissions of the API user who created it, in relation to any customer data.
- When registering an application, the system generates a set of credentials (that is, Client ID and Client Secret) that the client application submits in the OAuth2 authentication request.
Note Each registered application gets unique credentials, similar to a username and password. You must protect these credentials. They never expire. However, you can monitor them in the API Developer Portal, and if you detect a compromise, you can revoke or regenerate them. When you change credentials, update both the application and the CX Cloud profile with the new Client ID and Client Secret.
Application Registration
To use the CX Cloud API:
Note: You must create a Cisco.com account before logging into the API Console.
Navigate to the Cisco API Console portal.

Click Sign In and log in using CCO ID credentials.
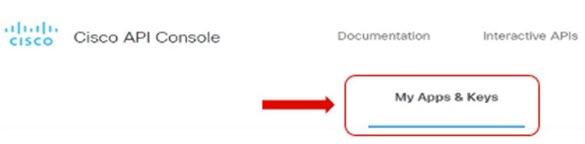
Click My Apps & Keys.
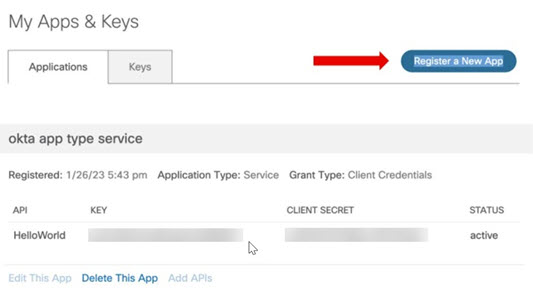
Click Register a New App to register a new application. The Register an Application page opens.
Enter the Name of the application.
Select the Service radio button under Application Type and select the Client Credentials check box under Grant Type.

Select one or more CX Cloud API resources under Select APIs and add them to the application.
- CX Cloud Alerts v2
- CX Cloud Contracts v2
- CX Cloud Customer v2
- CX Cloud Inventory v2
Select I agree to the terms of service and click Register. A confirmation message displays on the My Apps & Keys page, and the system sends a confirmation email. The new application registers successfully.
Navigate back to My Apps & Keys to retrieve the newly created Key (that is, Client ID) and Client Secret.
To use the CX Cloud API, associate the new application Key (that is, Client ID) with your CX Cloud profile by completing the following steps:
- Navigate to CX Cloud and log in using CCO ID credentials.

- Click Profile & Account.
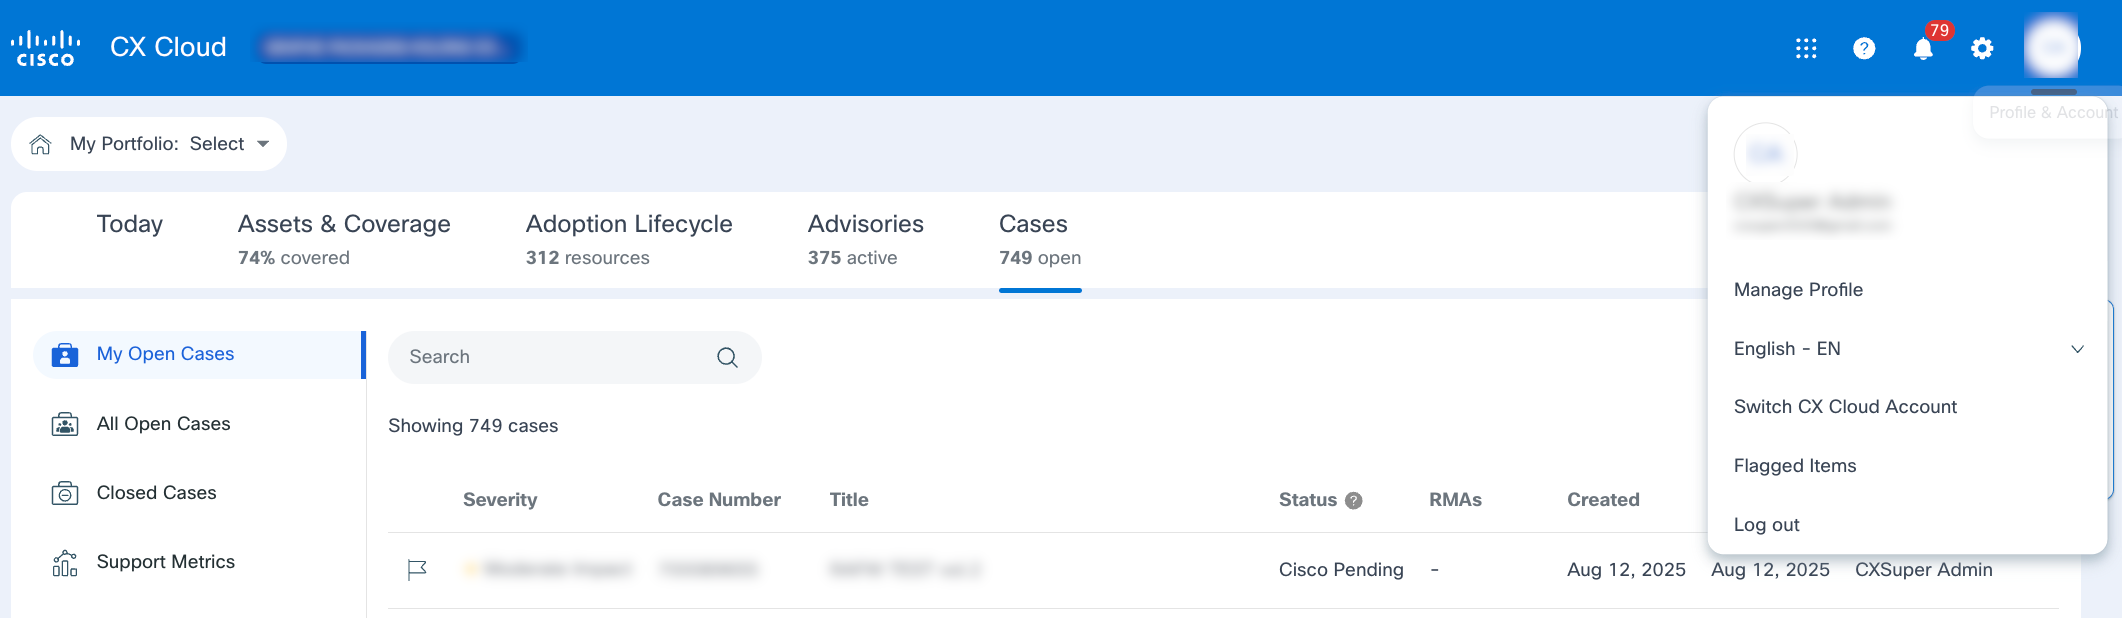
- Click Manage Profile.
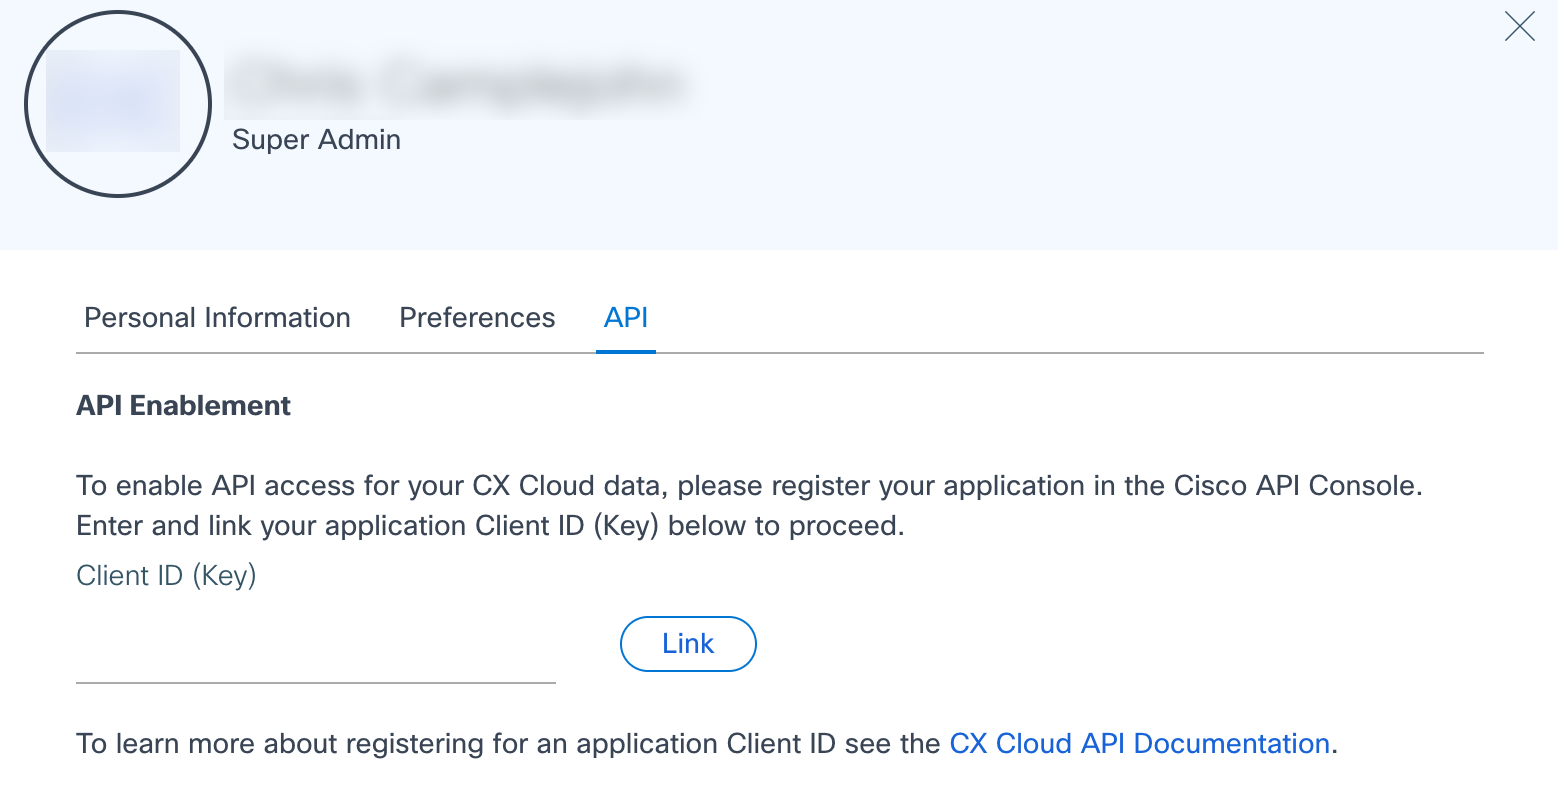
- Select API tab.
- Follow the on-screen instructions to enter the Key.
Note Complete this association only once for your Key (that is, Client ID). This association grants access to all CX Cloud accounts available to you. If you create a new key in the future, you will need to return to your profile to delete the existing key and add the new key.
Note There may be an initial delay of up to 10 minutes before you can use the CX Cloud API after authentication is set up for the first time.
Generating Access Tokens
The following details define the authentication HTTP request:
- HTTP Method:
POST - API Resource:
https://id.cisco.com/oauth2/default/v1/token Content-TypeHeader:application/x-www-form-urlencoded- Body: URL-encoded parameters:
grant_type: client_credentialsclient_id: application Client ID/Keyclient_secret: application Client Secret
Note The system generates the Client ID and Client Secret upon application registration. The key from the application in the API Console refers to the same value as the Client ID.
Request
Example:
curl --location 'https://id.cisco.com/oauth2/default/v1/token' \
--header 'Content-Type: application/x-www-form-urlencoded' \
--data-urlencode 'grant_type=client_credentials' \
--data-urlencode 'client_id=redacted' \
--data-urlencode 'client_secret=redacted'
Response
The response contains an access_token field and an expires_in field. The expires_in field indicates how many seconds the access token is valid, such as 1 hour.
{
    "token_type": "Bearer",
    "expires_in": 3600,
    "access_token": "XXXXXXXXXX",
    "scope": "customscope"
}
Authenticating with the Bearer Token
After generating the access token, include it in the Authentication header with each API request. The bearer token allows you to authenticate API requests without needing to provide a username or password with each request. To use a bearer token for authentication, include it in the Authorization header of requests. The header value should follow this format: Authorization: Bearer <your-bearer-token-here>.
Note: The default lifetime of a client credential access token is 3600 seconds (1 hour). After the token expires, the application can request a new access token. The application can also acquire a new token at any time before the current one expires.
The following example shows the bearer token in a request:
curl --location 'https://apix.cisco.com/cs/api/v2/customer-info/customer-details' \
--header 'Authorization: Bearer XXXXXXXXXX'