Getting started
Send REST requests to the Cisco DNA Center Always-on Sandbox using Postman. Learn how to get an authorization token, troubleshoot errors, and get device inventory.
Cisco DNA Center Environment
If you don’t have access to the Cisco DNA Center environment, we have you covered.
The DevNet Sandboxes provide developers with zero-cost, easy access to Cisco DNA Center Platform to develop and run code against 24x7. Cisco DNA Center is available as ALWAYS-ON DevNet Sandboxes for the following deployments:
Hello World
This example uses Postman (a freely available application) to make REST calls against a Cisco DNA Center appliance. After installing, complete this exercise to send some simple API requests to Cisco DNA Center.
To use your own Cisco DNA Center appliance for this tutorial, you must first install the Cisco DNA Center platform application and then enable the REST API bundle. After enabling the REST API bundle, wait four minutes before attempting to issue a REST request to Cisco DNA Center.
Installing Postman
Get Postman from the Postman homepage and follow the instructions to install it on your development machine.
Configure Postman to accept self-signed certificates:
Launch Postman.
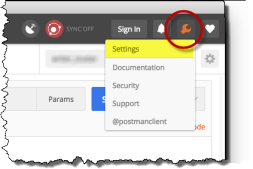
At the upper-right corner of Postman, click the wrench icon and choose Settings from the drop-down menu.
Figure: Opening Postman Settings

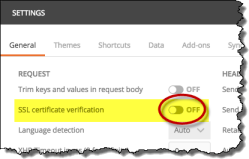
In the Request section, set SSL certificate verification to OFF.
Figure: Allowing self-signed certificates in Postman

Dismiss the Settings window by clicking X in the upper-right corner of the window.
Generating an Authorization Token
Cisco DNA Center accepts REST requests from authenticated users only. To authenticate to Cisco DNA Center, you must submit your user credentials. Successful authentication returns an authorization token that you can use to issue subsequent requests.
To generate an authorization token, take the following steps:
Launch Postman if you have not done so already.
Create a new request. Make sure the Create New tab is selected in Postman's opening screen. Click the Request button in the Building Blocks section.
Postman shows the Create dialog box. Give your new request a name and description, then save it to a new or existing collection.Set the request type to
POST.For new requests, Postman sets the default request type to
GET. You need to change this setting toPOSTfor this particular request.Supply the REST request URL.
Enter the request URL in the text field next to the request-type menu, replacingIP-addresswith the IP address of your Cisco DNA Center instance. For example, to use the DevNet Always-On Sandbox, replaceIP-addresswith thesandboxdnac.cisco.comdomain name.- In Cisco DNA Center version 1.2.6 and above, the URL must be of the following form:
https://<IP ADDRESS>/dna/system/api/v1/auth/token - For older versions of Cisco DNA Center, the URL must be of the following form:
https://<IP ADDRESS>/api/system/v1/auth/token
To find your Cisco DNA Center version number, choose About Cisco DNA Center from the "gear" menu
 on any page of the Cisco DNA Center user interface.
- In Cisco DNA Center version 1.2.6 and above, the URL must be of the following form:
Choose Basic Auth.
In the Authorization tab below the URL field, pull down the Type menu and select
Basic Auth. Postman displays a login form.In the login form, enter a valid username and password for your Cisco DNA Center instance.
For the DevNet Always-On Sandbox, use the following credentials:
- Username:
devnetuser - Password:
Cisco123!
- Username:
Send the request.
Click Send.
Postman sends the request to the Cisco DNA Center instance and displays the response. If your login is successful, Cisco DNA Center returns a 200 OK response and a JSON response body that looks like the following example:
{
  "Token": "eyJ0eXA ... O5uEMR-tc"
}
This JSON body contains a single JSON object that defines a key-value pair. A colon (
:) separates the"Token"key from its associated value. This value is the authorization token itself. Both the key and the value are surrounded by double-quotation (") marks.To improve readability, this listing omits part of the value. The token that Cisco DNA Center returns is much longer than this example listing.
Troubleshooting
If you received a status code other than 200 OK, check the following and then retry your request:
- Recheck the URL that you supplied.
- Make sure that you specified POST as the action.
- Make sure you turned off SSL Verification in Postman; see Installing Postman.
- If you are using your own Cisco DNA Center appliance or a reservation-based DevNet Sandbox, you may encounter bug CSCvn64908. To work around this problem, disable the REST API bundle, re-enable it, then wait four minutes before issuing a REST call. See Enabling the Cisco DNA Center REST API Bundle in Reserved Sandboxes.
Device Inventory Example
To use the authorization token in a request for a device inventory, take the following steps:
Create a request. To create this request, you can use a procedure similar to the one that you used in the previous section. Add the following data to the request:
Set the request type to
GET.Enter the REST request URL
- In Cisco DNA Center version 1.2.6 and above, the URL is of the following form:
https://<IP ADDRESS>/dna/intent/api/v1/network-device - In older versions of Cisco DNA Center, the URL is of the following form:
https://<IP ADDRESS>/api/v1/network-device
Replace
IP_addresswith the IP address of your Cisco DNA Center instance. For example, to use the DevNet Always-On Sandbox, replaceIP-addresswith thesandboxdnac.cisco.comdomain name.- In Cisco DNA Center version 1.2.6 and above, the URL is of the following form:
Add an X-Auth-Token header to your request. This header provides the authorization token that you generated in the previous section of this exercise.
- Click Headers.
- In the key field, type X-Auth-Token.
- In the value field, paste the value of the
"Token"JSON object that your token-generation request returned. Do not include the quotation marks.
Send the request.
Click Send. Postman sends the request to the Cisco DNA Center instance and displays its response.
A successful request results in a response that contains a JSON object containing the key "response". The value of "response" is an array of objects, each of which describes a device in the Cisco DNA Center inventory.
NOTE: If you query a Cisco DNA Center instance that has not yet discovered any network devices, the result contains no devices. To see a fully populated result, issue this request to the Cisco DNA Center instance in the DevNet Always-On Sandbox. For more information about device discovery, see "Discover Your Network" in the Cisco DNA Center User Guide.
Here's an example response, from the Cisco DNA Center instance in the DevNet Always-On Sandbox:
    {
      "response": [
        {
          "type": "Cisco ASR 1001-X Router",
          "errorCode": null,
          "softwareVersion": "16.6.1",
          "errorDescription": null,
          "lastUpdateTime": 1516993572109,
          "tagCount": "0",
          "location": null,
          "family": "Routers",
          "lastUpdated": "2018-01-26 19:06:12",
          "hostname": "asr1001-x.abc.inc",
          "inventoryStatusDetail": "<status><general code=\"SUCCESS\"/></status>",
          "role": "BORDER ROUTER",
          "macAddress": "00:c8:8b:80:bb:00",
          "roleSource": "AUTO",
          "bootDateTime": "2018-01-11 15:47:04",
          "collectionStatus": "Managed",
          "interfaceCount": "10",
          "lineCardCount": "9",
          "lineCardId": "a2406c7a-d92a-4fe6-b3d5-ec6475be8477, 5b75b5fd-21e3-4deb-a8f6-6094ff73e2c8, 8768c6f1-e19b-4c62-a4be-51c001b05b0f, afdfa337-bd9c-4eb0-ae41-b7a97f5f473d, c59fbb81-d3b4-4b5a-81f9-fe2c8d80aead, b21b6024-5dc0-4f22-bc23-90fc618552e2, 1be624f0-1647-4309-8662-a0f87260992a, 56f4fbb8-ff2d-416b-a7b4-4079acc6fa8e, 164716c3-62d1-4e48-a1b8-42541ae6199b",
          "managementIpAddress": "10.10.22.74",
          "memorySize": "3956371104",
          "platformId": "ASR1001-X",
          "reachabilityFailureReason": "",
          "reachabilityStatus": "Reachable",
          "series": "Cisco ASR 1000 Series Aggregation Services Routers",
          "snmpContact": "",
          "snmpLocation": "",
          "tunnelUdpPort": null,
          "waasDeviceMode": null,
          "apManagerInterfaceIp": "",
          "associatedWlcIp": "",
          "upTime": "15 days, 3:18:52.33",
          "serialNumber": "FXS1932Q1SE",
          "softwareType": "IOS-XE",
          "locationName": null,
          "collectionInterval": "Global Default",
          "instanceUuid": "d5bbb4a9-a14d-4347-9546-89286e9f30d4",
          "id": "d5bbb4a9-a14d-4347-9546-89286e9f30d4"
        },
        {
          "type": "Cisco Catalyst 9300 Switch",
          "errorCode": null,
          "softwareVersion": "16.6.1",
          "errorDescription": null,
          "lastUpdateTime": 1516993573093,
          "tagCount": "1",
          "location": null,
          "family": "Switches and Hubs",
          "lastUpdated": "2018-01-26 19:06:13",
          "hostname": "cat_9k_1.abc.inc",
          "inventoryStatusDetail": "<status><general code=\"SUCCESS\"/></status>",
          "role": "ACCESS",
          "macAddress": "f8:7b:20:67:62:80",
          "roleSource": "AUTO",
          "bootDateTime": "2018-01-11 14:42:33",
          "collectionStatus": "Managed",
          "interfaceCount": "41",
          "lineCardCount": "2",
          "lineCardId": "feb42c9f-323f-4e17-87d3-c2ea924320cb, 0f0c473e-b2e0-4dcf-af11-9e7cf7216473",
          "managementIpAddress": "10.10.22.66",
          "memorySize": "889225280",
          "platformId": "C9300-24UX",
          "reachabilityFailureReason": "",
          "reachabilityStatus": "Reachable",
          "series": "Cisco Catalyst 9300 Series Switches",
          "snmpContact": "",
          "snmpLocation": "",
          "tunnelUdpPort": null,
          "waasDeviceMode": null,
          "apManagerInterfaceIp": "",
          "associatedWlcIp": "",
          "upTime": "15 days, 4:23:48.72",
          "serialNumber": "FCW2136L0AK",
          "softwareType": "IOS-XE",
          "locationName": null,
          "collectionInterval": "Global Default",
          "instanceUuid": "6d3eaa5d-bb39-4cc4-8881-4a2b2668d2dc",
          "id": "6d3eaa5d-bb39-4cc4-8881-4a2b2668d2dc"
        },
        {
          "type": "Cisco Catalyst 9300 Switch",
          "errorCode": null,
          "softwareVersion": "16.6.1",
          "errorDescription": null,
          "lastUpdateTime": 1516993864882,
          "tagCount": "1",
          "location": null,
          "family": "Switches and Hubs",
          "lastUpdated": "2018-01-26 19:11:04",
          "hostname": "cat_9k_2.abc.inc",
          "inventoryStatusDetail": "<status><general code=\"SUCCESS\"/></status>",
          "role": "ACCESS",
          "macAddress": "f8:7b:20:71:4d:80",
          "roleSource": "AUTO",
          "bootDateTime": "2018-01-11 14:43:33",
          "collectionStatus": "Managed",
          "interfaceCount": "41",
          "lineCardCount": "2",
          "lineCardId": "789e00f9-f52d-453d-86c0-b18f642462ee, 242debfd-ff6c-4147-9bf6-574e488c5174",
          "managementIpAddress": "10.10.22.70",
          "memorySize": "889225280",
          "platformId": "C9300-24UX",
          "reachabilityFailureReason": "",
          "reachabilityStatus": "Reachable",
          "series": "Cisco Catalyst 9300 Series Switches",
          "snmpContact": "",
          "snmpLocation": "",
          "tunnelUdpPort": null,
          "waasDeviceMode": null,
          "apManagerInterfaceIp": "",
          "associatedWlcIp": "",
          "upTime": "15 days, 4:28:05.82",
          "serialNumber": "FCW2140L039",
          "softwareType": "IOS-XE",
          "locationName": null,
          "collectionInterval": "Global Default",
          "instanceUuid": "74b69532-5dc3-45a1-a0dd-6d1d10051f27",
          "id": "74b69532-5dc3-45a1-a0dd-6d1d10051f27"
        },
        {
          "type": "Cisco Catalyst38xx stack-able ethernet switch",
          "errorCode": null,
          "softwareVersion": "16.6.2s",
          "errorDescription": null,
          "lastUpdateTime": 1516992954094,
          "tagCount": "0",
          "location": null,
          "family": "Switches and Hubs",
          "lastUpdated": "2018-01-26 18:55:54",
          "hostname": "cs3850.abc.inc",
          "inventoryStatusDetail": "<status><general code=\"SUCCESS\"/></status>",
          "role": "CORE",
          "macAddress": "cc:d8:c1:15:d2:80",
          "roleSource": "MANUAL",
          "bootDateTime": "2018-01-11 15:20:34",
          "collectionStatus": "Managed",
          "interfaceCount": "59",
          "lineCardCount": "2",
          "lineCardId": "15d76413-5289-4a99-98b6-fcacfe76b977, f187f561-9078-4f30-b1a1-c6c6284bd075",
          "managementIpAddress": "10.10.22.69",
          "memorySize": "873744896",
          "platformId": "WS-C3850-48U-E",
          "reachabilityFailureReason": "",
          "reachabilityStatus": "Reachable",
          "series": "Cisco Catalyst 3850 Series Ethernet Stackable Switch",
          "snmpContact": "",
          "snmpLocation": "",
          "tunnelUdpPort": null,
          "waasDeviceMode": null,
          "apManagerInterfaceIp": "",
          "associatedWlcIp": "",
          "upTime": "11 days, 15:11:14.80",
          "serialNumber": "FOC1833X0AR",
          "softwareType": "IOS-XE",
          "locationName": null,
          "collectionInterval": "Global Default",
          "instanceUuid": "8be78ab1-d684-49c1-8529-2b08e9c5a6d4",
          "id": "8be78ab1-d684-49c1-8529-2b08e9c5a6d4"
        }
      ],
      "version": "1.0"
    }