Deploy SEA agent on industrial routers using CLI commands
This feature simplifies the configuration of supported network devices and the deployment of SEA agent on them. By following a guided configuration flow in the SEA User Interface and copying suggested CLI commands to the device, you can efficiently enable SEA. This is the recommended method for activating SEA on standalone (CLI-managed) network devices.
Previously, onboarding industrial routers and installing the SEA agent required several steps: creating a device profile, adding the network device to the Application Manager service, configuring device CLI for IoT Operations Dashboard connectivity, and then installing the agent. The current approach simplifies this by providing a guided workflow and tailored CLI commands, making the process more efficient and user-friendly.
Prerequisites
Before enabling SEA on industrial routers, ensure the following prerequisites are met:
- Network connectivity: Depending on the cluster in use, the IR device must always have access to us.ciscoiot.com or eu.ciscoiot.com.
- Firewall configuration: Ensure the firewall rules permit outbound connections from the device to both IoT OD and the assets. The DNS used needs to be able to provide connectivity to the appropriate IoT OD cluster.
Supported industrial routers
SEA CLI deployment is supported on the following Cisco industrial routers:
- IR 1101 Series
- IR 1800 Series
Enable SEA on industrial routers
Purpose
Enable Secure Equipment Access (SEA) by deploying and configuring the SEA agent on Cisco industrial routers using suggested CLI commands.
Context
This procedure uses the SEA User Interface to guide users through configuration, generates customized CLI commands for the selected network device, and enables efficient device onboarding and agent installation.
Before you begin:
- Confirm all prerequisites for the device and network are satisfied.
- Ensure you have the device serial number, model, and access credentials.
- Verify your device is listed among the supported routers.
Follow these steps to enable SEA on industrial routers:
- From the Services panel, choose Secure Equipment Access > System Management.
- Under the Network Devices panel, click Add Network Device.
- On the Add Network Device page, in the Network Device area, choose CLI Deployment from the Selection Method drop-down list.
After you select CLI Deployments from the list, the following fields become available:
- Network Device Name
- Client ID
- Network Device Type
- In the Network Device Name field, enter a name for the network device you want to add.
- In the Client ID field, enter the serial number of the network device.
- In the Network Device Type drop-down list, select Router, and then select a model of the router in the Network Device Model drop-down list, and click Next. The Advanced Configuration tab appears.
- To enable HTTP proxy, click Enable HTTP Connect Proxy, and enter the required HTTP Connect Proxy configuration details in the HTTP Connect Proxy section.
- Enter the network configuration details in the Network Configuration section.
- Click Add. The CLI commands tailored to your device configuration are generated and displayed in the Recommended CLI Deployment Commands section of the Deployment tab.
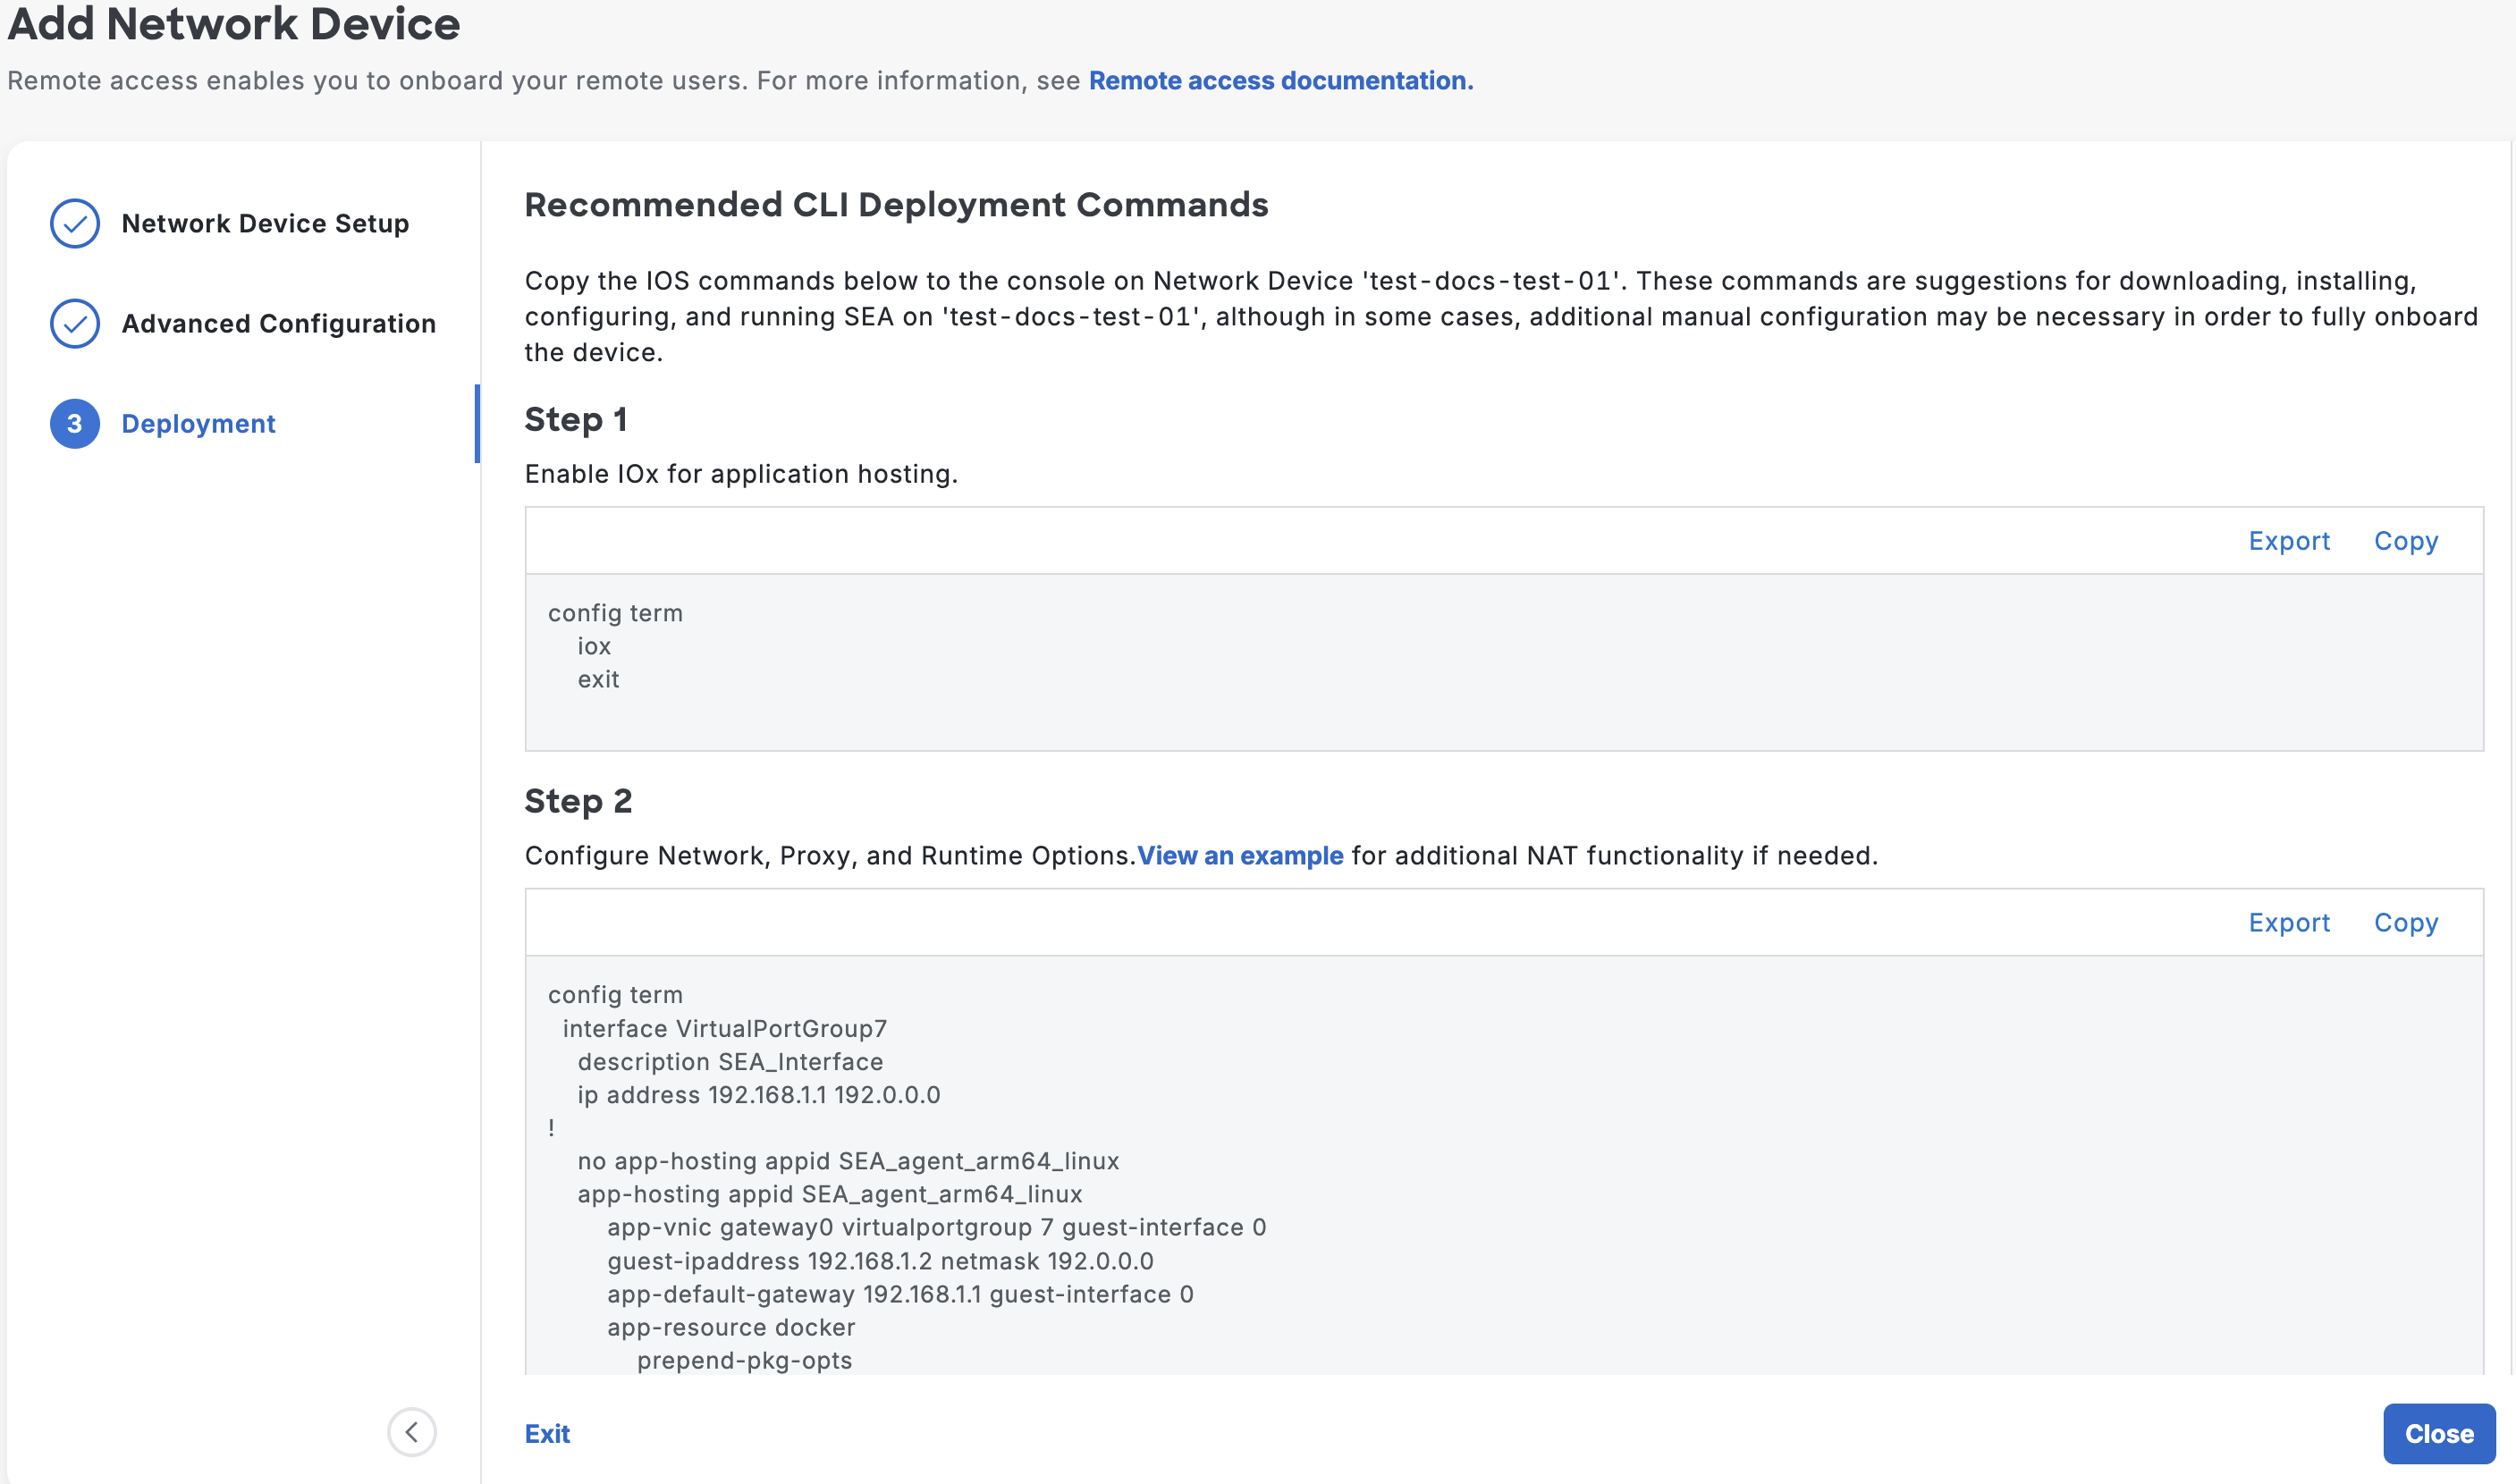
Copy the generated CLI commands from the dashboard and run them on the console of your device to:
a. Enable IOxb. Configure network, proxy, and runtime options
c. (Optional) If your assets do not use the IR as their default gateway, configure NAT. Click View an example for configuration guidance.
Note: Ensuring SEA cloud reachability may require NATing the SEA subnet’s traffic directly on the IR after completing step 2.
d. Download and install the SEA agent
Note: Download the SEA Agent to your local device by clicking Download SEA Agent. Then, copy the package to the flash drive of your network device and use the command in this section to install it.

The CLI commands are automatically saved. You can run them at a later time also. Click View Deployment Commands under Deployment Details to view the commands.
Click Close after running the commands.
Result
After successfully running the commands, the status of the network device changes to active on the System Management page.
SEA Agent connectivity modes
SEA agent connectivity modes are operational states that
- control how the SEA agent establishes secure connections with the IoT Operations Dashboard,
- use key rotation and recovery mechanisms to maintain device access, and
- indicate the agent’s connection status within the deployment interface.
The SEA Agent Connectivity Mode is displayed under the Deployment Details section to help you manage the keys for connection between SEA agent and IoT Operations Dashboard. When you add a device for the first time, the mode will be Recovery Mode. This status remains active for 48 hours. During this time, when you install the SEA agent by running the CLI commands, a new key (rotated key) will be generated, and the agent connects to the IoT Operations Dashboard using the rotated key. Subsequently, the mode changes to Rotation Mode. If the agent is unable to connect to the IoT Operations Dashboard using the rotated key, you will be prompted to switch to Recovery Mode. Upon switching, the agent connects to the IoT Operations Dashboard using the recovery key.
Note: You can switch to Recovery Mode by clicking the three dots (...) next to the View Deployment Commands area under the Deployment Details section.
Edit configuration details
Purpose
Update network device and configuration settings after initial SEA enablement.
Context
You may need to modify device descriptions, network parameters, or advanced options. Each configuration change generates new CLI commands. You must apply these commands to the device.
Before you begin:
- Make sure you have access to the System Management page and appropriate permissions.
You can change the configuration settings available under the Network Device Details and Additional Configuration sections. Any changes to the settings will trigger the generation of new CLI commands. Run these commands on the console.
Follow these steps to edit the Network Device Details section:
- On the System Management page, under Network Device Details, click Edit.
- In the Edit Network Device Details window, edit the Network Device Name and Network Device Description in the respective fields.
- Click Save.
To edit the Additional Configuration section, follow these steps:
- On the System Management page, under Additional Configuration, click View Details. The Additional Configuration window opens, displaying the current settings.
- In the window, click Edit. The Edit Additional Configuration page appears.
- Modify the settings as required, and click Save. Based on your input, the CLI commands are updated. Run these commands on the device's console. These commands are available in the CLI Restart Commands section.
HTTP connect proxy field descriptions
| Field | Description |
|---|---|
| Enable HTTP Connect Proxy | A toggle switch to activate the device's use of an HTTP proxy server for outbound connections. |
| Choose an HTTP Connect Proxy Configuration Mode | Selects the method for entering the proxy details: either as a single URL string or in separate form fields. |
| Proxy URL | Configuration mode where proxy details (server, port, authentication) are entered as a single URL. |
| Proxy Form | Configuration mode where proxy details are entered into separate fields. |
| Enter URL | Complete proxy server URL, typically including authentication, server address, and port. |
Network Configuration field descriptions
| Field | Description |
|---|---|
| Enable HTTP Connect Proxy | A setting to activate or deactivate the use of an HTTP proxy server for device connections. |
| Management VPG IP Address | The IP address assigned for administrative and management access to the device. |
| Subnet Mask | The subnet mask used to define the network segment of the IP address. |
| SEA Agent IP Address | The required IP address of the device where the SEA Agent is deployed. |
| VRF | The name of the Virtual Routing and Forwarding instance used to maintain separate routing tables for network segmentation. |
| Primary DNS IP Address | The IP address of the main Domain Name System (DNS) server used by the device for hostname resolution. |
| Secondary DNS IP Address | The IP address of the backup DNS server used for redundancy if the primary server is unavailable. |