Documentation>Cisco IoT Operations Dashboard
Cisco IoT Operations Dashboard
  • Overview
    • Welcome
    • Get Started
      • Onboarding an EDM-Managed device
      • Onboarding an Externally-Managed device
    • How to order
    • Set up the IoT Dashboard
    • Release notes
      • Edge Device release notes 2023
      • Edge Device release notes 2022
      • Edge Device release notes 2021
      • Edge Device release notes 2020
      • Application Manager
      • Cisco Cyber Vision release notes
      • Secure Equipment Access release notes 23
      • Secure Equipment Access release notes 22
      • Secure Equipment Access release notes 21
      • Edge Intelligence
        • 2023
        • 2022
        • 2021
        • 2020
      • Industrial Asset Vision
        • 2023
        • 2022
        • 2021
        • 2020
      • Industrial Wireless release notes
        • 2023
    • Log in
    • Upgrading Cisco IoT OD
    • Update network device firmware
    • Access control
      • Add and manage users
      • Create sub-organizations
      • Organization Hierarchy for IoT OD
      • Cisco SSO Login Experience
      • Enable Multi-Factor Authentication for an organization on IoT OD
    • Cisco Cross Platform Navigator
    • Audit user actions
    • Required accounts
    • Switch organizations or Services
    • View cloud service status
    • Feedback form
  • Edge Device Manager (EDM)
    • Requirements and release notes
      • Overview
      • Release notes
      • Firewall Rules: Device and network requirements
      • Supported devices and firmware
    • EDM Sandbox
    • Onboard network devices
      • Onboarding Quick Start Guide for IR devices
      • Prepare existing devices for onboarding
      • Troubleshoot IR device onboarding
      • Manually onboard network devices (alternative method)
    • Configure network devices
      • Overview
      • Create Configuration Group
      • Edit Configuration Group
      • Configuration Variables
      • Manage Configuration Group
      • Edit the configuration for a specific device
      • Create custom templates
      • Base Configuration
        • Hardware
        • WAN Uplink
        • LAN
        • Ethernet Settings
        • Interface
        • Device Settings
        • DHCP
        • Device Management
        • DNS/NTP
        • VPN
        • Network
        • Security
        • Wi-Fi
        • Serial
        • GPIO
    • Manage network devices
      • Add and manage network devices
      • Delete network devices
      • Deactivate network device
      • Mapping Modules for IR Devices
      • Connectivity from IR devices to Cellular Carriers
      • Convert AP to Autonomous Mode
      • Troubleshooting Issues
      • Add and monitor Meraki cameras
    • Monitor network devices
      • Monitor network device status
      • Track device location
      • View network device info on a map
      • View events and alerts
      • Manage notifications
    • EDM API
    • Application management
    • Application management troubleshooting tips
  • Application Manager
    • Overview
      • Release notes
    • Onboarding Externally-Managed IE3x00 Switches
      • Firewall Rules: Devices and Network Requirements
      • Device Configuration and Initiating Connection to OD
    • Application Inventory and Application Instances
    • Device Inventory
    • Device Profiles
    • Role-Based Access Control
    • Technotes: Troubleshooting Tips
  • Cisco Cyber Vision
    • Overview
      • Introduction
      • Release notes
      • User roles and permissions
    • Dashboard
    • Inventory
      • Assets
      • Asset Selection
      • Asset Deletion
      • Asset Vulnerability Management
    • Security Posture
      • Vulnerabilities
      • Acknowledge Vulnerabilities
        • Acknowledge vulnerabilities
    • Data sources
      • PCAP
      • Sensor Application
        • Sensor application
        • Capture modes
    • Configuration
  • Secure Equipment Access
    • Overview
      • Secure Equipment Access overview
      • Release notes 23
      • Release notes 22
      • Release notes 21
    • Add network devices and connected clients
    • Manage and schedule access for existing SEA access groups
    • Monitor sessions
    • Duo user security posture checks
    • Record Inline Sessions
    • Access methods
      • SSH Access Method
      • RDP Access Method
      • VNC Access Method
      • Web App Access Method
      • Telnet Access Method
      • SEA Plus Access Method
  • Edge Intelligence
    • Overview
      • EI overview
      • Using EI
      • Dashboard
      • Release notes
        • 2023
        • 2022
        • 2021
        • 2020
      • Upgrade EI Agents
      • Requirements
      • Supported devices and firmware
    • Enable EI agents
    • Add assets
      • Asset Management
      • Asset Types
      • Add Asset Instances
      • Map Asset Instances
      • Edit Asset Inventory Details
      • View Data Policy Status of an Asset
    • Add data destinations
    • Deploy data rule policies
    • Deploy data logic policies
      • Introduction to Data Logic
      • Install and Update VS Code and EI extension
      • Create Data Logic scripts in VS Code
      • Deploy Data Logic in Cisco EI
      • Update Data Logic scripts
      • Clone Data Logic from Cloud UI
    • View EI events
    • Configure and view alert rules
    • Troubleshooting Issues
      • Recommended Log Rotation
      • Documentation for Metrics collection
    • Edge Intelligence API
  • Industrial Asset Vision
    • Overview
      • Introduction
      • Release notes
        • 2023
        • 2022
        • 2021
        • 2020
    • Prerequisites
    • Quick start guide
      • Getting started
        • Onboard Network Devices
        • Onboard Sensors
        • Onboard Bridges
      • Add asset type
      • Add asset
      • Add sensor
      • Assign sensors
      • Add bridge
      • Change Preferences (User Localization)
    • View status and troubleshoot
      • View asset details and locations
      • View sensors details and troubleshoot
      • View network devices details and troubleshoot
      • Arctic Integration
    • Create alerts and generate reports
      • Create and view alerts
      • Generate and view reports
    • RF Performance Tool
    • Add Templates
    • Stream sensor data
    • Add Geofences
    • Group sensors and assets
    • Northbound APIs
      • Using APIs
      • APIs
        • Overview
        • API
          • AssetTypes
            • Get Asset Types
            • Add Asset Type
            • Delete Asset Type
            • Get Asset Type By Id
            • Update Asset Type
          • Assets
            • Get Assets
            • Add Asset
            • Delete Asset
            • Get Asset By Id
            • Update Asset
            • Assign Sensors To Asset
            • Delete Image Of Asset
            • Get Image Of Asset
            • Upload Image Of Asset
            • Get Sensors By Asset Id
            • Get Thumbnail Image Of Asset
            • Unassign Sensors From Asset
          • Sensors
            • Get Sensors
            • Get Sensor By Dev Eui
            • Claim Sensor By Dev Eui
            • Delete Sensor
            • Get Sensor By Id
            • Update Sensor
            • Get Sensor Location Data
            • Onboard Sensor
            • Get Sensor Tabular Telemetry Data
            • Get Sensor Telemetry Data
        • Model
          • AdditionalAttributesMap
          • Asset
          • AssetListResponse
          • AssetRequest
          • AssetType
          • AssetTypeListResponse
          • AssetTypeRequest
          • AssignSensorsRequest
          • AssignSensorsResponse
          • CreateSensorRequest
          • CustomAttributeData
          • CustomAttributeMetadata
          • Error
          • LiveDataItem
          • Location
          • LocationData
          • LocationDataResponse
          • OnboardSensorRequest
          • OnboardSensorResponse
          • PageInfo
          • Sensor
          • SensorListResponse
          • TabularTelemetryDataResponse
          • TelemetryData
          • TelemetryDataResponse
          • TelemetryValue
          • UnassignSensorsRequest
          • UnassignSensorsResponse
          • UpdateSensorRequest
  • Industrial Wireless
    • Overview
      • Introduction
      • Release notes
        • 2023
    • Supported firmware
    • Add new IW devices
    • Manage IW devices
      • Upgrade IW devices
      • Create Groups
      • Assign IW devices to a Group
      • Configure IW devices in online / offline mode
      • Edit and Delete Groups
      • Remove IW devices from Group
      • Create Templates
      • Duplicate Templates
      • Edit and Delete Templates
    • View details
      • View Group details
      • View IW device details
  • Solution Design
    • Tech guidance
    • Gateway Networking
    • Enterprise Network Integration
    • Security
    • Edge Compute
    • Field Deployment
    • Glossary
  • Developer Resources
    • Sandbox
    • Learning Labs
  • Community and Support
    • Developer Support
    • Videos
    • Related Information
    • System Status

Device Management

Note:

  • The Device Management section is not present in the IR800. (Instead, Managing Users is located in the User Management section of the IR800 base form and is identical to the Users section presented in this topic.
  • Both the IR1101 and IR1800 provide have Auto Recovery and Users functionality. Only the IR1800 series provides a Vehicle section (for Vehicle/Ignition for the IR800 router, see Device Settings.

Auto Recovery (IR1101 and IR1800) The IR1101 and IR1800 modems have an Auto Recovery feature that, when enabled, reset and register your device if both the connection to the Primary IP and Secondary IP Tracking Address and to IoT OD is lost. The auto recovery section has six fields where you can configure the type of recovery process you need to have. 

Note: If the internet connection is stable, but connectivity to IoT OD is lost, normal functioning of the device is unaffected.

Field Descriptions:

Note: You can also tailor the settings for Hardware reset timer, Enable Hardware Reset, and Enable Router Reload to only affect specific devices.

Enable Auto Recovery: (True/False) Setting the Auto Recovery feature to False (default setting) disables the feature. Setting the auto recovery to True activates the feature and allows you to select the recovery method that best fits your needs using the other fields. In addition, when the auto recovery feature is set to True, the built-in recovery functionality automatically attempts to reload the cellular modems and refresh the WAN interface IP addresses when the device loses Primary IP and Secondary IP Tracking Address connectivity.

Enable Router Reload: (True/False) Setting the Router Reload function to False (default setting) does not force the router to reload when connectivity to the Primary IP and Secondary IP Tracking Address is lost. Selecting True forces the router to periodically reload (every two hours) in order to recover connectivity to the Primary IP and Secondary IP Tracking Address.

Primary Tracking IP Address: The Primary IP address used by the device to confirm connectivity, for auto recovery feature. Set the IP address to meet your requirements.

Secondary Tracking IP Address: The Secondary IP address used by the device to confirm connectivity, for auto recovery feature. Set the IP address to meet your requirements. 

Enable Hardware Reset: (True/False) False (default setting) shows that this feature is disabled. Selecting True forces the device to wipe out the existing router configuration, performs a PnP reset, and re-registers it to IoT OD. This action occurs when the timer expires and there is no Primary IP and Secondary IP Tracking Address connectivity and both.

Hardware Reset Timer: (Default setting 12 hours) Provides a number of pre-set times (12 hours, 1 - 7 days in one-day increments). If the Enable Hardware Reset field is set to false (default), there is no need to set the Hardware Reset Time. The value is the amount of time the router waits when it loses Primary IP and Secondary IP Tracking Address connectivity and both auto recovery process forces the device to wipe out the existing configuration, performs a PnP reset, and device re-registers to IoT OD (when connectivity is established) as a new unconfigured device. Once device registers to IoTOD, device will get appropriate configuration as configured on IoTOD. 

To activate and configure auto recovery:

  1. Select True to enable auto recovery.
  2. (Optional) Select to Enable Router Reload.
  3. (Required) Enter the Primary Tracking IP Address.
  4. (Optional) Enter the Secondary Tracking IP Address.
  5. (Optional) Set the Enable Hardware Reset to True if you want to clear the existing configuration on the router and force the router to re-register to IoT OD.
  6. (Optional) Select the time interval  for the router.

Note: If the Enable Hardware Reset field is set to false (default), there is no need to set the Hardware Reset Time.

  1. Click Save. A success notice opens at the bottom right.

Device Management screen: Auto Recovery disabled and enabled

Device Auto Recovery

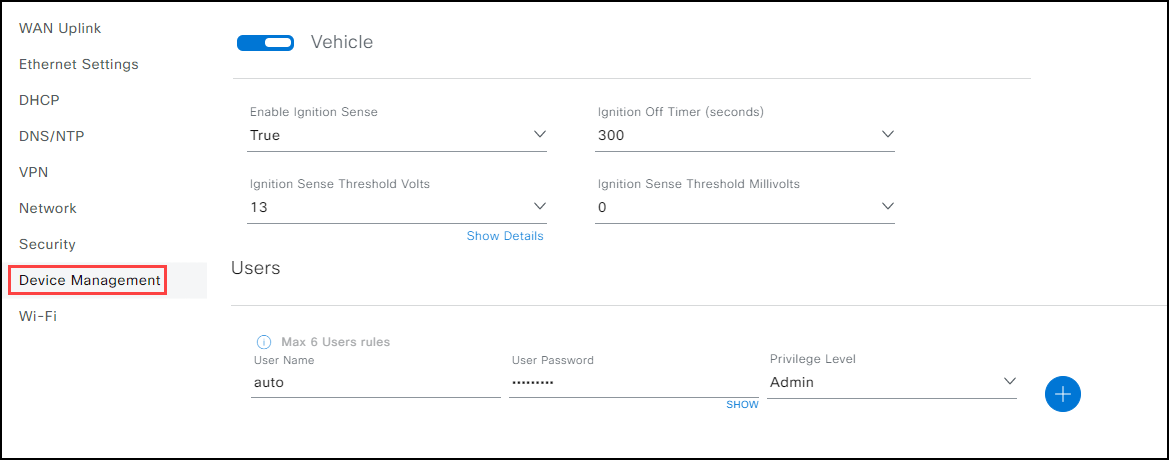
Vehicle (IR1800 only): This section displays the following parameters of ignition sensing:  

  • Enable Ignition Sense: Enables the IR1800 to "sense" state of the vehicle ignition (on or off) through the voltage level.
  • Ignition Off Timer (seconds): Sets the time, in seconds, before the IR1800 begins to initiate the shutdown sequence. The default value is 300 seconds. The maximum time span allowed is 32,400 seconds. 
  • Ignition Sense Threshold Volts: Provides the threshold where the IR1800 "senses" the voltage limit that initiates operation or shutdown. The range is 9-36 volts. >Note: The IR1800 can be powered directly by the OBD-II interface that provides a 12V (or 24V) power source.
  • Ignition Sense Threshold Millivolts: Provides greater granularity in the range for the IR1800 to operate or shutdown. The range is 0-999 millivolts.

To configure vehicle settings:

  1. Select True to initiate Enable Ignition Sense. 
  2. Type the Number of Seconds in the Ignition Off Timer field. (The default value is 300 seconds)
  3. Type the number of Volts in the Ignition Sense Threshold field. (The default value is 13.)
  4. Type the number of Millivolts for the Ignition Sense Threshold Millivolt field. (The default value is 0.)
  5. Click Save. A success notice opens in the bottom right.

Users (IR800, IR1101, and IR1800): This section allows you to enter up to six users:

  • User Name: Allows you to enter a User name. (Used to log into the IR1800 device using different access methods such as SSH, Telnet, RDP, Net App, etc.)
  • Password:  Allows you to enter a Password (Field constraints depend on the organization's policy.)
  • Privilege Level:  Allows you to enter the privilege level for either Admin users (level 15 in CLI) or User privileges (level 3 in CLI).

To set user information:

  1. Enter a User Name.
  2. Enter a Password.
  3. Select a Privilege Level: Admin or User.
  4. Click Save. A success notice opens in the bottom right.

Device Management screen

Device Management

Click here to return to Base Configuration

Next