Authentication
The EDM API requires access via an access token generated through the API Key. Use the EDM Operations Dashboard to generate the API Key. Assign roles to the API Key. Based upon these assigned roles the API Key can invoke a set of APIs.
More details about the roles and what actions is allowed with a particular role is described here https://developer.cisco.com/docs/iotod/#!add-and-manage-users/built-in-roles
When you authenticate using the /auth/token API, you receive an authorization token. Use the authorization token, which you must then include in the request of each subsequent API operation.
An API key is a unique identifier that is assigned to an individual or application using an API. An API Key can have different levels of roles and access and are typically used for authentication purposes. An access token is a more specific type of credential that is issued to authorize applications after successful authentication and are used to access protected resources on an API. As our application is based upon multi-organization architecture, it is used for identifying the organization for whom the API call is being made.
API Key Creation
When generating an API Key, select the Roles and Expiration period/duration.
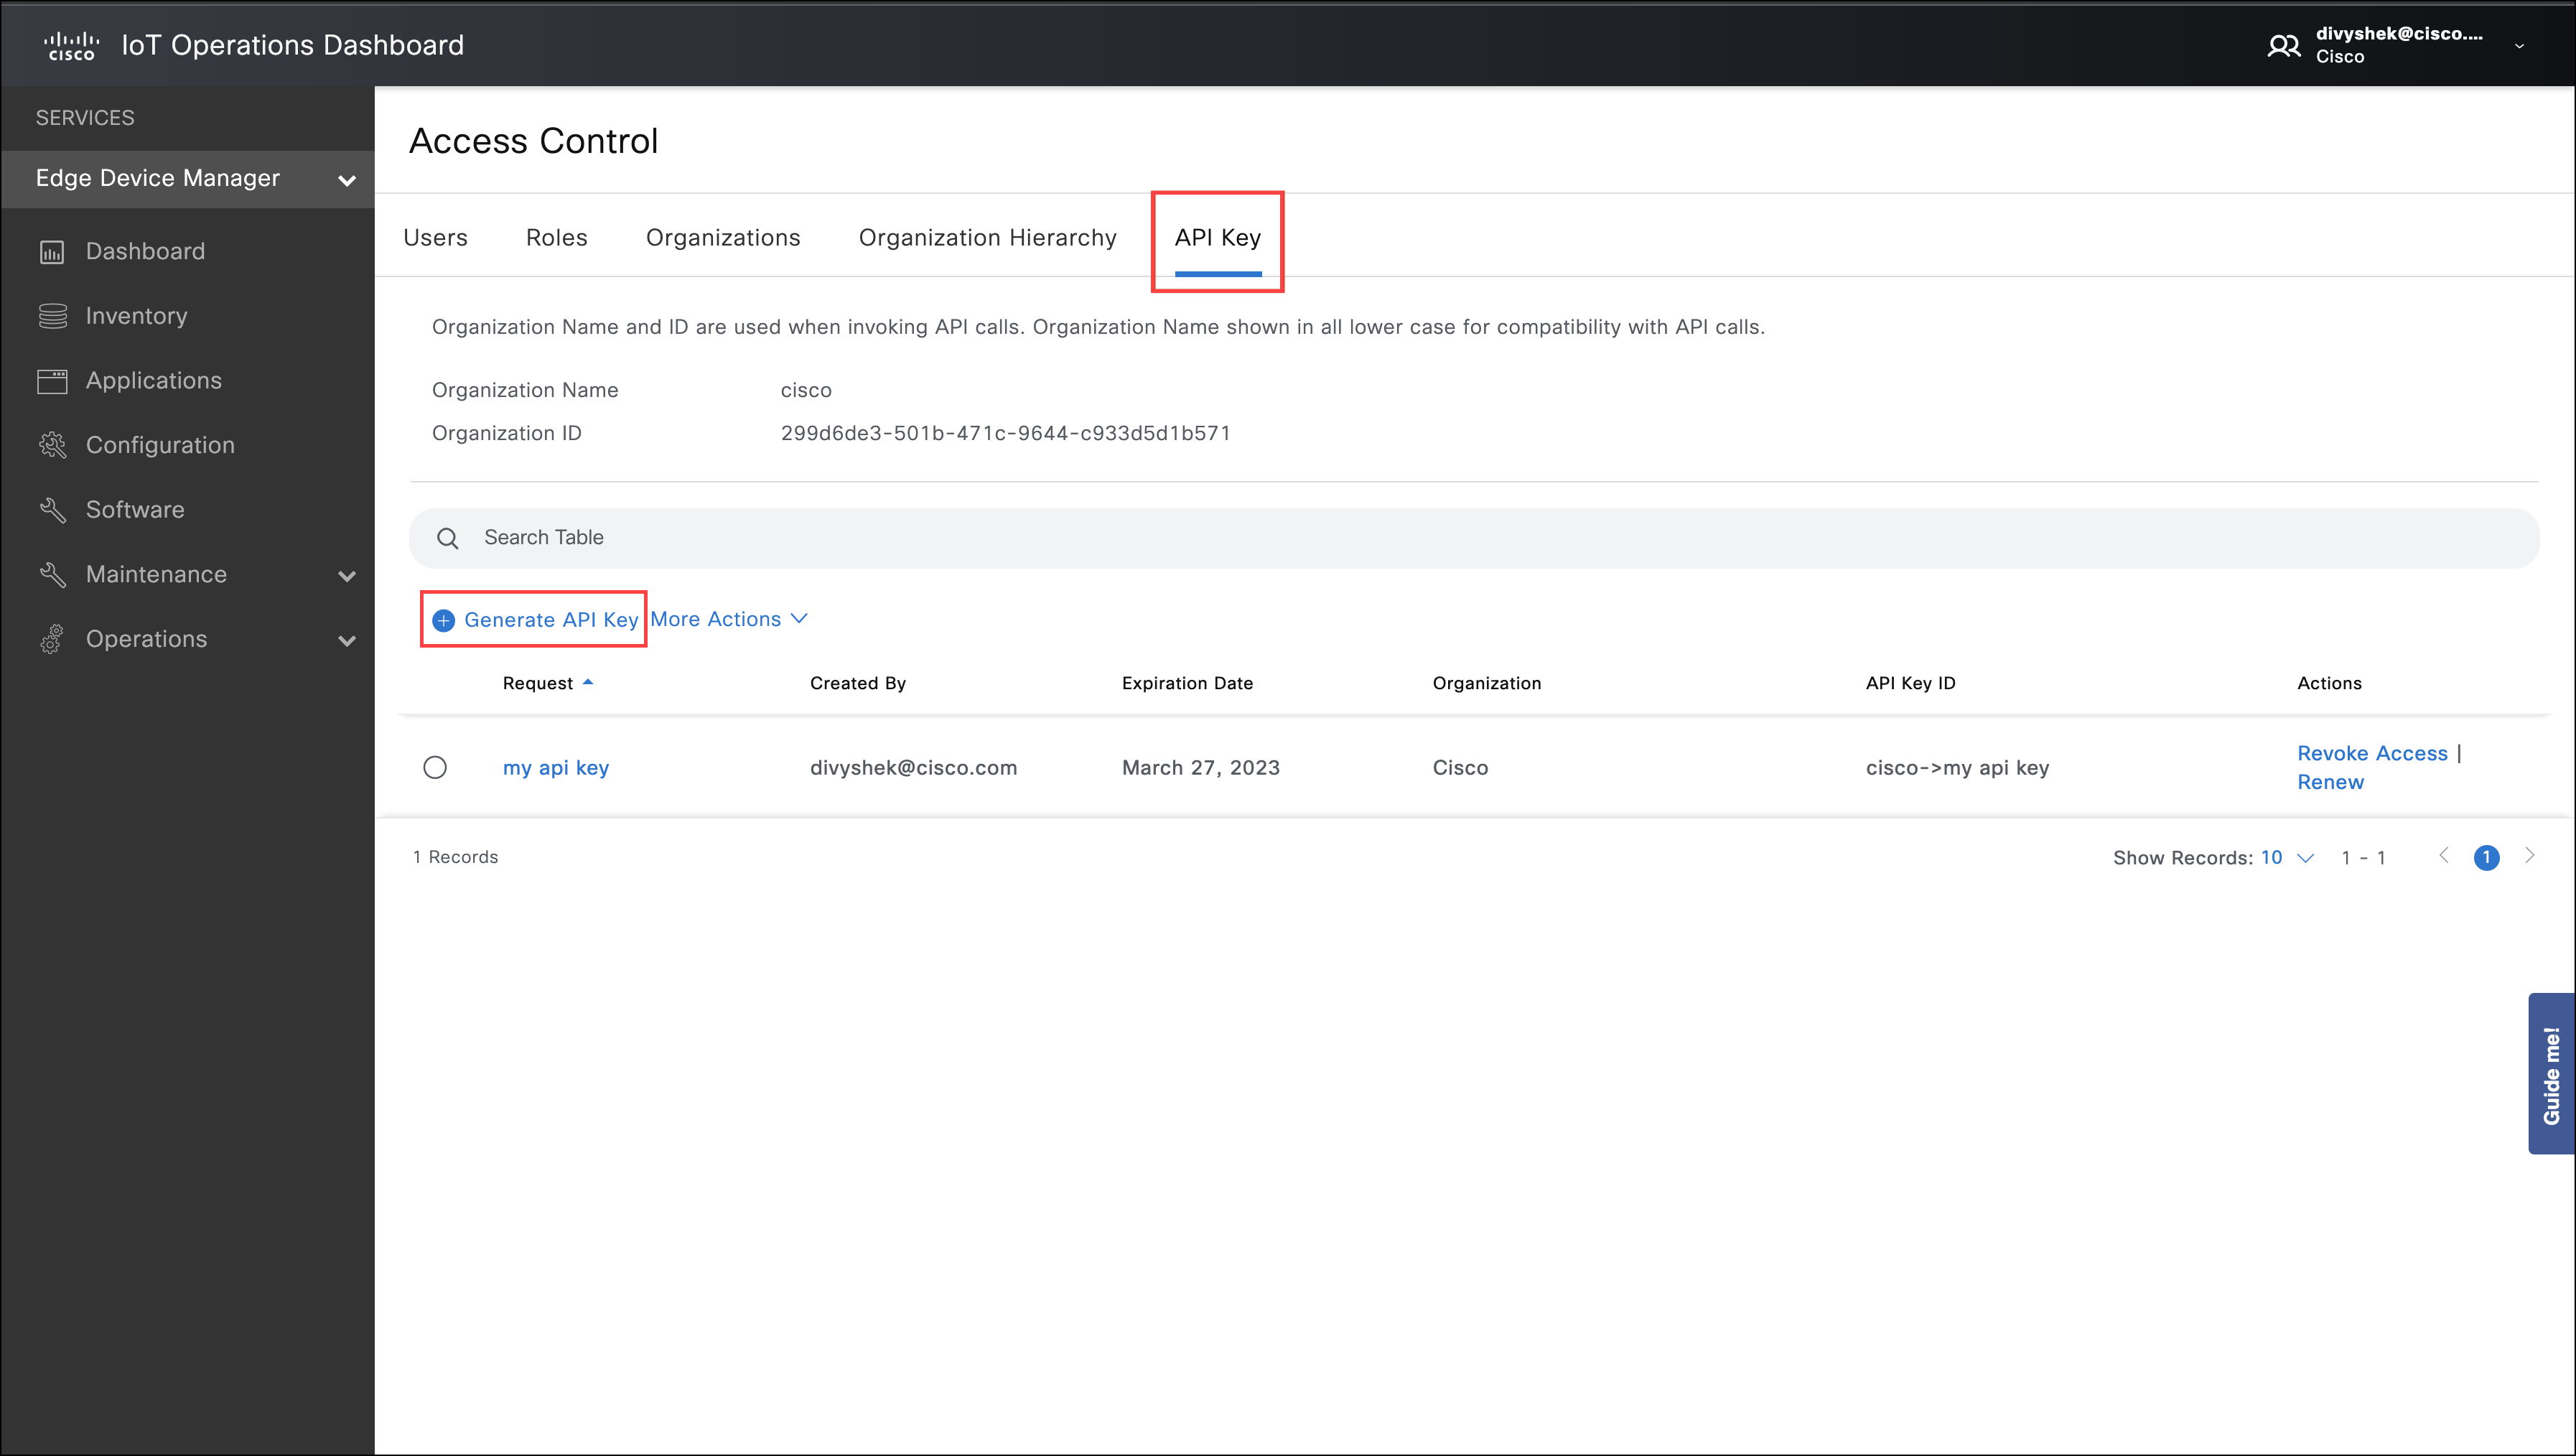
- Log in to IoT Operations Dashboard and click the "people icon" on the far right of the header. Click Access Control.
- Click the API Key tab. Click Generate API Key.
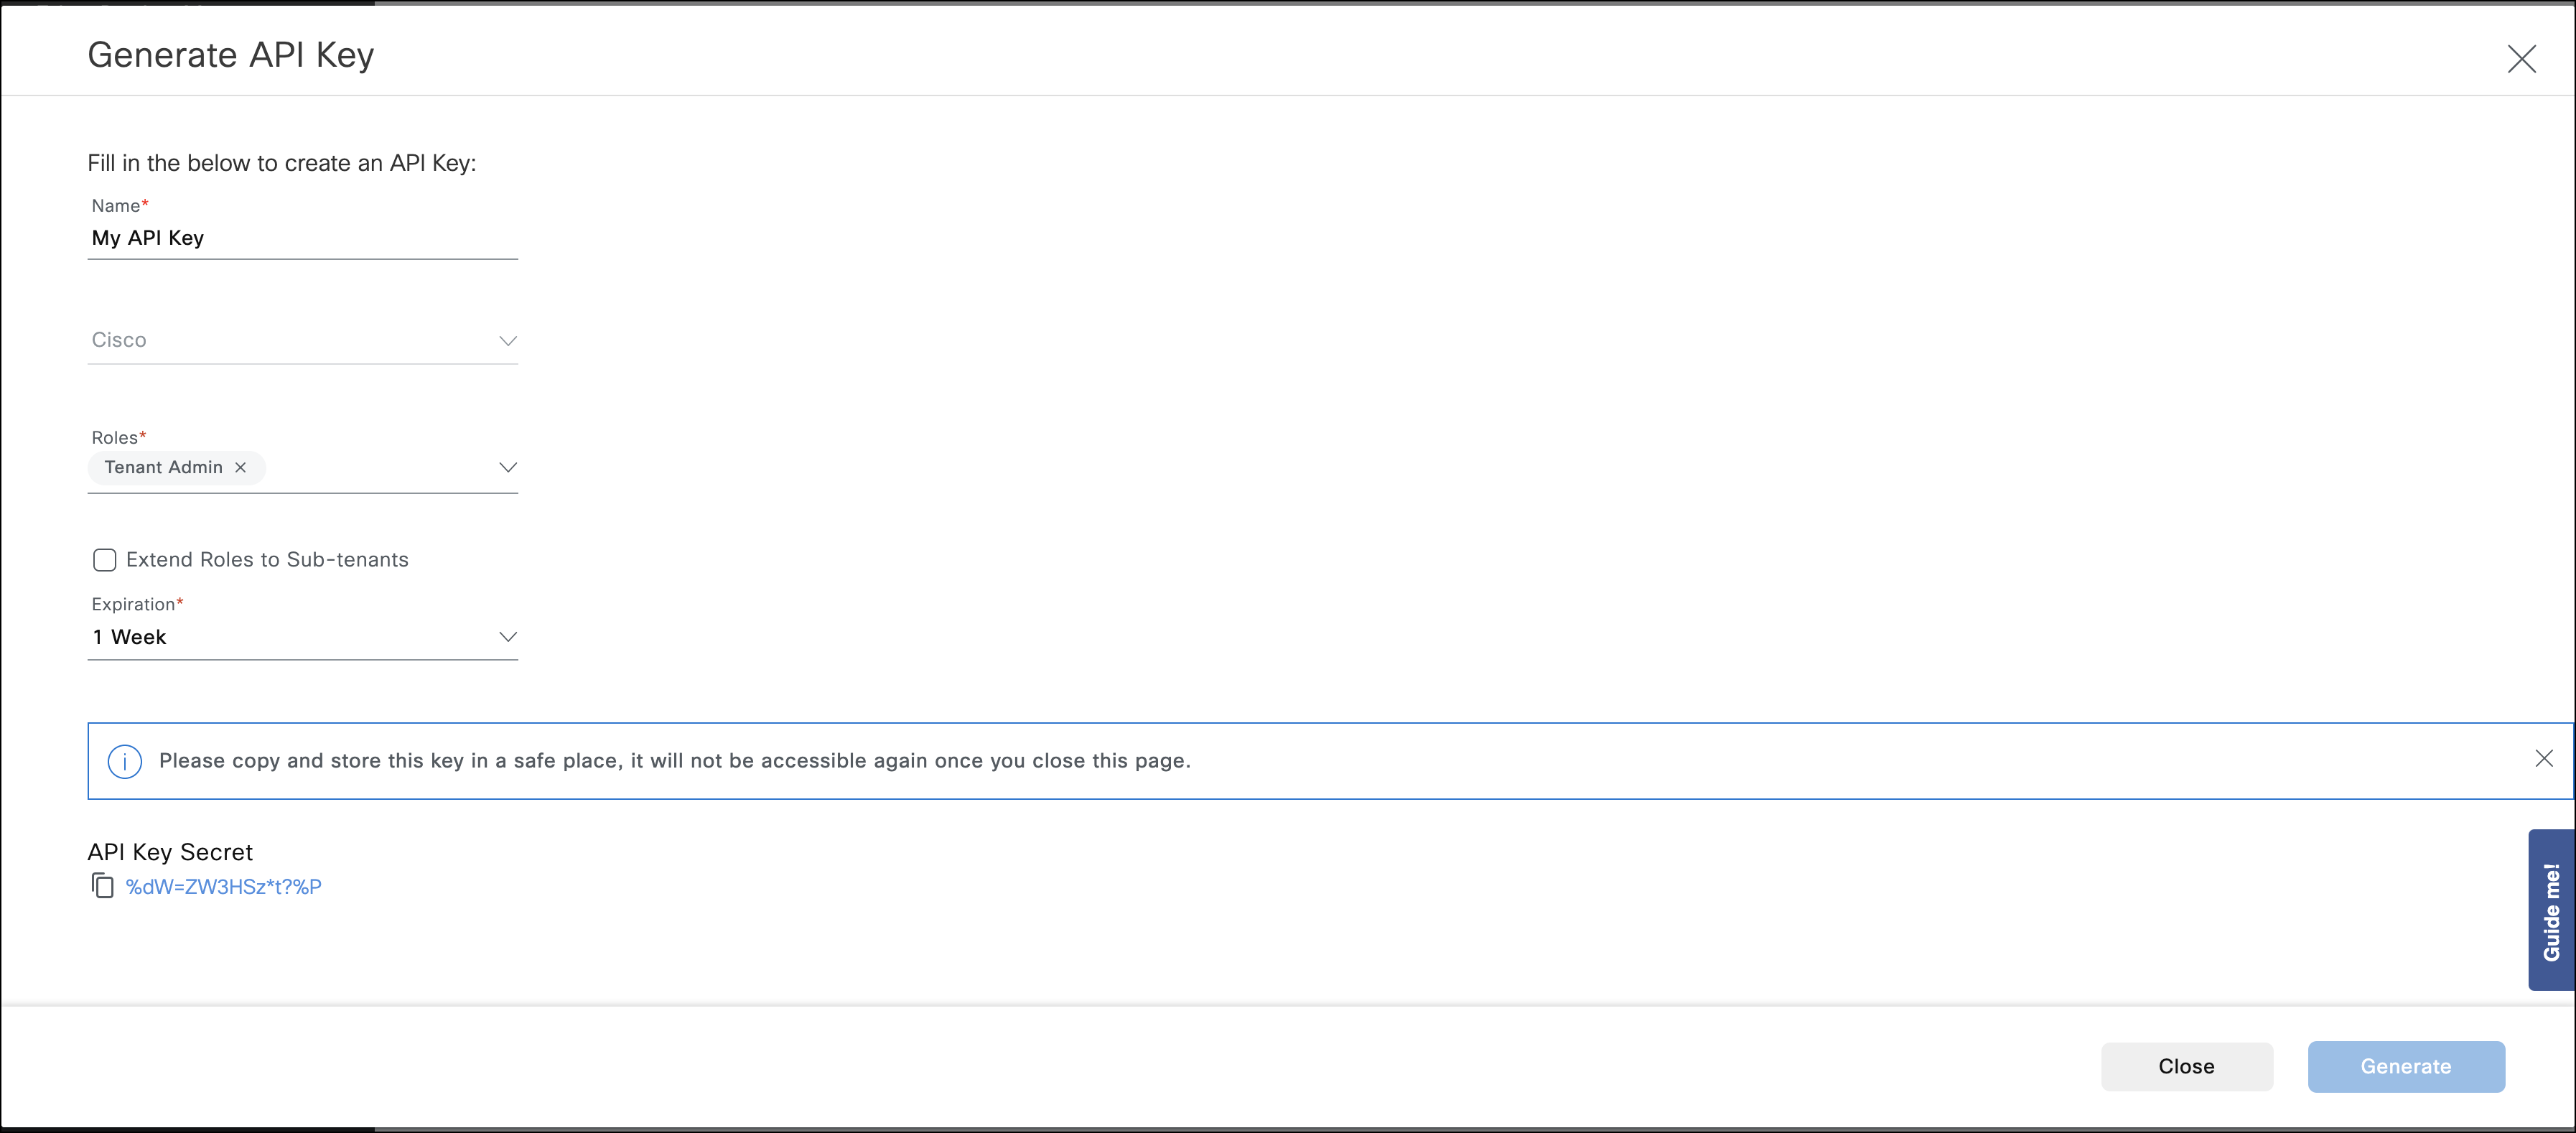
Enter the API key Name, select Role and Expiration time/duration and click Generate.
Copy the API Key Secret.
IMPORTANT: Do not navigate away from this screen before copying the API key; you cannot view it again.
Steps to Generate Access Token
Send a POST request to the following URL. Use the following json content in the request body to get the access_token. Use the token to invoke the EDM NB APIs.
NOTE: NB means Northbound.
POST {{Cluster URL}}/nbapi/iam/v1/auth/token
For Example:
POST https://us.ciscoiot.com/nbapi/iam/v1/auth/token
JSON Request Body
{
    "client_id": "{insert organization name}->{insert API key name}",
    "client_secret": "{insert API key secret}",
    "grant_type": "client_credentials"
}
NOTES:
- You must enter the organization name and the API key name in the client_id field in lower case only.
- You must retain the existing spaces.
- You can also find this value under the API Key ID column in the API Key page.
- client_id in upper case is not valid.
Example JSON:
{
    "client_id": "cisco->my api key",
    "client_secret": "!Fj?qAS$Rc-ct=W",
    "grant_type": "client_credentials"
}
Access Token Response
{
    "access_token": "eyJhbGciOiJSUzI1NiIsInR5cCIgOiAiSldUIiwia2lkIiA6ICJaYXdEQnRBcjlEbF8zSGhLTy1vMUZQXzhzZE8yc01xZzYwUHdGdW9JSzlVIn0.eyJleHAiOjE2ODYxMjA0MjQsImlhdCI6MTY4NjEyMDEyNCwianRpIjoiNzc5ZjYyYjEtM2MxMi00ODc4LTgwNTItNTFlMmI4OWQwYjk2IiwiaXNzIjoiaHR0cHM6Ly9yYWluaWVyZGV2Mi5jaXNjb2lvdGRldi5pby9hdXRoL3JlYWxtcy9yYWluaWVyLWlhbSIsImF1ZCI6ImFjY291bnQiLCJzdWIiOiI3MGQ4ODc4Yy1lYWFkLTRhY2MtOGI3ZS0zMzRhMWM3ZDkwZDAiLCJ0eXAiOiJCZWFyZXIiLCJhenAiOiJiYXNlIHRlbmFudC0-bXkgYXBpIGtleSIsImFjciI6IjEiLCJhbGxvd2VkLW9yaWdpbnMiOlsiaHR0cHM6Ly9yYWluaWVyZGV2Mi5jaXNjb2lvdGRldi5pbyJdLCJyZWFsbV9hY2Nlc3MiOnsicm9sZXMiOlsiZGVmYXVsdC1yb2xlcy1yYWluaWVyLWlhbSIsIm9mZmxpbmVfYWNjZXNzIiwidW1hX2F1dGhvcml6YXRpb24iXX0sInJlc291cmNlX2FjY2VzcyI6eyJiYXNlIHRlbmFudC0-bXkgYXBpIGtleSI6eyJyb2xlcyI6WyJ1bWFfcHJvdGVjdGlvbiJdfSwiYWNjb3VudCI6eyJyb2xlcyI6WyJtYW5hZ2UtYWNjb3VudCIsIm1hbmFnZS1hY2NvdW50LWxpbmtzIiwidmlldy1wcm9maWxlIl19fSwic2NvcGUiOiJwcm9maWxlIGVtYWlsIiwiY2xpZW50SG9zdCI6IjEyNy4wLjAuNiIsImVtYWlsX3ZlcmlmaWVkIjpmYWxzZSwiY2xpZW50SWQiOiJiYXNlIHRlbmFudC0-bXkgYXBpIGtleSIsInByZWZlcnJlZF91c2VybmFtZSI6InNlcnZpY2UtYWNjb3VudC1iYXNlIHRlbmFudC0-bXkgYXBpIGtleSIsImNsaWVudEFkZHJlc3MiOiIxMjcuMC4wLjYifQ.FRgcuq-5qJPWTpvLqxh3m3ZhEDTEZ6asgn6DevaTd3telZiqswSdbEbhbBlYauysfRT_e-FxHJVAPVXpZuC0Bmca8vJhSssG-oAreIkm7wQ5KyoIwm-UDdgS82uOf5wzTzOxsRBXf2L9lmT3_dD-0yJef7ET1Twx3IWO3rqSDw4cnadouAyUVDH_vTdFza47v-rCyolV0qI1Ki_5CUPIi6FeJIxcHwdMh7hF6_ZAQ1HFS8v012aGa54NgqRGj9slXFlHLaUzM3N_KOMNdKCbVMUYiklYuPhWeqc5dh0R21lIX2zbplltvUFUG_Lcz-pv9EAhiLzE74ucwWSxAR2xvQ",
    "token_type": "Bearer",
    "expires_in": 300,
    "refresh_expires_in": 0
}
This gives the access_token. You must use this token for further API calls.
NOTE: access_token is valid for 300 seconds (5 minutes). Use it or generate a new token after 5 minutes.
Steps to fetch x-tenant-id
Log in to IoT Operations Dashboard and click the "people icon" on the far right of the header. Click Access Control.
Click the API Key tab and then copy the "Organization ID" from the UI and use it as the "x-tenant-id" in the http header for the API requests.
This x-tenant-id is mandatory for each API call. Use it for each API call.
After getting the access_token and the x-tenant-id, provide them in the header as key value pairs shown below:
key:x-tenant-id, value:{{x-tenant-id}}
key:Authorization, value:Bearer {{access_token}}
Example:
x-tenant-id 71724bda-56fg-8hnc-9065-98z255hgml4c
Authorization Bearer eyJhbGciOiJSUzI1NiIsInR5cCIgOiAiSldUIiwia2lkIiA6ICJaYXdEQnRBcjlEbF8zSGhLTy1vMUZQXzhzZE8yc01xZzYwUHdGdW9JSzlVIn0.eyJleHAiOjE2NzkyOTY0MjIsImlhdCI6MTY3OTI5NjEyMiwianRpIjoiMzY5NmEwYmItM2Y0Mi00YmMwLWFlMTgtNzg0MzNlY2Y2OGM0IiwiaXNzIjoiaHR0cHM6Ly9yYWluaWVyZGV2Mi5jaXNjb2lvdGRldi5pby9hdXRoL3JlYWxtcy9yYWluaWVyLWlhbSIsImF1ZCI6WyJsb2dpbi1hcHAiLCJhY2NvdW50Il0sInN1YiI6IjJiMWE2OGEwLTViMzgtNDA2Yi1hYWViLWUwNjA5ODU4N2EzNSIsInR5cCI6IkJlYXJlciIsImF6cCI6ImxvZ2luLWFwcCIsInNlc3Npb25fc3RhdGUiOiJiYzQyNDFkNi01NGFmLTQwYTEtODg0Yi1mNWMwZjc1MTJhMjciLCJhbGxvd2VkLW9yaWdpbnMiOlsiKiJdLCJyZWFsbV9hY2Nlc3MiOnsicm9sZXMiOlsiZGVmYXVsdC1yb2xlcy1yYWluaWVyLWlhbSIsIm9mZmxpbmVfYWNjZXNzIiwidW1hX2F1dGhvcml6YXRpb24iXX0sInJlc291cmNlX2FjY2VzcyI6eyJhY2NvdW50Ijp7InJvbGVzIjpbIm1hbmFnZS1hY2NvdW50IiwibWFuYWdlLWFjY291bnQtbGlua3MiLCJ2aWV3LXByb2ZpbGUiXX19LCJzY29wZSI6InByb2ZpbGUgZW1haWwiLCJzaWQiOiJiYzQyNDFkNi01NGFmLTQwYTEtODg0Yi1mNWMwZjc1MTJhMjciLCJlbWFpbF92ZXJpZmllZCI6ZmFsc2UsIm5hbWUiOiJJT1ROTVMgQWRtaW4iLCJwcmVmZXJyZWRfdXNlcm5hbWUiOiJpb3RubXMtYWRtaW5AY2lzY28uY29tIiwiZ2l2ZW5fbmFtZSI6IklPVE5NUyIsImZhbWlseV9uYW1lIjoiQWRtaW4iLCJlbWFpbCI6ImlvdG5tcy1hZG1pbkBjaXNjby5jb20ifQ.AGy_xex6JnGnwbhg8QdZotdNekznqpeJqoi907jHRoeZE5oO7XYRIcykoRrq7c_NKdzYuXCbPEzYwgAaTEzuOBLuO4l0IR2ZVf3WCPat_NHUEiq37tSEHo980bfA1ZB-D6Qihuisd90phbDWXk98KF3bEzWfqffdgzvD_n3CtS9AvvbtjXHhfD2f7Fuo9bOQfsXUou6smCvfTrQ0Wn-x0f6IbUy5hIBGKKrM5uqdNJ7_F-ZlqYeVcYhlcKSEJ50A3jvMFT-TBhp7rC5Y17DsJP-mYx8lmnP9-TM_YkeeUYurDls9jYlVm-wJs2tXmfPG7sU8aFSQ5Fnmzd2peLLg
NOTE: If Single-Sign On (SSO) is set up for an organization, create an API Key with the required roles to access the API instead of using user accounts.