Documentation>Cisco IoT Operations Dashboard
Cisco IoT Operations Dashboard
  • Overview
    • Welcome
    • Get Started
      • Onboarding an EDM-Managed device
      • Onboarding an Externally-Managed device
    • How to order
    • Set up the IoT Dashboard
    • Release notes
      • Edge Device release notes 2023
      • Edge Device release notes 2022
      • Edge Device release notes 2021
      • Edge Device release notes 2020
      • Application Manager
      • Cisco Cyber Vision release notes
      • Secure Equipment Access release notes 23
      • Secure Equipment Access release notes 22
      • Secure Equipment Access release notes 21
      • Edge Intelligence
        • 2023
        • 2022
        • 2021
        • 2020
      • Industrial Asset Vision
        • 2023
        • 2022
        • 2021
        • 2020
      • Industrial Wireless release notes
        • 2023
    • Log in
    • Upgrading Cisco IoT OD
    • Update network device firmware
    • Access control
      • Add and manage users
      • Create sub-organizations
      • Organization Hierarchy for IoT OD
      • Cisco SSO Login Experience
      • Enable Multi-Factor Authentication for an organization on IoT OD
    • Cisco Cross Platform Navigator
    • Audit user actions
    • Required accounts
    • Switch organizations or Services
    • View cloud service status
    • Feedback form
  • Edge Device Manager (EDM)
    • Requirements and release notes
      • Overview
      • Release notes
      • Firewall Rules: Device and network requirements
      • Supported devices and firmware
    • EDM Sandbox
    • Onboard network devices
      • Onboarding Quick Start Guide for IR devices
      • Prepare existing devices for onboarding
      • Troubleshoot IR device onboarding
      • Manually onboard network devices (alternative method)
    • Configure network devices
      • Overview
      • Create Configuration Group
      • Edit Configuration Group
      • Configuration Variables
      • Manage Configuration Group
      • Edit the configuration for a specific device
      • Create custom templates
      • Base Configuration
        • Hardware
        • WAN Uplink
        • LAN
        • Ethernet Settings
        • Interface
        • Device Settings
        • DHCP
        • Device Management
        • DNS/NTP
        • VPN
        • Network
        • Security
        • Wi-Fi
        • Serial
        • GPIO
    • Manage network devices
      • Add and manage network devices
      • Delete network devices
      • Deactivate network device
      • Mapping Modules for IR Devices
      • Connectivity from IR devices to Cellular Carriers
      • Convert AP to Autonomous Mode
      • Troubleshooting Issues
      • Add and monitor Meraki cameras
    • Monitor network devices
      • Monitor network device status
      • Track device location
      • View network device info on a map
      • View events and alerts
      • Manage notifications
    • EDM API
    • Application management
    • Application management troubleshooting tips
  • Application Manager
    • Overview
      • Release notes
    • Onboarding Externally-Managed IE3x00 Switches
      • Firewall Rules: Devices and Network Requirements
      • Device Configuration and Initiating Connection to OD
    • Application Inventory and Application Instances
    • Device Inventory
    • Device Profiles
    • Role-Based Access Control
    • Technotes: Troubleshooting Tips
  • Cisco Cyber Vision
    • Overview
      • Introduction
      • Release notes
      • User roles and permissions
    • Dashboard
    • Inventory
      • Assets
      • Asset Selection
      • Asset Deletion
      • Asset Vulnerability Management
    • Security Posture
      • Vulnerabilities
      • Acknowledge Vulnerabilities
        • Acknowledge vulnerabilities
    • Data sources
      • PCAP
      • Sensor Application
        • Sensor application
        • Capture modes
    • Configuration
  • Secure Equipment Access
    • Overview
      • Secure Equipment Access overview
      • Release notes 23
      • Release notes 22
      • Release notes 21
    • Add network devices and connected clients
    • Manage and schedule access for existing SEA access groups
    • Monitor sessions
    • Duo user security posture checks
    • Record Inline Sessions
    • Access methods
      • SSH Access Method
      • RDP Access Method
      • VNC Access Method
      • Web App Access Method
      • Telnet Access Method
      • SEA Plus Access Method
  • Edge Intelligence
    • Overview
      • EI overview
      • Using EI
      • Dashboard
      • Release notes
        • 2023
        • 2022
        • 2021
        • 2020
      • Upgrade EI Agents
      • Requirements
      • Supported devices and firmware
    • Enable EI agents
    • Add assets
      • Asset Management
      • Asset Types
      • Add Asset Instances
      • Map Asset Instances
      • Edit Asset Inventory Details
      • View Data Policy Status of an Asset
    • Add data destinations
    • Deploy data rule policies
    • Deploy data logic policies
      • Introduction to Data Logic
      • Install and Update VS Code and EI extension
      • Create Data Logic scripts in VS Code
      • Deploy Data Logic in Cisco EI
      • Update Data Logic scripts
      • Clone Data Logic from Cloud UI
    • View EI events
    • Configure and view alert rules
    • Troubleshooting Issues
      • Recommended Log Rotation
      • Documentation for Metrics collection
    • Edge Intelligence API
  • Industrial Asset Vision
    • Overview
      • Introduction
      • Release notes
        • 2023
        • 2022
        • 2021
        • 2020
    • Prerequisites
    • Quick start guide
      • Getting started
        • Onboard Network Devices
        • Onboard Sensors
        • Onboard Bridges
      • Add asset type
      • Add asset
      • Add sensor
      • Assign sensors
      • Add bridge
      • Change Preferences (User Localization)
    • View status and troubleshoot
      • View asset details and locations
      • View sensors details and troubleshoot
      • View network devices details and troubleshoot
      • Arctic Integration
    • Create alerts and generate reports
      • Create and view alerts
      • Generate and view reports
    • RF Performance Tool
    • Add Templates
    • Stream sensor data
    • Add Geofences
    • Group sensors and assets
    • Northbound APIs
      • Using APIs
      • APIs
        • Overview
        • API
          • AssetTypes
            • Get Asset Types
            • Add Asset Type
            • Delete Asset Type
            • Get Asset Type By Id
            • Update Asset Type
          • Assets
            • Get Assets
            • Add Asset
            • Delete Asset
            • Get Asset By Id
            • Update Asset
            • Assign Sensors To Asset
            • Delete Image Of Asset
            • Get Image Of Asset
            • Upload Image Of Asset
            • Get Sensors By Asset Id
            • Get Thumbnail Image Of Asset
            • Unassign Sensors From Asset
          • Sensors
            • Get Sensors
            • Get Sensor By Dev Eui
            • Claim Sensor By Dev Eui
            • Delete Sensor
            • Get Sensor By Id
            • Update Sensor
            • Get Sensor Location Data
            • Onboard Sensor
            • Get Sensor Tabular Telemetry Data
            • Get Sensor Telemetry Data
        • Model
          • AdditionalAttributesMap
          • Asset
          • AssetListResponse
          • AssetRequest
          • AssetType
          • AssetTypeListResponse
          • AssetTypeRequest
          • AssignSensorsRequest
          • AssignSensorsResponse
          • CreateSensorRequest
          • CustomAttributeData
          • CustomAttributeMetadata
          • Error
          • LiveDataItem
          • Location
          • LocationData
          • LocationDataResponse
          • OnboardSensorRequest
          • OnboardSensorResponse
          • PageInfo
          • Sensor
          • SensorListResponse
          • TabularTelemetryDataResponse
          • TelemetryData
          • TelemetryDataResponse
          • TelemetryValue
          • UnassignSensorsRequest
          • UnassignSensorsResponse
          • UpdateSensorRequest
  • Industrial Wireless
    • Overview
      • Introduction
      • Release notes
        • 2023
    • Supported firmware
    • Add new IW devices
    • Manage IW devices
      • Upgrade IW devices
      • Create Groups
      • Assign IW devices to a Group
      • Configure IW devices in online / offline mode
      • Edit and Delete Groups
      • Remove IW devices from Group
      • Create Templates
      • Duplicate Templates
      • Edit and Delete Templates
    • View details
      • View Group details
      • View IW device details
  • Solution Design
    • Tech guidance
    • Gateway Networking
    • Enterprise Network Integration
    • Security
    • Edge Compute
    • Field Deployment
    • Glossary
  • Developer Resources
    • Sandbox
    • Learning Labs
  • Community and Support
    • Developer Support
    • Videos
    • Related Information
    • System Status

Onboard Bridge

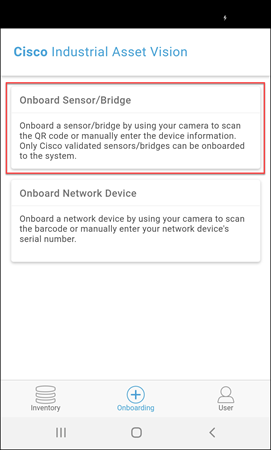
  1. Click Onboard Sensor/Bridge.

Onboard a Bridge

  1. Scan the QR code present on the bridge or enter the DevEUI manually.
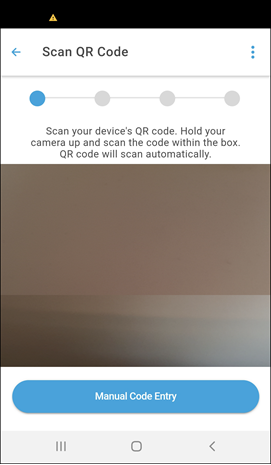
Onboard a Bridge

OR

Onboard a Bridge

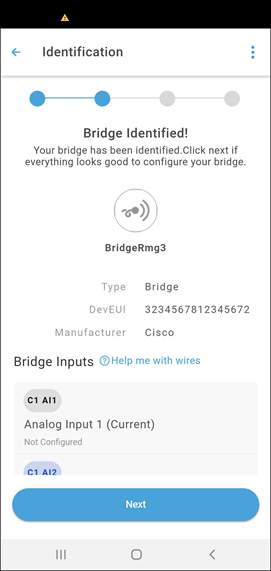
  1. Once the bridge is identified its details along with the bridge inputs are displayed. The configured inputs are shown against the analog and digital inputs. If an input is not configured, nothing is shown against the analog/digital input. Click Next. Note: Click on Help me with wires to know more about the bridge wiring.

Onboard a Bridge

  1. Enter the bridge name. Select a level in the Assign an Org Hierarchy drop-down box to which the bridge has to be assigned. The hierarchy shows the levels to which you have access to in bold. The other levels are disabled (grayed out). You can also use the Search field to search for the required level. Start typing to narrow down the search. Note: Bridges cannot be assigned to an asset; they can only be assigned to an organization hierarchy level.

  2. Select the template from the Apply Template (Optional) drop-down to which the bridge should be assigned. This step is optional. In case the user does not choose a template, the bridge will get associated with the default template that is present for the onboarded bridge.
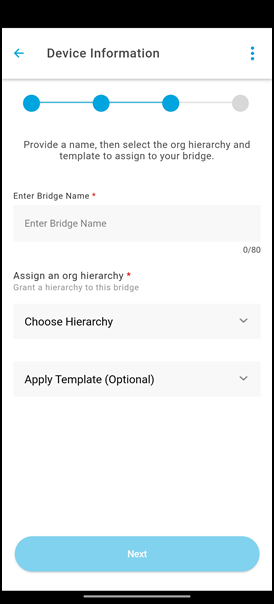
 Onboard a Bridge

  3. Click Next.

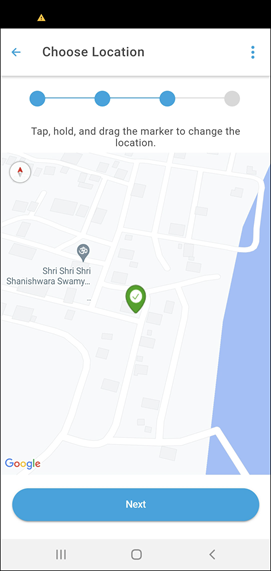
  4. Tap, hold, and then drag the marker to change the bridge location. Click Next.

Onboard a Bridge

  1. Once the bridge is configured, you have to turn on the bridge. When IAV receives the bridge data, its state changes and the data is displayed. Click Done.

Onboard a Bridge

Note: If you try to onboard a bridge that has already been onboarded, the following message is shown- "Device is already onboarded".

  1. In the bridges Inventory tab, you can select an organization level, and based on this selection, the list of bridges is displayed. To select an organization level, click Global on the top right of the screen and select a level displayed below.

  2. Click on a bridge to view its details and summary. Bridges can have alerts associated with them. Brides with one or more alerts are indicated with a Close. Click on a Bridge name to view its details. Select Show Alerts on top of the screen to view all the alerts for that bridge. The number on the alerts bar indicates the active alerts count.

Next