Onboarding Externally-Managed IR devices
You can use Cisco IoT Operations Dashboard (IoT OD) Services on the IR devices operated locally via CLI, Local Manager, or any other third-party management applications to onboard externally managed IRs. The available IoT OD Services include Secure Equipment Access (SEA), and Edge Intelligence (EI) (planned, not yet available).
To use the Cisco Services, apply a simple device configuration to the externally managed IRs. IoT OD does not onboard the IR devices via the PnP method, push configuration, or do software or firmware upgrades. Use third-party device management applications to perform those functions on the externally managed devices. This allows you to continue using the current configuration methods or tools.
| Capability | IoT OD-Managed Devices | Externally-managed Devices |
|---|---|---|
| PnP Onboarding | Yes | No |
| Location History | Yes | No |
| Firmware Upgrade | Yes | No |
| Events Logs from Device(Via SNMP Traps) | Yes | No |
| Configuration Management | Yes | No |
| Alerts (for events generated by the device) | Yes | No |
| Alert Rules (Notifications) | Yes | No |
With this new offer, industrial customers can quickly increase the value of their IR devices running as the hosting platform for IOx applications with cloud-based service management via IoT OD. For example, with minimal effort, the existing IR devices can handle Secure Remote Access sessions to Cisco and non-Cisco assets via SEA, or capture data on edge and inject it into their cloud platforms of choice via Edge Intelligence Service on IoT OD.
Note: SEA and EI Services will be available in Beta for tests on IR devices.
Supported IR models and IOS-XE firmware on IoT OD
IMPORTANT: This feature applies to both greenfield and brownfield devices. Brownfield is defined as devices that have previously been operational in the field.
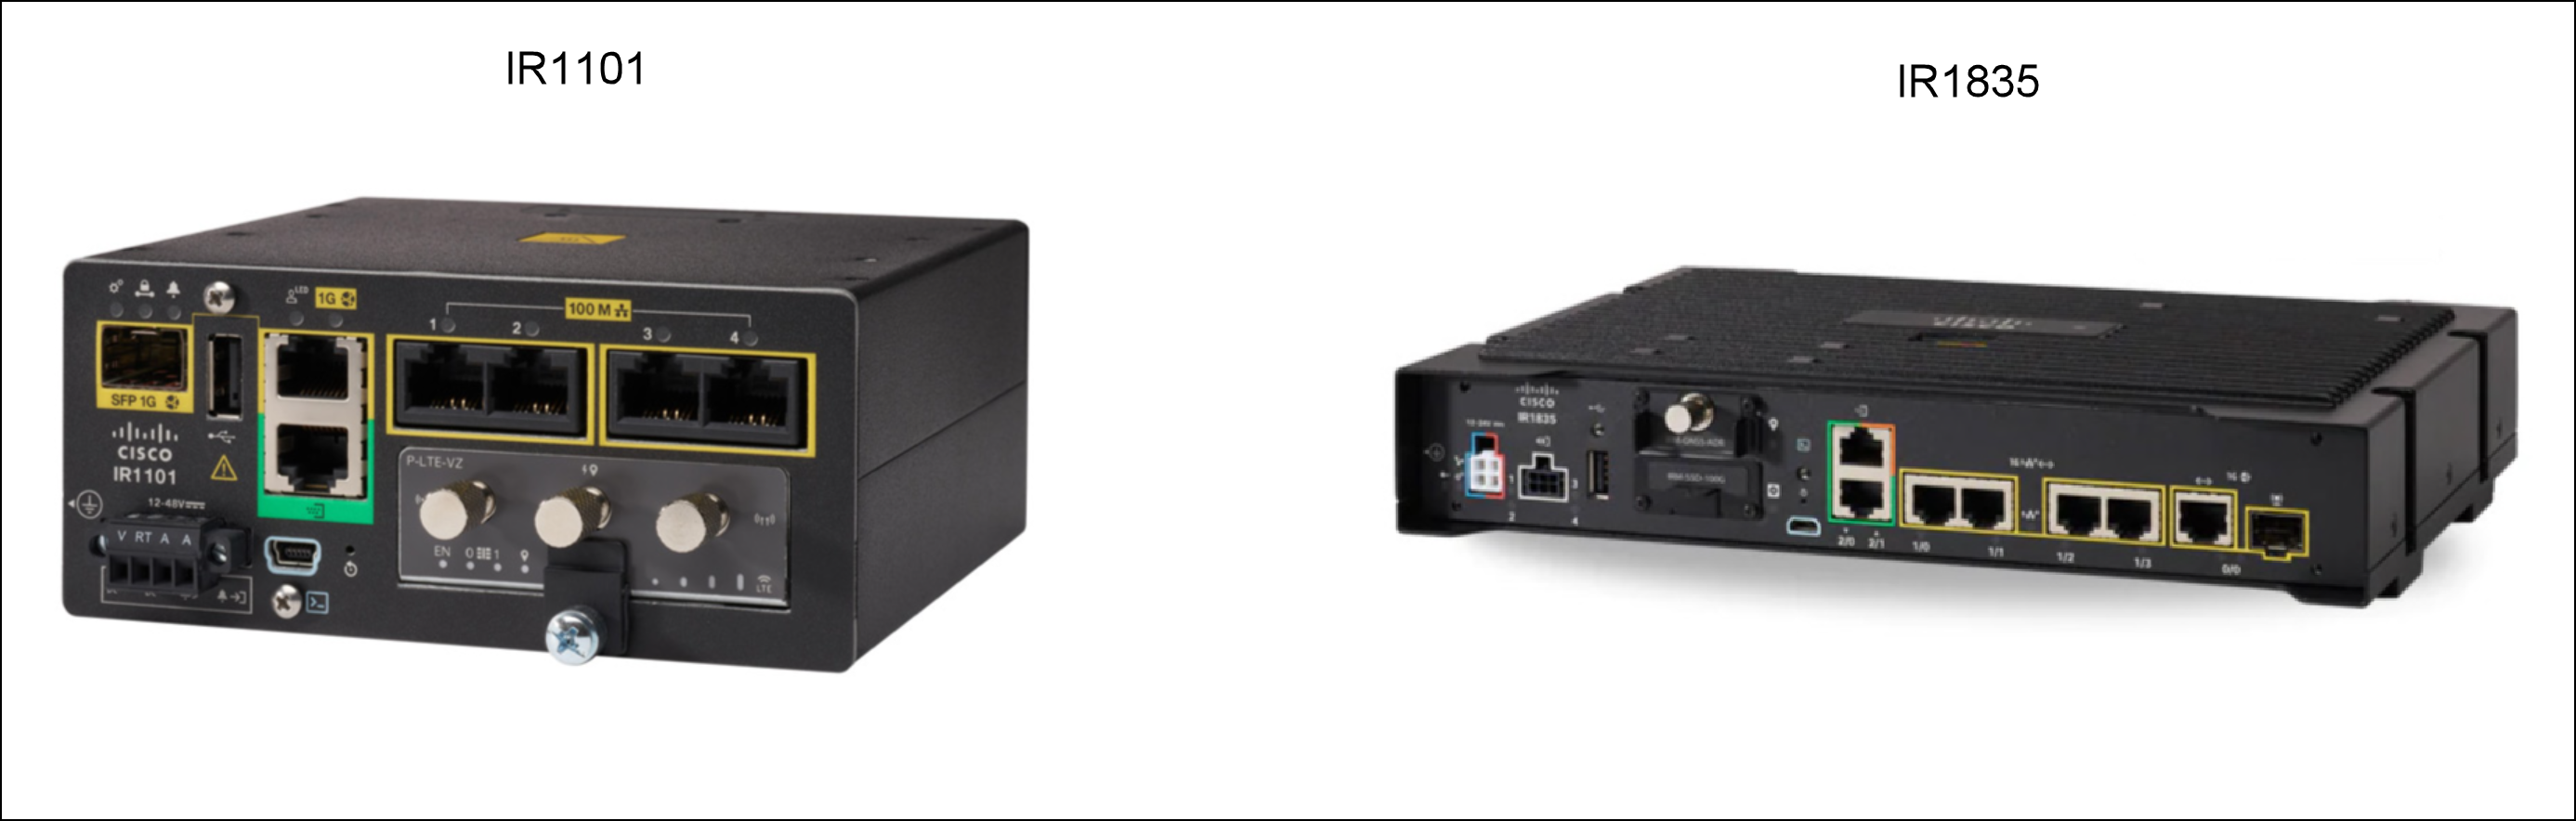
The supported router models that can enable IoT OD services on them are
| Base Product ID | Model Series Product ID (based on license) | Minimum IOS XE version |
|---|---|---|
| IR1100 | IR1101-K9, IR1101-A-K9 | 17.12.2/17.13.1a |
| IR1800 | IR1821-K9, IR1831-K9, IR1833-K9, IR1835-K9 | 17.12.2/17.13.1a |
Note:
- These IR devices support the IOx framework and have the ability to host IOx applications for IoT OD Services (SEA, EI). An IoT OD user with Application Management privileges can load, deploy, troubleshoot, and remove Cisco applications using IoT OD. IoT OD Services require service-specific privileges. For example, a user should have one of the SEA roles to use SEA.
- The router should run a minimum IOS-XE version 17.12.2/17.13.1a or higher to support IoT OD services. Please refer to the Cisco Software Download page (https://software.cisco.com/download/home), search for the hardware type (e.g., IR1800) and download the latest IOS XE Software and apply it to the device.
SEA: Today SEA can run on Full IOx and IOx Lite capable platforms. SEA agent has low demand for platform resources. SEA Plus user app is available for Windows OS only today.
Recommended Configuration Flow
This procedure covers how an OD System Administrator can onboard devices not managed by IoT Operations Dashboard.
In general, two areas require configuration:
- IoT OD (Customer Organization): Create your Organization (with active support for externally-managed devices) and onboard a target IR device as externally-managed. See Step 3 below.
- Configure a required service on IoT OD. For example, for SEA configuration, go to the SEA module in your Organization. See Step 6 below.
IoT OD Service activation on an externally-managed IR device
This section details the process and workflow needed to have a Service supported by IoT OD up and running on an externally-managed IR device. The information is presented in the following sections:
- Step 1: Device readiness
- Step 2: Customer site readiness
- Step 3: Cloud infrastructure and Operations Dashboard readiness
- Step 4: Device onboarding and troubleshooting
- Step 5: Device status in IoT OD
- Step 6: IOx application deployment, Service configuration, and activation
- Step 7: IoT OD Service deactivation and device removal on an externally-managed IR device
Step 1: Device readiness
To ready your device:
- Ensure IoT OD supports your device.
Note: For IoT OD-managed IR devices, see Supported network devices and firmware.
- Cable the device securely. Use the power cable and uplink connection cables.
- Verify the device has the minimum software version. Update the device, if necessary.
For externally-managed IR devices, a minimum of 17.12.2/17.13.1a IOS XE version is allowed.Note: For IoT OD-managed devices, see Supported network devices and firmware.
- For externally-managed IR devices, apply configuration command to establish WebSocket tunnel between the device and IoT OD. See below.
- Ensure that the device is configured such that it has an IP address and internet access (to connect to IoT OD). Device configuration might include interfaces and networking.
- Note down the serial number and base product ID of the device for later use.
Use the following command to show the product ID and serial# for your device:

Router#show license udi
UDI: PID:IR1101-K9,SN:FCW2543ZE5V
In this example, the product ID (PID) is IR1101-K9 and serial number (SN) is FCW2543ZE5V. This data will be used to add the device to IoT OD.
Step 2: Customer site readiness
For site security:
- Refer to Firewall Rules: Device and network requirements and verify you are using available IP addresses and network ports for your region (EU or US).
- Please ensure the site is ready for communication with IoT OD–ACLs allow IoT OD public IP addresses, etc.
Note: To simplify and start faster, open 9 IPs to communicate with the US or EU IoT OD clusters and port 443. At every given moment, only 3 IPs are used to communicate from each pool, but they can swap over time within the pool of 9.
US Cluster: https://us.ciscoiot.com
Address:
34.208.194.240
54.149.83.252
44.240.60.228
52.41.249.164
35.84.105.79
44.239.87.207
52.13.236.221
35.82.65.56
44.233.50.219
EU Cluster: https://eu.ciscoiot.com
Address:
52.48.70.216
34.248.53.167
52.214.211.181
54.78.150.189
52.18.172.175
99.80.35.117
52.17.112.150
34.251.125.44
34.241.227.241
For more specific use cases, refer to the Firewall Rules: Device and network requirements.
For the SEA Plus access method:
- Have both of the following:
- SEA agent installed on an externally-managed IR devices or EDM-managed IR (use IoT OD, SEA module to create SEA gateway from an onboarded device).
- SEA Plus application installed on your computer.
- Have Windows 10 OS or later on your computer.
- Ensure that no VPN client is in active mode on the computer.
- Verify your virus scanner (antivirus) doesn't block the SEA Plus application.
Step 3: Cloud infrastructure and Operations Dashboard readiness
To begin onboarding an existing IR device into IoT OD:
- If the customer organization is not created on IoT OD, create the organization. Use the online instructions at us.ciscoiot.com or eu.ciscoiot.com based on the geographical location.
- Log in to the organization with a user who has appropriate permissions/roles to add devices or ask the Tenant Admin to create one.
Note: When a new user is created on IoT OD, the target user will receive a personal invitation to access the cloud platform. Only a Tenant Admin can predefine or assign a custom role to the user.
- Create a new Device Profile or select an existing Device Profile for the device as applicable.
- Select Application Manager from the Services pane.
- Click Device Profiles tab > Create Device Profile. The Create Device Profile screen appears.
- In Device Profile Setup, fill in the device profile name and description details and click Next.
- In Device Profile Configuration, create the credentials and click Next.
- In Assign Devices, select all the existing devices you want to add to the device profile and click Next. You can select one or more devices to move from one device profile to another.
- Review the details and click Create Device Profile.
The new device profile now appears in the Device Profiles list.
- Add the device in IoT OD as an externally-managed device.
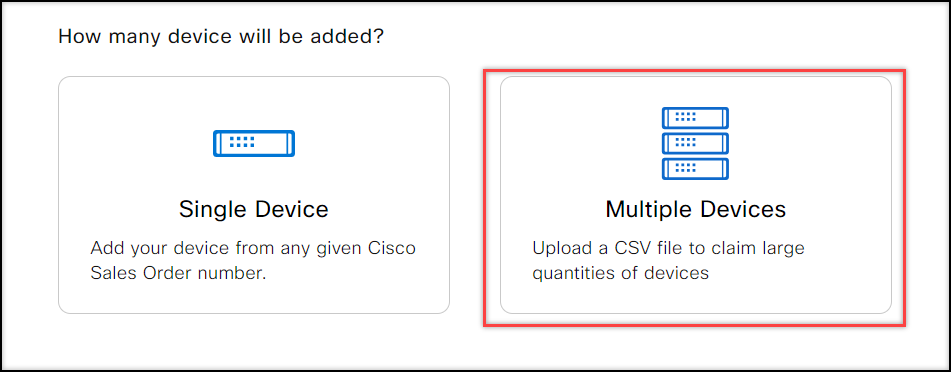
To add externally-managed devices in Bulk:
- Select Application Manager from the Services pane.
- Click Devices > Staged.
- Click Add Devices.
- Select Multiple Devices.
To use a .CSV file:
- Select a device from the Device Profile list.
- Click Download Sample CSV that contains the correct column fields.
- Enter the settings and variables for your devices. Populate your .CSV file with the appropriate data.
- Upload the .CSV file that includes the settings for your network devices.
- Click Claim and wait for the success message to appear. If the claim fails, correct your .CSV file and try again.
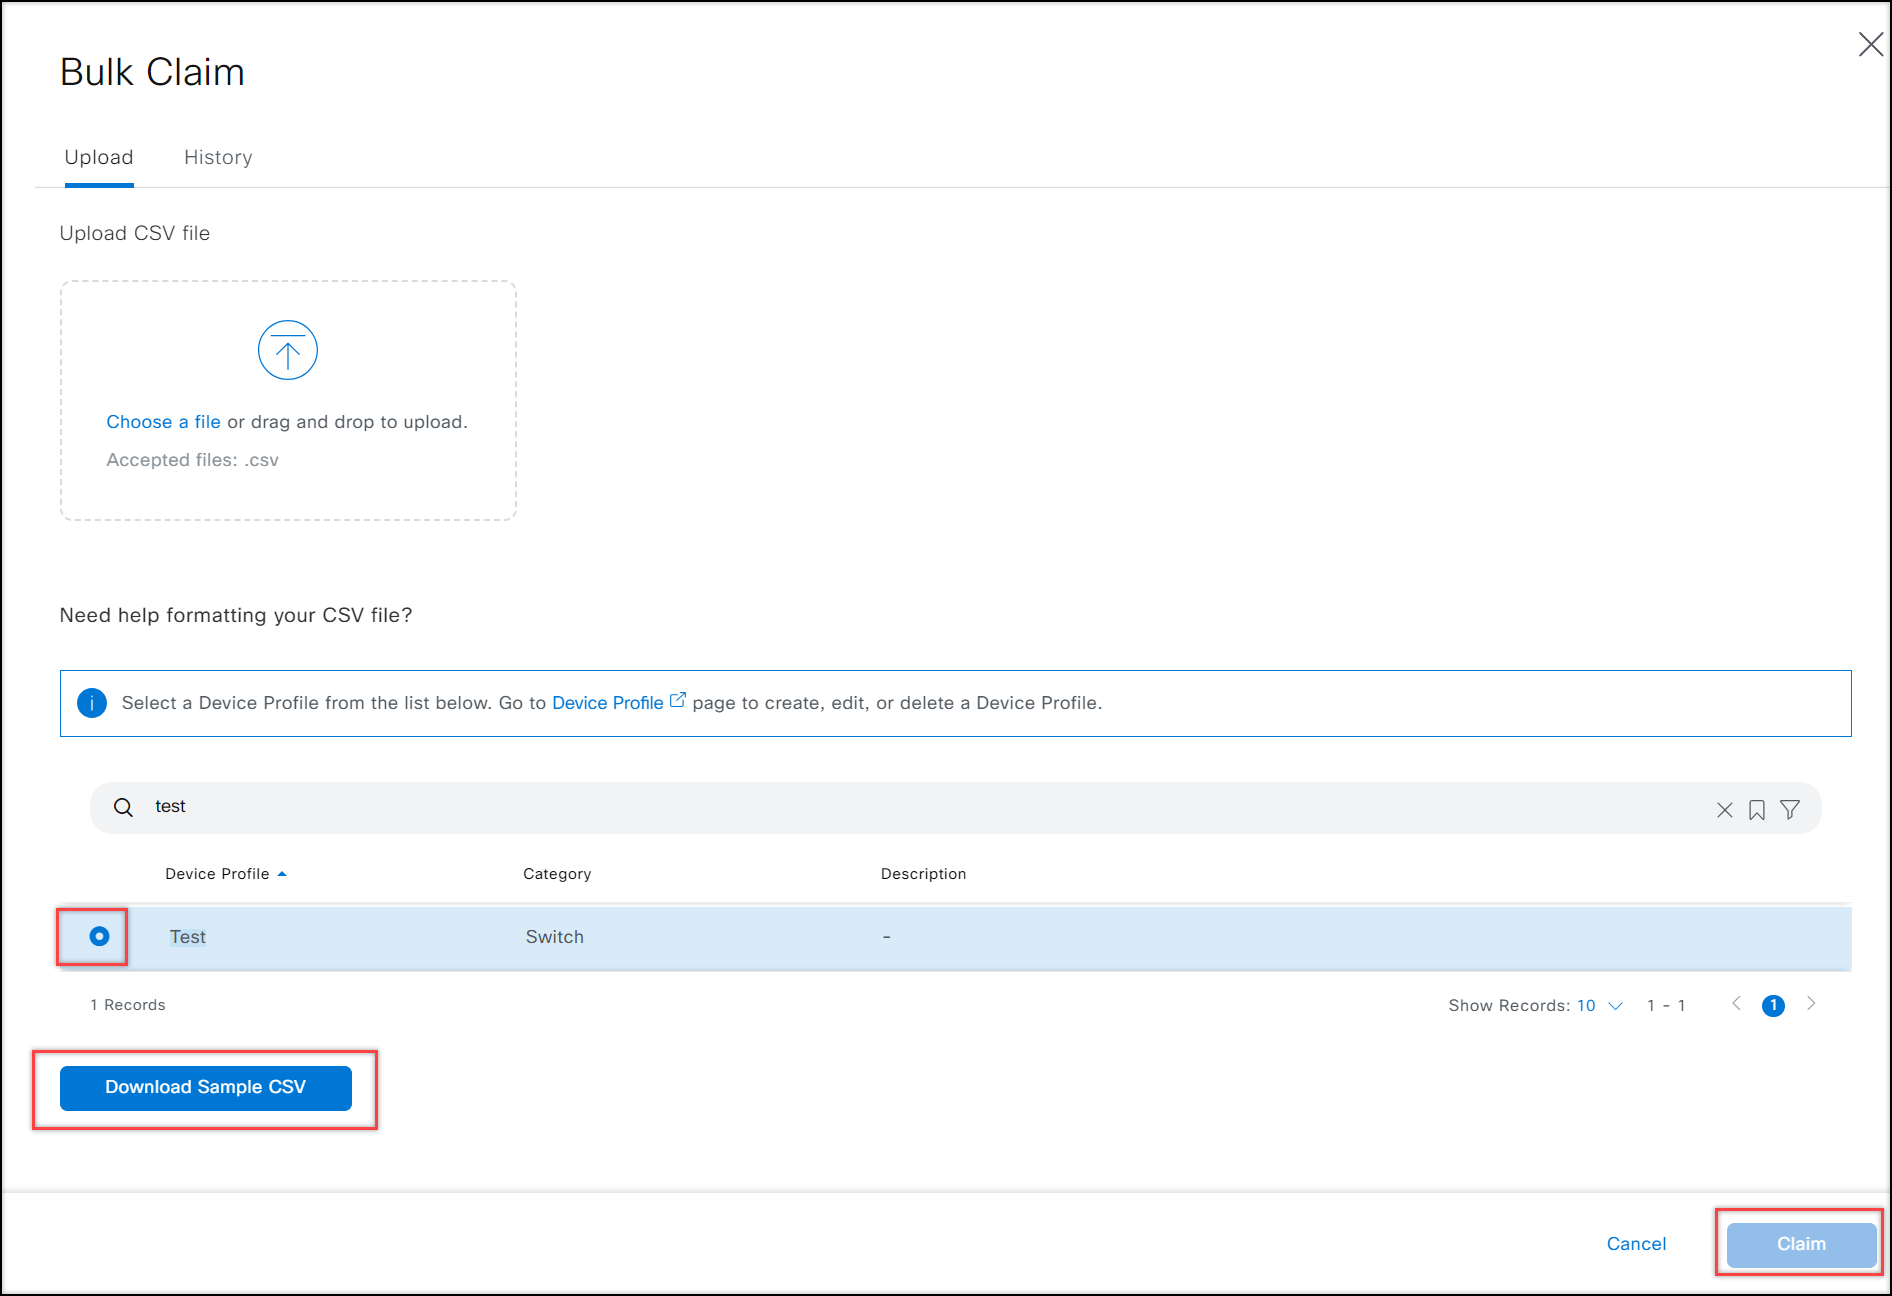
Note: Do not use the default Device Profiles (e.g., External Managed - IRXXXX).
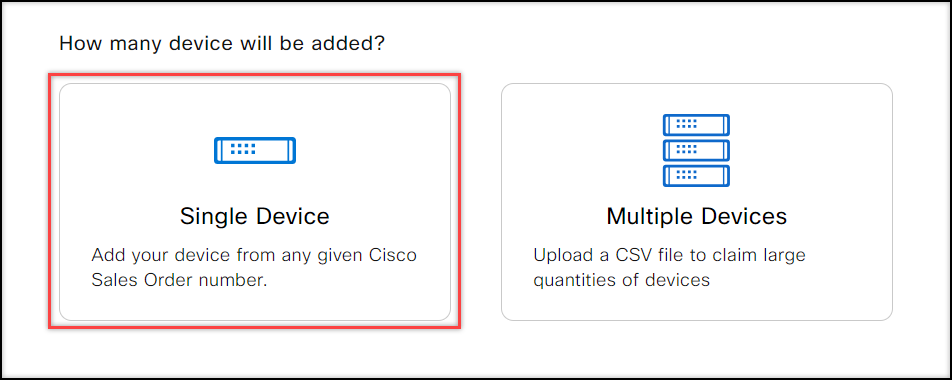
To add a single, externally-managed device:
Select Application Manager from the Services pane.
Click Devices > Staged tab.
Click Add Devices.
Select Single Device.
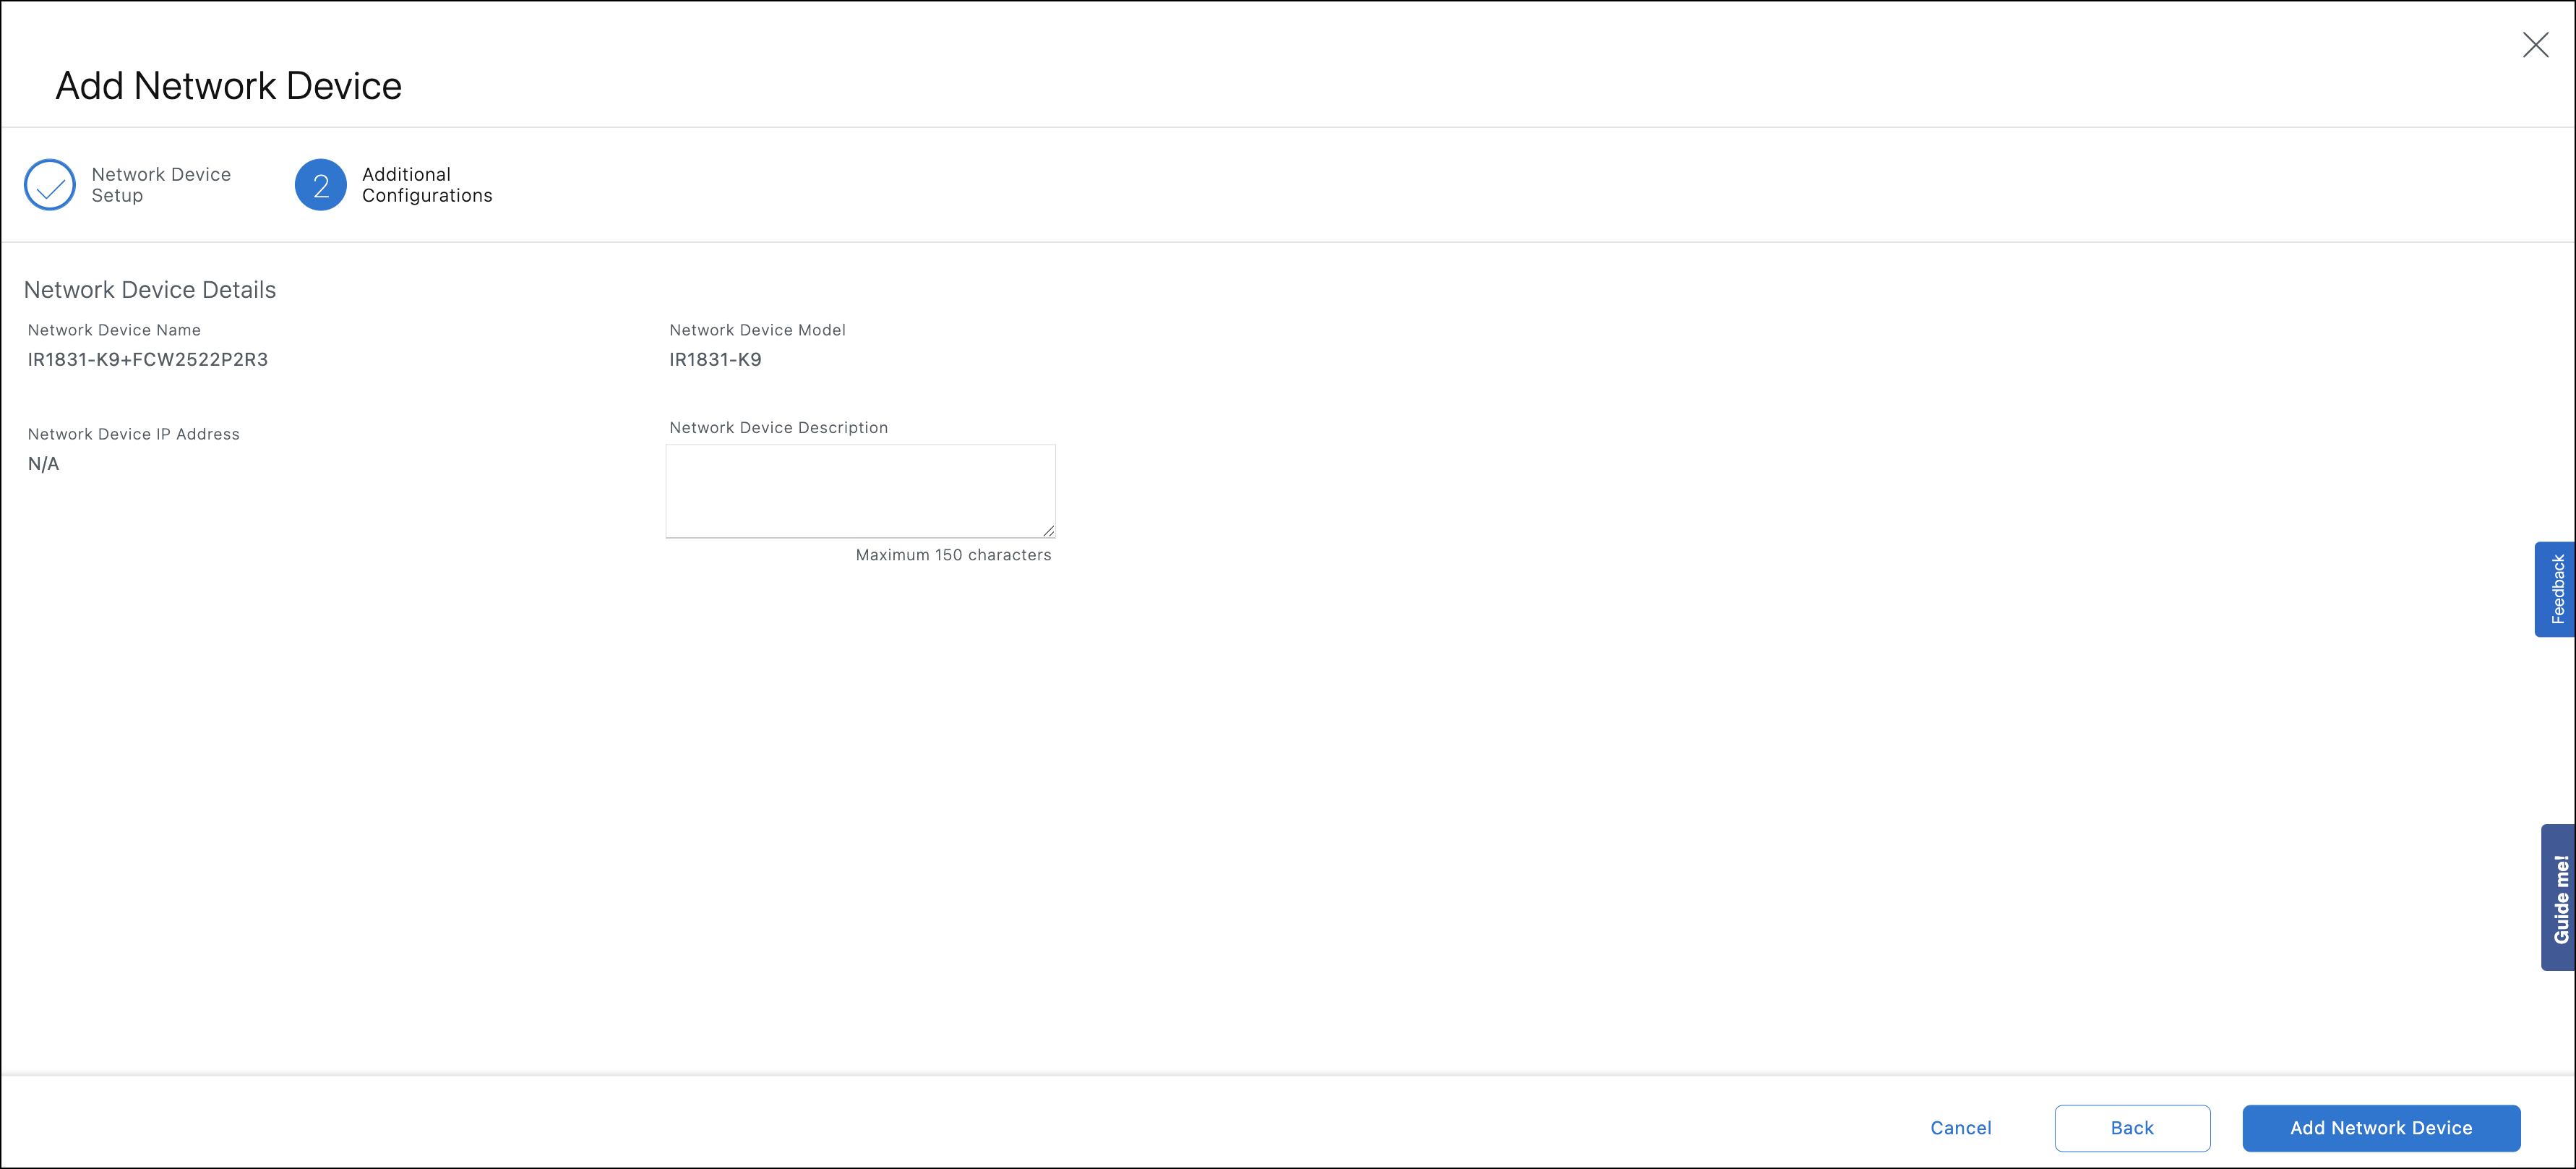
In Setup, provide the necessary inputs like serial number, product ID (PID), and name. Click Next.
Note: When entering the product ID (PID), provide the base PID without the E/A/RE/RA prefixes. These prefixes denote the license and are not required while adding the device to IoT OD.
In Assign Device Profile, select the device profile and click Next.
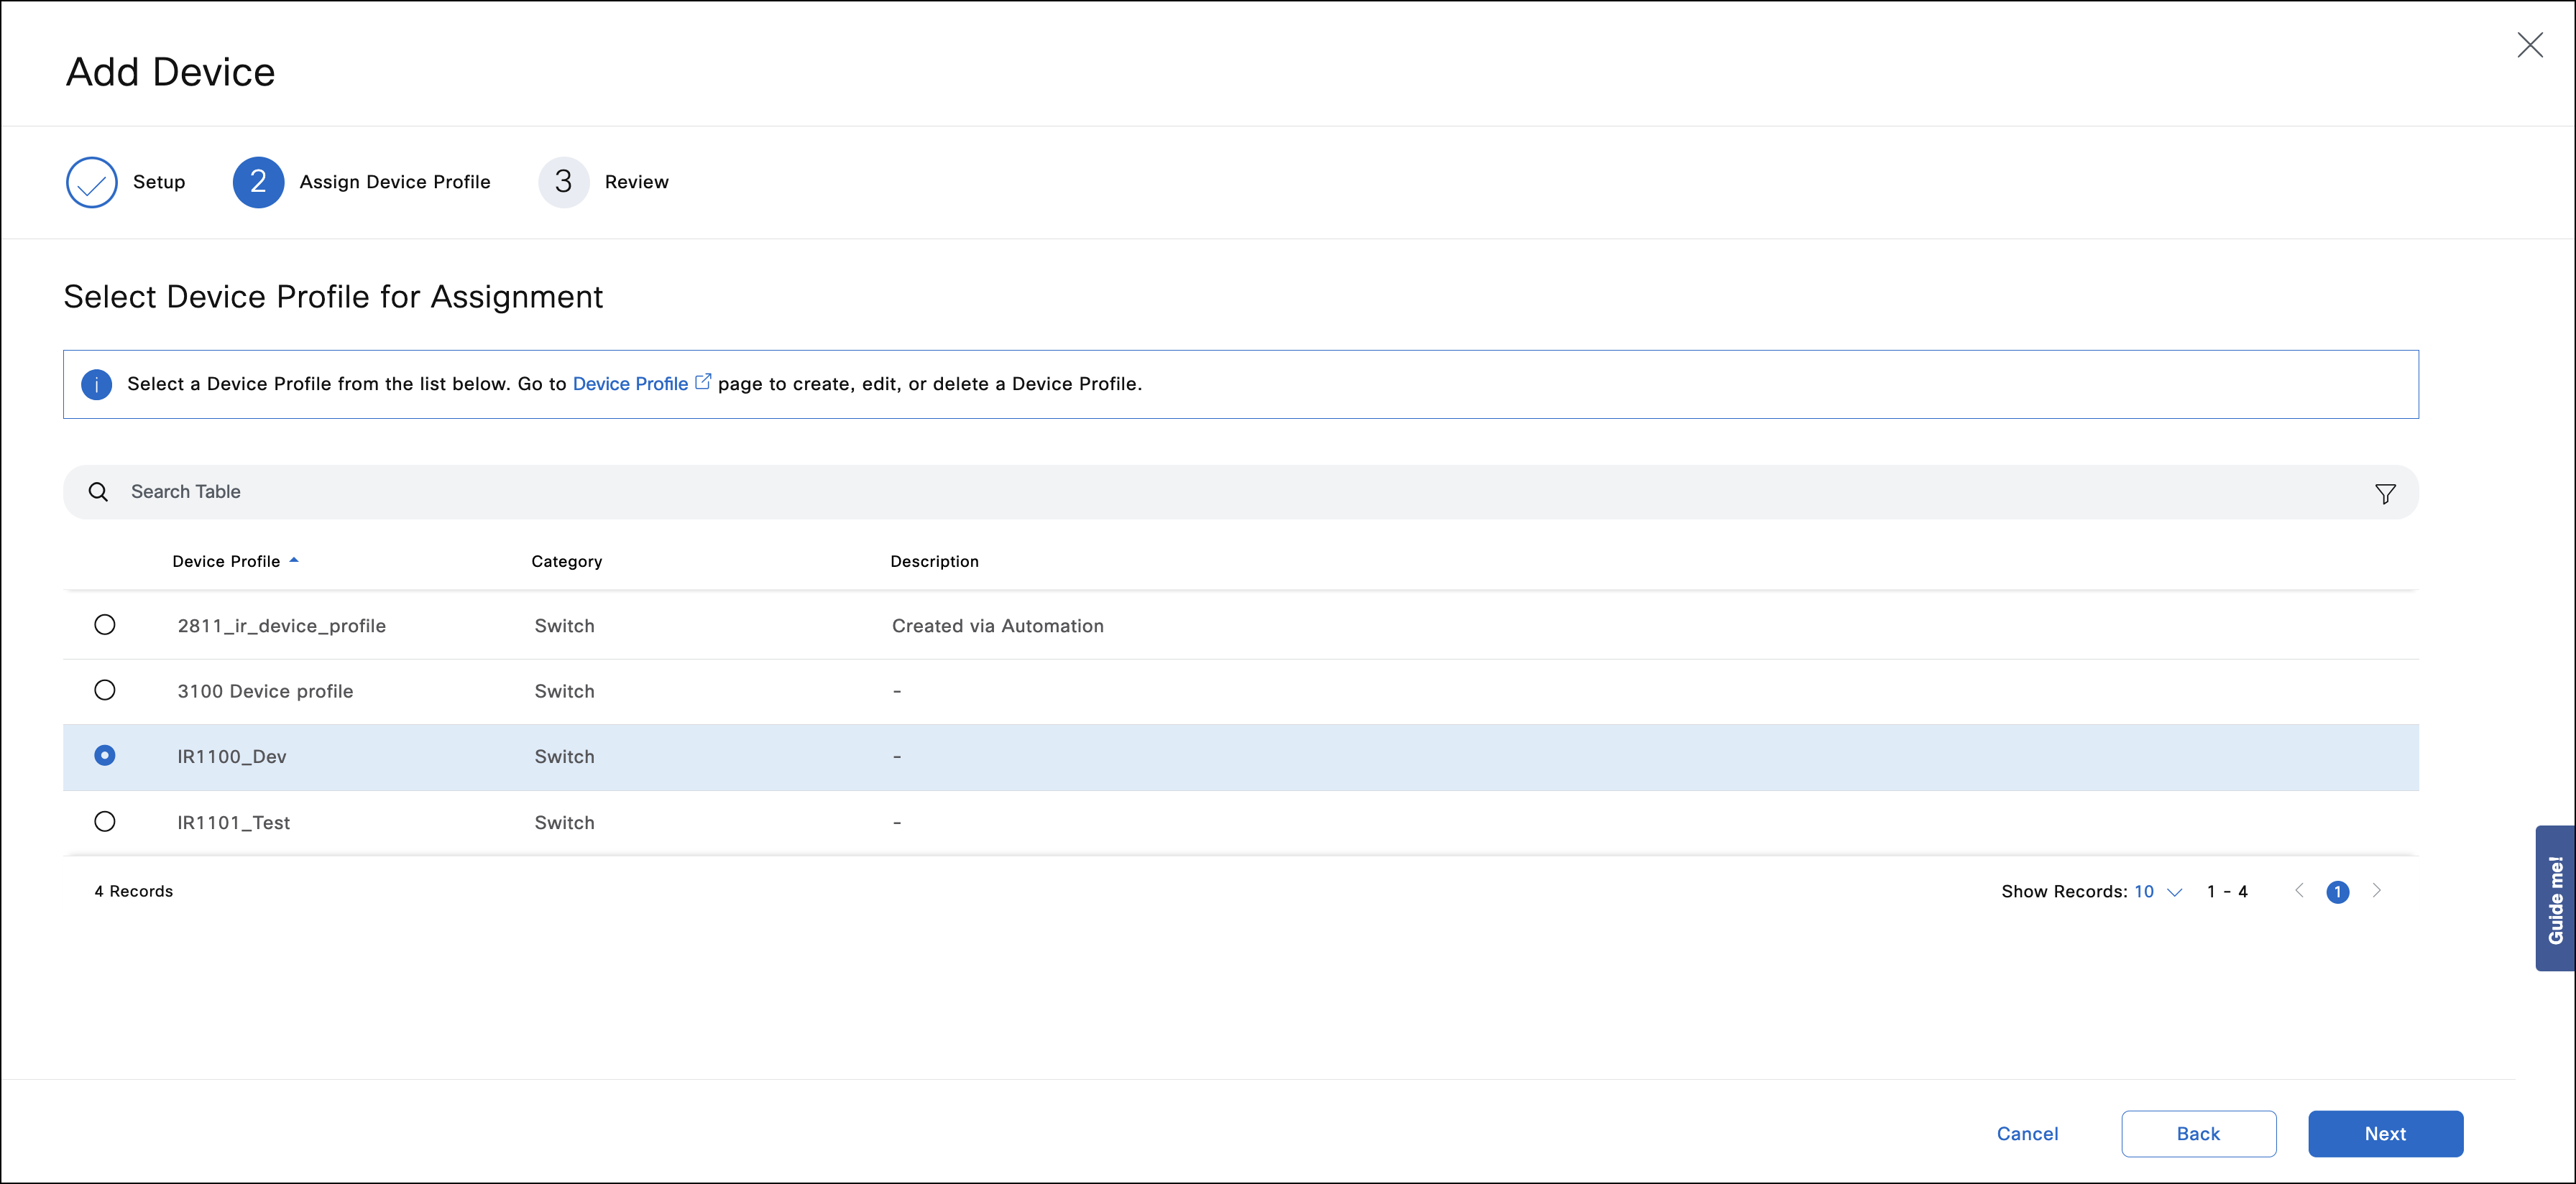
- In Review, verify all information and click Add Device.
- The device now appears in the Staged tab list.
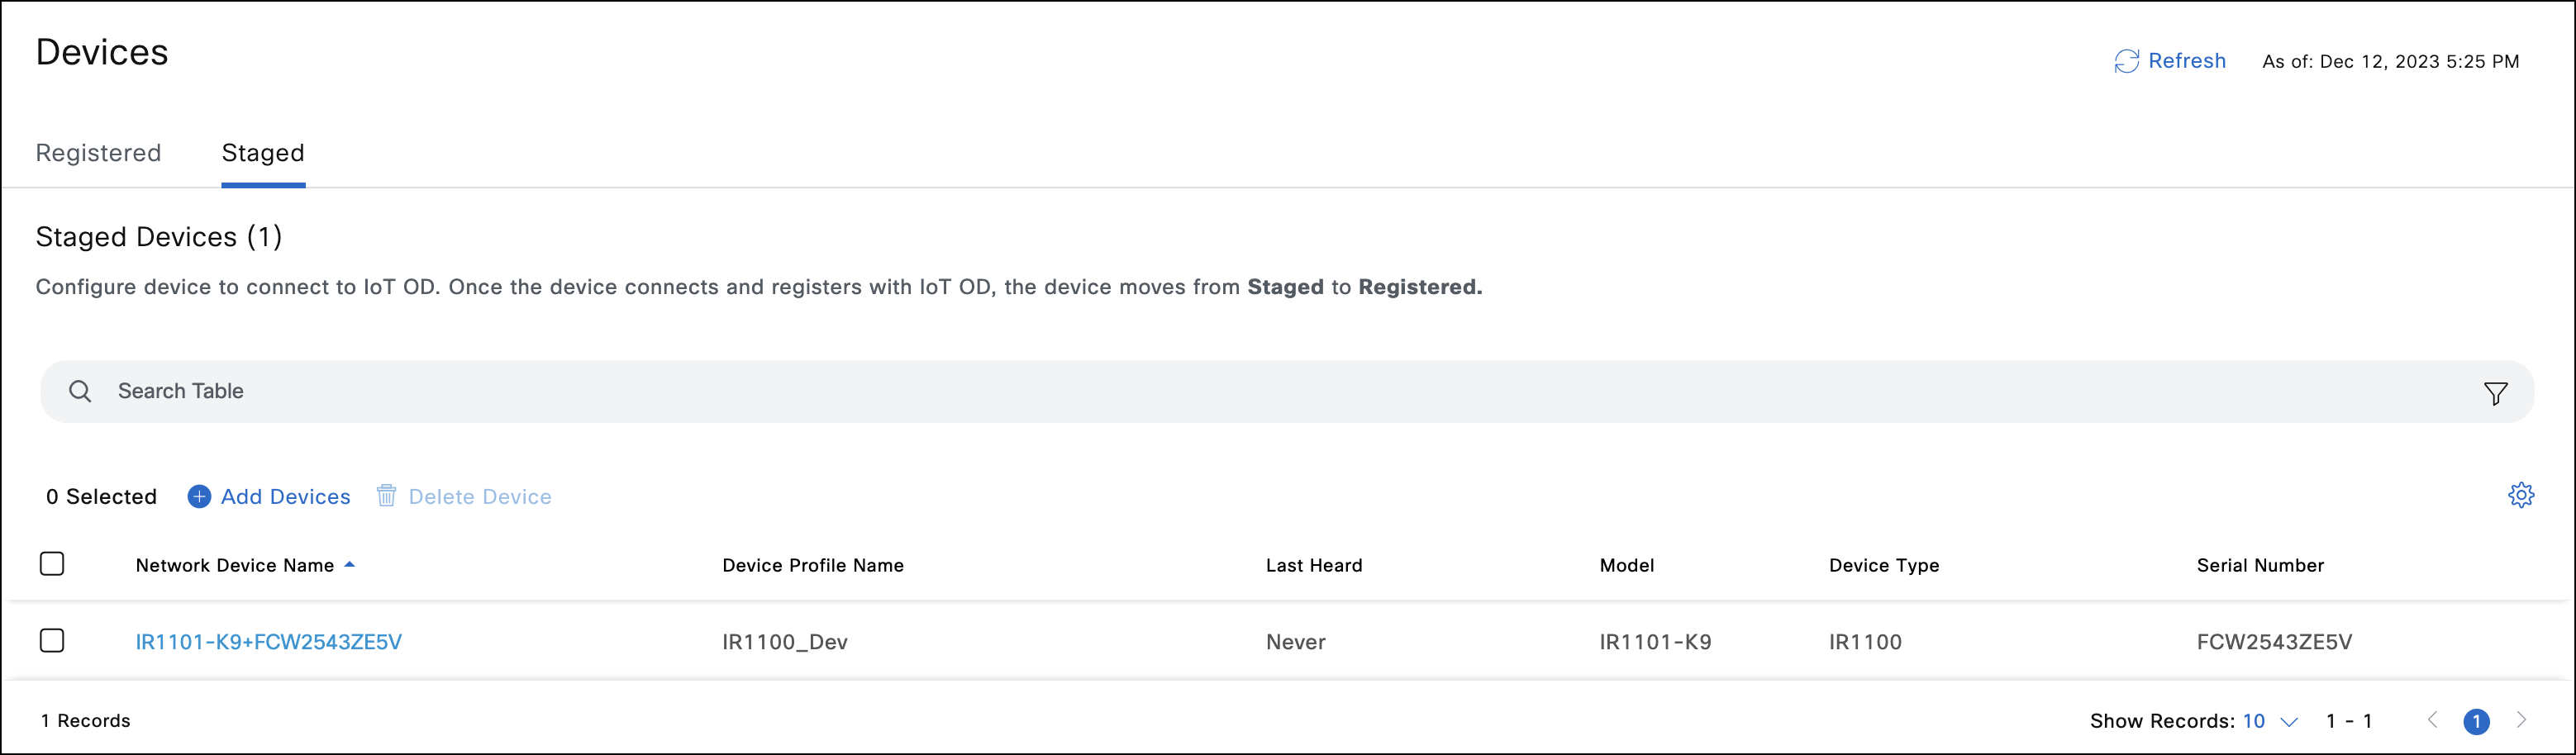
Device credentials are auto-generated by IoT OD and can be reviewed on the device Summary page.
At this stage, the cloud-side configuration of the solution is done. IoT OD is ready to process registration attempts from the actual IR device.
Device Profile Management
To delete a device profile:
- Select the device profile from the Device Profile Name column and click Delete.
To edit a device profile:
- Select the device profile. In the Action column, click Edit Configuration.
- Do the necessary changes and fill in the credentials.
- Click Save.
Step 4: Device onboarding and troubleshooting
For details, see Configuring devices managed by CLI/Local Manager in IR Device Configuration and Initiating Connection to OD.
Step 5: Device status in IoT OD
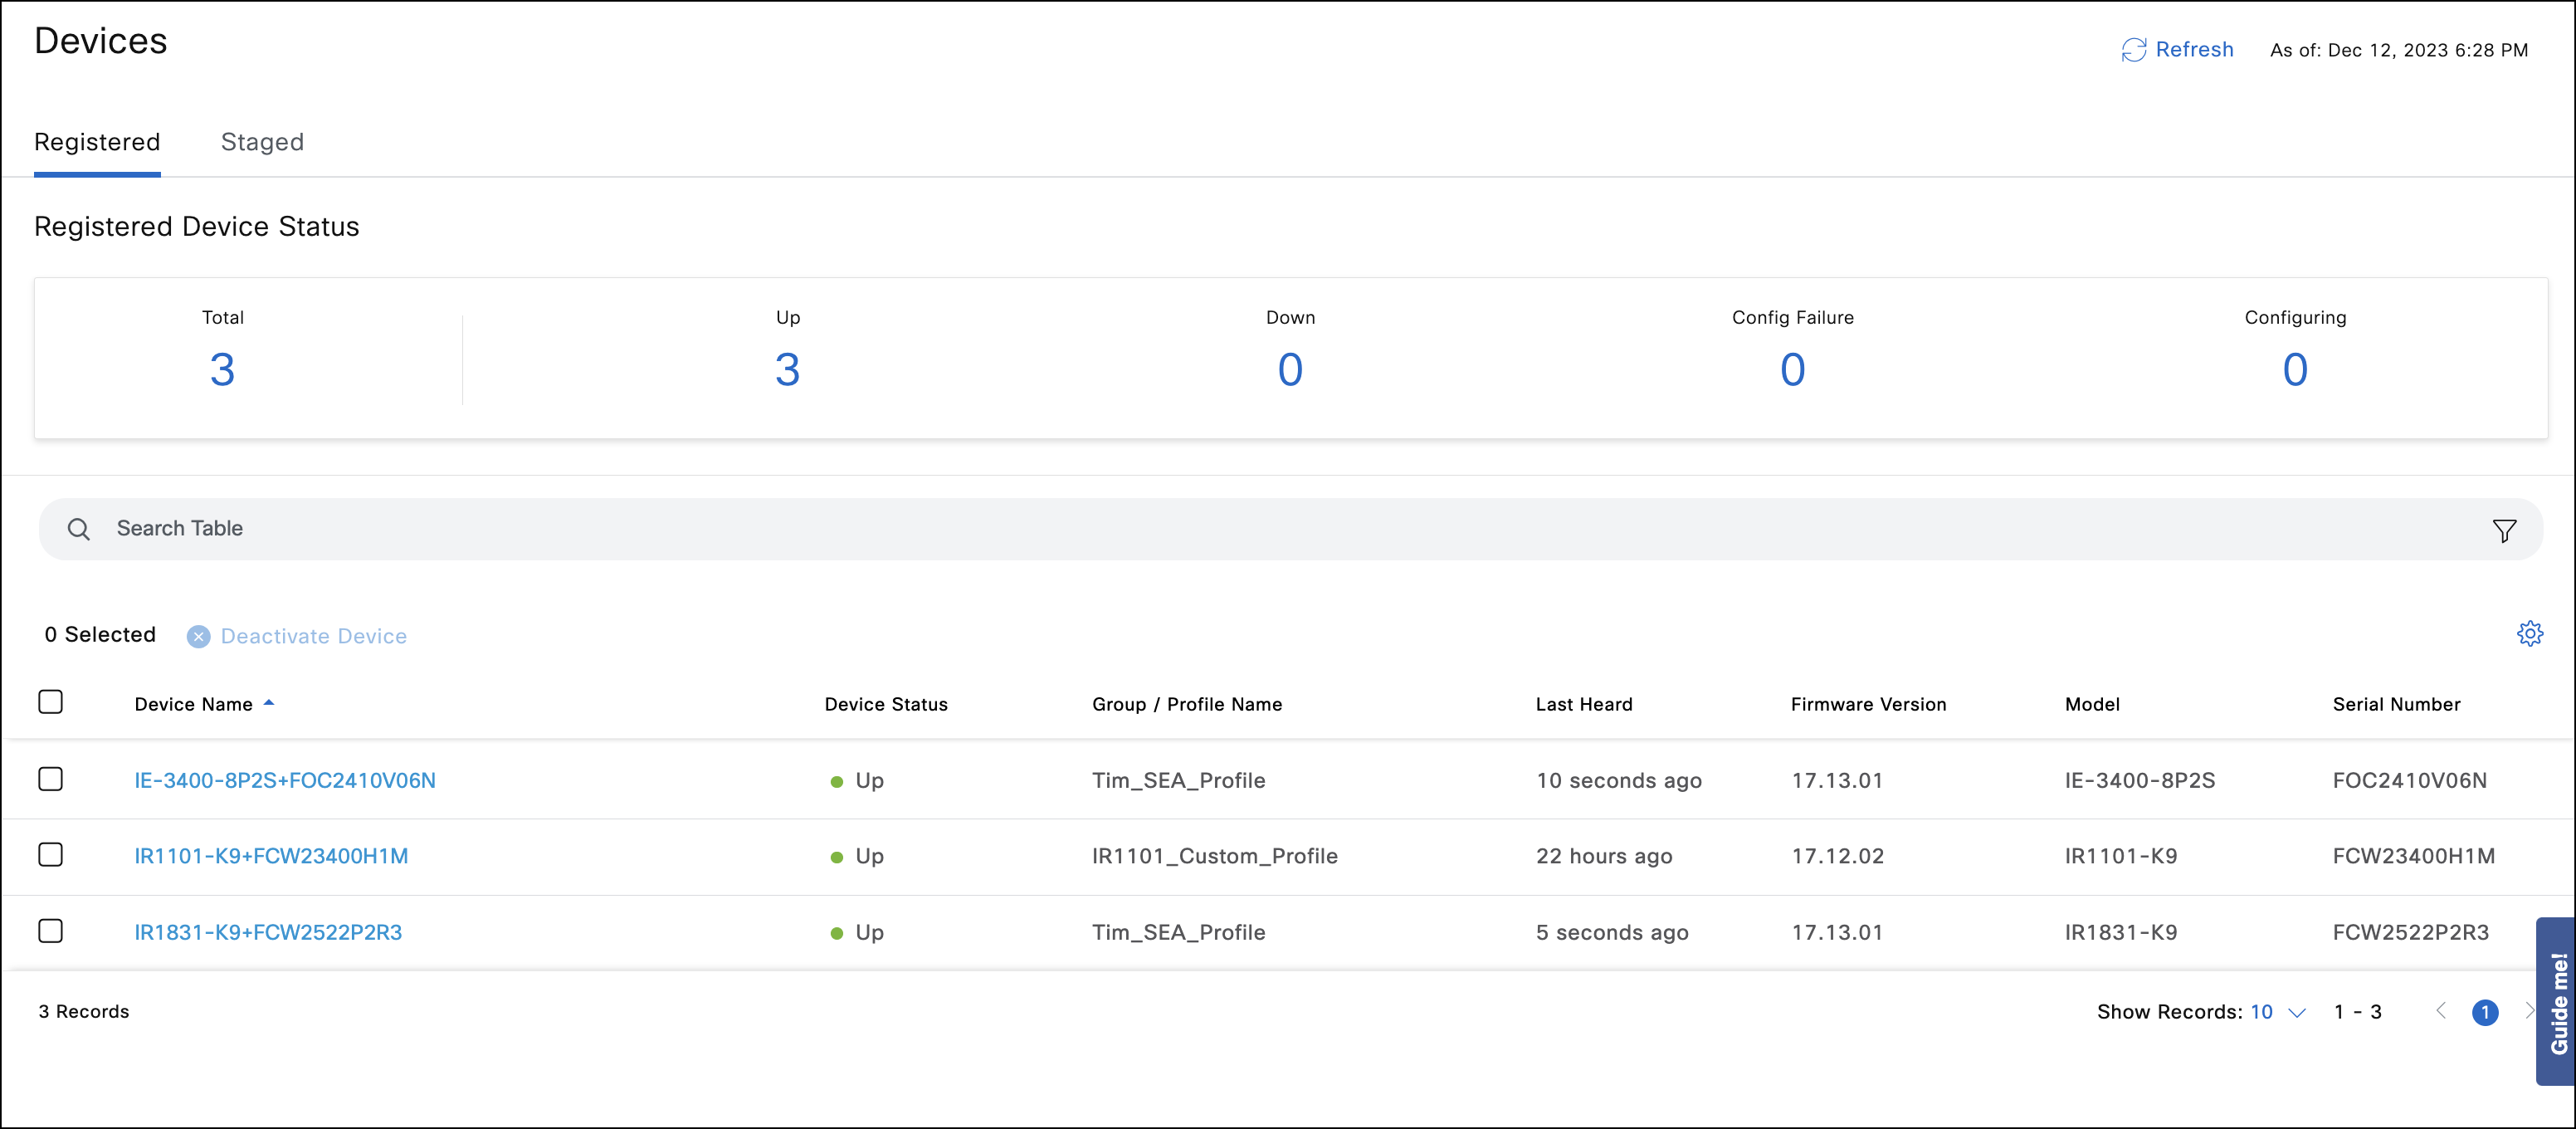
- Verify on IoT OD that the device has moved from the Devices > Staged tab to the Devices > Registered tab.
- If the device is still present in the Devices > Staged tab even after executing the steps for device onboarding, check the following on the device:
Verify that the device has connectivity to the appropriate IoT OD cluster (US/EU) by using the telnet command.
// Verify that opening a telnet session to the cluster is successful. The output should have "Open"
Example:
 #telnet us.ciscoiot.com 443
 Trying us.ciscoiot.com (10.105.58.227, 443)... Open
Verify that the "iotod-cert" trust point is created correctly using the right certificate and is configured correctly in the cgna websocket profile, as described in earlier sections.
- Once a device connects with a registration request, the device configuration is recognized and validated by IoT OD, and the device automatically moves to Devices > Registered.
Note:
- The IR device will move to Devices > Registered with Up status if the device registration is finished successfully.
- If IoT OD received a registration attempt but had some issues, (e.g., incorrect credentials), the IR device will move to Devices > Registered with Config Failure status.
- If IoT OD didn't receive any registration attempt, the IR device will stay in the Devices > Staged list.
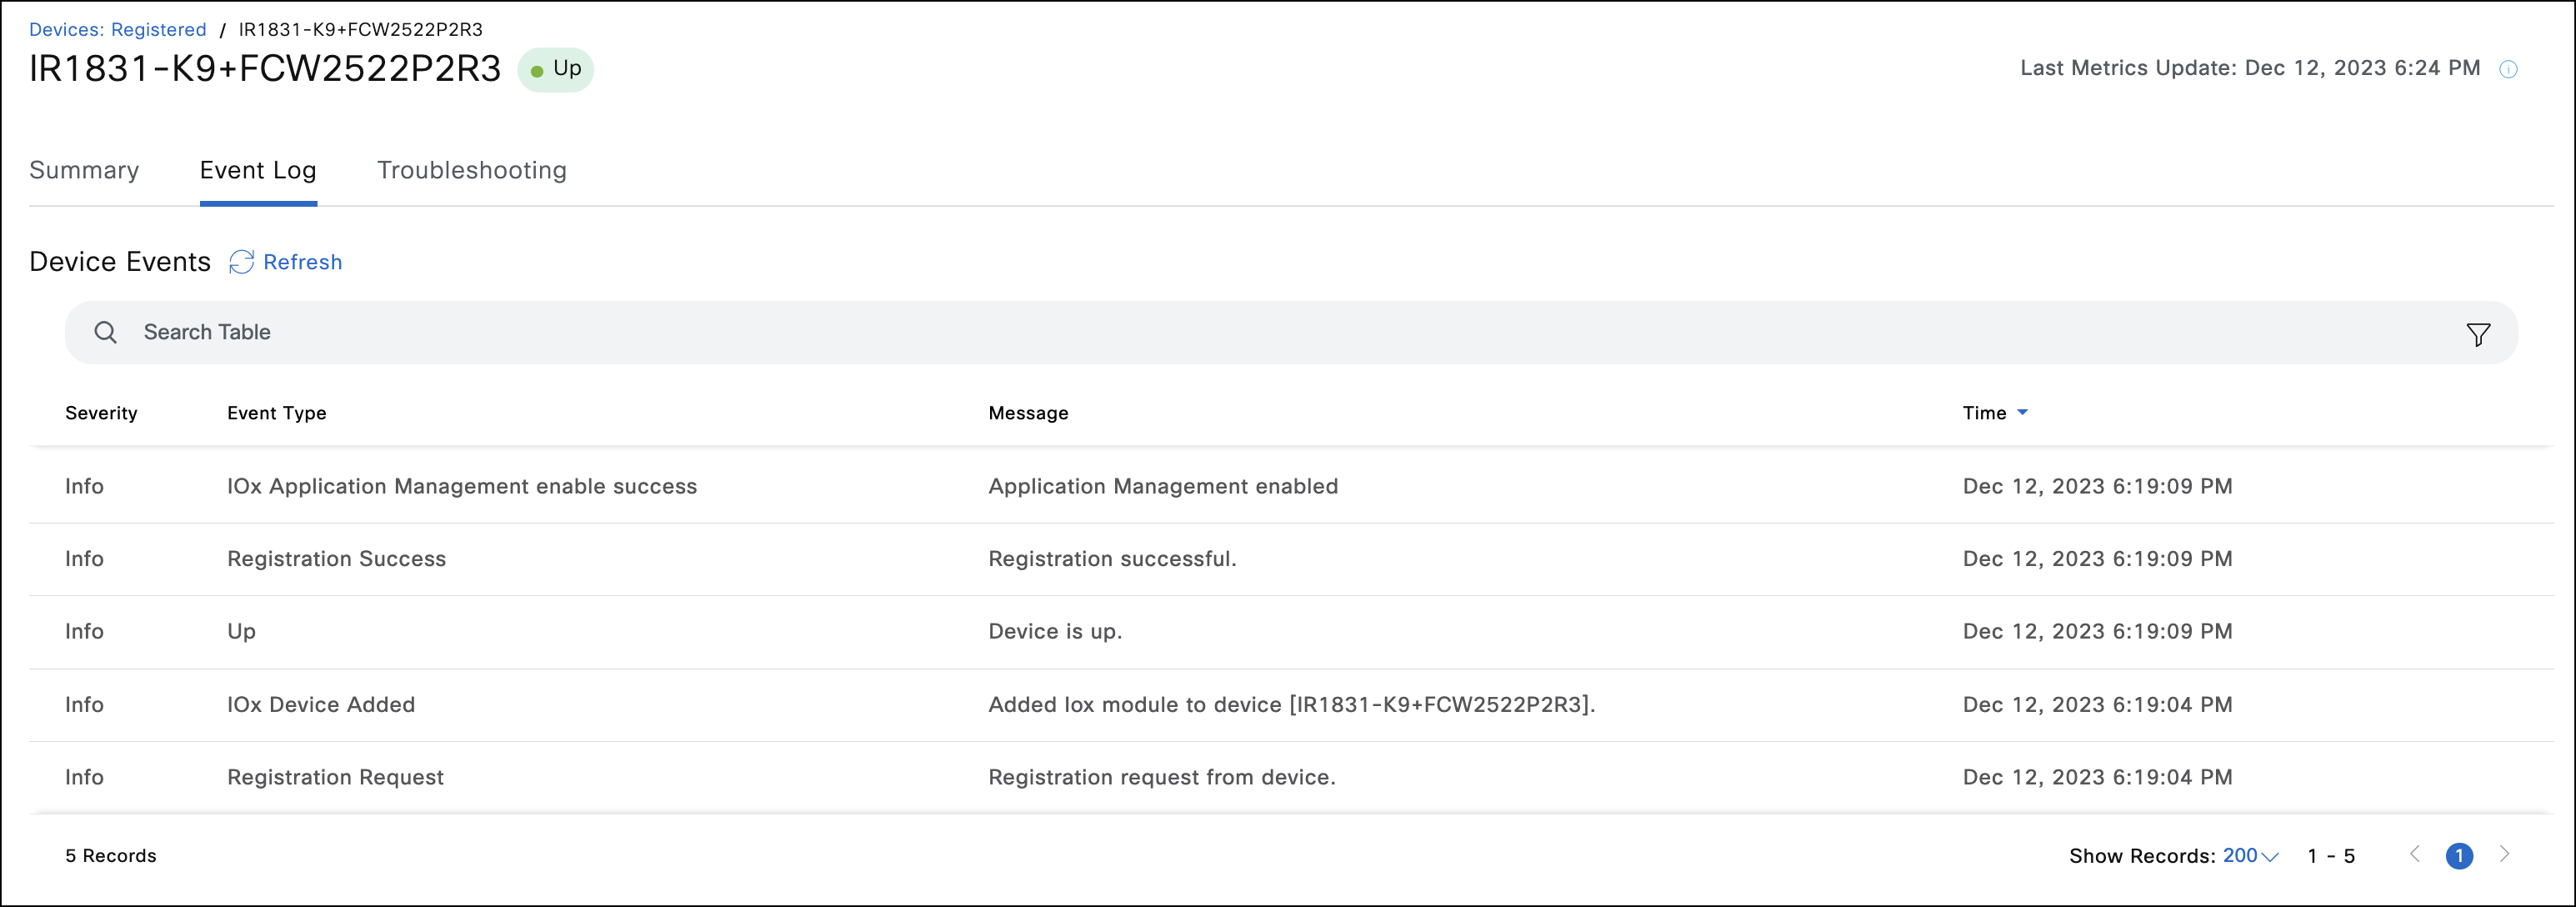
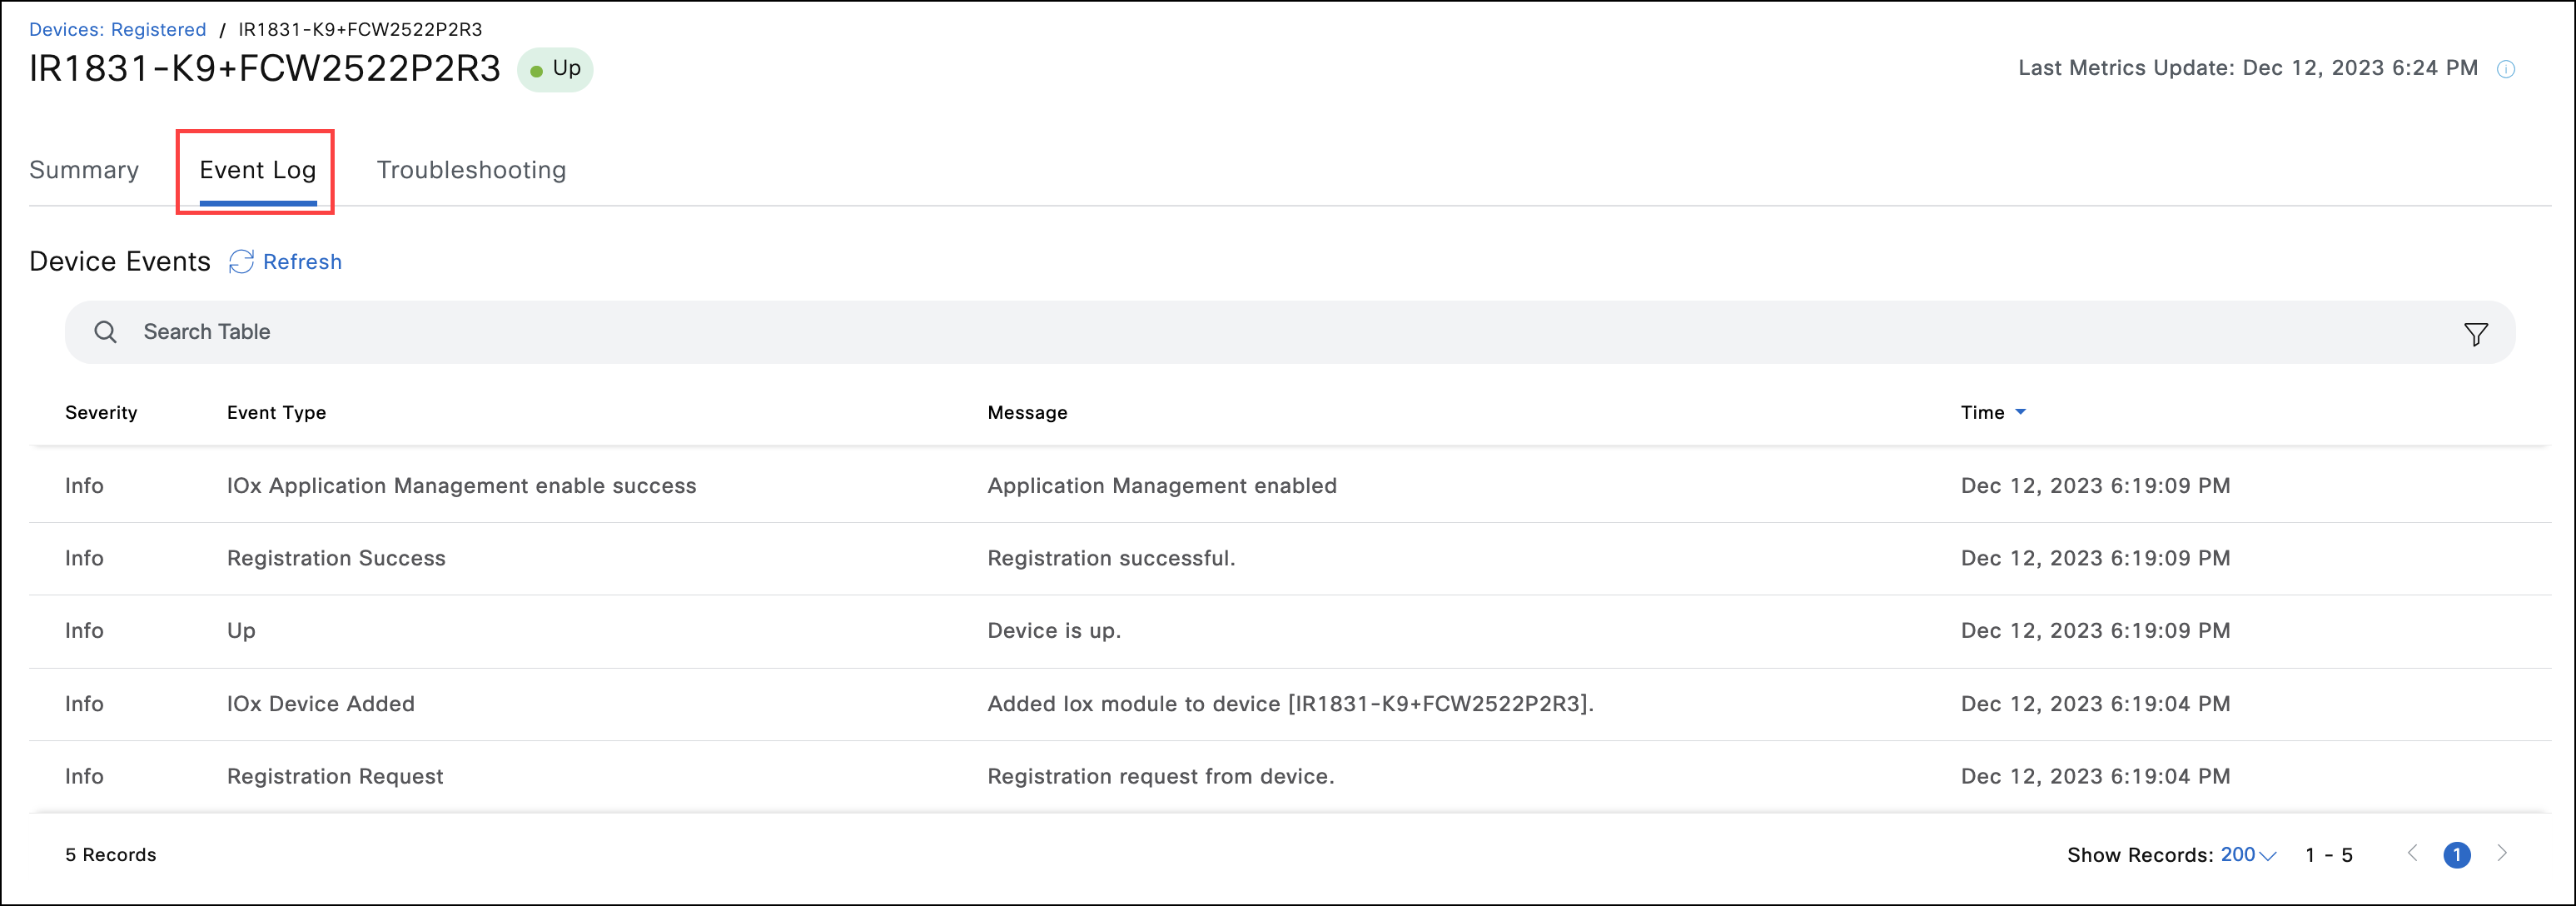
- If you encounter problems, use the Event Log page on the device level to see the onboarding and Application Manager-related events. Use troubleshooting tools on the device Troubleshooting page for debugging.
Note: To use Troubleshooting tools, the device should register successfully on IoT OD and establish websocket tunnel. The Troubleshooting page allows Ping IP, Traceroute IP, and IOS Show Commands execution on the device. The IOS Show Commands will work only if there is proper configuration for wsma applied on the IR device by the user.
- If the device moves from Staged tab to Registered tab, but the device status shows as Registering, and the Event Logs show timeout messages as shown below, the most probable reason is that there is some issue in connectivity between the device and IoT OD.
- If the credentials do not match, the event logs will show an authentication failure. If that occurs, run the user creation command again, using the correct username and password. To find the correct credentials, go to the Summary page, click on View More in the right corner, and a slider will appear with the username and password.
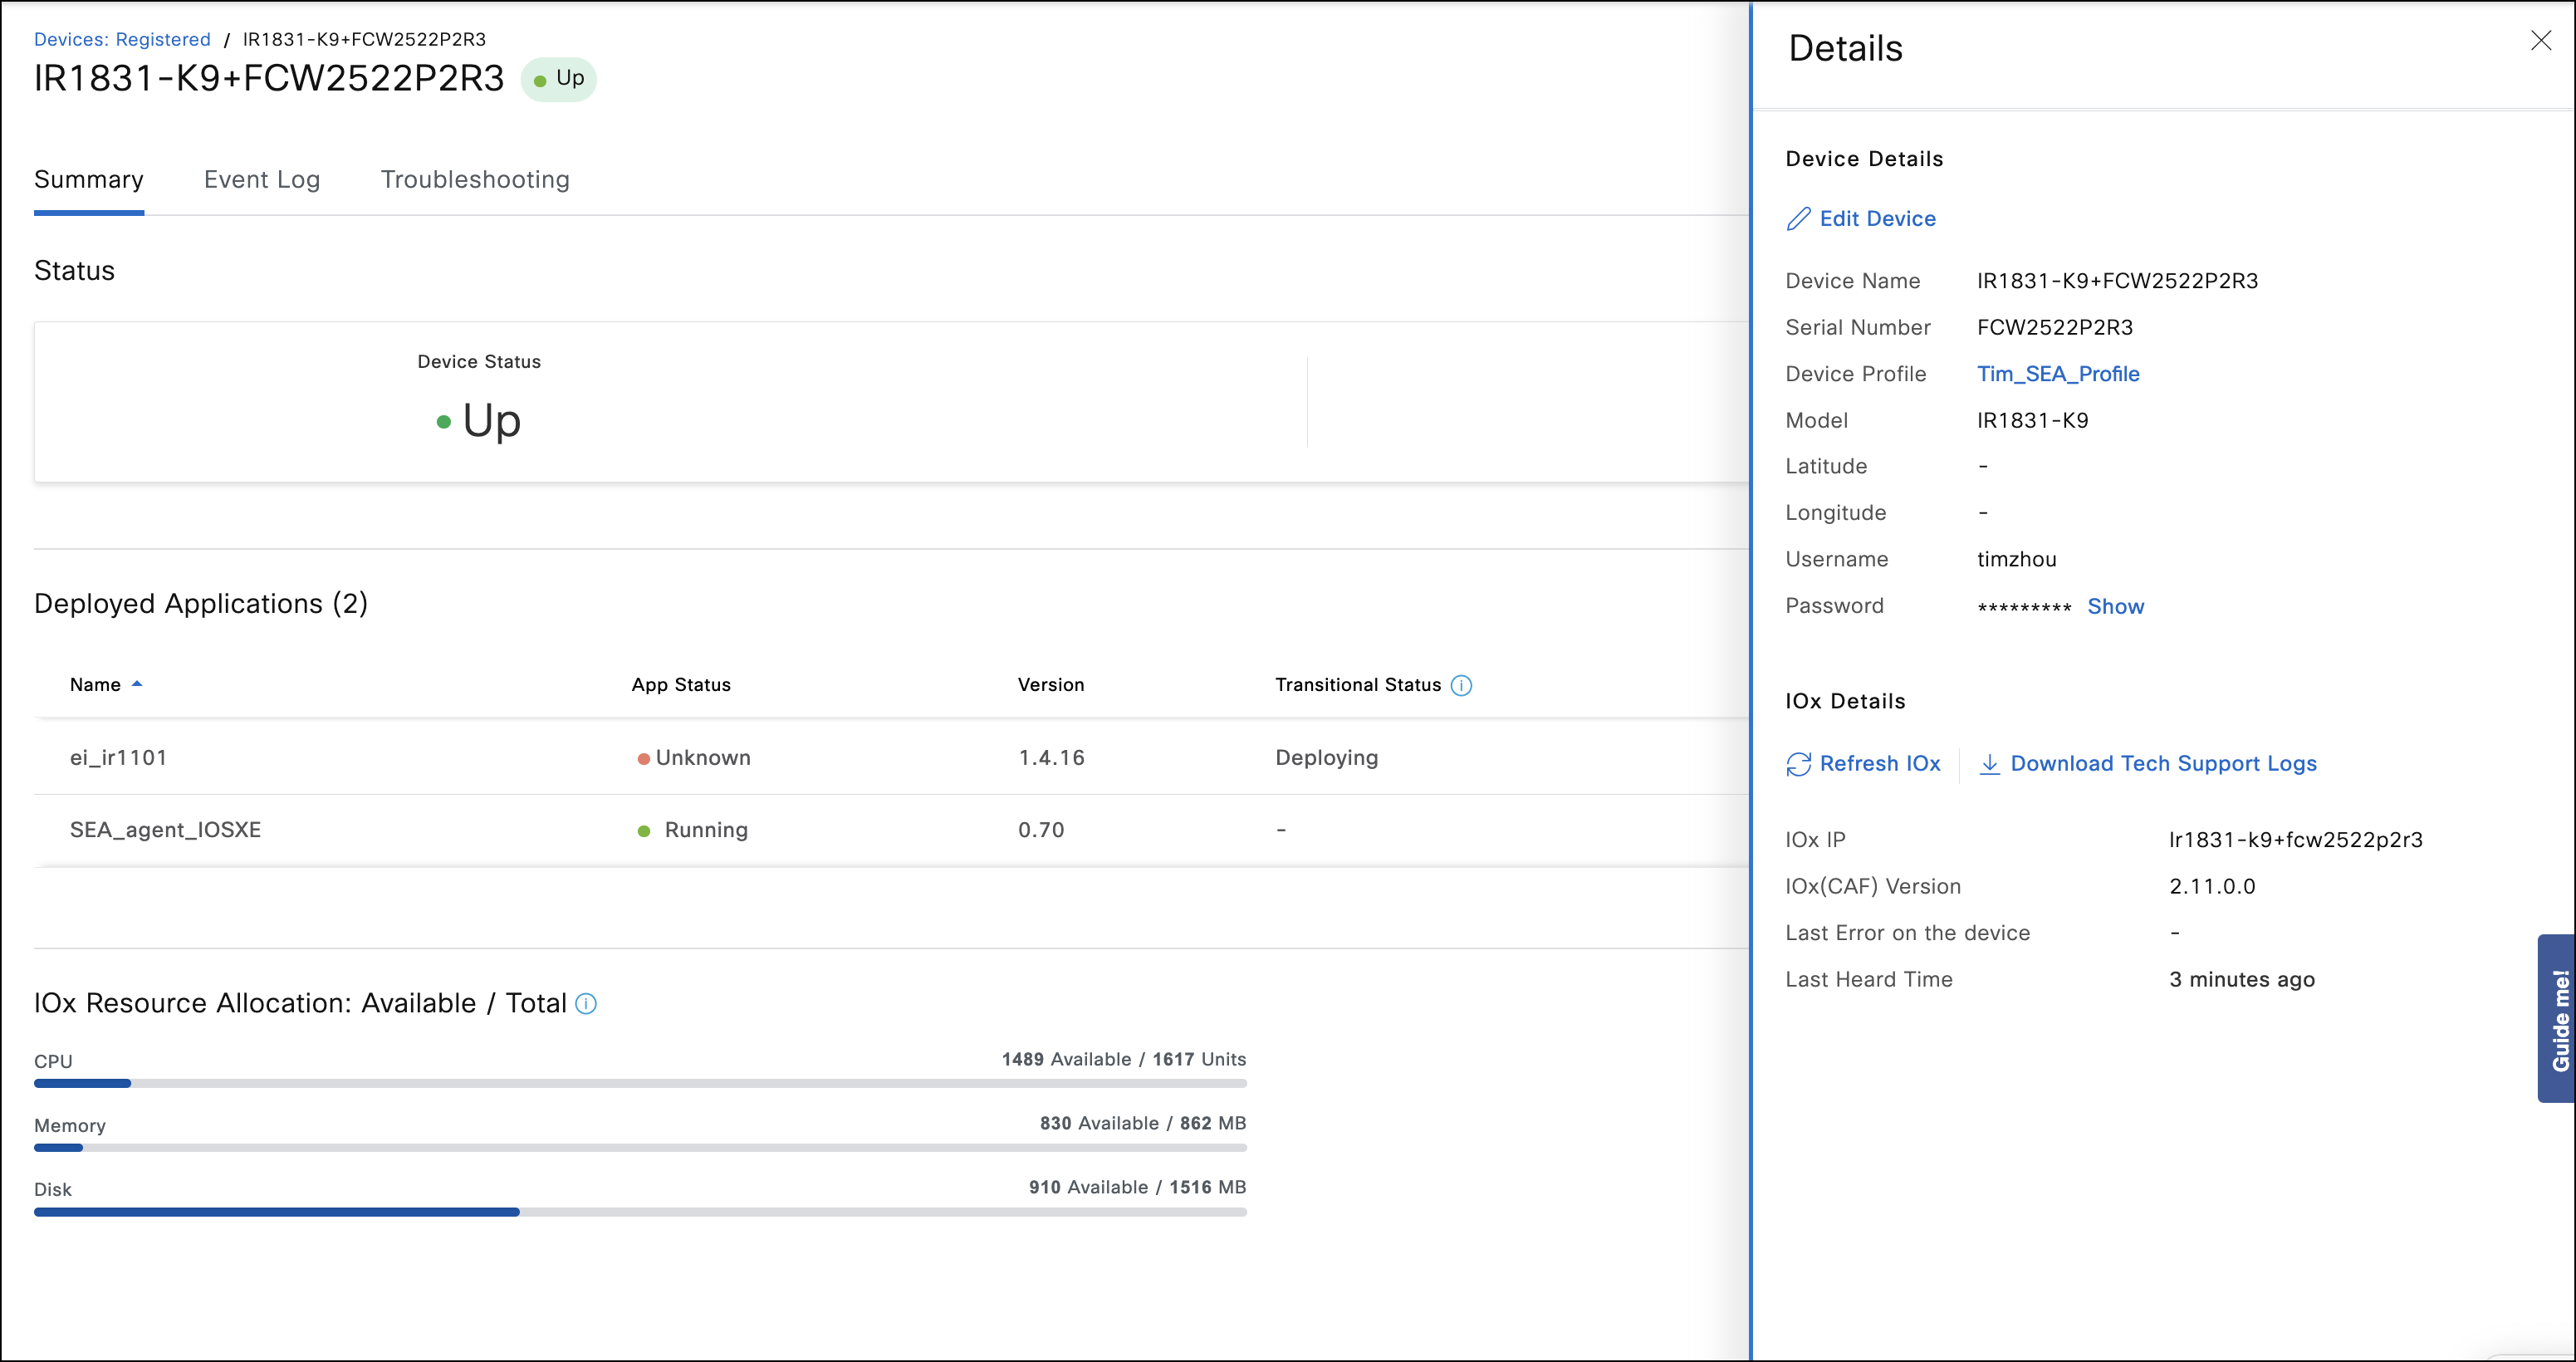
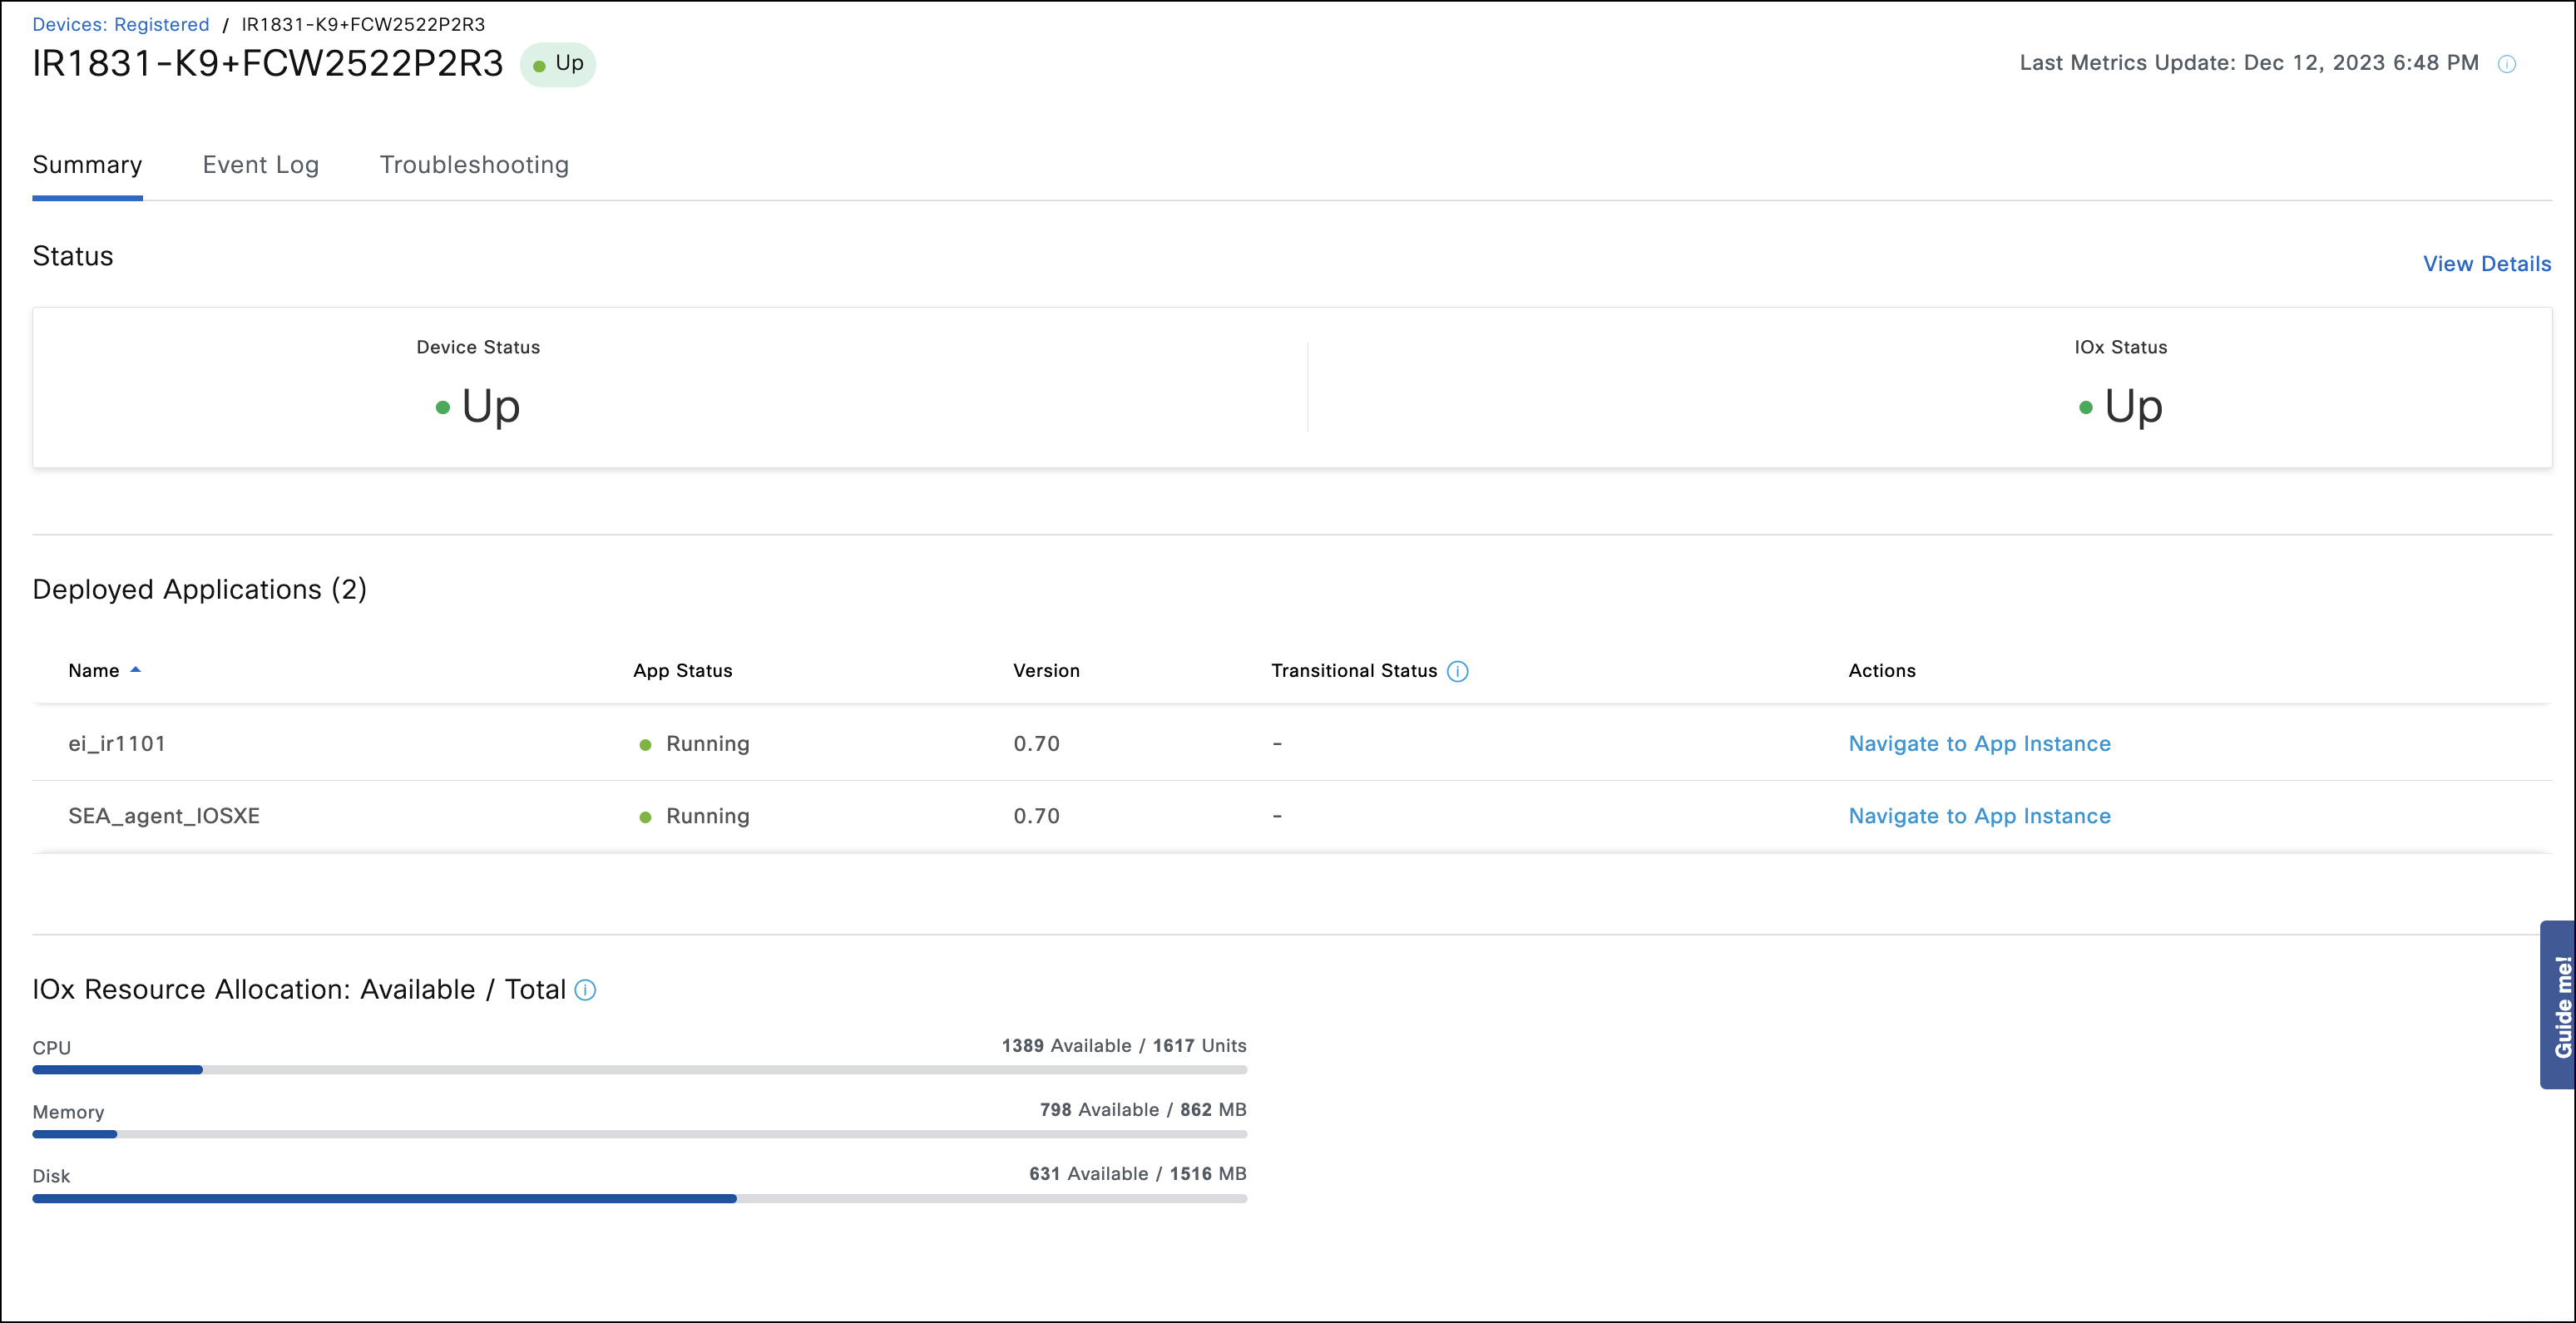
- Once the IR device appears with the status Up in the Devices > Registered tab, click on the device name, and check the Applications tab on the device to verify that the Application Management is enabled successfully. In case of successful discovery, the details will appear similar to the image below.
- In case the value of IOx status field is not up and the field Last Error on the device indicates any connectivity issue, try executing the Refresh IOx action. If the issue is still unresolved, check the error message and see the Application Management troubleshooting section for further debugging.
Step 6: IOx Application deployment, Service configuration, and activation
See the following documentation for additional reference on Application Management in IoT OD:
Note:
In most cases, you don't need Application Management to deploy SEA Service on IoT OD. You can make all necessary service-specific configurations for those Services, including software installation onto IR devices, in the corresponding modules on IoT OD. For EI, you need Application Management to install EI software onto the IR device. After that, you can use the EI module on IoT OD to configure the Service.
SEA
Installing, configuring, and activating SEA on a device
The installation of the SEA agent application (see Secure Equipment Access–Overview) is identical to installing SEA agent on an IoT OD-managed device with one exception. For the router, specify the VPG0 where the SEA agent ethernet interface will be placed. This VPG0 should have these services so that SEA can get:
- DHCP services to assign SEA agent interface an IP address
- Default route for SEA agent to reach the internet and IoT OD cloud
- DNS IP address to resolve host names for access to IoT OD but also for hosts SEA agent will be configured to connect to
For the service-specific configuration for SEA or SEA Plus, please refer to the Secure Equipment Access–Overview.
EI
Installing, configuring and activating EI on a device
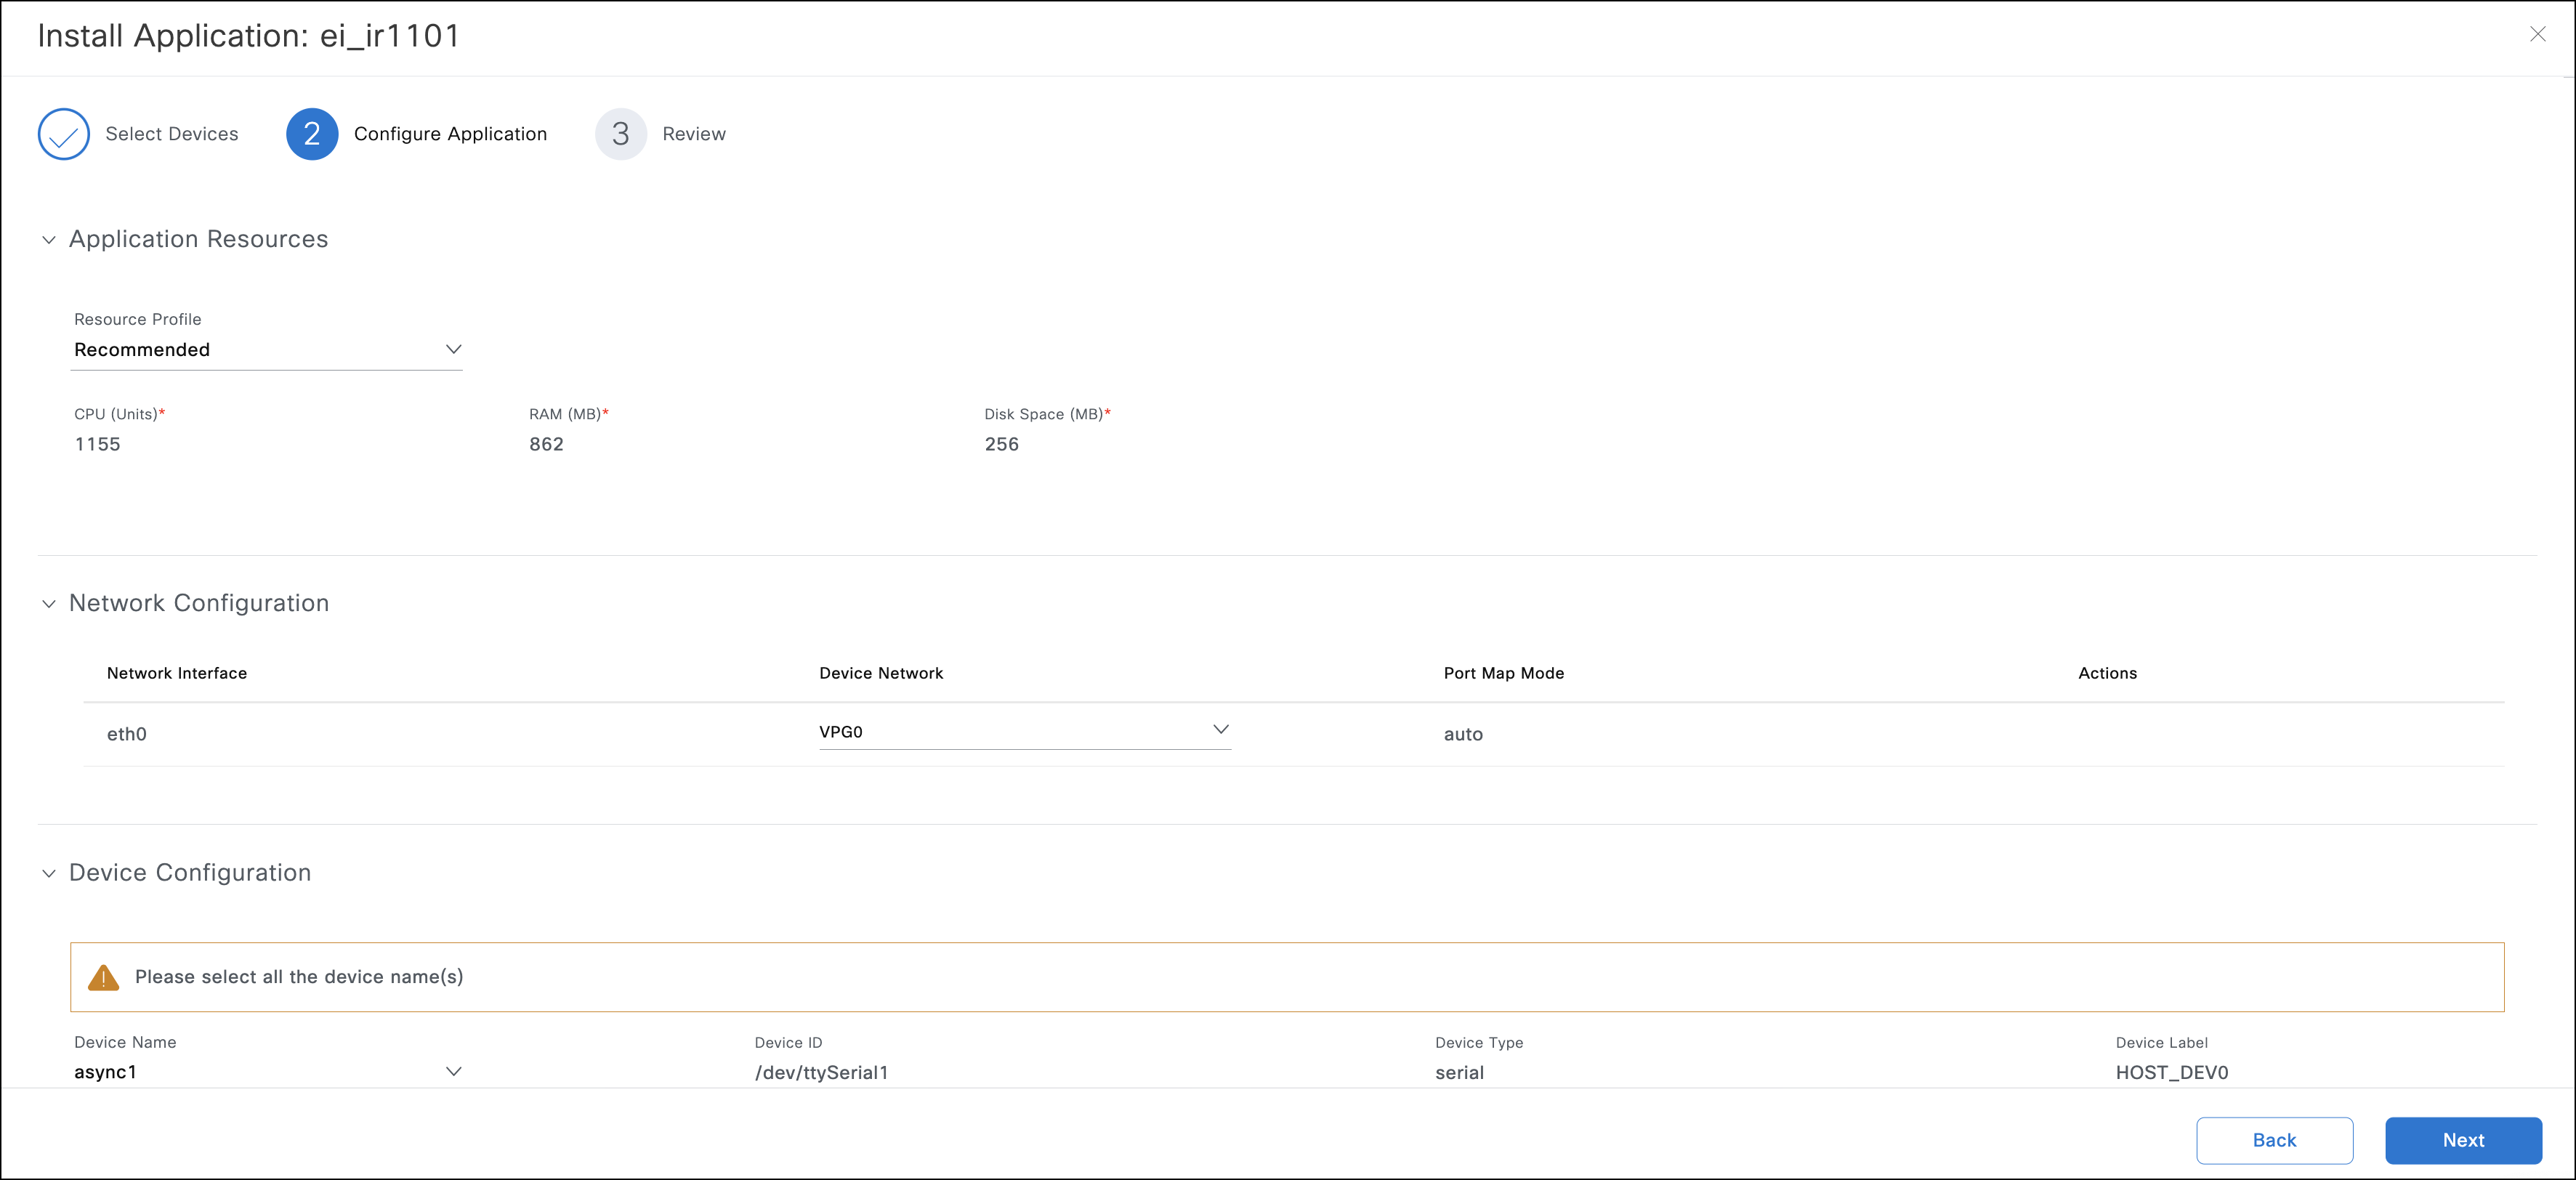
The installation of Edge Intelligence (EI) is identical to installing EI on a IoT OD managed device (see Introduction to Edge Intelligence: Overview) with one exception. For the router, you specify the VPG0 where EI ethernet interface will be placed. This VPG0 should have these services so that EI can get:
- DHCP services to assign EI interface an IP address
- Default route for EI to reach the internet and IoT OD cloud
- DNS IP address to resolve host names for access to IoT OD but also for hosts EI will be configured to connect to
Note: In contrast to the VPG0 configuration for SEA, you need to use VPG0 configuration feature in the Application Management, not in the EI service.
In the example below, we add EI to an IR device. After installation, the EI agent should appear online in the EI Service pane of IoT OD. For Enable EI agents, and configure EI assets, data policies, and data destinations, see Using EI.
Applications co-existence on IR devices
Disclaimer: Currently, Cisco provides official support for a single IoT OD Service per IR device. Every IoT OD Service requires Cisco-developed IOx application installation on the IR device. Set ups with multiple services per device (and so multiple IOx applications) are not supported but not prohibited. Some platforms allow a great level of Cisco applications to co-exist out of the box, but some have limited hardware resources and require careful planning and implementation. It is up to the customer or partner to find an acceptable app-platform-config combination.
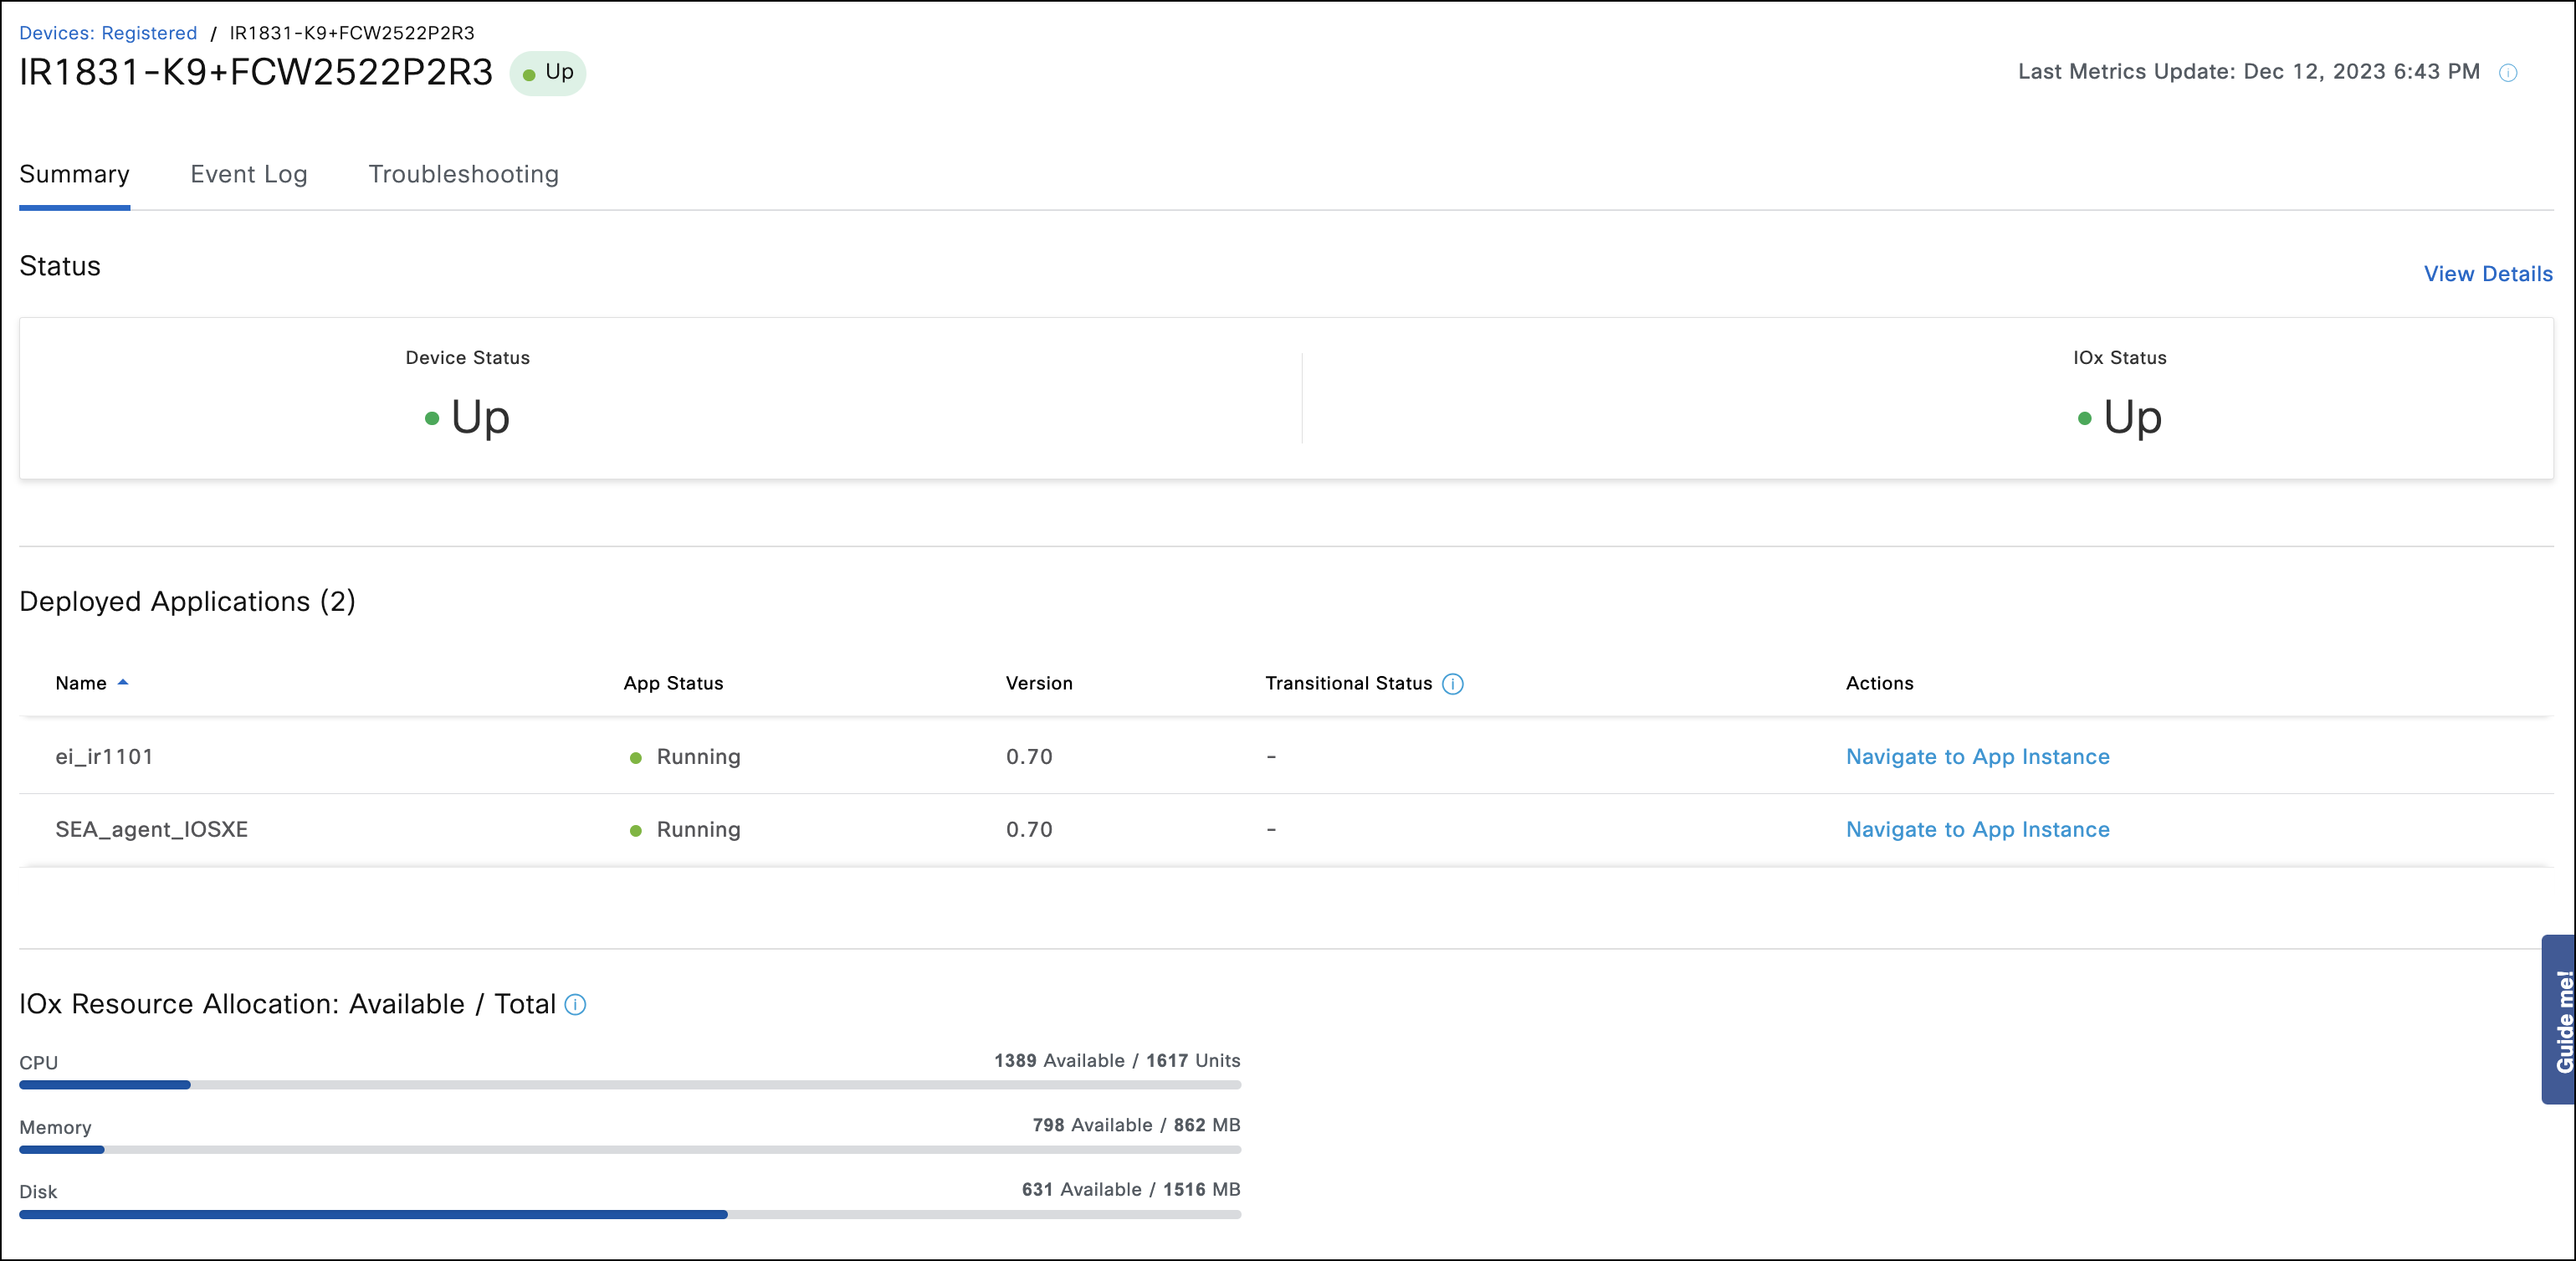
An example of IR11xx or IR18xx routers Currently, both SEA and EI Applications can be installed on IR routers with default application configurations at the same time and successfully run without having to make any changes to resources (i.e., CPU, memory, disk). This is because the application's resource allocation today for both combined is less than the total available resources on IR1800. In this example, the Applications tab of the device shows both applications running at the same time with some resources still available.
Step 7: IoT OD Service deactivation and device removal on an externally-managed IR
To deactivate IoT OD Services on an externally-managed IR:
Remove the OD-specific configuration from the device.
// Remove the IoT OD connection profiles
no cgna transport-profile wst
no cgna profile cg-nms-register

// Remove the user that was used by IoTOD (if this user is not used for any other purposes on the device)
no username cisco

// Remove the trustpoint created for IoT OD connection (use the same name that was given while configuring the trust point)
no crypto pki trustpoint iotod-cert

// Remove WSMA & CGNA related configuration (if WSMA is not needed)
no wsma agent exec
no wsma agent config
no wsma profile listener exec
no wsma profile listener config
no cgna gzip

// Stop IOx and remove configuration of VirtualPortGroup 0 (if IOx is not needed)
no iox
no interface VirtualPortGroup 0
Deactivate the device in IoT OD.
- Select Application Manager from the Services pane.
- Click Devices > Registered.
- Use the checkbox to select the device(s) to be deactivated.
- Select the Deactivate Device action on the top of the table.
- Confirm the operation, when prompted.
Remove the device from IoT OD.
- Select Application Manager from the Services pane.
- Click Devices > Staged.
- Use the checkbox to select the device(s) to be removed.
- Select the Delete Device action on the top of the table.
- Confirm the operation when prompted.
IMPORTANT:
- Because IoT OD Application Management today only supports setting application config at the time of installation, if you want to change VPG0 info for the application, for example, you must uninstall the application first and then install it again with the new VPG0 information.
- Once an externally-managed IR device is registered on IoT OD (for IoT OD Services), it should not be deactivated unless it is being decommissioned. If a device is deactivated and needs to be activated again, copy the newly-generated random password from the device info screen and use that on the device for the user "odserviceuser" manually.
Troubleshooting
After following the above steps to onboard a device in IoT OD, the following INFO lines should appear in the Event Log tab of the device and its status should now appear as UP.

If the device has any of these conditions:
- device is not UP
- timeouts appear in the log
- device stays in the Unused tab of the Inventory
then
To verify proper config:
- Confirm the odserviceuser password is identical to to same user added to device IOS configuration.
- Check the URL registration profile to make sure it is using the correct IoT OD cluster and no typos under the header: cgna profile cg-nms-register
- Confirm both "ip http server" and "ip http secure-server" are enabled in IOS.
- Confirm device has functioning DNS service by pinging a public IP by name:
- ping cisco.com
Sending 5, 100-byte ICMP Echos to 72.163.4.161, timeout is 2 seconds:
!!!!!
- ping cisco.com
- A web socket might be established between the device and IoT OD, but the device is still not registering. Confirm the web socket connection state is "connected" using this command:
- show cgna transport all | inc IDA Status
IDA Status: Connected
- show cgna transport all | inc IDA Status
- If web socket connection is not established, this low-level show command will display liveness messages between the device and IoT OD. There should be continuous ping/pong messages as follows:
- show logging process ida internal reverse
- 2023/05/24 18:40:29.453267143 {ida_ws_R0-0}{1}: [ida_ws] [6785]: (note): DATA: Sent PING Packet - pong Debt 1
- 2023/05/24 18:39:39.495901643 {ida_ws_R0-0}{1}: [ida_ws] [6785]: (ERR): LWS Callback:: REASON: 9 - CLIENT_RECEIVE_PONG
- show logging process ida internal reverse
The following information provides assistance when working with device onboarding issues (indicated in Event Logs) and application issues (networking related).
| Issue | Action |
|---|---|
| IOx is not enabled | Enable IOx and verify if it is running correctly. |
| IOx is configured, but it still is not running correctly | Follow Cisco's recommendation and configure the trunk with an uncommon native VPG0. You can also choose to limit the allowed VPG0s on this trunk to those needed for application and internet communication, though it's not mandatory. If you use a native VPG0 number greater than 1004, ensure the router is set to "vtp mode transparent" to allow VPG0 creation. This setup allows applications to be deployed in any desired VPG0 for better control of application traffic. |