SEA Plus access method
Prerequisites
IMPORTANT:
- The current SEA Plus App release only provides support for Windows 10 (minimum version) OS SEA Plus app versions.
- If you have VPN clients installed on your computer, only use the SEA Plus App without any other VPN client in active mode.
- Make sure that your virus scanner (antivirus) doesn't block the SEA Plus application.
Note:
- To use SEA Plus features, ensure the feature is activated in your Organization on IoT OD. If you don't know the status of the feature, please contact Cisco.
- The SEA Plus features are premium features and require an Advantage license on IoT OD.
IMPORTANT: Before you begin, ensure you have both the SEA agent on a managed Cisco device and the SEA Plus application installed. You must also have access to a remote session with the SEA Plus access method configured on IoT OD.
For detailed information on accessing and managing network devices and creating remote sessions, see:
Download the SEA Plus Application
To download the SEA Plus Application (user application), find a repository page on the IoT OD. Create a path to the application repository.
- Choose Secure Equipment Access > Remote Sessions.
- From the Remote Sessions screen, click Download SEA Plus App. The SEA User Application screen opens with a list of available applications.
- Choose the appropriate application and version and click the download icon to download that application/version.
Note:
- SEA Plus App version is 0.70.
- SEA Plus Agent version is 0.70.
- SEA Plus can also be used with SEA Plus Agent and App version 0.65 but 0.70 is recommended.
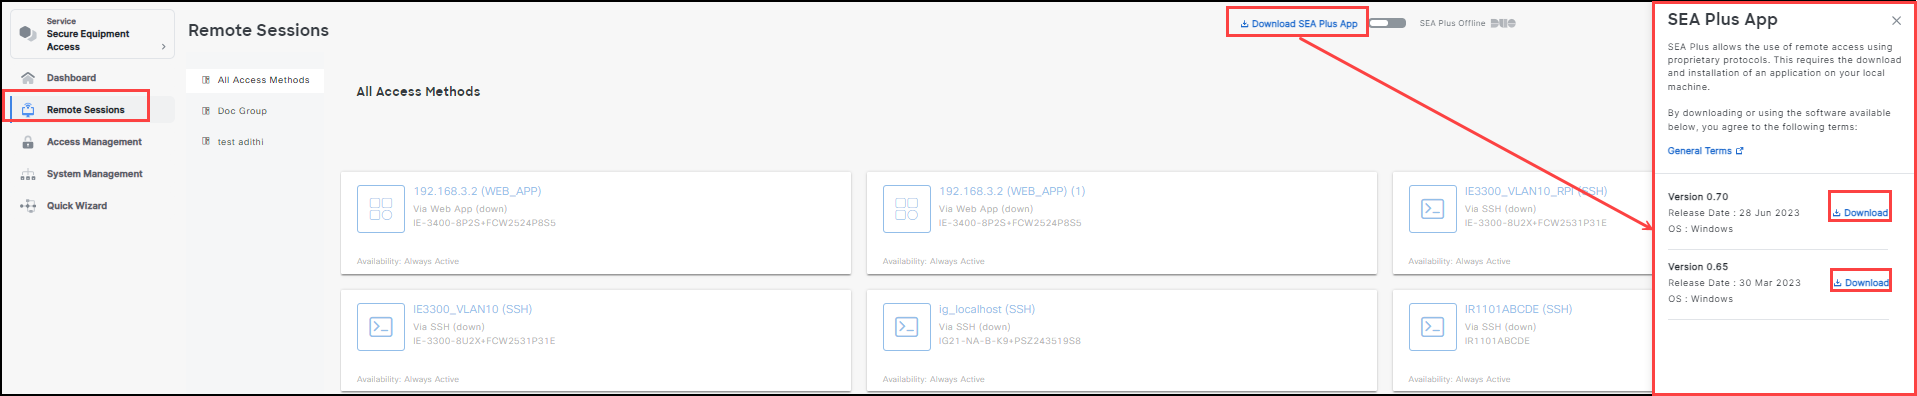
- The SEA Plus App Wizard opens. Follow each step to load the app to your computer.
Note: If a specific version is not listed or recommended, then download the latest version that is listed.
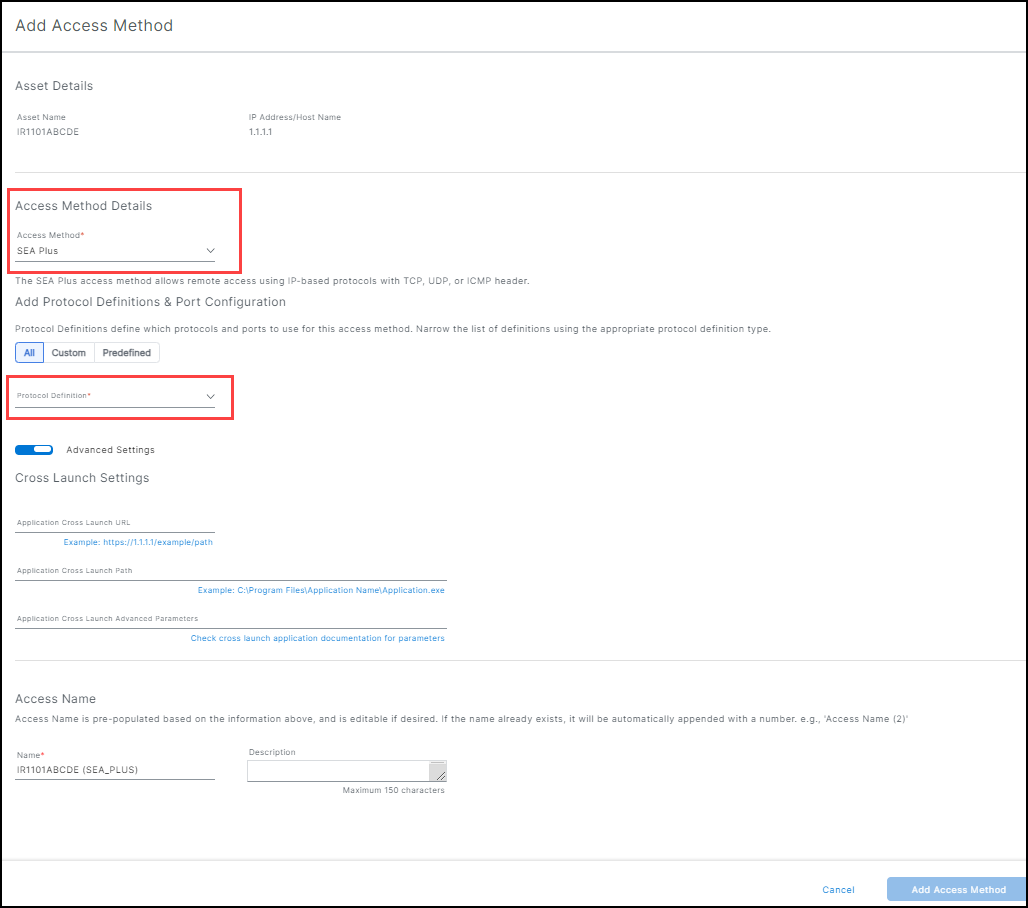
Configure the SEA Plus Access Method
Note: To use the SEA Plus access method, ensure the asset was added using its IP address (not its hostname).
- Choose Secure Equipment Access > System Management > Network Devices tab.
- Choose a Network Device to open the Network Device Details screen.
- From the Network Device Details screen, click on an Asset. The Asset Details page opens with the list of associated access methods.
For detailed information on adding assets, see Add network devices and assets to a group.
- Click Add Access Method.
- Choose SEA Plus from the Access Method list.
- (Optional) Choose either All (default) or Custom filter to configuring the protocol definition.
Note: All legacy SEA Plus access methods are still available for use, but they cannot be modified. (They are read-only.)
- Choose the appropriate Protocol Definition and Port Configuration from the drop-down list. For information on creating Protocol Definitions, see the SEA Plus Protocol Definitions.
Note: ou can refine your Protocol Definition list by select either: All, Custom, or Predefined.
- (Optional) Advanced Settings-Cross Launch Settings
- Application Cross Launch URL: (Optional) Use this field to launch a Web-based application to interact with assets behind the network device. The system automatically opens your local browser and launches the Web application.
- Application Cross Launch Path: (Optional) Enter the path on your local system to launch an application to interact with an established assets. (See adding an asset.)
- Application Cross Launch Parameters: (Optional) Additional parameters to provide to the application launched via the cross launch path, for example: password, port, local directory, to be sent to the application launched through the cross launch path.
Access Name: Access Name is pre-populated based on the information above and is editable if desired. If the name already exists, it will be automatically appended with a number. For example, Access Name (2).
Name: The pre-populated or customized name.
(Optional) Description: Max character limit is 150.
When the access method is complete, click Add Access Method.
Choose Access Management from the left pane to give users access to the remote sessions where the appropriate access method(s) reside. See Create groups for remote sessions.