Getting Started
Alert: Cisco has made the end-of-life (EOL) announcement for the Cisco Industrial Asset Vision (IAV).
Note: NB refers to Northbound.
Server Name/URL/Cluster name must be known.
The main API path — …/at/nbapi/v1.
- Example:
- URL: https://us.ciscoiot.com/ for the US cluster and https://eu.ciscoiot.com for the EU cluster.
- Full PATH/URL : https://us.ciscoiot.com/at/nbapi/v1 for the US cluster and https://eu.ciscoiot.com/at/nbapi/v1 for the EU cluster.
- Example:
Choose an individual API path. For example; asset types, assets, sensors, etc.
Generate an access token to authenticate. For the procedure to generate an access token, refer here.
- This gives the access_token. You have to use this token for further API calls.
Note: The access_token is valid for 300 seconds (5 minutes) and needs to be refreshed.
- Getting the x-tenant-id using the Developer tools of any Browser:
Note: This procedure varies slightly based on the browser and in a future release of IoT OD, APIs will be exposed to retrieve this information.
In the Firefox browser, go to Web Developer Tools and click the Network Tab.
Login using your user name and password.
Note: You have to have the Tenant Admin permissions.
After logging in, the following API call is made with the relative path /iam/users/me. This can be viewed by filtering the XHR API calls. For example, an API call as https://us.ciscoiot.com/iam/users/me gives the response in the following format:
{
      "roles": [
           {
             "tenant_name": "ATRNEU1 LIVE TENANT",
             "tenant_id": "4ec4e912-a53e-471e-a617-62f47d7e80f6",
             "role_name": "tenant-admin",
             "role_id": "8cc52173-9fc1-43a7-8535-b0cd0a560880"
                },
          {
             "tenant_name": "DemoTenant5",
             "tenant_id": "4213b2bc-e1ab-4225-acc6-2f64c98d621b",
             "role_name": "tenant-admin",
             "role_id": "8cc52173-9fc1-43a7-8535-b0cd0a560880"
           }
           ]
}
The above API response returns more than one role as per your user access. Each array item has a tenant name and a tenant id, and a role name and a role id. If you have access to only one tenant, then this API response will return the result that has only one item.
You need to pick the tenant id of the respective tenant and use it as the x-tenant-id in the HTTP header for the API requests.
- This gives the access_token. You have to use this token for further API calls.
x-tenant-id is mandatory to use for each API call. After getting the access Token and the x-tenant-id, provide them in headers as shown below:
x-tenant-id   {{x-tenant-id}}
  Authorization Bearer {{access_token}}
Authentication & Authorization
- A CCI authenticated user cannot be used for token generation. To use APIs, an API user needs to be created
- API authentication is done via the access token that is generated by making a call to the nbapi/iam/auth/token API
- Authorization is based on the user's role
Creating a User for API usage
SSO authenticated user credentials cannot be used to generate authentication token for API invocation. An API user has to be explicitly created for IAV NB API invocation. If an API user has not yet been created, create one. The steps for creating an API user are as follows:
- Create an API key with tenant admin role
- Generate an access token with the above API key (Provide this value as a header in Step 4 and Step 5)
- Fetch the value for x-tenant-id header that needs to be used for API invocation (Provide this value as a header in step 4 and 5)
- Get the list of roles in the organization
- Create the API user by providing the necessary inputs such as email ID and roles
Each of the above steps are detailed below.
Steps for Create an API Key
Create an API Key with tenant admin role. When generating an API Key, select the role as Tenant Admin and choose the required Expiration period/duration.
- Log in to IoT Operations Dashboard and click the "people icon" on the far right of the header. Click Access Control.
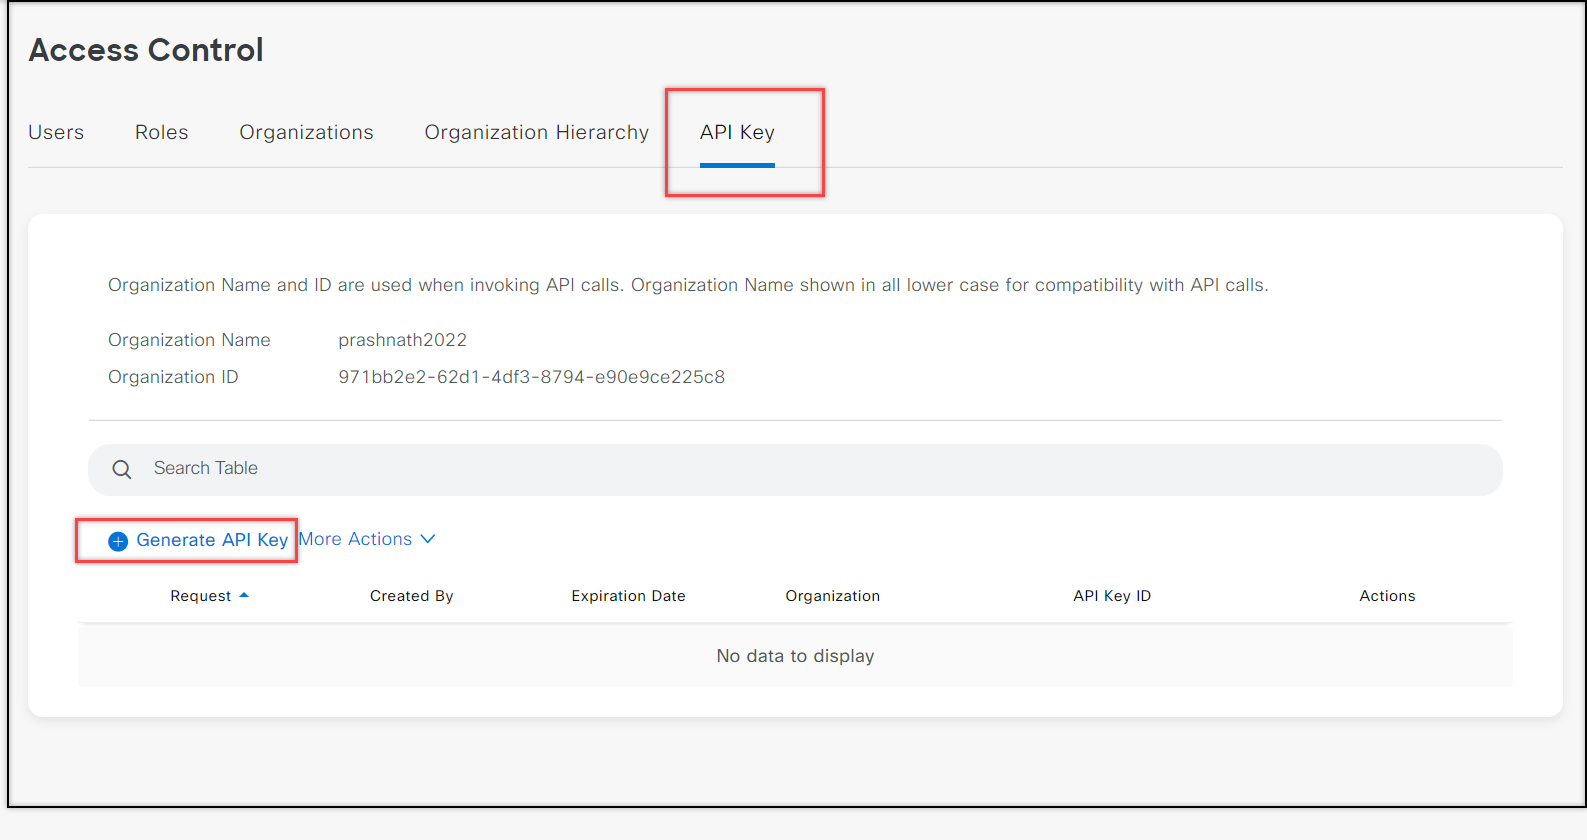
- Click the API Key tab. Click Generate API Key.
Enter the API key Name, select Role as Tenant Admin and Expiration time/duration. Click Generate.
Copy the API Key Secret.
Important: Do not navigate away from this screen before copying the API key; you cannot view it again.

Generate Access Token using the API Key
Generate an Auth Token for using an API Key that was generated in the above step.
Send a POST request to the following URL.
End Point:
POST {{Cluster URL}}/nbapi/iam/v1/auth/token
For Example:
POST https://us.ciscoiot.com/nbapi/iam/v1/auth/token
Use the following json content in the request body to get the access_token.
JSON Body in the Request Format:
{
    "client_id": "{insert organization name}->{insert API key name}",
    "client_secret": "{insert API key secret}",
    "grant_type": "client_credentials"
}
Notes:
- You must enter the organization name and the API key name in the client_id field in lower case only.
- You must retain the existing spaces.
- You can also find this value under the API Key ID column in the API Key page.
- client_id in upper case is not valid.
Example for JSON Request Body:
{
    "client_id": "cisco->my api key",
    "client_secret": "!Fj?qAS$Rc-ct=W",
    "grant_type": "client_credentials"
}
Example Response:
{
    "access_token": "eyJhbGciOiJSUzI1NiIsInR5cCIgOiAiSldUIiwia2lkIiA6ICJaYXdEQnRBcjlEbF8zSGhLTy1vMUZQXzhzZE8yc01xZzYwUHdGdW9JSzlVIn0.eyJleHAiOjE2ODYxMjA0MjQsImlhdCI6MTY4NjEyMDEyNCwianRpIjoiNzc5ZjYyYjEtM2MxMi00ODc4LTgwNTItNTFlMmI4OWQwYjk2IiwiaXNzIjoiaHR0cHM6Ly9yYWluaWVyZGV2Mi5jaXNjb2lvdGRldi5pby9hdXRoL3JlYWxtcy9yYWluaWVyLWlhbSIsImF1ZCI6ImFjY291bnQiLCJzdWIiOiI3MGQ4ODc4Yy1lYWFkLTRhY2MtOGI3ZS0zMzRhMWM3ZDkwZDAiLCJ0eXAiOiJCZWFyZXIiLCJhenAiOiJiYXNlIHRlbmFudC0-bXkgYXBpIGtleSIsImFjciI6IjEiLCJhbGxvd2VkLW9yaWdpbnMiOlsiaHR0cHM6Ly9yYWluaWVyZGV2Mi5jaXNjb2lvdGRldi5pbyJdLCJyZWFsbV9hY2Nlc3MiOnsicm9sZXMiOlsiZGVmYXVsdC1yb2xlcy1yYWluaWVyLWlhbSIsIm9mZmxpbmVfYWNjZXNzIiwidW1hX2F1dGhvcml6YXRpb24iXX0sInJlc291cmNlX2FjY2VzcyI6eyJiYXNlIHRlbmFudC0-bXkgYXBpIGtleSI6eyJyb2xlcyI6WyJ1bWFfcHJvdGVjdGlvbiJdfSwiYWNjb3VudCI6eyJyb2xlcyI6WyJtYW5hZ2UtYWNjb3VudCIsIm1hbmFnZS1hY2NvdW50LWxpbmtzIiwidmlldy1wcm9maWxlIl19fSwic2NvcGUiOiJwcm9maWxlIGVtYWlsIiwiY2xpZW50SG9zdCI6IjEyNy4wLjAuNiIsImVtYWlsX3ZlcmlmaWVkIjpmYWxzZSwiY2xpZW50SWQiOiJiYXNlIHRlbmFudC0-bXkgYXBpIGtleSIsInByZWZlcnJlZF91c2VybmFtZSI6InNlcnZpY2UtYWNjb3VudC1iYXNlIHRlbmFudC0-bXkgYXBpIGtleSIsImNsaWVudEFkZHJlc3MiOiIxMjcuMC4wLjYifQ.FRgcuq-5qJPWTpvLqxh3m3ZhEDTEZ6asgn6DevaTd3telZiqswSdbEbhbBlYauysfRT_e-FxHJVAPVXpZuC0Bmca8vJhSssG-oAreIkm7wQ5KyoIwm-UDdgS82uOf5wzTzOxsRBXf2L9lmT3_dD-0yJef7ET1Twx3IWO3rqSDw4cnadouAyUVDH_vTdFza47v-rCyolV0qI1Ki_5CUPIi6FeJIxcHwdMh7hF6_ZAQ1HFS8v012aGa54NgqRGj9slXFlHLaUzM3N_KOMNdKCbVMUYiklYuPhWeqc5dh0R21lIX2zbplltvUFUG_Lcz-pv9EAhiLzE74ucwWSxAR2xvQ",
    "token_type": "Bearer",
    "expires_in": 300,
    "refresh_expires_in": 0
}
This gives the access_token. You must use this token for further API calls.
Note: access_token is valid for 300 seconds (5 minutes). Use it or generate a new token after 5 minutes.
Fetch x-tenant-id
Log in to IoT Operations Dashboard and click the "people icon" on the far right of the header. Click Access Control.
Click the API Key tab. Copy the "Organization ID" from the UI and use it as the "x-tenant-id" in the http header for the API requests.
This x-tenant-id is mandatory for each API call. Use it for each API call.
After getting the access_token and the x-tenant-id, provide them in the header as key value pairs shown below:
key:x-tenant-id, value:{{x-tenant-id}}
key:Authorization, value:Bearer {{access_token}}
Example:
x-tenant-id 71724bda-56fg-8hnc-9065-98z255hgml4c
Authorization Bearer eyJhbGciOiJSUzI1NiIsInR5cCIgOiAiSldUIiwia2lkIiA6ICJaYXdEQnRBcjlEbF8zSGhLTy1vMUZQXzhzZE8yc01xZzYwUHdGdW9JSzlVIn0.eyJleHAiOjE2NzkyOTY0MjIsImlhdCI6MTY3OTI5NjEyMiwianRpIjoiMzY5NmEwYmItM2Y0Mi00YmMwLWFlMTgtNzg0MzNlY2Y2OGM0IiwiaXNzIjoiaHR0cHM6Ly9yYWluaWVyZGV2Mi5jaXNjb2lvdGRldi5pby9hdXRoL3JlYWxtcy9yYWluaWVyLWlhbSIsImF1ZCI6WyJsb2dpbi1hcHAiLCJhY2NvdW50Il0sInN1YiI6IjJiMWE2OGEwLTViMzgtNDA2Yi1hYWViLWUwNjA5ODU4N2EzNSIsInR5cCI6IkJlYXJlciIsImF6cCI6ImxvZ2luLWFwcCIsInNlc3Npb25fc3RhdGUiOiJiYzQyNDFkNi01NGFmLTQwYTEtODg0Yi1mNWMwZjc1MTJhMjciLCJhbGxvd2VkLW9yaWdpbnMiOlsiKiJdLCJyZWFsbV9hY2Nlc3MiOnsicm9sZXMiOlsiZGVmYXVsdC1yb2xlcy1yYWluaWVyLWlhbSIsIm9mZmxpbmVfYWNjZXNzIiwidW1hX2F1dGhvcml6YXRpb24iXX0sInJlc291cmNlX2FjY2VzcyI6eyJhY2NvdW50Ijp7InJvbGVzIjpbIm1hbmFnZS1hY2NvdW50IiwibWFuYWdlLWFjY291bnQtbGlua3MiLCJ2aWV3LXByb2ZpbGUiXX19LCJzY29wZSI6InByb2ZpbGUgZW1haWwiLCJzaWQiOiJiYzQyNDFkNi01NGFmLTQwYTEtODg0Yi1mNWMwZjc1MTJhMjciLCJlbWFpbF92ZXJpZmllZCI6ZmFsc2UsIm5hbWUiOiJJT1ROTVMgQWRtaW4iLCJwcmVmZXJyZWRfdXNlcm5hbWUiOiJpb3RubXMtYWRtaW5AY2lzY28uY29tIiwiZ2l2ZW5fbmFtZSI6IklPVE5NUyIsImZhbWlseV9uYW1lIjoiQWRtaW4iLCJlbWFpbCI6ImlvdG5tcy1hZG1pbkBjaXNjby5jb20ifQ.AGy_xex6JnGnwbhg8QdZotdNekznqpeJqoi907jHRoeZE5oO7XYRIcykoRrq7c_NKdzYuXCbPEzYwgAaTEzuOBLuO4l0IR2ZVf3WCPat_NHUEiq37tSEHo980bfA1ZB-D6Qihuisd90phbDWXk98KF3bEzWfqffdgzvD_n3CtS9AvvbtjXHhfD2f7Fuo9bOQfsXUou6smCvfTrQ0Wn-x0f6IbUy5hIBGKKrM5uqdNJ7_F-ZlqYeVcYhlcKSEJ50A3jvMFT-TBhp7rC5Y17DsJP-mYx8lmnP9-TM_YkeeUYurDls9jYlVm-wJs2tXmfPG7sU8aFSQ5Fnmzd2peLLg
Fetch the list of Role Ids
End point:
GET {{Cluster URL}}/nbapi/iam/v1/roles
access_token and the x-tenant-id should be provided in the header as key value pairs shown below (refer to earlier sections above to fetch the values for these two headers):
key:x-tenant-id, value:{{x-tenant-id}}
key:Authorization, value:Bearer {{access_token}}
For Example:
GET https://us.ciscoiot.com/nbapi/iam/v1/roles
Example JSON Response
{
"count": 3,
"roles": [
   {
      "id": "8cc52173-9fc1-43a7-8535-b0cd0a560880",
      "name": "tenant-admin"
   },
   {
     "id": "5645b810-69be-4efa-becf-7d4d5cbb0d35",
     "name": "Device Operator"
   },
   {
     "id": "04e1cba9-7c41-4b71-a693-225f306b8440",
     "name": "IT Admin"
   }
}
Choose the roles that should be provided to the API user.
Create the API user
End Point
POST {{SERVER_URL}}/nbapi/iam/v1/users/apiuser
access_token and the x-tenant-id should be provided in the header as key value pairs shown below (refer to earlier sections above to fetch the values for these two headers):
key:x-tenant-id, value:{{x-tenant-id}}
key:Authorization, value:Bearer {{access_token}}
For Example
POST https://us.ciscoiot.com/nbapi/iam/v1/users/apiuser
JSON Request Body Format:
{
    "email": "email id of the API user"
    "roles": "[ "role-id 1", "role-id 2" ... ]",
}
Example for JSON Request Body
{
"email": "johnsmith@cisco.com",
"roles": ["d5bb174e-75b6-4397-9c55-1a6ef82c02f5"]
}
Example Response
{
"user_uuid": "ff3509b6-ed0b-40d6-99d9-b3f3d0d10c2f"
}
Initialize the API user Once API user is created, a mail will be sent to the user to initialize the account including setting the password. Follow the procedure as instructed in the email notification.
Access Token Generation
Once the API user is initialized, access token to call an API can be generated using the user credentials of the user.
Send a POST request to the following.
POST {{SERVER_URL}}/nbapi/iam/v1/auth/token
For Example:
POST https://us.ciscoiot.com/nbapi/iam/v1/auth/token
The following JSON content should be provided as part of the post request to get the access_token that can be used to invoke IAV NB APIs.
Access token generation json
{
    "username": "{insert the username here}",
    "password": "{insert the password here}"
}
Example JSON:
{
     "username": "apiuser@acme.com",
     "password": "WileyCoyote21"
}
Example for Access token response (Token content reduced for brevity)
{
   "access_token": "eyJhbGciOiJSUzI1NiIsInR5cCIgOiAiSldUIiwia2lkIiA6ICJoTVNCWEpVU3BvYTF6VUxCTGNLVFZNeGFnVzkxM....Q9PA",
    "refresh_token": "eyJhbGciOiJIUzI1NiIsInR5cCIgOiAiSldUIiwia2lkIiA6ICIyN2I2NTE3MC0xMGY0LTRiY2UtYjliMy02ZjBhM...GpADE",
    "token_type": "bearer",
    "expires_in": 300,
    "refresh_expires_in": 1800
}
API Versioning
- IAV Northbound APIs will support versioning of APIs using URI path based versioning
- IAV Northbound APIs will have the URI path "at/nbapi/v1"
- API version is changed only for Breaking/Backward incompatible changes
- API version will not be changed when backward compatible changes are made
Possible Backward Compatible Changes
- Adding new attributes in JSON output of existing APIs
- Adding support for new query parameters
- Adding new endpoints
Note: Backward compatible changes may be done in a future release and you have to implement their integrations in such a way that their integration will not break by the addition of new fields/params/APIs.
Filtering, Sorting, and Pagination for List/Get APIs
Filtering
The filter query parameter is supported by all List/Get APIs for Filtering.
The following Filter field names can be given for each API:
For example:
- filter=Name=ilike="Temperature Sensor 1"
- filter=ManufacturerName=="Honeywell"
- filter=Model!="AV300"
ASSET_TYPE:
- Name
- CreatedBy
- ModifiedBy
ASSET:
- Name
- Type
- Model
- ModifiedBy
GATEWAYS:
- Name
- Type
- SerialNumber
- Model
- GatewayId
- ModifiedBy
- CreatedBy
- Status
enum-values:
- Inventory
- Unheard
- Heard
- Online
- Offline
LORATP:
- Name
- ManufacturerName
SENSORS:
- Name
- Type
- Vendor
- Model
- DisplayModel
- DevEUI
- ModifiedBy
- CreatedBy
- Asset
- AssetName
- Status
enum-values:
- Inventory
- Unheard
- Heard
- Healthy
- Unhealthy
- Offline
Sorting
orderBy query parameter is supported by all List/Get APIs for Sorting.
orderBy specifies the column/attribute name followed by "asc" or "desc" to specify the sort order.
For example:
- orderBy=lastSeenAt
- orderBy=createdTime desc
orderBy is an optional parameter and when not passed, createdTime desc is used as default sorting. The Filter field names can be given in orderBy query param. Refer to Filtering.
Pagination
page and size query parameters are supported by all List/Get APIs for Pagination.
- page — this specifies the page number
- size — this specifies the page size page and size are optional parameters and default values for page, and size are 0 and 10.
Note: Max page size supported and defined in API Spec is 500 for all List/Get APIs.
All List/Get APIs provides pageinfo JSON object as part of the response with the following data:
- totalCount — total number of elements found for the given query/filtering criteria
- page — current page number
- size — page size
- count — number of elements in current page
Northbound APIs
IAV Northbound APIs have the URI path {{SERVER_URL}}/at/nbapi/v1 The following Northbound APIs are supported by IAV:
- AssetType Management APIs
- Asset Management APIs
- Gateway Management APIs
- Lora ThirdParty Sensor Management APIs
- Sensor Management APIs
Additional APIs will be added in a phased manner.
AssetType Management APIs
- Get Asset Types
- Get Asset Type By Id
- Add Asset Type
- Update Asset Type
- Delete Asset Type
Asset Management APIs
- Get Assets
- Get Asset By Id
- Add Asset
- Update Asset
- Delete Asset
- Get Sensors of an Asset
- Assign Sensors to an Asset
- Unassign Sensors from an Asset
- Get Image of an Asset
- Get Thumbnail Image of an Asset
- Update/Upload Image of an Asset
- Delete Image of an Asset
Gateway Management APIs
- Get Gateways
- Add Gateway
- Get Gateway by Id
- Update Gateway
- Delete Gateway
- Get Gateway by Serial Number
- Get Gateway Rx/Tx Histogram
Lora ThirdParty Sensor Management APIs
- Get Lora ThirdParty Sensor Models
- Add Lora ThirdParty Sensor
Sensor Management APIs
- Get Sensors
- Get Sensor By Id
- Get Tabular Telemetry Data for a Sensor — This has a max limit of 2000 records
- Update Sensor
- Delete Sensor
- Get Sensor By DevEUI
- Claim Sensor By DevEUI
- Onboard Sensor
- Get Location Data for a Sensor
- Get Telemetry Data for a Sensor — This has a max limit of 2000 records
- Send downlink By DevEUI
Caveats
Following caveats/limitations apply for usage of the NB APIs. These will be removed in future releases.
- For maximum functional reach of API integrations, it is recommended to setup a separate user account designated for API usage assigned with Tenant admin role.
- If a new API user is added with tenant admin role, one of the below steps must be performed to ensure that user has proper access control group assigned in IAV.
- Login to IAV Web application as that user - this will initiate a sync for that specific user internally and will associate Full Admin ACG to the user.
- Some other tenant admin can login to IAV Web application and go to the users tab - this will cause sync for all users and all tenant admin users will be assigned Full Admin ACG.
- In case intention is to use some other role (other than an existing Admin role), then,
- When a new user account is created for API access, Tenant admin has to ensure that he or she has to login to IAV Web Application and assign appropriate access control groups (ACG) for the user.
Additional notes:
- API keys cannot be used for accessing the NB APIs. API keys are not associated to any users whereas to access sensor/asset/gateway data within IAV, we would need to know the user who is invoking the API so that we can filter and provide a response based on the access control groups assigned to the user in IAV.
- In case Single-Sign On (SSO) is setup for an organization, then, User account that is used for invoking APIs should be set up so they are excluded from SSO authentication.
Generating Client Bindings
Installing openapi-generator
Instructions for installing openapi-generator can be found at OpenAPI Generator CLI Installation.
For MacOS, run the following command to install: openapi-generator installation
brew install openapi-generator (MAC)
Java
Run the following command to generate Java Open API Client bindings: open api client generator java
openapi-generator generate -i IAVNBApiSpec_v1.yaml -o ./IAV-NBAPI-Client-Bindings/iav-nbapi-java-client/ -g java -p java8=true --library jersey2
Python
Run the following command to generate Python Open API Client bindings: open api client generator python
openapi-generator generate -i IAVNBApiSpec_v1.yaml -o ./IAV-NBAPI-Client-Bindings/iav-nbapi-python-client/ -g python
Example Program
Java
IAV NBAPI client example java program
package org.openapitools.client;

import org.openapitools.client.api.AssetsApi;
import org.openapitools.client.auth.ApiKeyAuth;
import org.openapitools.client.model.AssetListResponse;

import javax.ws.rs.client.ClientBuilder;
import javax.ws.rs.client.Entity;
import javax.ws.rs.core.MediaType;
import java.util.HashMap;

public class IAVNBApiTest {

    public static void main(String[] args) {

        ApiClient defaultClient = Configuration.getDefaultApiClient();
        //Cluster URL
        defaultClient.setBasePath("https://us.ciscoiot.com/at/nbapi/v1");

        //Header to be set for the NB API
        defaultClient.addDefaultHeader("x-tenant-id", "60d96cd9-4ee2-409a-bbe0-a774b3b35b01");

        /**
         * Below POST API call is made to get the access token
         */
        String iavServerUrl = "https://us.ciscoiot.com";
        String iam_AuthTokenPath = "/nbapi/iam/v1/auth/token";
        String username = "apiuser@acme.com";
        String password = "WileyCoyote21";

        /**
         * Post the below payload to get the auth token for NB Apis
         */
        String authPayload = "{\n" +
                "    \"username\": \""+ username+ "\",\n" +
                "    \"password\": \""+ password+ "\"\n" +
                "}";

       HashMap<String,String> response = ClientBuilder.newBuilder().build().
               target(iavServerUrl+ iam_AuthTokenPath).request(MediaType.APPLICATION_JSON)
                .post(Entity.entity(authPayload, MediaType.APPLICATION_JSON)
                        , HashMap.class);

        String accessToken = response.get("access_token");
        System.out.println(response);

        // BearerToken to be set with access token retrieved in the previous api call
        ApiKeyAuth BearerToken = (ApiKeyAuth) defaultClient.getAuthentication("BearerToken");
        BearerToken.setApiKey(accessToken);
        BearerToken.setApiKeyPrefix("Bearer");

        /**
         * Get all the Assets
         */
        AssetsApi apiInstance = new AssetsApi(defaultClient);
        try {
            AssetListResponse result = apiInstance.getAssets(null, null, null, null);
            System.out.println(result);
        } catch (ApiException e) {
            System.err.println("Exception when calling AssetsApi#getAssets");
            System.err.println("Status code: " + e.getCode());
            System.err.println("Reason: " + e.getResponseBody());
            System.err.println("Response headers: " + e.getResponseHeaders());
            e.printStackTrace();
        }
    }
}
Python
IAV NBAPI example python program
import time
import openapi_client
import requests

from pprint import pprint
from openapi_client.api import assets_api
from openapi_client.model.asset_list_response import AssetListResponse
from openapi_client.model.error import Error


iam_url = "https://us.ciscoiot.com"
iam_auth_token_path = "/nbapi/iam/v1/auth/token"


username = "apiuser@acme.com"
password = "WileyCoyote21"


auth_json = "{{ \"username\" : \"{}\", \"password\" : \"{}\" }}".format(username, password)
headers = {'Content-Type' : 'application/json'}

response = requests.post(url = iam_url + iam_auth_token_path, data = auth_json, headers = headers)

response_json = response.json()

access_token = response_json['access_token']
refresh_token = response_json['refresh_token']
expires_in = response_json['expires_in']


iav_url = "https://us.ciscoiot.com/at/nbapi/v1"

x_tenant_id = "93c2f610-90bc-4c56-9386-8c06719c8692"

# Defining the host is optional and defaults to http://us.ciscoiot.com/iav/api/v1
# See configuration.py for a list of all supported configuration parameters.
configuration = openapi_client.Configuration(
    host = iav_url
)

# The client must configure the authentication and authorization parameters
# in accordance with the API server security policy.
# Examples for each auth method are provided below, use the example that
# satisfies your auth use case.

# Configure API token authorization: BearerToken
configuration.api_key['BearerToken'] = access_token
configuration.api_key_prefix['BearerToken'] = 'Bearer'


# Enter a context with an instance of the API client
with openapi_client.ApiClient(configuration, 'x-tenant-id', x_tenant_id) as api_client:
    # Create an instance of the API class
    #api_instance = asset_types_api.AssetTypesApi(api_client)
    api_instance = assets_api.AssetsApi(api_client)

    try:
        # Get assets
        api_response = api_instance.get_assets()
        pprint(api_response)
    except openapi_client.ApiException as e:
        print("Exception when calling AssetsApi->get_assets: %s\n" % e)