Getting Started
The Getting Started introduces standard Nexus Dashboard and services REST API operations. The section also explains how to access the in-product API reference and compose and test simple API calls.
The Nexus Dashboard REST API supports standard REST methods:
- POST - For resource creations and actions.
- PUT - For resource updates.
- DELETE - For resource deletions.
- GET - For reading resources.
- The REST interface requires JSON payloads. However, APIC API proxy operations accept either JSON or XML.
A typical REST API operation consists of three elements:
Request URL— The address of the resource to which you make the API call.Request message— The JSON-formatted payload that contains the new data you want to add or update. For a read-only GET operation, the request message is empty.Request response— The JSON-formatted response that contains the requested information.
Note: Beginning with Nexus Dashboard release 4.3.1, the system validates all requests against the API schema definition.
Accessing API Reference
The complete API reference is available directly in the product at:
```
https://<nd-node-ip>/help-center/swagger/
```
Base URI
Use the tables for the base URI associated with each API. To make an API request, combine the base URI with the specific endpoint path from the API reference documentation. For example, if the base URL is https://{nd-node-ip}/api/v1/manage and the endpoint is /fabrics, the full URL is https://{nd-node-ip}/api/v1/manage/fabrics.
General Availability APIs
| API Name | Base URI |
|---|---|
| Infra | https://{nd-node-ip}/api/v1/infra |
| Manage | https://{nd-node-ip}/api/v1/manage |
| One Manage | https://{nd-node-ip}/api/v1/oneManage |
| Analyze | https://{nd-node-ip}/api/v1/analyze |
| Orchestration | https://{nd-node-ip}/mso/api/ |
| Nexus Dashboard (Legacy) | https://{nd-node-ip}/ |
| NDFC LAN (Legacy) | https://{nd-node-ip}/appcenter/cisco/ndfc/api/v1/ |
| NDFC SAN (Legacy) | https://{nd-node-ip}/appcenter/cisco/ndfc/api/v1/ |
| Insights (Legacy) | https://{nd-node-ip}/ |
Note: Replace
{nd-node-ip}with your Nexus Dashboard domain or IP address.
Example
The full URI includes the base URI plus the endpoint that is listed in the API reference:
```
https://<nd-node-ip>/api/v1/manage/fabrics
```
Using Nexus Dashboard to Test API
You can test all available API calls on a live Nexus Dashboard cluster directly from the API reference documentation page.
Log in to your Nexus Dashboard cluster.
From the top menu bar, select Help > Help Center.
On the Nexus Dashboard Help Center page, click API Reference: Swagger (in-product).
In the API DOCS page, use the Try It functionality to test the call.
The example shows how to retrieve the roles that are assigned to your account:
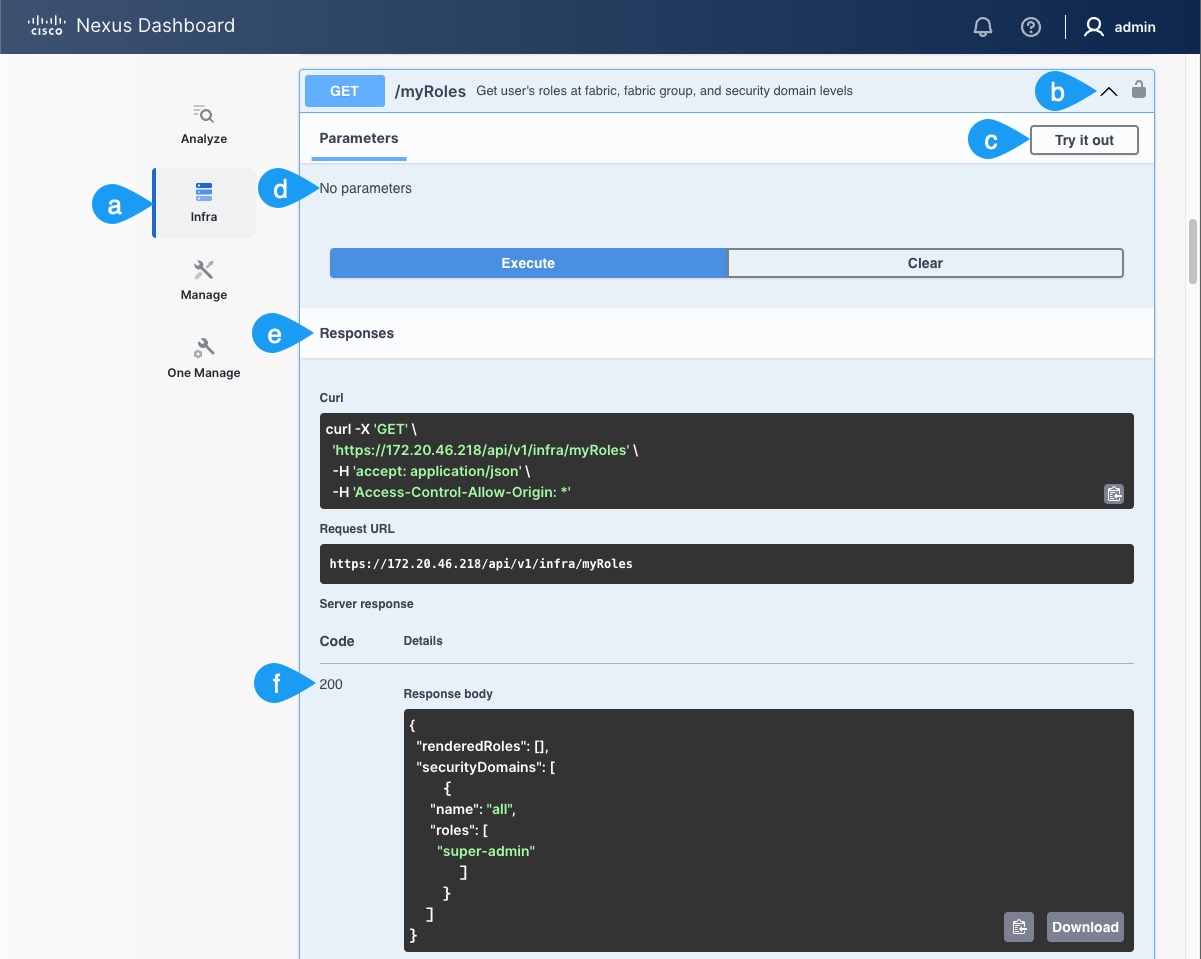
a) In the left navigation pane, select an API category to filter and view the related API list.
For example,
Infra.b) Scroll down and click the specific API you want to test.
c) Click Try it out.
d) Enter the payload parameters in the Parameters section and click Execute.
e) The Responses area is populated with the response code and payload.
f) A 200 (OK) response code indicates a successful request. The system displays the response payload.
Note: In the example, the call has no specific parameters.
Note: The
200success code and response JSON show the roles that are assigned to your account.
You can also use the API DOCS page to view examples of the Request and Response payloads for all available API calls.
Using Postman to Test API
Postman is an API platform for building and using APIs. You can use Postman to quickly test API calls before you implement them in complex applications.
Installing Postman
The Getting Started guide does not include complete Postman installation and configuration instructions. Complete the following steps to configure Postman for basic Nexus Dashboard API testing.
Download and install Postman.
You can download the installation package from https://www.postman.com.
Disable SSL verification in Postman.
- Start Postman.
- In the top right corner of the screen, click the tools icon and select Settings.
- In the General tab, disable the SSL certificate verification option.
Using Postman
The example shows how to test the login API using Postman.
Open Postman.
Create a new request.
a) Provide the request information. Select
POSTand provide the URL.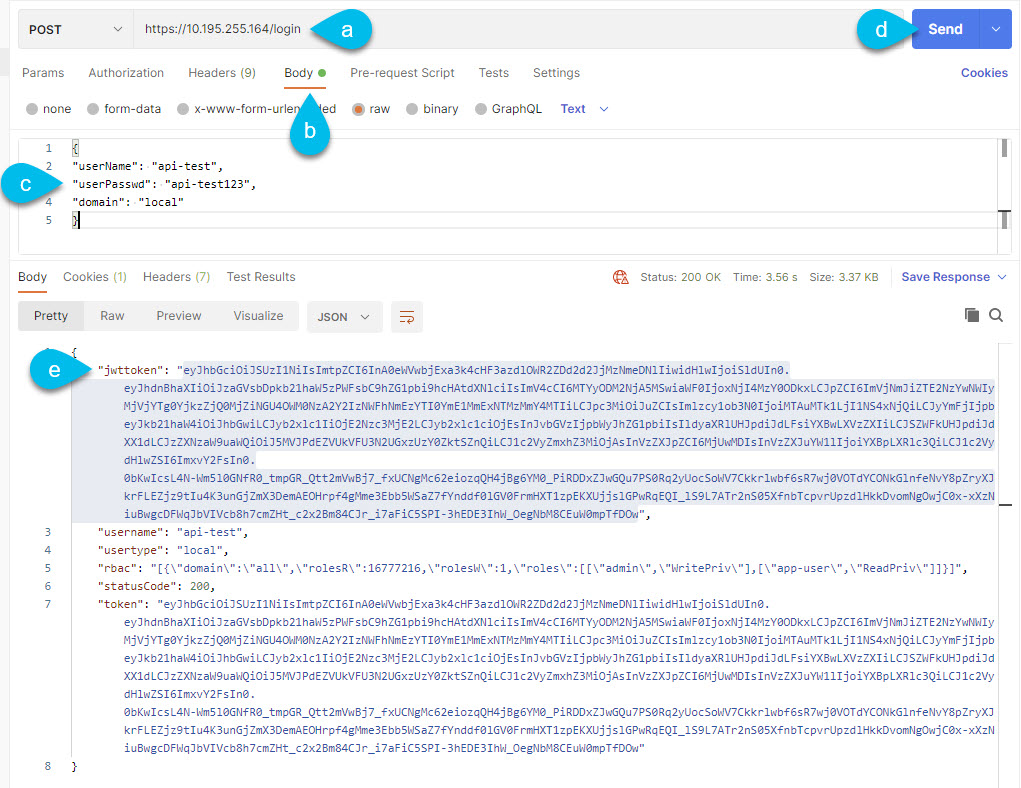
You can use the management IP address of any of the cluster’s nodes.
b) Select how you plan to provide the request payload.
Select Body and
rawto copy and modify an existing JSON payload example from the API reference.c) Copy the JSON payload for logging in from the example in the API reference and modify it for your environment.
You can get sample
RequestandResponsepayloads from the complete API reference, as described in Using Nexus Dashboard To Test API.For the example, change the
userNameanduserPasswdvalues.d) Click Send to send the request to your Nexus Dashboard.
e) In the response payload, copy the
jwttokenvalue for authentication in subsequent API calls.
Using cURL to Test API
You can also use cURL to execute API calls.
Log in using a cURL command to retrieve the authentication token:
curl -k --request POST 'https://<nd-node-ip>/api/v1/infra/login' \ --data-raw '{"userName": "admin","userPasswd":"Cisco123!","domain":"DefaultAuth"}'Note: If you are running cURL from Windows, escape the quotes, for example:
> curl -k --request POST "https://<nd-node-ip>/api/v1/infra/login" --data-raw "{\"userName\":\"admin\",\"userPasswd\":\"Cisco123!\",\"domain\":\"DefaultAuth\"}"Sample response payload containing the token (
jwttoken):{ "jwttoken": "eyJhbGciOiJSUzI1NiIsImtpZCI6InliZTVvZjMzODFqcXphczZsZnZ5Y3c0MmlsOXZ3Ym9hIiwidHlwIjoiSldUIn0.eyJhdnBhaXIiOiJzaGVsbDpkb21haW5zPWFsbC9hZG1pbi8iLCJjbHVzdGVyIjoiNjQ2NTc2NjMtNmM3NS03Mzc0LTY1NzItMzEyZDMzMzIyZDMzIiwiZXhwIjoxNjQ0MzQzMjkzLCJpYXQiOjE2NDQzNDIwOTMsImlkIjoiNDhkMTA1YmRmYmM0OWE1ZmNmMzlhMTBiOTYxMzg2ZTYxZGZlNDAwODVjYjAzMTVkODE4Yjc2MWM1NzM1ZGFmYSIsImlzcyI6Im5kIiwiaXNzLWhvc3QiOiIxMC4zMC4xMS4zMiIsInJiYWMiOlt7ImRvbWFpbiI6ImFsbCIsInJvbGVzUiI6MTY3NzcyMTYsInJvbGVzVyI6MSwicm9sZXMiOltbImFkbWluIiwiV3JpdGVQcml2Il0sWyJhcHAtdXNlciIsIlJlYWRQcml2Il1dfV0sInNlc3Npb25pZCI6IkxIbUVVWW0zUjI3ZFNtVGRKOTdIN0lZQiIsInVzZXJmbGFncyI6MCwidXNlcmlkIjoyNTAwMiwidXNlcm5hbWUiOiJhZG1pbiIsInVzZXJ0eXBlIjoibG9jYWwifQ.JBC2b_tbE-ULqv7oQBY9I7tMI47IYDHr0loVtCD3Kd3V2TX6TGSI0W7UHtB27NxuKgVuUDa3s9CHpBlMuLe9u-RU8z6mmJAPofGmRcy33-kDq7DnFEQjcq2m41V3CPmYSYP7BrcGWi2evImGrSErkZAFWsIIcfqLJ20x8emczFFRr_Pvep0jkLtQCE6nrX1954EUvZl4Mu0WD_uQ25OdgdpRzsc1jnf2E4oWcrqoKiIah4Ai4wuVPi-NXhU5Fj8WpeX4MTjlXnQB3WKE5-3e-MyVQU_TgIAzqMs6h_dlJ9jyrhBDunXgigG1ztUY98dM39qQ6CImZVel9M3-sUrzSg", "username": "admin", "usertype": "local", "rbac": "[{\"domain\":\"all\",\"rolesR\":16777216,\"rolesW\":1,\"roles\":[[\"admin\",\"WritePriv\"],[\"app-user\",\"ReadPriv\"]]}]", "statusCode": 200, "token": "eyJhbGciOiJSUzI1NiIsImtpZCI6InliZTVvZjMzODFqcXphczZsZnZ5Y3c0MmlsOXZ3Ym9hIiwidHlwIjoiSldUIn0.eyJhdnBhaXIiOiJzaGVsbDpkb21haW5zPWFsbC9hZG1pbi8iLCJjbHVzdGVyIjoiNjQ2NTc2NjMtNmM3NS03Mzc0LTY1NzItMzEyZDMzMzIyZDMzIiwiZXhwIjoxNjQ0MzQzMjkzLCJpYXQiOjE2NDQzNDIwOTMsImlkIjoiNDhkMTA1YmRmYmM0OWE1ZmNmMzlhMTBiOTYxMzg2ZTYxZGZlNDAwODVjYjAzMTVkODE4Yjc2MWM1NzM1ZGFmYSIsImlzcyI6Im5kIiwiaXNzLWhvc3QiOiIxMC4zMC4xMS4zMiIsInJiYWMiOlt7ImRvbWFpbiI6ImFsbCIsInJvbGVzUiI6MTY3NzcyMTYsInJvbGVzVyI6MSwicm9sZXMiOltbImFkbWluIiwiV3JpdGVQcml2Il0sWyJhcHAtdXNlciIsIlJlYWRQcml2Il1dfV0sInNlc3Npb25pZCI6IkxIbUVVWW0zUjI3ZFNtVGRKOTdIN0lZQiIsInVzZXJmbGFncyI6MCwidXNlcmlkIjoyNTAwMiwidXNlcm5hbWUiOiJhZG1pbiIsInVzZXJ0eXBlIjoibG9jYWwifQ.JBC2b_tbE-ULqv7oQBY9I7tMI47IYDHr0loVtCD3Kd3V2TX6TGSI0W7UHtB27NxuKgVuUDa3s9CHpBlMuLe9u-RU8z6mmJAPofGmRcy33-kDq7DnFEQjcq2m41V3CPmYSYP7BrcGWi2evImGrSErkZAFWsIIcfqLJ20x8emczFFRr_Pvep0jkLtQCE6nrX1954EUvZl4Mu0WD_uQ25OdgdpRzsc1jnf2E4oWcrqoKiIah4Ai4wuVPi-NXhU5Fj8WpeX4MTjlXnQB3WKE5-3e-MyVQU_TgIAzqMs6h_dlJ9jyrhBDunXgigG1ztUY98dM39qQ6CImZVel9M3-sUrzSg" }Extract the authentication token from the response payload.
The standard login response payload contains the authentication token, account login information, and role-based access control (RBAC) privileges.
Use only the authentication token for subsequent calls.
Optionally, you can extract the token into a shell variable to simplify future calls, for example:
export AUTH_TOKEN=eyJhbGciOiJSUzI1NiIsImtpZCI6InliZTVvZjMzODFqcXphczZsZnZ5Y3c0MmlsOXZ3Ym9hIiwidHlwIjoiSldUIn0.eyJhdnBhaXIiOiJzaGVsbDpkb21haW5zPWFsbC9hZG1pbi8iLCJjbHVzdGVyIjoiNjQ2NTc2NjMtNmM3NS03Mzc0LTY1NzItMzEyZDMzMzIyZDMzIiwiZXhwIjoxNjQ0MzQzMjkzLCJpYXQiOjE2NDQzNDIwOTMsImlkIjoiNDhkMTA1YmRmYmM0OWE1ZmNmMzlhMTBiOTYxMzg2ZTYxZGZlNDAwODVjYjAzMTVkODE4Yjc2MWM1NzM1ZGFmYSIsImlzcyI6Im5kIiwiaXNzLWhvc3QiOiIxMC4zMC4xMS4zMiIsInJiYWMiOlt7ImRvbWFpbiI6ImFsbCIsInJvbGVzUiI6MTY3NzcyMTYsInJvbGVzVyI6MSwicm9sZXMiOltbImFkbWluIiwiV3JpdGVQcml2Il0sWyJhcHAtdXNlciIsIlJlYWRQcml2Il1dfV0sInNlc3Npb25pZCI6IkxIbUVVWW0zUjI3ZFNtVGRKOTdIN0lZQiIsInVzZXJmbGFncyI6MCwidXNlcmlkIjoyNTAwMiwidXNlcm5hbWUiOiJhZG1pbiIsInVzZXJ0eXBlIjoibG9jYWwifQ.JBC2b_tbE-ULqv7oQBY9I7tMI47IYDHr0loVtCD3Kd3V2TX6TGSI0W7UHtB27NxuKgVuUDa3s9CHpBlMuLe9u-RU8z6mmJAPofGmRcy33-kDq7DnFEQjcq2m41V3CPmYSYP7BrcGWi2evImGrSErkZAFWsIIcfqLJ20x8emczFFRr_Pvep0jkLtQCE6nrX1954EUvZl4Mu0WD_uQ25OdgdpRzsc1jnf2E4oWcrqoKiIah4Ai4wuVPi-NXhU5Fj8WpeX4MTjlXnQB3WKE5-3e-MyVQU_TgIAzqMs6h_dlJ9jyrhBDunXgigG1ztUY98dM39qQ6CImZVel9M3-sUrzSgUse the authentication token for a service-specific API call.
The example shows how to retrieve managed fabrics from the Manage API:
curl --insecure --request GET 'https://<nd-node-ip>/api/v1/manage/fabrics'\
--header 'Cookie: AuthCookie=eyJhbGciOiJSUzI1NiIsImtpZCI6InliZTVvZjMzODFqcXphczZsZnZ5Y3c0MmlsOXZ3Ym9hIiwidHlwIjoiSldUIn0.eyJhdnBhaXIiOiJzaGVsbDpkb21haW5zPWFsbC9hZG1pbi8iLCJjbHVzdGVyIjoiNjQ2NTc2NjMtNmM3NS03Mzc0LTY1NzItMzEyZDMzMzIyZDMzIiwiZXhwIjoxNjQ0MzQzMjYzLCJpYXQiOjE2NDQzNDIwNjMsImlkIjoiNDhkMTA1YmRmYmM0OWE1ZmNmMzlhMTBiOTYxMzg2ZTYxZGZlNDAwODVjYjAzMTVkODE4Yjc2MWM1NzM1ZGFmYSIsImlzcyI6Im5kIiwiaXNzLWhvc3QiOiIxMC4zMC4xMS4zMiIsInJiYWMiOlt7ImRvbWFpbiI6ImFsbCIsInJvbGVzUiI6MTY3NzcyMTYsInJvbGVzVyI6MSwicm9sZXMiOltbImFkbWluIiwiV3JpdGVQcml2Il0sWyJhcHAtdXNlciIsIlJlYWRQcml2Il1dfV0sInNlc3Npb25pZCI6IlNKTVhQTXpiMWNNRHVTNjBaUmUzR0NDRSIsInVzZXJmbGFncyI6MCwidXNlcmlkIjoyNTAwMiwidXNlcm5hbWUiOiJhZG1pbiIsInVzZXJ0eXBlIjoibG9jYWwifQ.TbGc5Wz9-16WIH6UChYEfplRie9v_n4LrTpOthx2Mepl0FIseTkQwJGAzaBIsIjJ1dIWXjayXzVtHNURe2LHdwFIHZ9lkWGfsvh6xsrBWWerZDYuV4nsF9J0hW-LuTsnZCQxyPwL99G1SVcBKgDsnpblqkOi68cbkjED-C1ecG2WBgG3xFnjE7fQbI0Sr1y61q4FNhdkq9CBhs9jXHM4NCHDRFO8nqug67LsSJ9A-VLZXXxGJ4M9IejJkff76uz14YRoqbzgLQzvhmNkrxAqcbFm_LENV48T-2XJzcFqO7GMddmWqKxx0h4cTYps7umT63Qcnwp80rMa_7GWBsSFrw'
Or the same call using the token shell variable:
curl --insecure --request GET 'https://<nd-node-ip>/api/v1/manage/fabrics'\
--header ‘Cookie: AuthCookie="$AUTH_TOKEN"'
Response output:
{"fabrics":[{"alertSuspend":"disabled","category":"fabric","externalStreamingSettings":{"email":[],"messageBus":[],"syslog":{"collectionSettings":{"anomalies":[]},"facility":"","servers":[]}},"licenseTier":"essentials","location":{"latitude":0,"longitude":0},"management":{"type":"vxlanIbgp","netflowSettings":{"netflow":false},"vpcLayer3PeerRouter":true,"ptp":false,"l3VniRange":"50000-59000","securityGroupTag":false,"advertisePhysicalIp":false,"fabricVpcQosPolicyName":"spine_qos_for_fabric_vpc_peering","bfdPim":false,"underlayIpv6":false,"bfdIsis":false,"nveHoldDownTimer":180,"autoUniqueVrfLiteIpPrefix":false,"ospfAuthentication":false,"macsec":false,"defaultQueuingPolicyOther":"queuing_policy_default_other","autoBgpNeighborDescription":true,"mplsIsisAreaNumber":"0001","ipv6LinkLocal":true,"autoSymmetricVrfLite":false,"policyBasedRouting":false,"vrfLiteSubnetTargetMask":30,"tenantRoutedMulticastIpv6":false,"vpcPeerLinkPortChannelId":"500","isisAuthentication":false,"perVrfLoopbackAutoProvision":false,"replicationMode":"multicast","anycastRendezvousPointIpRange":"10.251.251.0/24","vpcIpv6NeighborDiscoverySync":true,"tcamAllocation":true,"realTimeInterfaceStatisticsCollection":false,"serviceNetworkVlanRange":"3000-3199","isisLevel":"level-2","targetSubnetMask":31,"autoSymmetricDefaultVrf":false,"defaultQueuingPolicyRSeries":"queuing_policy_default_r_series","brownfieldNetworkNameFormat":"Auto_Net_VNI$$VNI$$_VLAN$$VLAN_ID$$","fabricVpcDomainId":false,"vrfLiteSubnetRange":"10.33.0.0/16","nxapi":true,"vrfLiteAutoConfig":"manual","greenfieldDebugFlag":"enable","vrfVlanRange":"2000-2299","vpcTorDelayRestoreTimer":30,"objectTrackingNumberRange":"100-299","pimHelloAuthentication":false,"bfdAuthentication":false,"bgpLoopbackId":0,"nveLoopbackIpRange":"10.111.100.0/22","vpcPeerKeepAliveOption":"management","autoVrfLiteDefaultVrf":false,"aimlQos":false,"ipv6SubnetTargetMask":126,"strictConfigComplianceMode":false,"brownfieldSkipOverlayNetworkAttachments":false,"vpcPeerLinkVlan":"3600","nxapiHttpPort":80,"bgpAuthentication":false,"leafTorIdRange":false,"rendezvousPointMode":"asm","bfdOspf":false,"bgpLoopbackIpRange":"10.11.0.0/22","aaa":false,"ntpServerCollection":["10.81.254.131"],"overlayMode":"cli","autoGenerateMulticastGroupAddress":false,"stpRootOption":"unmanaged","perVrfLoopbackAutoProvisionIpv6":false,"localDhcpServer":false,"bgpAuthenticationKeyType":"3des","siteId":"65999","bgpAsn":"65999","nextGenerationOAM":true,"cdp":false,"l3VniNoVlanDefaultOption":false,"vrfLiteMacsec":false,"vrfExtensionTemplate":"Default_VRF_Extension_Universal","tenantRoutedMulticast":false,"nxapiHttp":false,"routeMapSequenceNumberRange":"1-65534","networkVlanRange":"2300-2999","staticUnderlayIpAllocation":false,"heartbeatInterval":190,"mplsHandoff":false,"bootstrapSubnetCollection":[],"powerRedundancyMode":"redundant","bfd":false,"anycastGatewayMac":"1234.5678.9000","ntpServerVrfCollection":["management"],"vrfRouteImportIdReallocation":false,"linkStateRoutingTag":"UNDERLAY","rendezvousPointLoopbackId":250,"aimlQosPolicy":"400G","ngoamSouthBoundLoopDetect":false,"linkStateRoutingProtocol":"ospf","networkExtensionTemplate":"Default_Network_Extension_Universal","dnsCollection":["10.0.249.16"],"vrfLiteIpv6SubnetRange":"fd00::a33:0/112","fabricMtu":9216,"vpcDomainIdRange":"1-1000","hostInterfaceAdminState":true,"bfdIbgp":false,"vpcAutoRecoveryTimer":360,"dnsVrfCollection":["management"],"isisAreaNumber":"0001","snmpTrap":true,"subInterfaceDot1qRange":"2-511","privateVlan":false,"networkTemplate":"Default_Network_Universal","defaultQueuingPolicy":false,"allowVlanOnLeafTorPairing":"none","vrfLiteIpv6SubnetTargetMask":126,"anycastBorderGatewayAdvertisePhysicalIp":false,"rendezvousPointCount":2,"name":"tme-fabric","performanceMonitoring":false,"nveLoopbackId":1,"vpcDelayRestoreTimer":150,"nxapiHttpsPort":443,"vpcPeerLinkEnableNativeVlan":false,"l2HostInterfaceMtu":9216,"coppPolicy":"strict","day0Bootstrap":false,"advertisePhysicalIpOnBorder":true,"vrfTemplate":"Default_VRF_Universal","ospfAreaId":"0.0.0.0","tenantDhcp":true,"routeReflectorCount":2,"inbandManagement":false,"underlayMulticastGroupAddressLimit":128,"ipServiceLevelAgreementIdRange":"10000-19999","intraFabricSubnetRange":"10.1.0.0/16","defaultQueuingPolicyCloudscale":"queuing_policy_default_8q_cloudscale","multicastGroupSubnet":"239.1.1.0/25","fabricInterfaceType":"p2p","fabricVpcQos":false,"advancedSshOption":false,"l2VniRange":"30000-49000"},"name":"tme-fabric","securityDomain":"all","telemetryCollection":false}]}
Troubleshooting
A successful API call returns the 200 status code. If the response payload contains a different status code, it typically includes an error message that identifies the problem. To troubleshoot the error, perform the checks in the list:
Verify that you selected the correct action (for example,
POST) for the target API.Check that the URL you provided is the same URL that you use to log into the Nexus Dashboard GUI.
Ensure that SSL certificate verification is disabled in Postman settings.
Check the Nexus Dashboard cluster health using the GUI or
acs healthcommand to verify that no cluster issues prevent API use.