This documentation corresponds to an older version of the product, is no longer updated, and may contain outdated information.
Please access the latest versions from https://cisco-tailf.gitbook.io/nso-docs and update your bookmarks. OK
This chapter shows examples of a typical deployment for a highly
available (HA) setup. A reference to an example implementation of the
tailf-hcc layer-2 upgrade deployment scenario
described here, check the NSO example set under
examples.ncs/development-guide/high-availability/hcc.
The example covers the following topics:
-
Installation of NSO on all nodes in an HA setup
-
Initial configuration of NSO on all nodes
-
HA failover
-
Upgrading NSO on all nodes in the HA cluster
-
Upgrading NSO packages on all nodes in the HA cluster
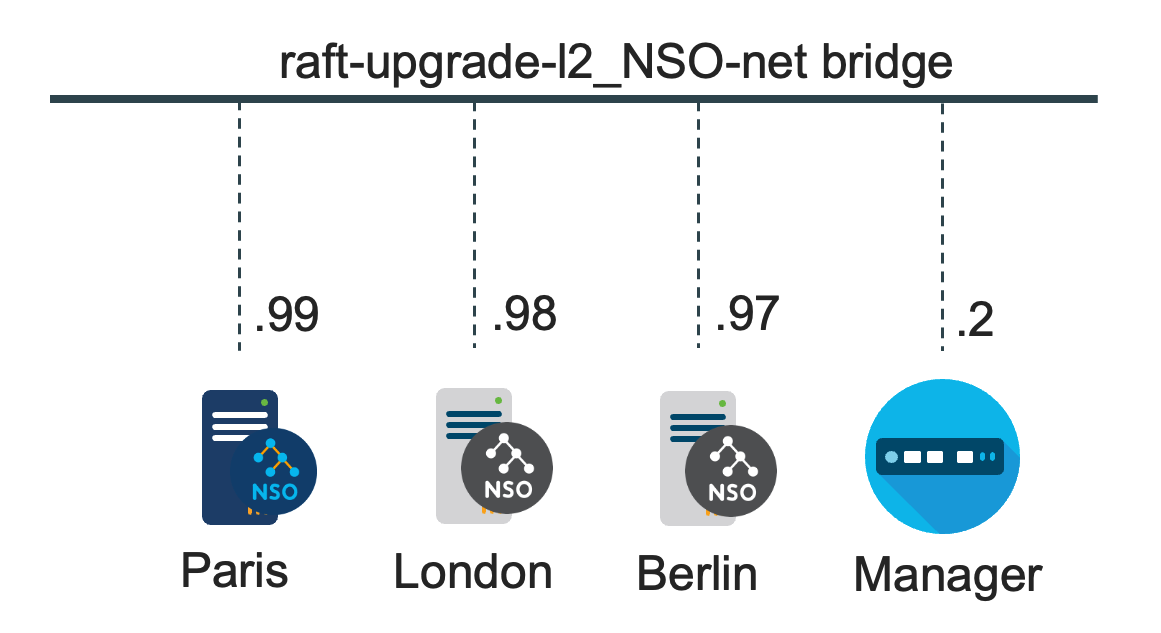
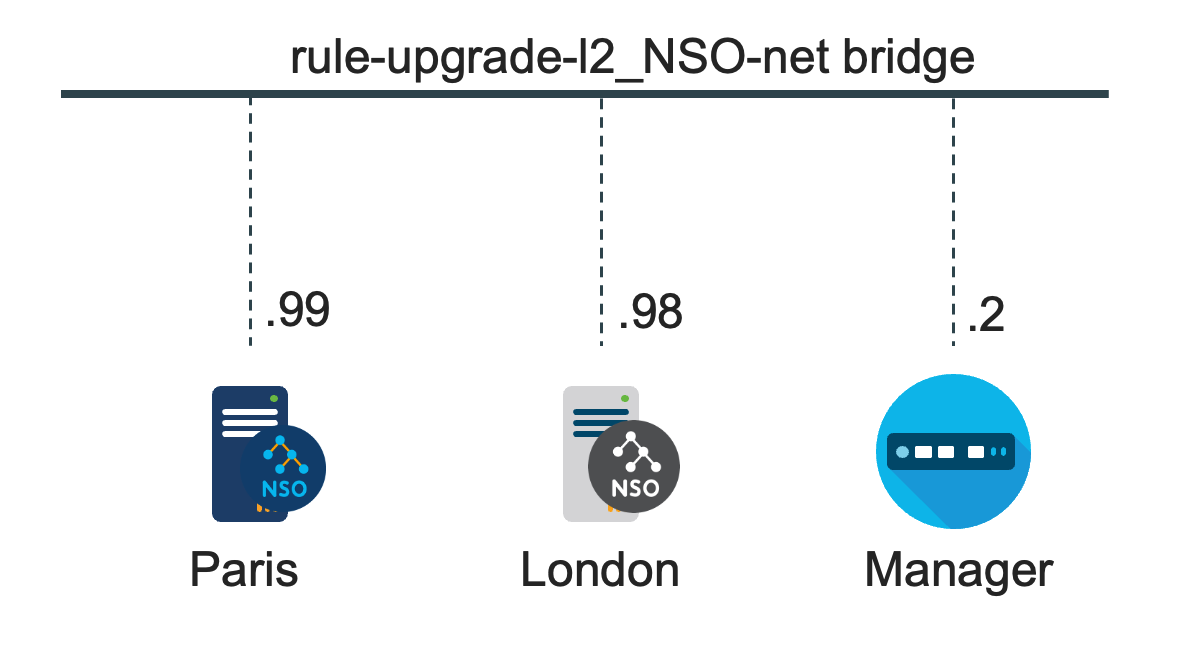
The deployment examples use both the legacy rule-based and recommended HA Raft setup. See High Availability for HA details. The HA Raft deployment consists of three nodes running NSO and a node managing them, while the rule-based HA deployment uses only two nodes.
Based on the Raft consensus algorithm, the HA Raft version provides the best fault tolerance, performance, and security and is therefore recommended.
For the HA Raft setup, the NSO nodes paris.fra, london.eng, and berlin.ger nodes make up a cluster of one leader and two followers.
For the rule-based HA setup, the NSO nodes paris
and london make up one HA pair, one primary and one
secondary.
HA is usually not optional for a deployment. Data resides in CDB, a RAM database with a disk-based journal for persistence. Both HA variants can be set up to avoid the need for manual intervention in a failure scenario, where HA Raft does the best job of keeping the cluster up. See High Availability for details.
An NSO system installation on the NSO nodes is recommended for deployments. For system installation details, see the section called “System Install Steps” in Getting Started.
In this container-based example, Docker Compose uses a
Dockerfile to build the container image and install
NSO on multiple nodes, here containers. A shell script uses an
SSH client to access the NSO nodes from the manager node to
demonstrate HA failover and, as an alternative, a Python script
that implements SSH and RESTCONF clients.
-
An
adminuser is created on the NSO nodes.Password-less sudo access is set up to enable the
tailf-hccserver to run the ip command.The manager's SSH client uses public key authentication, while the RESTCONF client uses a token to authenticate with the NSO nodes.
The example creates two packages using the ncs-make-package command:
dummyandinert. A third package,tailf-hcc, provides VIPs that point to the current HA leader/primary node. -
The packages are compressed into a
tar.gzformat for easier distribution, but that is not a requirement.
Note
While this deployment example uses containers, it is intended as a generic deployment guide. For details on running NSO in a container, such as Docker, see the Containerized NSO chapter. see the Containerized NSO.
This example uses a minimal Red Hat UBI distribution for hosting NSO with the following added packages:
-
NSO's basic dependency requirements are fulfilled by adding the Java Runtime Environment (JRE), OpenSSH, and OpenSSL packages.
-
The OpenSSH server is used for shell access and secure copy to the NSO Linux host for NSO version upgrade purposes. The NSO built-in SSH server provides CLI and NETCONF access to NSO.
-
The NSO services require Python.
-
To fulfill the
tailf-hccserver dependencies, theiproute2utilities andsudopackages are installed. See the section called “Dependencies” in thetailf-hccpackage chapter for details on the dependencies. -
The
rsyslogpackage enables storing an NSO log file from several NSO logs locally and forwarding some logs to the manager. -
The arp command from the
net-toolsandiputils(ping) packages has been added for demonstration purposes.
The steps in the list below are performed as root.
Docker Compose will build the container images, i.e., create the
NSO installation as root.
The admin user will only need root access to
run the ip command when tailf-hcc
adds the Layer 2 VIP address to the leader/primary node interface.
The initialization steps are also performed as root
for the nodes that make up the HA cluster:
-
Create the
ncsadminandncsoperLinux user groups. -
Create and add the
adminandoperLinux users to their respective groups. -
Perform a system installation of NSO that runs NSO as the
adminuser. -
The
adminuser is granted access to run the ip command from thevipctlscript asrootusing the sudo command as required by thetailf-hccpackage. -
The
cmdwrapperNSO program gets access to run the scripts executed by the generate-token action for generating RESTCONF authentication tokens as the current NSO user. -
Password authentication is set up for the read-only
operuser for use with NSO only, which is intended for WebUI access. -
The
rootuser is set up for Linux shell access only. -
The NSO installer,
tailf-hccpackage, application YANG modules, scripts for generating and authenticating RESTCONF tokens, and scripts for running the demo are all available to the NSO and manager containers. -
adminuser permissions are set for the NSO directories and files created by the system install, as well as for theroot,admin, andoperhome directories. -
The
ncs.crypto_keysare generated and distributed to all nodes.Note
The
ncs.crypto_keysfile is highly sensitive. It contains the encryption keys for all encrypted CDB data, which often includes passwords for various entities, such as login credentials to managed devices.Note
In an NSO system install setup, not only the TLS certificates (HA Raft) or shared token (rule-based HA) need to match between the HA cluster nodes, but also the configuration for encrypted strings, by default stored in
/etc/ncs/ncs.crypto_keys, needs to match between the nodes in the HA cluster.For rule-based HA, the tokens configured on the secondary nodes are overwritten with the encrypted token of type
aes-256-cfb-128-encrypted-stringfrom the primary node when the secondary connects to the primary. If there is a mismatch between the encrypted-string configuration on the nodes, NSO will not decrypt the HA token to match the token presented. As a result, the primary node denies the secondary node access the next time the HA connection needs to be re-established with a "Token mismatch, secondary is not allowed" error. -
For HA Raft, TLS certificates are generated for all nodes.
-
The initial NSO configuration,
ncs.conf, is updated and in sync (identical) on the nodes. -
The SSH servers are configured to allow only SSH public key authentication (no password). The
operuser can use password authentication with the WebUI but has read-only NSO access. -
The
operuser is denied access to the Linux shell. -
The
adminuser can access the Linux shell and NSO CLI using public key authentication. -
New keys for all users are distributed to the HA cluster nodes and the manager node when the HA cluster is initialized.
-
The OpenSSH server and the NSO built-in SSH server use the same private and public key pairs located under
~/.ssh/id_ed25519, while the manager public key is stored in the~/.ssh/authorized_keysfile for both NSO nodes. -
Host keys are generated for all nodes to allow the NSO built-in SSH and OpenSSH servers to authenticate the server to the client.
Each HA cluster node has its own unique SSH host keys stored under
${NCS_CONFIG_DIR}/ssh_host_ed25519_key. The SSH client(s), here the manager, has the keys for all nodes in the cluster paired with the node's hostname and the VIP address in its/root/.ssh/known_hostsfile.The host keys, like those used for client authentication, are generated each time the HA cluster nodes are initialized. The host keys are distributed to the manager and nodes in the HA cluster before the NSO built-in SSH and OpenSSH servers are started on the nodes.
-
As NSO runs in containers, the environment variables are set to point to the system install directories in the Docker Compose
.envfile.NSO run as the non-root
adminuser and, therefore, the ncs command is used to start NSO instead of the/etc/init.d/ncsand/etc/profile.dscripts. The environment variables are copied to a.pam_environmentfile so that therootandadminusers can set the required environment variables when those users access the shell via SSH. -
The start script is installed as part of the NSO system install, and it can be customized if you would like to use it to start NSO. The available NSO start script variants can be found under
/opt/ncs/current/src/ncs/package-skeletons/etc. The scripts may provide what you need and can be used as a starting point. -
If you are running NSO as the root user and using systemd, the
init.dscript can converted for use with systemd. Example:$
mkdir -p /etc/init.d$./nso-NSO_VERSION.linux.x86_64.installer.bin --system-install$cp /etc/init.d/ncs /etc/rc.d/init.d/$systemctl daemon-reload$echo "ExecReload=/etc/rc.d/init.d/ncs reload" << /run/systemd/generator.late/ncs.service$cp /run/systemd/generator.late/ncs.service /etc/systemd/system/$systemctl start ncs -
The OpenSSH sshd and rsyslog daemons are started.
-
The packages from the package store are added to the
${NCS_RUN_DIR}/packagesdirectory before finishing the initialization part in therootcontext. -
The NSO smart licensing token is set.
-
The NSO IPC socket is configured in
ncs.confto only listen to localhost 127.0.0.1 connections, which is the default setting.By default, the clients connecting to the NSO IPC socket are considered trusted, i.e., no authentication is required, and the use of 127.0.0.1 with the
/ncs-config/ncs-ipc-addressIP address inncs.confto prevent remote access. See the section called “Security Considerations” and ncs.conf(5) in Manual Pages for more details. -
/ncs-config/aaa/pamis set to enable PAM to authenticate users as recommended. All remote access to NSO must now be done using the NSO host's privileges. See ncs.conf(5) in Manual Pages for details. -
Depending on your Linux distribution, you may have to change the
/ncs-config/aaa/pam/servicesetting. The default value iscommon-auth. Check the file/etc/pam.d/common-authand make sure it fits your needs. See ncs.conf(5) in Manual Pages for details.Alternatively, or as a complement to the PAM authentication, users can be stored in the NSO CDB database or authenticated externally. See the section called “Authentication” for details.
-
RESTCONF token authentication under
/ncs-config/aaa/external-validationis enabled using atoken_auth.shscript that was added earlier together with agenerate_token.shscript. See ncs.conf(5) in Manual Pages for details.The scripts allow users to generate a token for RESTCONF authentication through, for example, the NSO CLI and NETCONF interfaces that use SSH authentication or the Web interface.
The token provided to the user is added to a simple YANG list of tokens where the list key is the username.
-
The token list is stored in the NSO CDB operational data store and is only accessible from the node's local MAAPI and CDB APIs. See the HA Raft and rule-based HA
upgrade-l2/manager-etc/yang/token.yangfile in the examples. -
The NSO web server HTTPS interface should be enabled under
/ncs-config/webui, along with/ncs-config/webui/match-host-name = trueand/ncs-config/webui/server-nameset to the hostname of the node, following security best practice. See ncs.conf(5) in Manual Pages for details.Note
The SSL certificates that NSO generates are self-signed:
$
openssl x509 -in /etc/ncs/ssl/cert/host.cert -text -nooutCertificate: Data: Version: 1 (0x0) Serial Number: 2 (0x2) Signature Algorithm: sha256WithRSAEncryption Issuer: C=US, ST=California, O=Internet Widgits Pty Ltd, CN=John Smith Validity Not Before: Dec 18 11:17:50 2015 GMT Not After : Dec 15 11:17:50 2025 GMT Subject: C=US, ST=California, O=Internet Widgits Pty Ltd Subject Public Key Info: .......Thus, if this is a production environment and the JSON-RPC and RESTCONF interfaces using the web server are not used solely for internal purposes, the self-signed certificate must be replaced with a properly signed certificate. See ncs.conf(5) in Manual Pages under
/ncs-config/webui/transport/ssl/cert-fileand/ncs-config/restconf/transport/ssl/certFilefor more details. -
Disable
/ncs-config/webui/cgiunless needed. -
The NSO SSH CLI login is enabled under
/ncs-config/cli/ssh/enabled. See ncs.conf(5) in Manual Pages for details. -
The NSO CLI style is set to C-style, and the CLI prompt is modified to include the hostname under
/ncs-config/cli/prompt. See ncs.conf(5) in Manual Pages for details.<prompt1>\u@nso-\H> </prompt1> <prompt2>\u@nso-\H% </prompt2> <c-prompt1>\u@nso-\H# </c-prompt1> <c-prompt2>\u@nso-\H(\m)# </c-prompt2> -
NSO HA Raft is enabled under
/ncs-config/ha-raft, and the rule-based HA under/ncs-config/ha. See ncs.conf(5) in Manual Pages for details. -
Depending on your provisioned applications, you may want to turn
/ncs-config/rollback/enabledoff. Rollbacks do not work well with nano service reactive FASTMAP applications or if maximum transaction performance is a goal. If your application performs classical NSO provisioning, the recommendation is to enable rollbacks. Otherwise not. See ncs.conf(5) in Manual Pages for details.
The NSO system installation places an AAA
aaa_init.xml file in the $NCS_RUN_DIR/cdb directory.
Compared to a local installation for development, no users are defined
for authentication in the aaa_init.xml file, and
PAM is enabled for authentication. NACM rules for controlling NSO
access are defined in the file for users belonging to a
ncsadmin user group and read-only access for a
ncsoper user group. As seen in the
previous sections, this example creates Linux root,
admin, and oper users, as well as the
ncsadmin and ncsoper Linux user groups.
PAM authenticates the users using SSH public key authentication without a
passphrase for NSO CLI and NETCONF login. Password authentication
is used for the oper user intended for NSO WebUI
login and token authentication for RESTCONF login.
Before the NSO daemon is running, and there are no existing CDB
files, the default AAA configuration in the
aaa_init.xml is used. It is restrictive and is
used for this demo with only a minor addition to allow the oper user
to generate a token for RESTCONF authentication.
The NSO authorization system is group-based; thus, for the rules to apply to a specific user, the user must be a member of the group to which the restrictions apply. PAM performs the authentication, while the NSO NACM rules do the authorization.
-
Adding the
adminuser to thencsadmingroup and theoperuser to the limitedncsopergroup will ensure that the two users get properly authorized with NSO. -
Not adding the
rootuser to any group matching the NACM groups results in zero access, as no NACM rule will match, and the default in theaaa_init.xmlfile is to deny all access.
The NSO NACM functionality is based on the
Network Configuration Access Control Model IETF RFC 8341
with NSO extensions augmented by
tailf-acm.yang. See
The AAA infrastructure
, for more details.
The manager in this example logs into the different NSO hosts
using the Linux user login credentials. This scheme has many
advantages, mainly because all audit logs on the NSO hosts will
show who did what and when. Therefore, the common bad practice of
having a shared admin Linux user and NSO local user
with a shared password is not recommended.
Note
The default aaa_init.xml file provided
with the NSO system installation must not be used
as-is in a deployment without reviewing and verifying that every NACM
rule in the file matches the desired authorization level.
This example sets up one HA cluster using HA Raft or rule-based HA with
the tailf-hcc server to manage virtual IP addresses.
See the the section called “NSO Rule-based HA” and the section called “Tail-f HCC Package” for details.
The NSO HA, together with the tailf-hcc
package, provides three features:
-
All CDB data is replicated from the leader/primary to the follower/secondary nodes.
-
If the leader/primary fails, a follower/secondary takes over and starts to act as leader/primary. This is how HA Raft works and how the rule-based HA variant of this example is configured to handle failover automatically.
-
At failover,
tailf-hccsets up a virtual alias IP address on the leader/primary node only and uses gratuitous ARP packets to update all nodes in the network with the new mapping to the leader/primary node.
Nodes in other networks can be updated using the
tailf-hcc layer-3 BGP functionality or a load balancer.
See the NSO example set under
examples.ncs/development-guide/high-availability.
See the NSO example set under
examples.ncs/development-guide/high-availability/hcc
for a reference to an HA Raft and rule-based HA
tailf-hcc Layer 3 BGP examples.
The HA Raft and rule-based HA upgrade-l2 examples also demonstrate HA failover, upgrading the NSO version on all nodes, and upgrading NSO packages on all nodes.
Depending on your installation, e.g., the size and speed of the managed devices and the characteristics of your service applications, some default values of NSO may have to be tweaked, particularly some of the timeouts.
-
Device timeouts. NSO has connect, read, and write timeouts for traffic between NSO and the managed devices. The default value may not be sufficient if devices/nodes are slow to commit, while some are sometimes slow to deliver their full configuration. Adjust timeouts under
/devices/global-settingsaccordingly. -
Service code timeouts. Some service applications can sometimes be slow. Adjusting the
/services/global-settings/service-callback-timeoutconfiguration might be applicable depending on the applications. However, the best practice is to change the timeout per service from the service code using the JavaServiceContext.setTimeoutfunction or the Pythondata_set_timeoutfunction.
There are quite a few different global settings for NSO. The two mentioned above often need to be changed.
NSO uses Cisco Smart Licensing, which is described in detail in Cisco Smart Licensing . After registering your NSO instance(s), and receiving a token, following steps 1-6 as described in the Create a License Registration Token section of Cisco Smart Licensing , enter a token from your Cisco Smart Software Manager account on each host. Use the same token for all instances and script entering the token as part of the initial NSO configuration or from the management node:
admin@nso-paris#license smart register idtoken YzY2Yj...admin@nso-london#license smart register idtoken YzY2Yj...
Note
The Cisco Smart Licensing CLI command is present only in the Cisco Style CLI, which is the default CLI for this setup.
The NSO system installations performed on the nodes in the HA
cluster also install defaults for logrotate. Inspect
/etc/logrotate.d/ncs and ensure that the settings
are what you want. Note that the NSO error logs, i.e., the files
/var/log/ncs/ncserr.log*, are internally rotated
by NSO and must not be rotated by logrotate.
For the HA Raft and rule-based HA upgrade-l2 examples, see the
reference from the
examples.ncs/development-guide/high-availability/hcc/README;
the examples integrate with rsyslog to log the
ncs, developer, upgrade,
audit, netconf, snmp, and
webui-access logs to syslog with facility set
to daemon in ncs.conf.
rsyslogd on the nodes in the HA cluster is
configured to write the daemon facility logs to
/var/log/daemon.log, and forward the daemon
facility logs with severity info or higher to the manager
node's /var/log/ha-cluster.log syslog.
Use the audit-network-log for recording southbound traffic towards
devices. Enable by setting
/ncs-config/logs/audit-network-log/enabled and
/ncs-config/logs/audit-network-log/file/enabled to true in
$NCS_CONFIG_DIR/ncs.conf, See
ncs.conf(5) in Manual Pages
for more
information.
NED trace logs are a crucial tool for debugging NSO installations and not recommended for deployment. These logs are very verbose and for debugging only. Do not enable these logs in production.
Note that the NED logs include everything, even potentially sensitive
data is logged. No filtering is done.
The NED trace logs are controlled through the CLI under:
/device/global-settings/trace.
It is also possible to control the NED trace on a per-device basis under
/devices/device[name='x']/trace.
There are three different settings for trace output. For various historical reasons, the setting that makes the most sense depends on the device type.
-
For all CLI NEDs, use the
rawsetting. -
For all ConfD and netsim-based NETCONF devices, use the pretty setting. This is because ConfD sends the NETCONF XML unformatted, while
prettymeans that the XML is formatted. -
For Juniper devices, use the
rawsetting. Juniper devices sometimes send broken XML that cannot be formatted appropriately. However, their XML payload is already indented and formatted. -
For generic NED devices - depending on the level of trace support in the NED itself, use either
prettyorraw. -
For SNMP-based devices, use the
prettysetting.
Thus, it is usually not good enough to control the NED trace from
/devices/global-settings/trace.
While there is a global log for, for example, compilation errors in
/var/log/ncs/ncs-python-vm.log, logs from user
application packages are written to separate files for each package,
and the log file naming is
ncs-python-vm-.
The level of logging from Python code is controlled on a per package
basis. See the section called “Debugging of Python packages” in Development Guide for more details.
pkg_name.log
User application Java logs are written to
/var/log/ncs/ncs-java-vm.log.
The level of logging from Java code is controlled per Java package.
See the section called “Logging” in Development Guide Java VM chapter for more details.
The internal NSO log resides at /var/log/ncs/ncserr.*. The log is
written in a binary format. To view the internal error log, run the
following command:
$ ncs --printlog /var/log/ncs/ncserr.log.1
All large-scale deployments employ monitoring systems. There are plenty
of good tools to choose from, open source and commercial.
All good monitoring tools can script (using various
protocols) what should be monitored. It is recommended that a special
read-only Linux user without shell access be set up like the
oper user earlier in this chapter.
A few commonly used checks include:
-
At startup, check that NSO has been started using the $NCS_DIR/bin/ncs_cmd -c "wait-start 2" command.
-
Use the ssh command to verify SSH access to the NSO host and NSO CLI.
-
Check disk-usage using, for example, the df utility.
-
For example, use curl or the Python requests library to verify that the RESTCONF API is accessible.
-
Check that the NETCONF API is accessible using, for example, the $NCS_DIR/bin/netconf-console tool with a
hellomessage. -
Verify the NSO version using, for example, the $NCS_DIR/bin/ncs --version or RESTCONF
/restconf/data/tailf-ncs-monitoring:ncs-state/version. -
Check if HA is enabled using, for example, RESTCONF
/restconf/data/tailf-ncs-monitoring:ncs-state/ha.
RESTCONF can be used to view the NSO alarm table and subscribe
to alarm notifications. NSO alarms are not events. Whenever an
NSO alarm is created, a RESTCONF notification and SNMP trap
is also sent, assuming that you have a RESTCONF client
registered with the alarm stream or configured a proper SNMP target.
Some alarms, like the rule-based HA ha-secondary-down
alarm, require the intervention of an operator. Thus, a monitoring tool
should also fetch the NSO alarm list.
$ curl -ik -H "X-Auth-Token: TsZTNwJZoYWBYhOPuOaMC6l41CyX1+oDaasYqQZqqok=" \
https://paris:8888/restconf/data/tailf-ncs-alarms:alarms
Or subscribe to the ncs-alarms RESTCONF Notification stream.
NSO metric has different contexts all containing different
counters, gauges and rate of change gauges.
There is a sysadmin,
a developer and a debug
context.
Note that only the sysadmin context is
enabled by default, as it is designed to be lightweight.
Consult the YANG module tailf-ncs-metric.yang
to learn the details of the different contexts.
You may read counters by e.g. CLI, as in this example
admin@ncs# show metric sysadmin counter session cli-total
metric sysadmin counter session cli-total 1
You may read gauges by e.g. CLI, as in this example
admin@ncs# show metric sysadmin gauge session cli-open
metric sysadmin gauge session cli-open 1
You may read rate of change gauges by e.g. CLI, as in this example
admin@ncs# show metric sysadmin gauge-rate session cli-open
NAME  RATE
-------------
1m    0.0
5m    0.2
15m   0.066
The presented configuration enables the built-in web server
for the WebUI and RESTCONF interfaces. It is paramount for security
that you only enable HTTPS access with
/ncs-config/webui/match-host-name and
/ncs-config/webui/server-name properly set.
The AAA setup described so far in this deployment document is the recommended AAA setup. To reiterate:
-
Have all users that need access to NSO authenticated through Linux PAM. This may then be through
/etc/passwd. Avoid storing users in CDB. -
Given the default NACM authorization rules, you should have three different types of users on the system.
-
Users with shell access are members of the
ncsadminLinux group and are considered fully trusted because they have full access to the system. -
Users without shell access who are members of the
ncsadminLinux group have full access to the network. They have access to the NSO SSH shell and can execute RESTCONF calls, access the NSO CLI, make configuration changes, etc. However, they cannot manipulate backups or perform system upgrades unless such actions are added to by NSO applications. -
Users without shell access that are members of the
ncsoperLinux group have read-only access. They can access the NSO SSH shell, read data using RESTCONF calls, etc. However, they cannot change the configuration, manipulate backups and perform system upgrades.
-
If you have more fine-grained authorization requirements than read-write
and read-only, additional Linux groups can be created, and the
NACM rules can be updated accordingly. See
the section called “The aaa_init.xml Configuration” from earlier in this
chapter on how the reference example implements users, groups, and NACM
rules to achieve the above.
The default aaa_init.xml file must not be used
as-is before reviewing and verifying that every NACM rule in the file
matches the desired authorization level.
For a detailed discussion of the configuration of authorization rules through NACM, see The AAA infrastructure , particularly the section called “Authorization”.
A considerably more complex scenario is when users require shell access
to the host but are either untrusted or should not have any access to
NSO at all.
NSO listens to a so-called IPC socket configured through
/ncs-config/ncs-ipc-address. This socket is
typically limited to local connections and defaults to
127.0.0.1:4569 for security. The socket multiplexes
several different access methods to NSO.
The main security-related point is that no AAA checks are performed on this socket. If you have access to the socket, you also have complete access to all of NSO.
To drive this point home, when you invoke the ncs_cli command, a small C program that connects to the socket and tells NSO who you are, NSO assumes that authentication has already been performed. There is even a documented flag --noaaa, which tells NSO to skip all NACM rule checks for this session.
You must protect the socket to prevent untrusted Linux shell users from
accessing the NSO instance using this method. This is done by using
a file in the Linux file system.
The file /etc/ncs/ipc_access gets created and
populated with random data at install time.
Enable /ncs-config/ncs-ipc-access-check/enabled in ncs.conf
and ensure that trusted users can read the
/etc/ncs/ipc_access file, for example, by changing
group access to the file. See
ncs.conf(5) in Manual Pages
for details.
$cat /etc/ncs/ipc_accesscat: /etc/ncs/ipc_access: Permission denied $sudo chown root:ncsadmin /etc/ncs/ipc_access$sudo chmod g+r /etc/ncs/ipc_access$ls -lat /etc/ncs/ipc_access$cat /etc/ncs/ipc_access.......
For an HA setup, HA Raft is based on the Raft consensus algorithm and
provides the best fault tolerance, performance, and security. It is
therefore recommended over the legacy rule-based HA variant. The
raft-upgrade-l2 project, referenced from the
NSO example set under
examples.ncs/development-guide/high-availability/hcc,
together with this Deployment Example chapter, describes a reference
implementation. See the section called “NSO HA Raft” for more HA Raft details.