This documentation corresponds to an older version of the product, is no longer updated, and may contain outdated information.
Please access the latest versions from https://cisco-tailf.gitbook.io/nso-docs and update your bookmarks. OK
The device YANG models contained in the Network Element Drivers (NEDs) enable NSO to store device configurations in the CDB and expose a uniform API to the network for automation, such as by Python scripts. The concept of NSO services builds on top of this network API and adds the ability to store service-specific parameters with each service instance.
This chapter introduces the main service building blocks and shows you how to build one yourself.
Network automation includes provisioning and deprovisioning configuration, even though the deprovisioning part often doesn't get as much attention. It is nevertheless significant since leftover, residual configuration can cause hard-to-diagnose operational problems. Even more importantly, without proper deprovisioning, seemingly trivial changes may prove hard to implement correctly.
Consider the following example. You create a simple script that configures a DNS server on a router, by adding the IP address of the server to the DNS server list. This should work fine for initial provisioning. However, when the IP address of the DNS server changes, the configuration on the router should be updated as well.
Can you still use the same script in this case? Most likely not, since you need to remove the old server from configuration and add the new one. The original script would just add the new IP address after the old one, resulting in both entries on the device. In turn, the device may experience slow connectivity as the system periodically retries the old DNS IP address and eventually times out.
The following figure illustrates this process, where a simple script first configures the IP address 192.0.2.1 (“.1”) as the DNS server, then later configures 192.0.2.8 (“.8”), resulting in a leftover old entry (“.1”).
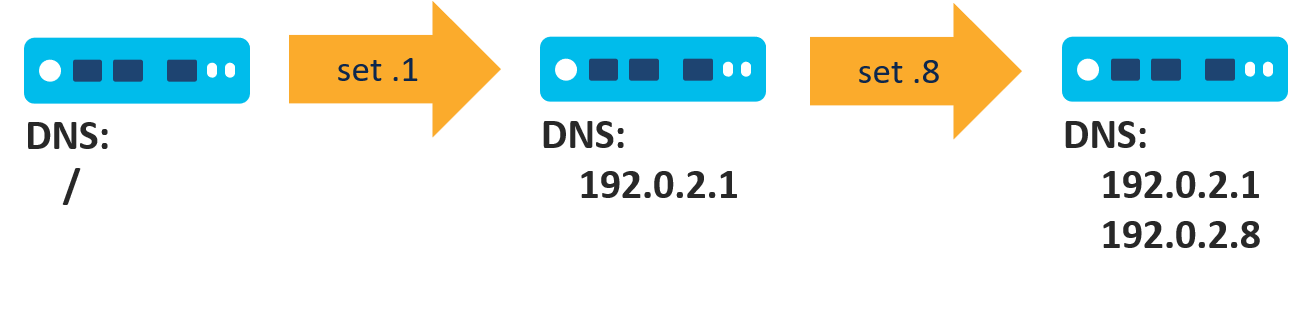
In such situation the script could perhaps simply replace the existing configuration, by removing all existing DNS server entries before adding the new one. But is this a reliable practice? What if a device requires an additional DNS server that an administrator configured manually? It would be overwritten and lost.
In general, the safest approach is to keep track of the previous changes and only replace the parts that have actually changed. This, however, is a lot of work and nontrivial to implement yourself. Fortunately, NSO provides such functionality through the FASTMAP algorithm, which is used when deploying services.
The other major benefit of using NSO services for automation is service interface definition using YANG, which specifies the name and format of the service parameters. Many new NSO users wonder why use a service YANG model when they could just use the Python code or templates directly. While it might be difficult to see the benefits without much prior experience, YANG allows you to write better, more maintainable code, which simplifies the solution in the long run.
Many, if not most, security issues and provisioning bugs stem from unexpected user input. You must always validate user input (service parameter values) and YANG compels you to think about that when writing the service model. It also makes it easy to write the validation rules by using a standardized syntax, specifically designed for this purpose.
Moreover, separation of concerns into the user interface, validation, and provisioning code allows for better organization, which becomes extremely important as the project grows. It also gives NSO the ability to automatically expose the service functionality through its APIs for integration with other systems.
For these reasons, services are the preferred way of implementing network automation in NSO.
As you may already know, services are added to NSO with
packages.
Therefore, you need to create a package if you want to implement a service
of your own. NSO ships with an ncs-make-package
utility that makes creating packages effortless. Adding the
--service-skeleton python option creates a service
skeleton, that is, an empty service, which you can tailor to your needs.
As the last argument you must specify the package name, which in this case
is the service name. The command then creates a new directory with that
name and places all the required files in the appropriate subdirectories.
The package contains the two most important parts of the service:
-
the service YANG model and
-
the service provisioning code, also called the mapping logic.
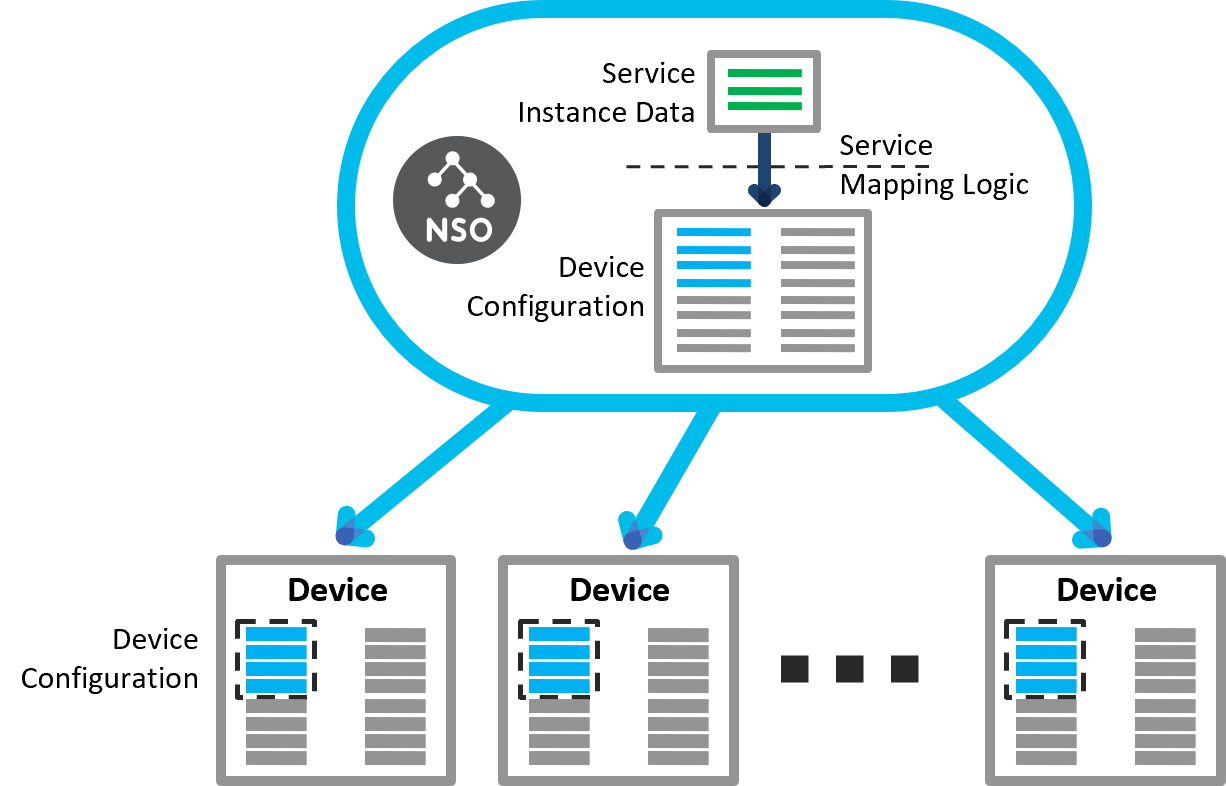
Let's first look at the provisioning part. This is the code that performs the network configuration necessary for your service. The code often includes some parameters, for example, the DNS server IP address (or addresses) to use if your service is in charge of DNS configuration. So, we say that the code maps the service parameters into the device parameters, which is where the term mapping logic originates from. NSO, with the help of the NED, then translates the device parameters to the actual configuration. This simple tree-to-tree mapping describes how to create the service and NSO automatically infers how to update, remove or re-deploy the service, hence the name FASTMAP.
How do you create the provisioning code and where do you place it? Is it similar to a stand-alone Python script? Indeed, the code is mostly the same. The main difference is that now you don't have to create a session and a transaction yourself because NSO already provides you with one. Through this transaction, the system tracks the changes to configuration made by your code.
The package skeleton contains a directory called
python. It holds a Python package named after your
service. In the package, the ServiceCallbacks
class (the main.py file) is used for provisioning
code.
The same file also contains the Main class,
which is responsible for registering the
ServiceCallbacks class as service provisioning
code with NSO.
Of the most interest is the cb_create() method
of the ServiceCallbacks class:
def cb_create(self, tctx, root, service, proplist)
NSO calls this method for service provisioning. Now, let's see how to evolve a stand-alone automation script into a service. Suppose you have Python code for DNS configuration on a router, similar to the following:
with ncs.maapi.single_write_trans('admin', 'python') as t:
    root = ncs.maagic.get_root(t)

    ex1_device = root.devices.device['ex1']
    ex1_config = ex1_device.config
    dns_server_list = ex1_config.sys.dns.server
    dns_server_list.create('192.0.2.1')

    t.apply()
Taking into account the cb_create() signature
and the fact that the NSO manages the transaction for a service, you
will not be needing the transaction and root variable
setup. The NSO service framework already takes care of setting up the
root variable with the right transaction.
There is also no need to call apply() because
NSO does that automatically.
You only have to provide the core of the code (the middle portion in
the above stand-alone script) to the cb_create():
def cb_create(self, tctx, root, service, proplist):
    ex1_device = root.devices.device['ex1']
    ex1_config = ex1_device.config
    dns_server_list = ex1_config.sys.dns.server
    dns_server_list.create('192.0.2.1')
You can run this code by adding the service package to NSO and provisioning a service instance. It will achieve the same effect as the stand-alone script but with all the benefits of a service, such as tracking changes.
In practice, all services have some variable parameters. Most often parameter values change from service instance to service instance, as the desired configuration is a little bit different for each of them. They may differ in the actual IP address that they configure or in whether the switch for some feature is on or off. Even the DNS configuration service requires a DNS server IP address, which may be the same across the whole network but could change with time if the DNS server is moved elsewhere. Therefore, it makes sense to expose the variable parts of the service as service parameters. This allows a service operator to set the parameter value without changing the service provisioning code.
With NSO, service parameters are defined in the service model,
written in YANG. The YANG module describing your service is part of the
service package, located under the src/yang path,
and customarily named the same as the package.
In addition to the module-related statements (description, revision,
imports, and so on), a typical service module includes a YANG
list, named after the service. Having a list allows you
to configure multiple service instances with slightly different
parameter values.
For example, in a DNS configuration service, you might have multiple
service instances with different DNS servers. The reason being,
some devices, such as those in the Demilitarized Zone (DMZ), might not
have access to the internal DNS servers and would need to use a different
set.
The service model skeleton already contains such a list statement. The following is another example, similar to the one in the skeleton:
list my-svc {
  description "This is an RFS skeleton service";

  key name;
  leaf name {
    tailf:info "Unique service id";
    tailf:cli-allow-range;
    type string;
  }

  uses ncs:service-data;
  ncs:servicepoint my-svc-servicepoint;

  // Devices configured by this service instance
  leaf-list device {
    type leafref {
      path "/ncs:devices/ncs:device/ncs:name";
    }
  }

  // An example generic parameter
  leaf server-ip {
    type inet:ipv4-address;
  }
}
Along with the description, the service specifies a key,
name, to uniquely identify each service instance. This can be
any free-form text, as denoted by its type (string). The statements
starting with tailf: are NSO-specific extensions for
customizing the user interface NSO presents for this service.
After that come two lines, the uses and
ncs:servicepoint, that tell NSO this is a service and
not just some ordinary list. At the end, there are two parameters defined,
device and server-ip.
NSO then allows you to add the values for these parameters when configuring a service instance, as shown in the following CLI transcript:
admin@ncs(config)# my-svc instance1 ?
Possible completions:
  check-sync           Check if device config is according to the service
  commit-queue
  deep-check-sync      Check if device config is according to the service
  device
  < ... output omitted ... >
  server-ip
  < ... output omitted ... >
Finally, your Python script can read the supplied values inside the
cb_create() method via the provided
service variable.
This variable points to the currently-provisioning service instance,
allowing you to use code such as service.server_ip for the
value of the server-ip parameter.
-
No previous NSO or netsim processes are running. Use the ncs --stop and ncs-netsim stop commands to stop them if necessary.
-
NSO local install with a fresh runtime directory has been created by the ncs-setup --dest ~/nso-lab-rundir or similar command.
-
The environment variable
NSO_RUNDIRpoints to this runtime directory, such as set by the export NSO_RUNDIR=~/nso-lab-rundir command. It enables the below commands to work as-is, without additional substitution needed.
The “getting-started/developing-with-ncs” set of examples
contains three simulated routers that you can use for this scenario.
The 0-router-network directory holds the data
necessary for starting the routers and connecting them to your NSO
instance. First, change the current working directory:
$ cd $NCS_DIR/examples.ncs/getting-started/developing-with-ncs/0-router-networkFrom this directory, you can start a fresh set of routers by running the following make command:
$ make showcase-clean-start
< ... output omitted ... >
DEVICE ex0 OK STARTED
DEVICE ex1 OK STARTED
DEVICE ex2 OK STARTED
make: Leaving directory 'examples.ncs/getting-started/developing-with-ncs/0-router-network'
The routers are now running. The required NED package and a CDB
initialization file, ncs-cdb/ncs_init.xml, were also
added to your NSO instance. The latter contains connection details for
the routers and will be automatically loaded on the first NSO start.
In case you're not using a fresh working directory, you may need to
use the ncs_load command to load the file manually.
Older versions of the system may also be missing the above
make target, which you can add to the
Makefile yourself:
showcase-clean-start:
        $(MAKE) clean all
        cp ncs-cdb/ncs_init.xml ${NSO_RUNDIR}/ncs-cdb/
        cp -a ../packages/router ${NSO_RUNDIR}/packages/
ncs-netsim startYou create a new service package with the
ncs-make-package command. Without the
--dest option, the package is created in the current
working directory. Normally you run the command without this option,
as it is shorter. For NSO to find and load this package, it has
to be placed (or referenced via a symbolic link) in the
packages subfolder of the NSO running
directory.
So, change the current working directory before creating the package:
$ cd $NSO_RUNDIR/packagesYou need to provide two parameters to
ncs-make-package. The first is the
--service-skeleton python option, which selects
the Python programming language for scaffolding code.
The second parameter is the name of the service. As you are creating
a service for DNS configuration, dns-config is a
fitting name for it. Run the final, full command:
$ ncs-make-package --service-skeleton python dns-configIf you look at the file structure of the newly created package, you will see it contains a number of files.
dns-config/
+-- package-meta-data.xml
+-- python
|   '-- dns_config
|       +-- __init__.py
|       '-- main.py
+-- README
+-- src
|   +-- Makefile
|   '-- yang
|       '-- dns-config.yang
+-- templates
'-- test
    +-- < ... output omitted ... >
The package-meta-data.xml describes the
package and tells NSO where to find the code. Inside the
python folder is a service-specific Python package,
where you add your own Python code (to main.py
file). There is also a README file that you
can update with the information relevant to your service.
The src folder holds the source code that you must
compile before you can use it with NSO. That is why there is also a
Makefile that takes care of the compilation process.
In the yang subfolder is the service YANG module.
The templates folder can contain additional XML
files, discussed later. Lastly, there is the test
folder where you can put automated testing scripts, which will not be
discussed here.
While you can always hard-code the desired parameters, such as the DNS server IP address, in the Python code, it means you have to change the code every time the parameter value (the IP address) changes. Instead, you can define it as an input parameter in the YANG file. Fortunately, the skeleton already has a leaf called dummy that you can rename and use for this purpose.
Open the dns-config.yang, located inside
dns-config/src/yang/, in a text or code editor
and find the following line:
leaf dummy {Replace the word “dummy” with the word
“dns-server”, save the file and return to the shell.
Run the make command in the
dns-config/src folder to compile the updated
YANG file.
$ make -C dns-config/src
make: Entering directory 'dns-config/src'
mkdir -p ../load-dir
mkdir -p java/src//
bin/ncsc  `ls dns-config-ann.yang  > /dev/null 2>&1 && echo "-a dns-config-ann.yang"` \
              -c -o ../load-dir/dns-config.fxs yang/dns-config.yang
make: Leaving directory 'dns-config/src'In a text or code editor open the main.py
file, located inside dns-config/python/dns_config/.
Find the following snippet:
    @Service.create
    def cb_create(self, tctx, root, service, proplist):
        self.log.info('Service create(service=', service._path, ')')
Right after the self.log.info() call,
read the value of the dns-server parameter into a
dns_ip variable:
dns_ip = service.dns_server
Mind the 8 spaces in front to make sure the line is correctly aligned. After that, add the code that configures the ex1 router:
        ex1_device = root.devices.device['ex1']
        ex1_config = ex1_device.config
        dns_server_list = ex1_config.sys.dns.server
        dns_server_list.create(dns_ip)
Here, you are using the dns_ip variable that
contains the operator-provided IP address instead of a hard-coded value.
Also note that there is no need to check if the entry for this DNS
server already exists in the list.
In the end, the cb_create() method should
look like the following:
    @Service.create
    def cb_create(self, tctx, root, service, proplist):
        self.log.info('Service create(service=', service._path, ')')
        dns_ip = service.dns_server
        ex1_device = root.devices.device['ex1']
        ex1_config = ex1_device.config
        dns_server_list = ex1_config.sys.dns.server
        dns_server_list.create(dns_ip)
Save the file and let's see the service in action!
Start the NSO from the running directory:
$ cd $NSO_RUNDIR; ncsThen start the NSO CLI:
$ ncs_cli -C -u adminIf you have started a fresh NSO instance, the packages are loaded automatically. Still, there's no harm in requesting a package reload anyway:
admin@ncs# packages reload
reload-result {
    package dns-config
    result true
}
reload-result {
    package router-nc-1.0
    result true
}
As you will be making changes on the simulated routers, make sure NSO has their current configuration with the devices sync-from command.
admin@ncs# devices sync-from
sync-result {
    device ex0
    result true
}
sync-result {
    device ex1
    result true
}
sync-result {
    device ex2
    result true
}
Now you can test out your service package by configuring a service instance. First, enter the configuration mode.
admin@ncs# configConfigure a test instance and specify the DNS server IP address:
admin@ncs(config)# dns-config test dns-server 192.0.2.1The easiest way to see configuration changes from the service code is to use the commit dry-run command.
admin@ncs(config-dns-config-test)# commit dry-run
cli {
    local-node {
        data  devices {
                  device ex1 {
                      config {
                          sys {
                              dns {
             +                    # after server 10.2.3.4
             +                    server 192.0.2.1;
                              }
                          }
                      }
                  }
              }
             +dns-config test {
             +    dns-server 192.0.2.1;
             +}
    }
}
The output tells you the new DNS server is being added in addition to an existing one already there. Commit the changes:
admin@ncs(config-dns-config-test)# commitFinally, change the IP address of the DNS server:
admin@ncs(config-dns-config-test)# dns-server 192.0.2.8With the help of commit dry-run observe how the old IP address gets replaced with the new one, without any special code needed for provisioning.
admin@ncs(config-dns-config-test)# commit dry-run
cli {
    local-node {
        data  devices {
                  device ex1 {
                      config {
                          sys {
                              dns {
             -                    server 192.0.2.1;
             +                    # after server 10.2.3.4
             +                    server 192.0.2.8;
                              }
                          }
                      }
                  }
              }
              dns-config test {
             -    dns-server 192.0.2.1;
             +    dns-server 192.0.2.8;
              }
    }
}The DNS configuration example intentionally performs very little configuration, a single line really, in order to focus on the service concepts. In practice, services can become more complex in two different ways. First, the DNS configuration service takes the IP address of the DNS server as an input parameter, supplied by the operator. Instead, the provisioning code could leverage another system, such as an IP Address Management (IPAM), to get the required information. In such cases, you have to add additional logic to your service code to generate the parameters (variables) to be used for configuration.
Second, generating the configuration from the parameters can become more complex when it touches multiple subsystems or spans across multiple devices. An example would be a service that adds a new VLAN, configures an IP address and a DHCP server, and adds the new route to a routing protocol. Or perhaps the service has to be duplicated on two separate devices for redundancy.
An established approach to the second challenge is to use a templating system for configuration generation. Templates separate the process of constructing parameter values from how they are used, adding a degree of flexibility and decoupling. NSO uses XML-based configuration (config) templates, which you can invoke from provisioning code or link directly to services. In the latter case, you don't even have to write any Python code.
XML templates are snippets of configuration, similar to the CDB init files, but more powerful. Let's see how you could implement the DNS configuration service using a template instead of navigating the data model with Python.
While you are free to write an XML template by hand, it has to follow the target data model. Fortunately, the NSO CLI can help you and do most of the hard work for you. First, you'll need a sample instance with the desired configuration. As you are configuring the DNS server on a router and the ex1 device already has one configured, you can just reuse that one. Otherwise, you might configure one by hand, using the CLI. You do that by displaying the existing configuration in the XML format and saving it to a file, by piping it through the display xml and save filters, as shown here:
admin@ncs#show running-config devices device ex1 config sys dns | display xml<config xmlns="http://tail-f.com/ns/config/1.0"> <devices xmlns="http://tail-f.com/ns/ncs"> <device> <name>ex1</name> <config> <sys xmlns="http://example.com/router"> <dns> <server> <address>192.0.2.1</address> </server> </dns> </sys> </config> </device> </devices> </config> admin@ncs#show running-config devices device ex1 config sys dns | \ display xml | save template.xml
The file structure of a package usually contains a
templates folder and that is where the template
belongs. When loading packages, NSO will scan this folder and
process any .xml files it finds as templates.
Of course, a template with hard-coded values is of limited use, as
it would always produce the exact same configuration. It becomes a lot
more useful with variable substitution. In its simplest form, you define
a variable value in the provisioning (Python) code and reference it from
the XML template, by using curly braces and a dollar sign:
{$VARIABLE}. Also, many users prefer to keep the variable
name uppercased to make it stand out more from the other XML elements
in the file. For example, in the template XML file for the DNS service,
you would likely replace the IP address 192.0.2.1 with
the variable {$DNS_IP} to control its value from the
Python code.
You apply the template by creating a new
ncs.template.Template object and calling its
apply() method. This method takes the name of the XML
template as the first parameter, without the trailing
.xml extension, and an object of type
ncs.template.Variables as the second parameter.
Using the Variables object, you provide values
for the variables in the template.
template_vars = ncs.template.Variables()
template_vars.add('VARIABLE', 'some value')

template = ncs.template.Template(service)
template.apply('template', template_vars)
In fact, variables in a template can take a more complex form of
an XPath expression, where the parameter for the
Template constructor comes into play. This parameter
defines the root node (starting point) when evaluating XPath paths.
Use the provided service variable, unless you
specifically need a different value.
It is what the so-called template-based services use as well.
Template-based services are no-code, pure template services that
only contain a YANG model and an XML template.
Since there is no code to set the variables, they must rely on XPath for
the dynamic parts of the template. Such services still have a YANG data
model with service parameters, that XPath can access.
For example, if you have a parameter leaf defined in the service YANG file
by the name dns-server, you can refer to its value with the
{/dns-server} code in the XML template.
Likewise, you can use the same XPath in a template of a Python service. Then you don't have to add this parameter to the variables object but can still access its value in the template, saving you a little bit of Python code.
-
No previous NSO or netsim processes are running. Use the ncs --stop and ncs-netsim stop commands to stop them if necessary.
-
NSO local install with a fresh runtime directory has been created by the ncs-setup --dest ~/nso-lab-rundir or similar command.
-
The environment variable
NSO_RUNDIRpoints to this runtime directory, such as set by the export NSO_RUNDIR=~/nso-lab-rundir command. It enables the below commands to work as-is, without additional substitution needed.
The “getting-started/developing-with-ncs” set of examples
contains three simulated routers that you can use for this scenario.
The 0-router-network directory holds the data
necessary for starting the routers and connecting them to your NSO
instance. First, change the current working directory:
$ cd $NCS_DIR/examples.ncs/getting-started/developing-with-ncs/0-router-networkFrom this directory, you can start a fresh set of routers by running the following make command:
$ make showcase-clean-start
< ... output omitted ... >
DEVICE ex0 OK STARTED
DEVICE ex1 OK STARTED
DEVICE ex2 OK STARTED
make: Leaving directory 'examples.ncs/getting-started/developing-with-ncs/0-router-network'
The routers are now running. The required NED package and a CDB
initialization file, ncs-cdb/ncs_init.xml, were also
added to your NSO instance. The latter contains connection details for
the routers and will be automatically loaded on the first NSO start.
In case you're not using a fresh working directory, you may need to
use the ncs_load command to load the file manually.
Older versions of the system may also be missing the above
make target, which you can add to the
Makefile yourself:
showcase-clean-start:
        $(MAKE) clean all
        cp ncs-cdb/ncs_init.xml ${NSO_RUNDIR}/ncs-cdb/
        cp -a ../packages/router ${NSO_RUNDIR}/packages/
ncs-netsim startThe DNS configuration service that you are implementing will
have three parts: the YANG model, the service code, and the XML template.
You will put all of these in a package named “dns-config”.
First, navigate to the packages subdirectory:
$ cd $NSO_RUNDIR/packagesThen run the following command to set up the service package:
$ ncs-make-package --build --service-skeleton python dns-config
bin/ncsc  `ls dns-config-ann.yang  > /dev/null 2>&1 && echo "-a dns-config-ann.yang"` \
              -c -o ../load-dir/dns-config.fxs yang/dns-config.yang
In case you are building on top of the previous showcase, the package folder may already exist and will be updated.
You can leave the YANG model as is for this scenario but you need
to add some Python code that will apply an XML template during
provisioning. In a text or code editor open the
main.py file, located inside
dns-config/python/dns_config/, and find the
definition for the cb_create() function:
    @Service.create
    def cb_create(self, tctx, root, service, proplist):
        ...
You will define one variable for the template, the IP address of
the DNS server. To pass its value to the template, you have to create
the Variables object and add each variable, along
with its value. Replace the body of the cb_create()
function with the following:
        template_vars = ncs.template.Variables()
        template_vars.add('DNS_IP', '192.0.2.1')
The template_vars object now contains a value
for the DNS_IP template variable, to be used with the
apply() method that you are adding next:
        template = ncs.template.Template(service)
        template.apply('dns-config-tpl', template_vars)
Here, the first argument to apply() defines
the template to use. In particular, using
“dns-config-tpl”, you are requesting the template from the
dns-config-tpl.xml file, which you will be creating
shortly.
This is all the Python code that is required. The final, complete
cb_create method is as follows:
    @Service.create
    def cb_create(self, tctx, root, service, proplist):
        template_vars = ncs.template.Variables()
        template_vars.add('DNS_IP', '192.0.2.1')
        template = ncs.template.Template(service)
template.apply('dns-config-tpl', template_vars)The most straightforward way to create an XML template is by using the NSO CLI. Return to the running directory and start the NSO:
$ cd $NSO_RUNDIR && ncs --with-package-reloadThe --with-package-reload option will make sure
NSO loads any added packages and save a
packages reload command on the NSO CLI.
Next, start the NSO CLI:
$ ncs_cli -C -u adminAs you are starting with a new NSO instance, first invoke the sync-from action.
admin@ncs# devices sync-from
sync-result {
    device ex0
    result true
}
sync-result {
    device ex1
    result true
}
sync-result {
    device ex2
    result true
}
Next, make sure that the ex1 router already has an existing entry for a DNS server in its configuration.
admin@ncs# show running-config devices device ex1 config sys dns
devices device ex1
 config
  sys dns server 10.2.3.4
  !
 !
!
Pipe the command through the display xml and
save CLI filters to save this configuration in an XML
format. According to the Python code, you need to create a template file
dns-config-tpl.xml.
Use packages/dns-config/templates/dns-config-tpl.xml
for the full file path.
admin@ncs# show running-config devices device ex1 config sys dns \
| display xml | save packages/dns-config/templates/dns-config-tpl.xml
At this point you have created a complete template that will
provision the 10.2.3.4 as the DNS server on the ex1 device. The only
problem is, the IP address is not the one you have specified in the Python
code. To correct that, open the dns-config-tpl.xml
file in a text editor and replace the line that reads
<address>10.2.3.4</address> with the following:
<address>{$DNS_IP}</address>The only static part left in the template now is the target device
and it's possible to parameterize that, too. The skeleton, created by
the ncs-make-package command, already contains a node
device in the service YANG file. It is there to allow the
service operator to choose the target device to be configured.
leaf-list device {
  type leafref {
    path "/ncs:devices/ncs:device/ncs:name";
  }
}
One way to use the device service parameter is to read
its value in the Python code and then set up the template parameters
accordingly. However, there is a simpler way with XPath.
In the template, replace the line that reads
<name>ex1</name> with the following:
<name>{/device}</name>The XPath expression inside the curly braces instructs NSO
to get the value for device name from the service instance's data,
namely the node called device.
In other words, when configuring a new service instance, you have to
add the device parameter, which selects the router for provisioning.
The final XML template is then:
<config xmlns="http://tail-f.com/ns/config/1.0">
  <devices xmlns="http://tail-f.com/ns/ncs">
    <device>
      <name>{/device}</name>
      <config>
        <sys xmlns="http://example.com/router">
          <dns>
            <server>
              <address>{$DNS_IP}</address>
            </server>
          </dns>
        </sys>
      </config>
    </device>
  </devices>
</config>
Remember to save the template file and return to the NSO CLI. Because you have updated the service code, you have to redeploy it for NSO to pick up the changes:
admin@ncs# packages package dns-config redeploy
result true]
Alternatively, you could call the packages reload command, which does a full reload of all the packages.
Next, enter the configuration mode:
admin@ncs# configAs you are using the device node in the service model for target router selection, configure a service instance for the ex2 router in the following way:
admin@ncs(config)# dns-config dns-for-ex2 device ex2Finally, using the commit dry-run command, observe the ex2 router being configured with an additional DNS server.
admin@ncs(config-dns-config-dns-for-ex2)# commit dry-runAs a bonus for using an XPath expression to a leaf-list in the service template, you can actually select multiple router devices in a single service instance and they will all be configured.