Getting Started with Cisco PSIRT openVuln API
The Cisco Product Security Incident Response Team (PSIRT) openVuln API is a RESTful API that allows customers to obtain Cisco Security Vulnerability information in different machine-consumable formats.
To get started you require to have a registered cisco.com account and have gone through the process of registering your application. See the Authentication section to acomplish this.
Try them out!
The best way to learn about the PSIRT openVuln APIs is to use them and see how easy it is. Before diving into programmatically calling the REST APIs, it is good to get a better understanding of the APIs by trying them out manually using a REST client. There are many REST client tools available, and you can use whichever tool you are most comfortable with, but Postman was used in our previous examples.
Additionally you can use the API reference in this documenation to make your first call.
Using CURL and Postman
In Authentication you can see an example of making your first API call with both CURL and Postman.
Using PSIRT OpenVuln Interactive API
In this example we will use the PSIRT OpenVuln Interactive Documentation API to make a test call
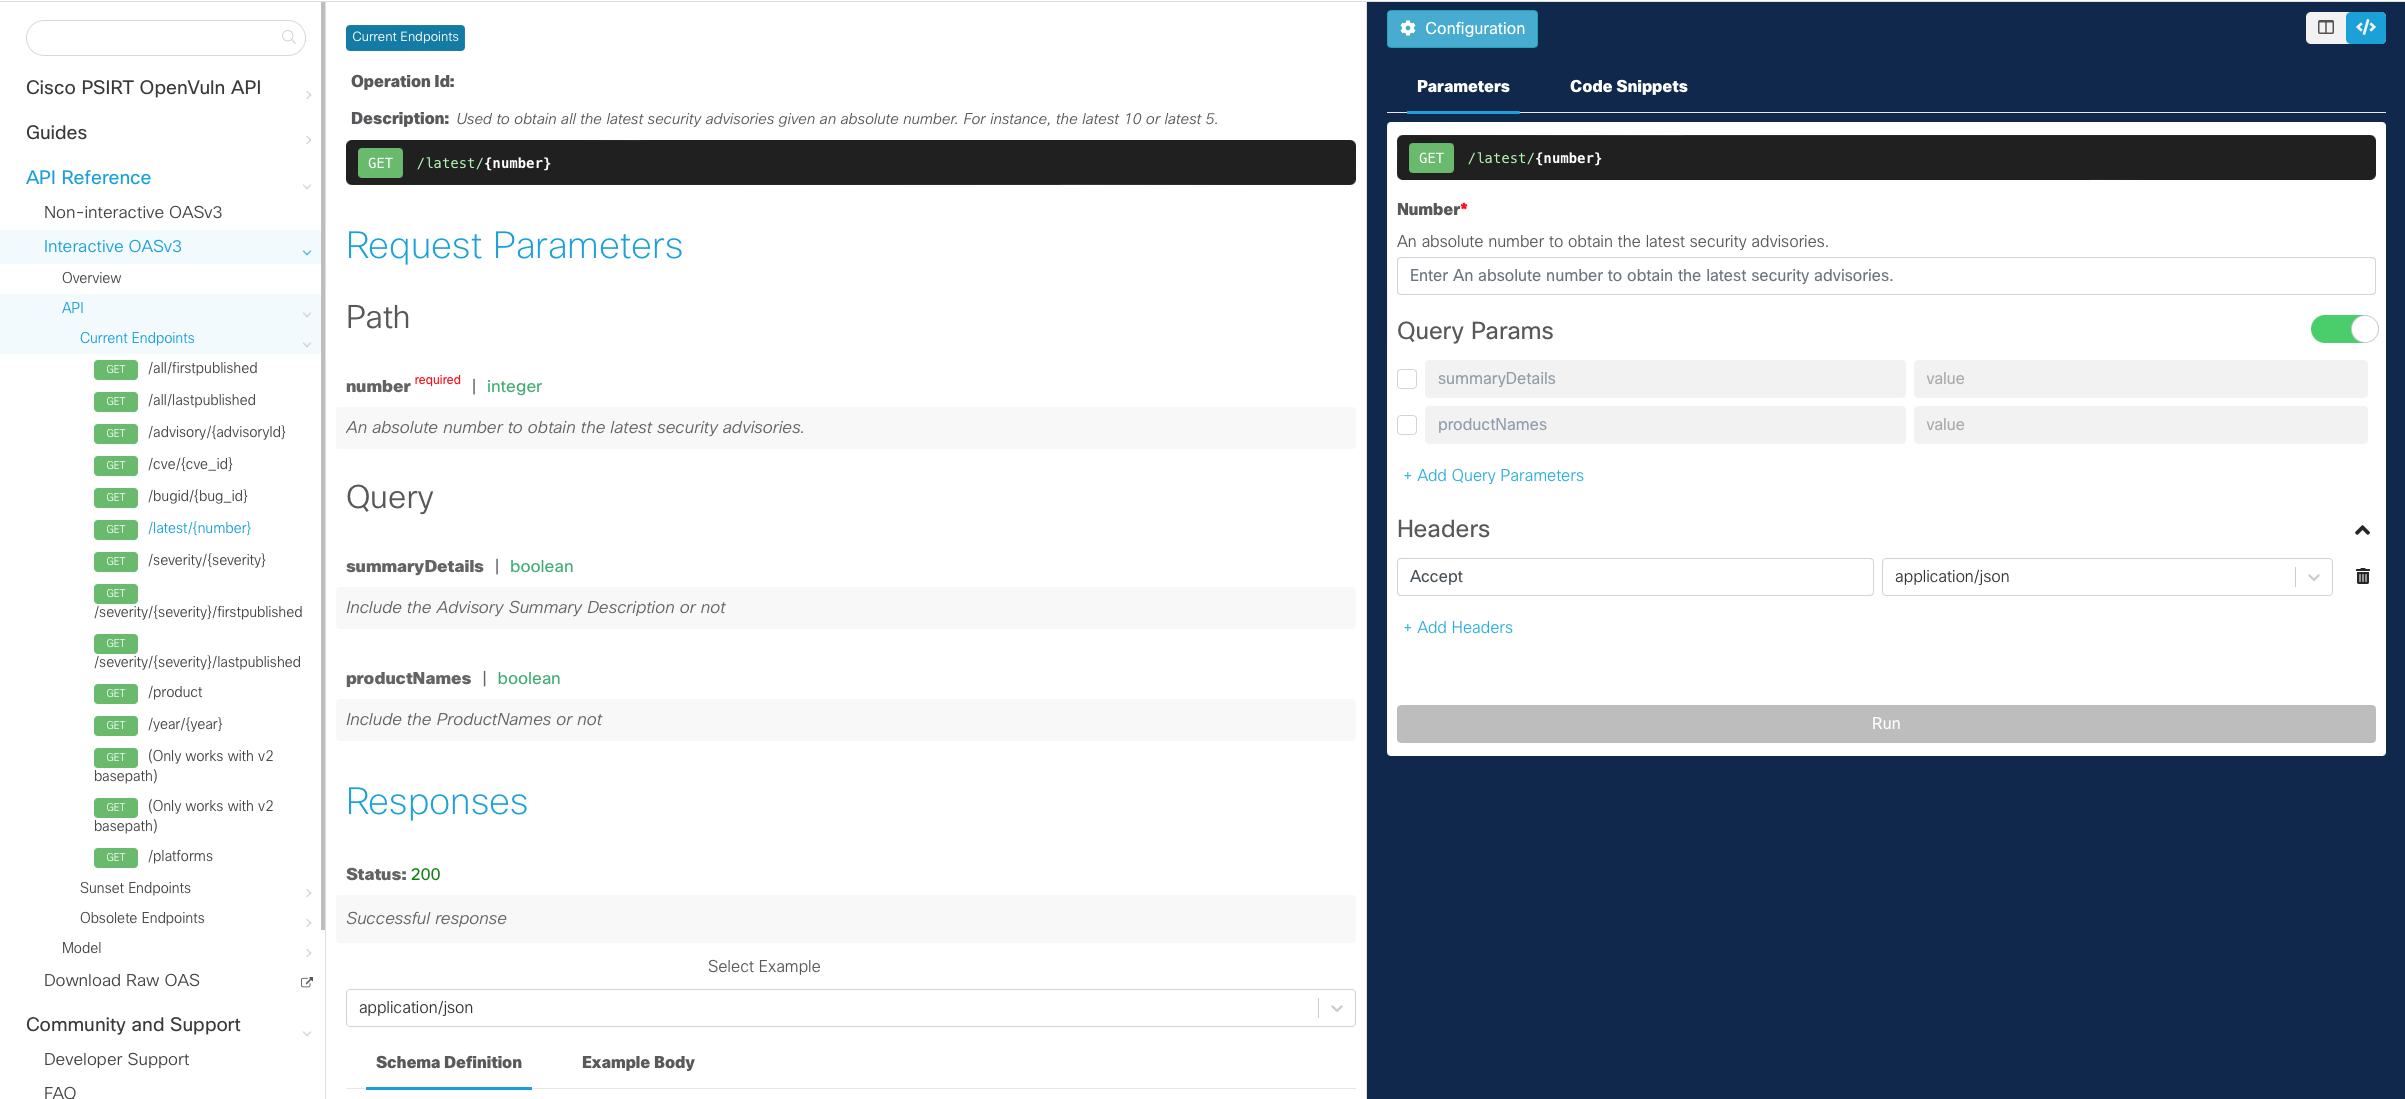
- Goto the API reference Interactive OASv3 tab.
- Click on API and choose a endpoint from the list of Current Endpoints (In this example we are using /cve/{cve_id} endpoint.
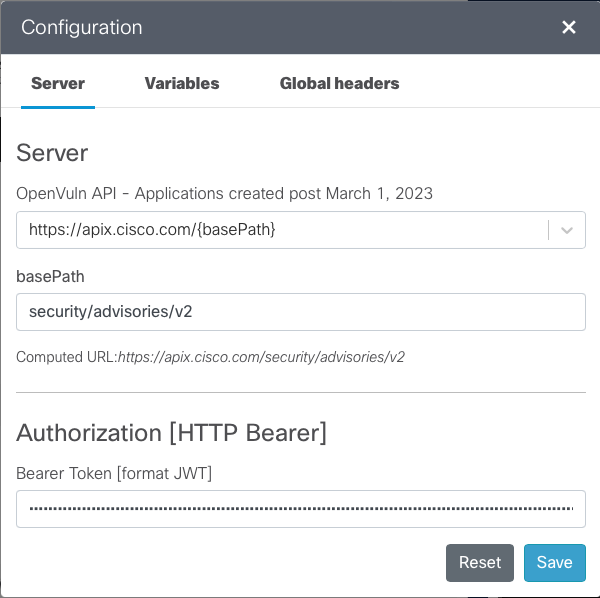
- We need to obtain a token to proceed; you can get this either via CURL or Postman as shown on the Authentication page. For this example we will use the following token:
{"token_type":"Bearer","expires_in":3600,"access_token":"eyJraWQiOiI4MUN0dlNFZzFwYzRHNmNBRjFTU0hYNVVaWk5kZ3hzMG1lOVFLZjVocGtzIiwiYWxnIjoiUlMyNTYifQ.eyJ2ZXIiOjEsImp0aSI6IkFULjMwYnF0QjJKdEpmUHpra1BGUGVZUGtRNXpocWtTbXJ5NjJqWW5Cb09oTDQiLCJpc3MiOiJodHRwczovL2lkLmNpc2NvLmNvbS9vYXV0aDIvZGVmYXVsdCIsImF1ZCI6ImFwaTovL2RlZmF1bHQiLCJpYXQiOjE2ODMwMDc0OTAsImV4cCI6MTY4MzAxMTA5MCwiY2lkIjoiNGVwd3U1ajJzc3k5cGg4OHlxNnBrZTc4Iiwic2NwIjpbImN1c3RvbXNjb3BlIl0sImFjY2Vzc19sZXZlbCI6MSwic3ViIjoiNGVwd3U1ajJzc3k5cGg4OHlxNnBrZTc4IiwiZnVsbF9uYW1lIjoibnVsbCBudWxsIiwiYXpwIjoiNGVwd3U1ajJzc3k5cGg4OHlxNnBrZTc4In0.dOEPzpnK9P-xF0--DaDl-Rub-ZlHlebv4Ai4GbaFevZReB4gzfNQljIuhqsHsTDSHIIc8G-M0iQxWHT9mx6TK5WARDrEmJA0qE9n6rV1cTxiMe8SapzT_iqbowIFA5jbfgWpApFwqnGh8tJDWFLClkT1xxQAoIhWrnmMBpZx3MhjV4MnQmSXsJOcFnyj_iSCKhR-6nQWa3qCcYb6JkgiT0nyfHWQfCUcL4QZzo5LX_ilOrGndE6Pc3IPAl6XFVqqsxmWbs2wFEsuqPP-a4sopHAV_FyEeqPTi9uI9CtzPOW0Ya_GGjJ8BX_yJZ0A_zdN2zj9v36hXXfcZuz2JoXsAw","scope":"customscope"} - Click on Configuration in the Parameters pane.
- Choose the server you are using; and the base path will autopopulate.
- In the Authorization [HTTP Bearer] field paste your access token that you obtained in Step 3.
- Click on Save.
Now we are ready to make our first API call.
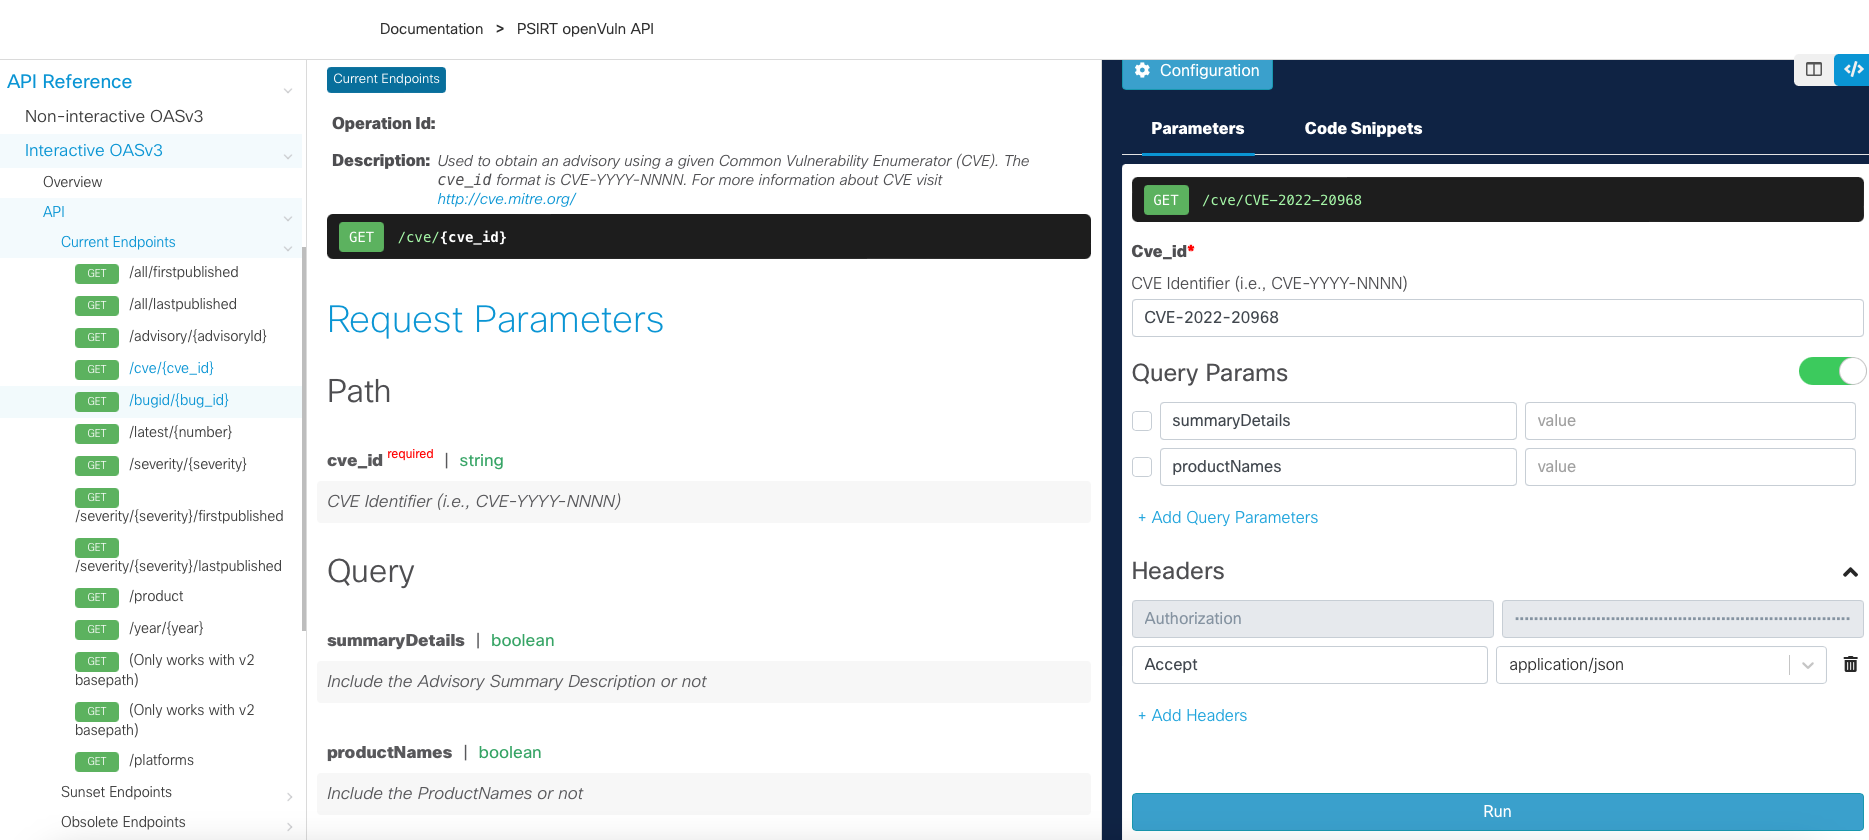
In this example we are querying for CVE-2022-20968 as shown in the following example. Type this value into the CVE Identifier field in the Parameters pane and click Run. If Run is greyed out; go back to Step 4.
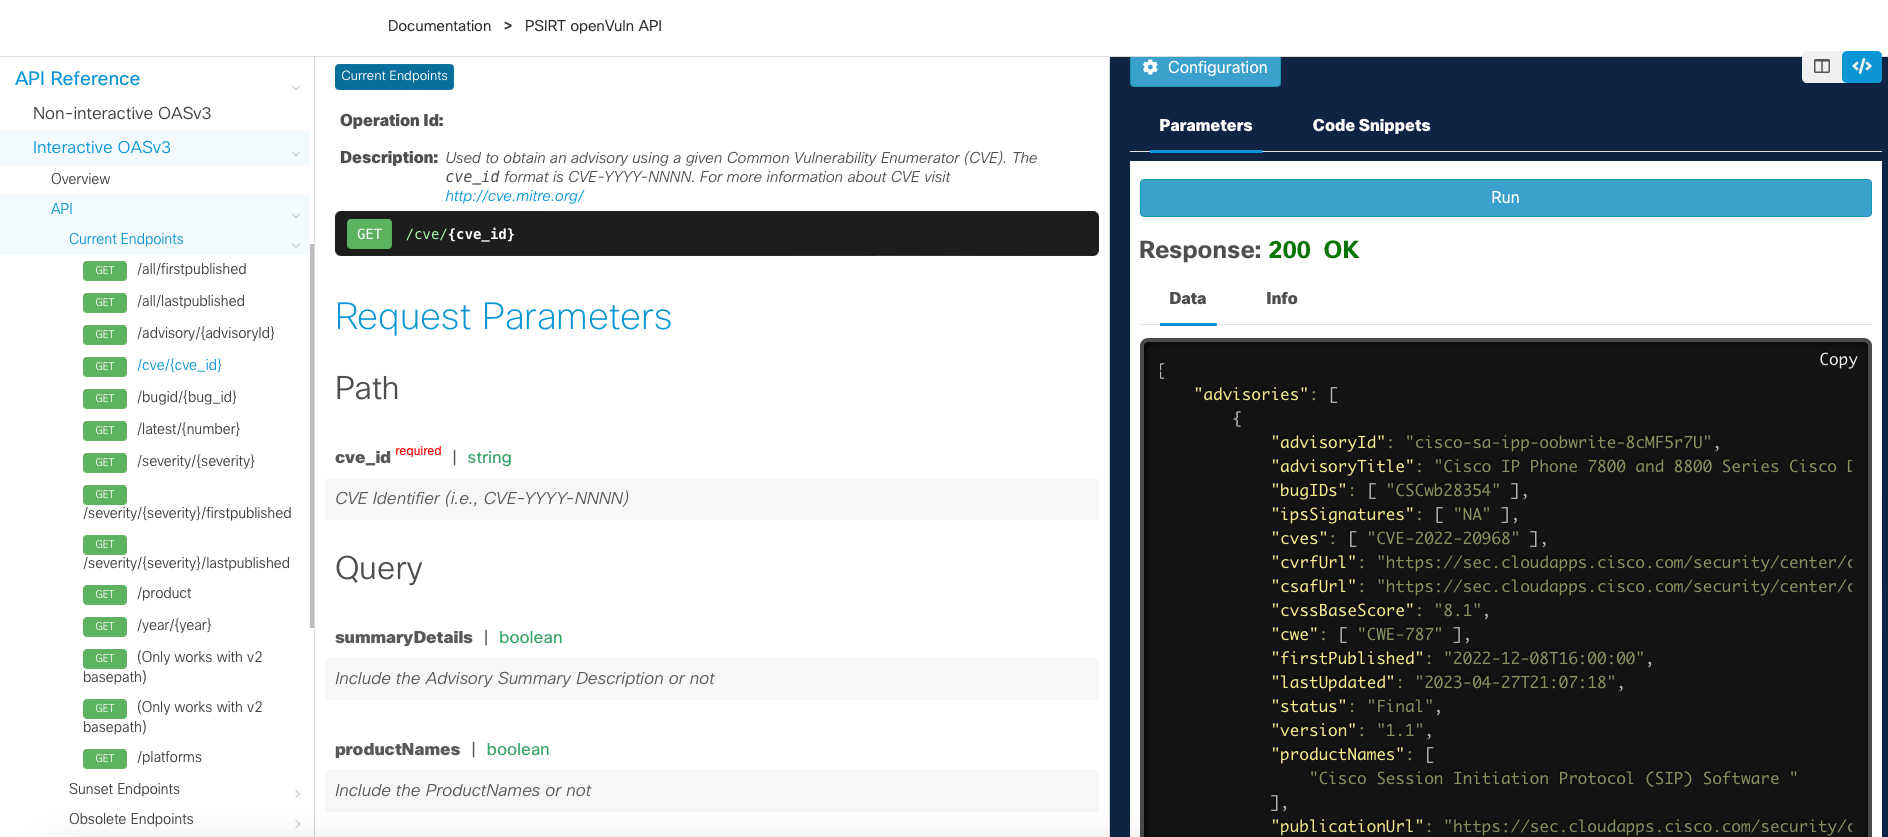
If all is successful you will receive a Response 200 OK and the data in json format as shown below.
If unsuccessful; ensure you have followed the above steps correctly and have obtained the token correctly.