Authentication
The Security Cloud Control API provides a standard REST interface and supports the bearerAuth credentials flow. To use the Security Cloud Control API you need to acquire an API key from the Security Cloud Control user interface.
Note: API keys, passwords, secrets, and tokens allow access to your private customer data. Never share your credentials with another user or organization.
API Keys are created based on the designated role. The permissions granted by the role determine which APIs can be executed by a given API key.
Every organization will begin with two roles: member and administrator. Member is able to access the APIs to request information, but cannot create or modify organizations, nor create new users. Administrators can create and modify organizations and users.
Each organization can also create additional custom roles with specific permissions to meet their use cases.
Users will not be able to see roles with a greater access than their own.
How to Create an API Key
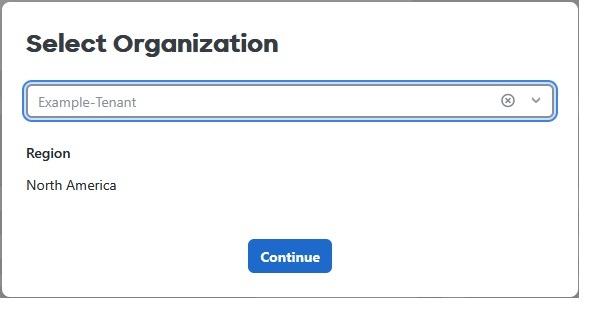
Log in to security.cisco.com in your browser.
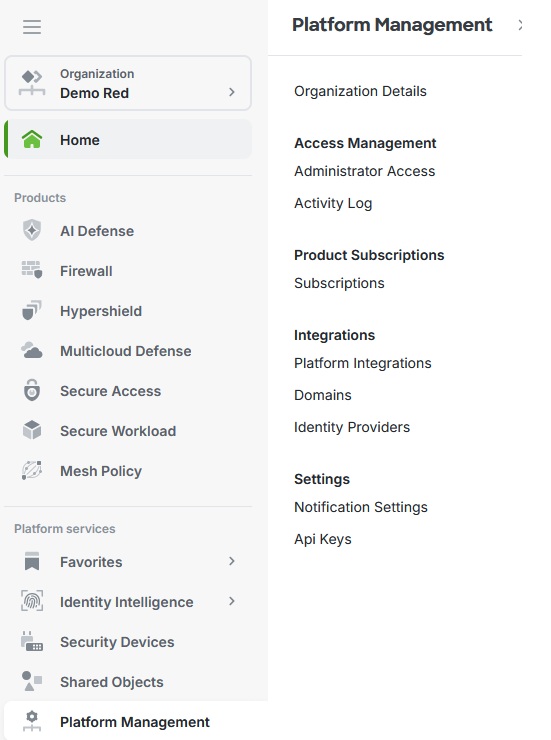
Select the organization.
If this is a Managed organization, under Platform Management go to “API Keys".
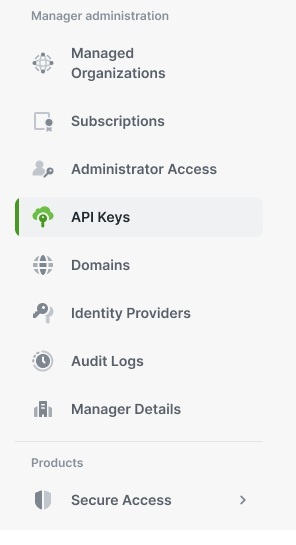
If this is a Manager organization, select "API Keys" in the left navigation menu.
Select “Generate API key”.

Fill in a key name and an optional description. Under "Key Expiry", select either a specific expiration date, or that the key will not expire.
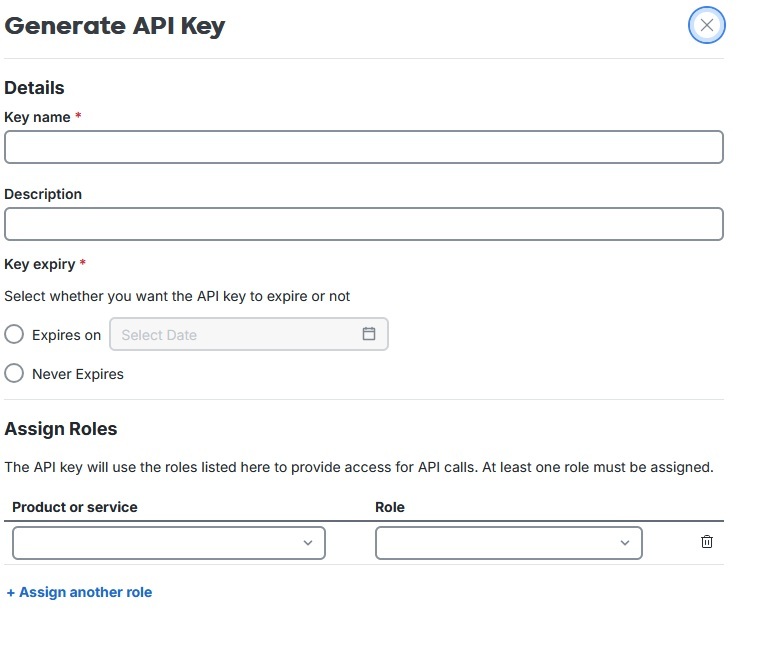
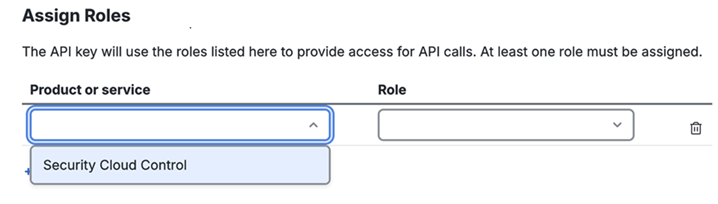
Under "Assign Roles", for the Product or Service select "Security Cloud Control".
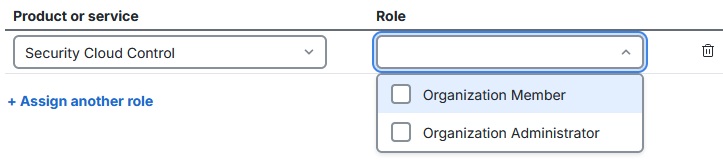
Drop down the roles and select the desired role. You will not be able to see roles before selecting the product or service. While "Organization Member" should always be available, additional roles may be present depending on the organization and level of access. You may assign multiple roles to the key. Roles assigned to a key cannot be edited after a key is generated.
Click “Generate” to generate the key.
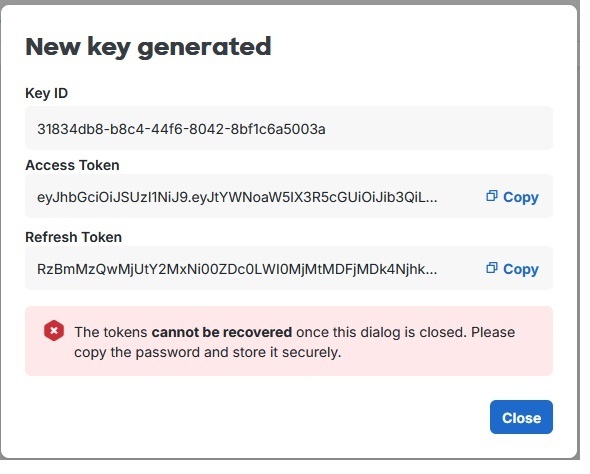
This will bring up the new Key ID, Access Token, and Refresh Token. Note that these tokens cannot be accessed or recovered later, so be sure to copy them and store them securely.
Use the Access Token to make API requests. The Access Token is valid for 18 hours.
Below is an example of an authentication request, with <token> standing in for the Access token:
curl --location 'https://api.security.cisco.com/v1/organizations/<orgId>/subscriptions' \
--header 'Authorization: Bearer <token>'
The Refresh Token is used to get a new Access and Refresh Tokens. The Refresh Token is valid for 60 days. Refresh the token using the Refresh Token operation.
If the Refresh Token is allowed to expire you will not be able acquire a new Access or Refresh Token for this key.
How to Refresh an Access Token
Refresh the token using the Refresh Token operation.
Below is an example of a token refresh request, with <refreshToken> standing in for the refresh token:
curl --location 'https://api.security.cisco.com/v1/organizations/<orgId>/apiKeys/<apiKeyId>/token' \
--header 'Authorization: Bearer <refreshToken>' \
--header 'Content-Type: application/x-www-form-urlencoded' \
--data-urlencode 'grant_type=refresh_token'
Response:
{
    "permissions": [
        {
            "roleId": "<role_id>",
            "roleName": "Security Cloud Control - Administrator",
            "product": "Security Cloud Control",
            "productKey": "enterprise",
            "roleDisplayName": "Organization Administrator",
            "productInstanceId": "enterprise-default-instance",
            "roleType": "static",
            "applicationScopeIds": []
        }
    ],
    "access_token": "<access_token>",
    "expires_in": 64799,
    "refresh_token": "<refresh_token>",
    "refresh_token_expires_in": 5124465,
    "token_type": "Bearer"
}
Notice the expires_in field which gives the time in seconds until the access token expires, and the refresh_token_expires_in field which gives the time in seconds until the refresh token expires. It is important to be aware of when these tokens expire.
How to Disable an API Key
Locate the key in your list of API Keys.
Drop down the menu to the right and select "Disable". If a key is disabled, it can be enabled at any time.
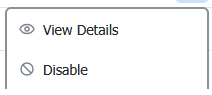
To enable a disabled key, drop down the menu and select "Enable".
Key Expiry
- Authentication tokens expire after 18 hours.
- Refresh tokens expire after 60 days.
- Refresh tokens cannot be refreshed if allowed to expire.
- When you perform a refresh, you get a new authentication token which will last for another 18 hours.
- Always use the refresh token given in your most recent refresh.
- Although refresh tokens expire after 60 days, to maintain an active account you should perform the Refresh Token operation at least once every 50 days.