Push API
Introduction
Push API is Meraki's event-driven data delivery service. Instead of polling the Dashboard API repeatedly to detect changes, you configure a webhook endpoint once and receive data as it becomes available.
The core model is simple: your organization subscribes to a topic (a stream of data, like configuration changes or device availability changes). When new data is available, Meraki sends it to your receiver - an HTTPS webhook endpoint you control. You stop asking. Meraki tells you.
Push API notifications do not count against the organization's API rate limit
Benefits
Reduce API call volume. Heavy polling - especially for device status and configuration changes - consumes a large portion of your organization's API budget, leaving less capacity for actual provisioning. Push API delivers data continuously without ongoing requests.
Near-real-time visibility. Polling every 10–15 minutes creates blind spots. Push API enables faster alerting and automated response.
Scale without linear cost. With polling, adding more devices means more API calls. With Push API, the message volume is driven by change frequency, not device count.
Simpler architecture. No scheduler, no polling loop, no change-detection logic. Subscribe once; receive continuously. Your webhook receiver handles the rest.
Use Cases
Configuration drift detection
Problem: You poll getOrganizationConfigurationChanges on a schedule to audit unauthorized changes or trigger compliance workflows. High-frequency polling is needed to catch changes quickly, but this burns API budget.
With Push API: Subscribe to the configuration changes topic. Any change - firewall rule update, SSID modification, admin action - is delivered with full change details.
Outcome: Compliance teams catch drift in real time. Automated workflows can trigger on the event without polling overhead.
NOC device availability dashboards
Problem: Your NOC dashboard wait few minutes between polls to show live up/down state.
With Push API: Subscribe to device availability changes. Your dashboard receives a message when a device's availability state changes - fewer messages and shorter response time.
Outcome: Real-time device state in dashboards without proportional API cost.
Key Concepts
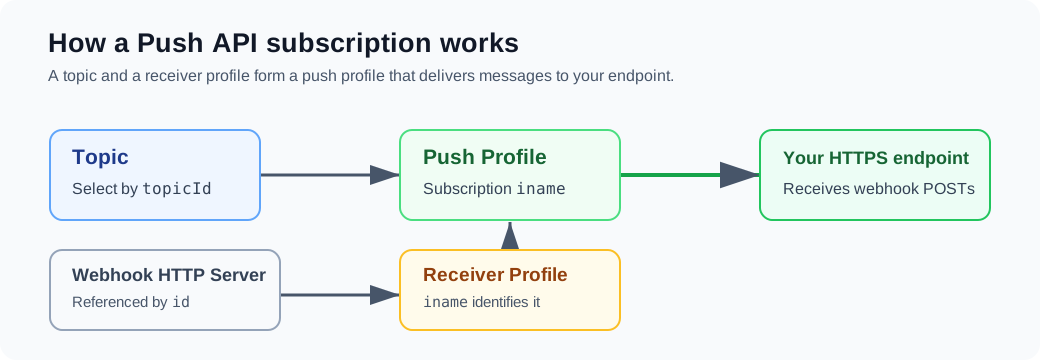
Topic - A stream of Meraki data you can subscribe to, such as device availability changes or configuration changes. Available topics depend on your organization's beta enrollment. Use the List Push Topics endpoint to see what's available to your org.
Receiver - An HTTPS webhook endpoint you control. Meraki delivers messages here via HTTP POST.
Receiver Profile - A Push API resource that registers your webhook endpoint. It wraps a Meraki webhook HTTP server with an immutable name for use in subscriptions.
Push Profile - A subscription: the combination of a topic and a receiver profile. Creating a push profile tells Meraki to start sending that topic's data to that receiver.
iname (immutable name) - A stable, human-readable identifier you assign to receiver profiles and push profiles. It cannot be changed after creation and is used in update and delete operations. Choose names that are descriptive and durable (e.g. config_changes_noc).
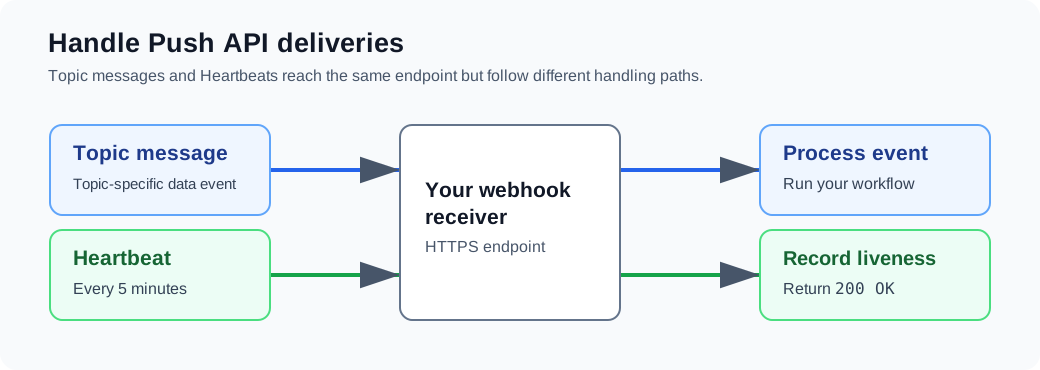
Heartbeat - A message sent every 5 minutes to every active push profile. It confirms the delivery pipeline is healthy. Your receiver should check for "topic": "heartbeat" and use them for liveness monitoring.
Prerequisites
Before you configure Push API, ensure you have:
- Full organization admin access - Required to create and manage push configurations.
- An internet-accessible HTTPS webhook endpoint - Must have a valid SSL certificate from a trusted CA; self-signed certificates are not supported.
- An API client - at this stage, Push API can be configured ONLY via API. There is no Dashboard page for these configurations.
Testing without a receiver? webhook.site provides a temporary HTTPS endpoint you can use to inspect messages during initial setup.
Configuration Guide
Beta notice: Meraki Push API is currently in beta. Features, schemas, and supported capabilities may change, including in ways that are not backward compatible. We reserve the right to make breaking changes during the beta period.
Step 1: Create a webhook receiver
Push API delivers messages using Meraki's existing webhook infrastructure. First, register your endpoint as an org-wide HTTP server.
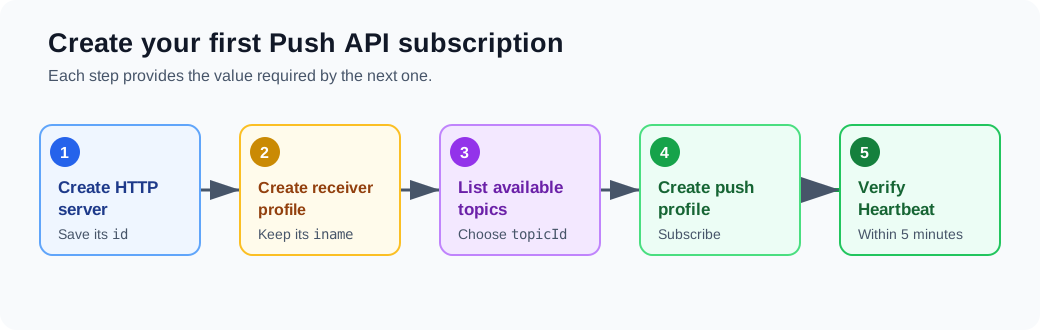
Use Create Organization Webhooks HTTP Server to create the receiver. Use the built-in Push payload template wpt_00008, and save the returned HTTP server id; you will use it in Step 2. If your receiver requires another format, first create a custom payload template with the Dashboard API.
Step 2: Create a push receiver profile
Register your webhook server as a Push API receiver by creating a receiver profile. The iname you choose here is permanent - pick something descriptive.
Use Create Organization API Push Receivers Profile to create the profile, supplying the HTTP server id from Step 1. Record the receiver profile iname; you will use it when creating subscriptions.
Step 3: List available topics
Check which topics are available for your organization. Available topics depend on your beta enrollment.
Use Get Organization API Push Topics to list the topics available to your organization. Use the returned topicId when creating a push profile.
Step 4: Subscribe to a topic
Create a push profile to link a topic to your receiver. This is your subscription - once created, Meraki will start delivering messages for that topic to your receiver.
Use Create Organization API Push Profile to associate a topic with the receiver profile. Give the subscription a descriptive, durable iname.
Step 5: Verify your setup
After creating your first push profile, you should receive a heartbeat message at your receiver within 15 minutes. This confirms the delivery pipeline is working.
To subscribe to additional topics, repeat Step 4 with a different iname and topicId. Each topic requires its own push profile; you can reuse the same receiver profile.
Managing Subscriptions
Use the Dashboard API operation reference to manage your configuration:
- List push profiles
- Update a push profile (for example, to point to a different receiver)
- Delete a push profile
- List receiver profiles
- Update a receiver profile
- Delete a receiver profile
Understanding Messages
All Push API messages follow this structure:
{
  "items": [
    { /* topic-specific data */ }
  ],
  "meta": {
    "sentAt": "2026-04-28T14:30:00Z",
    "source": {
      "organization": {
        "id": "123456"
      },
      "profile": {
        "iname": "config_changes_subscription"
      }
    }
  }
}
items- Array of data objects for the topic. For change-based topics, each item represents one event.meta.sentAt- ISO 8601 timestamp of when the message was sent.meta.source.profile.iname- Identifies which push profile triggered this delivery. Use this to route messages when a single receiver handles multiple subscriptions.
Heartbeat messages
Every push profile generates a heartbeat every 5 minutes:
{
  "items": [],
  "meta": {
    "sentAt": "2026-04-28T14:35:00Z",
    "source": {
      "organization": {
        "id": "123456"
      },
      "profile": {
        "iname": "config_changes_subscription"
      }
    }
  },
  "topic": "heartbeat"
}
Recommended handler pattern: check message.topic === "heartbeat" early in your receiver logic and return 200 OK without further processing. Do not treat a heartbeat as a data event.