Captive Portal with Zapier


Easily extend your WiFi splash page with the Meraki Captive Portal API and Zapier to automate marketing task like emails, surveys, CRM integration.

Use Cases
- Survey processing
- Dynamic network policies
- Trigger business workflows
- Store data in CRM
- Instant engagement
Configuration
There are a few steps to get this going. Once configured, there are tons of possibilities for interacting with the data.
- Configure Meraki network
- Host a Captive Portal
- Zapier Integration
Pre-requisites
- Meraki wireless network
- Zapier account (free will work)
- Web host (As simple as Apache or Github, no server side required)
Captive Portal Application
The splash page is where the user will login to the network, this is called a Captive Portal. This could be a full blown web application or as simple as a static HTML site. For this example, we can use a simple example that can be cloned and used on Github.
Installation
Clone the repository
git clone https://github.com/dexterlabora/excap-clientjs-zapierThe excap-clientjs-zapier/public directory is where the website files reside. You can modify the index.html file to change the splash page. The /js/merak.js file contains the captive portal API logic.
Local
Serve a website
A NodeJS utility to quickly run a web server
Install the utility.
$ npm install -g serveHost the website.
$ cd excap-clientjs-zapier$ serve public

Serving!

      - Local:                  http://localhost:5000
      - On Your Network:        http://192.168.43.51:5000

       Copied local address to clipboard!
ngrok reverse proxy
Install the utility [Mac][Other]
In a new terminal window, run ngrok to make the website available to the public internet.
$ ngrok http 5000ngrok by @inconshreveable (Ctrl+C to quit)
Session Status online
Update update available (version 2.2.8, Ctrl-U to update)
Version 2.2.4
Region United States (us)
Web Interface http://127.0.0.1:4040
Forwarding http://78d1a459.ngrok.io -> localhost:5000
Forwarding https://78d1a459.ngrok.io -> localhost:5000
Connections ttl opn rt1 rt5 p50 p90
0 0 0.00 0.00 0.00 0.00
Meraki
Setup the Meraki network to enable the API integrations. Use your ngrok URL (i.e. https://78d1a459.ngrok.io)
- Configure SSID
- Wireless → Configure → Access Control:
- Splash Authentication: Click-through
- Walled Garden: include Zapier & splashserver addresses
- *.ngrok.io
- hooks.zapier.com
- Wireless → Configure → Splash page:
- Custom splash URL: https://78d1a459.ngrok.io?zap_url=[YourZapURL]]
- Note: We will get the Zap URL in a later step. Update this once obtained in the Zapier section.
- Custom splash URL: https://78d1a459.ngrok.io?zap_url=[YourZapURL]]
- Wireless → Configure → Access Control:
Production Deployment Option
Github
Upload the files to your own Github repository and setup Pages to host your splash page.
Sample URL
https://dexterlabora.github.io/excap-clientjs-zapier/public/index.html?zap_url=https://hooks.zapier.com/hooks/catch/123123/123123/
Test
Connect to the wireless network with your client to see if you are getting redirected to your splash page.

At this point you have a working splash page! Now let’s do some cool stuff with automation.
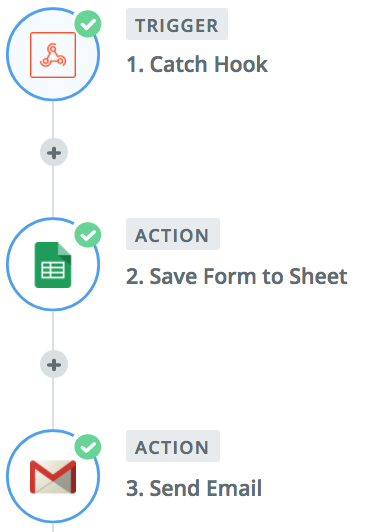
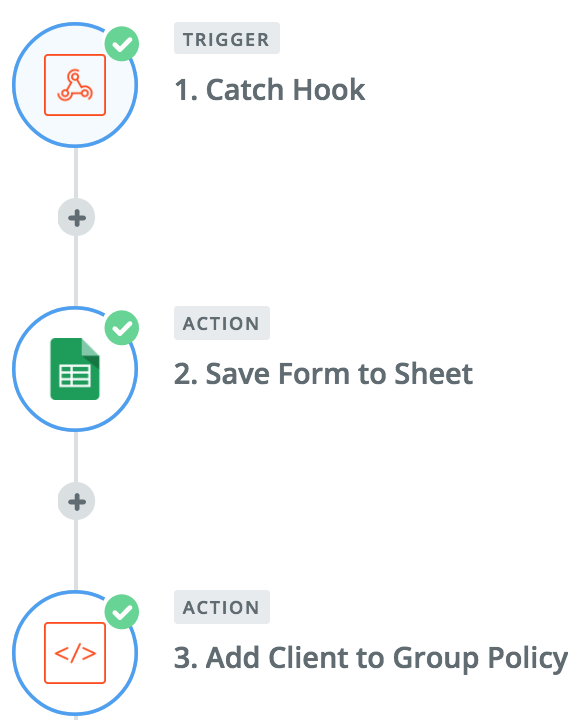
Zapier – Save to Google Sheet and Send Email
The next step is to build a “Zap” within Zapier. This will consist of a Catch Hook trigger followed by a few actions.

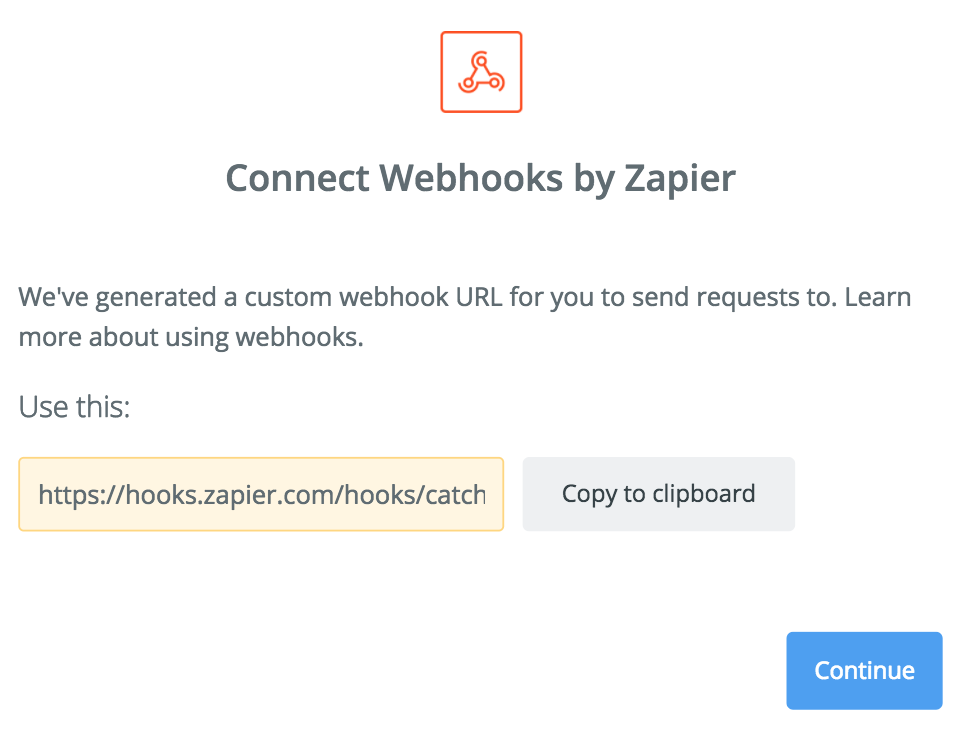
Catch Hook
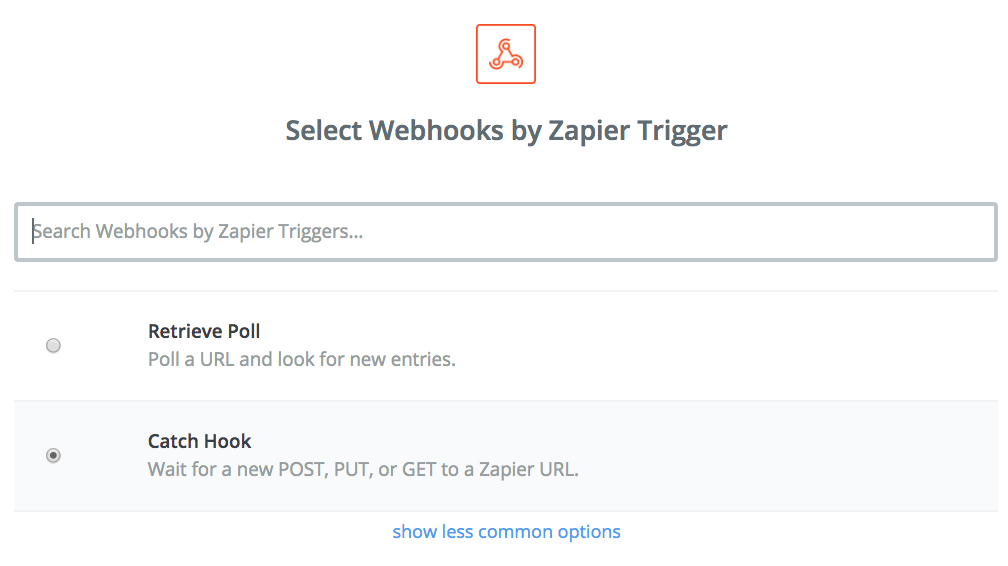
Copy the URL to your clipboard and paste it somewhere to be used for the next step.
Update the Meraki Dashboard with the new splash URL
Wireless → Configure → Splash page: Custom splash URL:
Sample
https://yourServer/?zap_url=https://hooks.zapier.com/hooks/catch/123123/123123/
Test your splash page with a wireless client. This is important because the test data will be recorded by Zapier and used for the next steps.
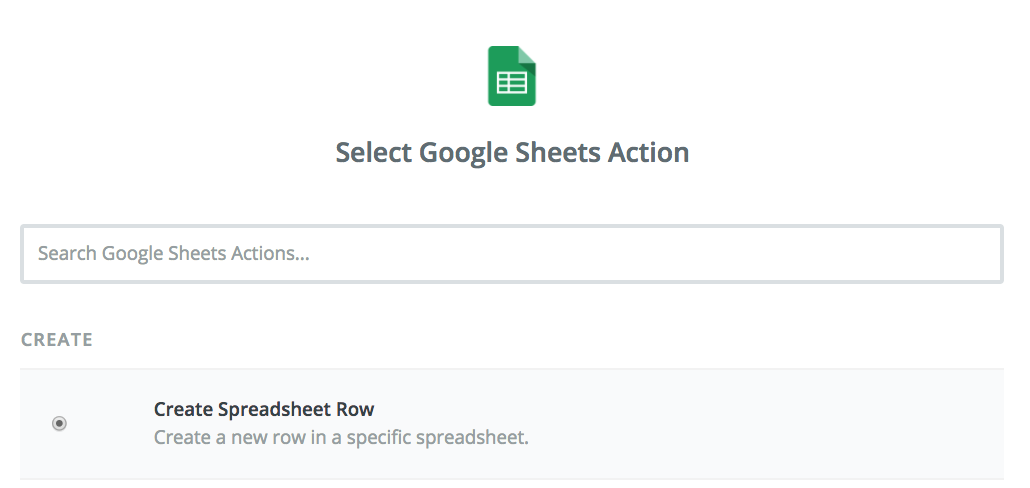
Google Sheet for Storage
Add a Google Sheets Action to Create a Spreadsheet Row
Follow the steps to login to link your Google account.
Select the data names for each of the sheet columns.

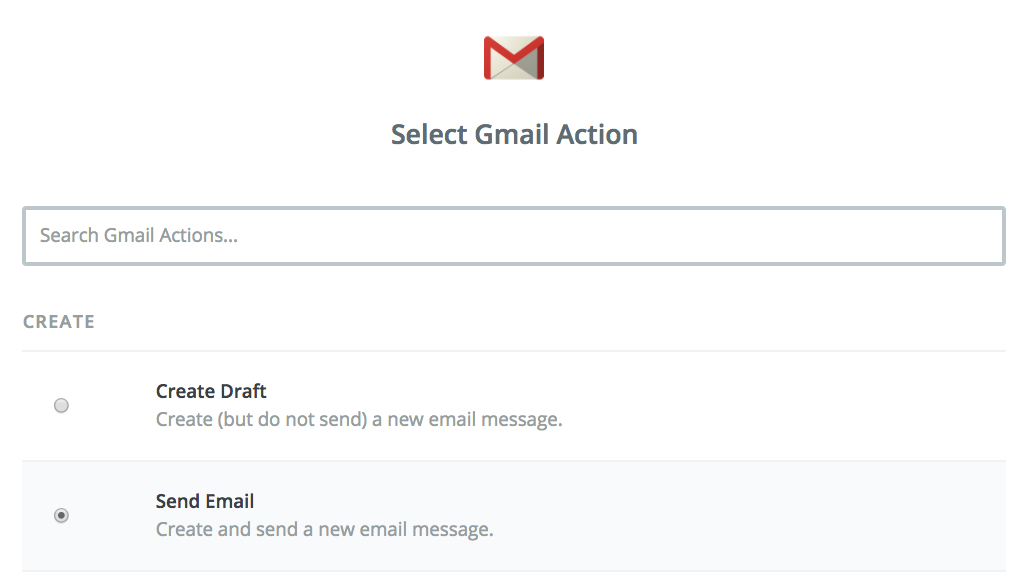
Send an Email
Select the Gmail Action to Send Email
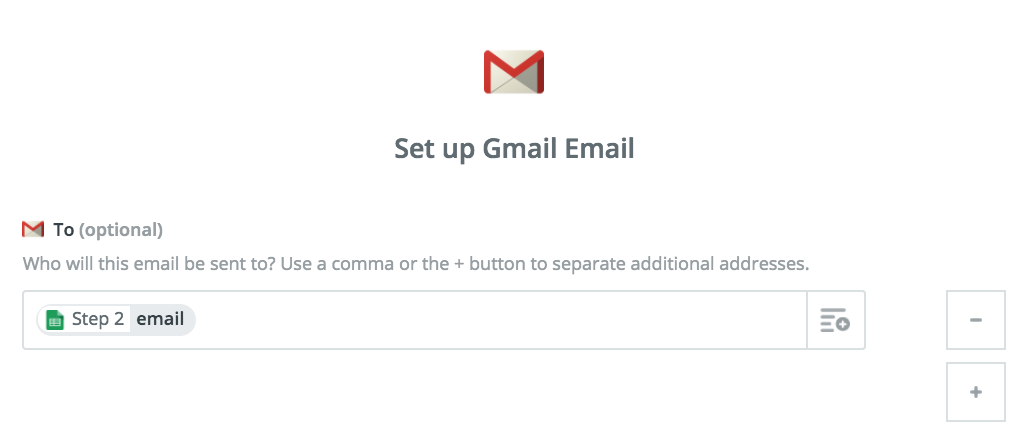
Edit the Template
Include the provided email in the To section.
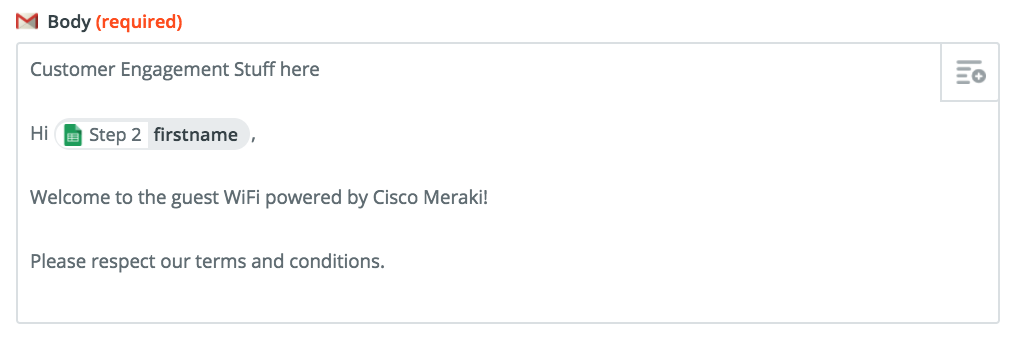
Add a body to the message and feel free to use the provided variables.
Test
- Login to WiFi
- Check Google Sheet
- Check Email

Success !
You are now able to log splash page form data into a Google Sheet.
Group Policy
(Advanced)
This Zap will use JavaScript and work with API calls to assign a Group Policy to the client.
Use Cases
- One-time registration
- Custom Traffic Shaping & Security
- Compliance
Meraki
We will use the Meraki Dashboard API to provide extra functionality. One of the useful API endpoints is the ability to assign a Group Policy to a client MAC address.
Open the Meraki Dashboard and configure the following settings.
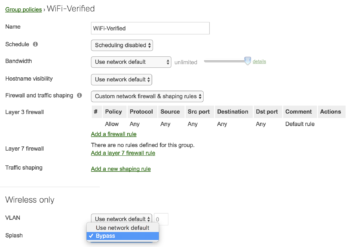
- Group Policy
- Network-wide → Configure → Group policies:
- Add a group: “WiFi Verified”
- Splash: Bypass
- Dashboard API
- Organization → Settings:
- API access: Enable access to the Cisco Meraki Dashboard API
- My Profile
- API key: Generate and/or copy API key for later use
- Organization → Settings:
Zapier
We will create a new Zap similar to the previous example, but instead of sending an email, we will add a JavaScript action to run the Meraki Dashboard API code.
(Note: The free version of Zapier only allows for 3 tasks, which is why we are creating a new Zap for this demo)
Create Zap
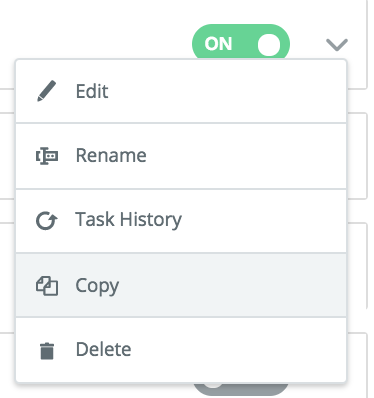
Copy the previous Zap and then delete the Gmail action.
Make note of your new webhook URL.

Add a Code action
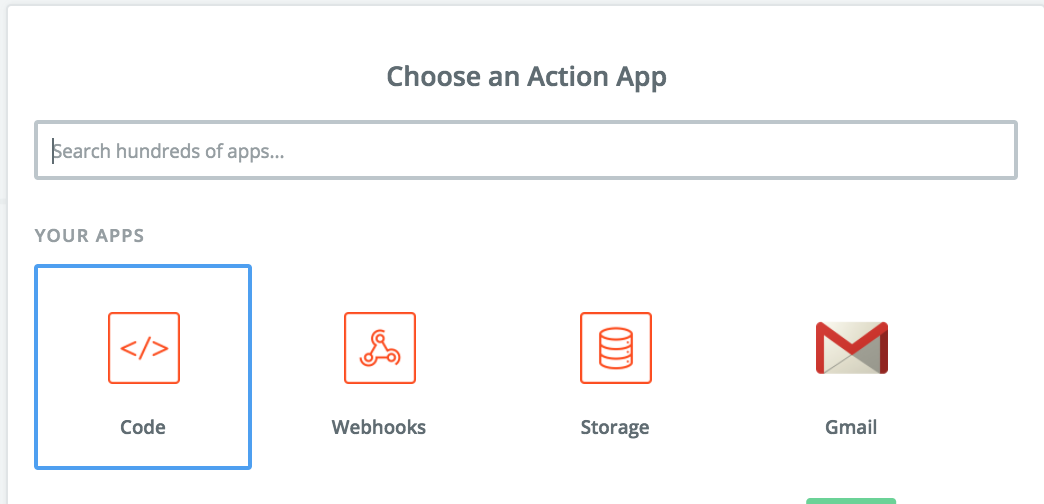
Select Run Javascript

Code Template
This is where it gets a little complicated if you are new to the Meraki Dashboard API. In order to assign a Group Policy, we must gather some necessary network information.
- API Key
- Network ID
- Policy ID
- Shard
- Client MAC
Required API Calls
Use the following API calls to gather the necessary information and ultimately apply the Group Policy. The Group Policy API call requires you to know your policy ID number. But, this call requires you to know the network ID, which ultimately requires you to know the organization ID. To collect these IDs, run the following API calls in this order and note the ID for the intended network/policy, etc. The last call can be used to test the step performed by the script which applies the policy.
- [GET] List the Organizations
- [GET] List the Networks
- [GET] List the Group Policies
- [PUT] Update the Group Policies for a client
You can use the Postman Collection to gather this information easily. It consists of all the API calls to extract the required IDs need for the subsequent calls.
(Note: working with Postman is beyond the scope of this document)
Once the values are gathered, update the Set Variables section in the Javascript. The API Key should be noted from the Meraki Dashboard → Profile. The Client MAC is gathered from the Captive Portal process automatically.
JavaScript Code
Test
Connect to the WiFi.
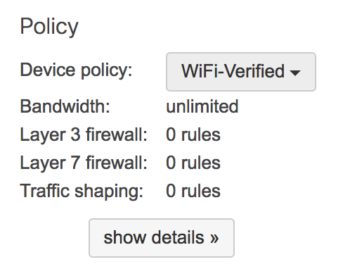
Open the Meraki Dashboard and look for the client.
The client should now have a Group Policy attached to it.
Success!
With this concept, you can implement a ton of great solutions with your Meraki network.