Application Inventory and Application Instances
Application Inventory
Managing and maintaining inventory of applications running on the network devices helps to track, monitor, and optimize applications deployed across network devices.
Install applications on individual devices
Use these instructions to select the specific devices where an application will be installed:
Go to Applications and click on the application name.
Click Install Application.
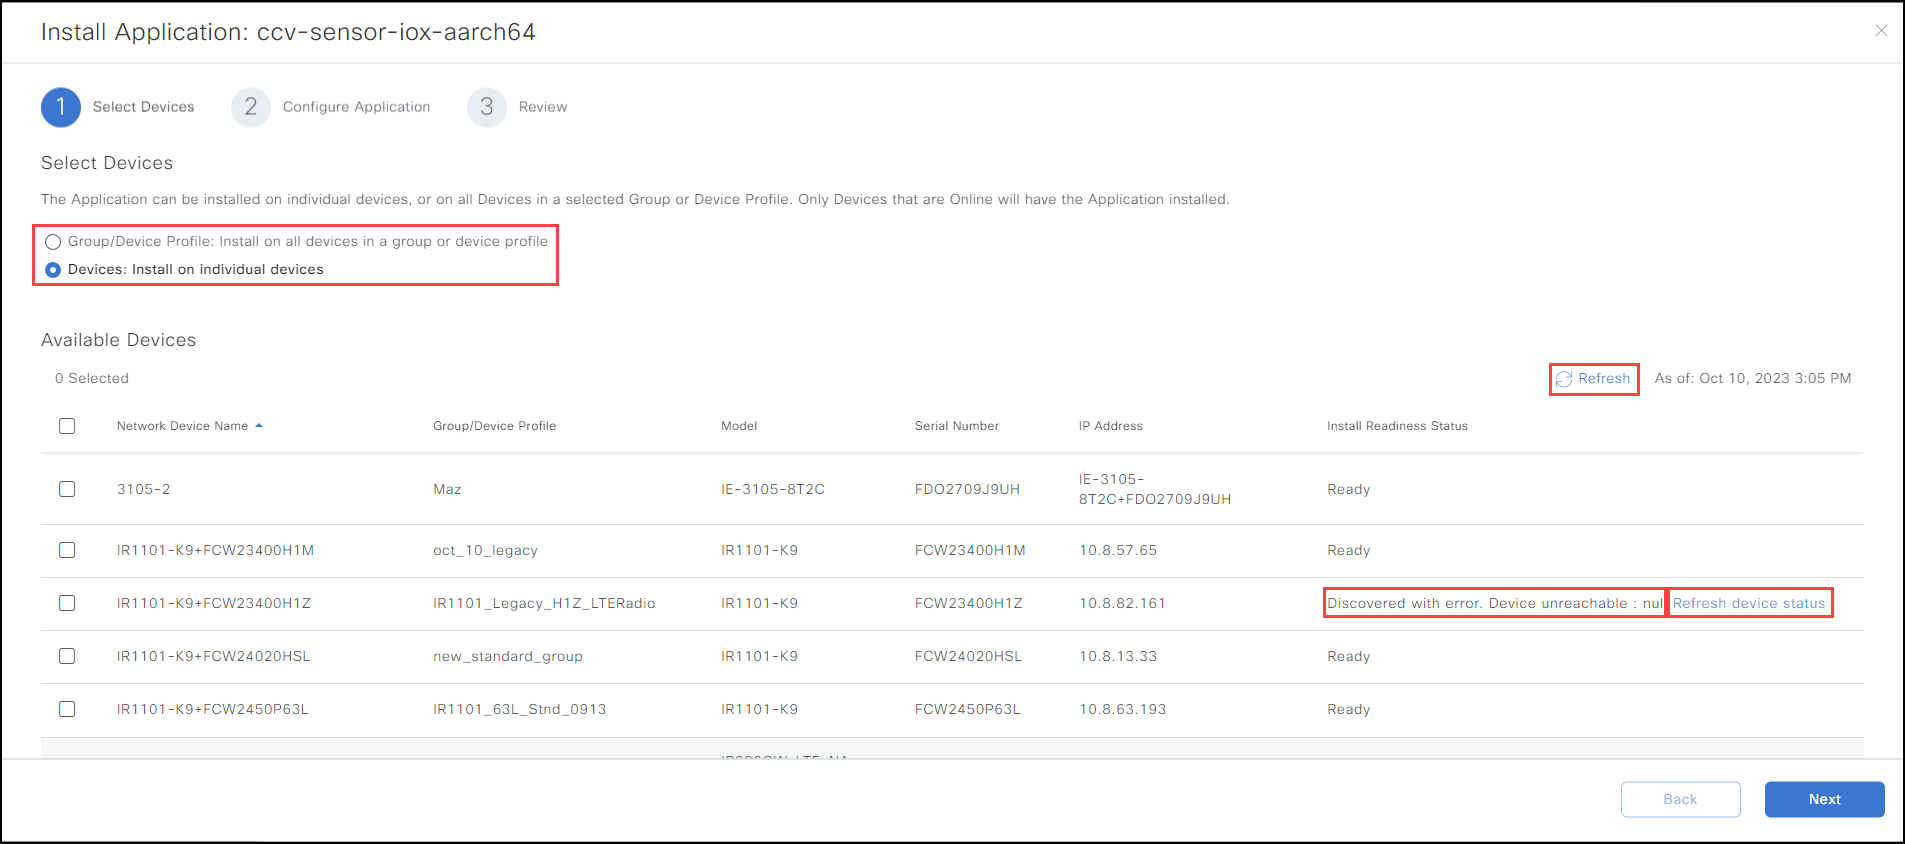
Select the devices where the application needs to be installed. Devices can run more than one application. Use the Platform Support Matrix for application estate planning purposes.
Note:
- Devices that connect to IoT OD using web sockets, such as IE switches (IE3xxx devices), will show their product ID and serial number in the IP Address field. IP address is not relevant for devices connected to IoT OD using web sockets.
- For devices that connect to IoT OD using IPsec tunnels such as IR1101 or IR1800, the device IP address is shown in the serial number field if the device has not yet been discovered. The serial number is displayed once the device is discovered.
- If you encounter the device status “Discovered with error” for the device, choose Device Refresh to clear any temporary errors.
- Click Next.
- Under Application Specific Parameters, you can accept the default settings, or change them (see below for more information).
- Click Next to review your changes. If the installation fails, the reason for non-compatibility is displayed in the Install Error Reason column. Roll over the error for more details. Review the set of devices and the configuration.
- Click Finish.
- Wait for the process to complete, which can take a minute or more based on your network connectivity.
- Check the status in the Instances page.
- Click Device Refresh for the latest device status, then click the table Refresh button to see the latest application status, which will change to "Running" if installation is successful.
- Errors are displayed under the status column. Rollover the "i" for tips that explain errors.
- The column "Data fetched at" shows when the status/health data was retrieved from the device.
- If an application installation fails due to configuration error or lack of resource availability, correct the values and re-install the application.
Install applications on device groups / profiles
Use these instructions to install applications on multiple network devices using device groups.
- Set up Device Profiles, if necessary. See Device Profiles.
- Go to Applications and click on the application name.
- Click Install Application.
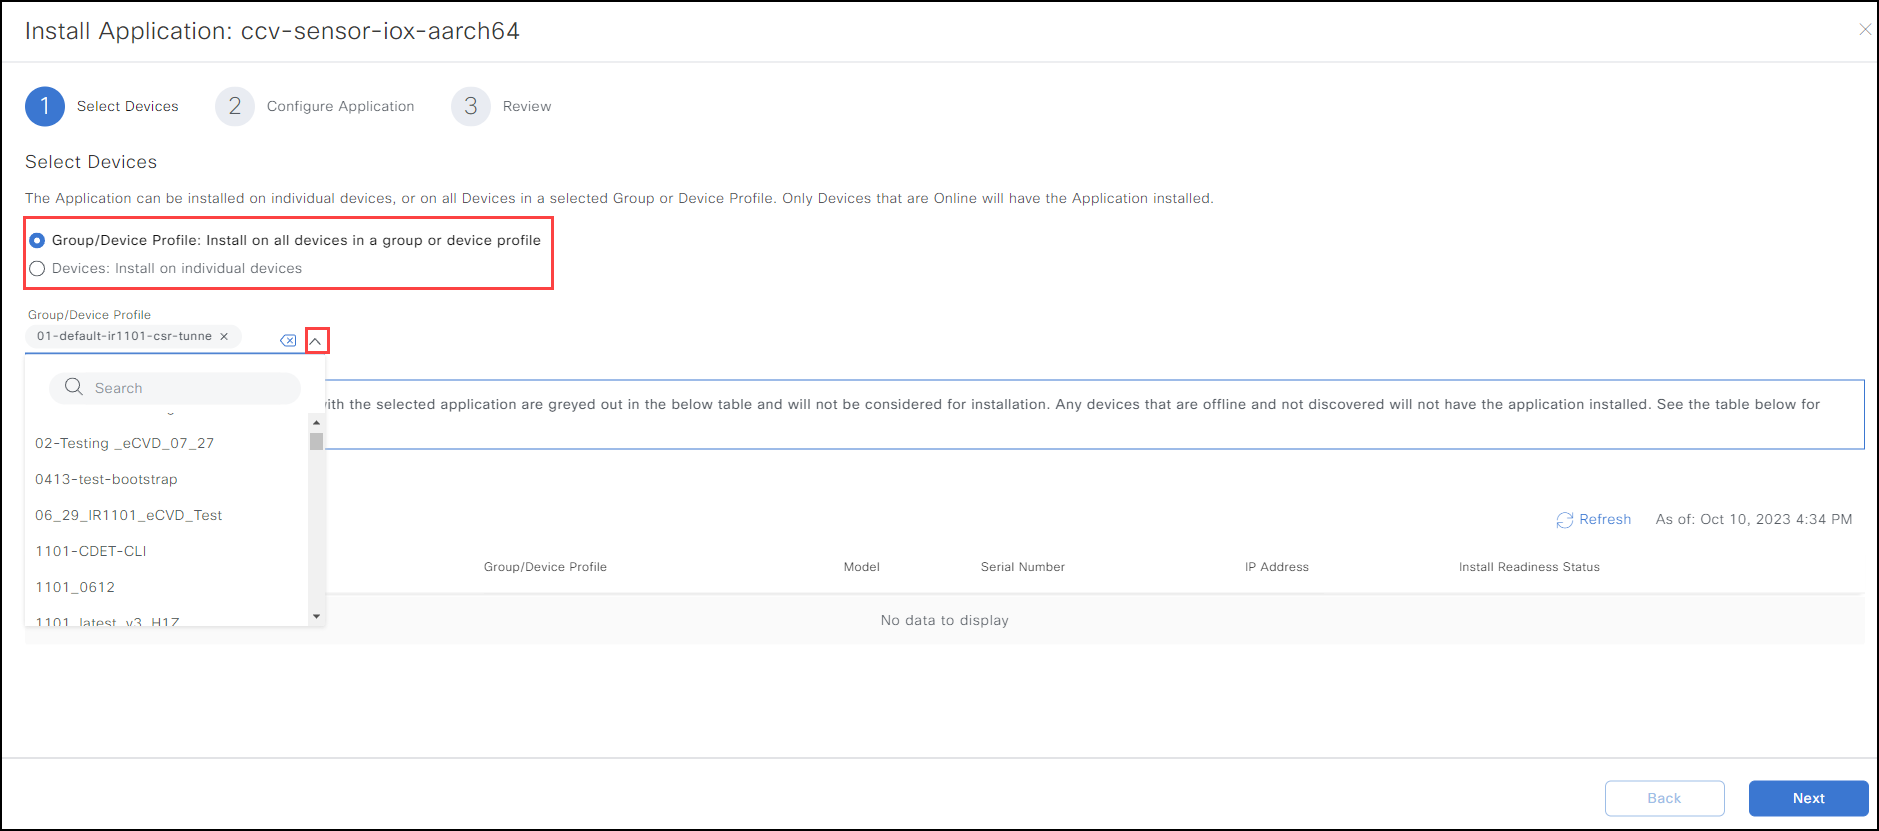
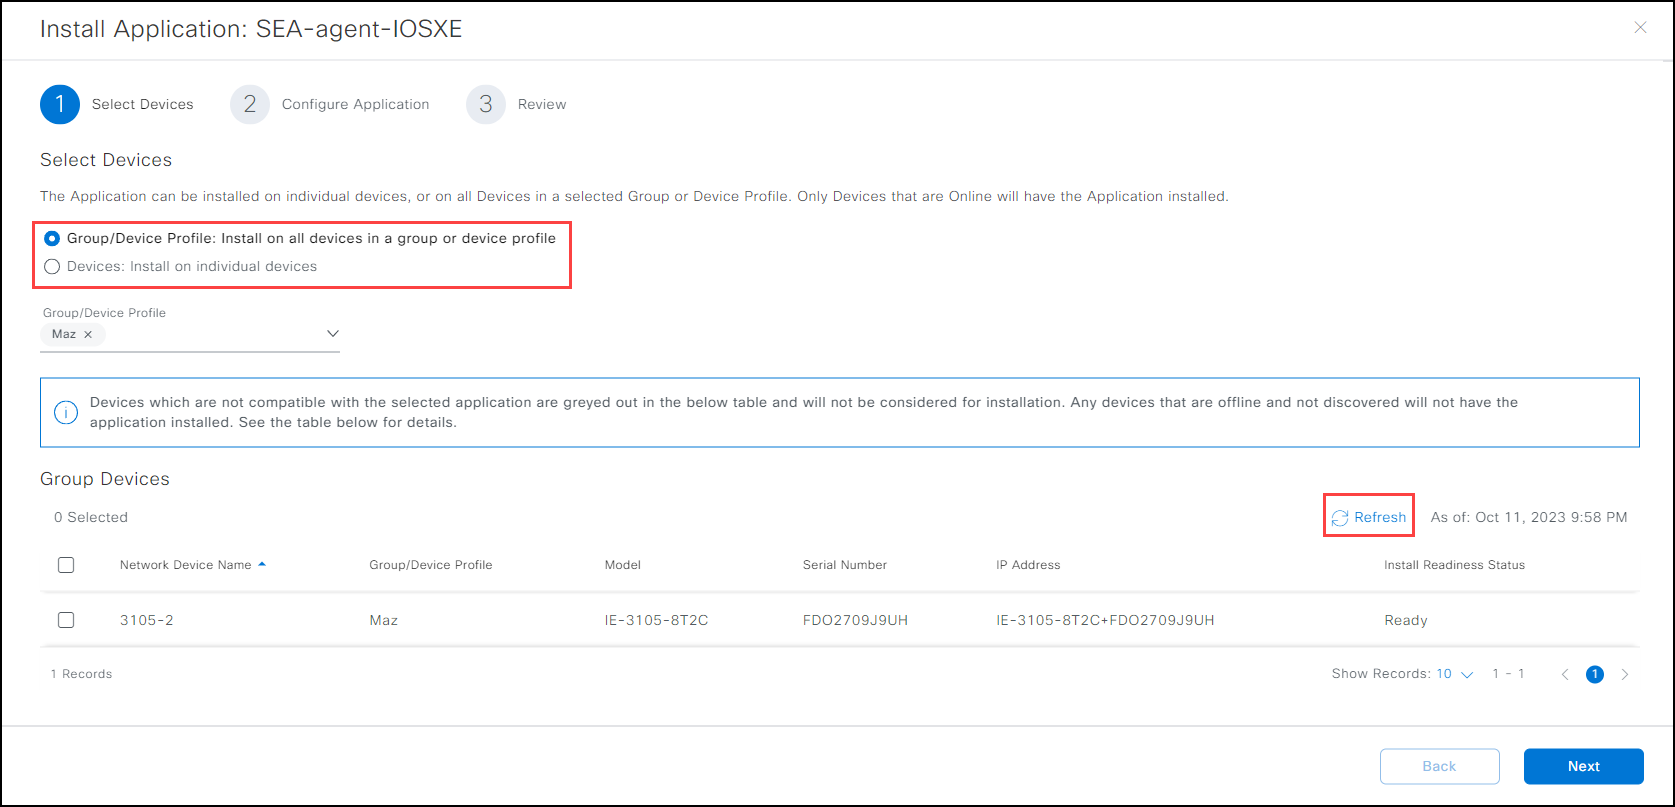
- Select the radio button Group/Device Profile: Install on all devices in a group or device profile.
- Select one or more groups that have devices of the same platform, such as the IR8x9 or IR1101. The Group Devices detail window populates with all the devices included for this installation process.
- Click Next.
- Under Application Specific Parameters, you can accept the default settings, or change them (see below for more information).
- Click Next to review your changes. If the installation fails, the reason for the non-compatibility is displayed in the Install Error Reason column. Roll over the error for more details. Review the set of devices and the configuration.
- Click Finish.
- Wait for the process to complete, which can take a minute or more based on your network connectivity.
- Check the status in the Instances page.
- Click Device Refresh for the latest device status. Click the table Refresh button to see the latest application status, which will change to "Running" if installation is successful.
- Errors are displayed under the status column. Rollover the "i" for tips that explain errors.
- The column "Data fetched at" shows when the status/health data was retrieved from the device.
- If an application installation fails due to configuration error or lack of resource availability, correct the values and re-install the application.
Change the application settings
Use the following information to optionally modify the application settings during installation on network devices.
The developer recommended configuration is entered by default. Modify the settings only if required by your organization.
- The Resource Profile fields match device capabilities. You can also choose any other available profile based on application runtime requirements.
- If the application developer has not specified a specific field such as Disk Space, then, entering that field is mandatory.
Network Configuration Details
The network section details displayed will depend on the type of device. The details for Routers and Switches are as described in the examples below:
For Routers:
Under Network Configuration > Device Network, choose the network type. For IR8x9 devices, typically iox-bridge0 and iox-nat0 are options. (see the section "Configuring network interface for IR8x9" below for more details). For IR1101 and IR1800, available value is VPG0.

For Switches:
Under Network Configuration > VLAN ID, choose one of the available options or enter a VLAN ID. Ensure that the VLAN specified is the one which is intended to carry the application traffic.

Device Configuration Details
Under Device Configuration, the following peripheral device configurations are supported:
IR8x9 — Only serial ports can be selected; USB is not supported.
IR1101 & IR1800 — Only serial ports can be selected; USB is not supported.
IE3400/IE3300 — Peripheral devices are not available.
Notes:
- Peripheral device labels specified in the application package can be mapped to peripheral device.
- Dynamic addition of peripheral devices/ports during installation is not currently supported. If an application needs peripheral devices, the developer should specify them in the package definition.
Configuring Network Interface for IR8x9
- Device Network mode and IP Address allocation.
- There are two ways IP Address for Application interfaces can get configured: NAT and Bridge modes. These can be configured during installation of the application.
- If Device Network for an interface is assigned as "NAT" type, the interface is assigned an internal IP address by IOx and the address is translated to a unique IOx IP address and port combination when external communication happens. These internal IP addresses are not reachable directly from sub-tended devices. The sub-tended devices use the IOx IP address and the correct port to reach these interfaces.
- If Device Network for an interface is assigned as "Bridge" type, each interface is assigned a unique IP address in the same subnet as the IOx IP address, based on the DHCP rules. These IP addresses are reachable from sub-tended devices.
- For IR800 devices, the network mode (NAT or Bridge) can be chosen during application installation. For IR1101 and IR1800 series devices, the default network for applications in VPG0 (Virtual Port Group) and this is configured in bridge mode.
- Port mapping is available for IOx-nat0 only. See Actions > Edit Port Map Mode. Select the 1to1 port mapping mode, if you want to specify a different port than what the application developer has configured.
Application Instance Management
Application instances helps to manage the operational aspects of the applications on the network devices such as starting, stopping, re-starting, and updating, or deleting them.
Application management options
The following options are available on applications installed on a device.
- Go to Applications and click on the application name.
- Click View Instances to display the devices where the application installation is attempted. Use this page to manage the applications on a device.
- Your selected application version appears above the Instances list. Remove the version filter to display all devices where the application is installed.
- To view devices with a different application version, use the Filter button to change the version number.
- An application installed on a device, can be in any of the following states:
- DEPLOYED: Application is installed on the device, but the required resources have not been committed to the application.
- ACTIVATED: The application's required resources are now committed. Associated container artifacts are also generated.
- RUNNING: Application is now running.
- STOPPED : Application is stopped.
- Use the Action buttons above the table to:
- Start or Stop the application on a device list
- Uninstall the application on a device list
- Change Version (used to upgrade or downgrade)
- Use the checkboxes and Actions button drop-down menu to:
- Device Refresh.
- View/Download the application logs (installed applications only)
- View Resource Usage of the application – shows data over the last 24 hours.
- View IP Configuration of the application – provides detailed information about the network configuration of the application, including the IP address and ports reachable from the sub-tended devices.
- Download the Tech Support Log bundle. Note: If the size of the tech support log bundle is very large, the download can fail on the client side and cause the browser tab to go blank. The supported maximum size depends on the available RAM in your computer where the browser is running. If this happens, refresh the page and close other applications in the system to free up RAM and try again.
Upgrade or downgrade an application
Change the application version to upgrade or downgrade an application on a device or group of devices.
Configuration parameters cannot be modified when changing the version. Before you begin, verify that the application version change can be done without configuration modifications.
Applications may not support upgrading/downgrading from any version to any other version. Contact the application developer for the supported upgrade/downgrade paths.
Wait until any previous operation finishes before attempting to upgrade or downgrade (change version) on the device.
- Click View Instances to display the devices where the application is running.
- Your selected application version appears above the Instances list. Remove the version filter to display all devices where the application is installed.
- To view devices with a different application version, use the Filter button to change the version number.
- Select the device from the Instances list and click Change Version. The details window appears.
Note: Only versions that were previously added to IoT OD are displayed.
- Click Select Version and choose the new application version.
- Click Apply. The selected application version will install on the device(s).
- Wait for the process to complete, which can take up to a minute based on your network connectivity. Refresh the table to see the latest results.

Stop or start an application
- Click View Instances to display the devices where the application is installed.
- Select the device from the Instances list and click Stop or Start.
Uninstall an application
Uninstall an application to remove it from a device. The application remains in IoT OD and can be installed or re-installed on devices.
Applications can be uninstalled only if the device is online.
- Go to Applications and click on the application name.
- Click View Instances.
- Under the Actions column for one or more devices, click
 and then select Uninstall.
 - Wait for the process to complete, which can take a minute or more based on your network connectivity. Refresh the table to see the latest results.
Note: When a network device is deleted from Application Manager, the application instance corresponding to that device is also removed from application management.
Delete an application
Removing an application version from IoT OD means it will no longer be available to install on devices.
An application version can be deleted only if it is not installed in any device.
- Uninstall the application from all devices.
- Go to Applications and select the application to be deleted.
- Under the Actions column for that application version, click and select Delete.
Note: If you delete a network device from the Application Manager inventory IoT OD inventory without uninstalling the installed applications, the device will be removed from the Application Management Instance inventory view and IoT OD inventory. However, the IOx application will continue to run on the device.