Remote Docker Workflow Overview
Remote Docker workflow is an alternative to traditional app deployment approaches that are using Local Manager or ioxclient tools. Remote Docker workflow is designed for developers, so we Cisco recommends that it is used only during application development and not on a production gateway.
Remote Docker workflow enables developers to use the familiar Docker CLI (or Docker-compose) tool for the entire IOx app lifecycle operations on Cisco devices. This article describes how to use the feature for a sample Docker app.
Note Although the developer can use Docker tools for the app development lifecycle, there are some operations of Docker engine which are restricted for security and maintenance reasons. Check the caveat section at the bottom of the page for more details.
Caution Because Remote Docker can run containers by bypassing and therefore invisible to the Local Manager or IOx Management Application, the Remote Docker workflow is meant to be used only on development systems and not in production systems.
Supported Platforms
For the supported platforms, see the Compatibility Matrix on DevNet: https://developer.cisco.com/docs/iox/#!feature-compatibility-matrix
Initial Setup
Before starting with the Docker tool-based app lifecycle operation, use the following steps to set up the Cisco device and local development machine:
- Enable Remote Docker access.
- Create the Docker application profile.
- Setup local development machine environment.
Enable Remote Docker Access
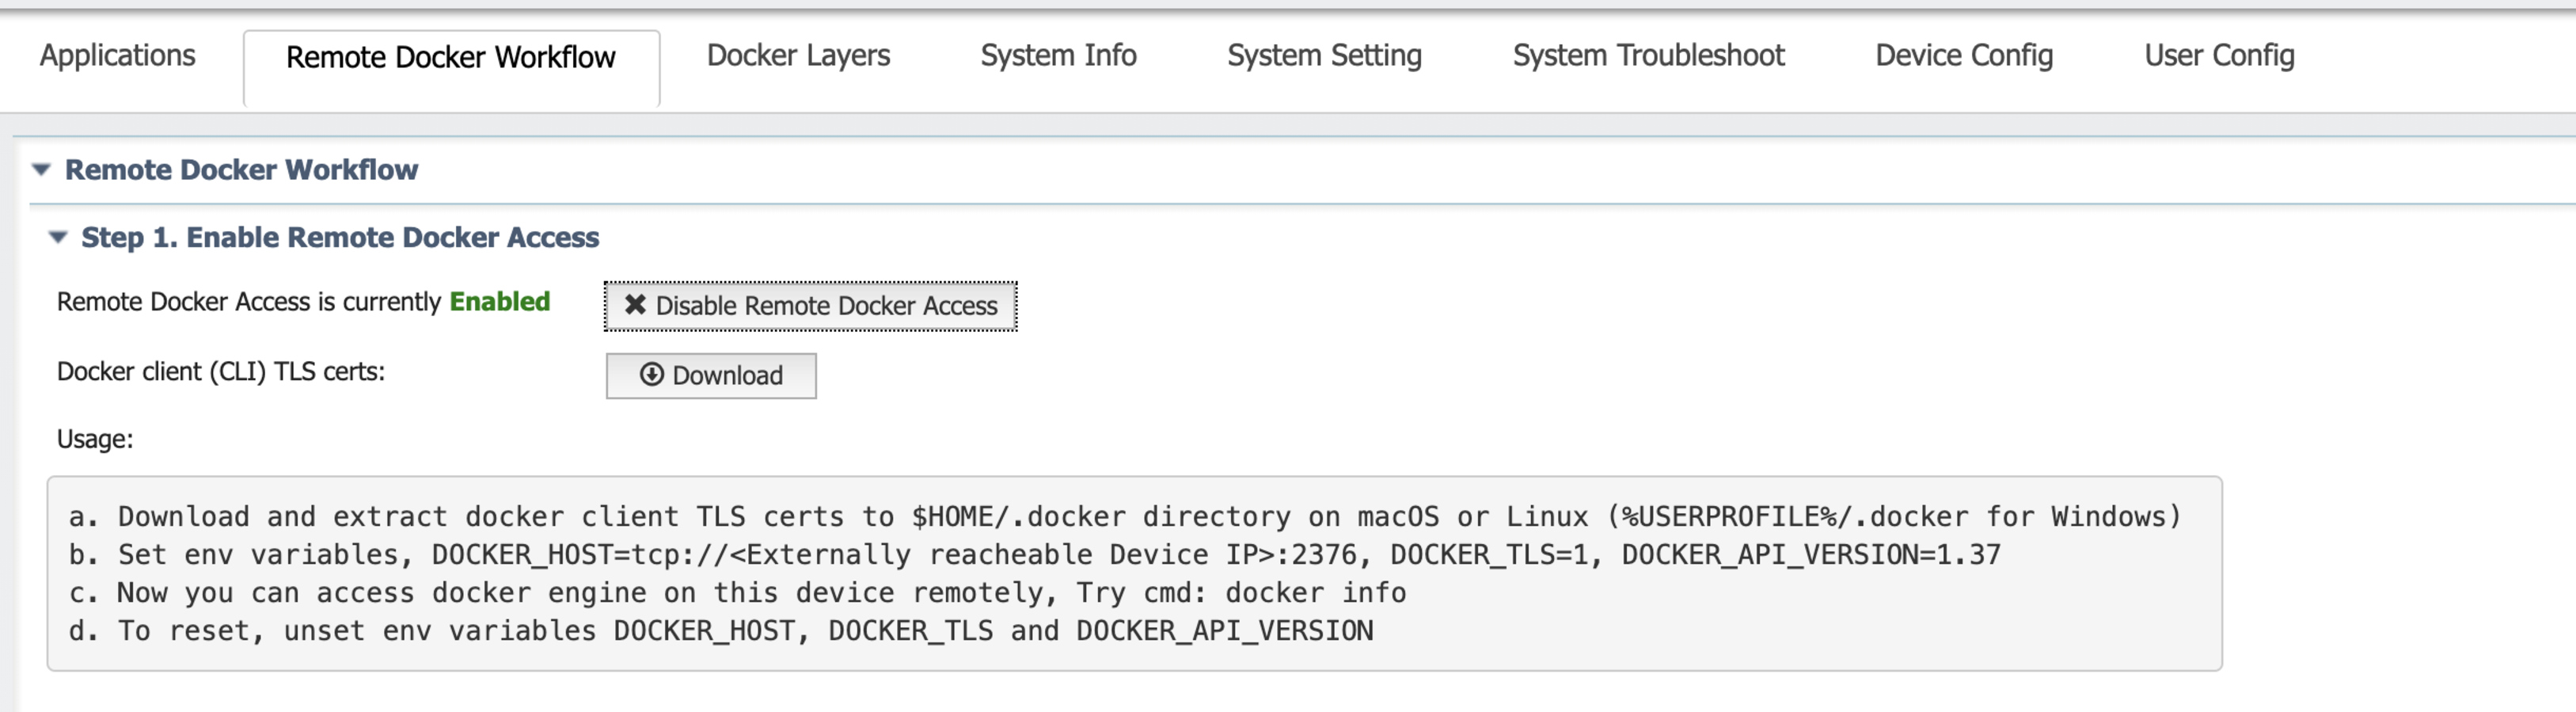
By default, the Docker engine on Cisco platforms does not listen for external requests originating from outside the device. Therefore, you must enable Remote Docker access from Cisco IOx Local Manager.
If your image supports Remote Docker workflow, use the “Remote Docker Workflow” tab in the Cisco IOx Local Manager web interface to set up Cisco devices to use this feature.

This operation enables the docker engine to listen for external requests and generates docker client Transport Layer Security (TLS) certificates that must be copied and extracted to your local machine in either the $HOME/.docker directory on macOS or Linux, or the %USERPROFILE%/.docker directory for Windows.
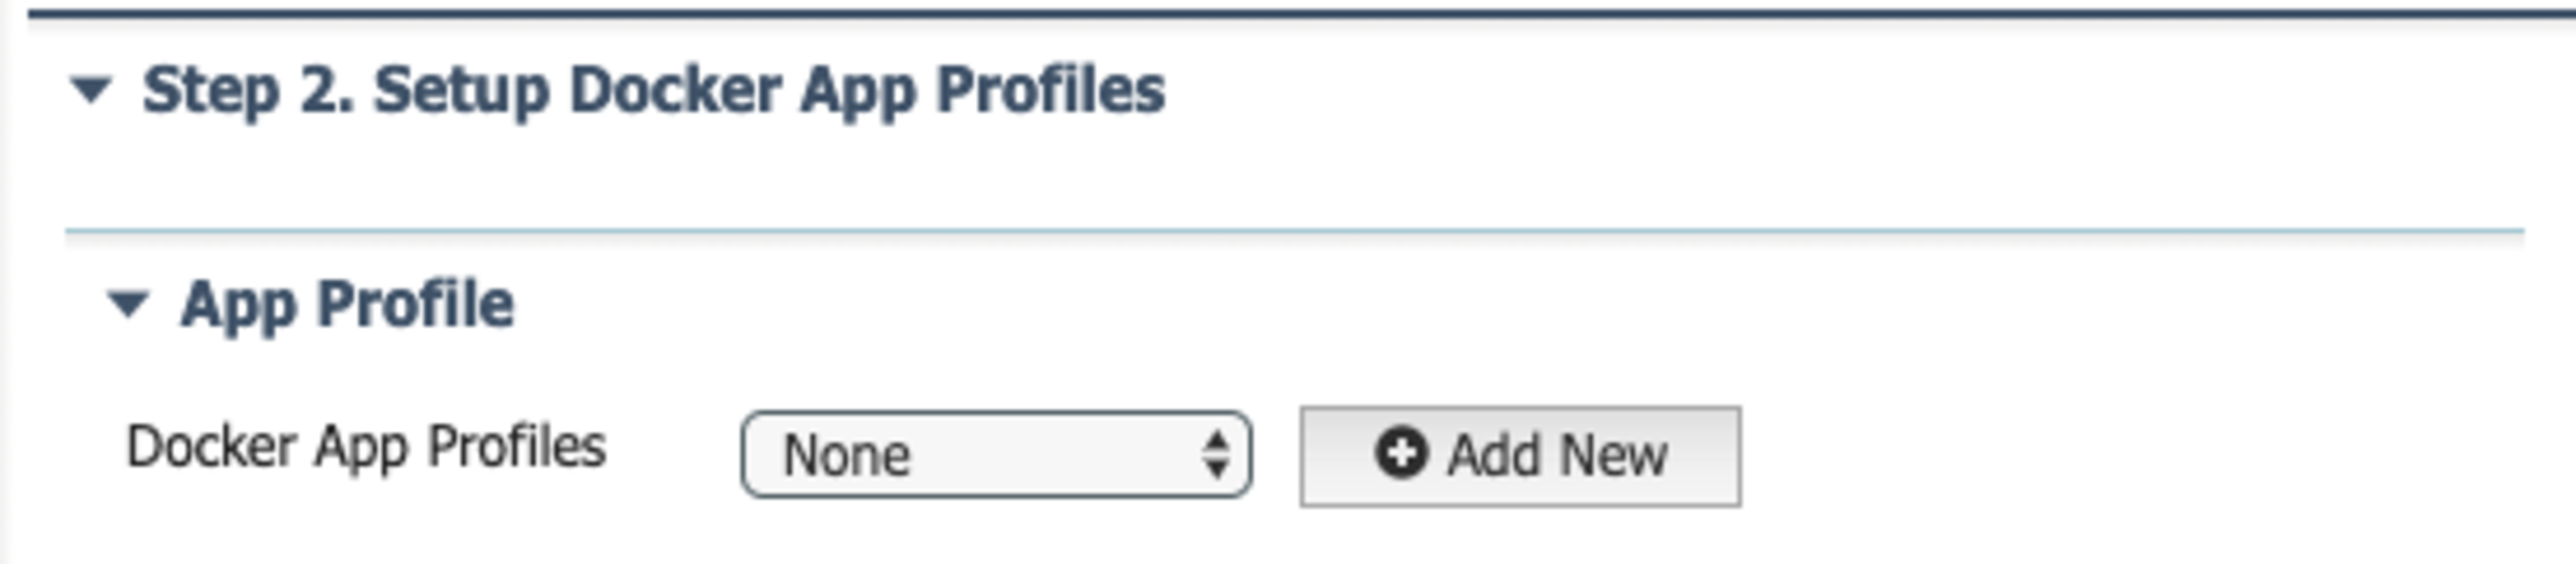
Create the Docker Application Profile
Any 3rd party container application running on Cisco devices has a set of dependencies on the platform, for example, minimum compute resources required for the application, required network interfaces, and a list of peripherals that must be mounted into the container for reading and writing data from southbound sensors.
To simplify the application development process, IOx provides a way to setup pre-provision platform dependencies of the docker app with the creation of a docker app profile. Using this profile allow you to focus on the core part of application logic instead of the platform configurations and dependencies during the iterative app development cycle.
Here are the outcomes of app profile creation.
- App dependencies are setup in the device ready for app consumption
- IOx generates docker run command options representing these app dependencies for direct usage from the Docker CLI.
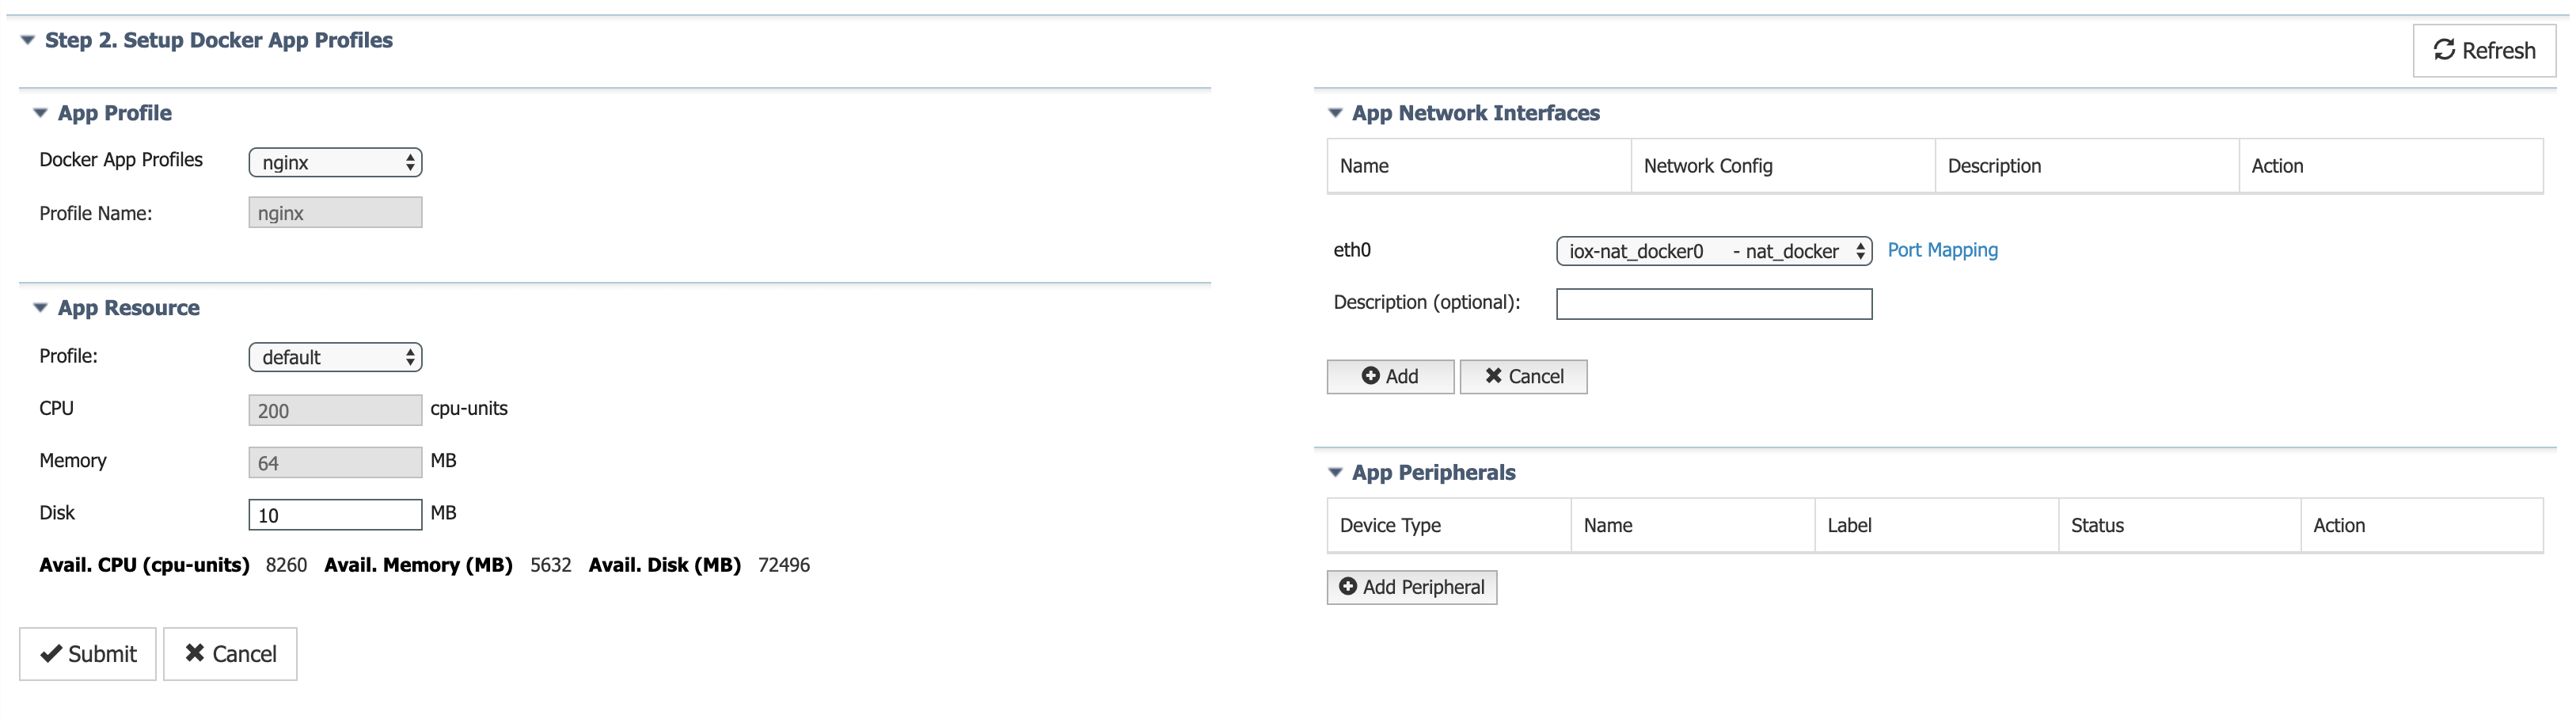
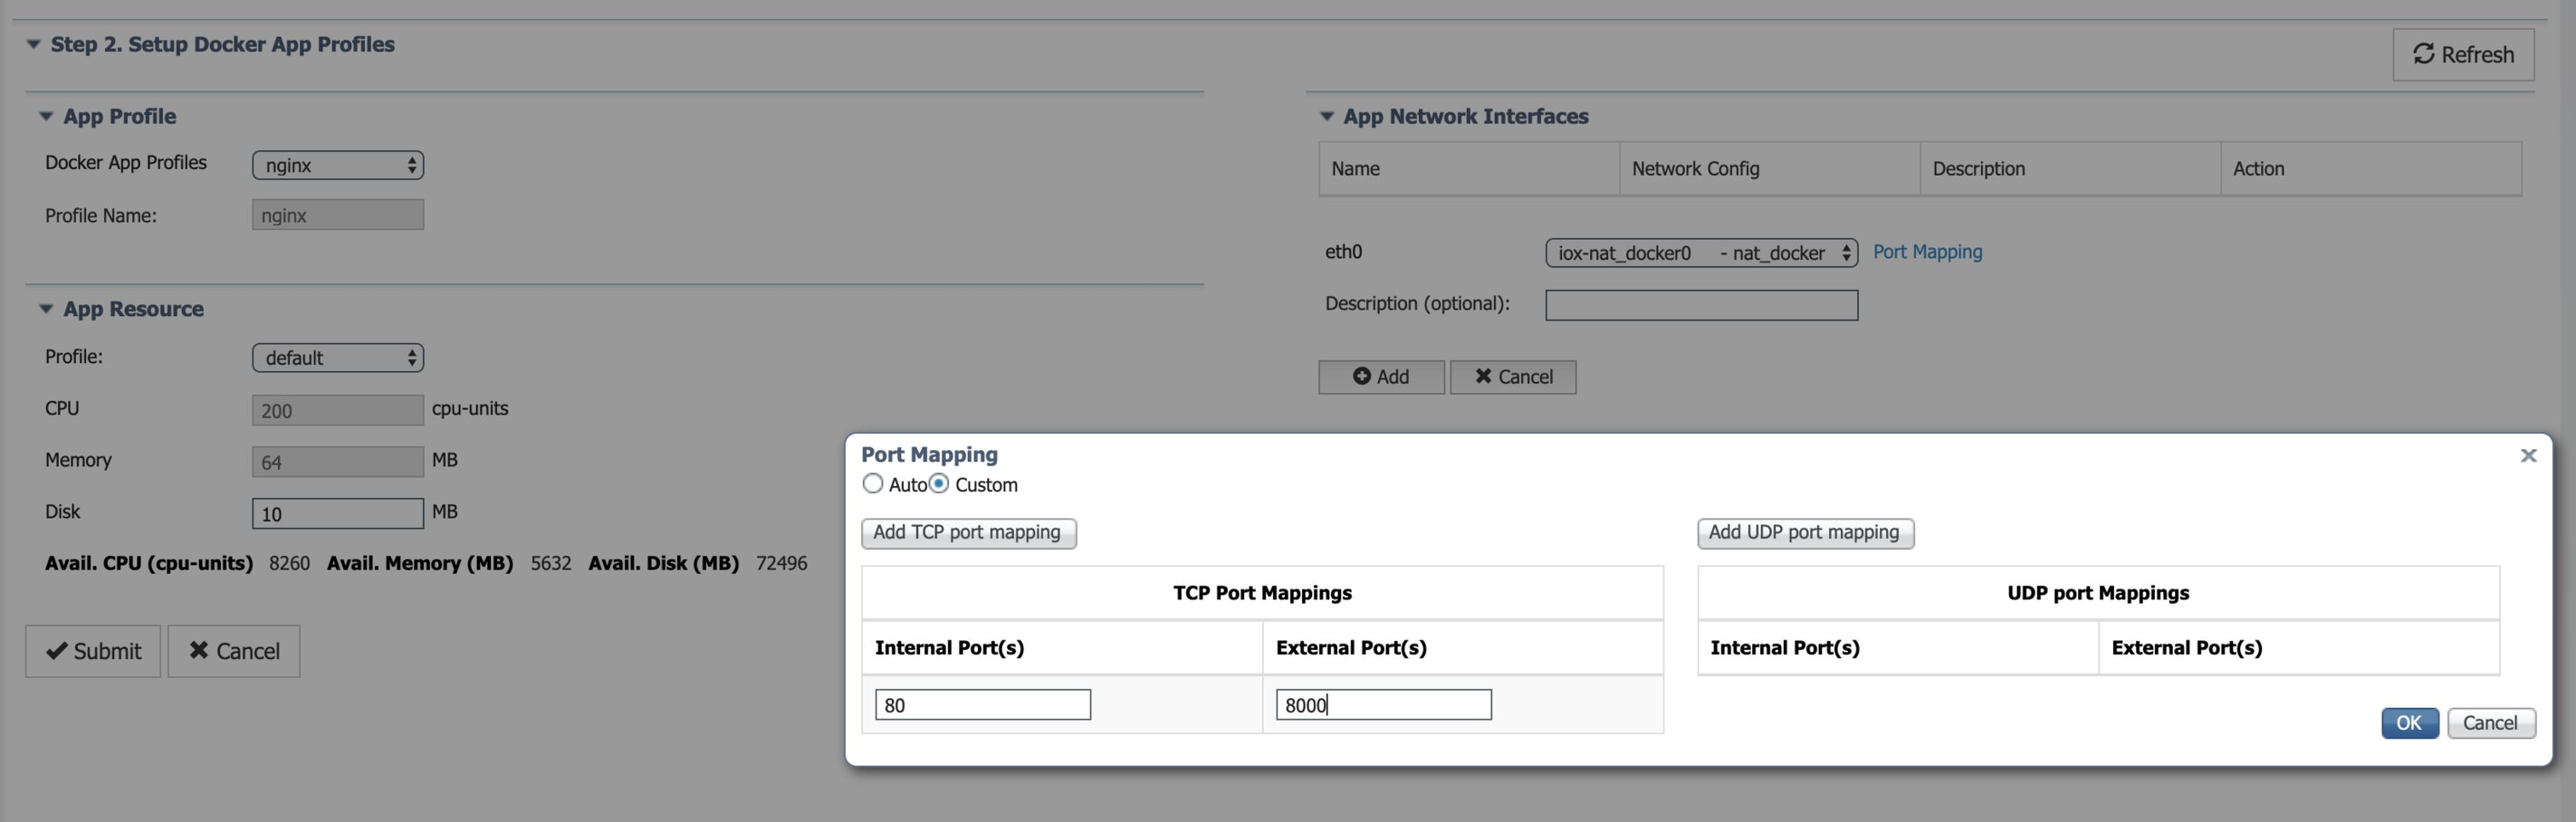
The following example shows how to create a sample app profile for nginx Docker application, which needs to expose the web server running on port 80 inside the container to the external world on host port 8000. Set up the appropriate compute resources and network interfaces for the nginx application as shown below.
Configure port mapping needed by nginx web server.
Once you submit the app profile definition, IOx generates the docker run options associated to the app profile dependencies as shown below.
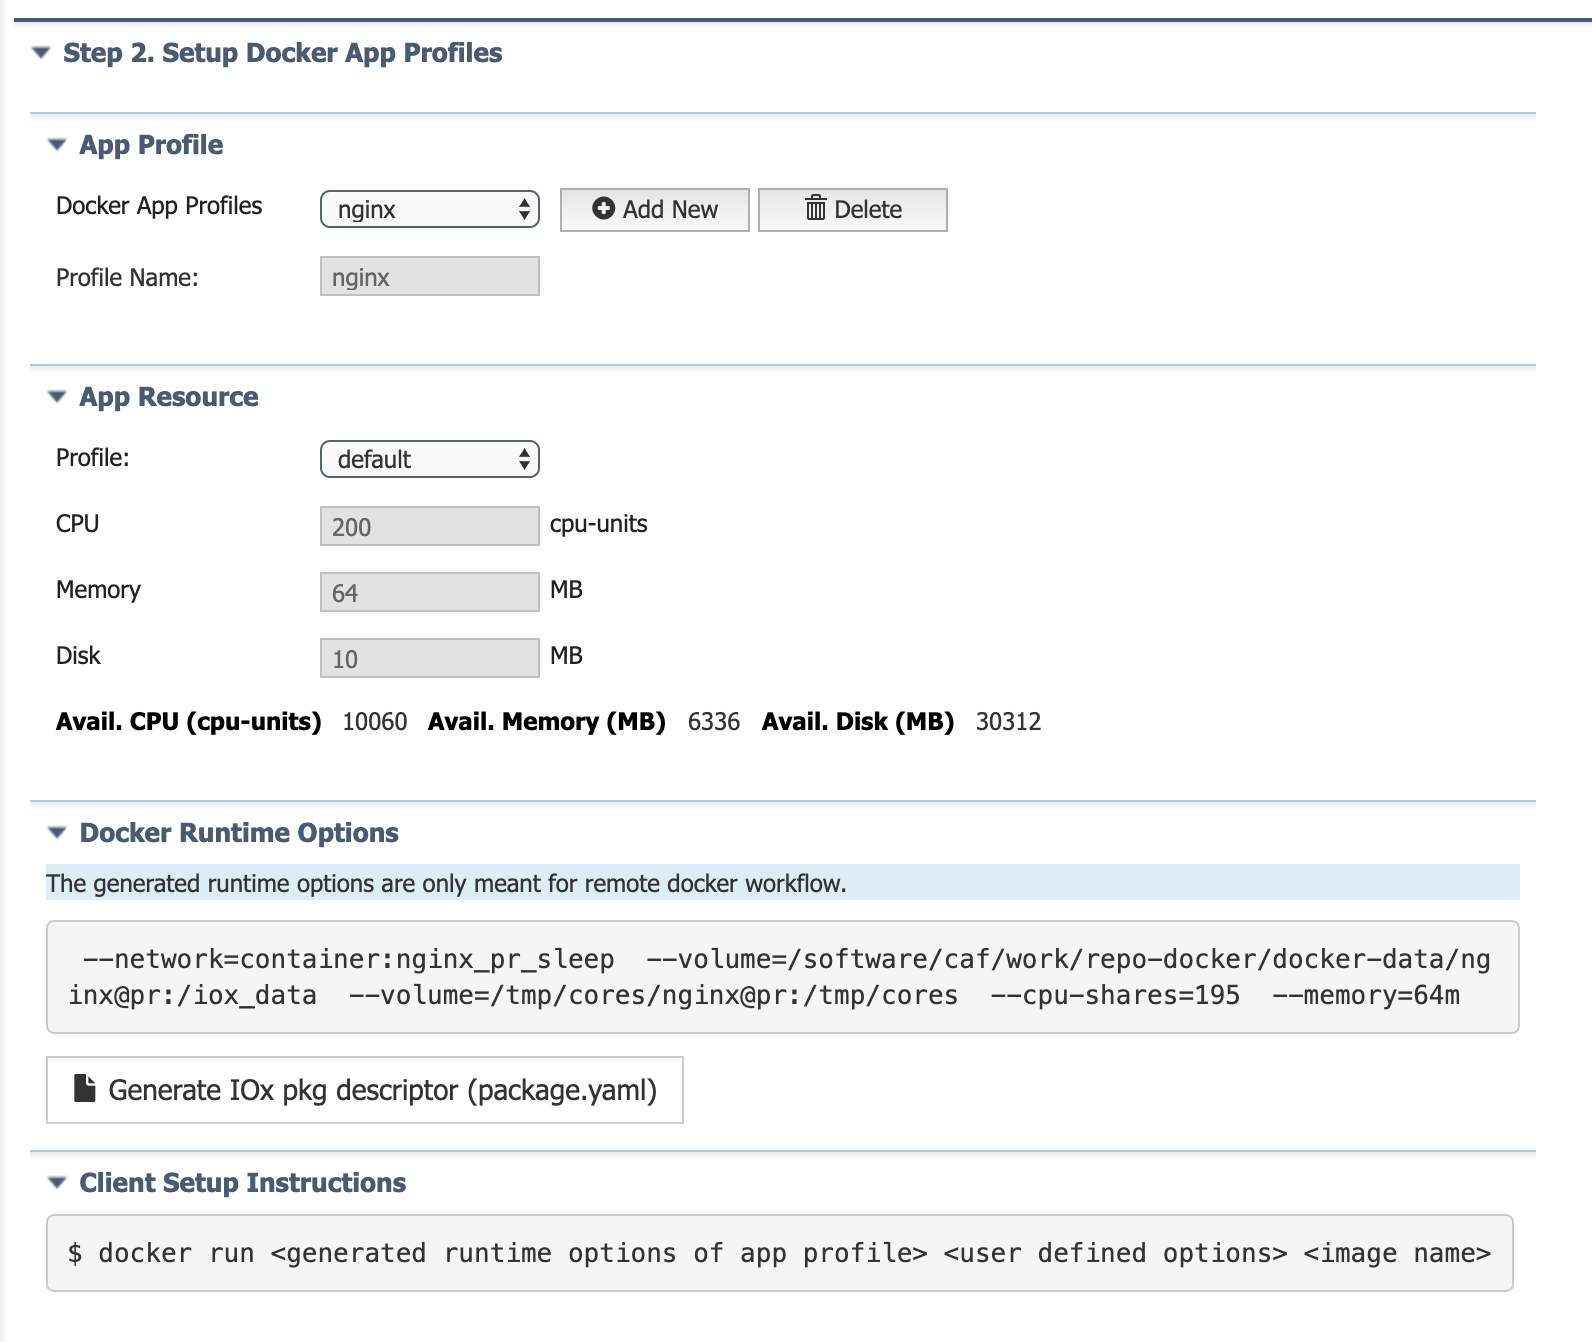
Also, you can download the defined app profile dependencies in IOx Package descriptor format (package.yaml). This package.yaml can be used to package IOx application.
Note When you disable Remote Docker access, all of the docker app profiles, containers, images, and volumes are automatically deleted.
Set Up the Local Development Machine Environment
After setting up the environment on your Cisco device, set up the local development machine for the Docker CLI client tool to remotely communicate with Docker engine on the Cisco device. The local Docker client needs to know how to access your gateway (IP address) with valid credentials (the TLS certificates or Username/password).
Pre-requisite
Install Docker client locally on your development machine.
Setup steps - IC3000 platform
Follow below steps to setup local development machine, if your target cisco platform is IC3000. If your target cisco platform is IOS-XE OS based platforms, then skip to next section (Setup steps - IOSXE OS platforms).


From the Cisco IOx Local Manager-> Remote docker workflow tab, download the docker client TLS certificate by clicking the "Download" button next to "Docker client (CLI) TLS certs". The
tlscerts.tarfile will be downloaded.Extract the TAR archive to docker client config directory, $HOME/.docker/ on macOS or Linux. In Windows, extract the tar archive to %USERPROFILE%/.docker/
tlscerts.tar
  |- ca.pem
  |- cert.pem
  |- key.pem
- Export remote docker engine configuration via environment variables. Replace
with your cisco platform's externally reachable IP address. In case of linux and MacOS, do as below. For Window, update cert path accordingly.
$ export DOCKER_HOST=tcp://<device_ip>:2376 DOCKER_TLS=1 DOCKER_API_VERSION=1.37 export DOCKER_CERT_PATH=$HOME/.docker/
Setup steps - IOSXE OS platform
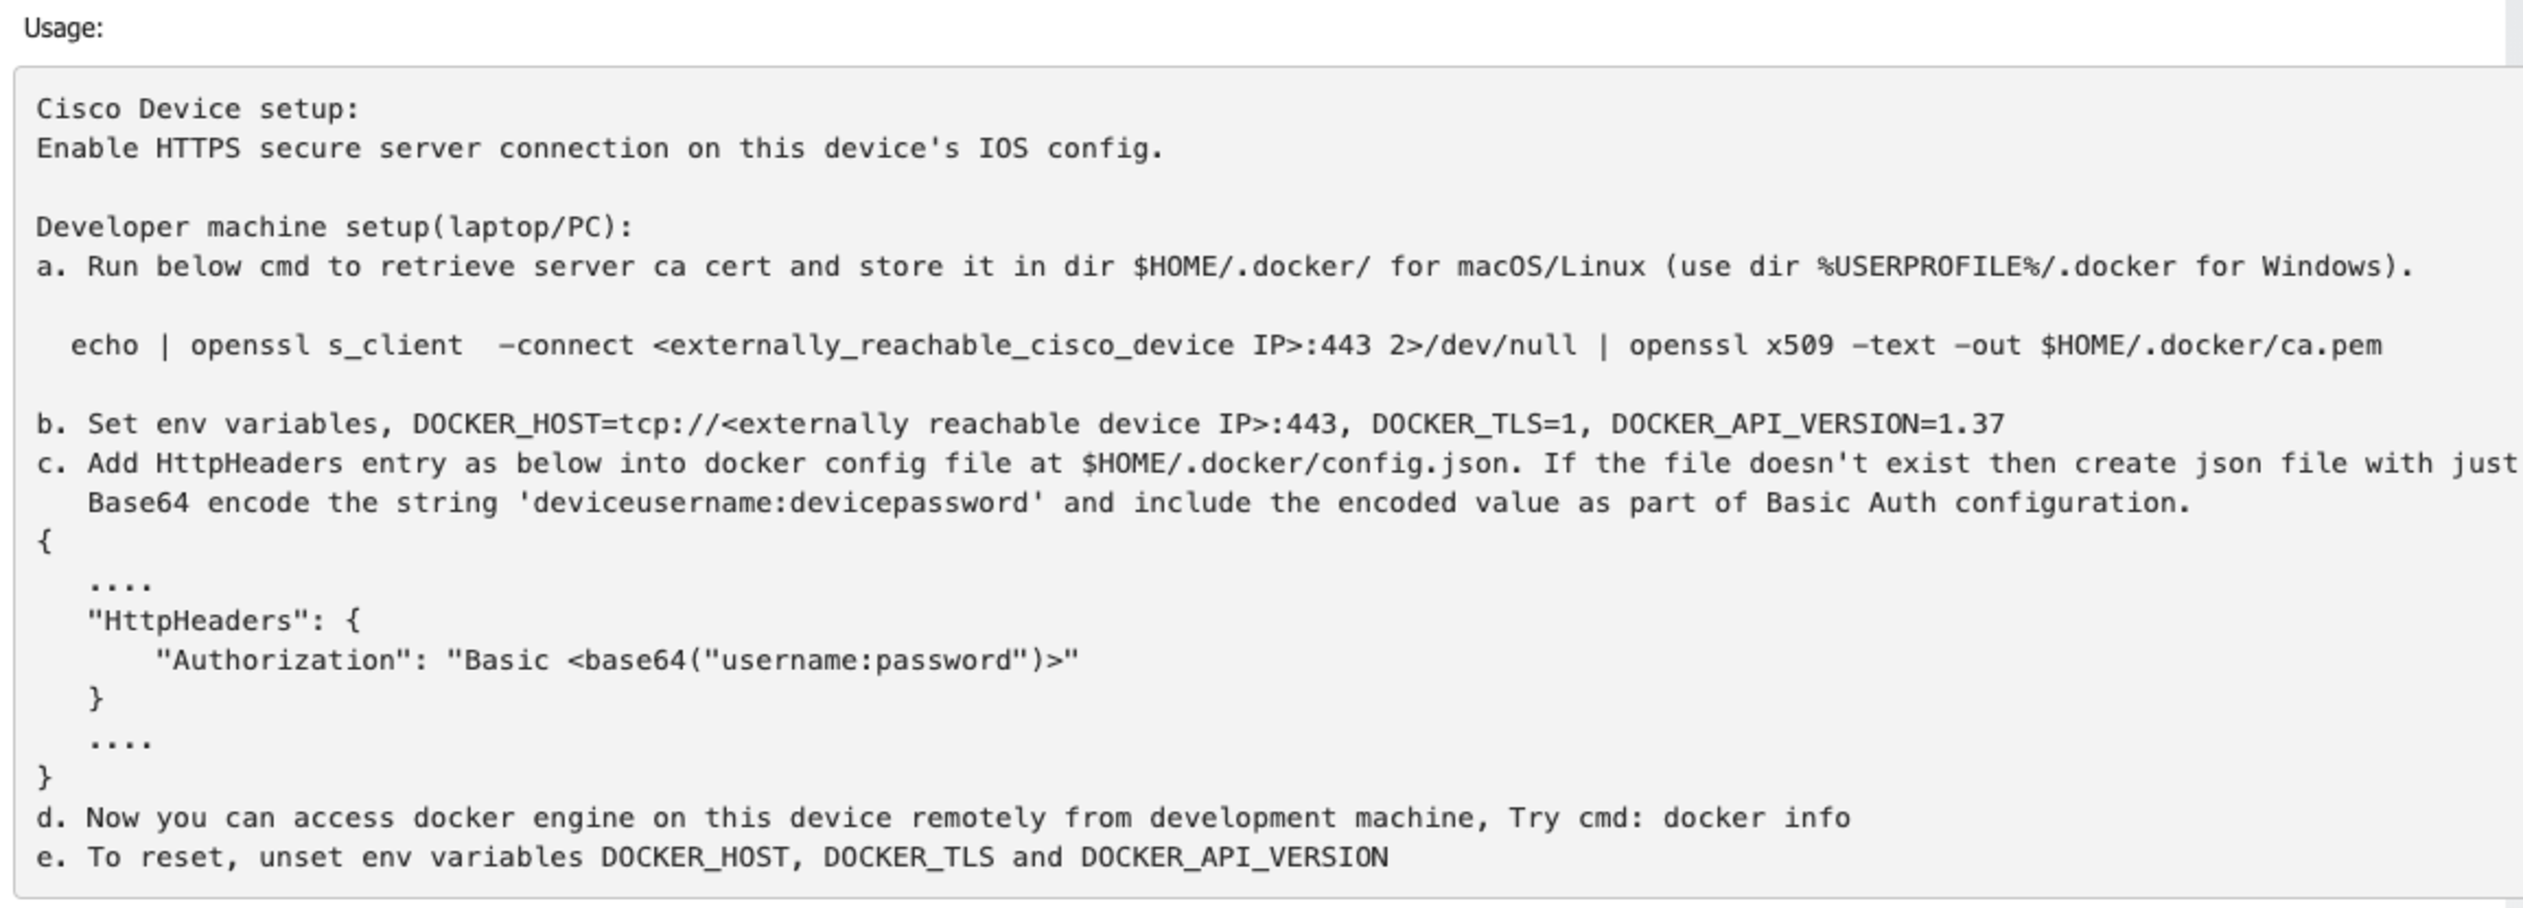
Note: Make sure HTTPS secure server is enabled on Cisco platform's IOS config before proceeding with this section. If not, use below in IOS configuration command on the Cisco device CLI.
<cisco_device>[conf]# ip http secure-server
Below steps are to be executed on local development machine.
- Retrive server certificate from Cisco platform using below command and store it in directory $HOME/.docker/ for macOS or Linux. For Windows, store the cert in dir %USERPROFILE%/.docker/
$ echo | openssl s_client -connect <externally_reacheable_cisco_device_ip>:443 2>/dev/null | openssl x509 -text -out $HOME/.docker/ca.pem
- Export remote docker engine configuration via environment variables. Replace
with your cisco platform's externally reachable IP address. In case of linux and MacOS, do as below.
$ export DOCKER_HOST=tcp://<device_ip>:443 DOCKER_TLS=1 DOCKER_API_VERSION=1.37
- Setup docker client httpheader requests with basic authorization as below. This is needed for successful authentication with server. Add HttpHeaders section in docker client configuration file at $USER/.docker/config.json. Replace <base64("username:password")> with base64 encoded value of actual device credentials in the format of username:password. For example, if the device username and password is adminuser, adminpwd respectively, then generate basee64 encoded value of string "adminuser:adminpwd" and add the HttpHeader section as "Authorization": "Basic YWRtaW51c2VyOmFkbWlucHdk"
...
"HttpHeaders": {
    "Authorization": "Basic <base64("username:password")>"
}
...
Testing Docker Commands
Once the local development machine is set up correctly, any commands executed with local Docker CLI will be sent to the remote Docker engine on the Cisco device and will retrieve the output of that remote device.
For example, when you execute the following command, it returns your remote Docker engine's details:
$ docker info
Note 1 Environment variables are applicable only to the current terminal. If you create a new terminal, you must set up the environment variables again.
Note 2 To have the Docker CLI talk back to the local Docker engine (reset to local context), close the terminal and open new terminal. Alternatively, you can unset the environment variables in the same terminal to switch back to the local context.
Docker-Native Developer experience
Now that you completed the setup on both the Cisco device and local development machine, you can use pure Docker tools for the entire app development lifecycle.
To complete the nginx example reference, spin up nginx application in a container on Cisco device and access the web server.
Load nginx Image Onto the Cisco Device
Since the nginx Docker image is not present on the Cisco device, you must load the Docker image on to the remote Cisco device. If the Cisco device is connected to the public internet, you can Docker pull from Dockerhub as well.
If the Cisco device is not connected to public internet, save the dockerhub nginx image into tar archive file using docker save command. This produces the nginx.tar archive file.
(docker_cli_local_context)$ docker pull nginx
(docker_cli_local_context)$ docker save nginx -o nginx.tar
Now you can load this tar archive onto the remote Cisco device.
(docker_cli_remote_context)$ docker load -i nginx.tar
Run nginx Container
(docker_cli_remote_context)$ docker run <generated runtime options of app profile> <custom user defined options> <image name>
Run the nginx Docker container using generated docker runtime options from Local Manager.
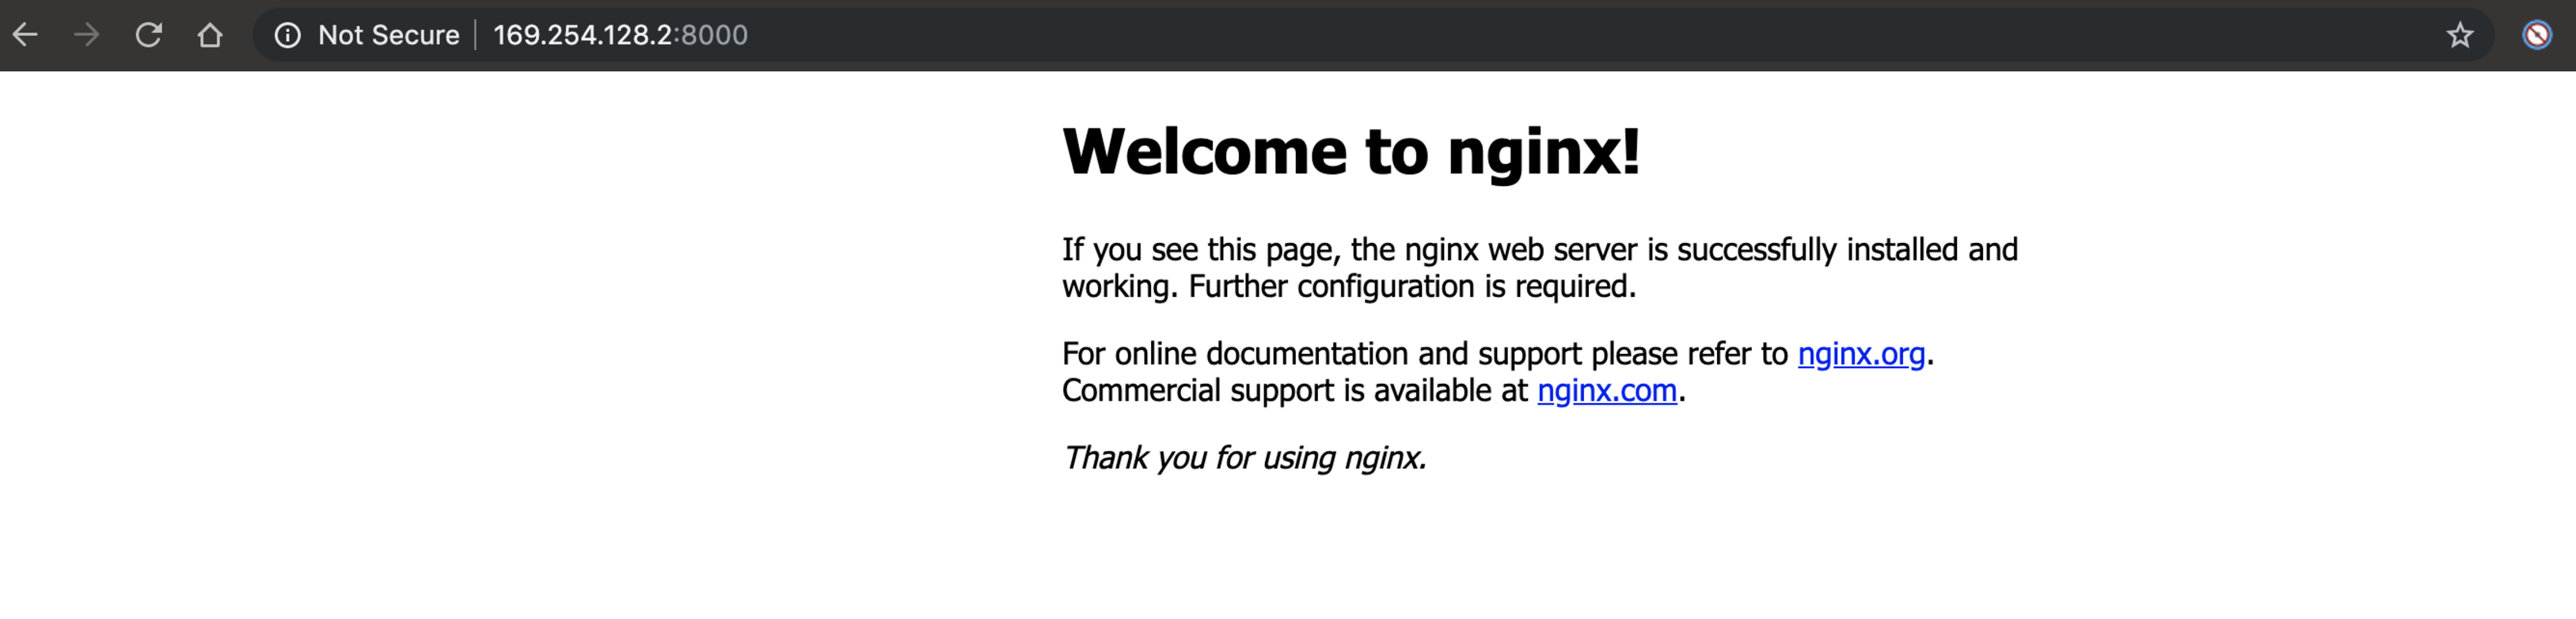
(docker_cli_remote_context)$ docker run --network=container:nginx_pr_sleep --volume=/software/caf/work/repo-docker/docker-data/nginx@pr:/iox_data --volume=/tmp/cores/nginx@pr:/tmp/cores --cpu-shares=195 --memory=64m nginx
The nginx application is running on the Cisco device and allows access to the server using external port 8000 and the device management IP address.
Caveats
Remote Docker workflow is only meant for a lab or development environment. DO NOT use this feature in production.
Clean up of Docker artifacts and reproductionizing the device: The images, containers, and volumes that are deployed via Remote Docker CLI, are not maintained or managed by the IOx app hosting framework. You need to manually cleanup all those artifacts and disable Remote Docker access. Then, you can use the device in production.
Since IOx app hosting framework does not manage the containers created by the Remote Docker CLI, only unsigned apps can be installed via this workflow. IOx app signature validation of feature configuration is not applicable to this Remote Docker workflow.
Administrator can find the logs in /var/log/Dockerd file on any container or image. Loading operations are done from Remote Docker CLI.
App containers deployed via the Remote Docker CLI are not visible and manageable by any other traditional IOx clients, for example, Local Manager, ioxclient, or Field Network Director (FND).
For security and maintenance reasons, IOx supports only subset of Docker run command options and Docker CLI commands. Remote Docker client needs to use Docker engine API v1.37.
When the Remote Docker workflow for developers is disabled and enabled again, a new set of TLS certificates is generated. This means the new certificates need to be downloaded and installed where the previous ones were installed on the developer machine. This can also be used as a measure to voluntarily revoke the previous certificates.
Docker app profiles do not support the Disable MAC learning (mirror mode) IOx feature.
Changes Starting with Release Cisco IOS XE 17.3 (Release Later Than 1.2.1 for IC3000)
Remote Wocker workflow will be treated as a mutually exclusive operation with traditional IOx app lifecycle management workflow (via Local Manager, ioxclient, Fog Director, Cisco Kinetic, Cisco DNAC, Cisco FND). When remote docker workflow is enabled, app lifecycle cannot be managed from a traditional client and vice versa.
App profiles, Docker containers, volumes, and images will be automatically cleaned up as part of disabling remote docker workflow.
List of docker containers, images, and volumes on the device can be seen on the remote docker workflow tab of IOx Local Manager.
Supported Docker Management Commands
$ docker container
$ docker image
$ docker volume
$ docker system

Other Commands:
  attach      Attach local standard input, output, and error streams to a running container
  build       Build an image from a Dockerfile
  commit      Create a new image from a container's changes
  cp          Copy files/folders between a container and the local filesystem
  create      Create a new container
  diff        Inspect changes to files or directories on a container's filesystem
  events      Get real time events from the server
  exec        Run a command in a running container
  export      Export a container's filesystem as a tar archive
  history     Show the history of an image
  images      List images
  import      Import the contents from a tarball to create a filesystem image
  info        Display system-wide information
  inspect     Return low-level information on Docker objects
  kill        Kill one or more running containers
  load        Load an image from a tar archive or STDIN
  login       Log in to a Docker registry
  logout      Log out from a Docker registry
  logs        Fetch the logs of a container
  pause       Pause all processes within one or more containers
  port        List port mappings or a specific mapping for the container
  ps          List containers
  pull        Pull an image or a repository from a registry
  push        Push an image or a repository to a registry
  rename      Rename a container
  restart     Restart one or more containers
  rm          Remove one or more containers
  rmi         Remove one or more images
  run         Run a command in a new container
  save        Save one or more images to a tar archive (streamed to STDOUT by default)
  search      Search the Docker Hub for images
  start       Start one or more stopped containers
  stats       Display a live stream of container(s) resource usage statistics
  stop        Stop one or more running containers
  tag         Create a tag TARGET_IMAGE that refers to SOURCE_IMAGE
  top         Display the running processes of a container
  unpause     Unpause all processes within one or more containers
  update      Update configuration of one or more containers
  version     Show the Docker version information
  wait        Block until one or more containers stop, then print their exit codes
Note Refer to this page under section List of Unsupported Docker Runtime options for all unsupported docker run options.