- Overview
- Product Documentation
- CML Release Notes
- CML 2.2 Installation Guide
- CML 2.2 User Guide
- CML User's Guide
- Overview of CML 2.x
- Using CML and the HTML5 UI
- Dashboard
- Workbench
- Adding Nodes to a Lab
- Starting, Stopping, and Wiping Nodes
- Deleting Nodes
- Creating Links
- Rules for Creating Links and Interface Overprovisioning
- Adding Interfaces and Overprovisioning
- Overprovisioning Interfaces with Link Creation
- Starting Simulations
- Connecting to a Node's Console
- Changing Global Console Settings
- Download the Console History
- Setting CPU limit on node
- Launch sequencing and CPU limiting
- Stopping Simulations
- External Connectivity for Simulations
- Link Packet Capture
- Lab Sharing
- Breakout Tool
- Custom VM Images
- Creating a New Node Definition
- CML 2.2 Admin Guide
- Resources
Workbench
The Workbench page is used to create and modify a lab’s topology and to interact with the lab simulation. To open a lab in the Workbench, find the lab in the Dashboard page and, depending on the Dashboard’s view, click on the tile (in tiles view) or the Open Lab link or lab preview (in list view) associated with the lab.
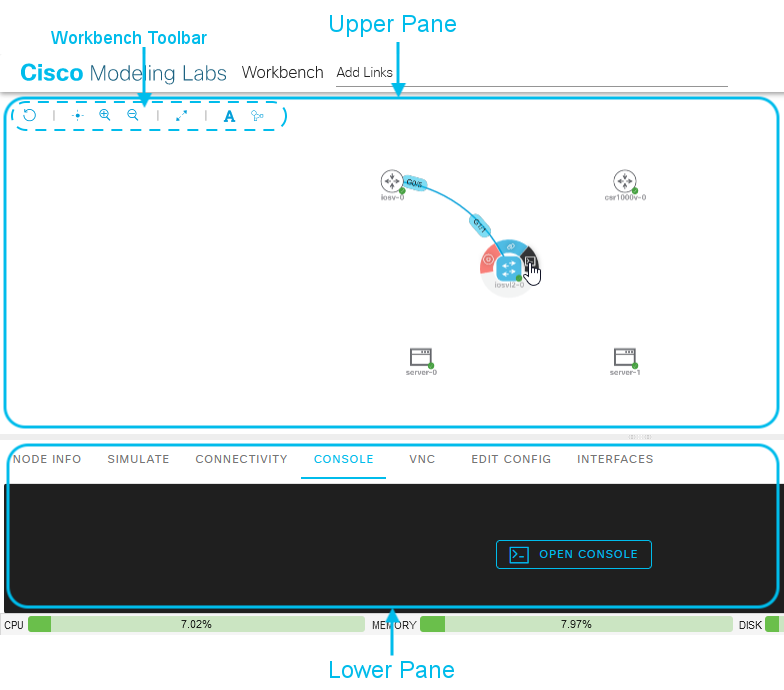
The Workbench page is divided into an upper and lower pane. The upper pane is a graphical canvas where you can create, modify, and interact with the lab topology. The lower pane provides a tabbed view of different details and actions for the selected topology element. If no element is selected in the lab–for example, when you click on the canvas background in the upper pane–the tabs in the lower pane show information about the topology itself. If you select a node or link in the upper pane, the tabs and details in the lower pane will show information about the selected topology element.

The workbench toolbar at the top-left of the upper pane of the Workbench provides buttons for the following actions:
Toolbar Button |
Description |
|---|---|
Undo Last Action |
Undo the last action in the canvas, such as adding a node, moving a node, removing a link, etc. Note that this feature is still considered experimental (alpha). |
Center View |
Center the topology in the canvas. |
Zoom In |
Zoom in on the topology in the canvas. |
Zoom Out |
Zoom out of the topology in the canvas. |
Full Screen |
Expand the canvas (upper pane) to full screen. |
Toggle Link Labels |
Toggle to enable / disable the display of the interface names on each side of the link in the canvas. |
Toggle Link Style |
Toggle the canvas between a curved or straight style for the display of the links in the lab. |