Automating NX-OS with Netbox and Ansible Automation Platform
This guide contains a few basic examples to get started automating NX-OS based networks with Netbox and Ansible Automation Platform. While this example is not part of the Nexus-as-Code project, it offers more seasoned Ansible users several examples to get started with driving network changes through Netbox.
Open source configuration management tools like Netbox are gaining traction in the industry. Netbox combines traditional IP address management (IPAM) with datacenter infrastructure management (DCIM). It offers a powerful API and event-driven webhooks which makes it ideal for network automation. Some organizations want to use Netbox as their source of truth for their datacenter infrastructure. Others prefer it as a system of records to store information reflecting the state of the infrastructure. In this example, Netbox is leveraged as a SSoT (Single Source of Truth) for network configuration.
This guide assumes a working installation of Netbox and Ansible Automation Platform. For installation instructions please visit:
- Netbox 4.0
- Ansible Automation Platform 2.4
- Git
- A text editor / Integrated Development Environment (IDE) (such as VisualStudio Code)
It also assumes that the reader has the option to create a private repository to store the Ansible inventory and playbooks. This guide makes use of the SaaS version of Gitlab.
Examples covered here include:
- Complete interface configuration
- Switch Virtual Interface (SVI) configuration
It is worth noting that Netbox does not offer many of the Gitops benefits such as branching, versioning, etc. For those that are interested in this, Nautobot is available as an alternative. Nautobot was initially developed as a fork of Netbox. It offers native Git integration along with support for plugins that allow to sync inventory state between different DCIM tools. The examples below can also be used with Nautobot.
Adding device configuration and tags to Netbox
First, Netbox needs to have some device configuration in place so that Ansible Automation Platform can execute Playbooks against those devices. Tags will be used to prevent Ansible Automation Platform from running a job each time a change is made in Netbox. In the Netbox GUI, navigate to Customization > Tags and add a new tag named ansible-int.

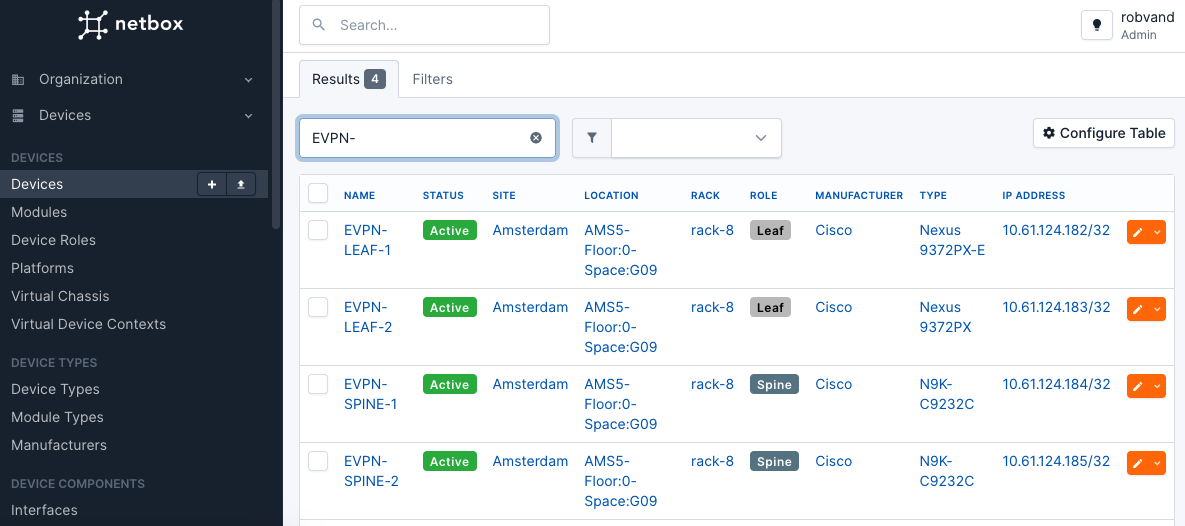
Add at least one device to the Netbox inventory. This example assumes 4 Nexus switches as shown below. Tip: Many device types have already been added to the netbox-community devicetype-library.
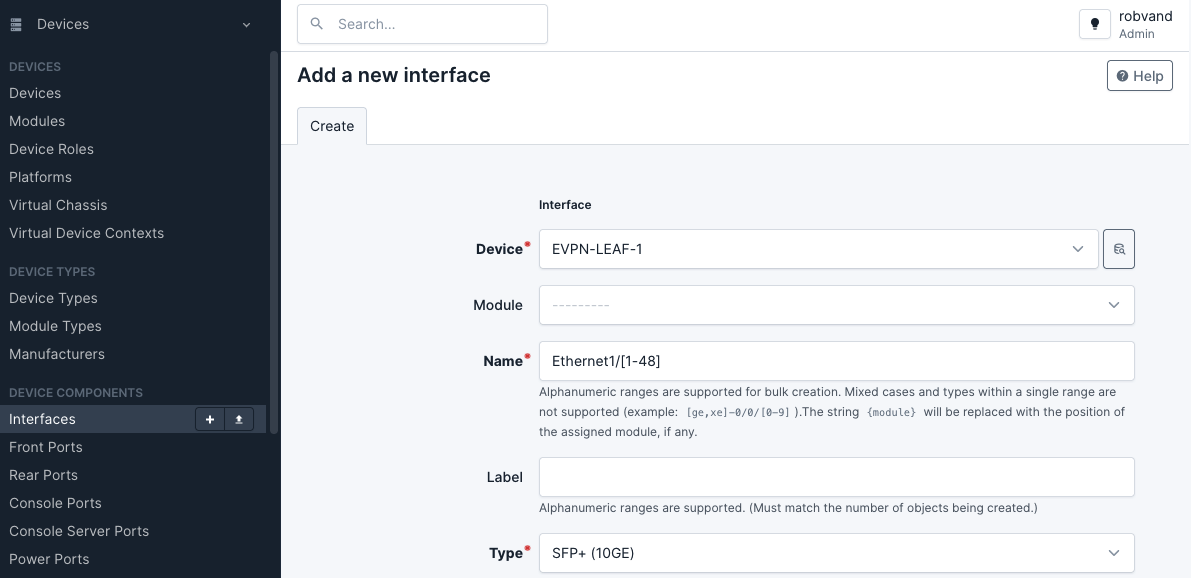
Add interfaces to the device. Note that it is possible to use make use of ranges to support bulk creation. An example is the range Ethernet1/[1-48] with Type SFP+ (10GE) and Ethernet1/[49-54] with Type QSFP+ (40GE) for a typical 48-port top of rack switch. Keep in mind that the name of the interfaces should match the actual interface names on the device/switch.
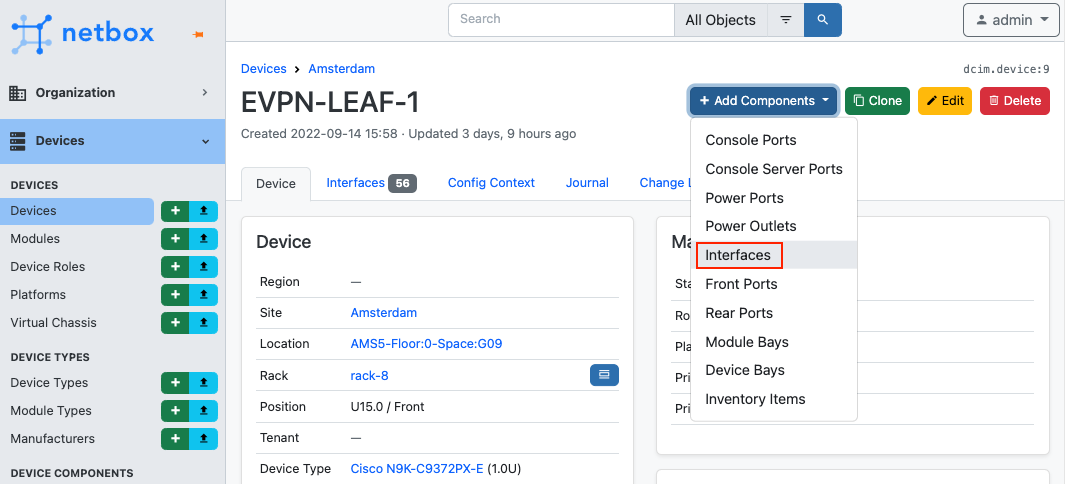
Within the device overview window, navigate to Add Components > Interfaces:
Add a range of interfaces to the device:
Note: if the instance of Netbox already contains existing devices and interfaces, This step is optional.
Set up a repository
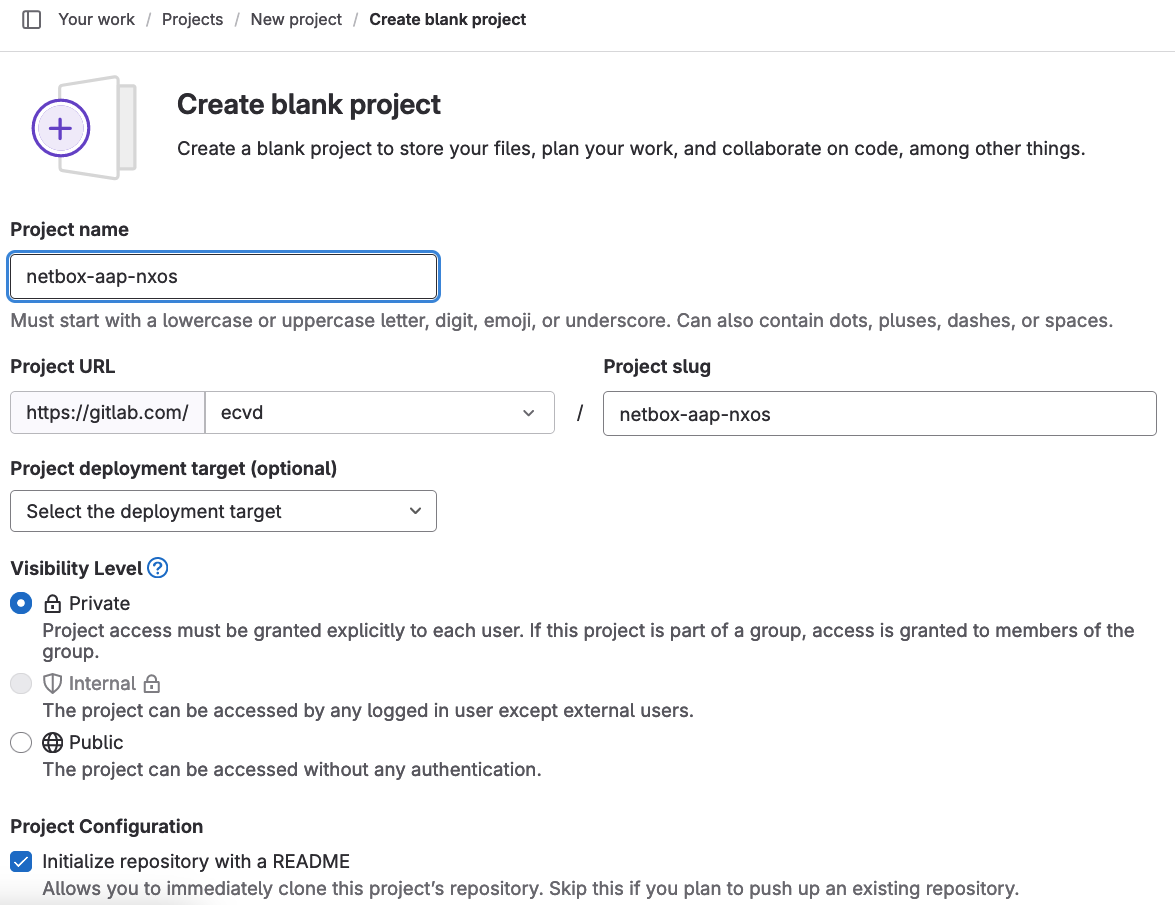
Now that the initial device configuration has been added to Netbox, the next step is to create a Git repository. As mentioned before, this guide leverages Gitlab. When doing so, be mindful of the visibility settings on the Gitlab project as this repository will store login credentials to the Nexus switches in an inventory.ini file.
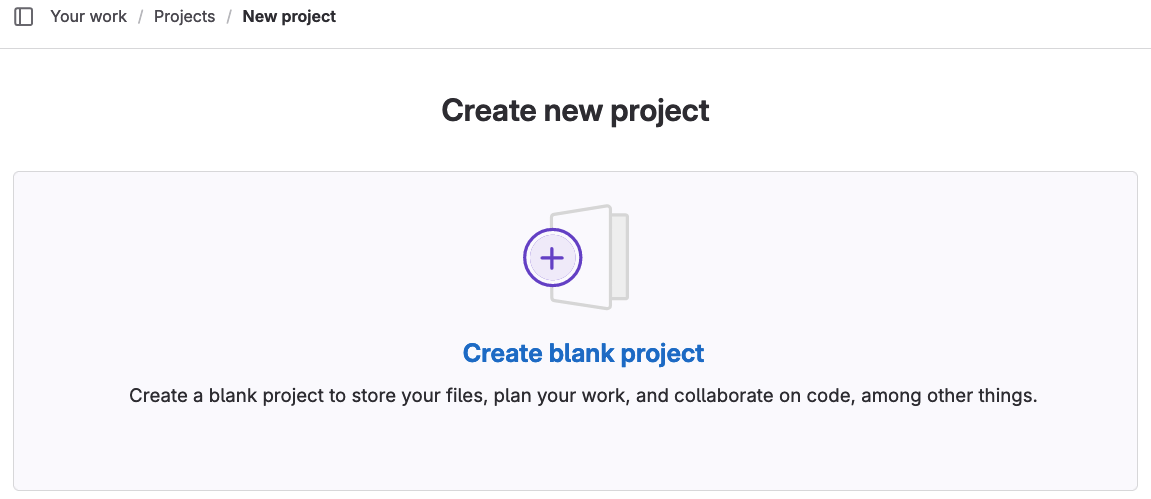
Give the new repository a sensible name and select Create project.
Go ahead and clone the repository. The URL can be found in the clone dropdown menu.
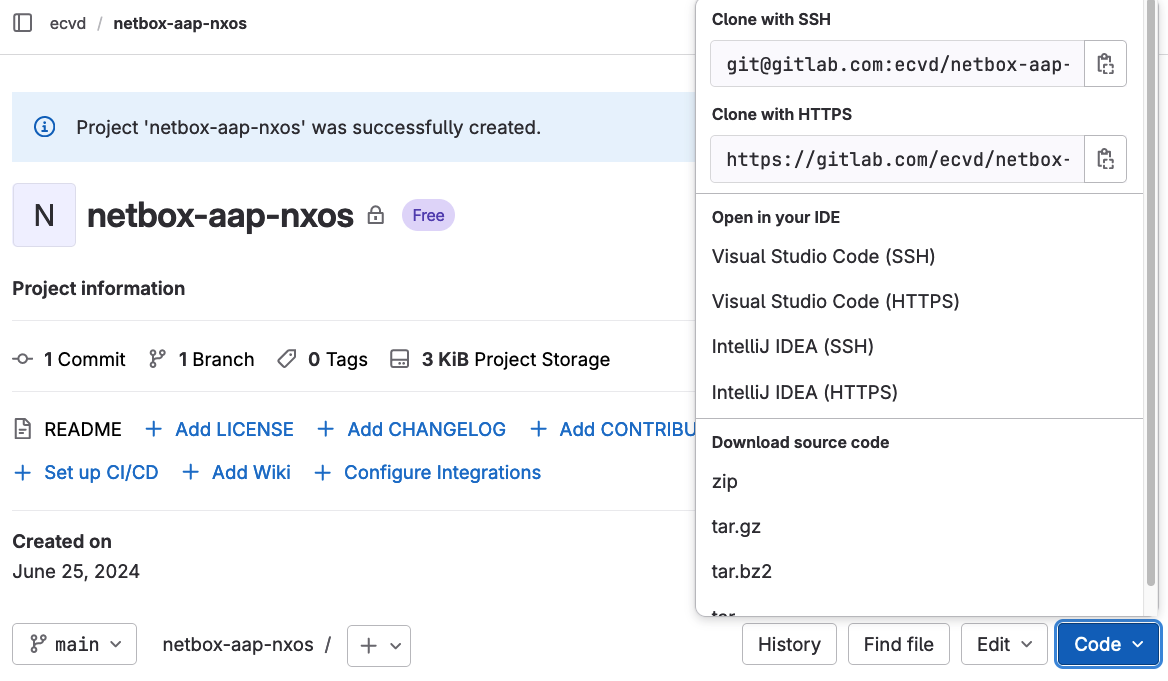
git clone git@gitlab.com:<group>/<newrepo>.git
Cloning into '<newrepo>'...
remote: Enumerating objects: 3, done.
remote: Counting objects: 100% (3/3), done.
remote: Compressing objects: 100% (2/2), done.
remote: Total 3 (delta 0), reused 0 (delta 0), pack-reused 0
Receiving objects: 100% (3/3), done.
Populating the repository
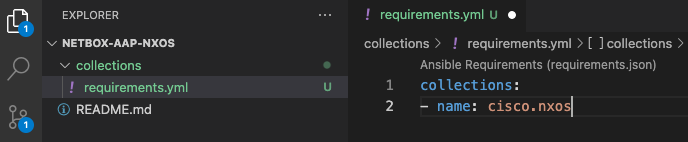
Open the cloned folder in a text editor / IDE. Within this folder, create a new folder named collections. In that the collections folder, create a file named requirements.yml. Populate the requirements.yml file with the following:
collections:
- name: cisco.nxos
The cloned folder should now have the following structure:
The requirements.yml file will instruct Ansible Automation Platform which collection it should use.
Next up is the inventory file. Create a new file inventory.yml within the root of the cloned folder, and add the code below. Feel free to customize this based on the requirements and devices that are in scope. Make sure to update the device credentials in ansible_user and ansible_ssh_pass.
[all:vars] represents the variables that apply to all devices. As the management IP address for each device is likely unique, these are specified as group variables such as EVPN-LEAF-1. Make sure to substitute the group variables in the inventory.ini file with the correct device name as configured in Netbox. For example, substitute EVPN-LEAF-1 with my-prod-switch-1 if that matches the device name in Netbox. Lastly, make sure to update the management IP address for each device.
[all:vars]
ansible_connection=  network_cli
ansible_network_os= nxos
ansible_user= admin
ansible_ssh_pass= "password"
[EVPN-LEAF-1]
10.61.124.182
[EVPN-LEAF-2]
10.61.124.183
[EVPN-SPINE-1]
10.61.124.184
[EVPN-SPINE-2]
10.61.124.185
Creating the first playbook
Now that the environment has been set up with a requirements and inventory file, next is the creation of the first Ansible Playbook. This playbook will configure basic interface parameters such as setting the description, speed, duplex, access VLAN, etc.
- Create a file within the root of the cloned folder named
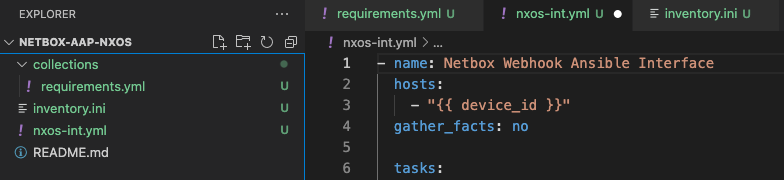
nxos-int.yml, and add the following code:
- name: Netbox Webhook Ansible Interface
  hosts:
    - "{{ device_id }}"
  gather_facts: no

  tasks:

  - name: Nxos L2 Interface VLAN
    cisco.nxos.nxos_l2_interfaces:
      config:
      - name: "{{ interface_id }}"
        access:
          vlan: "{{ vlan_id }}"
      state: replaced
    tags:
      - ansible-int

  - name: Nxos Interface
    cisco.nxos.nxos_interfaces:
      config:
      - name: "{{ interface_id }}"
        description: "{{ description }}"
        duplex: "{{ duplex }}"
        mtu: "{{ mtu }}"
        speed: "{{ speed }}"
        enabled: "{{ enabled }}"
      state: merged
    tags:
      - ansible-int
- Save the
netbox-interfaces.ymlfile.
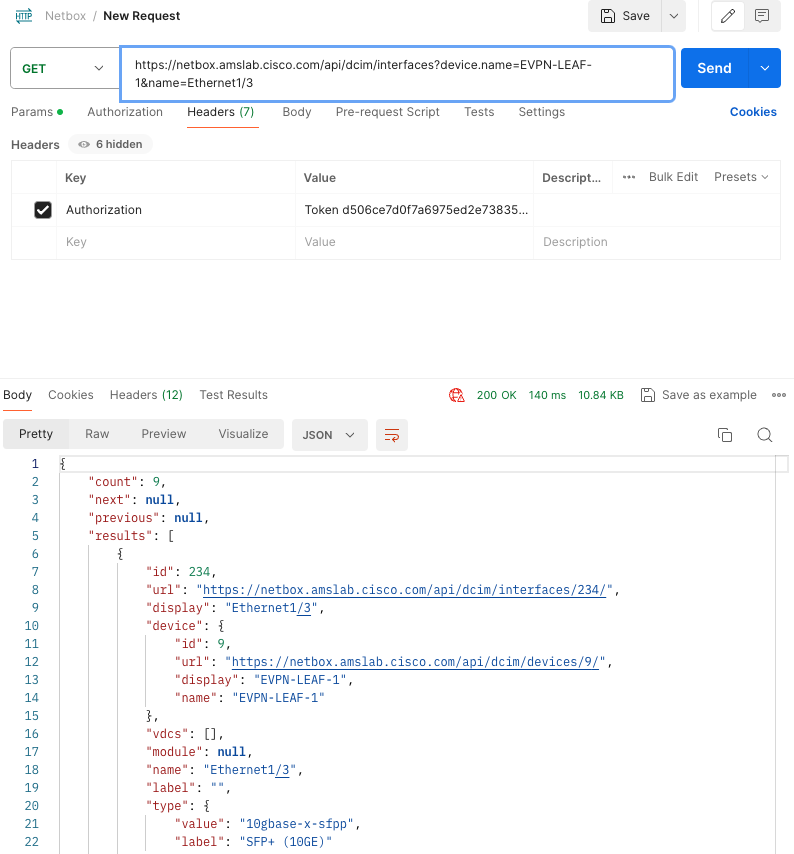
Note that variable values such as
{{ vlan_id }}will be passed to Ansible Automation Platform through a webhook. These variables will be substituted. When configuring a webhook in Netbox in a later step, the payload is modified in such a way that only the fields that are relevant for the Ansible Playbook are sent. In order to better understand which fields can be passed in the body of the webhook, it can be useful to make use of Postman and the Netbox API. When doing this, make sure to provide the Netbox API key in the authorization tab. An example POST request is shown below. Make sure to substitutedevice.namewith the correct device name andnamewith any interface.
The folder should now contain the following files and look like this:
- The next steps are pushing the local changes to the remote repository. This is done by adding the changes to staging, writing a commit message, followed by pushing the changes to the remote git repository.
~/netbox-aap-nxos main ?3 > git add .
~/netbox-aap-nxos main +3 > git status #optional command for verification
On branch main
Your branch is up to date with 'origin/main'.

Changes to be committed:
  (use "git restore --staged <file>..." to unstage)
        new file:   collections/requirements.yml
        new file:   inventory.ini
        new file:   nxos-int.yml

~/netbox-aap-nxos main +3 > git commit -am "initial code"
[main bec08bf] initial code
 3 files changed, 15 insertions(+)
 create mode 100644 collections/requirements.yml
 create mode 100644 inventory.ini
 create mode 100644 nxos-int.yml

~/netbox-aap-nxos main >1 > git push
Enumerating objects: 7, done.
Counting objects: 100% (7/7), done.
Delta compression using up to 12 threads
Compressing objects: 100% (3/3), done.
Writing objects: 100% (6/6), 601 bytes | 601.00 KiB/s, done.
Total 6 (delta 0), reused 0 (delta 0), pack-reused 0
To gitlab.com:ecvd/netbox-aap-nxos.git
   9a65793..bec08bf  main -> main
Setting up Ansible Automation Platform
In order for AAP to read and access the contents of the previously created Git repository it is required to add credentials. In the Ansible Automation Platform GUI, navigate to Resources > Credentials, and select Add. In the Create New Credential window, perform the following actions:
- Provide a
Namefor the credentials. - Optionally, provide a
description. - In the
Credential Typefield, select Source Control. - In the
Type Detailssection, provide a Username and Password. - Select
Save.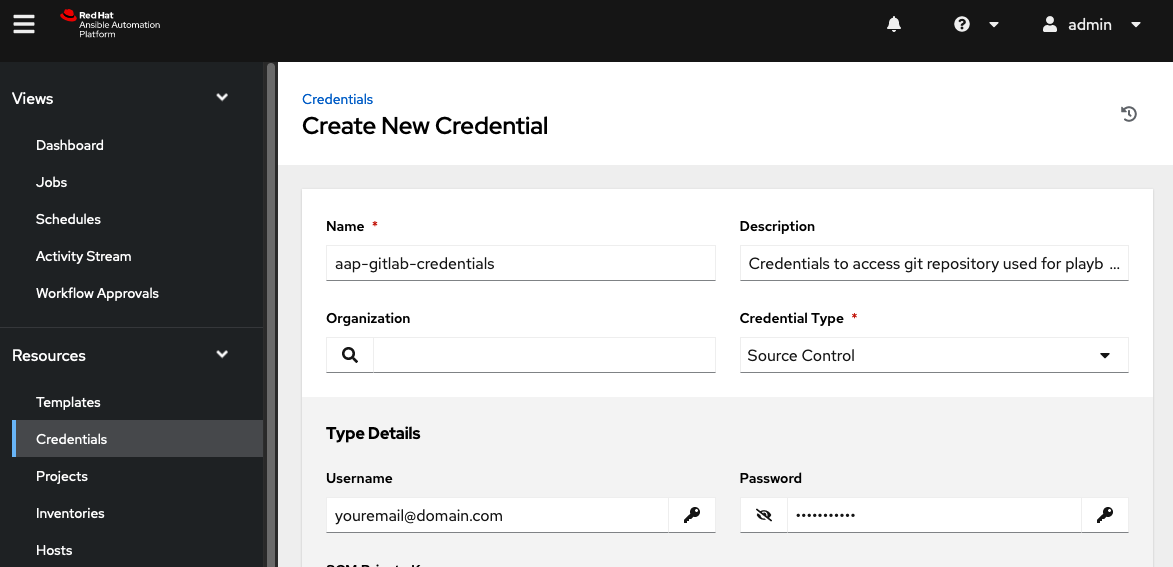
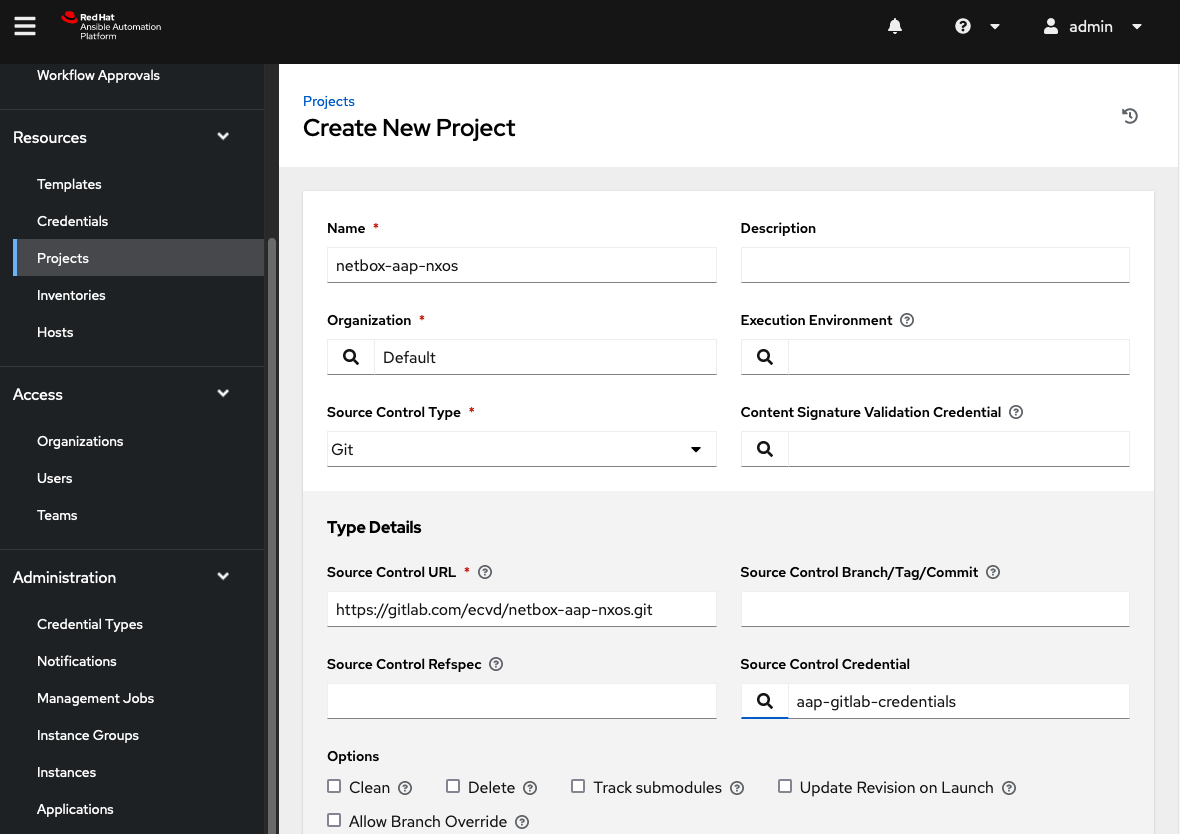
Add a new project by navigating to Resources > Projects and selecting Add:
In this window, perform the following actions:
- Provide a
namefor the new project. - Select
Gitas the SCM type. - Provide the
SCM URL. This is the URL to access the Git repository. (an example is https://gitlab.com/your-org/netbox-aap-nxos.git)
After saving the new project configuration, Ansible Automation Platform will trigger an SCM update to read the contents of the repository. The status can be observed in the detailed view or by navigating to Views > Jobs.
If repository is read successfully by Ansible Automation Platform, the contents of inventory.ini can be used to create a new inventory. Navigate to Resources > Inventories > Add and select Add Inventory to add a new inventory:
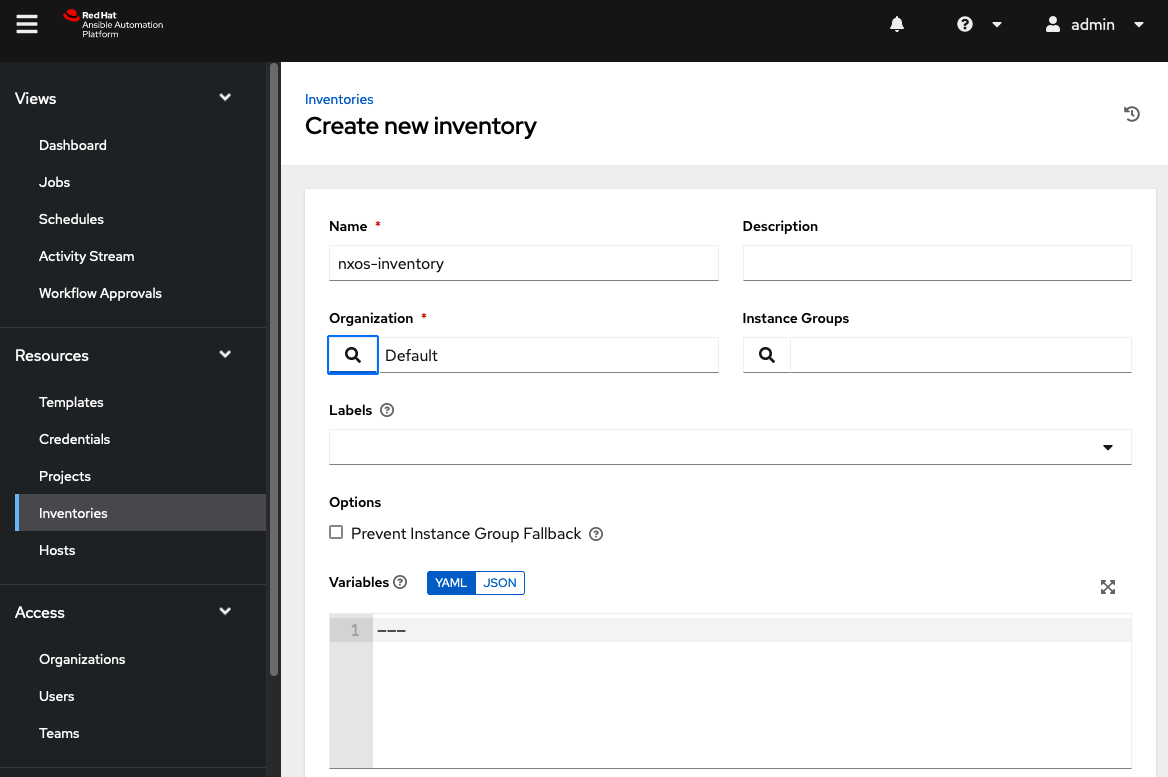
In the Create new inventory window, select Save and navigate to the Sources menu. Within this menu, select add to add a new source. In this window, perform the following actions:
Provide a
Namefor the inventory.Select
Sourced from a Projectin theSourcedropdown menu.In
Source Details>Project. Select the previously created project.In
Source Details>Inventory File. Selectinventory.ini.Select
Save.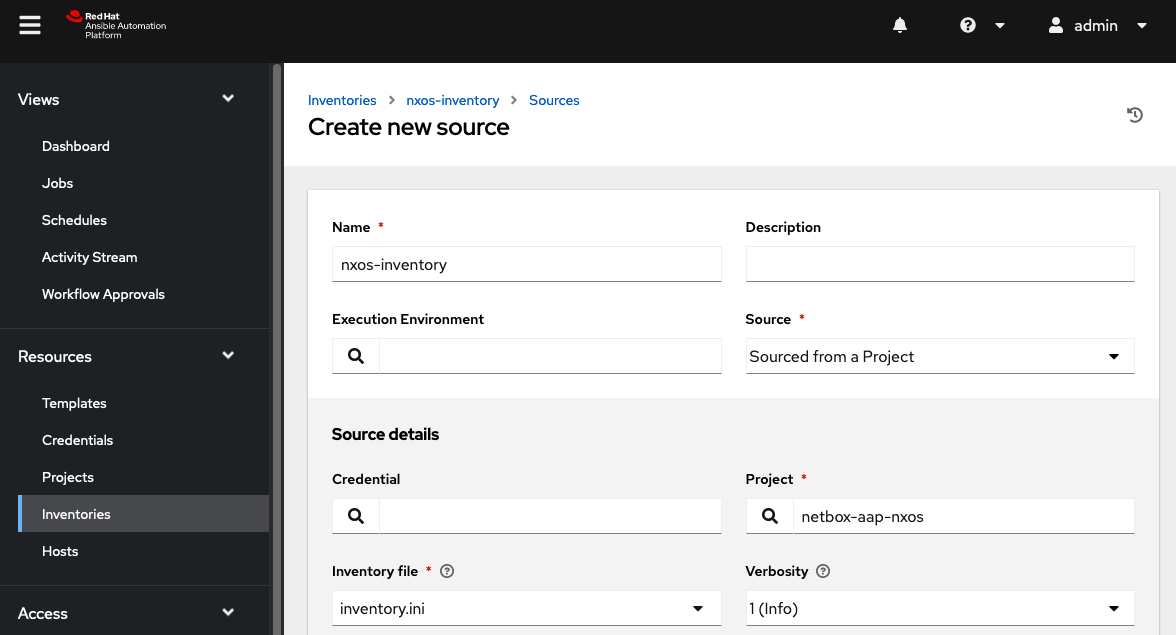
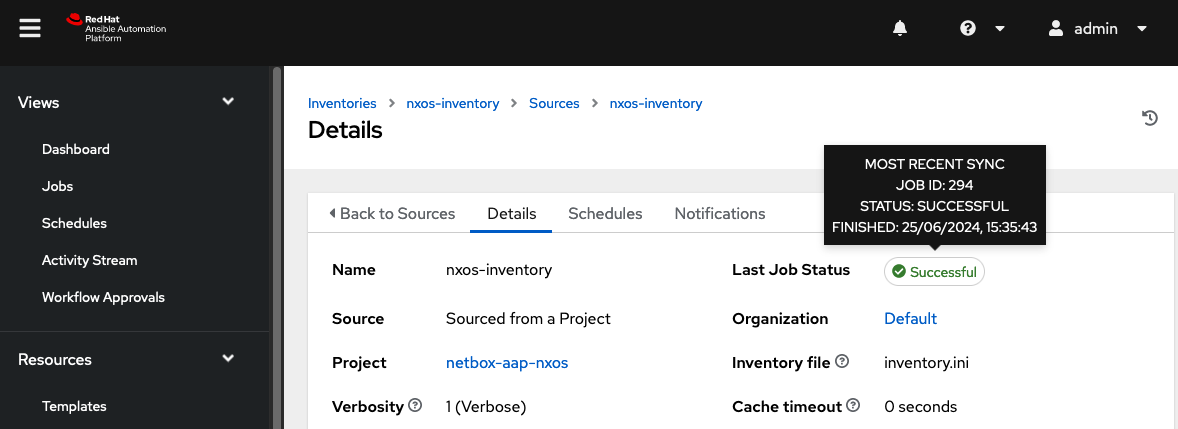
Note that if there are frequent changes to the remote repository it can be helpful to check the
update on launchandupdate variablesupdate options to refresh the inventory file to the most recent version whenever a job using this inventory is launched.Navigate to the bottom of the Details view and select
Syncto trigger a one time inventory sync.Ensure that this job runs successfully.
The next step is to create a job template. The job template is where the inventory, playbook and other settings are linked together. Navigate to Resources > Templates and select Add > Add job template to add a new job template. In the Create New Job Template window, perform the following actions:
- Provide a
Namefor the job template. - In the
Inventorymenu, select the previously created inventory. - In the
Projectmenu, select the previously created project. - In the
Playbookmenu, ensure that the nxos-int.yml playbook is populated and select it.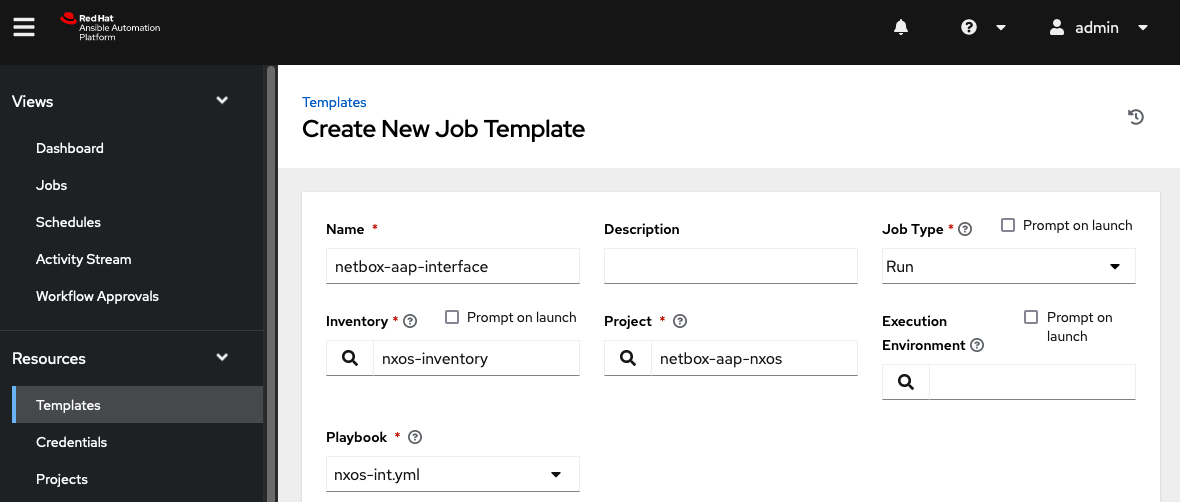
- In the
variablesconfiguration area, selectPrompt on Launch.
- Navigate the the bottom and check
Prompt on LaunchforJob Tags.
Note: the
prompt on launchflags are important as this instructs the job to prompt for extra variables and tags. The variables will get substituted with the values in the webhook sent by Netbox. The tags are needed to determine when the playbook should run. - Save the template and take note of the URL to find the Job Template ID. For example, If this is the URL:
https://url/#/templates/job_template/15/details. The Job ID is 15.
The final steps are adding an Application and Token to authorize the POST requests (webhooks) sent by Netbox to Ansible Automation Platform.
Navigate to Administration > Applications and select Add to add a new application. In the Create New Application window, perform the following actions:
- Provide a
Namefor the new application. - In the
Authorization grant typemenu, selectResource owner password-based. - In the
Client typemenu, selectPublic.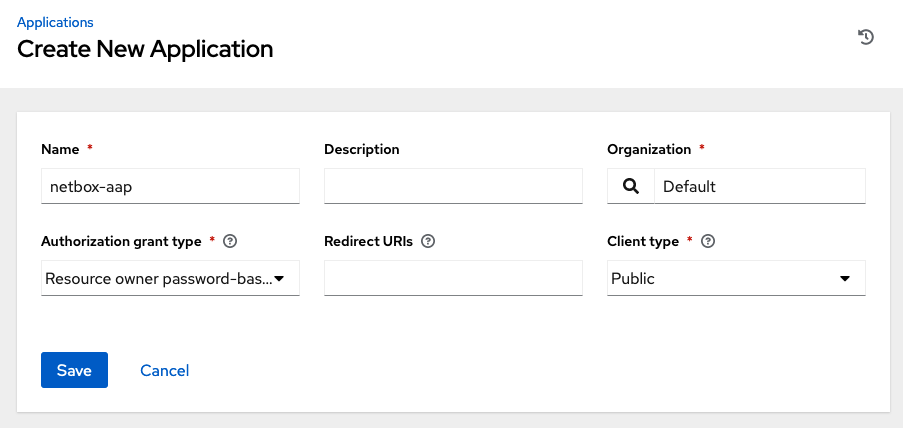
- Select
Saveto save the new application.
Navigate to Access > Users and select the admin user. Alternatively, add or use another user. In the Users detailed view, perform the following actions:
- Navigate to the
Tokensmenu tab and selectAddto add a new token. - In the
Applicationfield, select the previously created application. - In the
Scopefield, selectWrite. - Select
Saveand take note of theTokenandRefresh Tokenas this is only displayed once.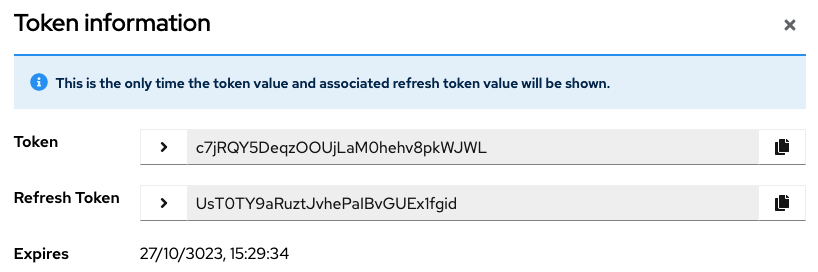
Setting up the webhook
In the Netbox GUI, navigate to Other > Integrations > Webhooks and select Add to add a new Webhook. In the Add a new webhook window, perform the following actions:
- Provide a
Namefor the Webhook. - In the
URLfield, provide the job template url with thelaunchparameter. Job ID 15 is used as example. This should match the respective job ID as noted earlier. - In the
Additional headersaddAuthorization: Bearer <your-token>to authenticate with Ansible Automation Platform. This is theTokenfrom previous step.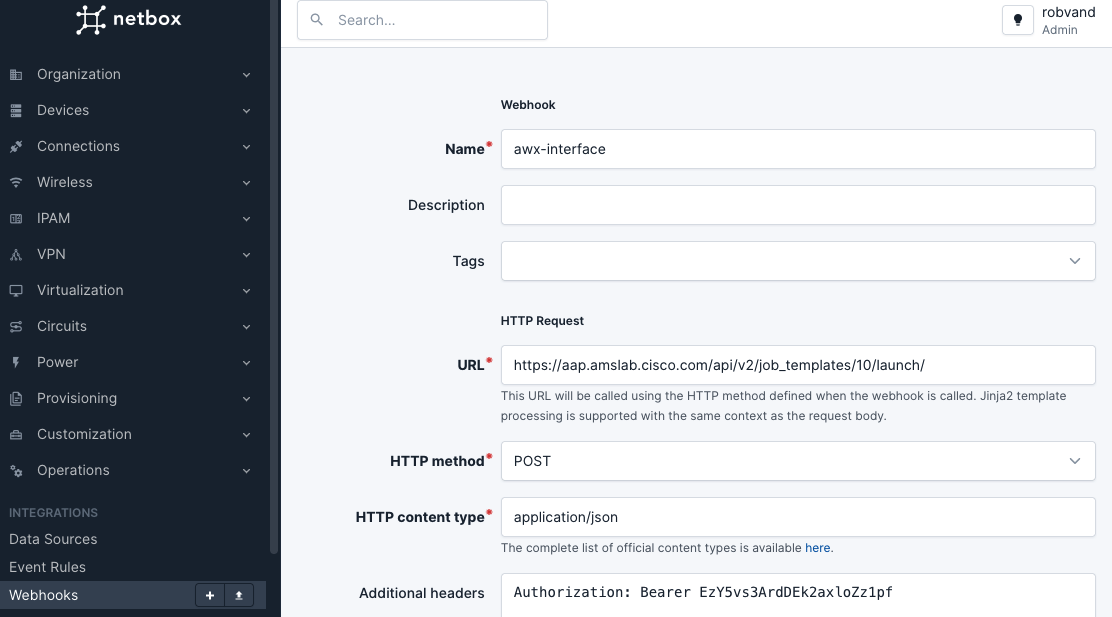
- In the
Body templatefield, provide the json formatted text from the following snippet:
{   "extra_vars":   {
        "device_id": "{{ data['device']['name'] }}",
        "interface_id": "{{ data['name'] }}",
        "vlan_id": "{{ data['untagged_vlan']['vid'] }}",
        "description": "{{ data['description'] }}",
        "duplex": "{{ data['duplex']['value'] }}",
        "mtu": "{{ data['mtu'] }}",
        "speed": "{{ data['speed'] }}",
        "enabled": "{{ data['enabled'] }}"
                    },
    "job_tags": "{{ data['tags'][0]['name'] }}"
}
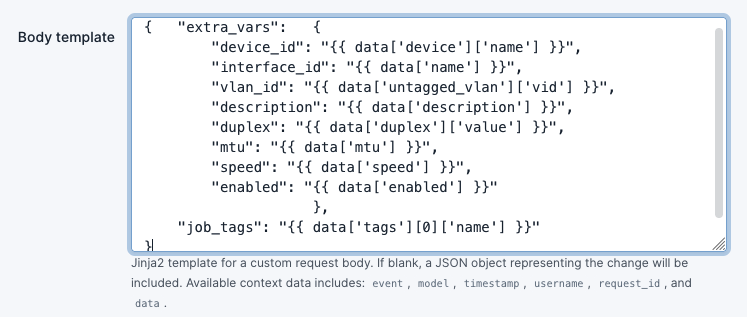
Note: the
Body templatefield is a Jinja2 template that allows the user to customise what is presented in the payload of the webhook. For basic interface configuration, the body should carry at least some basic parameters. In this configuration example, it should also carry a job tag so that the tag can be used by Ansible Automation Platform whether it should run a playbook.
Note: The line
"job_tags": "{{ data['tags'][0]['name'] }}"only passes the first instance [0] of a tag applied to an interface. This does not allow passing multiple tags.
- Optionally, disable
SSL verification.Note: This setting should be left enabled for production usage.
Creating event rules
Now that the Webhook is created, event rules are required to determine when to run the webhook. In the Netbox GUI, navigate to Integrations > Event Rules, and select Add to add a new event rule. In this window, perform the following actions:
In the
Namefield, provide a name for the new event rule.In the
Object Types, select DCIM > InterfaceIn the
Tagsfield, select the previously created tag.In the
Eventsconfiguration section, select Updates.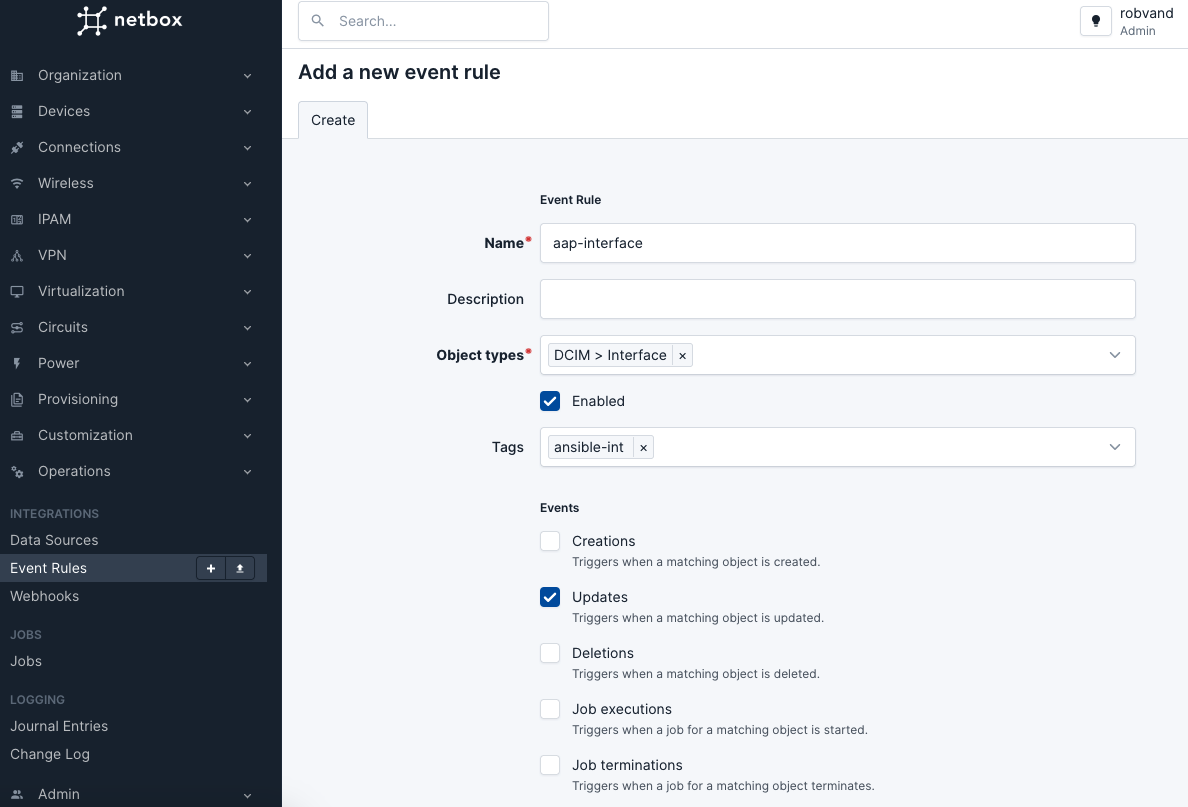
In the
Actionconfiguration section, forAction Type, selectWebhookIn the
Actionconfiguration section, forWebhook, select the webhook created in previous step.
Select
Saveto save the event rule.
Modifying an interface
With the webhook and event rule for interfaces configured, generate an dcim, interface update event by modifying some of the configuration on an interface. In the Netbox GUI, Navigate to Devices, select a Device, and select any of the interfaces from the Interfaces tab.
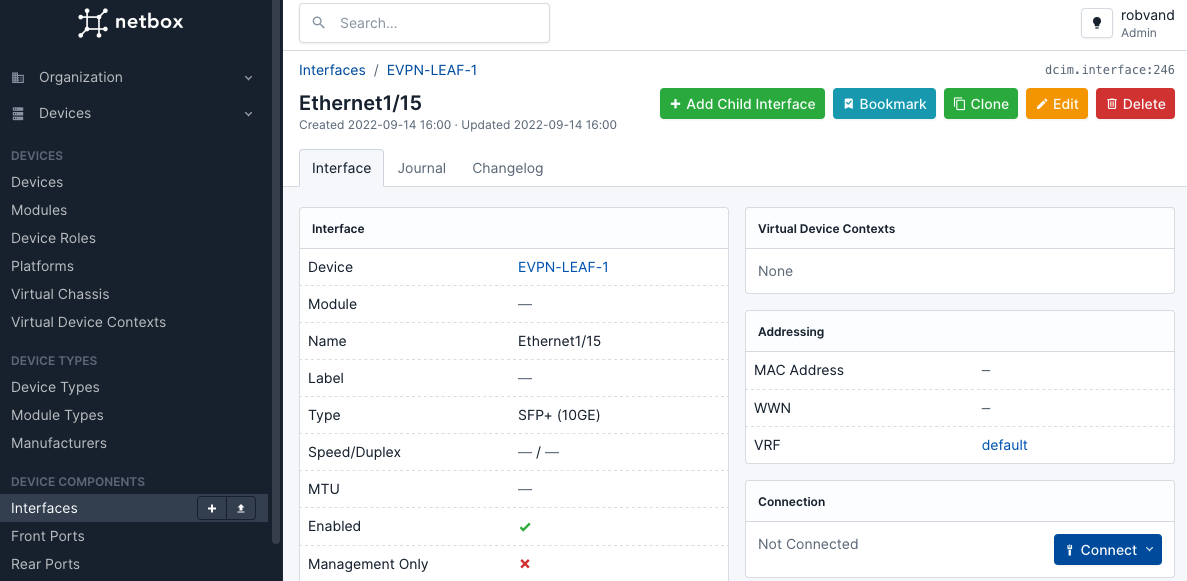
In the interface overview, select edit and perform the following actions:
- In the
Speedfield, provide an interface speed in Kbps. - In the
Duplexfield, select Full. - In the
Descriptionfield, provide a description. - In the
Tagsmenu, select the previously created tag.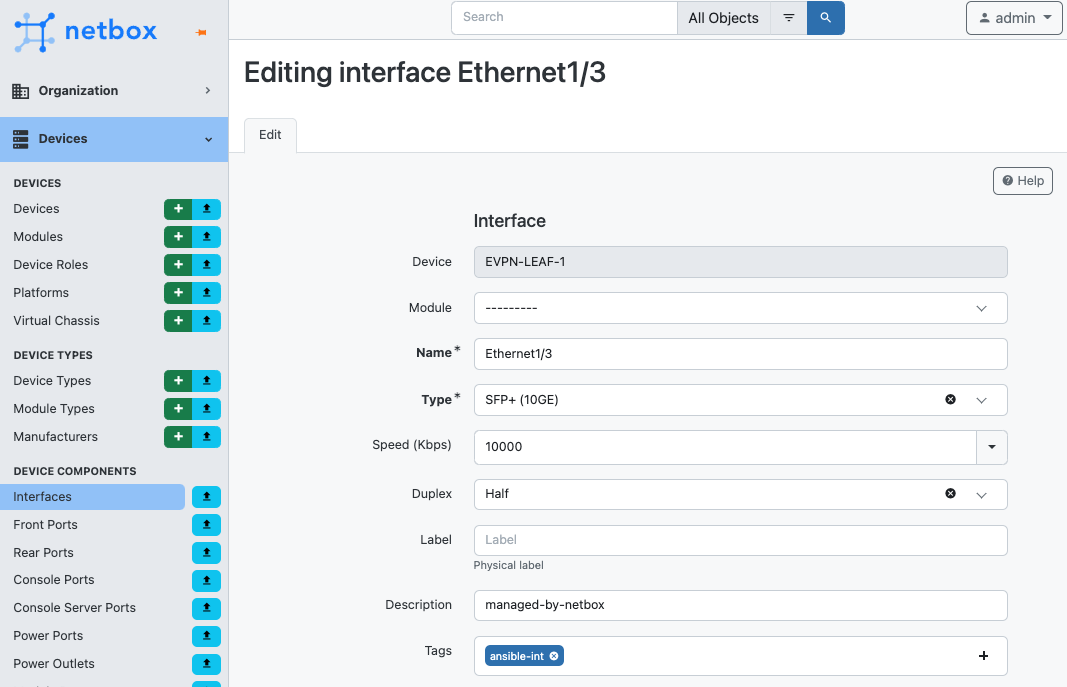
- In the
MTUfield, provide the MTU. - In the
Operationconfiguration section, check Enabled.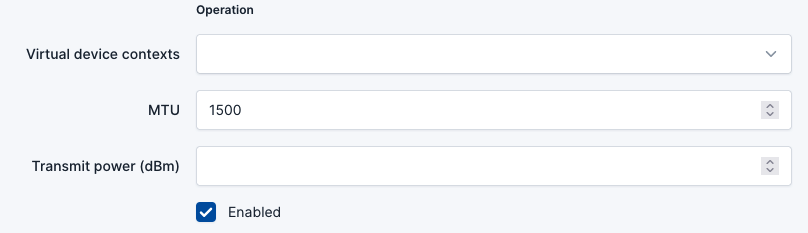
- In the
802.1Q Switchingmenu, select Access. - In the
Untagged VLANmenu, select a VLAN. (if no VLANs exist, add a VLAN)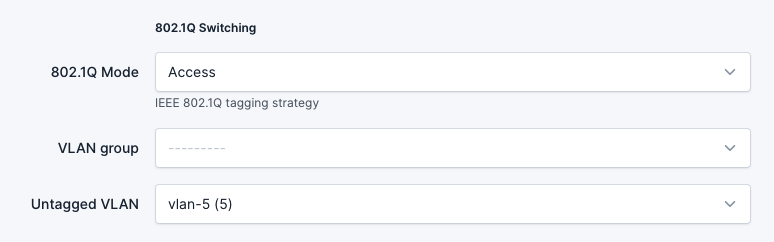
Before saving the configuration, open up a terminal and connect to the switch that owns the interface that is about to be modified, so that the changes can be verified later.
- Connect to the respective leaf over SSH and execute the following
showcommand on the repsective interface.
EVPN-LEAF-1# show run int eth1/15

!Command: show running-config interface Ethernet1/15
!Running configuration last done at: Wed Jun 19 09:00:29 2024
!Time: Tue Jun 25 16:00:15 2024

interface Ethernet1/15
  switchport mode trunk
  switchport trunk allowed vlan none
  spanning-tree port type edge trunk
  mtu 9216
- Navigate back to Netbox and select
Saveto save the interface configuration. This will trigger the Webhook and this will attempt to launch a job in Ansible Automation Platform. - In Ansible Automation Platform, navigate to
Views>Jobsand select the job to confirm the configuration by ensuring the job exists, and the rightjob template,inventory, andplaybookare shown.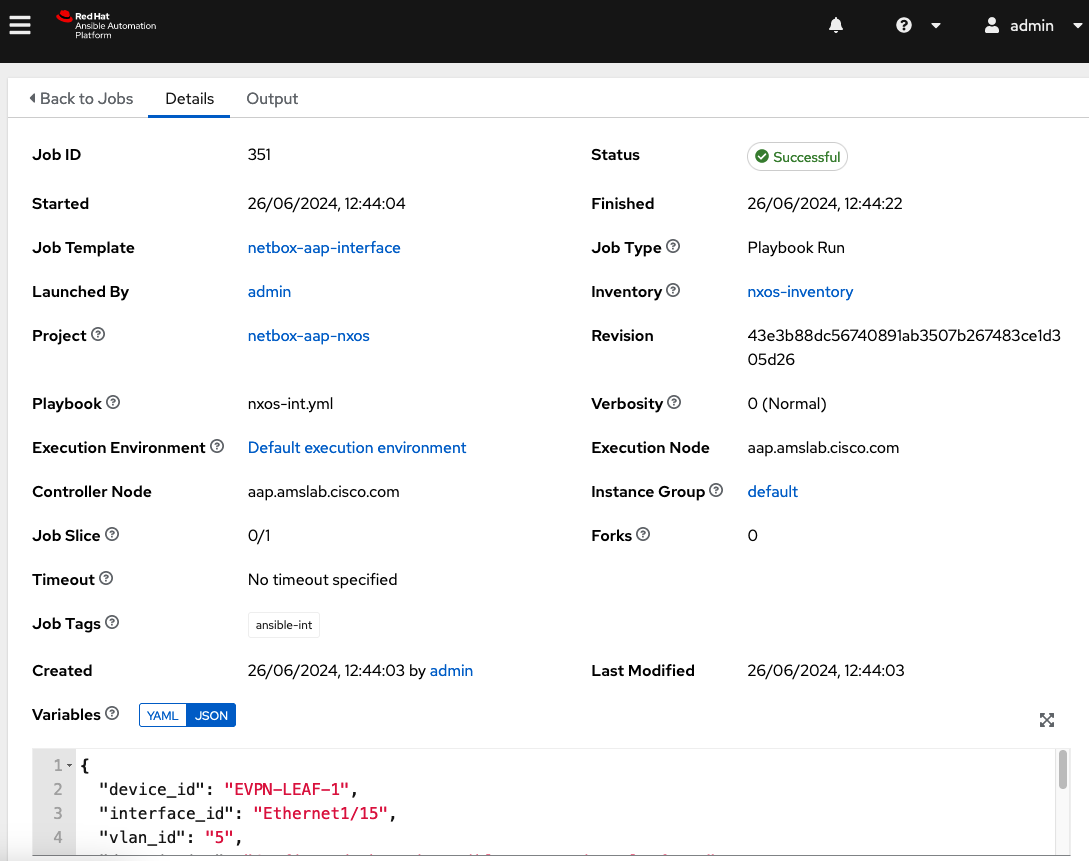
- Connect or return to the respective leaf over SSH and execute the following
showcommand on the repsective interface.
LEAF-1(config-if)# show run int eth1/15
!Command: show running-config interface Ethernet1/15

interface Ethernet1/15
  description Configured through Ansible Automation Platform
  switchport access vlan 5
  spanning-tree port type edge trunk
  speed 10000
  duplex full
Switch Virtual Interface (SVI) creation
An example to create an SVI will be provided here, but without the step by step guidance that was provided up to this point. Create a new job template for each new playbook.
The following Ansible playbook can be used to create an SVI on a Nexus switch:
cat nxos-l3-interface.yaml
---

- name: Netbox Webhook Ansible Interface
  hosts:
    - "{{ device_id }}"
  gather_facts: no

  tasks:

  - name: Nxos L3 Interface
    cisco.nxos.nxos_l3_interfaces:
      config:
      - name: "{{ interface_id }}"
        ipv4:
          - address: "{{ address }}"
      state: replaced
    tags:
      - ansible-l3-int
Note: the current
statefor the task is set toreplaced. Feel free to modify this to meet other requirements. Also make sure to create theTagin Netbox.
Following the Playbook above, the webhooks Body Template should be the following:
{   "extra_vars":   {
        "device_id": "{{ data['assigned_object']['device']['name'] }}",
        "address": "{{ data['address'] }}",
        "interface_id": "{{ data['assigned_object']['name'] }}"
},
    "job_tags": "{{ data['tags'][0]['name'] }}"
}
The Webhook should be configured to trigger on Create and Update events. The Event Content Type is IPAM > IP Address.