Captive Portal with NodeJS using Group Policies
A simple Captive Portal using Meraki Group Policies to authenticate a user on a wireless network and define their access.
Use Cases
This is an ideal solution if you are looking for a Guest or visitor splash page solution that provides one of the following:
- One-time Registration
- Premium Access
- 2-factor Authentication
Technologies
Environment
- NodeJS with Express
- Handlebars
1: Web App Installation
git clone https://github.com/dexterlabora/meraki-splash-gp.git meraki
cd meraki
npm install
Configure
Open the configs.js file and edit the variables and save it.
If you do not already have these values, complete the steps in the Meraki Setup section below and then complete the configuration.
// configs.js

// Rename this file to configs.js
// Define your Application Configurations here
var config = {
    // Meraki API Key
    apiKey: "YourAPIKey",
    // Meraki API Base URL
    baseUrl: "https://api.meraki.com/api/v0",
    // The Meraki Network ID
    networkId: "YourNetworkID",
    // The Meraki Group Policy ID
    policy: "100"
}
Start
npm start
Test
You should now be able to view the application running on your local machine.
You can test with a sample query string to observe how the variables are handled in the app.
Deploy
The web app should be publicly available so the clients are able to connect to it. You could either publish this app to a server with proper firewall rules, run a micro service with Heroku or create a dynamic tunnel back to your localhost using Ngrok.
2: Meraki Setup
To redirect the wireless clients to the captive portal and apply a policy, we must first configure the Meraki network.
Wireless SSID
Wireless –> Configure –> Access Control
- Splash Page: Click-through
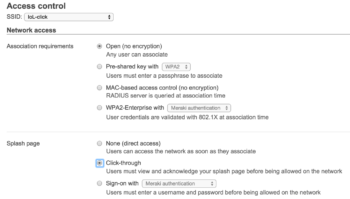
Splash Page Redirect
Wireless –> Configure –> Splash
- Custom Splash URL: https://YourPublicServerAddress:3000/

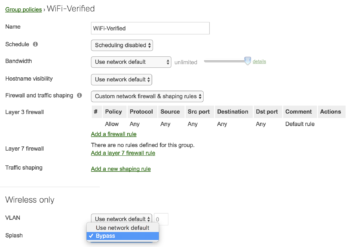
Group Policy
Network-wide –> Configure –> Group Policies
- add Group
- Splash: Bypass
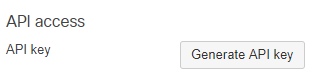
API
Organizations –> Settings
- API access: Enable

Profile –> API Keys
- Generate an API key (or use your existing)
Obtain Network and Policy IDs
To get the IDs required in the config.js file within our app, we must use the Meraki API to discover these values.
A meraki-policy-summary.js script is included in the project which can be run from within the terminal. It will print out the required IDs needed for configuration.
$ API_KEY=2f301bc_YourApiKey_f76e5ff66ebd170f node meraki-policy-summary.js
Running Meraki Network Summary Tool...

-- Organization --
 Name: Meraki DevNet Sandbox
 ID: 549236

-- Network --
 Name: Demo Net
 ID: L_646829496000098845

 Group Policies

 Name: noSplash
 ID: 100
Alternatively, you could use the Postman collection to interact with the Meraki Dashboard API and extract the necessary details.
List Organizations you have access to
- Note the ID for the intended organization
List Networks for a selected Organization ID
- Note the ID for the intended Network
List Group Policies for a Network
- Note the groupPolicyId
3: Finishing Up
Use the IDs discovered here to update your config.js file and restart the application.
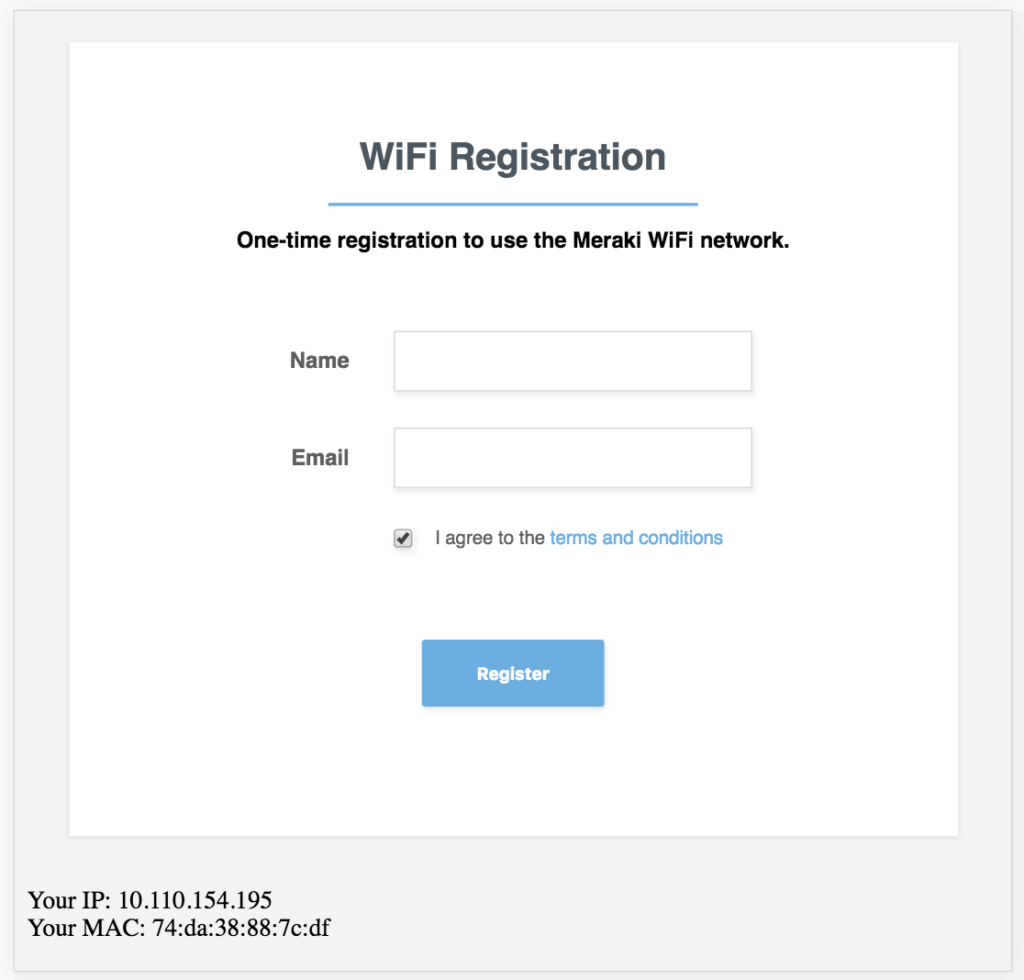
You should now be able to connect to your wireless network, see a splash page, and then be applied a Group Policy automatically!
Server Log
FINAL res.statusCode  200
FINAL res.body  {"mac":"04:03:d6:55:a8:34","type":"Group policy","groupPolicyId":100}
Additional Resources
Like what you see or want to share your ideas? Let us know in the Community.