Meraki Automation Demo using Webex Teams
Summary
Send these messages, in order, to MerakiBot on Webex Teams (address meraki.bot@webex.bot) to experience a simple network automation demo using Webex Teams as the front-end interface.
- automation create
- automation deploy
- automation update
- automation delete
Goal
This automation demo is a very easy way for you to experience the power and ease of the Meraki Dashboard API, using a fully-hosted service that interacts with Cisco Webex Teams. You can interact with a sample deployment by provisioning a brand new dashboard organization, multiple sites with devices, and wireless network configuration. No software needs to be installed except a browser and the Webex Teams app, so you can run this demo even on a mobile device. See the 2-minute example video on how the whole demo works.
Get started
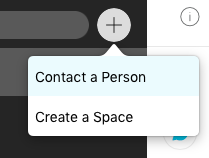

This demo uses a chatbot in Webex Teams, which also demonstrates cross-product Cisco API integration. Add a contact in Webex Teams with the + button > Contact a Person, and enter in MerakiBot’s address: meraki.bot@webex.bot
Tip 1 – You can hide any sensitive information in the chat window right before a demo by sending the message “clear”.
Tip 2 – Collapsing the list of people/spaces on the left, along with turning off notifications temporarily, will help minimize distractions and avoid potentially embarrassing messages! 😀
Create org
Send the message “automation create”, followed by any customers’ email addresses to add as admins to the new dashboard organization. For example:
automation create miles@meraki.com test@example.net
Each admin will receive an email, and can log into this dashboard org to monitor the provisioning process.
Tip 1 – You do NOT need to add your own email address, since Webex Teams knows your address already and will add it automatically, so if no other admin accounts are needed, then automation create is enough.
Tip 2 – Instead of appending multiple addresses, you can also attach a plaintext file with one email per line.
Deploy networks
Send the message “automation deploy”, followed by your city, state/country. Your network and several other ones, for the sake of showing automation at scale, will be created.
automation deploy Reykjavik, Iceland
Refresh the Organization > Overview page while networks are created and tagged; with the table contracted, you should see markers on the map for the various sites around the world. Also, go to a network’s Wireless > Access points list to see that a device has been added into each network, along with that device’s status page to verify a configured address.
Tip 1 – This step will create nine networks for you, each with a wireless device.
Tip 2 – If you do not specify a city & state/country, then Meraki’s global headquarters of San Francisco, CA will be used.
Update configuration
Send the message “automation update”, followed by a wireless password, or pre-shared key (PSK), of at least eight alphanumeric characters. For example:
automation update ciscomeraki
Check the Wireless > Access control pages to see your newly-updated PSK. Of course, this is just one example of network configuration, and the idea can be expanded to automating any amount of bulk configuration for full-stack networks at scale.
Tip 1 – If no password is specified, the default of “meraki123” will be used.
Tip 2 – Currently the PSK is the only parameter that you can specify to configure. Of course, any API-supported configuration can be added easily for a real-world scenario.
Delete and reset
To wrap up your demo, send the message “automation delete” to delete all networks, remove all admins, and most importantly, reset all serials so they can be returned to the shared inventory for use by another teammate/customer.
If you fail to run this step at the end of your demo, then you will receive licensing notification emails later, since the APs technically require a license once provisioned to networks. Also, your privilege to use this demo will be retracted if you neglect to complete this final step!
Tip – There are 10 total “pods” (sets of device serials) available for the Automation Demo. You can check the available capacity along with the full skinny on running this demo by sending:
automation demo