Scanning API with Node-RED Node
A Node-RED node to receive WiFi and Bluetooth location data from a Cisco Meraki wireless network.
Overview
Node-RED is a tool for wiring the Internet of Things. The open-source platform allows you to easily connect web services together and insert your own business logic to automate tasks or engage with the physical world. By using this custom Meraki Location “node”, the Meraki Scanning API can deliver a stream of telemetry data to the flow.
Meraki WiFi access points will send their WiFi and Bluetooth beacon observations, via the Meraki cloud, to this node.

The JSON stream will then be available in the msg.payload object from the Data output.

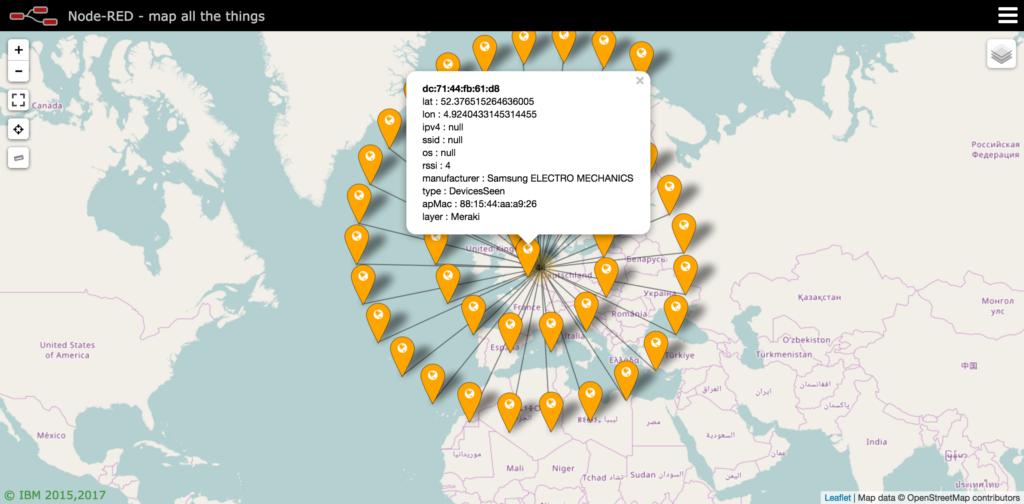
You can then use the data with your business logic or visualize it on a map.
Quick Start
If you are already using Node-RED and on a modern version (^v0.17), then you can use the Manage Palette menu option to install the node.

Search for “meraki” and install the “node-red-contrib-meraki-cmx” node.

The Location node should now be available to you.
Full Installation
Install Node-RED, the Meraki Location node and then configure the Meraki network to send the location data.
Node-RED
If you do not already have Node-RED installed, do that first and run at least one time.
sudo npm install -g --unsafe-perm node-rednode-redOfficial Node-RED installation instructions.
Install the Meraki CMX node by navigating to the hidden ~/.node-red directory and running the installer.
cd ~/.node-red
npm install node-red-contrib-meraki-cmx
Restart Node-RED.
- Stop node-red if its running by either either closing the terminal window or Ctrl/Cmd – C to end the process.
- Start node-red
node-redResults
27 Feb 13:48:31 - [info]

Welcome to Node-RED
===================

27 Feb 13:48:31 - [info] Node-RED version: v0.18.4
27 Feb 13:48:31 - [info] Node.js  version: v8.9.4
27 Feb 13:48:31 - [info] Darwin 17.4.0 x64 LE
27 Feb 13:48:32 - [info] Loading palette nodes
27 Feb 13:48:33 - [warn] ------------------------------------------------------
27 Feb 13:48:33 - [warn] [node-red/rpi-gpio] Info : Ignoring Raspberry Pi specific node
27 Feb 13:48:33 - [warn] ------------------------------------------------------
27 Feb 13:48:33 - [info] Settings file  : /Users/merakiuser/.node-red/settings.js
27 Feb 13:48:33 - [info] User directory : /Users/merakiuser/.node-red
27 Feb 13:48:33 - [warn] Projects disabled : set editorTheme.projects.enabled=true to enable
27 Feb 13:48:33 - [info] Flows file     : /Users/merakiuser/.node-red/flows_myComputer.corp.meraki.com.json
27 Feb 13:48:33 - [info] Creating new flow file
27 Feb 13:48:33 - [info] Starting flows
27 Feb 13:48:33 - [info] Started flows
27 Feb 13:48:33 - [info] Server now running at http://127.0.0.1:1880/
Open a web browser and navigate to the application URL:
http://127.0.0.1:1880

Add the Meraki Location Node to your Flow by finding it in the left menu and dragging the node to the Flow editor.

Double-click on the node to open its settings.
Set the URL endpoint (i.e. /scanning ) and select the type of radio messages you wish to receive.

Then click on the pencil icon to “add new meraki-cmx-settings”. Enter your validator, secret and name the config settings. Press “Add” to save your changes.

Data will be available on the first output, which can be parsed for use in your application flow. The second output will contain various levels of status. This is good for troubleshooting and understanding the various communication steps. By adding a debug node to the first output, you will be able to view the incoming JSON data object.

Meraki Configuration
Configure your Meraki Dashboard network with a new Post URL. This will be the publicly accessible address of the Node-RED server, with the node’s endpoint URL (i.e. http://yourserver/scanning). Test the Post URL by pressing the Validate button.
Dashboard Network-Wide –> Configure: General –> Location and scanning

If you are running Node-RED on your local computer, http://localhost:1880 will not be reachable from the Meraki cloud. A popular solution for this is to use ngrok, which is a free service to provide a dynamic reverse proxy to your application.
ngrok http 1880ngrok by @inconshreveable (Ctrl+C to quit)
Session Status online
Session Expires 7 hours, 59 minutes
Version 2.2.8
Region United States (us)
Web Interface http://127.0.0.1:4040
Forwarding http://573cc09a.ngrok.io -> localhost:1880
Forwarding https://573cc09a.ngrok.io -> localhost:1880With the new ngrok address, you can use the following for your Post URL: https://573cc09a.ngrok.io/scanning
After approximately 1 minute, Node-RED should start receiving the JSON feed. Sample flows are included with the node and can be found under Import –> Examples.
Success!