Getting Started
Requirements
To get started with Data Connect, you must:
Understand the License requirement. To know about the Data Connect license requirement, see License Requirement.
Enable the Data Connect feature. To know how to enable the Data Connect feature, see Enable Data Connect.
Configure the Required Certificates to use Data Connect.
- If you are using Cisco ISE Release 3.2, and want to know how to export the required certificate after the feature is enabled, see Export the Data Connect Certificate.
- If you are using Cisco ISE Release 3.3, and want to know how to obtain the required certificates for connecting to Data Connect after the feature is enabled, see Using Admin Certificate with Data Connect.
The following section provides the Client Connection Examples.
From Java Code
You can connect to the Cisco ISE monitoring database using any script or SQL tool of your choice. The following steps describe how to establish a database connection if you are using a Java code.
Note: If you are using a Java code to establish a database connection, you must have ojdbcX.jar (X is the version) downloaded in your local client. (Select the correct version based on your client JDK eg: ojdbc11.jar)
Before you begin
- Enable Data Connect on Cisco ISE.
- Download all the required certificates and save them to your local machine.
Procedure:
- Use the below command to add all the downloaded certificates to the trust store.
keytool -import -alias <Name> -file <Data Connect certificate file path and name> -storetype JKS -keystore <trust store name>
Note: To use PKCS12 as the storetype, replace JKs with PKCS12 in the code. Ensure that the alias name is unique.
- Enter a new trust store password when prompted for the same.
- Enter Y when prompted whether to trust this certificate or not.
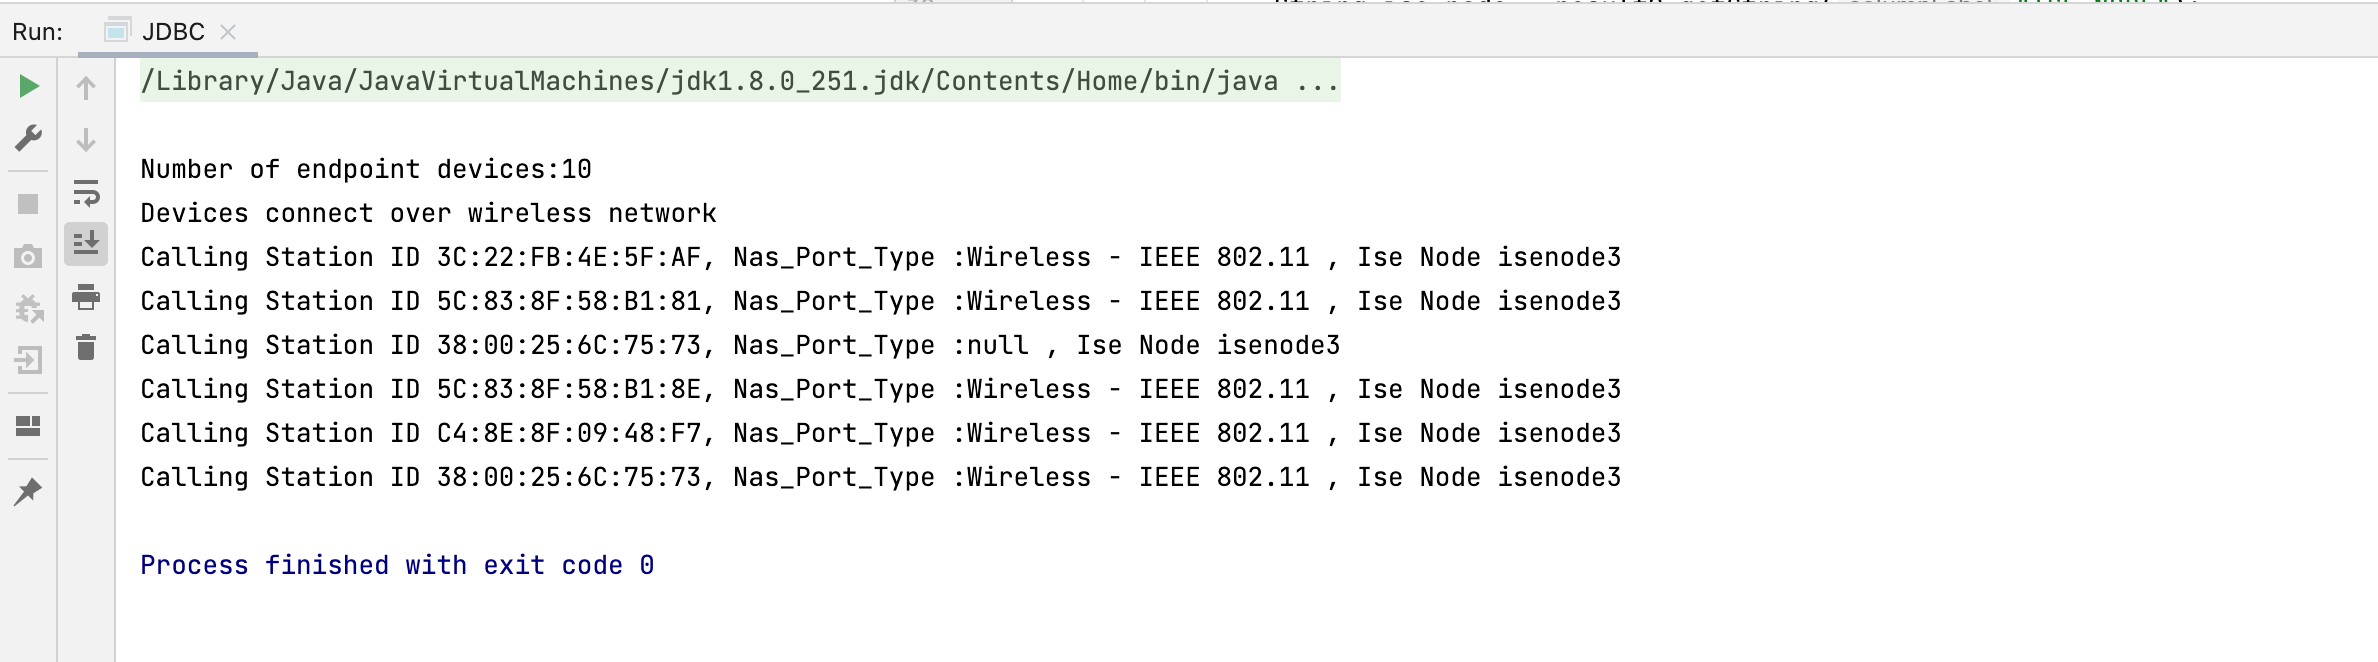
- Run the following script to establish database connection to the Cisco ISE monitoring database. It will execute two SQL statements. One returning the number of endpoints and the other giving details of devices connect via wireless connection.
import java.sql.*;
import java.util.Properties;

public class JDBC {

    public static  void main(String[] args) {
        try {
            String url =
                    "jdbc:oracle:thin:@(DESCRIPTION=(ADDRESS=(PROTOCOL=tcps)(HOST=1.1.1.1)(PORT=2484))(CONNECT_DATA=(SID=cpm10)))";   //ODBC connection details that are available in the Cisco ISE GUI

            Properties props = new Properties();
            props.setProperty("user", "dataconnect"); // The username is always dataconnect
            props.setProperty("password", "Cisco#123456789"); // The password is the same one that is set in the Data Connect window in the Cisco ISE GUI
            props.setProperty("javax.net.ssl.trustStore",
                    "/Users/xyz/testcert/System");// Path of the trust store created using the keytool command
            props.setProperty("javax.net.ssl.trustStoreType","JKS"); // Trust store type that is JAVA keystore (JKS) in this case
            props.setProperty("javax.net.ssl.trustStorePassword","Cisco123"); // Password that you set for the local client trust store
            Connection conn = DriverManager.getConnection(url, props);
            Statement stmt = conn.createStatement();

            //Sample Query 1: Retrieves Endpoints data
            ResultSet result1 = stmt.executeQuery("SELECT count(*) from endpoints_data");
            result1.next();
            System.out.println("\nNumber of endpoint devices:"+result1.getInt(1));

            // Device type represents the network device type. The below query retrieves the data for calling_station_id, nas_port_type, ise_node from the radius_authentications view only for those records whose network device type has wireless classification.
            System.out.println("Devices connect over wireless network");

            //Sample Query 2: Retrieves RADIUS Authentication data
            ResultSet result2 = stmt.executeQuery("Select distinct calling_station_id, nas_port_type, ise_node from radius_authentications where device_type like '%Wireless%'");
            while(result2.next()){
                String calling_station_id = result2.getString("calling_station_id");
                String nas_port_type = result2.getString("nas_port_type");
                String ise_node = result2.getString("ISE_NODE");
                System.out.println("Calling Station ID "+calling_station_id+", Nas_Port_Type :"+ nas_port_type +" , Ise Node "+ ise_node);
            }
        }
        catch(Exception e) {
            e.printStackTrace();

        }
    }
}
Output
Note: To use PKCS12 as the storetype, replace JKs with PKCS12 in the code.
From Python Code
The following steps describe how to establish a database connection if you are using Python JayDeBeApi module.
Note: If you are using a Python code to establish a database connection, you must have ojdbcX.jar (X is the version) downloaded in your local client. (Select the correct version based on your client JDK eg: ojdbc11.jar)
Before you begin
- Enable Data Connect on Cisco ISE.
- Download all the required certificates and save them to your local machine.
- Install
JayDeBeApiPython module using following command in the terminal or command line of your local client.
pip install JayDeBeApi
Procedure:
- Use the below command to add all the downloaded certificates to the trust store.
keytool -import -alias <Name> -file <Data Connect certificate file path and name> -storetype JKS -keystore <trust store name>
Note: To use PKCS12 as the storetype, replace JKs with PKCS12 in the code. Ensure that the alias name is unique.
- Enter a new trust store password when prompted for the same.
- Enter Y when prompted whether to trust this certificate or not.
- Run the following script to establish ODBC connection to the Cisco ISE monitoring data base and fetch the required details.
import `jaydebeapi`
import jpype
import traceback

conn = None
cursor = None

try:
    if jpype.isJVMStarted():
        print("already started!")
    jar = '/Users/xyz/Downloads/ojdbc8.jar'
    trustStore = "/Users/xyz/PycharmProjects/pkcs/store.jks" #Path of the trust store created using the keytool command
    trustStorePassword = "lab123" #Password that you set for the local client trust store
    ip_ise = "1.1.1.1"
    port_ise = "2484"
    dataconnect_user = "dataconnect" #The username is always dataconnect
    dataconnect_password = "Cisco123456#" #The password is the same one that is set in the Data Connect window in the Cisco ISE GUI
    url = "jdbc:oracle:thin:@(DESCRIPTION=(ADDRESS=(PROTOCOL=tcps)(HOST="+ip_ise+")(PORT="+port_ise+"))(CONNECT_DATA=(SID=cpm10)))" #ODBC connection details that are available in the Cisco ISE GUI
    jvm_path = jpype.getDefaultJVMPath()
    jpype.startJVM(jvm_path,    "-Djava.class.path=%s" % jar,
                                "-Djavax.net.ssl.trustStore=%s" % trustStore,
                                "-Djavax.net.ssl.trustStorePassword=%s" % trustStorePassword)

    conn = jaydebeapi.connect('oracle.jdbc.driver.OracleDriver',
                                   url,
                                   {'user': dataconnect_user,
                                    'password': dataconnect_password,
                                    'secure': 'true'},
                                   jar)

    cursor = conn.cursor()

    #Sample Query 1: Listing all the Network Device Groups

    cursor.execute('SELECT * from NETWORK_DEVICE_GROUPS')
    output = cursor.fetchall()
    print("\nList of Network Device Groups:")
    print("\nCreated By\t\t\t Status\t\t Name\n")
    for row in output:
        print(row[3],"\t", row[6],"\t",row[2])

    #Sample Query 2: Information of all the nodes in deployment

    cursor.execute('SELECT * from NODE_LIST')
    output = cursor.fetchall()
    print("\n\nList of Nodes:")
    print("\nHOSTNAME\t\t NODE_TYPE\t\t NODE_ROLE\n")
    for row in output:
        print(row[0],"\t", row[1],"\t",row[3])

    #Sample Query 3: Details of all the administrators of ISE

    cursor.execute('SELECT * from ADMIN_USERS')
    output = cursor.fetchall()
    print("\n\nList of Admin Users:")
    print("\nSTATUS\t\t ADMIN_GROUP\t NAME\n")
    for row in output:
        print(row[1],"\t", row[7],"\t",row[2])


except Exception as e:
    print('An exception occurred: {}'.format(e))
    print(traceback.format_exc())

finally:
    if cursor:
        cursor.close()
    if conn:
        conn.close()
    if jpype.isJVMStarted():
        jpype.shutdownJVM()
Output

From Oracle SQL Developer
You can connect to the Cisco ISE monitoring database using Oracle SQL Developer over SSL. The following steps describe how to establish a secured database connection if you are using SQLDeveloper as your client.
Note: The Keytool binary will be located in the bin folder of your Java installation. You may have to add it to your path variable.
Note: Tested on Oracle SQL Developer version-21.2.1.204.
Note: In case you get The Network Adapter could not establish the connection error after following all the steps, check if Oracle SQL Developer can modify access disk to file system. If the error persists, try running SQLDeveloper from the terminal.
Before you begin
- Enable Data Connect on Cisco ISE.
- Download all the required certificates and save them to your local machine.
Procedure to connect using JKS KeyStore:
Use the below command to add all the downloaded certificates to the trust store.
Example:
keytool -importcert -alias <Name> -file <Data Connect certificate file path and name> -keystore <trust store name> -storetype JKS
Note: To use PKCS12 as the storetype, replace JKs with PKCS12 in the code. Ensure that the alias name is unique.
- Enter a new trust store password when prompted for the same.
- Enter Y when prompted whether to trust this certificate or not.
- Open the
sqldeveloper.conf.
Note:
For mac os, the conf file will be located at /Applications/SQLDeveloper.app/Contents/Resources/sqldeveloper/sqldeveloper/bin/sqldeveloper.conf. For windows, if Oracle SQL Developer is downloaded in the Downloads folder, it will be located at Downloads\sqldeveloper-21.4.3.063.0100-x64\sqldeveloper\sqldeveloper\bin\sqldeveloper.conf.
Add the following properties to the
sqldeveloper.conf-Properties:
   AddVMOption -Djavax.net.ssl.trustStore=<trust store file path and name>
   AddVMOption -Djavax.net.ssl.trustStoreType=JKS
   AddVMOption -Djavax.net.ssl.trustStorePassword=<Enter the trusted store password>
Example:
   AddVMOption -Djavax.net.ssl.trustStore=/Users/<User Name>/testcert/client
   AddVMOption -Djavax.net.ssl.trustStoreType=JKS
   AddVMOption -Djavax.net.ssl.trustStorePassword=Cisco123
Note: To use PKCS12 as the storetype, replace JKs with PKCS12 in the code.
Save the file and restart the Oracle SQL Developer.
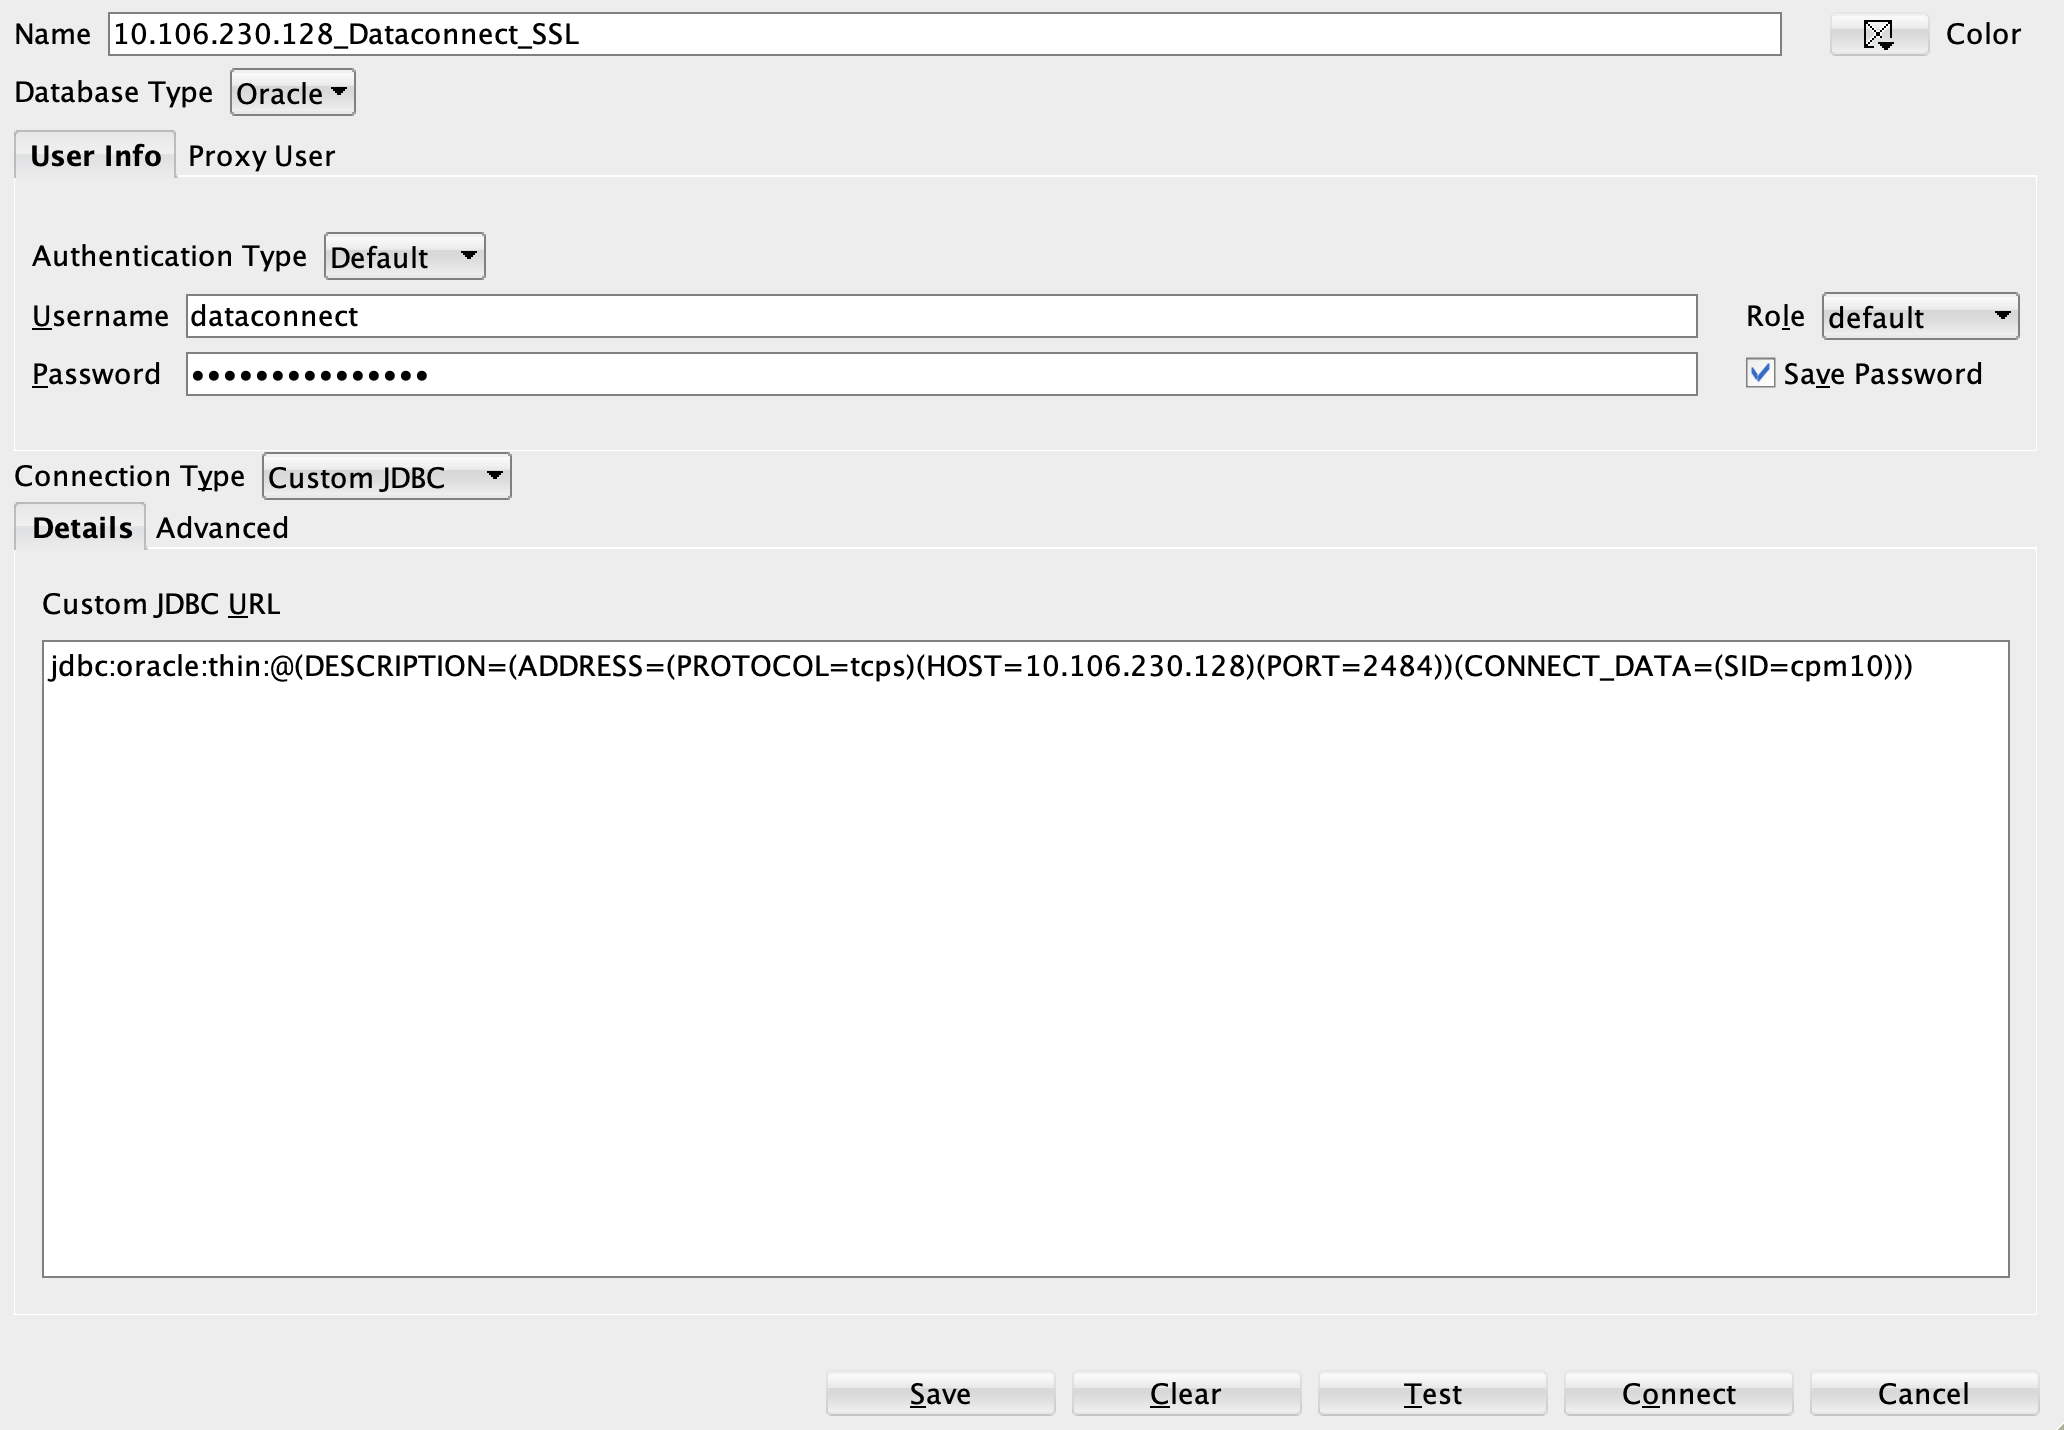
Add a new connection in Oracle SQL Developer with the below mentioned properties.
Properties:
Name - Give a name for the connection. Database Type - Oracle Authentication Type - Default Username - dataconnect Password - The dataconnect password set via UI or OpenAPI Connection Type - Custom JDBC Custom JDBC Url - jdbc:oracle:thin:@(DESCRIPTION=(ADDRESS=(PROTOCOL=tcps)(HOST=
)(PORT=2484))(CONNECT_DATA=(SID=cpm10))) Refer to the picture below.
Click on Test option. Success should be displayed.
From DbVisualizer
You can connect to the Cisco ISE monitoring database using any JDBC tool over SSL. The following steps describe how to establish a secured database connection if you are using DbVisualizer as your client. DbVisulalizer is an example of a JDBC tool.
Before you begin
- Enable Data Connect on Cisco ISE.
- Download all the required certificates and save them to your local machine.
Procedure to connect using JKS KeyStore:
Use the below command to add all the downloaded certificates to the trust store.
Example:
keytool -importcert -alias <Name> -file <Data Connect certificate file path and name> -keystore <trust store name> -storetype JKS
Note: To use PKCS12 as the storetype, replace JKs with PKCS12 in the code. Ensure that the alias name is unique.
Enter a new trust store password when prompted for the same.
Enter Y when prompted whether to trust this certificate or not.
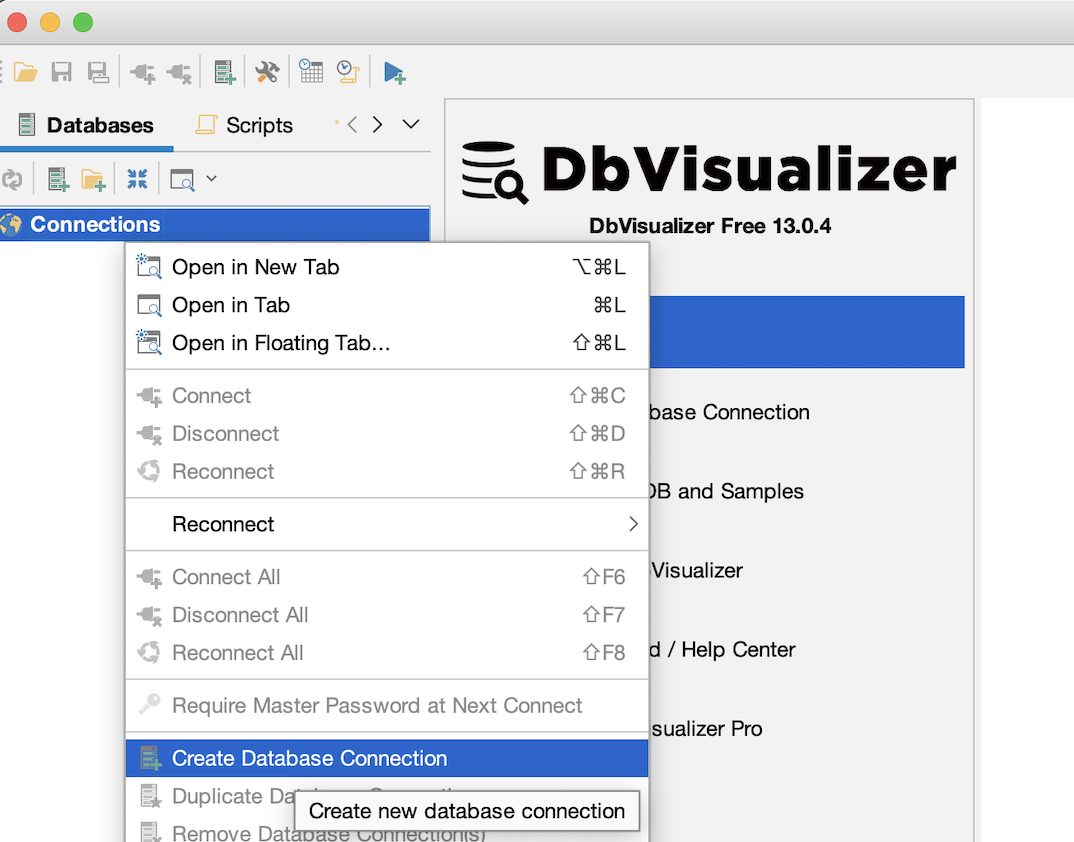
Open the DbVisualizer application and click on the create database connection option as shown below.
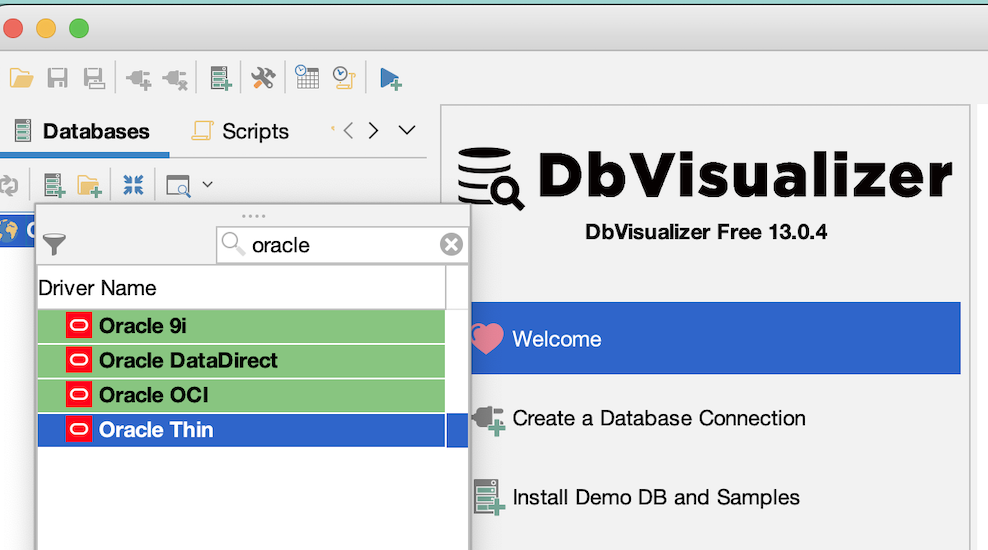
In the next window, select Oracle thin as the driver name as shown below.
In the next window, select the connections tab. Set the below mentioned properties:
Properties for connections tab.
Settings Format - Database URL Database URL - jdbc:oracle:thin:@(DESCRIPTION=(ADDRESS=(PROTOCOL=tcps)(HOST=
)(PORT=2484))(CONNECT_DATA=(SID=cpm10))) Database UserID - dataconnect Database Password - The dataconnect password set via UI or OpenAPI Next, open the Properties tab, and click on driver properties in the left hand list.
In the new window that opens, set the values for the following properties:
Properties:
javax.net.ssl.trustStore=
javax.net.ssl.trustStoreType=JKS javax.net.ssl.trustStorePassword= AP Example:
javax.net.ssl.trustStore=/Users/
/testcert/client javax.net.ssl.trustStoreType=JKS javax.net.ssl.trustStorePassword=Cisco123
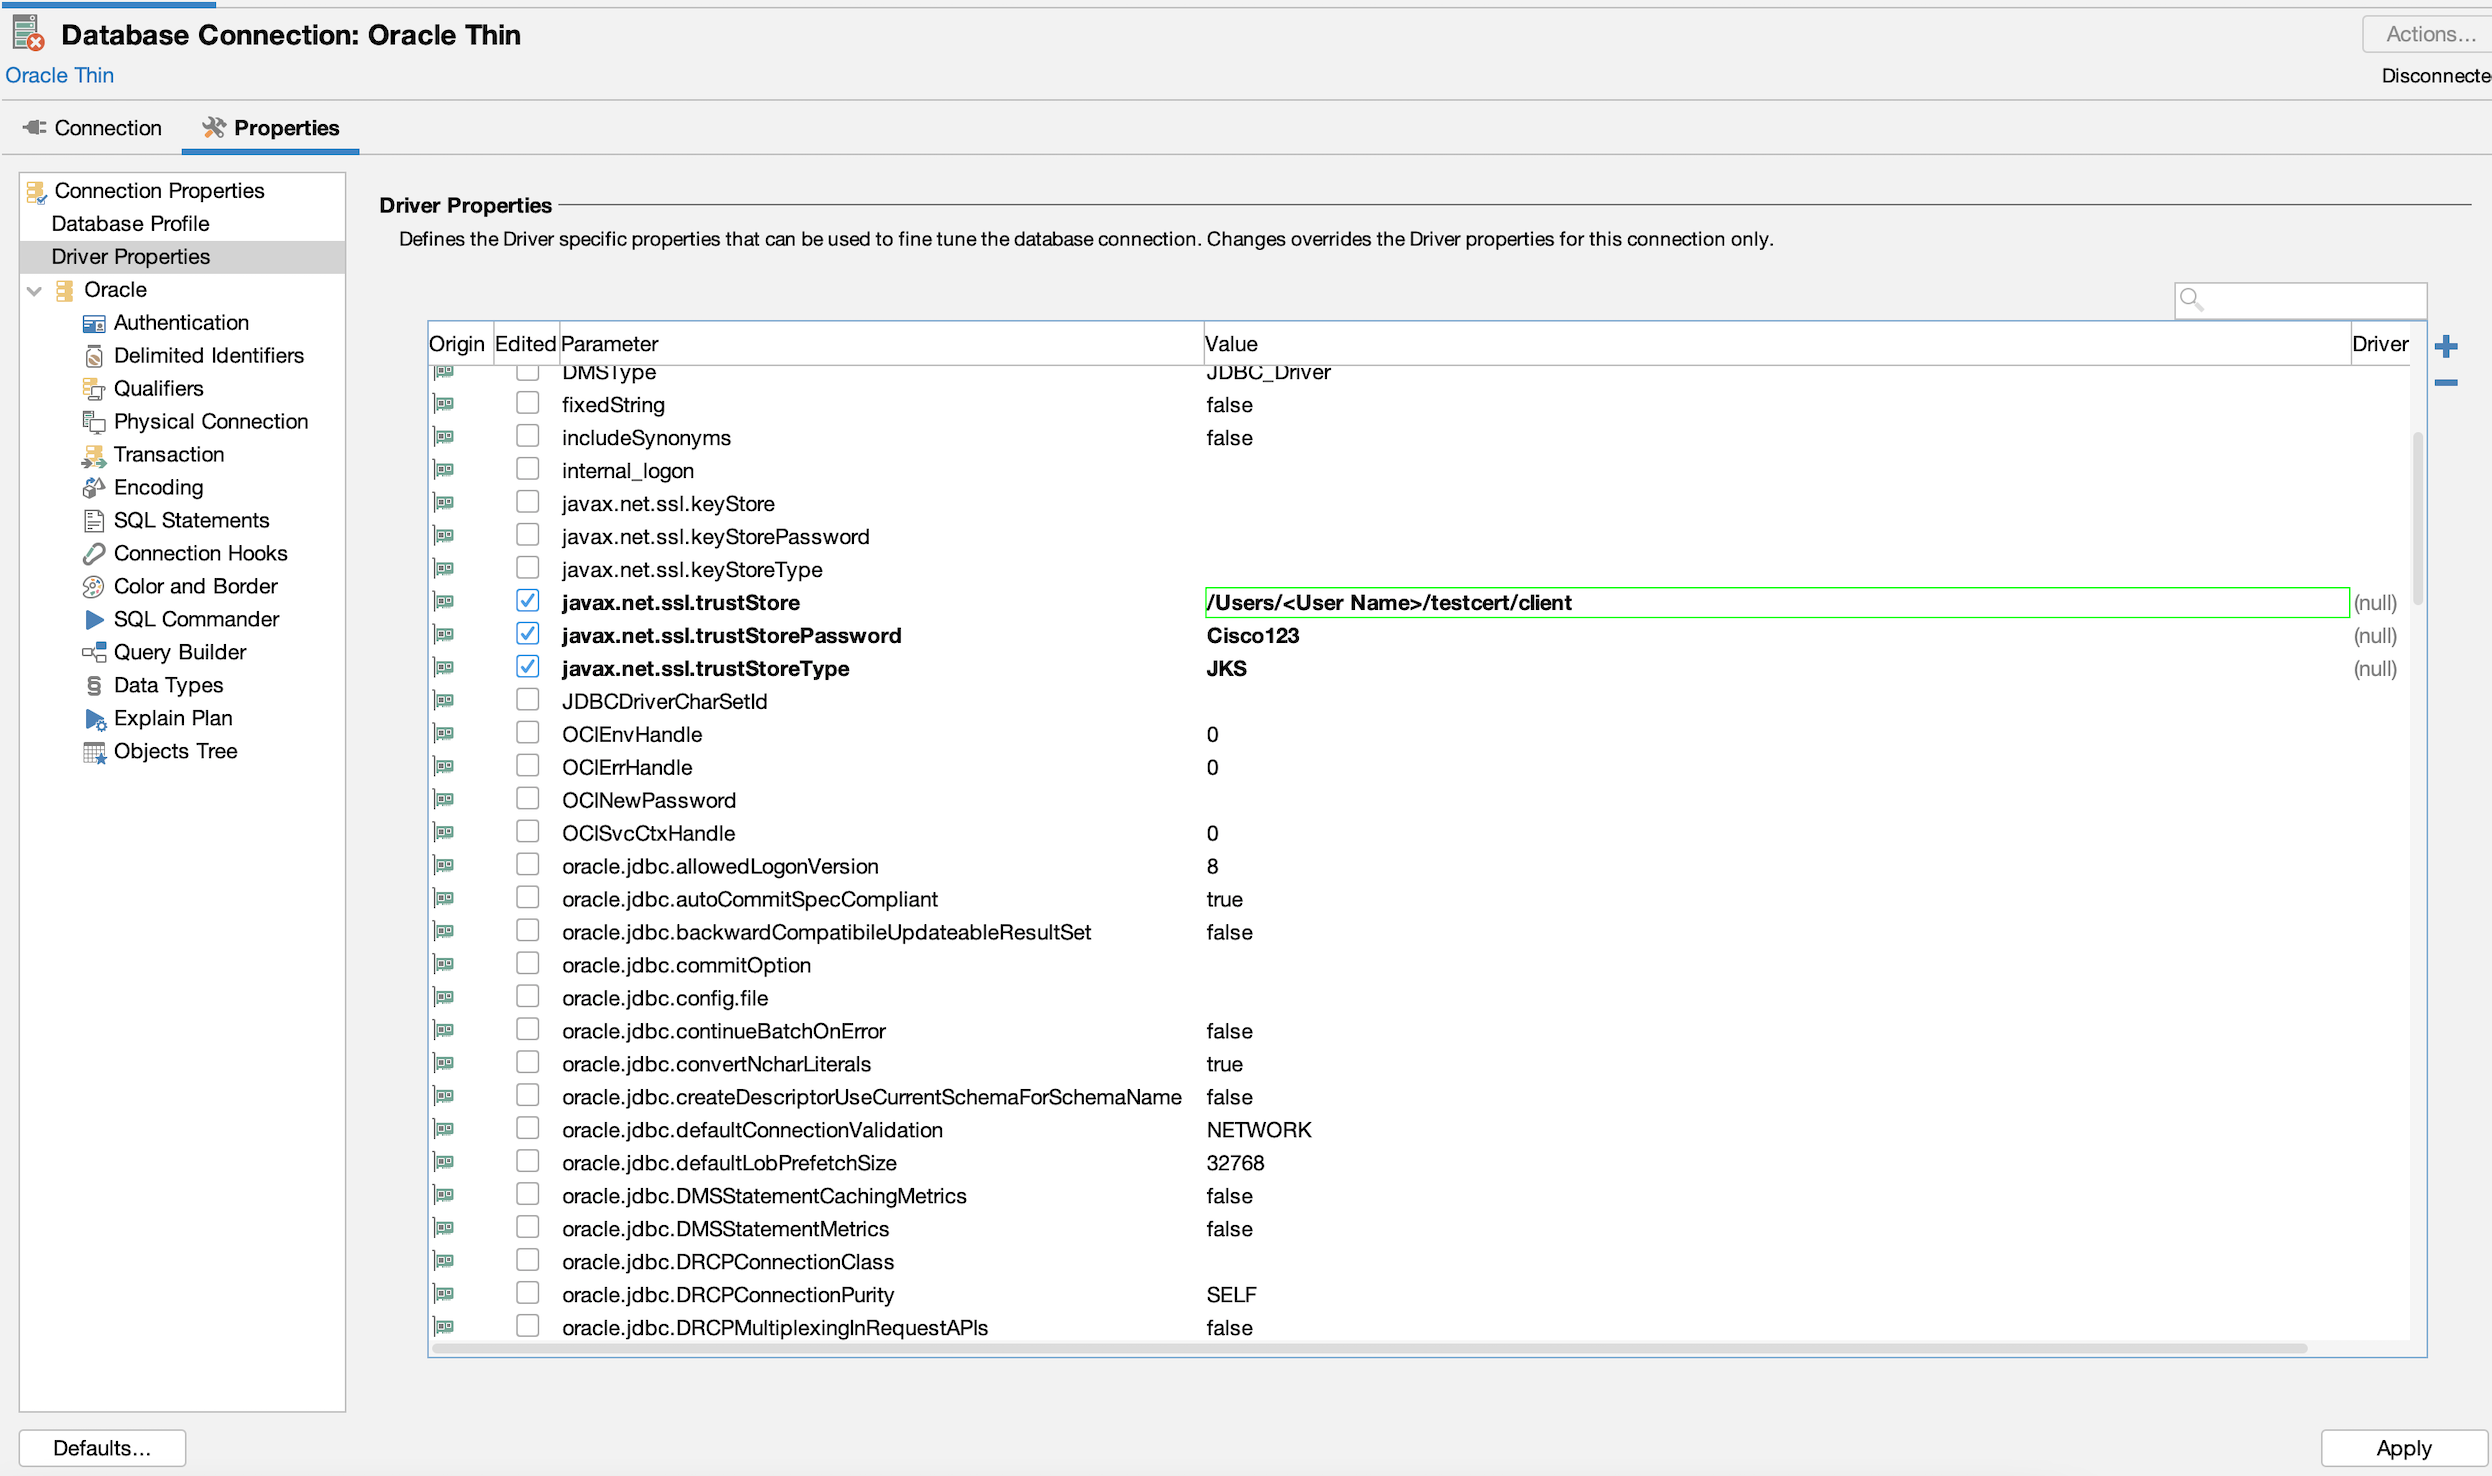
Note: To use PKCS12 as the storetype, replace JKs with PKCS12 in the code.
Click Apply.
Go to the connection tab and click on connect. In the message box below, you should now be able to see the database and driver version, and no errors. This means it is connected now.
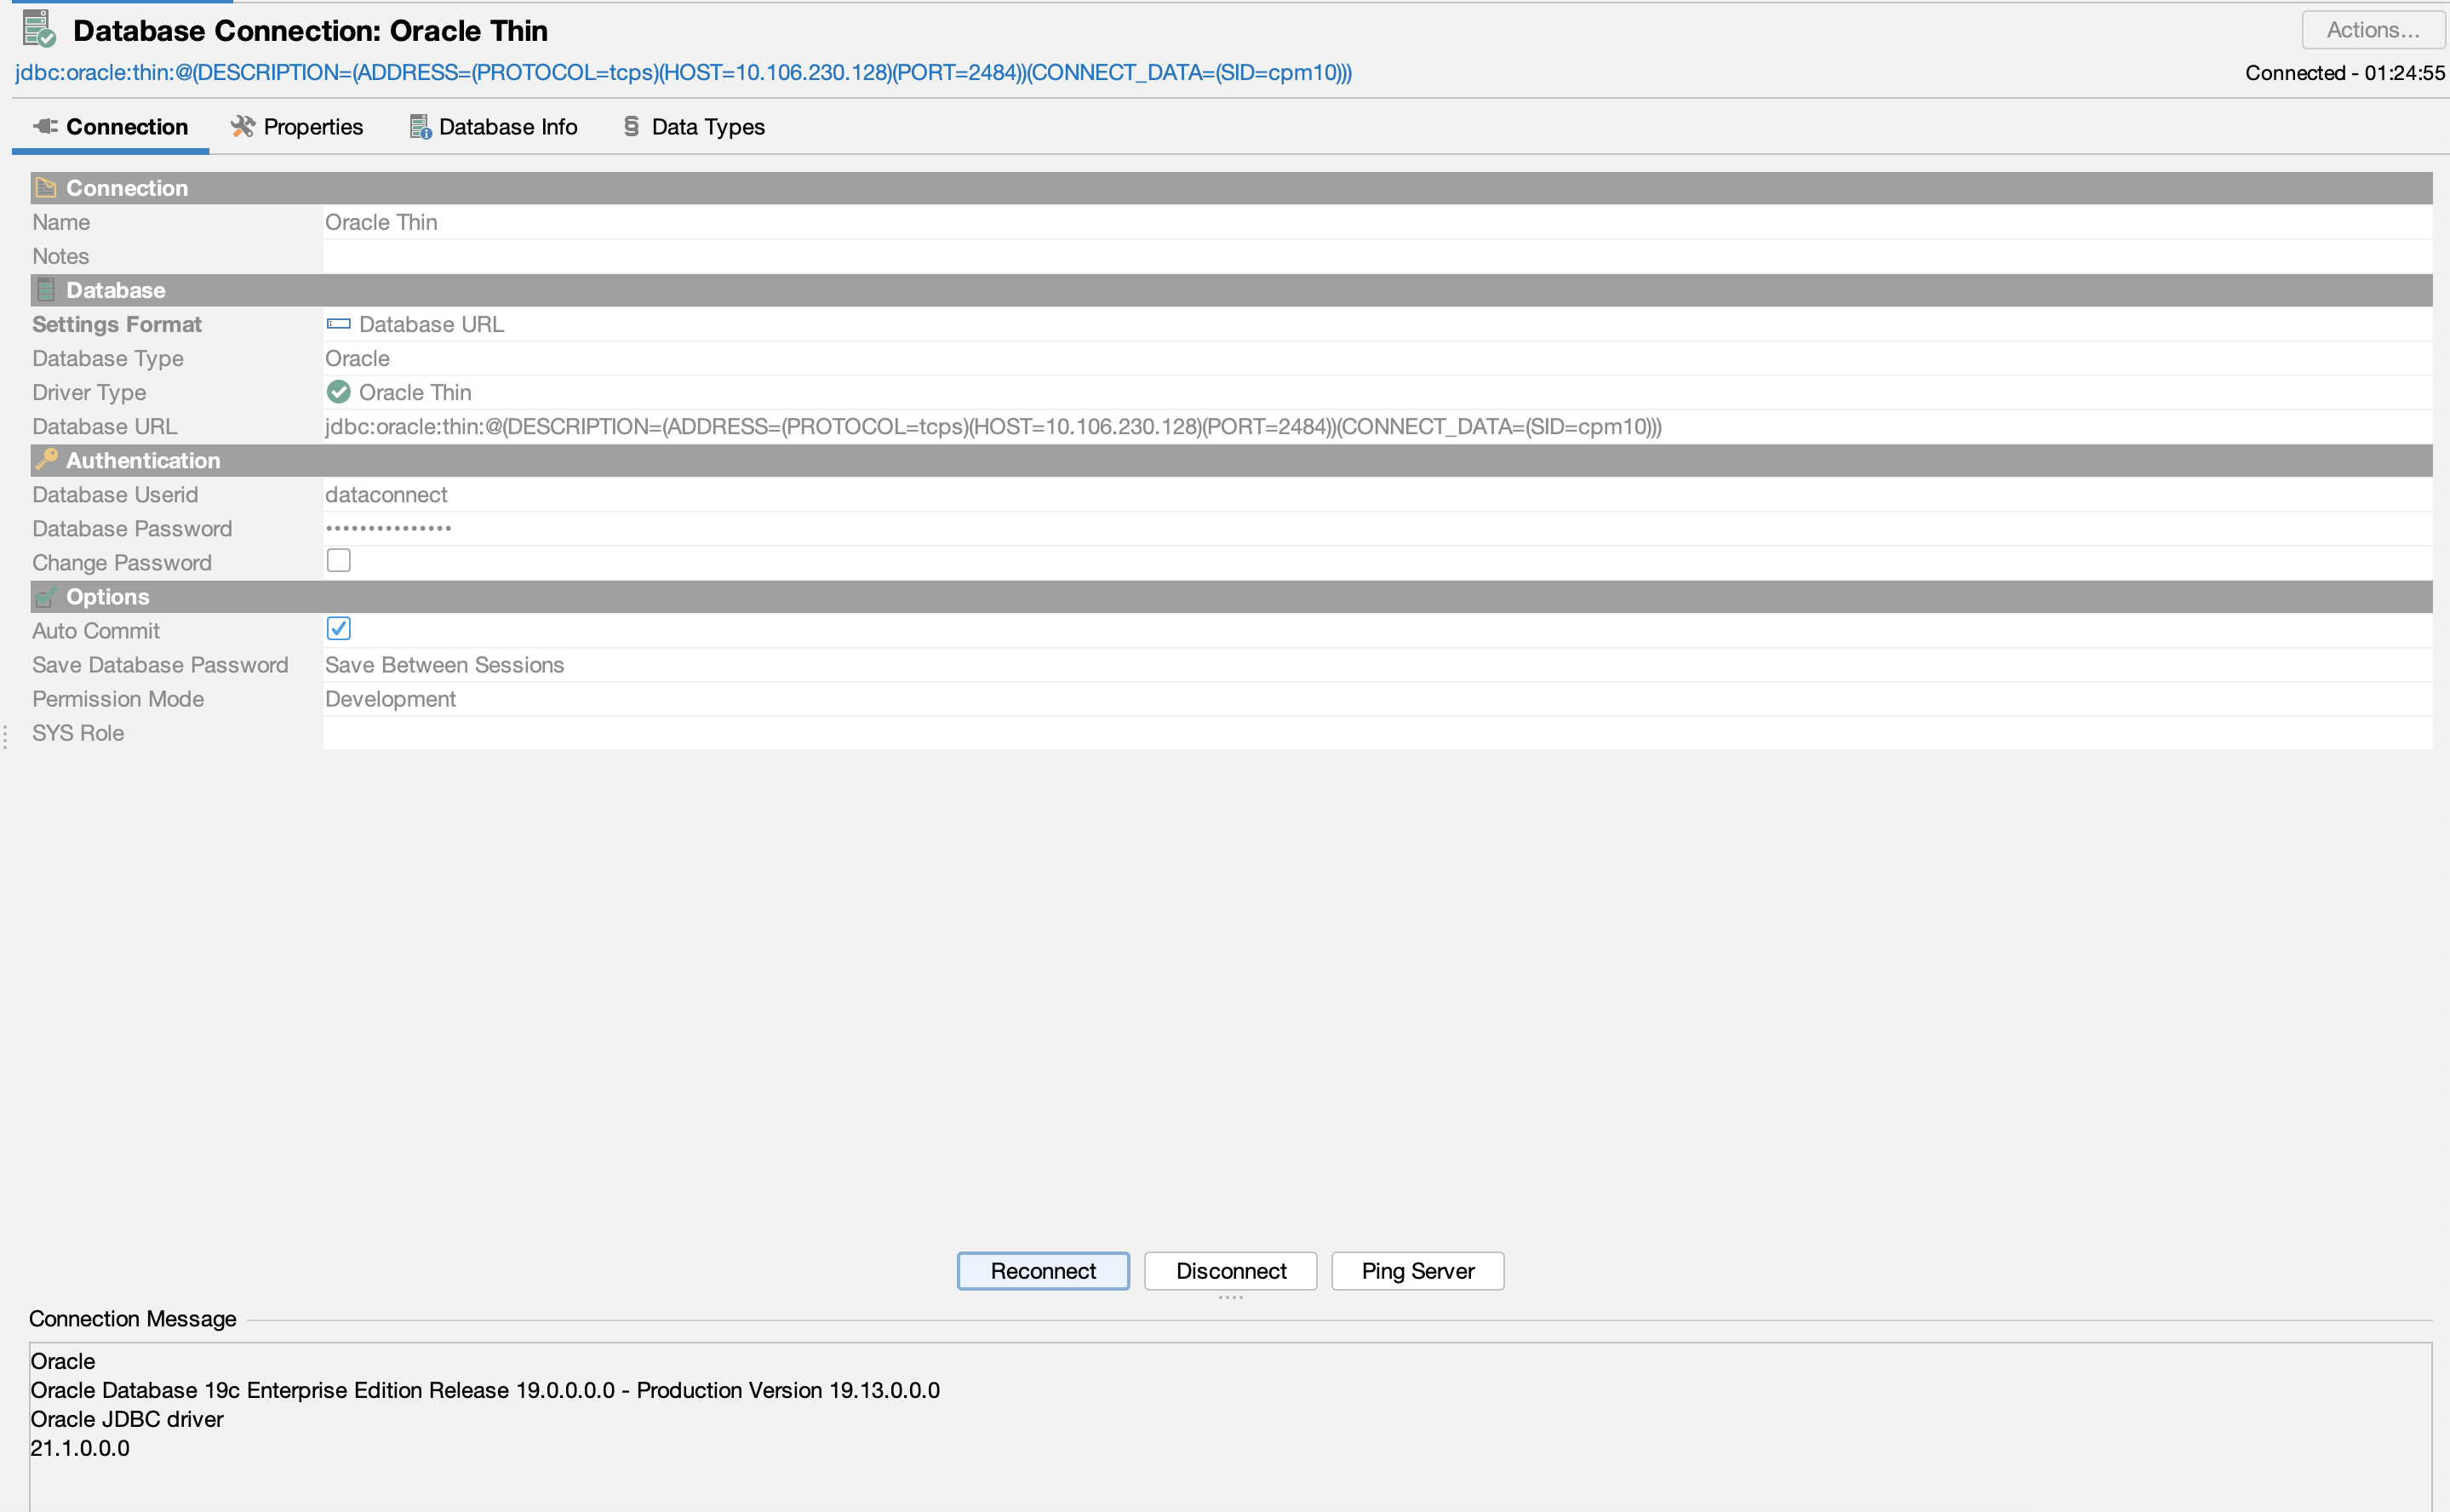
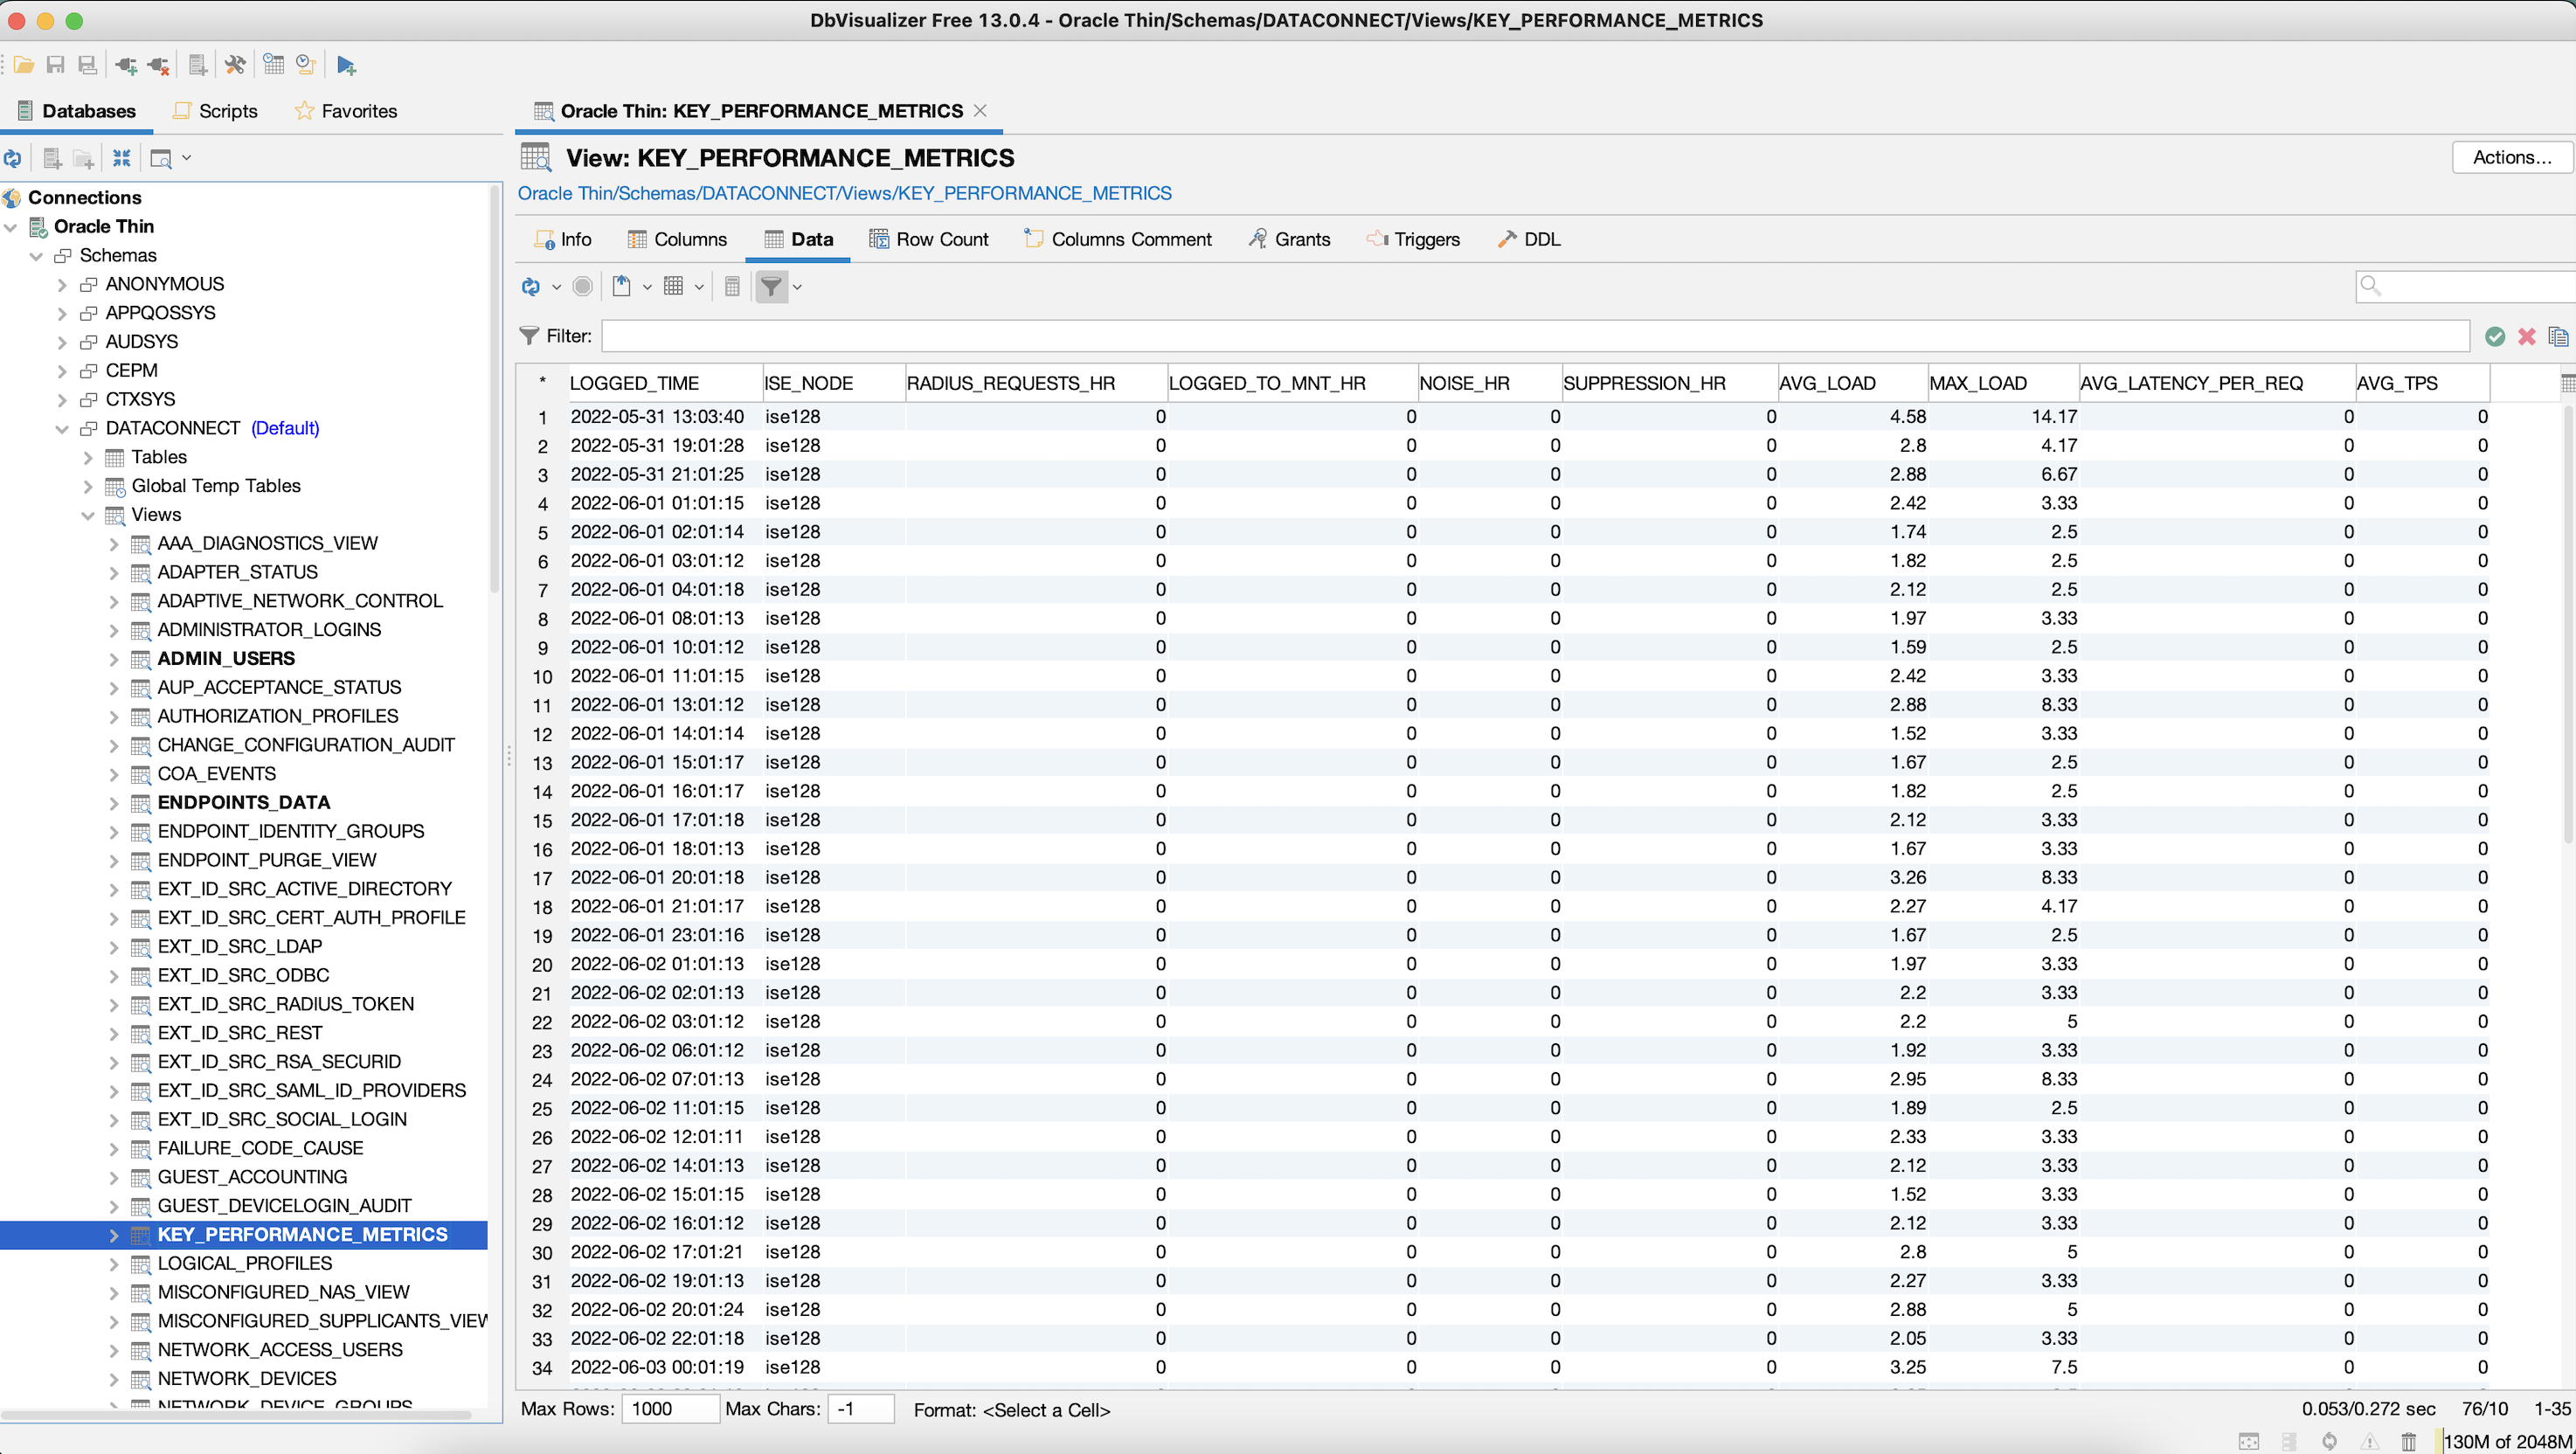
You now have access to all the dataconnect views.
From Microsoft Excel on Windows
Validated Versions:
- MS Excel - Office 365, 2204
- Windows 10 - 21H2
- ODAC - DAC122011
- Cisco ISE Version - 3.2.0.416
Before you begin:
- Install ODAC from the Oracle website.
- Install JDeveloper studio for Windows 64 bit from the Oracle website.
Step 1 : Configuring ODAC files
In your Windows Control Panel, navigate to Environment Variables.
Add a new system variable for storing ODAc files.
The variable name will be TNS_ADMIN and the variable value will be the path of the storage files.
Add the following content to
sqlnet.oralocated at your TNS_ADMIN variable.#SQLNET.AUTHENTICATION_SERVICES= (NTS) NAMES.DIRECTORY_PATH= (TNSNAMES, EZCONNECT) WALLET_LOCATION = (SOURCE = (METHOD = FILE) (METHOD_DATA = (DIRECTORY = %path to wallet with the dataconnect certificate which we will be creating in future steps% )) ) SSL_CLIENT_AUTHENTICATION=FALSEAdd the following content to
tnsnames.oralocated at your TNS_ADMIN variable.TestDB = (DESCRIPTION = (ADDRESS = (PROTOCOL = TCPS)(HOST = host ip)(PORT = 2484)) (CONNECT_DATA = (SERVER = DEDICATED) (SERVICE_NAME = cpm10) ) )
Note:
Please take care of indentation of configuration of these files while modifying. For more details, refer to https://docs.oracle.com/cd/A57673_01/DOC/net/doc/NWUS233/apb.htm
Step 2 : Adding new Data Source for ODBC
- The Microsoft ODBC Data Source Administrator manages database drivers and data sources. This application is located in the Windows Control Panel under Administrative Tools. Open "ODBC data sources 64 bit application" from the Windows start bar or search bar. Or you can directly open 64-bit application located under path “C:\windows\system32\odbcad32.exe”.
- Select either User DSN or System DSN tab,Click Add. Select the newly added oracle driver "Oracle in oracclient12Home1" in the “Create New Data Source” window that opens up.
- Enter a Data Source Name. For example, "textexcel".
- Enter the TNS Service name as given in tnsnames.ora. As per above example, TestDB.
- Enter "dataconnect" as the User ID which is the default username to connect to ISE DB.
- Click OK.
Step 3 : Create wallet with Orapki Command Line Utility
After successful installation of JDeveloper, orapki will be available at C:\Oracle\Middleware\Oracle_Home\oracle_common\bin.
- Add the path for orapki to the Windows path variable.
- Open power shell and run
orapki wallet create -wallet %path to wallet% -auto_loginto create the orapki wallet. For example,orapki wallet create -wallet . -auto_login. - Enter a new trust store password when prompted for the same.
Step 4: Import Data Connect Certificate to Orapki wallet
- Download the required certificates to local client add them to orapki client using the command shown below
- Run
orapki wallet add -wallet %Path to orapki wallet% -trusted_cert -cert %Path to certificate%on PowerShell. eg:orapki wallet add -wallet . -trusted_cert -cert .\DataConnectCertificate.pem - Enter a new trust store password when prompted for the same.
- Add the wallet path to
sqlnet.orafile.
Step 5: Configure Windows MS Excel
- Restart/Start MS Excel.
- Go to the Data tab and click ** Get data > From other Sources > From ODBC**.
- Select the Data Source Name(DSN) created in the previous steps. For example,"textexcel".
- Enter "dataconnect" as the user ID. Enter the password configured for “dataconnect” user through openapi or UI when prompted.