Getting Started
This section provides general information about the Control Center APIs, such as:
- Authentication
- Error Handling
- Best Practices
- Backward Compatibility
- more
API Sandbox
For API development purposes, Control Center maintains a sandbox environment in DevNet that's completely separate from the production environment. If you decide to develop in the sandbox environment, you must submit an access request in DevNet.
DevNet will create an Advantage account containing virtual devices with historical data. These devices will continue to generate new data over time. Your user account gives you access to Control Center’s APIs but not the web interface. No other users will have access to your devices.
Making a Reservation
You must have a DevNet account in order to use the Control Center sandbox. A sandbox reservation provides access to the sandbox for 30 days, regardless of the duration setting. You can begin the reservation immediately or set a future start time, based on your needs. Follow these instructions to make a reservation:
- Navigate to the Control Center sandbox. DevNet prompts you to log in if you haven't already.
- On the sandbox page, click the RESERVE button in the upper right corner.
- In the RESERVE pop-up, set the start date in the Schedule settings. Be aware that your Control Center account will remain active for 30 days from the start date, regardless of the duration specified in the reservation. Click the Reserve button to proceed.
- (Optional) If you choose a future date for the reservation, you can check on the reservation status at any time by clicking the RESERVATIONS link at the top of the sandbox page.
When your reservation starts, you will receive a welcome email from DevNet with the following information:
- User name (required for authentication)
- API key (required for authentication)
- API key expiration date
- Links to developer resources
Read through the Getting Started information here to learn about authentication, partial responses, pagination, and more. Use the Echo API to verify that you have set up your development environment correctly.
After 30 days, your API key and user account expire. You can extend the reservation by submitting a new request. DevNet reactivates your user account and sends you a new API key. To continue using any existing code, you must replace the authorization header value with a new one based the new API key (see Authentication). Also, be aware that DevNet resets the Control Center data for each sandbox reservation so you may have access to different devices.
Production Environment. If you use Control Center in a production environment, you must use a different API key and base URL. This information is available in the Knowledge Base, which you can access from the Help link on any Control Center page. Navigate to APIs > REST APIs > Getting Started > API Key/Base URL. The production environment also supports additional APIs. You cannot migrate any data from the sandbox environment to the production environment or vice versa.
Base URL
The Control Center REST API is securely available over HTTPS. The base URL for all functions in the sandbox is:
https://rws-jpotest.jasper.com/rws/api/If you use the APIs in a production environment, you can find your base URL in the Knowledge Base (APIs > REST APIs > Getting Started > Base URL).
User Access
Control Center has a hierarchy of three types of users: service provider (operator), account (enterprise), and customer (enterprise customer, distributor, or internal business unit). Each user type has a different view of the Control Center data. For example, a service provider can see all the devices owned by all of their accounts, each account can see their own devices and any controlled by their customers (if they have customers), while customers can see only their own devices.
Each user has a single user role that defines which features and data the user can access within the platform. Roles can allow or restrict access to entire areas of the application, and they can control access to individual fields or actions within a page. For example, a user with a technical support role would not be able to edit financial information.
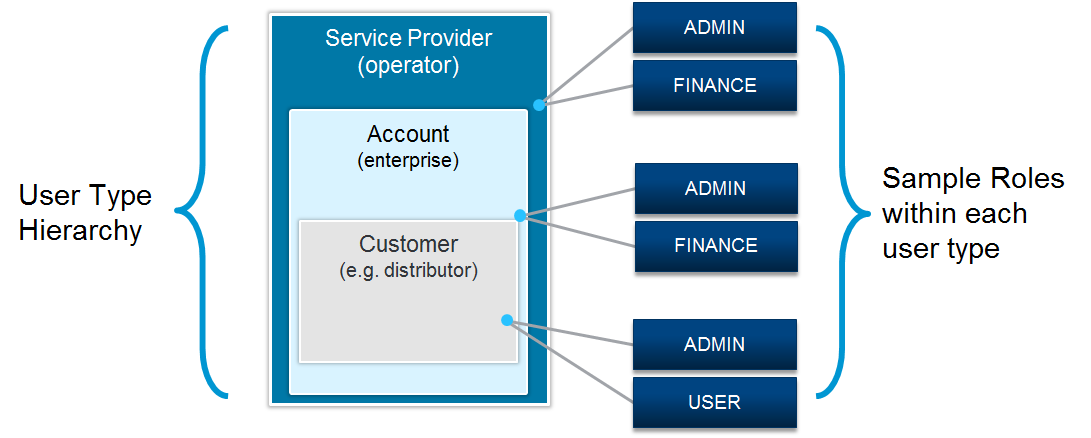
The Control Center sandbox supports one user role: AccountAdmin. This account administrator has the authority to view and edit device information, such as SIM state, rate plan, and communication plan, and customers. Users with this role can also view rate plan usage, view and send SMS messages to a device, and manage customers.
When you request access to the sandbox, you receive credentials (user name and API key) for an Account Admin user. DevNet generates a random user name and adds the "Admin" suffix.
API Key
Each user with API access has a unique API key that they must use in function calls. When you request access to the Control Center sandbox, DevNet creates a user account for you, with a user name and an API key. You will receive an email with this information.
Authentication
All API calls must be authenticated through the HTTP Basic Authentication scheme. To do this, you create an authorization header that you send as part of the API request. This header contains encoded versions of a Control Center user name and its associated API key.
Follow these instructions to create an authorization header:
- Combine the user name and API key into a single string with a colon separating the values. For example, if the user name is starterkit and the API key is d703f52b-1200-4318-ae0d-0f6092b2e6ab, the concatenated string would be:
starterkit:d703f52b-1200-4318-ae0d-0f6092b2e6ab - Encode the concatenated string using Base64 (i.e. RFC2045-MIME):
c3RhcnRlcmtpdDpkNzAzZjUyYi0xMjAwLTQzMTgtYWUwZC0wZjYw
OTJiMmU2YWI= - Set the Authorization header value to Basic followed by the encoded string from step 2. Make sure there is a space between Basic and the encoded string:
Basic c3RhcnRlcmtpdDpkNzAzZjUyYi0xMjAwLTQzMTgtYWUwZC0w
ZjYwOTJiMmU2YWI=
For example, a Search Devices request with an authorization header might look like this:
curl -X GET --header "Accept: application/json" --header "Authorization: Basic ZHB0cmlhbFVzZXIxOmQ3MDNmNTJiLTEyMDAtNDMxOC1hZTBkLTBmNjA5MmIyZTZhYg==" "https://rws-jpotest.jasper.com/rws/api/v1/devices?accountId=100020620&modifiedSince=2016-04-18T17%3A31%3A34%2B00%3A00&pageSize=50&pageNumber=1"If you're using Curl, you can use the user parameter followed by your username and API key (--user <your-username>:<your-API-key>) instead of an authorization header. Curl automatically encrypts your credentials and generates the appropriate HTTP authorization header. For example:
curl -X GET --header "Accept: application/json" --user <your-username>:<your-API-key>" "https://rws-jpotest.jasper.com/rws/api/v1/devices?accountId=100020620&modifiedSince=2016-04-18T17%3A31%3A34%2B00%3A00&pageSize=50&pageNumber=1"Resources
The Control Center sandbox supports the following resources and their associated functions:
| Resource | Functions |
|---|---|
| Customers |
|
| Devices |
|
| Echo |
|
| Rate Plans |
|
| SMS Messages |
|
| Usages |
|
Partial Responses
When you make a REST API request, Control Center returns a JSON-formatted response. The documentation for each API function lists the request parameters and contains a sample JSON response for that function.
For most GET functions, you can request a partial response to return just the data of interest to you. For example, if you want to get the rate plan for a particular device, you can instruct the Get Device Details function to return the rate plan name only and no other fields. You can request one or more fields, including subfields, subfields within an array, and subfields of any depth in a hierarchy.
Partial Response Guidelines
When requesting partial responses, keep in mind these guidelines. For use cases, see the following section.
| Guideline | Description |
|---|---|
| Syntax |
Use "fields=" followed by a comma-separated list of field names with no spaces between names. The GET function returns the fields in the order you request them. For example, "fields=smsMsgId,messageText,messageType,status" returns four attributes for a particular SMS message: ID, content, type (MO or MT), and status. You must specify the individual fields you want in the response. Otherwise, the function returns nothing. |
| Hierarchies |
To indicate fields in a hierarchy, use a forward slash. For example, "field=contact/name,contact/email,billingAddress/country" returns the name and email of the contact person and the country associated with the billing address. |
| Wildcards |
You can use an asterisk (*) to request all the subfields of a parent field. For example, "field=shippingAddress/* returns all the attributes of the shipping address. If you omit the asterisk and do not specify a subfield by name, the function does not return any subfields. For example, "field=shippingAddress/" returns no data. |
| Errors |
If the function call incorrectly formats the request parameters or uses an incorrect field name, Control Center returns as much data as it can, but does not supply an error message. For example, "field=iccid,ratePlan,commPlan" returns the ICCID and the rate plan name only. The function does not return the communication plan because the parameter should be "communicationPlan" not "commPlan". Similarly, "field=contact/ name, contact/email" returns the contact email, but not the contact name. Control Center trims spaces before and after parameters, but not within them. Be aware that Control Center ignores duplicate parameters. |
| API Functions |
You can request partial responses for most GET functions. The "fields=" request parameter does not work with PUT, POST, or DELETE functions. |
Partial Response Use Case #1: One field
Syntax: fields=field1
Example: Get Device Details
https://rws-jpotest.jasper.com/rws/api/v1/devices/8988216716970004975?fields=status
Sample Response:
{
   "status": "ACTIVATED"
}
Partial Response Use Case #2: Multiple fields
Syntax: fields=field1,field2,field3
Notes: Do not use spaces between field names.
Example: Get Device Details
https://rws-jpotest.jasper.com/rws/api/v1/devices/8988216716970004975?fields=
iccid,status,ratePlan
Sample Response:
{
   "iccid": "8988216716970004975",
   "status": "ACTIVATED",
   "ratePlan": "Monthly Flexible Pool 2GB"
}
Partial Response Use Case #3: Subfields
Syntax: fields=field1/subfield1,field1/subfield2
Example: Get Customer Details
https://rws-jpotest.jasper.com/rws/api/v1/customers/16716970?fields=
name,
billingAddress/addressLine1,
billingAddress/postalCode
Sample Response:
{
   "name": "Northwest Region",
   "billingAddress": {
      "addressLine1": "123 Main Street",
      "postalCode": "10155"
   }
}
Partial Response Use Case #4: Subfields in an array
Syntax: fields=field1/subfield1,field1/subfield2
Example: Get Device Usage in a Zone
https://rws-jpotest.jasper.com/rws/api/v1/devices/89302720396916972826/usageInZone?fields=
iccid, cycleStartDate, cycleEndDate,
deviceCycleUsageInZones/ratePlan,
deviceCycleUsageInZones/ratePlanVersion,
deviceCycleUsageInZones/zone,
deviceCycleUsageInZones/dataUsage,
deviceCycleUsageInZones/dataUsageUnit
Sample Response:
{
   "iccid": "89302720396916972826",
   "cycleStartDate": "2019-04-18T00:00:00.000Z",
   "cycleEndDate": "2019-05-17T23:59:59.000Z",
   "deviceCycleUsageInZones": {
      "Acme Monthly Individual, 3": [
      {
         "ratePlan": "Acme Monthly Individual",
         "ratePlanVersion": "3",
         "zone": "Roaming",
         "dataUsage": 20971924,
         "dataUsageUnit": "bytes"
      },
      {
         "ratePlan": "Acme Monthly Individual",
         "ratePlanVersion": "3",
         "zone": "Other Usage",
         "dataUsage": 1375776,
         "dataUsageUnit": "bytes"
      }
   ]
}
Partial Response Use Case #5: All subfields
Syntax: fields=field1/*
Notes: To include subfields in the response, you must specify the individual field names or use an asterisk (*) to return all fields. If you use a forward slash alone, the function returns no subfields.
Example: Get Customer Details
https://rws-jpotest.jasper.com/rws/api/v1/customers/16716970?fields=
name,
contacts/name,
contacts/email,
billingAddress/*
Sample Response:
{
   "name": "Northwest Region",
   "contacts": [
      {
         "name": "John Doe",
         "email": "jdoe@acme.com"
      },
      {
         "name": "Annette Wong",
         "email": "awong@acme.com"
      }
   ]
   "billingAddress": {
      "addressLine1": "593 Palm Dr.",
      "addressLine2": null,
      "city": "Los Angeles",
      "state": "CA",
      "country": "USA",
      "postalCode": "91201"
   }
}
Pagination
For functions that typically return numerous records (such as Search Devices and Search SMS), the API provides pagination controls that allow you to process one set of results and then request more.
These request parameters manage the pagination process:
| Request Parameter | Description |
|---|---|
|
pageSize |
Specifies the number of records returned in each response page. The maximum value is 50. The value defaults to 50. |
|
pageNumber |
Specifies the number of the response page to return. This value defaults to 1. |
These response values allow your code to process the returns properly:
| Response Value | Description |
|---|---|
|
pageNumber |
An integer specifying the number of the current response page. |
|
lastPage |
A true or false value indicating whether the current response page is the last in the series. |
For example, the first API request would define the number of records to include in the response (pageSize=50) and ask for the first page of records (pageNumber=1). The response would send an array containing the first 50 records and then let you know if there are any more pages to return (lastPage=false).
The second request would define the page size again (pageSize=50) and ask for the second page of results (pageNumber=2). The second response would return the next 50 records and alert you if there were more records to retrieve (lastPage=false). This process would continue until one of the responses indicates that the current page is the last page of results (lastPage=true).
Date/Time Formats
The REST APIs use the following date and time formats for requests and responses.
| Use Case | Format |
|---|---|
|
Search Requests, for example: • Search Devices (modifiedSince) • Search SMS (fromDate) |
yyyy-MM-ddTHH:mm:ssZ Example: 2016-04-18T17:31:34+00:00 |
|
Edit Device Request (effectiveDate) Get Device Usage in a Zone Request |
yyyy-MM-ddZ Example: 2016-04-18Z or 2016-04-18+05:00 |
|
Responses, for example: • Get Device Details (dateShipped) • Get Session Info (lastSessionEndTime) |
yyyy-MM-dd HH:mm:ss.SSSZ Example: 2016-04-18 17:31:34.121+0050 |
| Get Device Usage by Zone Response (all dates) |
yyyy-MM-ddTHH:mm:ss.SSSZ Example: 2016-12-06T15:58:06.466Z |
| Response timestamps (some) |
UNIX Epoch clock format. This format counts the number of seconds since the start of the UNIX Epoch on January 1, 1970 (UTC). There are a number of converters available online. Example: 1571416432 |
Error Handling
The REST APIs use standard HTTP status codes as well as business-specific error messages. If an error occurs, Control Center will return a JSON response containing an error code and an error message. For example:
{
   "errorMessage": "The API credentials are invalid.",
   "errorCode": "10000001"
}
The documentation for each API function contains a list of the errors that may occur for that function.
The standard HTTP status codes are shown below.
| HTTP Status Code | Description |
|---|---|
|
200 |
Success |
| 202 | Accepted. The request is scheduled for processing and the task should be complete within several seconds. |
|
400 |
Bad request |
| 401 | Invalid credentials |
| 404 | Resource not found |
| 500 | Server error |
SIM Status Values
Many API functions take the device SIM status as a parameter or return the information in the response. Following is a list of the values you may see.
| SIM State | Description |
|---|---|
|
ACTIVATION_READY |
An ACTIVATION_READY device can establish a data connection, but is generally not considered billable. When an ACTIVATION_READY device makes a data connection or sends an SMS, Control Center automatically changes its status to ACTIVATED, causing the device to become billable. In the case of a data connection, the device state transition occurs as soon as Control Center receives a data CDR. The workflow is similar in the case of SMS and voice services, with Control Center processing SMS or voice CDRs. Depending on how your account is set up, you may or may not be able to move a device from ACTIVATED to ACTIVATION_READY. |
|
REPLACED |
In certain situations, you may want to replace one SIM with another. The new SIM inherits information from the original SIM and the original SIM receives a REPLACED state. You must request this change from the operator. Only an operator can move a device to this state. |
|
ACTIVATED |
An ACTIVATED device can establish data connections and is considered billable. |
|
DEACTIVATED |
The DEACTIVATED state does not allow a device to establish data connections. Devices in the DEACTIVATED state are generally not considered billable unless a commitment applies. Typically, DEACTIVATED devices have been deployed, but they are temporarily inactive. |
|
INVENTORY |
The INVENTORY state does not allow a device to establish data connections. Devices in the INVENTORY state are generally not considered billable. Devices in the INVENTORY state behave similarly to those in the DEACTIVATED state. Typically, devices in INVENTORY have not been deployed yet, while DEACTIVATED devices have been deployed, but they are temporarily inactive. |
|
PURGED |
The PURGED state does not allow a device to establish data connections. A PURGED device has been physically removed from the network by the operator, typically in response to a customer request or as part of a SIM replacement policy. Contact your operator to learn about their policies for moving a device to the PURGED state. Only an operator can move a device to this state. |
|
RETIRED |
The RETIRED state does not allow a device to establish data connections. A device in this state is generally not considered billable unless a commitment applies. Typically, a RETIRED device is permanently inactive and ready to be moved to a PURGED state for removal from the network. If necessary, users can move a RETIRED device to a different SIM state. |
|
The TEST_READY state allows a device to establish a data connection and use other services free of charge. SIMs in this state are not considered billable. By default, the TEST_READY state provides each device with the following services, although the operator may configure these amounts differently:
As soon as the device reaches the configured limit for any service (data, SMS, voice, or other), the device will transition to the target state and no more free test traffic will be available for any service. Typically, the target state for SIMs exceeding their TEST_READY threshold is either ACTIVATION_READY or INVENTORY. The operator can configure this transition to suit the enterprise business model. Depending on how the account is set up, you may or may not be able to move a device from ACTIVATED back to TEST_READY. |
SMS Validity Period
The Send SMS function uses a tpvp request parameter for time-sensitive messages. This value defines the length of time the message is available before expiring. The SMSC will attempt to deliver the SMS message to the mobile device within this validity period. If the message cannot be delivered to the device by the end of this period (because the device is off or out of coverage, for example), the message will be dropped.
For example, suppose you have an application that sends a Door Lock/Unlock command to a vehicle via SMS. If the car is out of coverage when the message is sent, you wouldn't necessarily want to deliver the message hours later when the car is back in coverage. In this scenario, you might choose to expire the message after a 5 minute validity period.
The tpvp parameter supports validity periods between 5 minutes and 63 weeks in length using the TP-VP relative format defined by the GSM 03.40 standards:
| TPVP Value | Validity Period | Possible Validity Periods |
|---|---|---|
|
0-143 |
(TP-VP + 1) x 5 minutes |
5, 10, 15 minutes ... 11:55, 12:00 hours |
|
144-167 |
(12 + (TP-VP - 143) / 2 ) hours |
12:30, 13:00, ... 23:30, 24:00 hours |
|
168-196 |
(TP-VP - 166) days |
2, 3, 4, ... 30 days |
|
197-255 |
(TP-VP - 192) weeks |
5, 6, 7, ... 63 weeks |
In the Door Lock/Unlock example, if you pass a value of 0 for tpvp, the message would expire in 5 minutes: (0 + 1) x 5 = 5 minutes.
The maximum validity period depends on the SMSC configuration. If Cisco hosts the SMSC, the maximum validity period is 5 days (tpvp = 171). If the operator hosts the SMSC, the maximum validity period may be different. If the SMSC doesn't support the validity period you specify in the API call, the value defaults to the maximum validity period for that SMSC. If you do not specify a validity period, the API uses 3 days as the default.
API Best Practices
To maintain effective API performance for all Control Center users, Cisco recommends the following best practices for any client-side code that calls the Control Center APIs:
| Topic | Recommendation |
|---|---|
| Concurrent connections | Please limit the number of active calls to one at a time. API processing has the potential to slow down response time considerably, particularly when an API request results in a large number of returned records and heavy database activity. To comply with operator best practices, Cisco advises enterprises to avoid concurrent processing. |
| Calls per second | To ensure effective API performance for all accounts, please do not execute more than 5 transactions per second. If an account exceeds this limit, Cisco may curtail API usage by returning error responses for any subsequent API calls within the measurement period. |
| Call frequency | Many enterprises use the APIs to track device usage. In this situation, it's important to align your API calls with the frequency of your operator updates. For example, if your operator updates their usage information once per 6 hours, there's no need to request the information via API more often than once per 6 hours. In addition, there's often a delay between the time usage data is available and Control Center receives that usage data from the operator. In some cases, the delay can be as long as 24 hours. Check with your operator to learn about their processes and take advantage of their schedule. |
FTP Reports. For enterprises that require access to large amounts of data on a daily basis, FTP reports may be a better solution than APIs. Talk to your operator to learn more about reports that are available by FTP.
Backward Compatibility
Cisco regularly updates our APIs to provide new or enhanced functionality. Our goal is to keep our API changes backward-compatible within the same API version (see API Key) so that you don't have to update your code whenever we make these changes.
Backward-compatible changes for our REST APIs include:
- Adding new APIs
- Adding optional API request parameters
- Adding new fields to existing API responses
- Adding new values to existing API parameters that have enumerated sets of values
- Adding HTTP response headers or adding values to existing response headers
You should write your REST API clients with the expectation that these API changes will happen, so that they can handle such changes gracefully. For example, do not hard-code to a fixed set of API response fields, since new response fields may be added in the future; instead, look for only the fields that you are interested in, and ignore any other fields.
While Cisco strives to ensure that the majority of API changes are backward-compatible, there are times when incompatible changes need to be made. Backward-incompatible changes include:
- Removing or renaming an API, request parameter, response field, or enum value
- Changing the visible behavior of existing APIs
Cisco will provide at least six months' notice to operators before backward-incompatible changes go into effect. This notice will include specific information about the change along with instructions for upgrading your code without service disruption.
API Versions
Every API function includes a version number that identifies the API’s structure and behavior. Cisco increments this version number under the following circumstances:
- The API receives a backward-incompatible change AND
- The previous version of the API continues to be supported.
Refer to the detailed documentation to learn more about version numbers for each type of API.