This documentation corresponds to an older version of the product, is no longer updated, and may contain outdated information.
Please access the latest versions from https://cisco-tailf.gitbook.io/nso-docs and update your bookmarks. OK
When setting up an application project, there are a number of things
to think about. A service package needs a service model, NSO
configuration files and mapping code. Similarly, NED packages
need YANG files and NED code.
We can either copy an existing example and modify that, or
we can use the tool ncs-make-package to create
an empty skeleton for a package for us.
The ncs-make-package tool provides a good starting point
for a development project.
Depending on the type of package, we use
ncs-make-package to set up a working development structure.
As explained in NSO Packages, NSO runs all user Java code and also loads all data models through an NSO package. Thus a development project is the same as developing a package. Testing and running the package is done by putting the package in the NSO load-path and running NSO.
There are different kinds of packages; NED packages,
service packages etc. Regardless of package type, the structure
of the package as well as the deployment of the package into NSO
is the same.
The script
ncs-make-package creates the following for us:
-
A Makefile to build the source code of the package. The package contains source code and needs to be built.
-
If it's a NED package, a
netsimdirectory which is used by thencs-netsimtool to simulate a network of devices. -
If it is a service package, skeleton YANG and Java files that can be modified are generated.
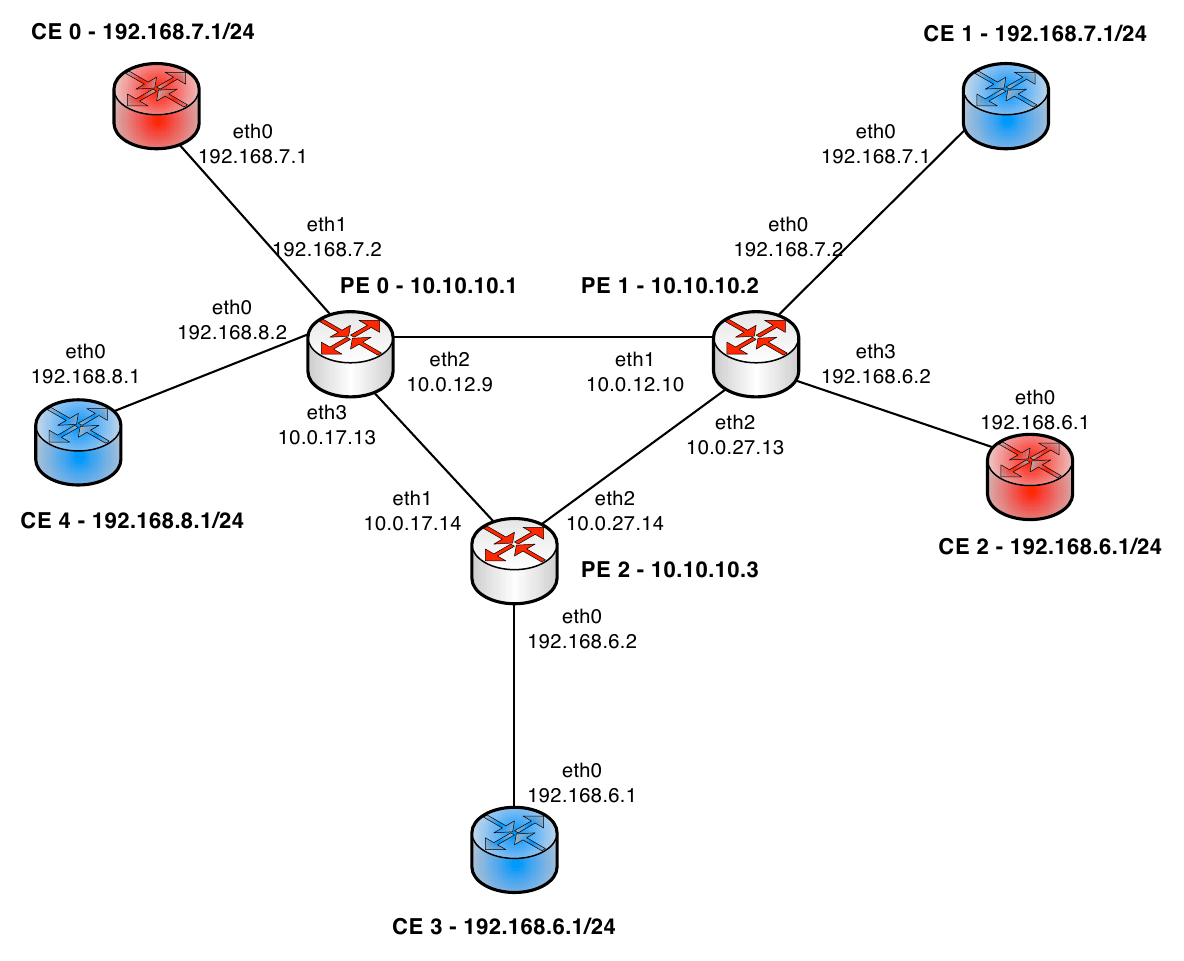
In this chapter we are going to develop an MPLS service for a network of provider edge routers (PE) and customer equipment routers (CE). The assumption is that the routers speak NETCONF and that we have proper YANG modules for the two types of routers. The techniques described here work equally well for devices that speak other protocols than NETCONF, such as Cisco CLI or SNMP.
The first thing we want to do is to create a simulation environment where ConfD is used as NETCONF server to simulate the routers in our network. We plan to create a network that looks like:
In order to create the simulation network, the first thing we need to do is to create NSO packages for the two router models. The packages is also exactly what NSO needs in order to manage the routers.
Assume that the yang files for the PE routers reside
in ./pe-yang-files and the YANG files
for the CE routers reside in
./ce-yang-files
The ncs-make-package tool is used to create
two device packages, one called pe and the other
ce.
 $ ncs-make-package --netconf-ned ./pe-yang-files pe
 $ ncs-make-package --netconf-ned ./ce-yang-files ce
 $ (cd pe/src; make)
 $ (cd pe/src; make)
At this point, we can use the ncs-netsim tool
to create a simulation network. ncs-netsim will
use the Tail-f ConfD daemon as a NETCONF server to simulate the
managed devices, all running on localhost.
$ ncs-netsim create-network ./ce 5 ce create-network ./pe 3 pe
The above command creates a network with 8 routers, 5 running
the YANG models for a CE router and 3 running a YANG model
for the PE routers. ncs-netsim can be used to
stop, start and manipulate this network. For example:
$ ncs-netsim start
DEVICE ce0 OK STARTED
DEVICE ce1 OK STARTED
DEVICE ce2 OK STARTED
DEVICE ce3 OK STARTED
DEVICE ce4 OK STARTED
DEVICE pe0 OK STARTED
DEVICE pe1 OK STARTED
DEVICE pe2 OK STARTED
In the previous section, we described how to use
ncs-make-package and
ncs-netsim to setup a simulation network.
Now, we want to use ncs to control and manage precisely the
simulated network. We can use the
ncs-setup tool setup a directory suitable
for this. ncs-setup has a flag to setup
NSO initialization files so that all devices in a
ncs-netsim network are added as managed
devices to NSO. If we do:
 $ ncs-setup --netsim-dir ./netsim --dest NCS;
 $ cd NCS
 $ cat README.ncs
 .......
 $ ncs
The above commands, db, log etc directories and also
creates an NSO XML initialization file in
./NCS/ncs-cdb/netsim_devices_init.xml.
The init file is important, it is created from the content
of the netsim directory and it contains the IP address, port,
auth credentials and NED type for all the devices in the netsim
environment. There is a dependency order between ncs-setup and ncs-netsim
since ncs-setup creates the XML init file based on the contents
in the netsim environment, therefor we must run the ncs-netsim
create-network command before we execute the ncs-setup command.
Once ncs-setup has been run, and the init XML file has been generated
it is possible to manually edit that file.
If we start the NSO CLI, we have for example :
$ ncs_cli -u admin
admin connected from 127.0.0.1 using console on zoe
admin@zoe> show configuration devices device ce0
address   127.0.0.1;
port      12022;
authgroup default;
device-type {
    netconf;
}
state {
    admin-state unlocked;
}
If we take a look at the directory structure of the generated
NETCONF NED packages, we have in ./ce
|----package-meta-data.xml
|----private-jar
|----shared-jar
|----netsim
|----|----start.sh
|----|----confd.conf.netsim
|----|----Makefile
|----src
|----|----ncsc-out
|----|----Makefile
|----|----yang
|----|----|----interfaces.yang
|----|----java
|----|----|----build.xml
|----|----|----src
|----|----|----|----com
|----|----|----|----|----example
|----|----|----|----|----|----ce
|----|----|----|----|----|----|----namespaces
|----doc
|----load-dir
It is a NED package, and it has a directory called
netsim at the top.
This indicates to the ncs-netsim tool
that ncs-netsim can create simulation
networks that contains devices running the YANG models from
this package. This section describes the netsim
directory and how to modify it.
ncs-netsim uses ConfD to simulate network
elements, and in order to fully understand how to modify a
generated netsim directory, some knowledge
of how ConfD operates may be required.
The netsim directory contains
three files:
-
confd.conf.netsimis a configuration file for the ConfD instances. The file will be/bin/sedsubstituted where the following list of variables will be substituted for the actual value for that ConfD instance:-
%IPC_PORT%for/confdConfig/confdIpcAddress/port -
%NETCONF_SSH_PORT%- for/confdConfig/netconf/transport/ssh/port -
%NETCONF_TCP_PORT%- for/confdConfig/netconf/transport/tcp/port -
%CLI_SSH_PORT%- for/confdConfig/cli/ssh/port -
%SNMP_PORT%- for/confdConfig/snmpAgent/port -
%NAME%- for the name of ConfD instance. -
%COUNTER%- for the number of the ConfD instance
-
-
The
Makefileshould compile the YANG files so that ConfD can run them. TheMakefileshould also have aninstalltarget that installs all files required for ConfD to run one instance of a simulated network element. This is typically all fxs files. -
An optional
start.shfile where additional programs can be started. A good example of a package where the netsim component contains some additional C programs is thewebserverpackage in the NSO website example$NCS_DIR/web-server-farm.
Remember the picture of the network we wish to work with, there the routers, PE and CE, have IP address and some additional data. So far here, we have generated a simulated network with YANG models. The routers in our simulated network have no no data in them, we can log in to one of the routers to verify that:
$    ncs-netsim cli pe0
admin connected from 127.0.0.1 using console on zoe
admin@zoe> show configuration interface
No entries found.
[ok][2012-08-21 16:52:19]
admin@zoe> exit
The ConfD devices in our simulated network all have a Juniper
CLI engine, thus we can, using the command
ncs-netsim cli [devicename] login to
an individual router.
In order to achieve this, we need to have some additional XML
initializing files for the ConfD instances. It is the
responsibility of the install target
in the netsim Makefile to ensure that each
ConfD instance gets initialized with the proper init data.
In the NSO example collection, the example
$NCS_DIR/examples.ncs/mpls contains precisely
the two above mentioned PE and CE packages, but modified so that
the network elements in the simulated network gets initialized
properly.
If we run that example in the NSO example collection we see
  $ cd $NCS_DIR/examples.ncs/mpls/mpls-devices
  $ make all
    ....
  $ ncs-netsim start
    .....
  $ ncs
  $ ncs_cli -u admin

admin connected from 127.0.0.1 using console on zoe
admin@zoe> show status packages package pe
package-version 1.0;
description     "Generated netconf package";
ncs-min-version 2.0;
component pe {
    ned {
        netconf;
        device {
            vendor "Example Inc.";
        }
    }
}
oper-status {
    up;
}
[ok][2012-08-22 14:45:30]
admin@zoe> request devices sync-from
sync-result {
    device ce0
    result true
}
sync-result {
    device ce1
    result true
}
sync-result {
   .......
admin@zoe> show configuration devices device pe0 config if:interface
interface eth2 {
    ip   10.0.12.9;
    mask 255.255.255.252;
}
interface eth3 {
    ip   10.0.17.13;
    mask 255.255.255.252;
}
interface lo {
    ip   10.10.10.1;
    mask 255.255.0.0;
}
A full simulated router network loaded into NSO, with ConfD simulating the 7 routers.
With the scripting mechanism it is possible for an end-user to add new functionality to NSO in a plug-and-play like manner. See Plug-and-play Scripting in User Guide about the scripting concept in general. It is also possible for a developer of an NSO package to enclose scripts in the package.
Scripts defined in an NSO package works pretty much as system level
scripts configured with the
/ncs-config/scripts/dir configuration parameter.
The difference is that the location of the scripts is predefined. The
scripts directory must be named scripts and must be located
in the top directory of the package.
In this complete example
examples.ncs/getting-started/developing-with-ncs/11-scripting
there is a README file and a simple post-commit
script
packages/scripting/scripts/post-commit/show_diff.sh
as well as a simple command script
packages/scripting/scripts/command/echo.sh.
So far we have only talked about packages that describe a managed device, i.e ned packages. There are also callback, application and service packages. A service package is a package with some YANG code that models an NSO service together with java code that implements the service. See Implementing Services.
We can generate a service package skeleton, using
ncs-make-package, as:
  $ ncs-make-package --service-skeleton java myrfs
  $ cd test/src; make
make sure that package is part of the load-path, and we can then create test service instances - that do nothing.
admin@zoe> show status packages package myrfs
package-version 1.0;
description     "Skeleton for a resource facing service - RFS";
ncs-min-version 2.0;
component RFSSkeleton {
    callback {
        java-class-name [ com.example.myrfs.myrfs ];
    }
}
oper-status {
    up;
}
[ok][2012-08-22 15:30:13]
admin@zoe> configure
Entering configuration mode private
[ok][2012-08-22 15:32:46]

[edit]
admin@zoe% set services myrfs s1 dummy 3.4.5.6
[ok][2012-08-22 15:32:56]
ncs-make-package will
generate skeleton files for our service
models and for our service logic. The package is fully
build-able and runnable even though the service models are empty.
Both CLI and Webui can be run. In addition to this we also have
a simulated environment with ConfD devices configured with YANG
modules.
Calling ncs-make-package with the arguments above
will create a service skeleton that is placed in the root in
the generated service model. However services can be augmented anywhere or
can be located in any YANG module. This can be controlled by giving the
argument --augment NAME where NAME is the path
to where the service should be augmented, or in the case of putting the
service as a root container in the service YANG this can be controlled
by giving the argument --root-container NAME.
Services created using ncs-make-package will be of
type list. However it is possible to have services that
are of type container instead. A container service need to
be specified as a presence container.
The service implementation logic of a service can be expressed using the Java language. For each such service a Java class is created. This class should implement the create() callback method from the ServiceCallback interface. This method will be called to implement the service to device mapping logic for the service instance.
We declare in the component for the package, that we have a
callback component. In the
package-meta-data.xml for the
generated package, we have:
  <component>
    <name>RFSSkeleton</name>
    <callback>
      <java-class-name>com.example.myrfs.myrfs</java-class-name>
    </callback>
  </component>
When the package is loaded, the NSO Java VM will load the
jar files for the package, and register the defined class
as a callback class. When the user creates a service of
this type, the create() method will be
called.
In the following sections we are going to show how to write a service applications through a number of examples. The purpose of these examples are to illustrate the concepts described in previous chapters.
-
Service Model - a model of the of the service you want to provide.
-
Service Validation Logic - a set of validation rules incorporated into your model.
-
Service Logic - a Java class mapping the service model operations onto the device layer.
If we take a look at the Java code in the service generated by
ncs-make-package,
first we have the create() which takes four parameters.
The ServiceContext instance is a container for the current service
transaction, with this e.g. the transaction timeout can be controlled.
The container service is a NavuContainer holding
a read/write reference to path in the instance tree containing the current
service instance. From this point you can start accessing all nodes
contained within created service. The root container is a
NavuContainer holding a reference to the NSO root. From
here you can access the whole data model of the NSO.
The opaque parameter contains a
java.util.Properties object instance. This object may be
used to transfer additional information between consecutive calls to the
create callback. It is always null in the first callback method when
a service is first created. This Properties object can be updated (or
created if null) but should always be returned.
    @ServiceCallback(servicePoint="myrfsspnt",
        callType=ServiceCBType.CREATE)
    public Properties create(ServiceContext context,
                             NavuNode service,
                             NavuNode root,
                             Properties opaque)
                             throws DpCallbackException {
        String servicePath = null;
        try {
            servicePath = service.getKeyPath();

            //Now get the single leaf we have in the service instance
            // NavuLeaf sServerLeaf = service.leaf("dummy");

            //..and its value (which is a ipv4-address )
            // ConfIPv4 ip = (ConfIPv4)sServerLeaf.value();

            //Get the list of all managed devices.
            NavuList managedDevices = root.container("devices").list("device");

            // iterate through all manage devices
            for(NavuContainer deviceContainer : managedDevices.elements()){

                // here we have the opportunity to do something with the
                // ConfIPv4 ip value from the service instance,
                // assume the device model has a path /xyz/ip, we could
                // deviceContainer.container("config").
                //         .container("xyz").leaf(ip).set(ip);
                //
                // remember to use NAVU sharedCreate() instead of
                // NAVU create() when creating structures that may be
                // shared between multiple service instances
            }
        } catch (NavuException e) {
            throw new DpCallbackException("Cannot create service " +
                                          servicePath, e);
        }
        return opaque;
    }
The opaque object is extremely useful to pass information between
different invocations of the create() method. The
returned Properties object instance is stored persistently.
If the create method computes something on its first invocation,
it can return that computation in order to have it passed in as a
parameter on the second invocation.
This is crucial to understand, the Mapping Logic
fastmap mode relies
on the fact that a modification of an existing
service instance can be realized as a full deletion of what the service
instance created when the service instance was first created,
followed by yet another create, this time with
slightly different parameters. The NSO transaction engine will then
compute the minimal difference and send southbound to all involved
managed devices.
Thus a good service instance create() method will - when
being modified - recreate exactly the same structures it created the
first time.
The best way to debug this and to ensure that a modification of a
service instance really only sends the minimal NETCONF diff to the south
bound managed devices, is to
turn on NETCONF trace in the NSO, modify a service instance and inspect
the XML sent to the managed devices. A badly behaving
create() method will incur large reconfigurations of the
managed devices, possible leading to traffic interruptions.
It is highly recommended to also implement a selftest()
action in conjunction to a service. The purpose of the
selftest() action is to trigger a test of the service.
The ncs-make-package tool creates an
selftest() action that takes no input parameters and
have two output parameters.
      tailf:action self-test {
        tailf:info "Perform self-test of the service";
        tailf:actionpoint myrfsselftest;
        output {
          leaf success {
            type boolean;
          }
          leaf message {
            type string;
            description
              "Free format message.";
          }
        }
The selftest() implementation is expected to do some
diagnosis of the service. This can possibly include use of testing
equipment or probes.
    /**
     * Init method for selftest action
     */
    @ActionCallback(callPoint="myrfsselftest", callType=ActionCBType.INIT)
    public void init(DpActionTrans trans) throws DpCallbackException {
    }

    /**
     * Selftest action implementation for service
     */
    @ActionCallback(callPoint="myrfsselftest", callType=ActionCBType.ACTION)
    public ConfXMLParam[] selftest(DpActionTrans trans, ConfTag name,
                                   ConfObject[] kp, ConfXMLParam[] params)
    throws DpCallbackException {
        try {
            // Refer to the service yang model prefix
            String nsPrefix = "myrfs";
            // Get the service instance key
            String str = ((ConfKey)kp[0]).toString();

          return new ConfXMLParam[] {
              new ConfXMLParamValue(nsPrefix, "success", new ConfBool(true)),
              new ConfXMLParamValue(nsPrefix, "message", new ConfBuf(str))};

        } catch (Exception e) {
            throw new DpCallbackException("selftest failed", e);
        }
    }
The NSO Java VM logging functionality is provided using LOG4J.
The logging is composed of a configuration file
(log4j2.xml)
where static settings are made i.e all settings that could be
done for LOG4J
(see https://logging.apache.org/log4j/2.x
for more comprehensive log settings). There are also dynamically
configurable log settings under
/java-vm/java-logging.
When we start the NSO Java VM in main()
the log4j2.xml
log file is parsed by the LOG4J framework and it applies the
static settings to the NSO Java VM environment. The file
is searched for in the Java CLASSPATH.
NSO Java VM starts a number of internal processes or threads,
one of these thread executes a service called
NcsLogger which handles the dynamic
configurations of the logging framework.
When NcsLogger starts it initially reads all the
configurations from /java-vm/java-logging
and applies them, thus overwriting settings that was previously parsed
by the LOG4J framework.
After it has applied the changes from the configuration it
starts to listen to changes that are made under
/java-vm/java-logging.
The LOG4J framework has 8 verbosity levels:
ALL,DEBUG,ERROR,FATAL,INFO,OFF,TRACE and WARN.
The have the the following relations:
ALL > TRACE > DEBUG > INFO > WARN > ERROR > FATAL > OFF.
This means that the highest verbosity that we could have is
level ALL and the lowest no traces at all ,
OFF.
There are corresponding enumerations for each LOG4J verbosity level
in tailf-ncs.yang, thus the NcsLogger does the mapping between
the enumeration type: log-level-type and the LOG4J verbosity levels.
 typedef log-level-type {
    type enumeration {
      enum level-all {
        value 1;
      }
      enum level-debug {
        value 2;
      }
      enum level-error {
        value 3;
      }
      enum level-fatal {
        value 4;
      }
      enum level-info {
        value 5;
      }
      enum level-off {
        value 6;
      }
      enum level-trace {
        value 7;
      }
      enum level-warn {
        value 8;
      }
    }
    description
      "Levels of logging for Java packages in log4j.";
  }

  ....

  container java-vm {
    ....
    container java-logging {
      tailf:info "Configure Java Logging";
      list logger {
        tailf:info "List of loggers";
        key "logger-name";
        description
          "Each entry in this list holds one representation of a logger with
           a specific level defined by log-level-type. The logger-name
           is the name of a Java package.  logger-name can thus be for
           example com.tailf.maapi, or com.tailf etc.";

        leaf logger-name {
          tailf:info "The name of the Java package";
          type string;
          mandatory true;
          description
            "The name of the Java package for which this logger
             entry applies.";
        }
        leaf level {
          tailf:info "Log-level for this logger";
          type log-level-type;
          mandatory true;
          description
            "Corresponding log-level for a specific logger.";
        }
      }
    }
To change a verbosity level one needs to create a logger. A logger is something that controls the logging of a certain parts of the NSO Java API.
The loggers in the system are hierarchically structured which means that there is one root logger that always exists. All descendants of the root logger inherits its settings from the root logger if the descendant logger don't overwrite its settings explicitly.
The LOG4J loggers are mapped to the
package level in NSO Java API so the root
logger that exits have a direct descendant
that is the package: com
and it has in turn a descendant
com.tailf.
The com.tailf logger has direct descendant
that corresponds to every package in the system
for example: com.tailf.cdb, com.tailf.maapi etc.
As in the default case one could configure a logger in the static
settings that is in a log4j2.properties
file this would mean that we need to explicitly
restart the NSO Java VM ,or one could
alternatively configure a logger dynamically if
an NSO restart is not desired.
Recall that if a logger is not configured explicitly then it will inherit its settings from its predecessors. To overwrite a logger setting we create a logger in NSO.
To create a logger, for example let say that one uses Maapi
API to read and write configuration changes in NSO.
We want to show all traces including INFO
level traces. To enable INFO traces for
Maapi classes (located in package com.tailf.maapi)
during runtime we start for example a
CLI session and create a logger called com.tailf.maapi.
ncs@admin% set java-vm java-logging logger com.tailf.maapi level level-info
[ok][2010-11-05 15:11:47]
ncs@admin% commit
Commit complete.
When we commit our changes to CDB the NcsLogger will
notice that a change has been made under
/java-vm/java-logging, it will
then apply the logging settings to the logger com.tailf.maapi
that we just created. We explicitly set the INFO
level to that logger. All the descend ands
from com.tailf.maapi will automatically
inherit its settings from that logger.
So where do the traces go? The default configuration
(in log4j2.properties):
appender.dest1.type=Console
the LOG4J framework forward all traces to stdout/stderr.
In NSO all stdout/stderr goes first through
the service manager. The service manager has configuration under
/java-vm/stdout-capture
that controls where the stdout/stderr will end up.
The default setting is in a file called
./ncs-java-vm.log.
    container stdout-capture {
      tailf:info "Capture stdout and stderr";
      description
        "Capture stdout and stderr from the Java VM.

         Only applicable if auto-start is 'true'.";
      leaf enabled {
        tailf:info "Enable stdout and stderr capture";
        type boolean;
        default true;
      }
      leaf file {
        tailf:info "Write Java VM output to file";
        type string;
        default "./ncs-java-vm.log";
        description
          "Write Java VM output to filename.";
      }
      leaf stdout {
        tailf:info "Write output to stdout";
        type empty;
        description
          "If present write output to stdout, useful together
           with the --foreground flag to ncs.";
      }
    }
It is important to consider that when creating a logger (in this case com.tailf.maapi) the name of the logger has to be an existing package known by NSO classloader.
One could also create a logger
named com.tailf with some desired level.
This would set all packages (com.tailf.*) to the same level.
A common usage is to set com.tailf
to level INFO which would set all traces,
including INFO from all packages to level INFO.
If one would like to turn off all available traces in
the system (quiet mode) then configure com.tailf
or (com) to level OFF.
There are INFO
level messages in all parts of the NSO Java API.
ERROR levels when exception occurs and some warning messages (level
WARN) for some places in packages.
There is also protocol traces between
the Java API and NSO which could be enabled if we create a logger
com.tailf.conf with DEBUG trace level.
When processing in the java-vm fails the exception error message is reported back to Ncs. This can be more or less informative depending on how elaborate the message is in the thrown exception. Also the exception can be wrapped one or several times with the original exception indicated as root cause of the wrapped exception.
In debugging and error reporting these root cause messages
can be valuable to understand what actually happens in the java code.
On the other hand, in normal operations, just a top level message message
without to much details are preferred.
The exceptions are also always logged in the java-vm log but if this log
is large it can be troublesome to correlate a certain exception to a
specific action in Ncs.
For this reason it is possible to configure the level of details shown
by ncs for an java-vm exception.
The leaf /ncs:java-vm/exception-error-message/verbosity takes
one of three values:
-
standard - Show the message from the top exception. This is the default
-
verbose - Show all messages for the chain of cause exceptions, if any
-
trace - Show messages for the chain of cause exceptions with exception class and the trace for the bottom root cause
Here is an example in how this can be used. In the web-site-service example we try to create a service without the necessary prepreparations:
admin@ncs% set services web-site s1 ip 1.2.3.4 port 1111 url x.se
[ok][2013-03-25 10:46:46]

[edit]
admin@ncs% commit
Aborted: Service create failed
[error][2013-03-25 10:46:48]

This is a very generic error message with does not describe what really
happens in the java code. Here the java-vm log has to be analyzed to find
the problem. However, with this cli session open we can from another cli
set the error reporting level to trace:

$ ncs_cli -u admin
admin@ncs> configure
admin@ncs% set java-vm exception-error-message verbosity trace
admin@ncs% commit

If we now in the original cli session issue the commit again we get the
following error message that pinpoint the problem in the code:

admin@ncs% commit
Aborted: [com.tailf.dp.DpCallbackException] Service create failed
Trace : [java.lang.NullPointerException]
        com.tailf.conf.ConfKey.hashCode(ConfKey.java:145)
        java.util.HashMap.getEntry(HashMap.java:361)
        java.util.HashMap.containsKey(HashMap.java:352)
        com.tailf.navu.NavuList.refreshElem(NavuList.java:1007)
        com.tailf.navu.NavuList.elem(NavuList.java:831)
        com.example.websiteservice.websiteservice.WebSiteServiceRFS.crea...
        com.tailf.nsmux.NcsRfsDispatcher.applyStandardChange(NcsRfsDispa...
        com.tailf.nsmux.NcsRfsDispatcher.dispatch(NcsRfsDispatcher.java:...
        sun.reflect.NativeMethodAccessorImpl.invoke0(Native Method)
        sun.reflect.NativeMethodAccessorImpl.invoke(NativeMethodAccessor...
        sun.reflect.DelegatingMethodAccessorImpl.invoke(DelegatingMethod...
        java.lang.reflect.Method.invoke(Method.java:616)
        com.tailf.dp.annotations.DataCallbackProxy.writeAll(DataCallback...
        com.tailf.dp.DpTrans.protoCallback(DpTrans.java:1357)
        com.tailf.dp.DpTrans.read(DpTrans.java:571)
        com.tailf.dp.DpTrans.run(DpTrans.java:369)
        java.util.concurrent.ThreadPoolExecutor.runWorker(ThreadPoolExec...
        java.util.concurrent.ThreadPoolExecutor$Worker.run(ThreadPoolExe...
        java.lang.Thread.run(Thread.java:679)
        com.tailf.dp.DpThread.run(DpThread.java:44)
[error][2013-03-25 10:47:09]
NSO will att first start take the packages found in the load path
and copy these into a directory under supervision of NSO located at
./state/package-in-use. Later starts of NSO will not take
any new copies from the packages load-path so changes will not take
effect by default.
The reason for this is that in normal operation changing packages
definition as a side-effect of a restart is an unwanted behavior.
Instead these type of changes are part of an NSO installation upgrade.
During package development as opposed to operations it is usually desirable that all changes to package definitions in the package load-path takes effect immediately. There are two ways to make this happen. Either start ncs with the --with-reload-packages directive:
$ ncs --with-reload-packages
or set the environment variable NCS_RELOAD_PACKAGES, for example like this
$ export NCS_RELOAD_PACKAGES=true
It is a strong recommendation to use the NCS_RELOAD_PACKAGES environment variable approach since it guaranties that the packages are updated in all situations.
It is also possible to request a running NSO to reload all its packages.
admin@iron> request packages reload
This request can only be performed in operational mode, and the effect is that all packages will be updated, and any change in YANG models or code will be effectuated. If any YANG models are changed an automatic CDB data upgrade will be executed. If manual (user code) data upgrades are necessary the package should contain an upgrade component. This upgrade component will be executed as a part of the package reload. See the section called “Writing an Upgrade Package Component” for information how to develop an upgrade component.
If the change in a package does not affect the data model or shared Java code, there is another command
admin@iron> request packages package mypack redeploy
This will redeploy the private JARs in the Java VM for the Java package, restart Python VM for the Python package and reload the templates associated with the package. However this command will not be sensitive to changes in the YANG models or shared JARs for the Java package.
By default, ncs will start the Java VM invoking the command
$NCS_DIR/bin/ncs-start-java-vm
That script will invoke:
$ java com.tailf.ncs.NcsJVMLauncher
The class NcsJVMLauncher contains the main() method.
The started java VM will
automatically retrieve and deploy all java code for the packages defined
in the load-path in the ncs.conf file. No other specification than the
package-meta-data.xml for each package is needed.
In the NSO CLI, there exist a number of settings and actions for the NSO Java VM, if we do:
$ ncs_cli -u admin

admin connected from 127.0.0.1 using console on iron.local
admin@iron> show configuration java-vm | details
stdout-capture {
    enabled;
    file    ./logs/ncs-java-vm.log;
}
connect-time                   30;
initialization-time            20;
synchronization-timeout-action log-stop;
java-thread-pool {
    pool-config {
        cfg-core-pool-size    5;
        cfg-keep-alive-time   60;
        cfg-maximum-pool-size 256;
    }
}
jmx {
    jndi-address 127.0.0.1;
    jndi-port    9902;
    jmx-address  127.0.0.1;
    jmx-port     9901;
}
[ok][2012-07-12 10:45:59]
We see some of the settings that are used to control how
the NSO Java VM run. In particular
here we're interested in /java-vm/stdout-capture/file
The NSO daemon will, when it starts, also start the NSO Java VM, and it will capture the stdout output from the NSO Java VM and send it to the file ./logs/ncs-java-vm.log. For more detail on the Java VM settings see The NSO Java VM.
Thus if we tail -f that file, we get all the output
from the Java code.
That leads us to the first and most simple way of developing the Java
code. If we now:
-
Edit our Java code.
-
Recompile that code in the package, e.g
cd ./packages/myrfs/src; make -
Restart the Java code, either through telling NSO to restart the entire NSO Java VM from the NSO CLI (Note, this requires env variable NCS_RELOAD_PACKAGES=true):
   admin@iron% request java-vm restart
   result Started
   [ok][2012-07-12 10:57:08]
Or instructing NSO to just redeploy the package we're currently working on.
   admin@iron% request packages package stats redeploy
   result true
   [ok][2012-07-12 10:59:01]
We can then do
tail -f logs/ncs-java-vm.log
in order to check for printouts and log messages. Typically there is
quite a lot of data in the NSO Java VM log.
It can sometime be hard to find our
own printouts and log messages. Therefore it can be convenient to use
the command:
admin@iron% set java-vm exception-error-message verbosity trace
which will make the relevant exception stack traces visible in the CLI.
It's also possible to dynamically, from the CLI control the level of logging as well as which Java packages that shall log. Say that we're interested in Maapi calls, but don't want the log cluttered with what is really NSO Java library internal calls. We can then do:
   admin@iron% set java-vm java-logging logger com.tailf.ncs level level-error
   [ok][2012-07-12 11:10:50]
   admin@iron% set java-vm java-logging logger com.tailf.conf level level-error
   [ok][2012-07-12 11:11:15]
   admin@iron% commit
   Commit complete.
Now considerably less log data will come. If we want these settings to always be there, even if we restart NSO from scratch with an empty database (no .cdb file in ./ncs-cdb) we can save these settings as XML, and put that XML inside the ncs-cdb directory, that way ncs will use this data as initialization data on fresh restart. We do:
   $ ncs_load -F p -p /ncs:java-vm/java-logging > ./ncs-cdb/loglevels.xml
   $ ncs-setup --reset
   $ ncs
The ncs-setup --reset command, stops the NSO daemon
and resets NSO back into "factory defaults". A restart of NSO will
reinitialize NSO from all XML files found in the CDB directory.
It's possible to tell NSO to not start the NSO Java VM at all. This is interesting in two different scenarios. First is if want to run the NSO Java code embedded in a larger application, such as a Java Application Server (JBoss), the other is when debugging a package. First we configure NSO to not start the NSO Java VM at all by adding the following snippet to ncs.conf:
<java-vm>
    <auto-start>false</auto-start>
</java-vm>
Now, after a restart or a configuration reload, no Java code is running, if we do:
admin@iron> show status packages
we will see that the oper-status of the packages
is java-uninitialized. We can also do
 admin@iron> show status java-vm
 start-status auto-start-not-enabled;
 status       not-connected;
 [ok][2012-07-12 11:27:28]
And this is expected, since we've told NSO to not start the NSO Java VM. Now, we can do that manually, at the UNIX shell prompt.
$ ncs-start-java-vm
.....
.. all stdout from NCS Java VM
So, now we're in position where we can manually stop the NSO Java VM, recompile the Java code, restart the NSO Java VM. This development cycle works fine. However, even though we're running the NSO Java VM standalone, we can still redeploy packages from the NSO CLI as
   admin@iron% request packages package stats redeploy
   result true
   [ok][2012-07-12 10:59:01]
to reload and restart just our Java code, no need to restart the NSO Java VM.
Since we can run the NSO Java VM standalone in a UNIX Shell, we can also
run it inside eclipse. If we stand in a NSO project directory, like
NCS generated earlier in this chapter,
we can issue the command
$ ncs-setup --eclipse-setup
This will generate two files, .classpath and
.project. If we add this
directory to eclipse as a "File->New->Java Project", uncheck the "Use the
default location" and enter the directory where the .classpath and .project
have been generated. We're immediately ready to run this code in eclipse.
All we need to do is to choose the main() routine in the
NcsJVMLauncher class.
The eclipse debugger works now as usual, and we can at will start and stop the Java code. One caveat here which is worth mentioning is that there are a few timeouts between NSO and the Java code that will trigger when we sit in the debugger. While developing with the eclipse debugger and breakpoints we typically want to disable all these timeouts.
First we have 3 timeouts in ncs.conf that matter. Copy the system ncs.conf and set the three values of
/ncs-config/japi/new-session-timeout
/ncs-config/japi/query-timeout
/ncs-config/japi/connect-timeout
to a large value. See man page ncs.conf(5) for a detailed description on what those values are. If these timeouts are triggered, NSO will close all sockets to the Java VM and all bets are off.
$ cp $NCS_DIR/etc/ncs/ncs.conf .
Edit the file and enter the following XML entry just after the Webui entry.
  <japi>
    <new-session-timeout>PT1000S</new-session-timeout>
    <query-timeout>PT1000S</query-timeout>
    <connect-timeout>PT1000S</connect-timeout>
  </japi>
Now restart ncs.
We also have a few timeouts that are dynamically reconfigurable from the CLI. We do:
$ ncs_cli -u admin

admin connected from 127.0.0.1 using console on iron.local
admin@iron> configure
Entering configuration mode private
[ok][2012-07-12 12:54:13]
admin@iron% set devices global-settings connect-timeout 1000
[ok][2012-07-12 12:54:31]

[edit]
admin@iron% set devices global-settings read-timeout 1000
[ok][2012-07-12 12:54:39]

[edit]
admin@iron% set devices global-settings write-timeout 1000
[ok][2012-07-12 12:54:44]

[edit]
admin@iron% commit
Commit complete.
and then to save these settings so that ncs will have them again on a clean restart (no cdb files)
$ ncs_load -F p -p /ncs:devices/global-settings > ./ncs-cdb/global-settings.xml
The eclipse Java debugger can connect remotely to a NSO Java VM and
debug that NSO Java VM
This requires that the NSO Java VM has been started with some additional
flags. By default the script in
$NCS_DIR/bin/ncs-start-java-vm is used
to start the NSO Java VM.
If we provide the -d flag, we will launch the NSO Java VM with
"-Xdebug -Xrunjdwp:transport=dt_socket,address=9000,server=y,suspend=n"
This is what is needed to be able to remote connect to the NSO Java VM, in the ncs.conf file
<java-vm>
    <start-command>ncs-start-java-vm -d</start-command>
</java-vm>
Now if we in Eclipse, add a "Debug Configuration" and connect to port 9000 on localhost, we can attach the Eclipse debugger to an already running system and debug it remotely.
An NSO project is a complete running NSO installation. It contain all the needed packages and the config data that is required to run the system.
By using the ncs-project
commands, the project can be populated with
the necessary packages and kept updated.
This can be used for encapsulating
NSO demos or even a full blown turn-key system.
For a developer, the typical workflow looks like this:
-
Create a new project using the
ncs-project createcommand -
Define what packages to use in the
project-meta-data.xmlfile. -
Fetch any remote packages with the
ncs-project updatecommand. -
Prepare any initial data and/or config files.
-
Run the application.
-
Possibly export the project for somebody else to run.
Using the ncs-project create command,
a new project is created. The file
project-meta-data.xml should be
updated with relevant information as will be described
below.
The project will also get a default
ncs.conf configuration file
that can be edited to better match different scenarios.
All files and directories should be put into a version
control system, such as git.
$ ncs-project create test_project
Creating directory: /home/developer/dev/test_project
Using NCS 5.7 found in /home/developer/ncs_dir
wrote project to /home/developer/dev/test_project
A directory called test_project
is created containing the files and directories of a NSO project
as shown below:
test_project/
|-- init_data
|-- logs
|-- Makefile
|-- ncs-cdb
|-- ncs.conf
|-- packages
|-- project-meta-data.xml
|-- README.ncs
|-- scripts
|-- |-- command
|-- |-- post-commit
|-- setup.mk
|-- state
|-- test
|-- |-- internal
|-- |-- |-- lux
|-- |-- |-- basic
|-- |-- |-- |-- Makefile
|-- |-- |-- |-- run.lux
|-- |-- |-- Makefile
|-- |-- Makefile
|-- Makefile
|-- pkgtest.env
The Makefile contains targets for building,
starting, stopping and cleaning the system. It also contains
targets for entering the CLI as well as some useful targets for
dealing with any git packages. Study the Makefile
to learn more.
Any initial CDB data can be put in the init_data
directory. The Makefile will copy any files
in this directory to the ncs-cdb before
starting NSO.
There is also a test directory created with a directory structure used for automatic tests. These tests are dependent on the test tool Lux (https://github.com/hawk/lux.git).
To fill this project with anything meaningful, the
project-meta-data.xml file needs to be
edited.
Project version number is configurable, the version we get
from the create command is 1.0. The
description should also be changed to a small text explaining what
the project is intended for. Our initial content of the
project-meta-data.xml may now look like this:
<project-meta-data xmlns="http://tail-f.com/ns/ncs-project">
  <name>test_project</name>
  <project-version>1.0</project-version>
  <description>Skeleton for a NCS project</description>

  <!-- More things to be added here -->

</project-meta-data>
For this example, let say we have a released package:
ncs-4.1.2-cisco-ios-4.1.5.tar.gz, a package
located in a remote git repository foo.git,
and a local package that we have developed ourself:
mypack. The relevant part of our
project-meta-data.xml file would then
look like this:
  <!-- we will add a package-store section here -->
  <!-- we will add a netsim section here -->

  <package>
    <name>cisco-ios</name>
    <url>file:///tmp/ncs-4.1.2-cisco-ios-4.1.5.tar.gz</url>
  </package>

  <package>
    <name>foo</name>
    <git>
      <repo>ssh://git@my-repo.com/foo.git</repo>
      <branch>stable</branch>
    </git>
  </package>

  <package>
    <name>mypack</name>
    <local/>
  </package>
By specifying netsim devices in the
project-meta-data.xml file, the necessary
commands for creating the netsim configuration will be
generated in the setup.mk file that
ncs-project update creates. The setup.mk
file is included in the top Makefile,
and provides some useful make targets for creating
and deleting our netsim setup.
  <netsim>
    <device>
      <name>cisco-ios</name>
      <prefix>ce</prefix>
      <num-devices>2</num-devices>
    </device>
  </netsim>
When done editing the project-meta-data.xml,
run the command ncs-project update. Add the -v
switch to see what the command does.
   $ ncs-project update -v
   ncs-project: installing packages...
   ncs-project: found local installation of "mypack"
   ncs-project: unpacked tar file: /tmp/ncs-4.1.2-cisco-ios-4.1.5.tar.gz
   ncs-project: git clone "ssh://git@my-repo.com/foo.git" "/home/developer/dev/test_project/packages/cisco-ios"
   ncs-project: git checkout -q "stable"
   ncs-project: installing packages...ok
   ncs-project: resolving package dependencies...
   ncs-project: resolving package dependencies...ok
   ncs-project: determining build order...
   ncs-project: determining build order...ok
   ncs-project: determining ncs-min-version...
   ncs-project: determining ncs-min-version...ok
   The file 'setup.mk' will be overwritten, Continue (y/n)?
Answer yes when asked to overwrite the setup.mk.
After this a new runtime directory is created with ncs and simulated
devices configured. You are now ready to compile your system with:
make all.
If you have a lot of packages, all located at the same
git repository, it is convenient to specify the repository
just once. This can be done by adding a packages-store
section as shown below:
    <packages-store>
      <git>
        <repo>ssh://git@my-repo.com</repo>
        <branch>stable</branch>
      </git>
    </packages-store>

    <!-- then it is enough to specify the package like this: -->
    <package>
      <name>foo</name>
      <git/>
    </package>
This means that if a package does not have a git repository defined,
the repository and branch in the packages-store
is used.
Note
If a package has specified that it is dependent on some other
packages in its package-meta-data.xml file,
ncs-project update will try to clone those packages
from any of the specified packages-store.
To override this behaviour, specify explicitly all packages
in your project-meta-data.xml file.
When the development is done the project can be bundled
together and distributed further. The ncs-project comes with a
command, export, used for this purpose. The
export command creates a tarball of the required files and any
extra files as specified in the
project-meta-data.xml file.
Note
Developers are encouraged to distribute the project, either via some Source Code Managements system, like git, or by exporting bundles using the export command.
When using export, a subset of the packages should be configured for exporting. The reason for not exporting all packages in a project is if some of the packages is used solely for testing or similar. When configuring the bundle the packages included in the bundle are leafrefs to the packages defined at the root of the model, see Example 122, “The NSO Project YANG model”. We can also define a specific tag, commit or branch, even a different location for the packages, different from the one used while developing. For example we might develop against an experimental branch of a repository, but bundle with a specific release of that same repository.
Note
Bundled packages specified as of type file://
or url:// will not be built, they will simply
be included as is by the export command.
The bundle also have a name and a list of included files. Unless another name is specified from the command line the final compressed file will be named using the configured bundle name and project version.
We create the tar-ball by using the export command:
There are two ways to make use of a bundle:
-
Together with the
ncs-project create
                                      --from-bundle=<bundlefile>
command -
Extract the included packages using tar for manual installation in an NSO deployment.
In the first scenario, it is possible to create an NSO project,
populated with the packages from the bundle, to create a ready
to run NSO system. The optional init_data part makes it possible
to prepare CDB with configuration, prior to starting the system
the very first time. The project-meta-data.xml
file will specify all the packages as local
to avoid any dangling pointers to
non-accessible git repositories.
The second scenario is intended for the case when you want to install the packages manually, or via a custom process, into your running NSO systems.
The switch --snapshot will add a timestamp in the
name of the created bundle file in order to make it clear that
it is not a proper version numbered release.
To import our exported project we would do an
ncs-project create and point out where the bundle
is located.
ncs-project has a full set of manpages
that describes its usage and syntax. Below is an overview of the
commands which will be explained in more detail further down
below.
    $ ncs-project --help

Usage: ncs-project <command>

  COMMANDS

  create    Create a new ncs-project

  update    Update the project with any changes in the
            project-meta-data.xml

  git       For each git package repo: execute an arbitrary git
            command.

  export    Export a project, including init-data and configuration.

  help      Display the man page for <command>

  OPTIONS

  -h, --help                      Show this help text.

  -n, --ncs-min-version           Display the NCS version(s) needed
                                  to run this project

  --ncs-min-version-non-strict    As -n, but include the non-matching
                                  NCS version(s)

See manpage for ncs-project(1) for more info.
The project-meta-data.xml file defines the project
meta data for a NSO project according to the
$NCS_DIR/src/ncs/ncs_config/tailf-ncs-project.yang
YANG model. See the tailf-ncs-project.yang module
where all options are described in more detail. To get an overview, use
the IETF RFC 8340 based YANG tree diagram.
$ yanger -f tree tailf-ncs-project.yangmodule: tailf-ncs-project
+--rw project-meta-data
+--rw name string
+--rw project-version? version
+--rw description? string
+--rw packages-store
| +--rw directory* [name]
| | +--rw name string
| +--rw git* [repo]
| +--rw repo string
| +--rw (git-type)?
| +--:(branch)
| | +--rw branch? string
| +--:(tag)
| | +--rw tag? string
| +--:(commit)
| +--rw commit? string
+--rw netsim
| +--rw device* [name]
| +--rw name -> /project-meta-data/package/name
| +--rw prefix string
| +--rw num-devices int32
+--rw bundle!
| +--rw name? string
| +--rw includes
| | +--rw file* [path]
| | +--rw path string
| +--rw package* [name]
| +--rw name -> ../../../package/name
| +--rw (package-location)?
| +--:(local)
| | +--rw local? empty
| +--:(url)
| | +--rw url? string
| +--:(git)
| +--rw git
| +--rw repo? string
| +--rw (git-type)?
| +--:(branch)
| | +--rw branch? string
| +--:(tag)
| | +--rw tag? string
| +--:(commit)
| +--rw commit? string
+--rw package* [name]
+--rw name string
+--rw (package-location)?
+--:(local)
| +--rw local? empty
+--:(url)
| +--rw url? string
+--:(git)
+--rw git
+--rw repo? string
+--rw (git-type)?
+--:(branch)
| +--rw branch? string
+--:(tag)
| +--rw tag? string
+--:(commit)
+--rw commit? stringproject-meta-data.xml file
<project-meta-data xmlns="http://tail-f.com/ns/ncs-project">
  <name>l3vpn-demo</name>
  <project-version>1.0</project-version>
  <description>l3vpn demo</description>
  <bundle>
    <!-- filename default -->
    <name>example_bundle</name>
    <package>
      <name>my-package-1</name>
      <local/>
    </package>
    <!-- The same package as used by the project, but with a specific URL -->
    <package>
      <name>my-package-2</name>
      <url>http://localhost:9999/my-local.tar.gz</url>
    </package>
    <package>
      <name>my-package-3</name>
      <git>
        <repo>ssh://git@example.com/pkg/resource-manager.git</repo>
        <tag>1.2</tag>
      </git>
    </package>
  </bundle>
  <package>
    <name>my-package-1</name>
    <local/>
  </package>
  <package>
    <name>my-package-2</name>
    <local/>
  </package>
  <package>
    <name>my-package-3</name>
    <git>
      <repo>ssh://git@example.com/pkg/resource-manager.git</repo>
      <tag>1.2</tag>
    </git>
  </package>
</project-meta-data>
Below is a list of the settings in the
tailf-ncs-project.yang that is configured thorough
the meta data file. A detailed description can be found in the YANG
model.
Note
The order of the XML entries in a
project-meta-data.xml must
be in the same order as the model.
-
name- A unique name of the project. -
project-version- the version of the project. This is for administrative purposes only. -
packages-store-
directory- paths for package dependencies. -
git-
repo- default git package repositories. -
branch, tag, or commit id
-
-
-
netsim- list netsim devices used by the project to generate a proper Makefile running the 'ncs-project setup' script.-
device -
prefix -
num-devices
-
-
bundle- Information to collect files and packages to pack them in a tarball bundle.-
name- tarball filename. -
includes- files to include. -
package- packages to include (leafref to the package list below)-
name- name of the package. -
local, url, or git- where to get the package. GIT option need a branch, tag, or commit id.
-
-
-
package- packages used by the project.-
name- name of the package. -
local, url, or git- where to get the package. GIT option need a branch, tag, or commit id.
-