This documentation corresponds to an older version of the product, is no longer updated, and may contain outdated information.
Please access the latest versions from https://cisco-tailf.gitbook.io/nso-docs and update your bookmarks. OK
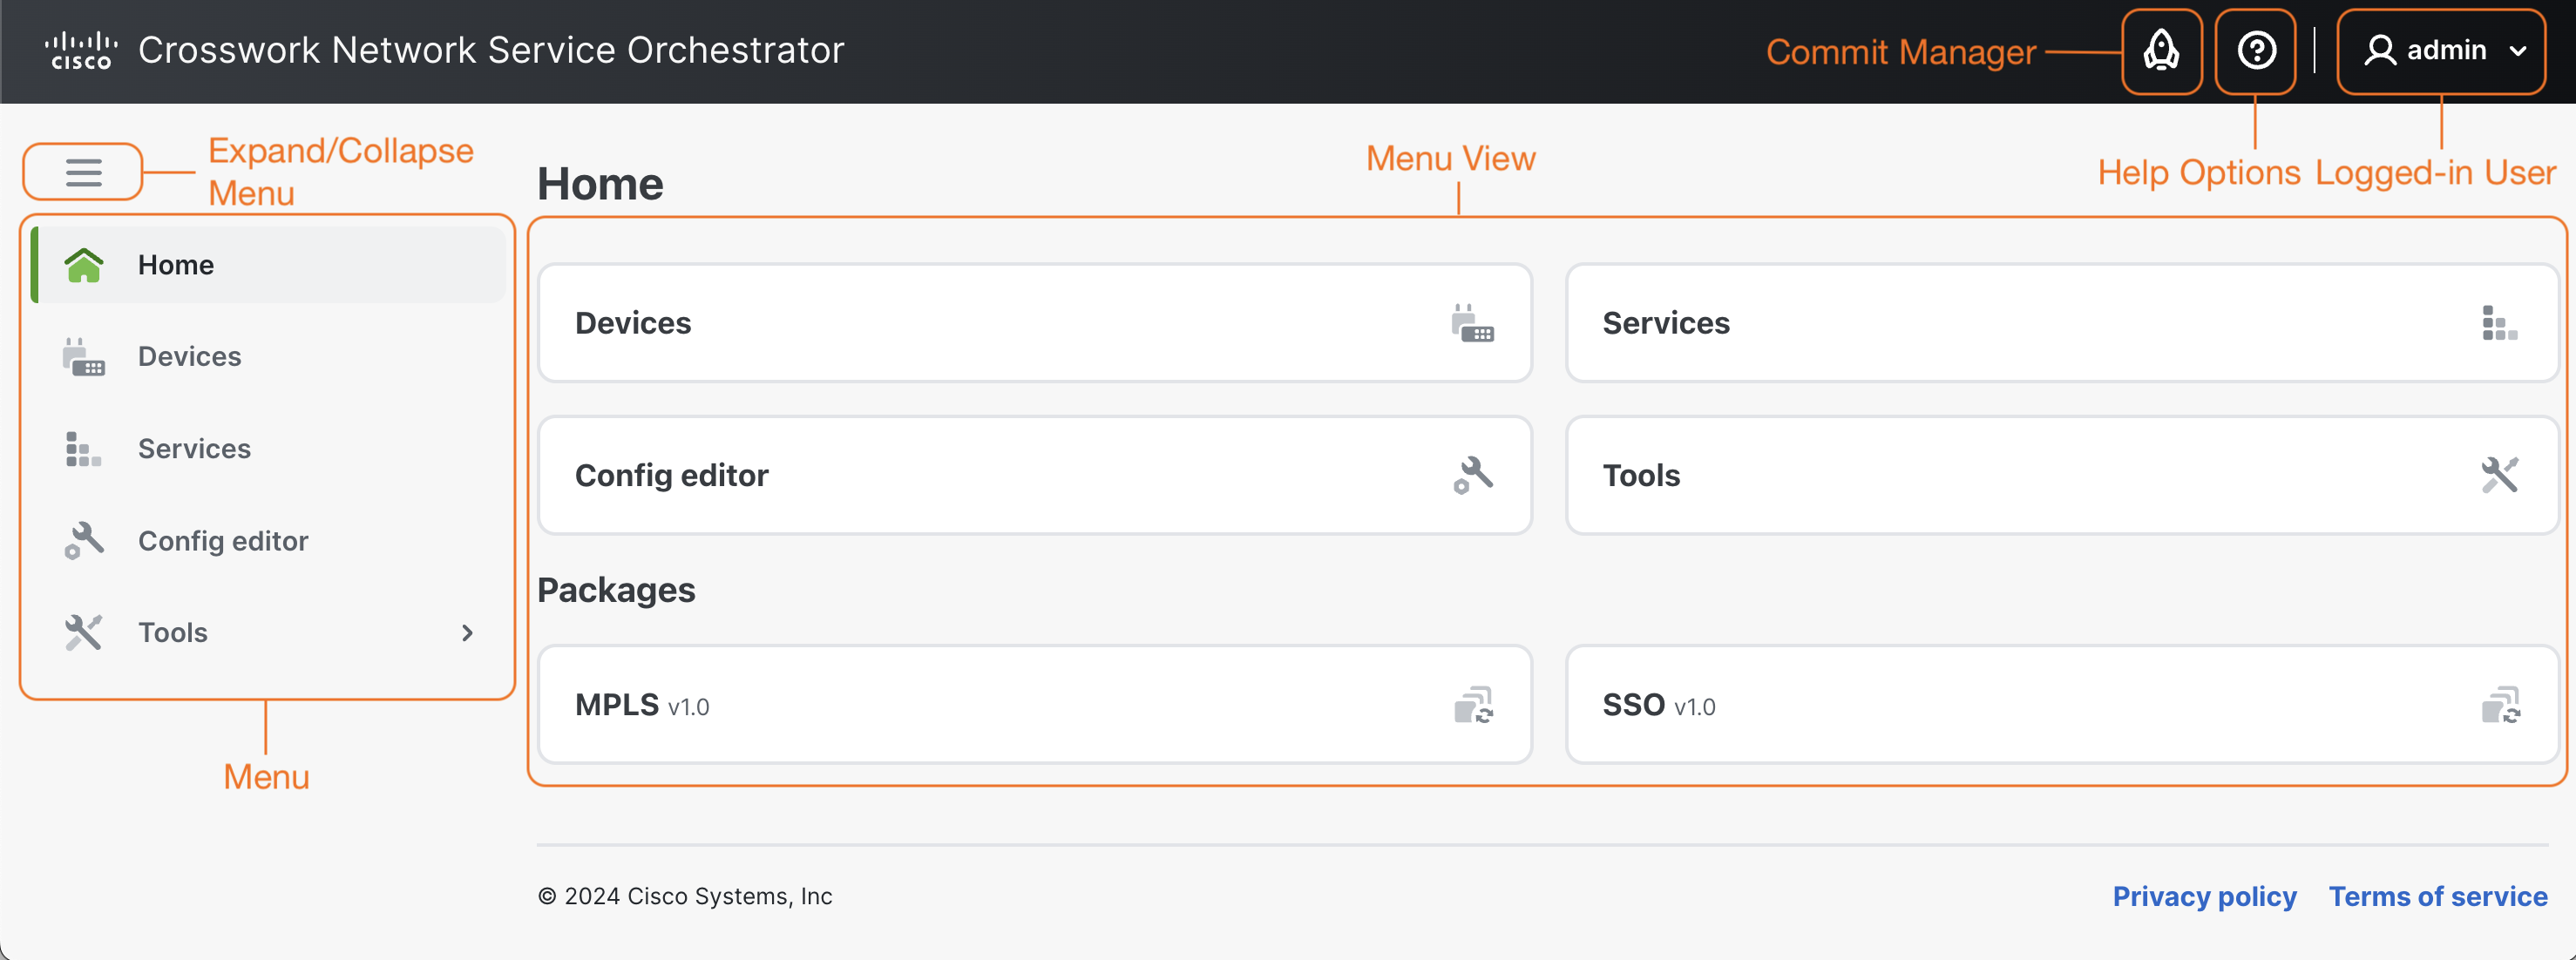
The NSO Web UI provides an intuitive northbound interface to your NSO deployment. The UI consists of individual views, each with a different purpose, such as device management, service management, commit handling, etc.
The main components of the Web UI are shown in the figure below.
The UI works by auto-rendering the underlying device and service models. This gives the benefit that the Web UI is immediately updated when new devices or services are added to the system. For example, say you have added support for a new device vendor. Then, without any programming requirements, the NSO Web UI provides the capability to configure those devices.
It's important to realize that the bulk of concepts and configuration options in Web UI are shared with the NSO CLI. The rest of the documentation covers these in detail. You need to be familiar with the fundamental concepts to work with the Web UI.
All modern web browsers are supported and no plug-ins are needed. The interface itself is a JavaScript Client.
By default, the Web UI is accessible on port 8080 of the NSO server for an NSO Local Install and port 8888 for a System
Install. The port can be changed in the ncs.conf file. A user must authenticate before accessing the (web) UI.
Log In
Log in to the NSO Web UI by using the username and password provided by your administrator. SSO SAML login is available if set up by your administrator. If applicable, use the SSO option to log in.
Log Out
Log out by clicking your username on the top-right corner and choosing .
Help Options
Access the help options by clicking the help
![]() icon. The following options are available:
icon. The following options are available:
-
: Access the Web UI's online help.
-
: Access help on using the configuration editor.
-
: Administer hidden groups, e.g. for debugging. Read more about hide groups in NSO CLI .
-
: Information about the version of NSO you are running.
In the Web UI, supplementary help text, whenever applicable, is available on the configuration fields and can be accessed by clicking the info icons.
The Commit Manager is accessible at all times from the UI banner. Working with the Commit Manager is further described in the section called “Tools”.
The Home view is the default view after logging in. It provides shortcuts to , , , and .
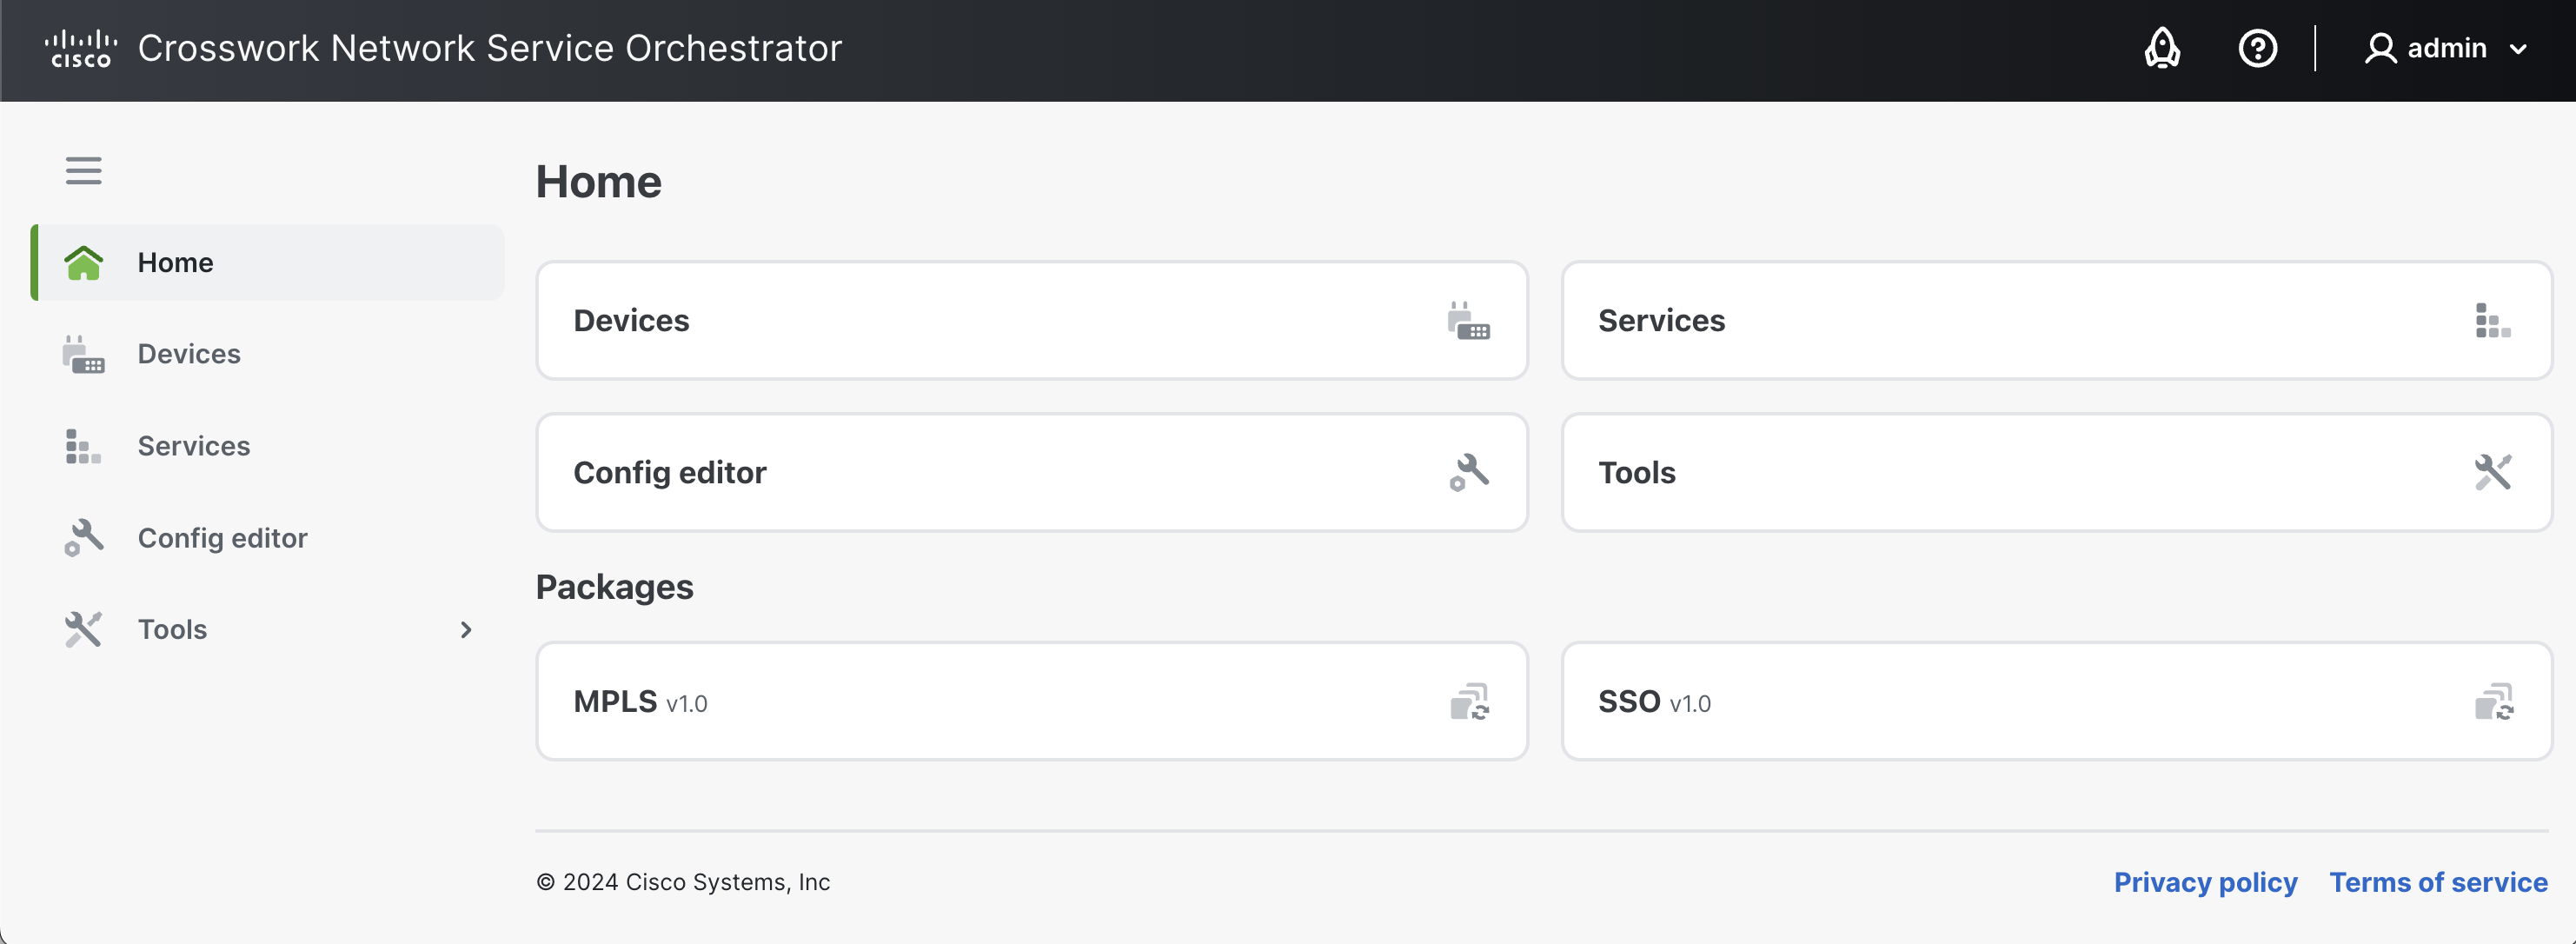
Currently loaded Web UI extension packages are shown in this view under Packages. Web UI packages are used to extend the functionality of your Web UI, for example, to create additional views and functionalities. Examples are creating a view to visualize your MPLS network, etc.
The Devices view provides options to manage devices and device groups in the NSO network.
The Device management view lists the devices in the network and provides options to manage them.
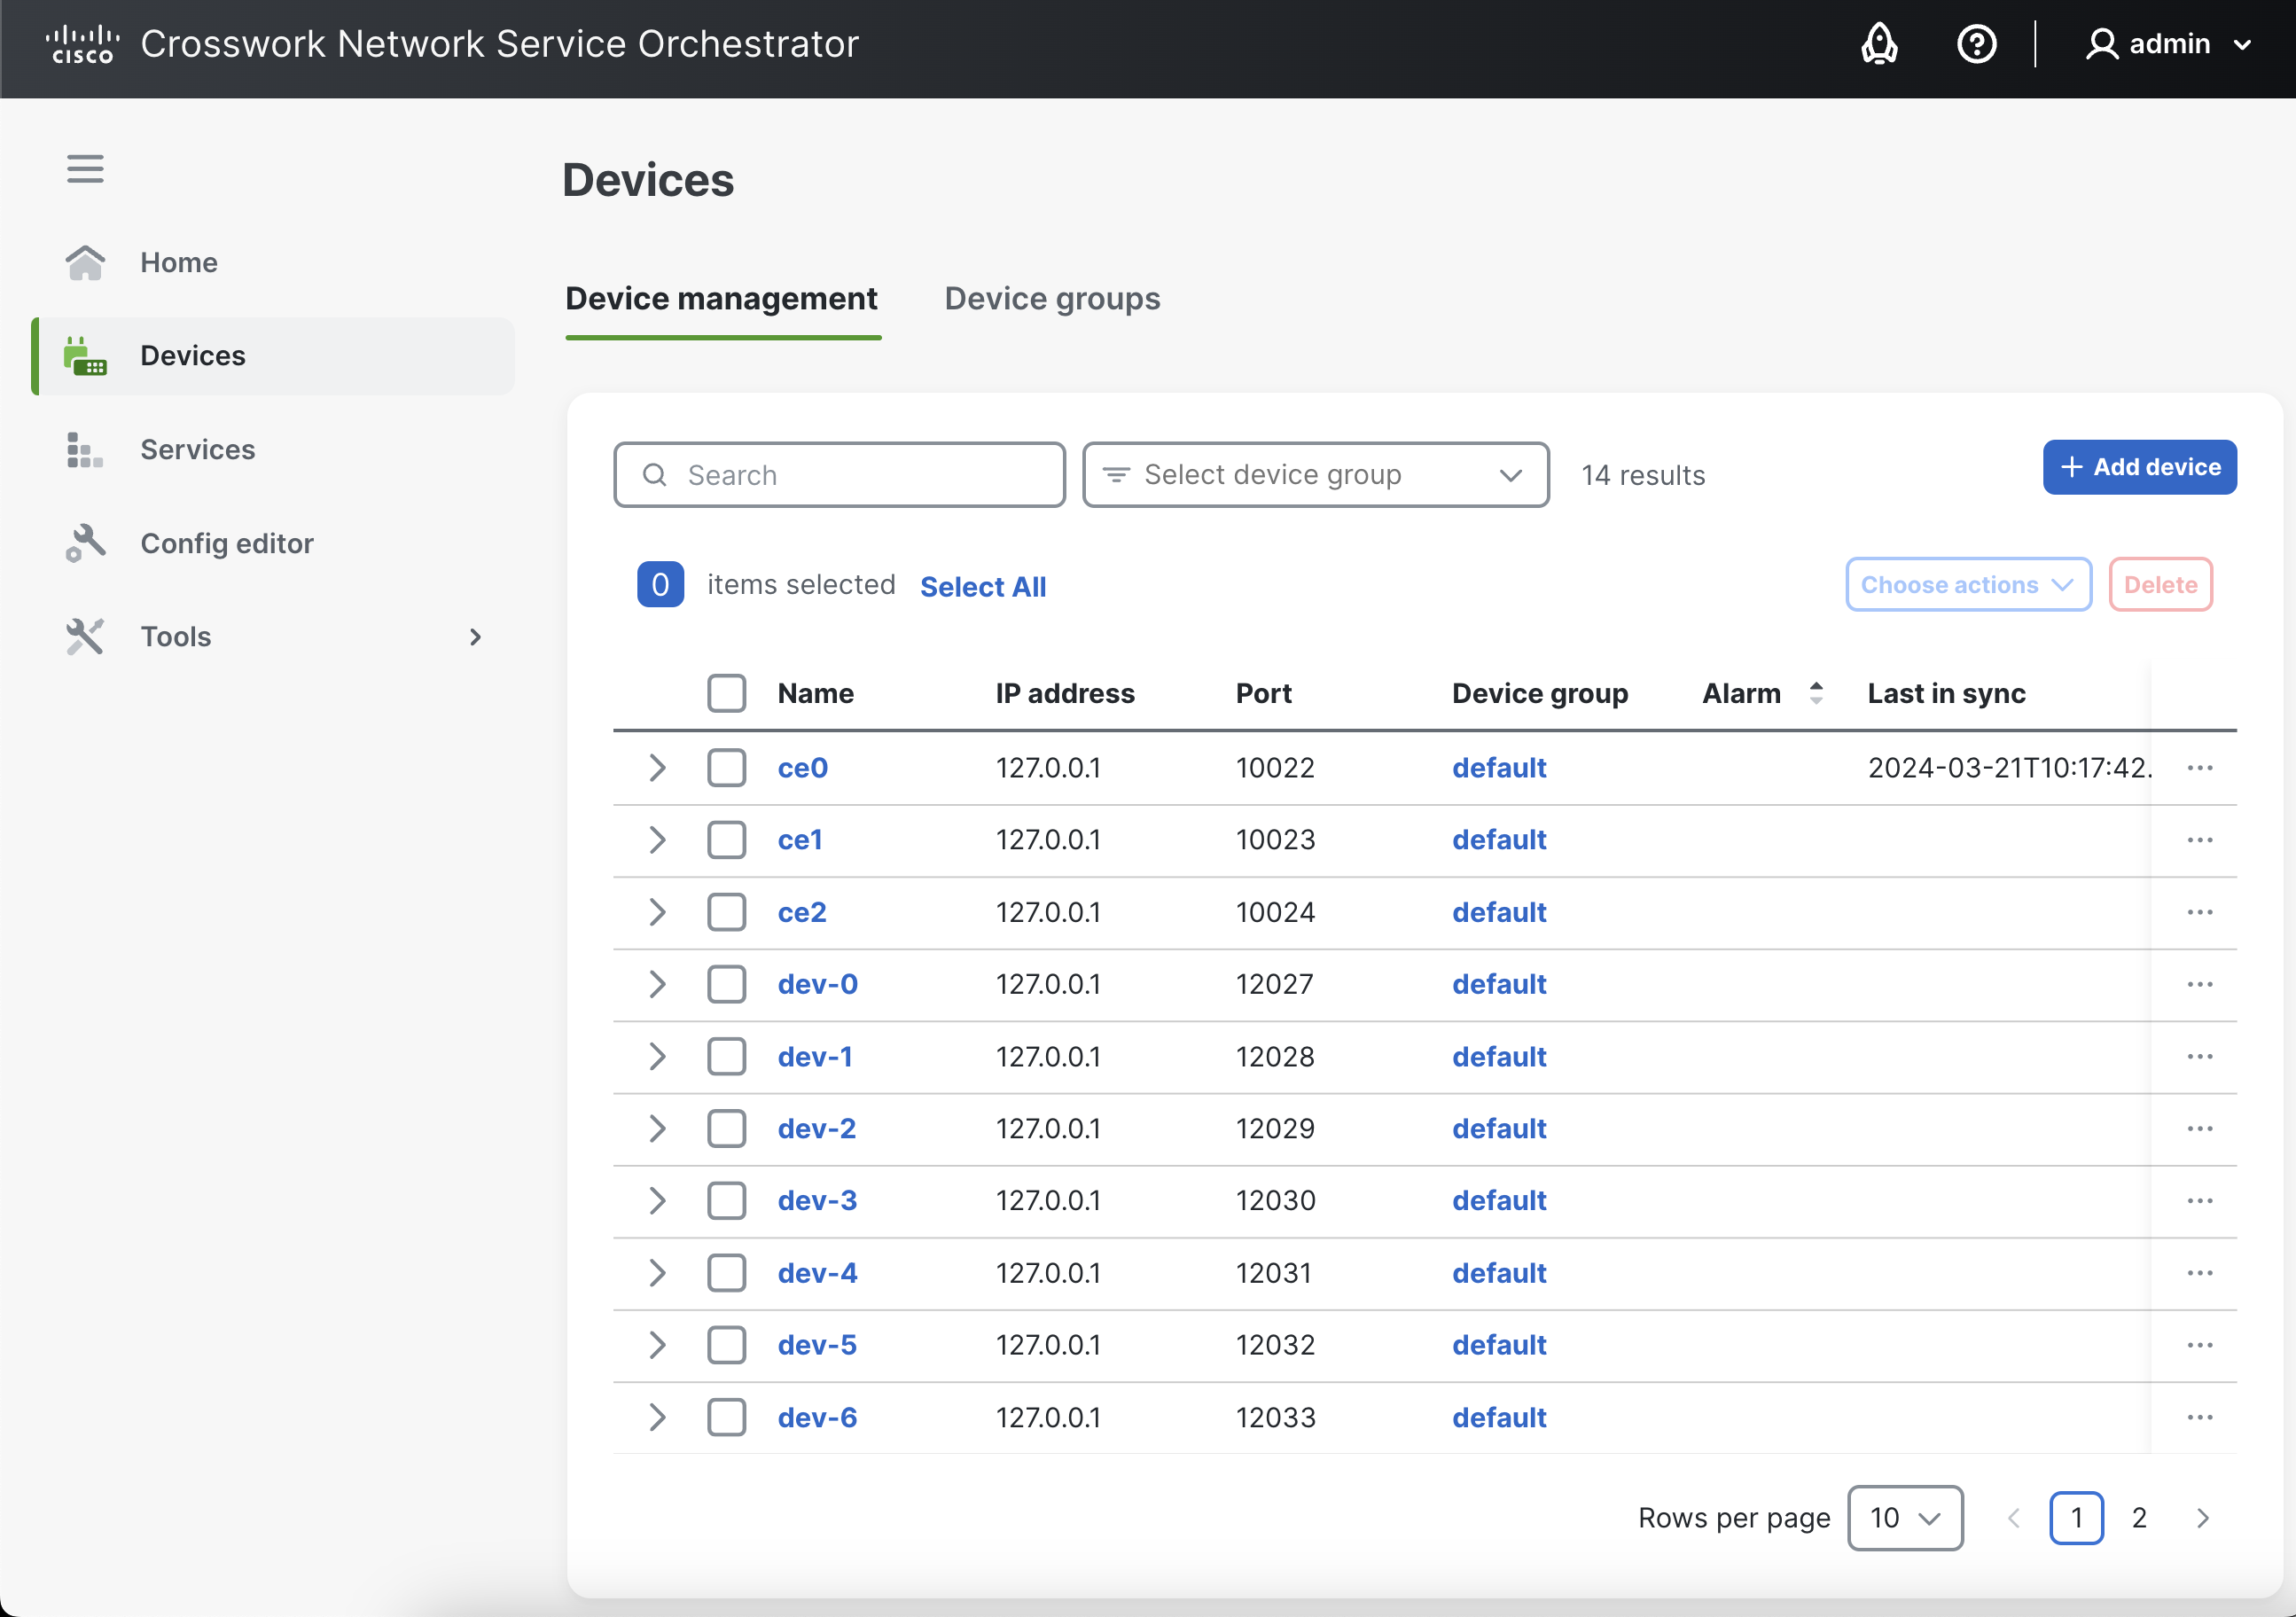
You can search for a device by its name, IP address, or other parameters. It is also possible to narrow down the results using the Select device group filter.
-
Click .
-
In the Add device pop-up, specify the device name.
-
Click .
-
Configure the specifics of the device in the Configuration editor.
-
Review and commit the changes in the Commit manager when done.
Actions can be applied on a device from the Device Management view or the Configuration Editor.
From the Device Management View
An action can be applied to a single or multiple devices at once.
-
Select the desired device(s) from the list.
-
Using the button, select the desired action. The result of the action is returned immediately.
Note
In the Device management view, you can also apply actions on a device using the more
![]() button.
button.
Actions Possible in the Device Management View
Available actions include:
-
Connect
-
Ping
-
Sync from
-
Sync to
-
Check sync
-
Compare config
-
Fetch ssh host keys
-
Apply template
-
Modify in Config editor (available using the more
 button on the device row)
-
Delete (available using the more
button on the device row)
See Life-cycle Operations - Manipulating Existing Services and Devices for the details of these actions.
From the Configuration Editor -> Actions Tab
Additional actions are applied per individual device. Use this option if you want to run an action with additional parameters.
-
Click the device name in the list.
-
Access the Actions tab in the Configuration editor.
-
Click the desired action in the list.
-
At this point, you can configure different parameters.
(To reset all the parameters to their default value, use the option).
-
Run the action.
Note
To fetch information about an action in the Configuration editor -> Actions tab, click the info
![]() icon.
icon.
Actions Possible in the Configuration Editor -> Actions Tab
If you access the device in the Configuration editor, the following additional actions are available.
See Life-cycle Operations - Manipulating Existing Services and Devices for the details of these actions.
-
In the Devices view, click the desired device from the list.
-
In the Configuration editor, click the Edit config tab.
-
Make the desired changes.
(Press Enter to save the changes. An uncommitted change in a field's value is marked by a green color, and is referred to as a 'dirty state').
-
Review and commit the change in the Commit manager.
Note
The other two tabs, i.e., Config and Operdata can be respectively used to:
-
View the device configuration, and,
-
View the device's operational data.
The Device groups view lists all the available groups and devices belonging to them. You can add new device groups in this view as well as carry out actions on devices belonging to a group.
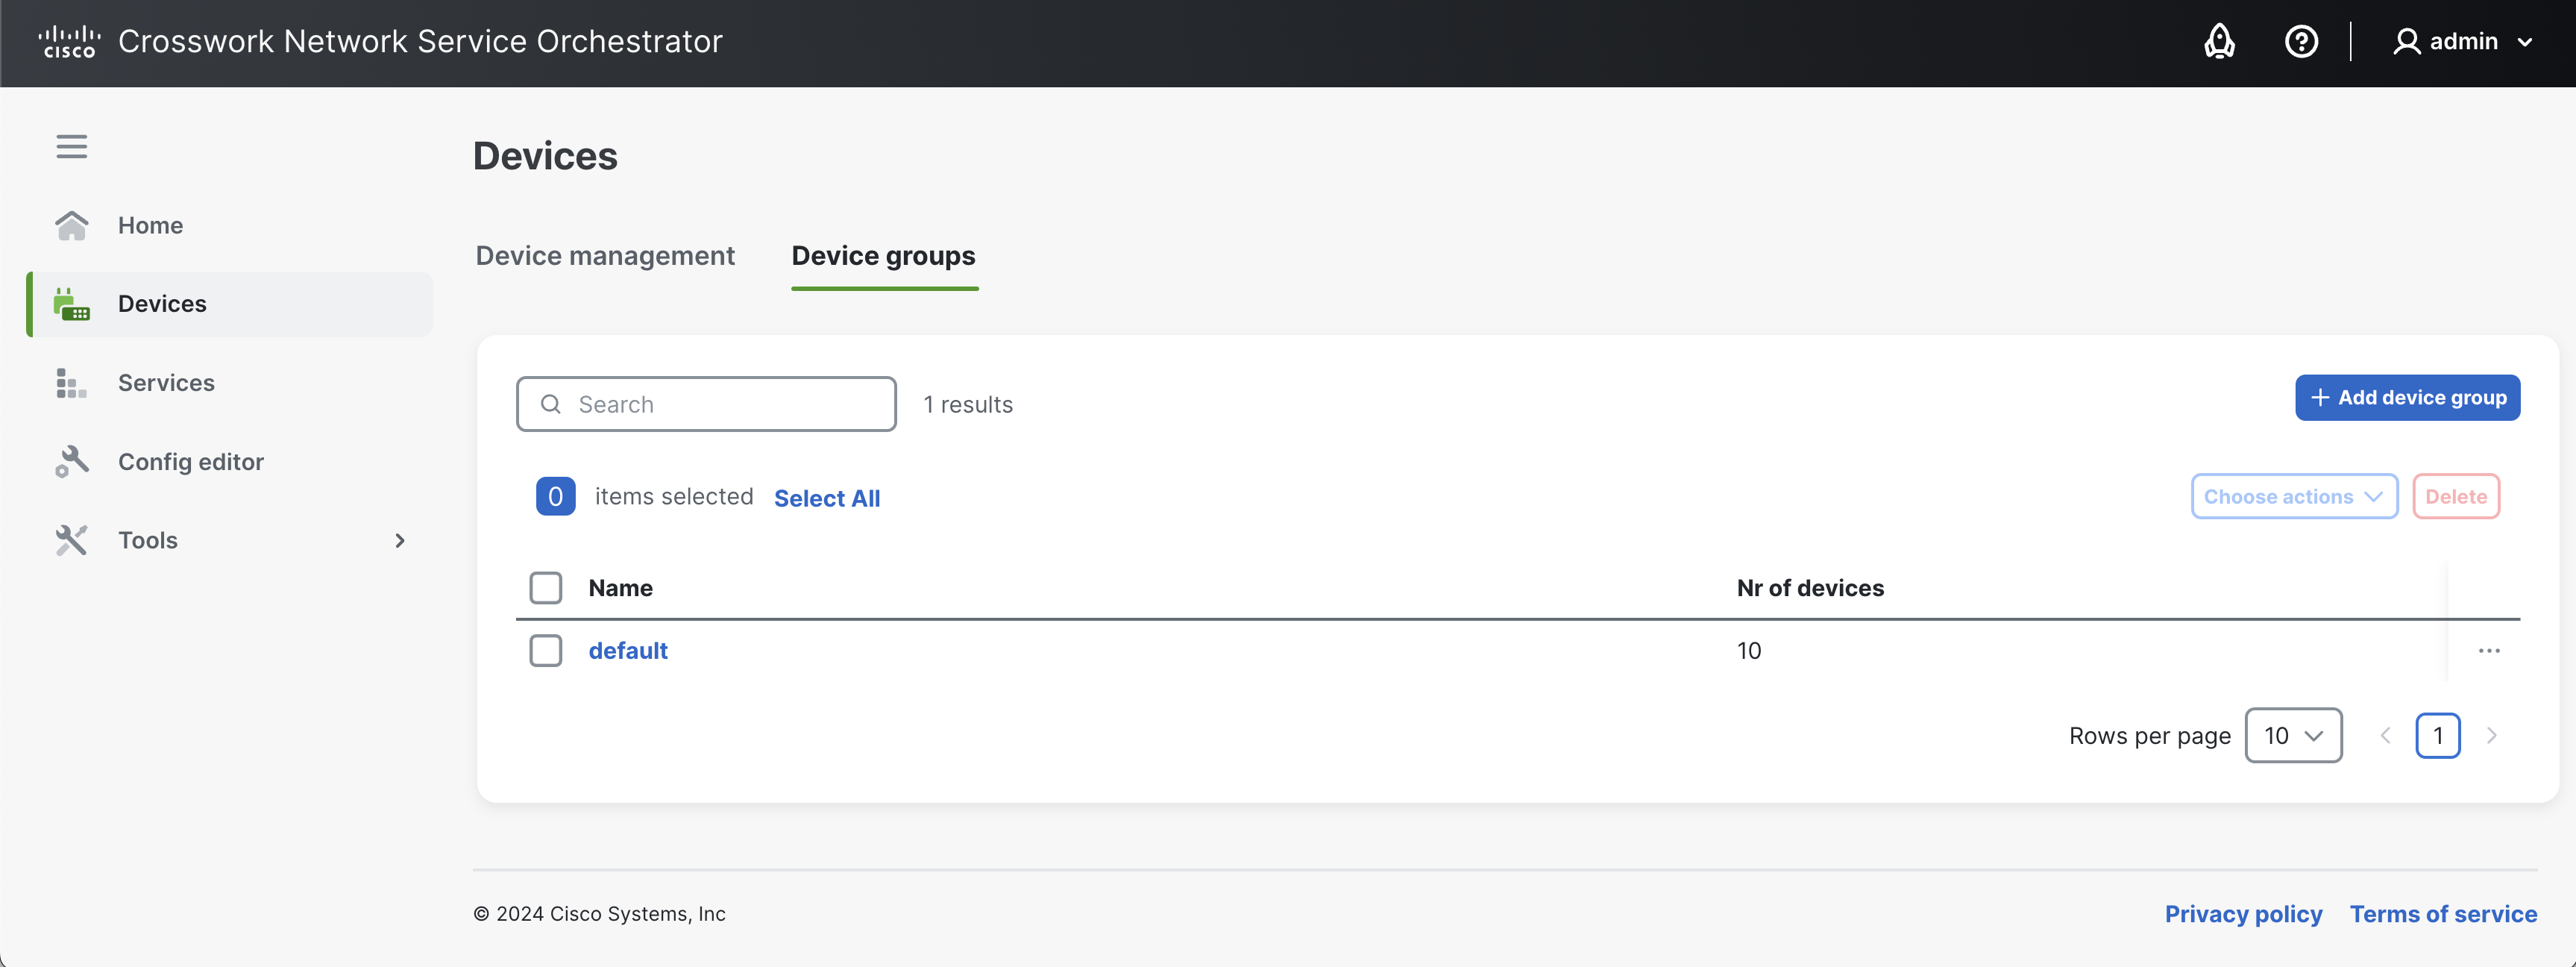
Device groups allow for the grouping and collective management of devices.
-
Click .
-
In the pop-up, specify the group name. If you want to place the new device group under a parent group, select the Place under parent device group option and specify the parent group.
-
Click . You will be redirected to the group's details page. Here, the following panes are available:
-
Details: Displays basic details of the group, i.e., its name and parent/sub groups information. To link a sub-group, use the Connect sub device group option.
-
Devices in this group: Displays currently added devices in the group and provides the option to remove them from the group.
-
Add devices: Displays all available NSO devices and provides the option to add them to the group.
-
-
In the Add devices pane, select the device(s) that you want to add to the new group and click . The added devices become visible under the Devices in this group pane.
-
Finally, click .
-
Click the desired device group to access the group's detail page.
-
In the Devices in this group pane, select the device(s) to be removed from the group.
-
Click . The devices are removed immediately (without a Commit Manager review).
-
Click .
Device group actions let you perform an action on all the devices belonging to a group.
-
Select the desired device group from the list. It is possible to select multiple groups at once.
-
Choose the desired action from the button.
Note
In the Device groups view, you can also apply actions on a device group using the more
![]() button.
button.
Actions Possible in the Device Groups View
The available group actions are the same as in the section called “Apply an Action on a Device” (e.g., Connect, Sync from, Sync to, etc.) and are described in Life-cycle Operations - Manipulating Existing Services and Devices .
The Modify in Config editor option is accessible by clicking the more options
![]() button on a device group.
button on a device group.
The Service manager view is where you create, deploy, and manage services in your NSO deployment. Available services are displayed in this view by default.
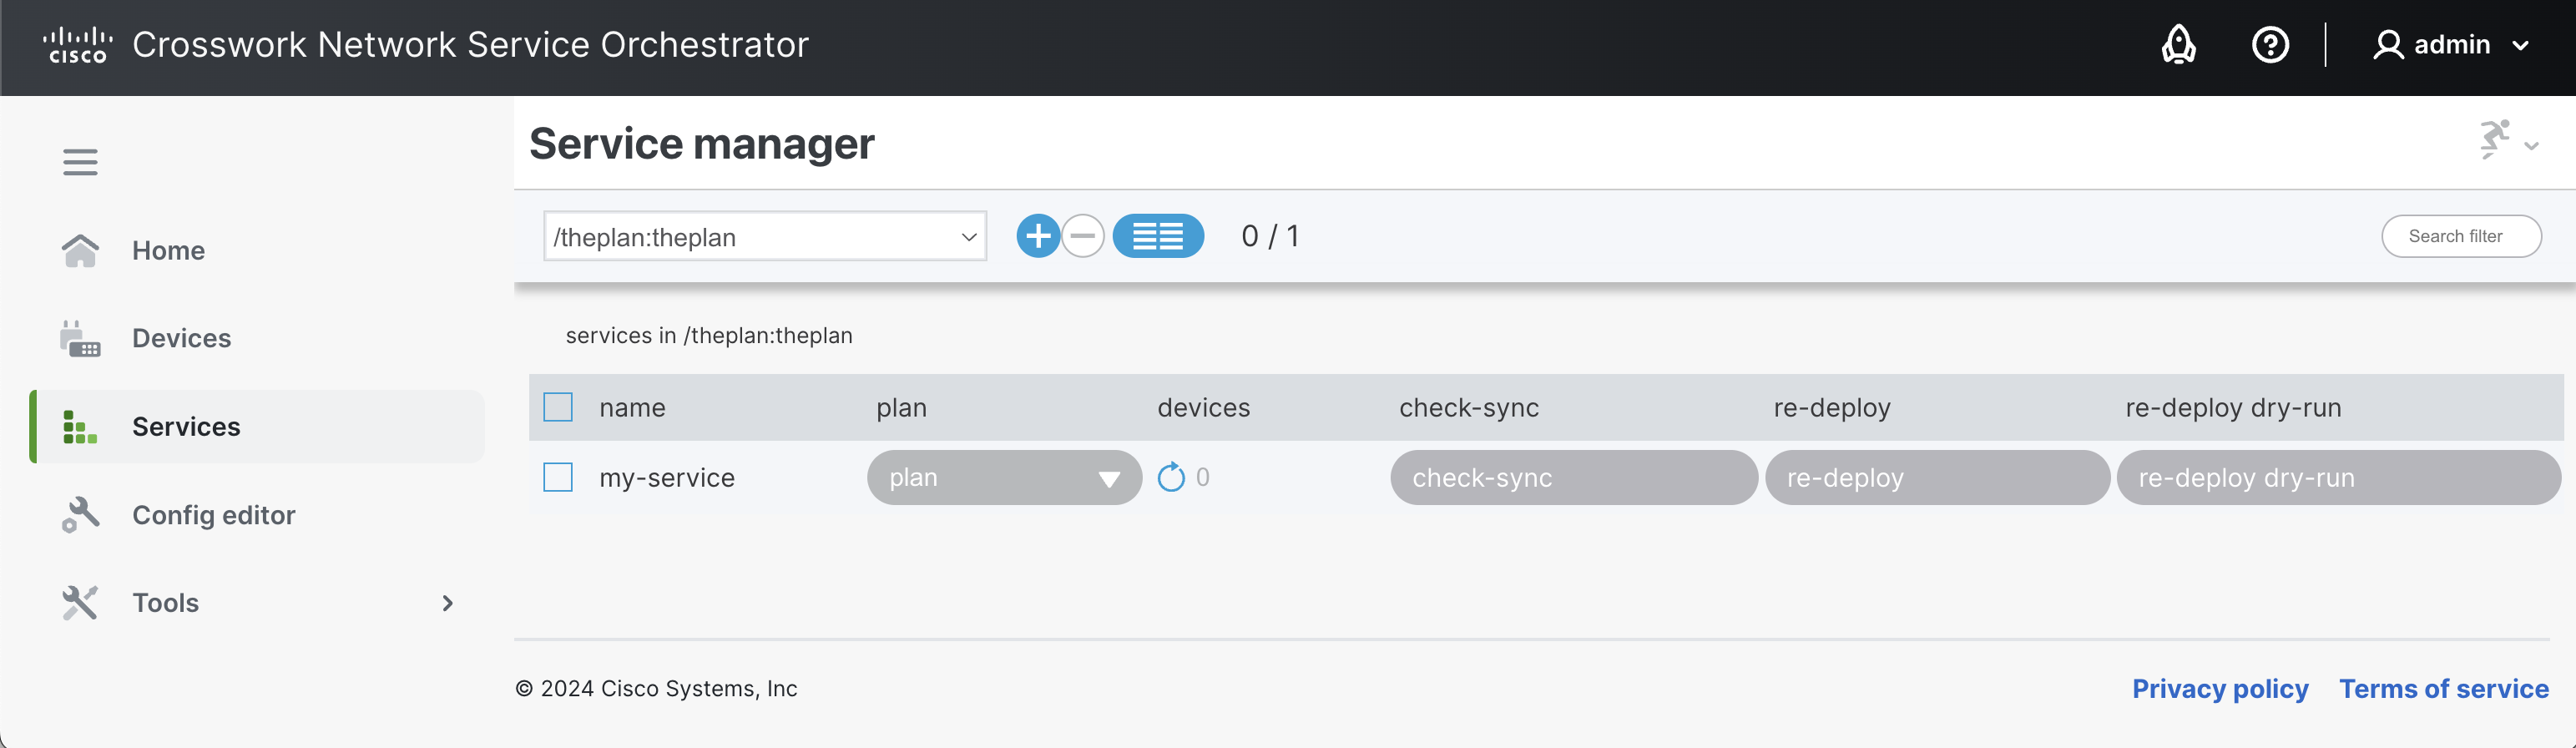
Columns in the Services List
-
name: The name of the service.
-
plan: Shows the service plan.
-
devices: Shows the number of devices associated with the service. Use the refresh
 button to reload the devices list.
-
check-sync, re-deploy, and re-deploy dry-run denote the actions that you can perform on a service.
Hide and display the columns of your choice by using the column selection
![]() icon.
icon.
If you have several services configured, you can use the Search filter to filter down results to the services(s) of your choice. The search filter matches the entered characters to the service name and shows the results accordingly. Results are shown only for the service point that you have selected.
To filter the service list:
-
Select the desired service point from the list to populate all the services under it.
-
Enter a partial or full name of the service you are searching for.
-
Press Enter.
-
In the Select service point drop-down list, select a service point.
-
Click the plus
 button.
-
In the Create service pop-up, enter the name of the service.
-
Confirm the intent.
-
Review and commit the service to NSO in the Commit manager.
You can apply actions on an existing service from the Service manager view or the Configuration editor. Start by selecting a service point to populate all services under it, and then follow the instructions below.
From the Service Manager View
You can apply an action on a single service or multiple services at once.
To apply an action on a service:
-
On the desired service in the list, click the action button (i.e., , , or ).
To apply an action on multiple services:
-
Select the desired services from the list.
-
Using the
 button, select the desired service action.
-
Confirm the intent.
Actions Possible in the Service Manager View
Available actions include:
See Life-cycle Operations - Manipulating Existing Services and Devices for the details of these actions.
Note
Action Result
The result of running a basic action is displayed using one of the following colors:
-
A red button color means that the action was unsuccessful.
-
A green button color means that the action was successful.
Expand the button further to get more information about the result.
From the Configuration Editor -> Actions Tab
Additional actions are applied per individual service. Use this option if you want to run an action with additional parameters.
-
Click the service name in the list.
-
Access the Actions tab in the Configuration editor.
-
Click the desired action in the list.
-
At this point, you can configure different parameters.
(Use the option to reset all parameters to default value).
-
Run the action.
Note
Fetch the action information by clicking the info
![]() icon in the
Configuration editor -> Actions tab.
icon in the
Configuration editor -> Actions tab.
Actions Possible in the Configuration Editor -> Actions Tab
Access the service in the Configuration editor to run the following actions:
See Life-cycle Operations - Manipulating Existing Services and Devices for the details of these actions.
Service configuration is viewed and carried out in the Configuration Editor.
Note
The Configuration editor shows a host of options when configuring a service. You are expected to be well-versed with these options (and service concepts in general) before you delve into service configuration. Refer to Developing a Simple Service in Development Guide for more information.
To start configuring a service:
-
Click the service name in the list.
-
In the Configuration editor, access the Edit config tab to make changes to the service.
-
Commit the changes in the Commit manager.
Note
The other two tabs, i.e., Config and Operdata can be respectively used to:
-
View the service configuration, and,
-
View the service's operational data.
-
In the services list, click the service that you want to delete. You can select multiple services.
-
Click the minus
 button.
-
Review and commit the change in the Commit manager.
The Configuration editor view is where you view and manage aspects of your NSO deployment using the underlying YANG model, for example, to configure devices, services, packages, etc.

The Configuration Editor's home page shows all the currently loaded YANG modules in NSO, i.e., the database schema. You can also browse and manage the configuration defined by the YANG modules in this view.
All NSO configuration is performed in this view. You can edit the configuration data defined YANG model directly in this view or get directed by the Web UI to this view.
An important component of Configuration Editor is the Configuration Navigator which you can use to traverse and edit
the configuration defined by the YANG model in a hierarchical tree-like fashion. This provides an efficient way to browse
and configure aspects of NSO. Let's say, for example, you want to access all the devices in your deployment and choose a specific
one to view and configure. In the Configuration Editor, you can do this by typing in ncs-devices in the navigator, and then choosing further guided options (automatically suggested by the Web UI), e.g., ncs-devices/device/ce0/config/....

Using the Configuration Navigator
As you navigate through the Web UI, the Configuration Navigator automatically displays and updates the path you are located at.
-
To exit back to the home page from another path, click the home
 button.
-
Click the up arrow
 to go back one step to the parent node.
-
To fetch information about a property/component, click the info
 button.
-
Use the TAB key to complete the config path.
When accessing an item (e.g., a device, service, etc.) using the Configuration Editor, the following tabs are visible:
-
Edit Config tab, to configure the item's configuration.
-
Config tab, to view configured items.
-
Operdata tab, to view the operational data relevant to the item (e.g., last sync time, last modified time, etc).
-
Actions tab, to apply an action to the item with specified options/parameters.
Depending on the selection of the above-mentioned tabs, you may see four additional tabs in the Configuration editor view:
-
Widgets tab, to view the data defined by YANG modules in different formats.
-
None tab.
-
Containers tab, to view container-specific information from the YANG model.
-
List tab, to view list-specific information from the YANG model.
The Tools view offers individual utilities that you can use to run specific tasks on your deployment, such as running compliance reports, etc.
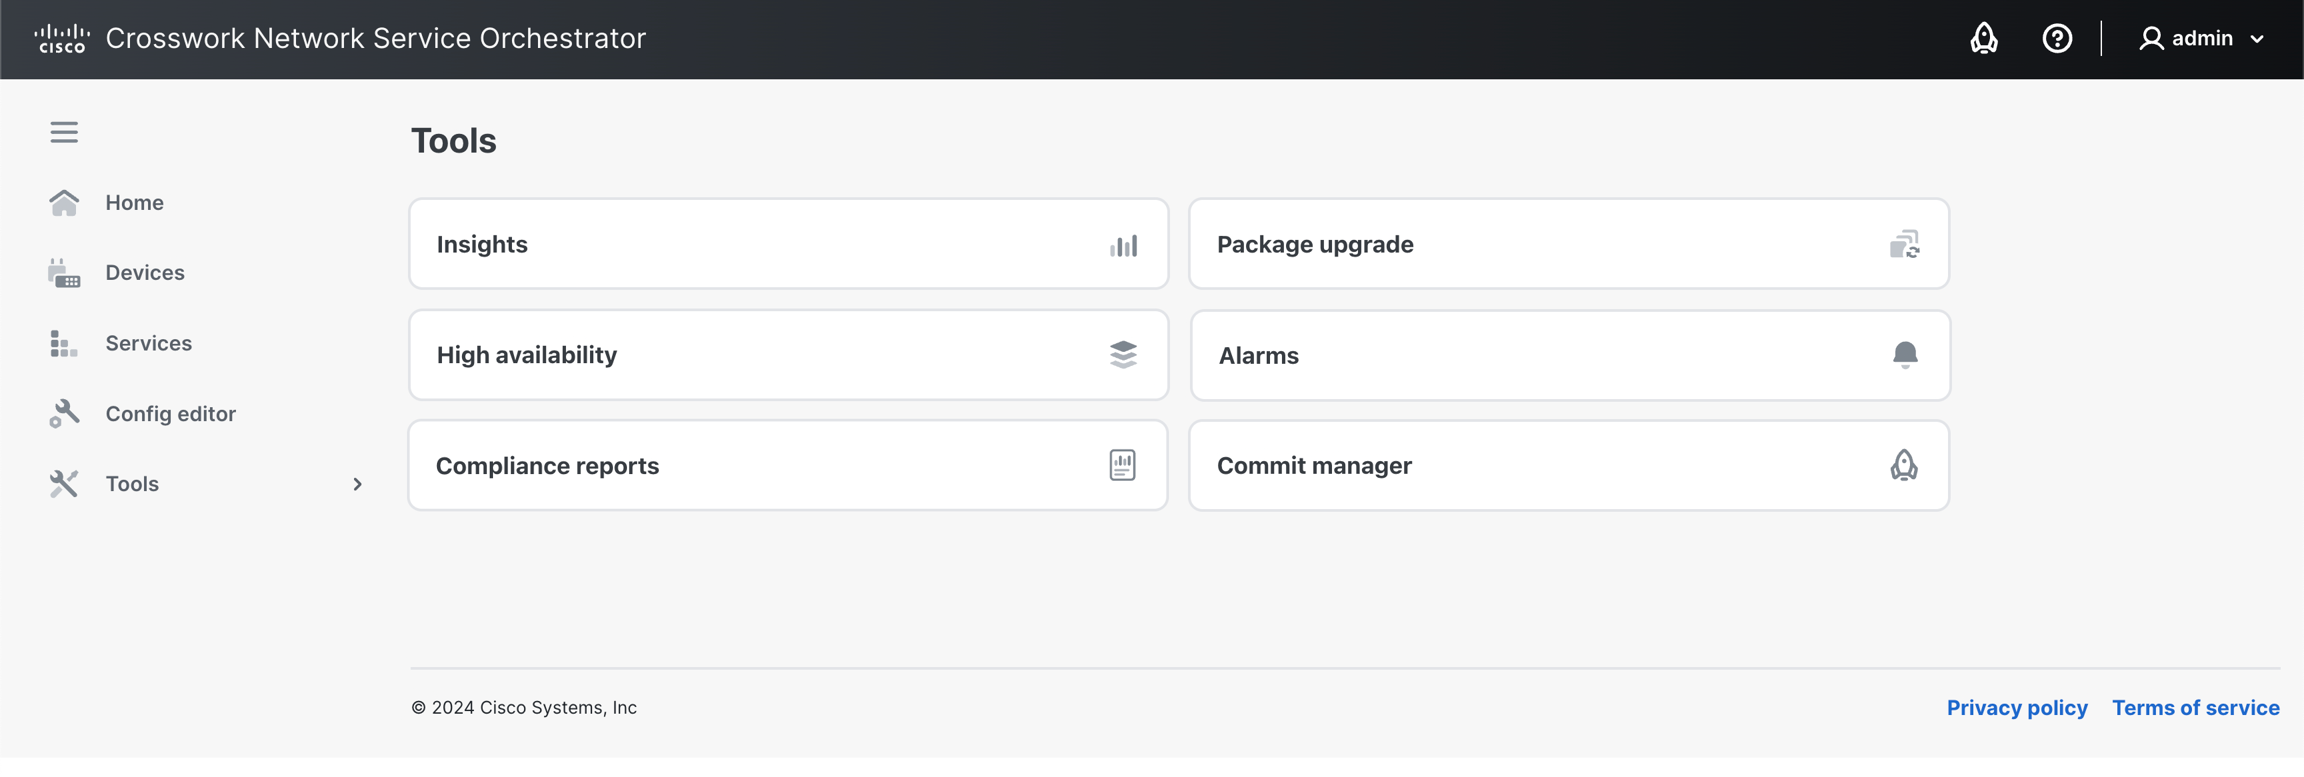
The following tools are available:
-
: Gathers and displays useful statistics of your deployment.
-
: Used to perform upgrades to the packages running in NSO.
-
: Used to manage a High Availability (HA) setup in your deployment.
-
: Shows current alarms/events in your deployment and provides options to manage them.
-
: Shortcut to the Commit Manager.
-
: Used to run compliance checks on your NSO network.
The Insights view collects and displays the following types of operational information using the /ncs:metrics data model to present useful statistics:
-
Real-time data about transactions, commit queues, and northbound sessions.
-
Sessions created and closed towards northbound interfaces since the last restart (CLI, JSON-RPC, NETCONF, RESTCONF, SNMP).
-
Transactions since last restart (committed, aborted, and conflicting). You can select between the running and operational data stores.
-
Devices and their sync statuses.
-
CDB info about its size, compaction, etc.
In the Package upgrade view, you can load custom packages in NSO.
The button on the Packages pane is the equivalent of the packages reload command in CLI. Read more about the reload action in NSO Packages.
-
In the Package upgrade view, click to select a new package (
.tar) from your local disk. -
Click . The package becomes visible under the Available pane.
(The Progress Trace shows the real-time progress of the upload).
-
Click .
-
On the Loaded pane, click and confirm the intent.
-
To uninstall a package, simply click next to the package in the Loaded packages list.
The High Availability view is used to visualize your HA setup (rule-based or Raft).
Actions can be performed on the cluster using the Configuration editor -> Actions tab. Possible actions are further described in High Availability in Administration Guide (see the section called Actions).
The Alarm manager view displays current alarms in the system. The alarms are categorized as criticals, majors, and minors and can be filtered by device.
You can run actions on an alarm by selecting it and using the
![]() button.
button.
The Commit manager displays notifications about commits pending to be approved. Any time a change (a transaction) is made in NSO, the Commit Manager displays a notification to review the change. You can then choose to confirm or revert the commit.
Note
Transactions and Commits
Take special note of the Commit Manager. Whenever a transaction has started, the active configuration data changes can be inspected and evaluated before they are committed and pushed to the network. The data is saved to the NSO datastore and pushed to the network when a user presses .
Any network-wide configuration change can be picked up as a rollback file. The rollback can then be applied to undo whatever happened to the network.
-
Access the Commit Manager by clicking its icon
 in the banner.
-
Review the available changes appearing as Current transaction. If there are errors in the change, the Commit Manager alerts you and suggests possible corrections. You can then fix them and press to clear the errors.
-
Click to undo or to confirm the changes in the transaction.
-
Commit Options: When committing a transaction, you have the possibility to choose Commit options and perform a commit with the specified commit option(s). Examples of commit options are: No revision drop, No deploy, No networking, etc. Commit options are described in detail in the section called “Methods - transaction - commit changes” in Web UI.
-
Note
In the Commit manager view, you can fetch additional information about the leaf by enabling
![]() and clicking the info
and clicking the info
![]() button.
button.
Load/Save Configuration Data
Start a transaction to load or save configuration data using the option which you can then review for commit. The following tabs are available:
-
Rollback, to load data that reverts an earlier change.
-
Files, to load data from a local file on your disk.
-
Paste, to load data by pasting it in.
-
Save, to save loaded data to a file on your local disk.
Commit Manager Tabs
In the Commit manager view, the following tabs are shown.
-
changes tab, to list the changes and actions done in the system, e.g., deleting a device or changing its properties.
-
errors tab, to list the errors encountered while doing changes. You can review the errors, make changes, and revalidate the error using the option.
-
warnings tab, to list the warnings encountered while doing changes.
-
config tab, to list the configuration changes associated with the change.
-
native config tab, to list the device configuration data in the native config.
-
commit queue tab, to manage commit queues. See the section called “Commit Queue” for more information.
The Compliance reporting view is used to create and run compliance reports to check the current situation, check historic events, or both. The recommended and preferred way of running the compliance reports is through the Web UI.
The following main tabs are available in this view:
-
Compliance reports, to create, run, manage, and view existing compliance reports.
-
Report results, to view report results and compliance report status.
-
In the Compliance reporting view, click
.
-
In the New report pop-up, enter the report name and confirm.
-
Next, set up the compliance report using the following tabs. For a more detailed description of Compliance Reporting concepts and related configuration options, see Life-cycle Operations - Manipulating Existing Services and Devices documentation.
-
General tab: to configure the report name. Configuration options include:
- Report name: Displays the report name and allows editing of the report name.
-
Devices tab: to configure device compliance checks. Configuration options include:
- Current out of sync: Check the device's current status and report if the device is in sync or out of sync. Possible values are true (yes, request a check-sync) and false (no, do not request a check-sync).
- Historic changes: Include or exclude previous changes to devices using the commit log. Possible values are true (yes, include), and false (no, exclude).
- Device choice: Include All devices or only Some devices. If Some devices is selected, specify the devices using an XPath expression, device groups, or devices.
- Compliance templates: If a compliance template should be used to check for compliance. See the section called “Device configuration checks”.
-
Services tab: to configure service compliance checks. Configuration options include:
- Current out of sync: Check the service's current status and report if the service is in sync or out of sync. Possible values are true (yes, request a check-sync) and false (no, do not request a check-sync).
- Historic changes: Include or exclude previous changes to services using the commit log. Possible values are true (yes, include), and false (no, exclude).
- Service choice: Include All services or only Some services. If Some services is selected, specify the services using an XPath expression or service instances.
-
-
Click when the report setup is complete.
-
In the Compliance reports tab, click the button on the desired report.
-
Specify the following:
-
Report title
-
Historical time interval. The report runs with the maximum possible interval if you do not specify an interval.
-
-
Click Run report.
The report's results, available from the Report results tab, show if the report was compliant or has violations. Click to fetch additional details.