Hello World!
Follow this guide if you're a new user looking to walk-through your first sandbox and get access to Cisco technology! This guide is broken down into two sections - reservation-based and always-on sandboxes.
We recommend you start with a reservation sandbox.
Reservation Hello World
Visit https://developer.cisco.com/sandbox and press the "Get started with Sandbox" button to view our catalog.
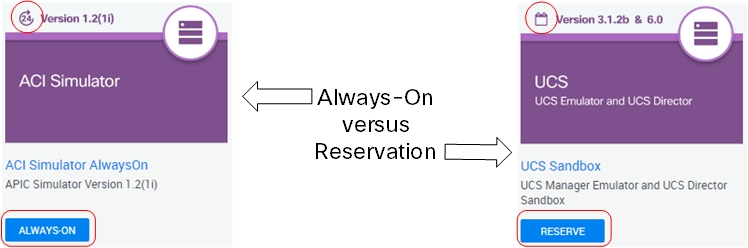
The catalog shows all of the sandboxes that are currently available. Notice each Sandbox has "Reserve" or "Always-On" buttons indicating type.
Let's try Collaboration 11.5 for this walk-through. In the top left, enter "Collaboration 11.5" in the search bar.
On the Collaboration 11.5 sandbox, select the "Reserve" button.
Setup the fields in in the window to the following:
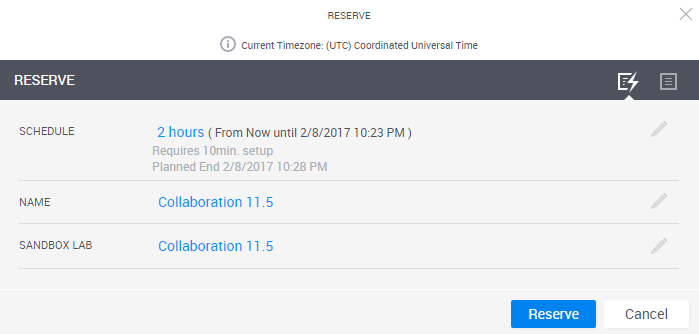
The most important part of this window is the reservation duration (default 2 hours) and start time (default "now".) Reservations can be set up to 7 days in total. Feel free to play around with these values, but for this example the defaults suit us.
Press the "Reserve" button
During this time setup is occurring. Our automation is preparing your sandbox for action! For the Collaboration 11 sandbox, this normally takes about 15 minutes. Maybe a good time for a cup of coffee?
Check your inbox for the "Your DevNet Sandbox Lab is Ready" email from devnetsandbox@cisco.com. This email will have the VPN credentials for your sandbox.
Next, install Cisco AnyConnect.
Start AnyConnect, and input the VPN credentials that you got from Step 6. Press "Connect."
You may be prompted with a warning to connect to an unsecured network. This is normal, please proceed.
AnyConnect will look like this when you've successfully established a connection:

Why do we use Virtual Private Network (VPN)? Sandboxes are hosted in the cloud but we leverage Private IP space for consistency. The VPN is a fully encrypted tunnel between your PC/device and the Sandbox. It temporarily modifies your local routing table and sends traffic destined for the Sandbox across the VPN tunnel. This means you access Sandbox servers just like they're sitting on your local network! Want to check out a resource's web interface? Just punch the IP into your browser! Want to RDP to the windows server? Just open a session! Want to call an API? Just make the call! We'll cover that now!
Connect to Sandbox Servers!
Let's try accessing CUCM's web interface with our example collaboration 11.5 Sandbox you've just reserved in the previous steps.
Take a look at your active reservation on the Sandbox's webpages. If you followed the steps above you likely are already there. If not, try this:
- Make sure you're logged into the Sandbox. Go to developer.cisco.com/sandbox
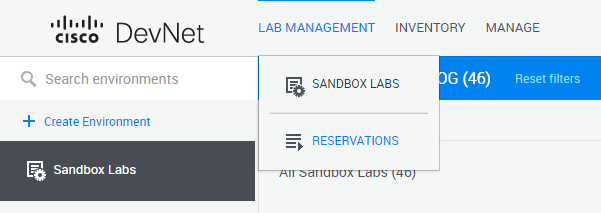
- Once logged into the Sandbox, click on "Lab Management > Reservations" in the top right corner.
- Click on your active Collaboration Reservation to see its topology:

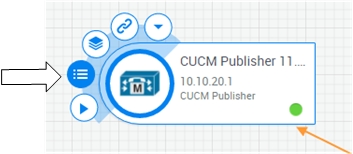
This is the Lab Blueprint (sometimes called a "Blueprint"). It displays servers and resources you're able to access! Locate the resource named "CUCM Publisher 11.5"

On the resource, locate the IP address.
Next hover over the resource and select the "Attributes" button
A window will open on the right side. From there, you can get the administrative username and password for any resource.
Next, open a new tab in a web browser, and type in the IP you found in steps 2 and 3 and press enter.
You will need to accept the self-signed certificate from the server.
Private Sandbox servers generally use self-signed SSL certificates.
Click the link for "Cisco Unified Communications Manager" after accepting the certificate warning.
Enter the credentials from steps 4 and 5 and login. You've now have full, administrative access to CUCM!
You should now understand how to reserve a sandbox, connect to the VPN, and access a resource!
Remember access resources as if they are sitting on your local network (once you're connected to VPN). This rings true for HTTP/s interfaces, Remote Desktop, SSH/Telnet connections, APIs and more! Check out section below.
Getting to know your sandbox
Instructions Panel
The instructions panel is found on the left side of your reservation. In here, you can typically expect to find information about the sandbox, its servers, resources for additional information, and support! Many also include details about what base configuration included for resources and servers in the sandbox. To access the instructions panel:
- Enter your reservation, and press the "Instructions" button located in the top toolbar.
This button is a toggle, which will show and hide this panel.
Output Window
The output window will display live information about the automation in your sandbox. It's a good place to look if you want to find your VPN information, or suspect there may have been errors in the sandbox setup. To view the output window:
- Enter your reservation, and press the "Output" button located in the top toolbar.
This button is a toggle, which will show and hide the window. Please note that you can drag the instructions window around.