This lab guide provides an overview of the Packaged Contact Center Enterprise (PCCE) Cisco DevNet Sandbox lab. It provides basic guidance on some of the functions that can be performed within the PCCE lab. Contact Center is a sizable product with tremendous capabilities and this document is only intended to provide a general entry point to PCCE.
When a Sandbox user reserves a PCCE lab, the environment will be dynamically created and the user will be emailed credentials to establish a VPN connection to access the PCCE lab. Additional details are provided with the introductory email. It’s critical that you establish the required VPN connection before trying to access any of the PCCE devices.
The VMs, Running Software, and Credentials section contains the details of each server in the PCCE lab environment.
PCCE Network Architecture
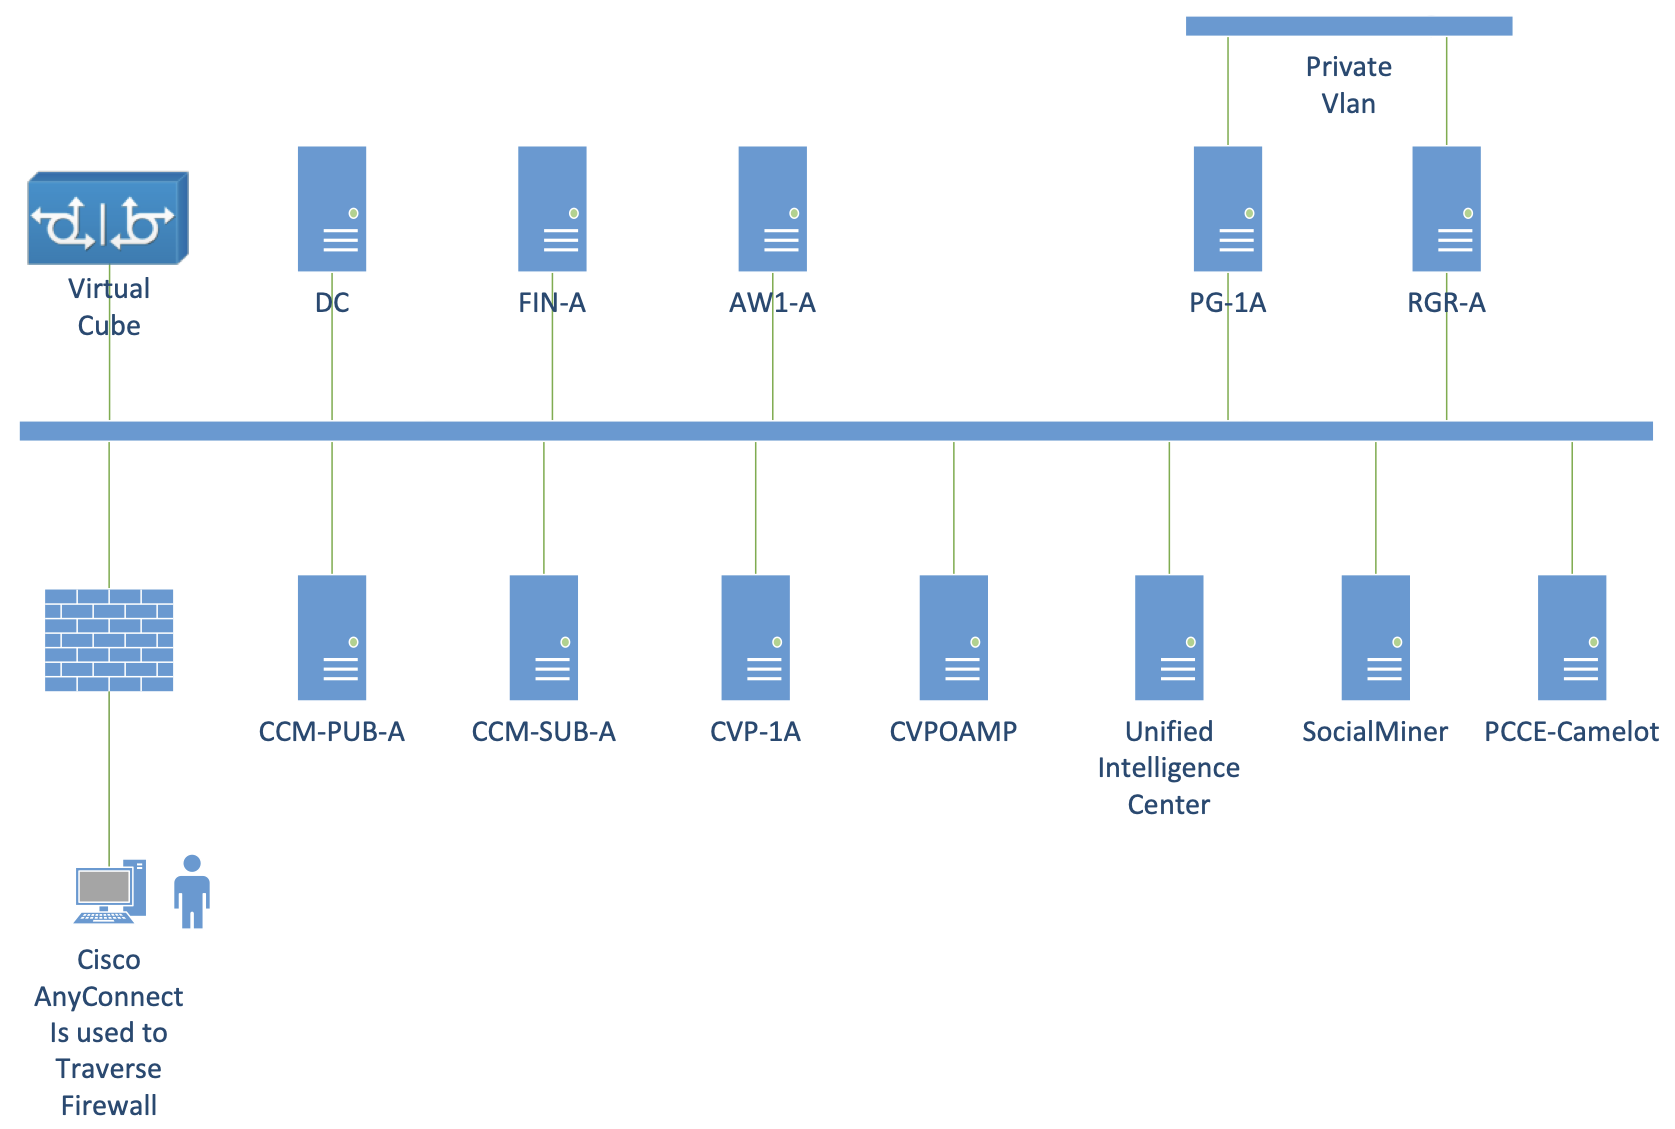
The diagram above depicts the PCCE network.
The following links provide product information (with sample code and scripts) and where to get community support for specific products in the lab:
VMs, Running Software, and Credentials
| Virtual Machine | IP Address | FQDN | Credentials |
|---|---|---|---|
| DC (Domain Controller) Active Directory, FS, DNS |
10.10.20.100 | fI01-dc.berlin.icm | User: pcceAdmin Password: C!sc0DevNet Domain: berlin.icm UCCE instance: pcce |
| PCCE-Camelot (Camelot PCCE) Tool for simulating phones |
10.10.20.4 | N/A | User: root Password: cisco123 |
| CVP-1A (Customer Voice Portal) CVP - Customer Voice Portal (Call Server/VXML Server), Call Studio, Wireshark |
10.10.20.10 | cvp-1a.berlin.icm | User: pcceAdmin Password: C!sc0DevNet |
| CVPOAMP (CVP Operations Console) CVP - Customer Voice Portal, Firefox |
10.10.20.12 | cvpoamp-a.berlin.icm | Platform User: Administrator Password: C!sc0DevNet1 Admin User: wsmadmin Password: C!sc0DevNet1 |
| PG-1A (Progger) CCE CUCM PG, CCE MR PG, CCE VRU PG, CTI Server, Dialer Unified CCE Service Control, Tomcat, ICM, UCM JTAPI Client, Unified ICM-CCE-CCH, CTI OS Security Server |
10.10.20.20 | cce-pg-1a-20.berlin.icm | User: pcceAdmin Password: C!sc0DevNet |
| AW1-A (DAW PCCE) AW/HDS/DDS. This server also hosts the Customer Collaboration Platform Task form to launch tasks to Finesse Agents. Unified CCE Service Console, Unified CCE Tools, Unified CCE Web Setup, SQL Server, Tomcat, ICM, Firefox, Chrome |
10.10.20.21 | cce-aw-1-21.berlin.icm | User: pcceAdmin Password: C!sc0DevNet |
| RGR-A (Rogger) Router/Logger Unified CCE Service Console, Unified CCE Tools, Unified CCE Web Setup, SQL Server, Tomcat, ICM, Unified ICM-CCE-CCH |
10.10.20.22 | cce-rgr-a-22.berlin.icm | User: pcceAdmin Password: C!sc0DevNet |
| CCM-PUB-A (CUCM Publisher) Cisco Call Manager Publisher |
10.10.20.30 | ccm-pub-a-30.berlin.icm | Platform User: Administrator Password: C!sc0DevNet Application User: admin Password: C!sc0DevNet |
| CCM-SUB-A (CUCM Subscriber) Cisco Call Manager Subscriber |
10.10.20.31 | ccm-sub-1a-31.berlin.icm | Platform User: Administrator Password: C!sc0DevNet Application User: admin Password: C!sc0DevNet |
| CUIC-PUB-A (Cisco Unified Intelligence Center) Co-resident CUIC, LiveData, and IdS |
10.10.20.40 | cuic-pub-a-40.berlin.icm | Platform User: Administrator Password: C!sc0DevNet Application User: Admin Password: C!sc0DevNet |
| FIN-A (Finesse) Finesse Primary, task routing, 3rd party gadget loaded |
10.10.20.50 | fin-pub-a-50.berlin.icm | Platform User: Administrator Password: C!sc0DevNet Application User: Admin Password: C!sc0DevNet Security Password: C!sc0DevNet 3rdpartygadget Password: C!sc0DevNet |
| Customer Collaboration Platform Customer Collaboration Platform (Formerly SocialMiner) |
10.10.20.60 | socialminer-1.berlin.icm | Platform User: Admin Password: C!sc0DevNet Application User: Admin Password: C!sc0DevNet |
| vCUBE Virtual Cisco Unified Border Element |
10.10.20.250 | N/A | Platform User: administrator Password: ciscopsdt |
User Interface URLs and Credentials
| Page | URL | Credentials |
|---|---|---|
| CUCM Administrator Console | https://ccm-pub-a-30.berlin.icm/ccmadmin | Username: admin Password: C!sc0DevNet |
| CCE Administrator Console | https://cce-aw-1-21.berlin.icm/cceadmin | Username: pcceAdmin@berlin.icm Password: C!sc0DevNet |
| Finesse Agent & Supervisor Desktop | https://fin-pub-a-50.berlin.icm:8445/desktop | Agent Usernames
Supervisor Usernames
Password Password for all users: cisco123 Extension Any extension from 1001 to 1009 Routepoint 8146010289 |
| Finesse Administrator Console | https://fin-pub-a-50.berlin.icm:8445/cfadmin | Username: Admin Password: C!sc0DevNet |
| CUIC User Interface | https://cuic-pub-a-40.berlin.icm:8444/cuicui | Username: Admin Password: C!sc0DevNet |
| CUIC Administration Console | https://cuic-pub-a-40.berlin.icm/oamp/Main.jsp | Username: Admin Password: C!sc0DevNet |
| Customer Collaboration Platform Administrator Console | https://socialminer-1.berlin.icm/administration.jsp Note: Can be only accessed on the AW1-A server |
Platform User: Admin Password: C!sc0DevNet |
| CCP Task Form | http://cce-aw-1-21.berlin.icm:8080/task.html | |
| CVP Operations Console | https://cvpoamp-a.berlin.icm:9443/oamp | Username: Administrator Password: C!sc0DevNet1 |
| Identity Service Management | https://cuic-pub-a-40.berlin.icm:8553/idsadmin/Main.jsp | Platform User: Admin Password: C!sc0DevNet |
Simplex Hybrid Lab Mode
The PCCE Sandbox lab is configured for Simplex Hybrid Lab Mode. Simplex simply means that the lab is not fault tolerant and only contains the 'A' side machines. Thus, the lab environment does not support failover testing. Hybrid mode means that login is supported via both SSO and direct PCCE sign-in.
The labs have two agent teams teamskill1 and teamskill2. Thus, this lab environment does enable testing of both login mechanisms.
Remote Desktop to AW1-A
The VMs, Running Software, and Credentials section provides a listing and the details of the machines involved in this PCCE lab.
The AW1-A server has been preconfigured with the necessary applications to utilize this Sandbox lab as well as bookmarks to the appropriate product login pages.
To remote desktop to AW1-A, use a traditional Remote Desktop application with the following credentials:
- IP Address: 10.10.20.21
- Login User ID: BERLIN.ICM\pcceAdmin
- Password: C!sc0DevNet
Agent Extensions
Camelot is an internally developed Cisco tool that allows phone simulation. There are currently ten registered Camelot phones in the PCCE environment. The associated extensions are 1000 - 1009. The device names are SEP6001FFFF0000 - SEP6001FFFF0009. They are simulated 7970 IP phones.
Upon initial startup of the AWA-1 server, a batch file runs which registers these simulated phones with the CallManager.
No action is needed on your part other than to use these extensions when working with pre-provisioned users. If you wish to better understand what occurs with this script, see the Appendix.
PCCE Administration
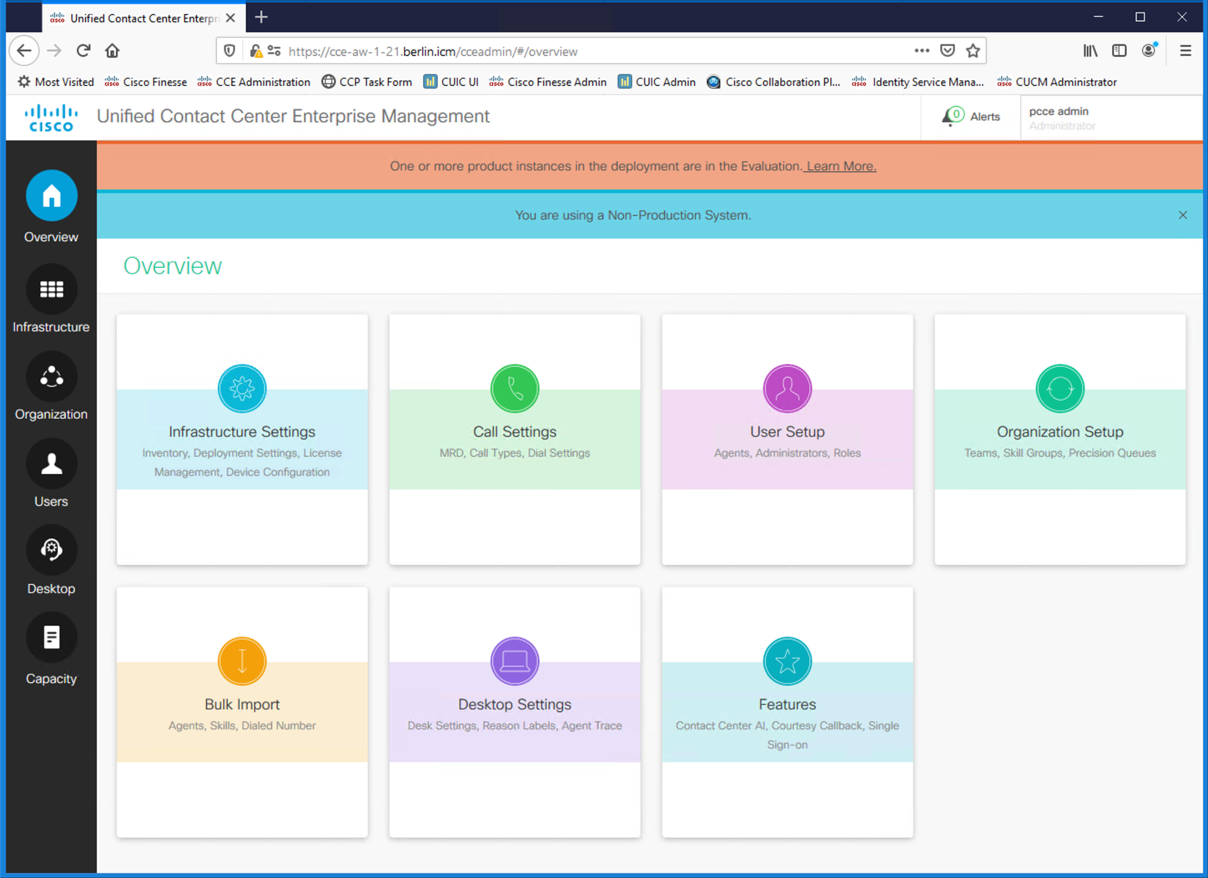
PCCE is administered via a web interface.
Launch a web browser and navigate to https://cce-aw-1-21.berlin.icm/cceadmin or remote desktop to AW1-A, launch Firefox and select 'CCE Administration' from the bookmark bar.
Login to Unified CCE Administration with the username pcceAdmin@berlin.icm and password C!sc0DevNet.
Note that pcceAdmin is an Administrative account enabling extra options. Agent and supervisors can also use this interface with reduced functionality.
Explore the user interface (Overview, Infrastructure, Organization, Users, Desktop, Capacity).
Select Users > Agents (Notice the pre-defined agents).
Notice the deployment type is "Lab Mode" with a "Non-Production" usage type.
Managing Agents and Supervisors
Log in to the PCCE Administration web interface (See the PCCE Administration section).
Select Users > Agents to see the currently configured agents and supervisors.
- Note that SSO based agents will end with the extension @berlin.icm while non SSO agents will not. Agents 1, 2, and 6 are non-SSO accounts. Non-SSO agents are assigned to 'team1' and 'team1skill' Skill Group. SSO agents are assigned to 'team2' and 'team2skill' Skill Group. This is not required, but simply how the lab is configured.
- Supervisor1 manages 'team1' and is non-SSO, while Supervisor2 manages 'team2' and is an SSO based account. Note that both supervisors require the @berlin.icm suffix to login.
Adding or Modifying SSO / Active Directory Agents
Start a remote desktop session to the Active Directory Domain Controller named DC.
- IP address: 10.10.20.100
- User Id: BERLIN.ICM\pcceAdmin
- Password: C!sc0DevNet
Launch Active Directory Users and Computers.
- Press Start from the start menu.
- Select Active Directory Users and Computers.
- Select Users under Berlin.ICM.
The supervisors and SSO Agents are displayed.
Create a user in Active Directory.
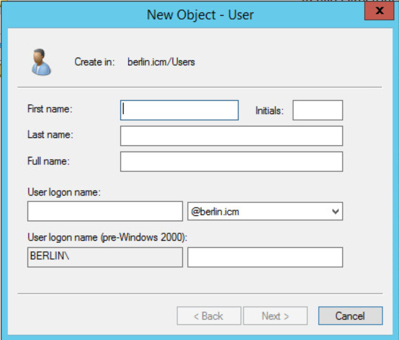
Right-click on Users > New > User.
Complete the new user dialog:
Add the SS0 user to PCCE.
Log in to the PCCE Administration web interface (See the PCCE Administration section).
Go to Users > Agents.
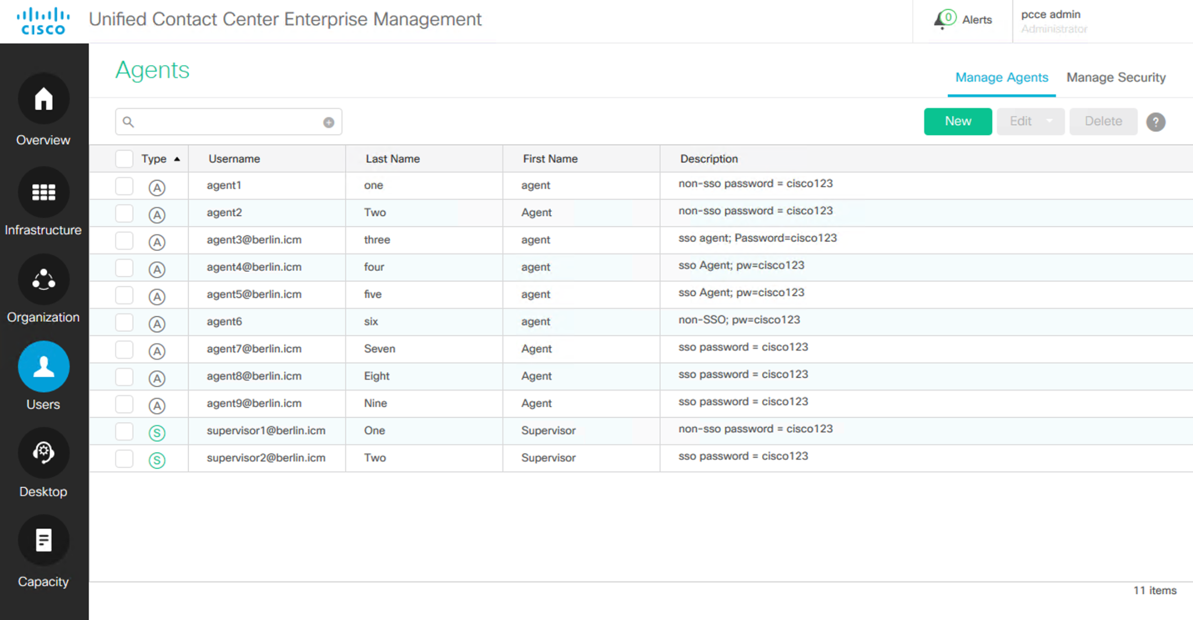
Click the New button.
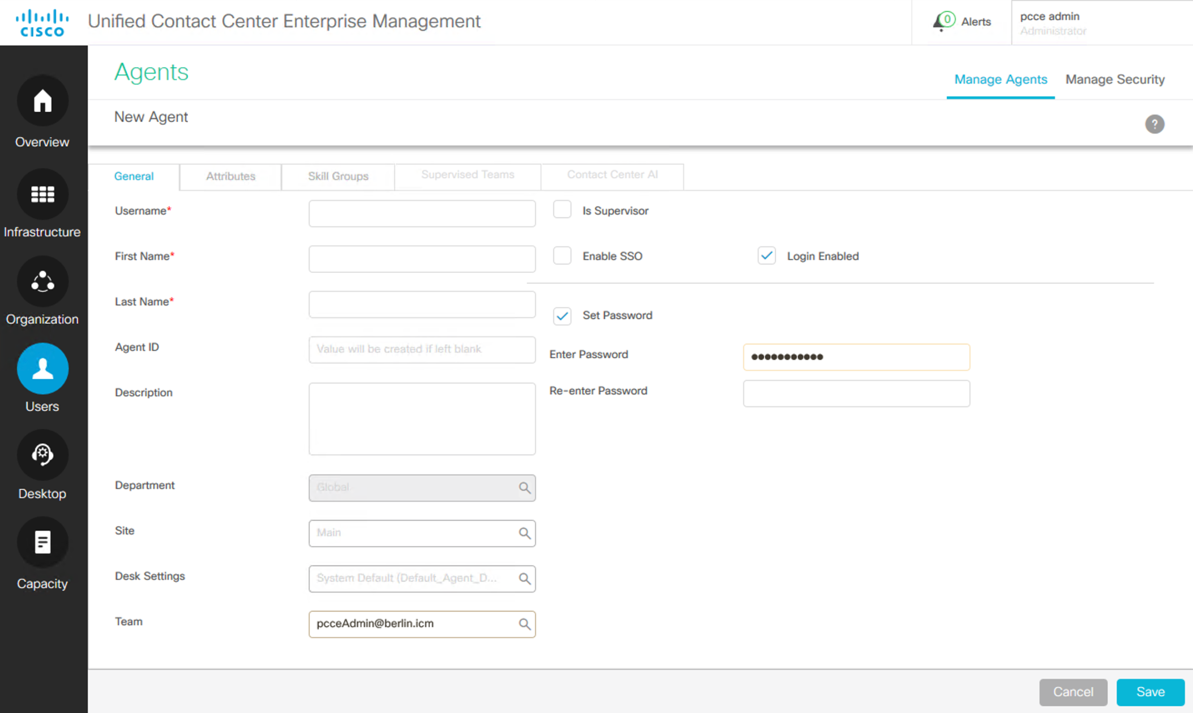
Complete the dialog with the same user information entered into Active Directory. The username uses the format username@domain. For example, agent5@berlin.icm.
Select the Enable SSO checkbox.
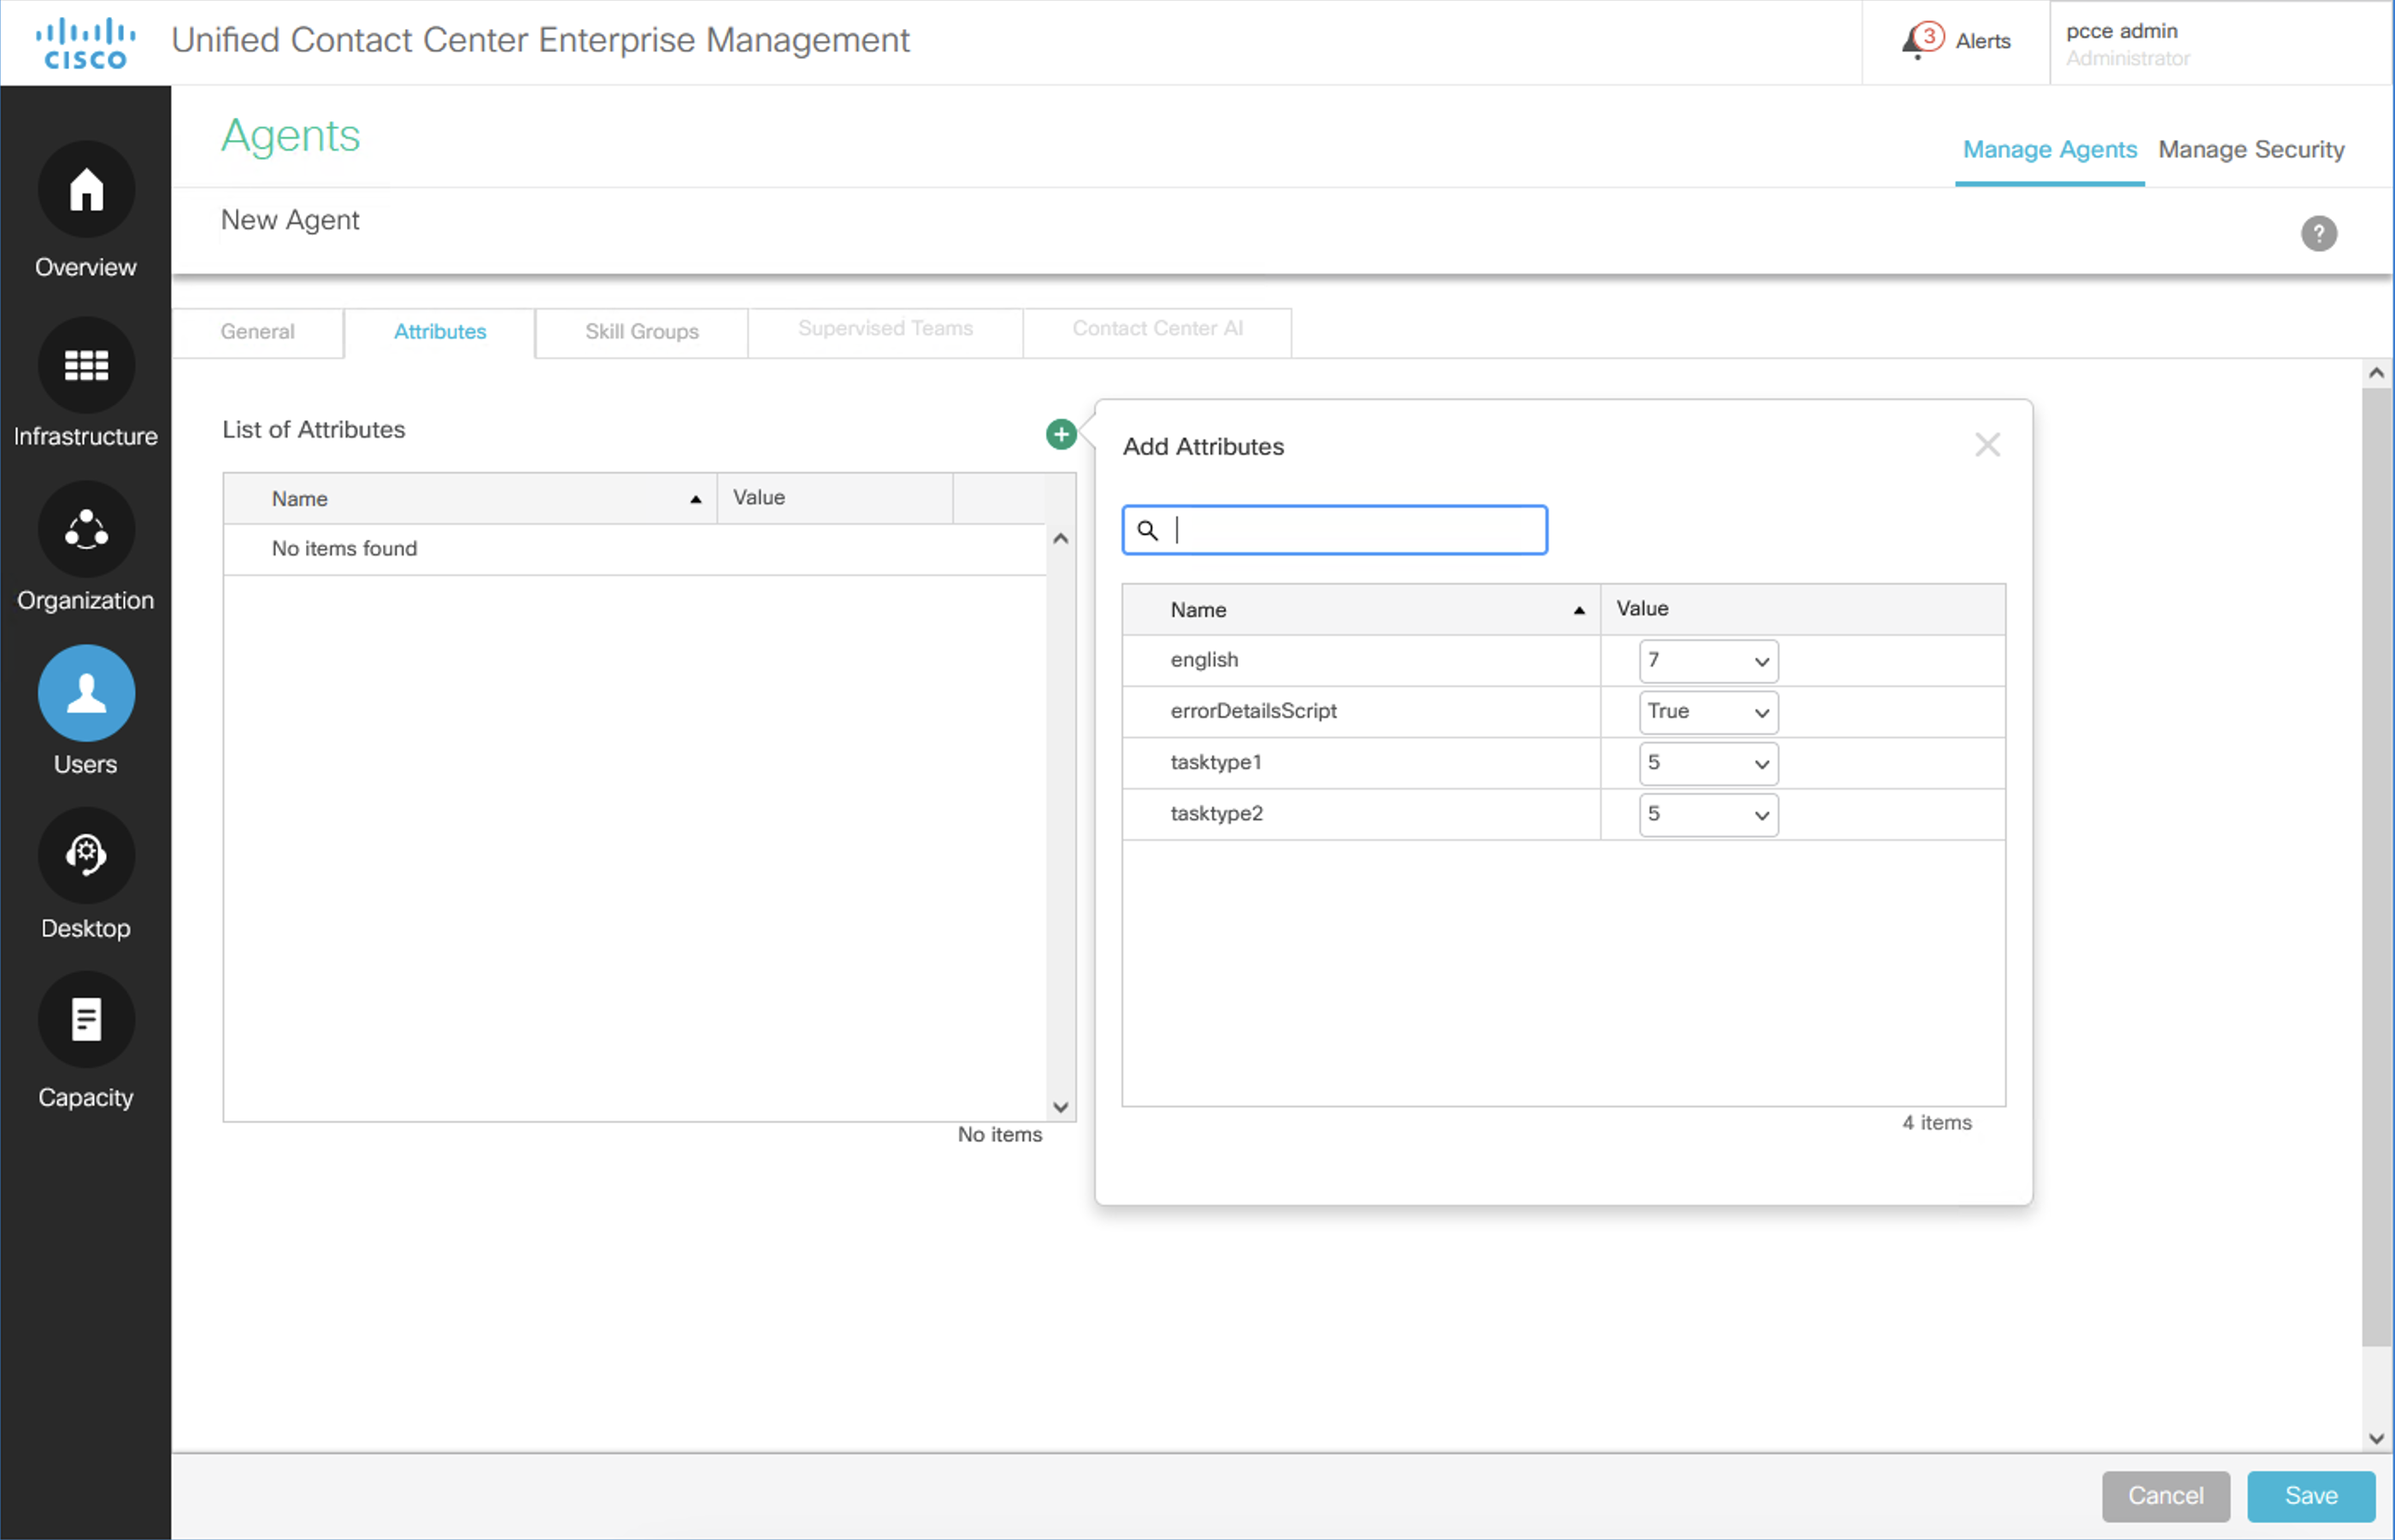
Assign the user attributes. Click the Attributes tab on this page. Add the attributes for the agent. Agent attributes and skill groups are key to performing task routing; they can be used individually or together to route tasks. Attributes can be used with Precision Queues.
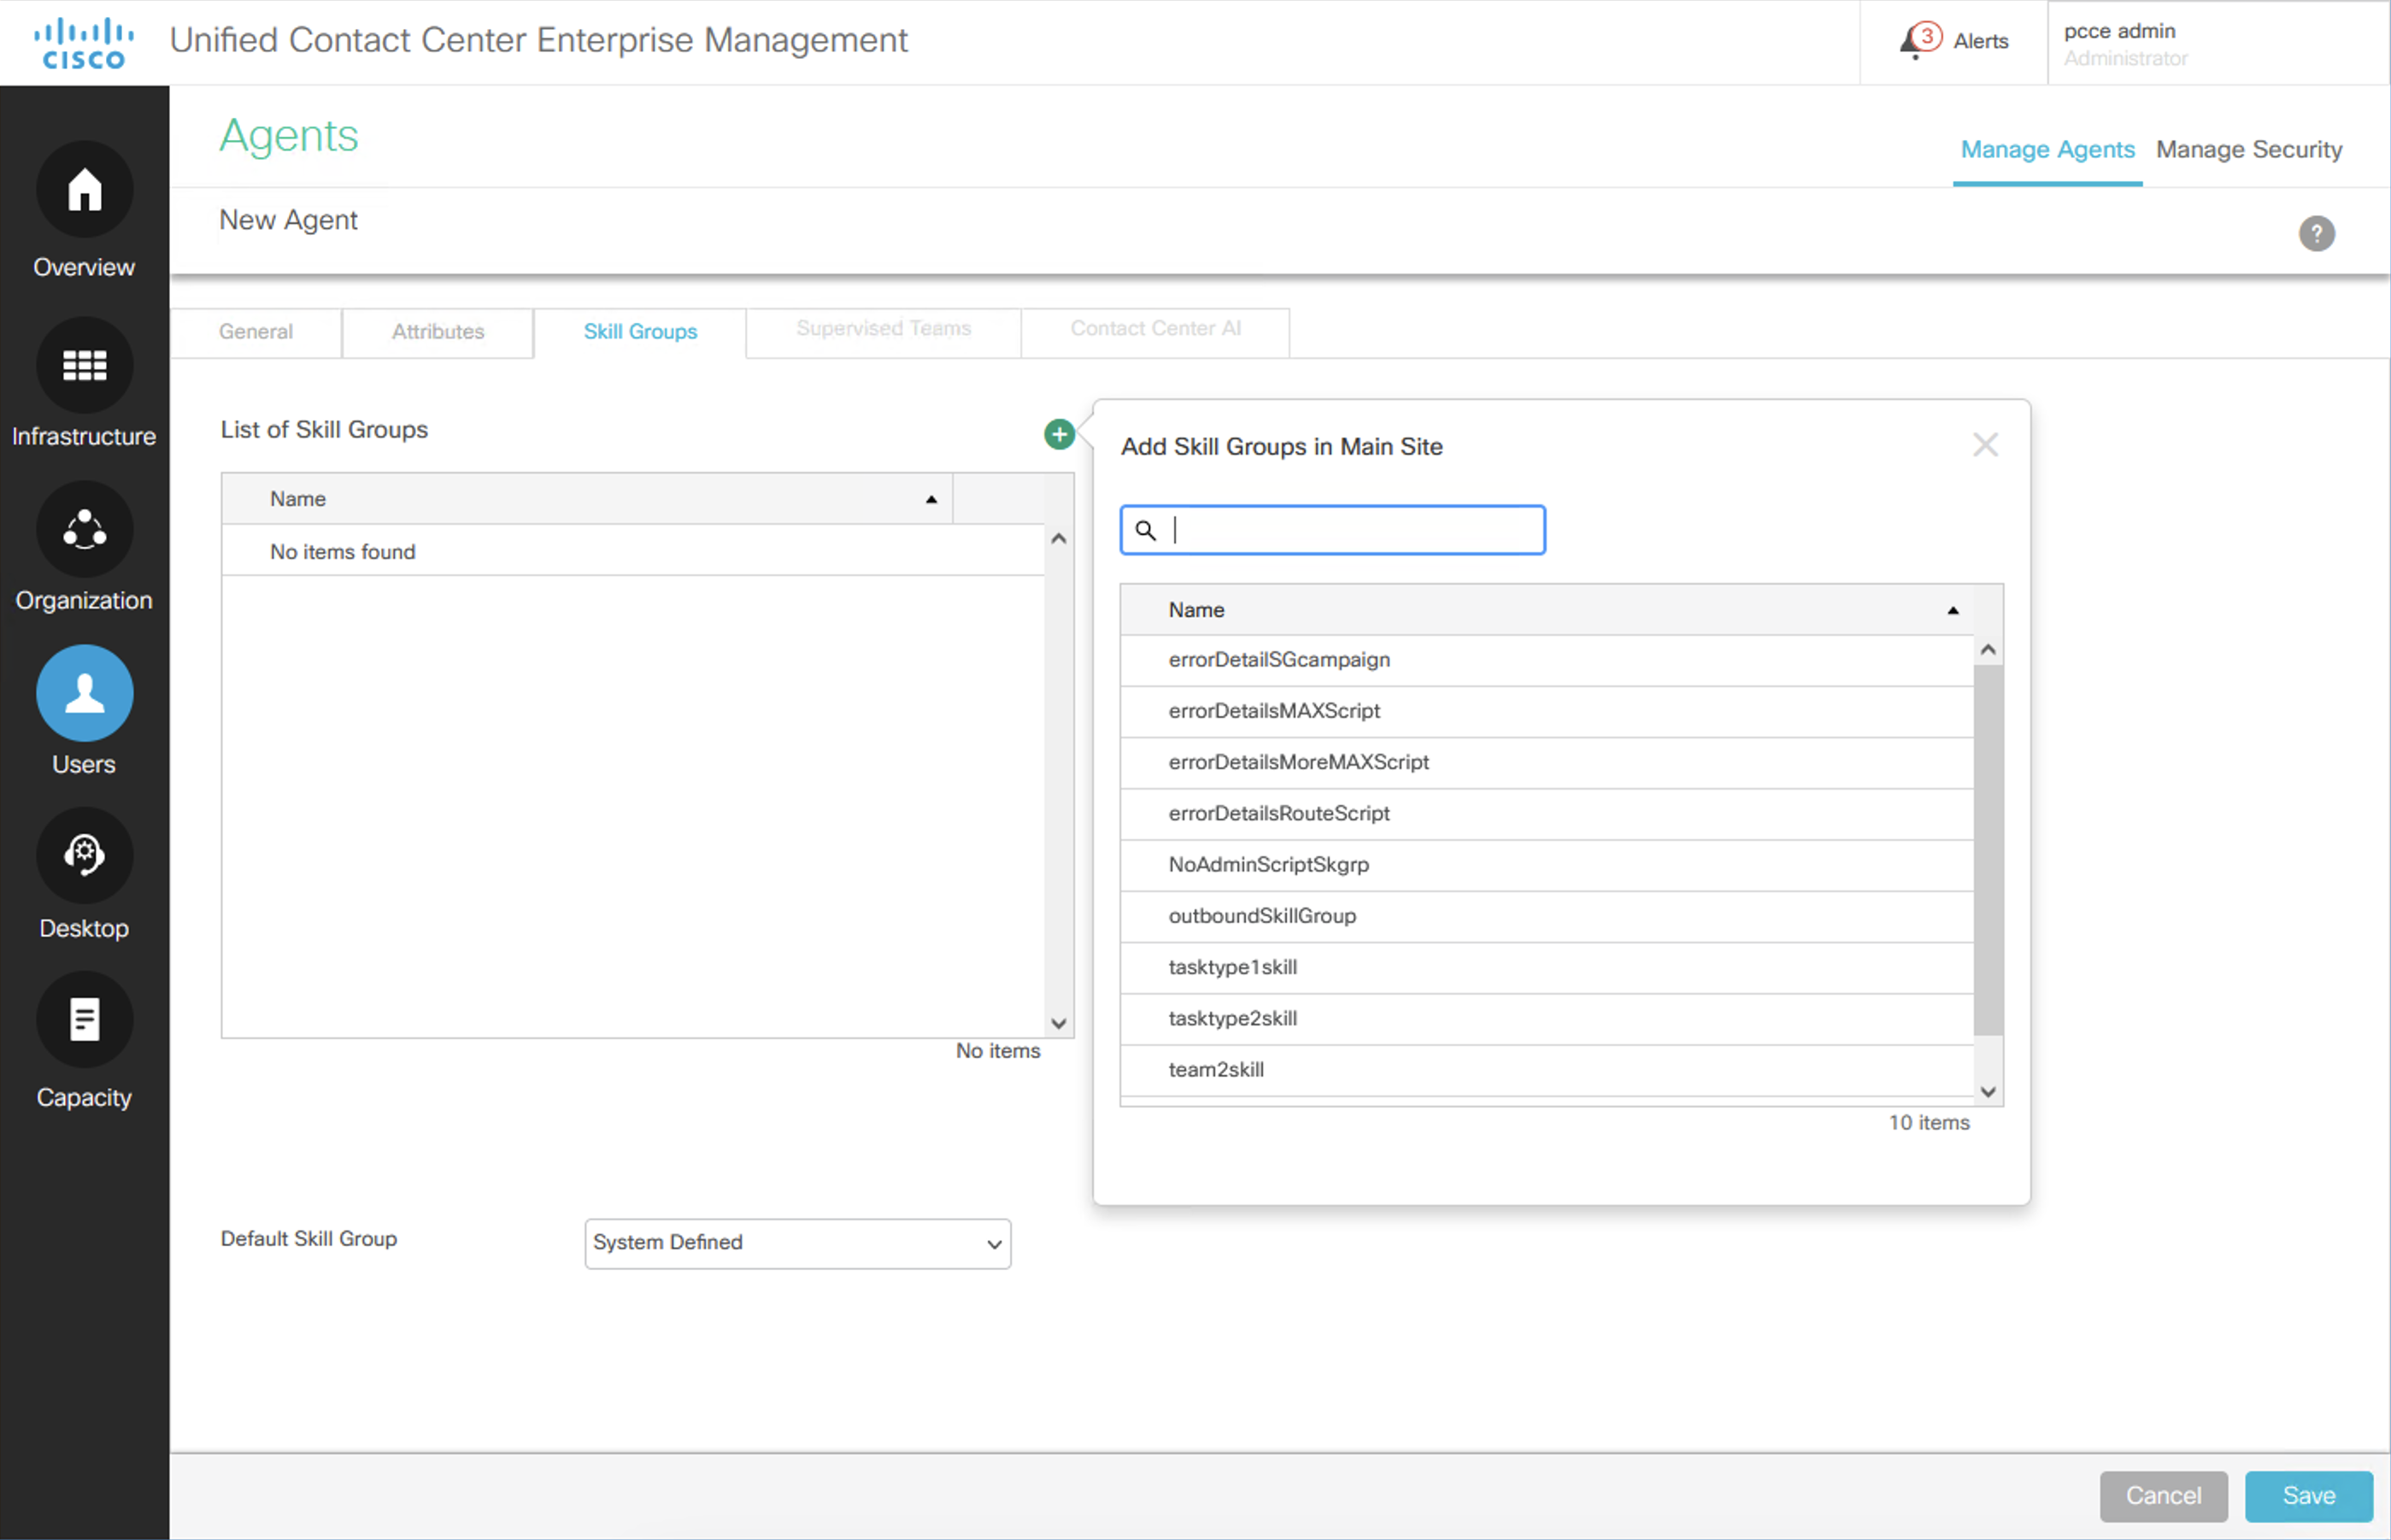
Assign the user skill groups. Click the Skill Groups tab for agent3. Agent attributes and skill groups are key to performing task routing; they can be used individually or together to route tasks.
Click the Save button.
Adding or Modifying Non-SSO Agents
Enter a Remote Desktop session to the Active Directory Domain Controller named DC.
- IP address: 10.10.20.100
- User Id: BERLIN.ICM\pcceAdmin
- Password: C!sc0DevNet
Add the non-SSO user to PCCE.
Log in to the PCCE Administration web interface (See the PCCE Administration section).
Go to Users > Agents.

Click the New button.

Complete the dialog, but do NOT select Enable SSO. The username uses the format username. For example, agent1. The domain name is not included for Non-SSO Agents. Teams can also be optionally selected from this dialog. Be aware that Supervisors always use an SSO/Active Directory account.
Assign the user attributes. Click the Attributes tab on this page. Add the attributes for the agent. Agent attributes and skill groups are key to performing task routing; they can be used individually or together to route tasks. Attributes can be used with Precision Queues.

Assign the user skill groups. Click the Skill Groups tab for agent3. Agent attributes and skill groups are key to performing task routing; they can be used individually or together to route tasks.

Click the Save button.
Creating and Managing Teams
Teams can be added and maintained from the PCCE Administration.
Log in to the PCCE Administration web interface (See the PCCE Administration section).
From the PCCE Administration screen, select Organization > Teams.
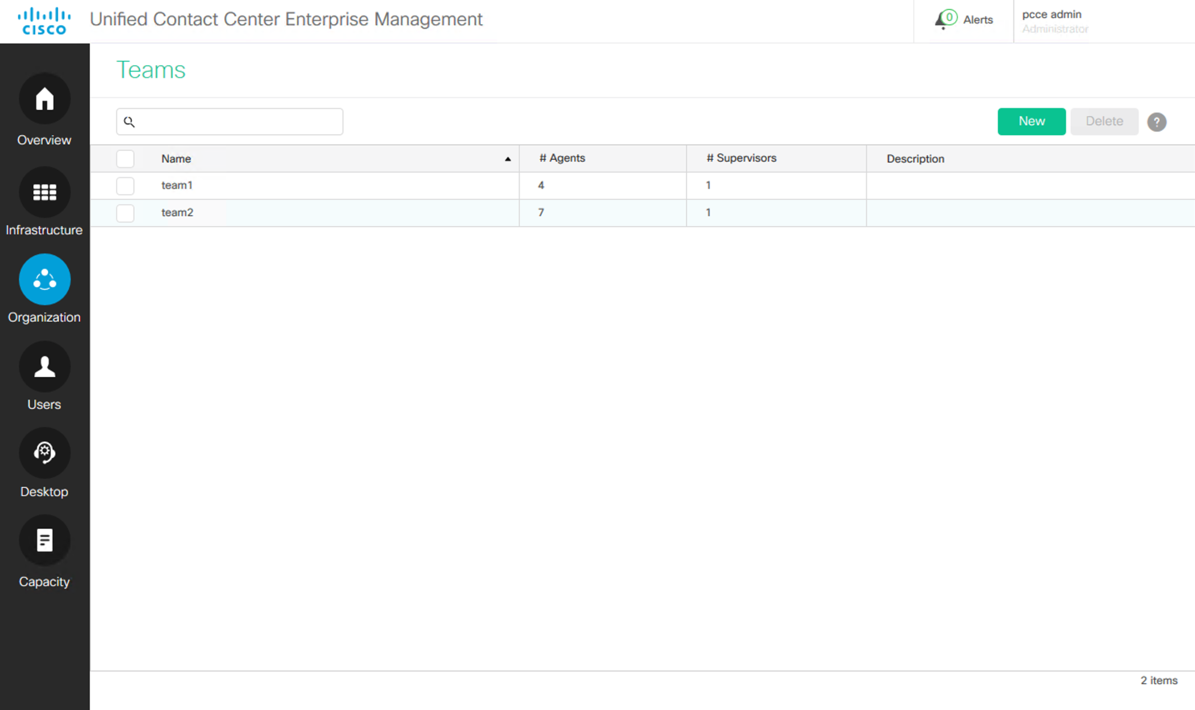
Click the New button to create a new team.
Click on an existing team to edit the team.
Creating and Managing Skill Groups
Skill groups can be added and maintained from PCCE Administration.
Log in to the PCCE Administration web interface (See the PCCE Administration section).
From the PCCE Administration screen, select Organization > Skills.
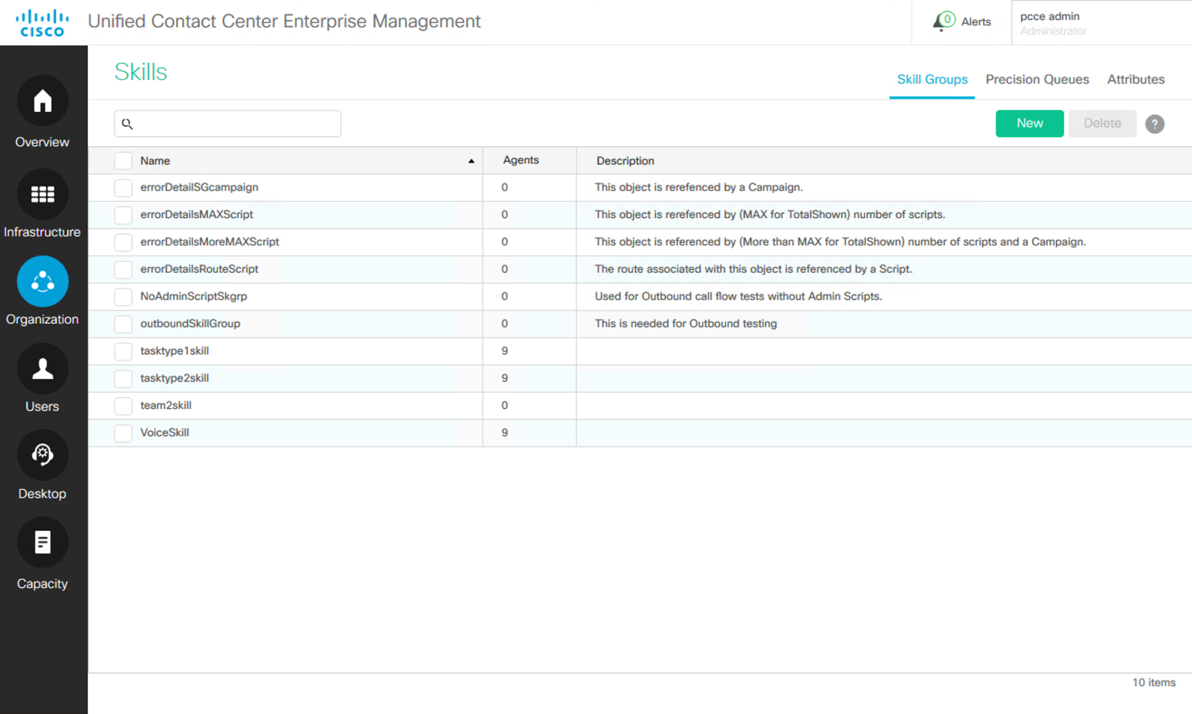
Click the New button to create a new skill group.
Click on an existing skill to edit the skill group.
Bulk Administration
Bulk Administration can be performed from PCCE Administration.
Log in to the PCCE Administration web interface (See the PCCE Administration section).
From the PCCE Administration screen, select Overview > Bulk Import > Bulk Import.
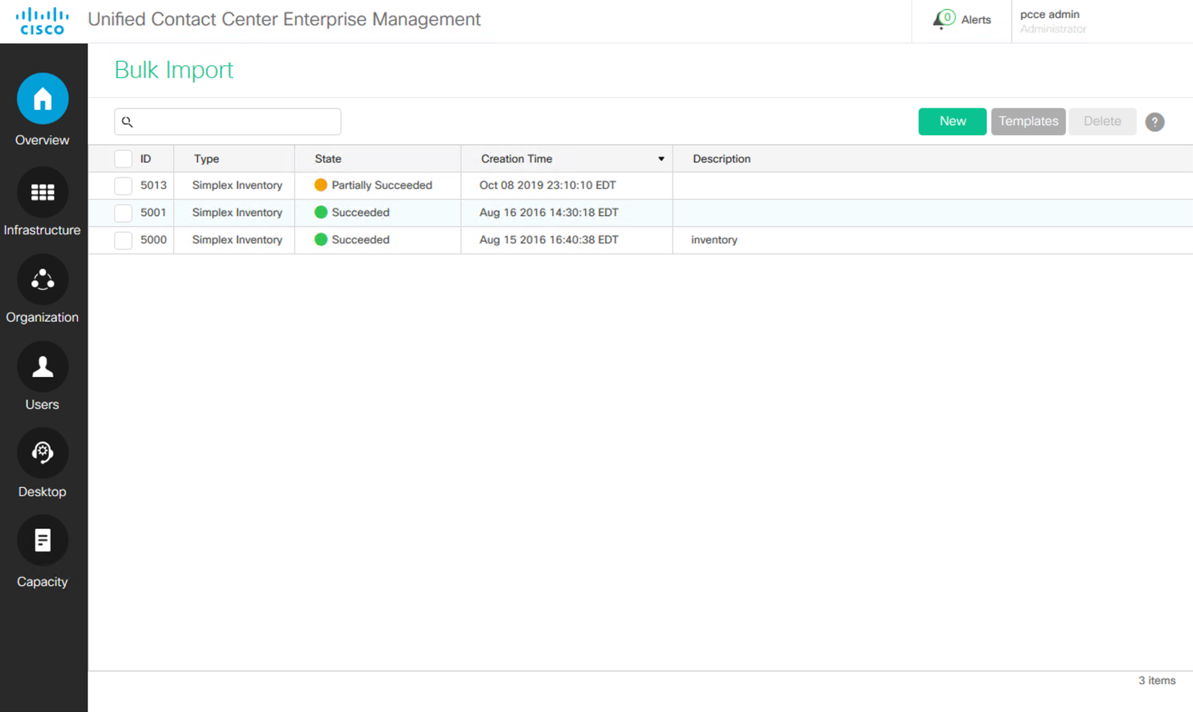
To utilize bulk administration, first select the Templates button from the Bulk Jobs Dialog. Download and complete an appropriate template.
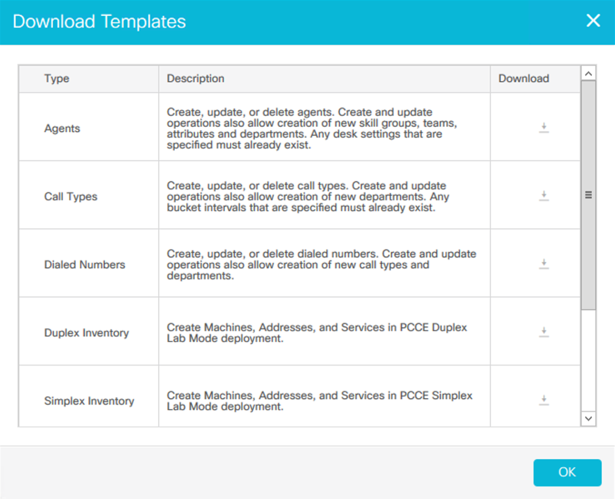
Modify the downloaded template accordingly.
Click the New button.
Click the Browse button and select the modified template.
Click the Save button.
View PCCE Inventory and System Status
System status can be performed from PCCE Administration.
Go to the PCCE Administration web interface (See the PCCE Administration section).
Select Infrastructure > Inventory.
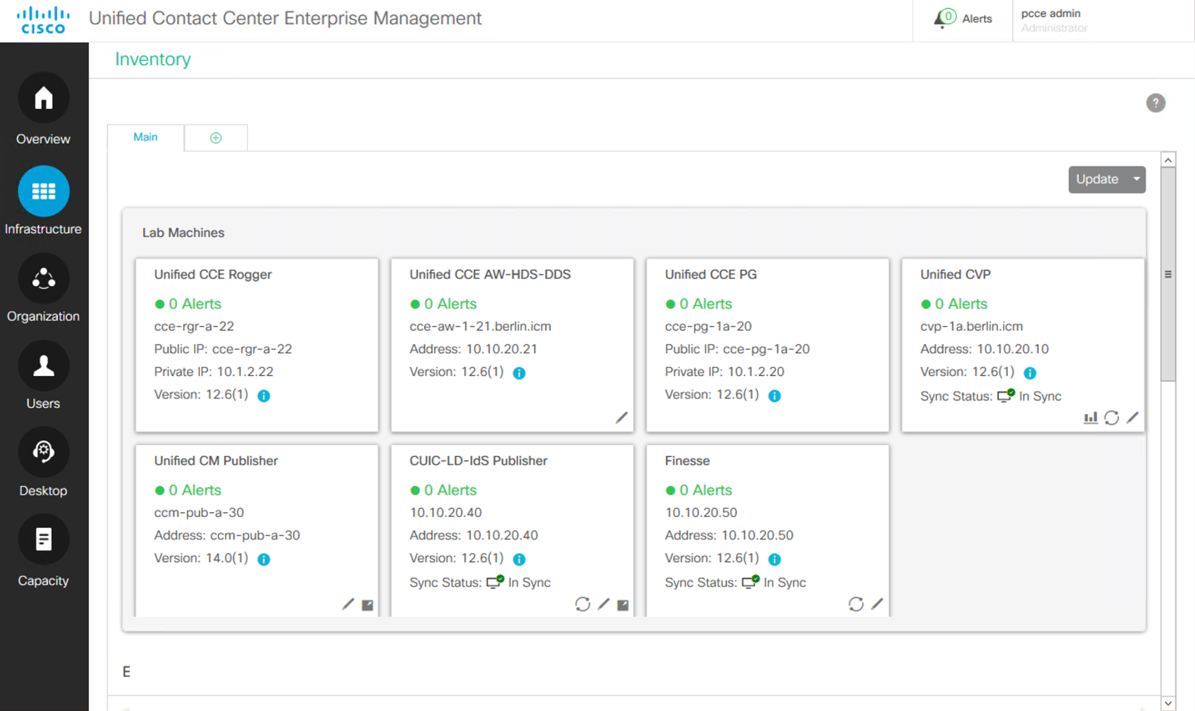
Note that the alerts shown on this screen are due to the fact that this is a Lab Mode system. For example, no Secondary failover server exists in a lab configuration, so it raises an alert.
Cisco Identity Service (SSO)
SSO and Identity Services can be performed from PCCE Administration.
Log in to the PCCE Administration web interface (See the PCCE Administration section).
Select Overview > Features > Single Sign-On.
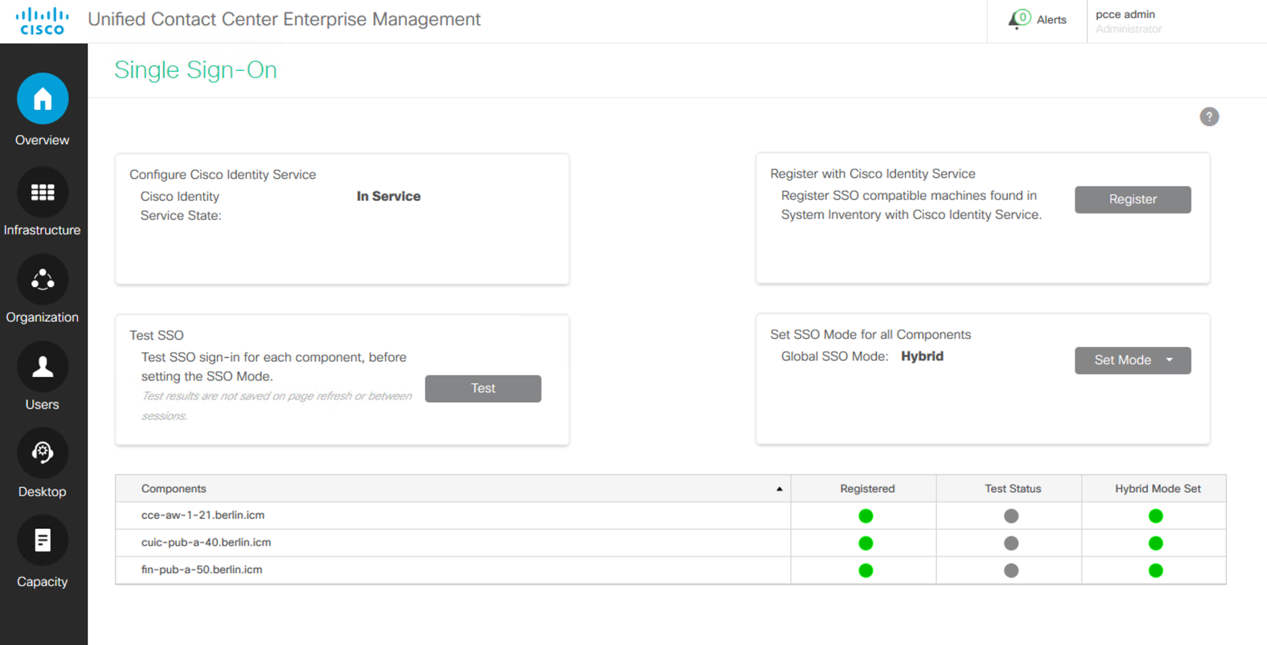
Single Sign-on is already configured for the PCCE lab. This is informational only.
Customer Collaboration Platform Task
This PCCE Sandbox contains a sample JavaScript application to inject tasks into the system via Customer Collaboration Platform (formerly SocialMiner). For your convenience, this script is automatically started with the AWA-1 server. see the Appendix if you want to understand the details of this script.
Task Form
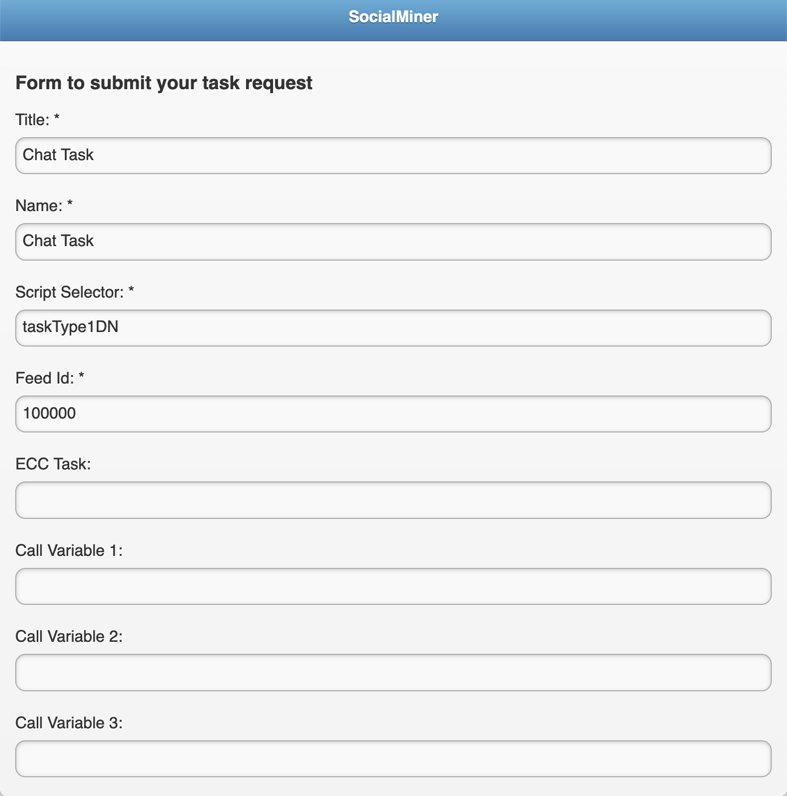
This PCCE Sandbox contains a Customer Collaboration Platform (formerly SocialMiner) Task Form to manually generate tasks into the Finesse Agent’s queues for testing purposes. In your production environment, an automated process may be used to generate and route tasks based on your needs.
Note that Task Routing is pre-configured such that TaskType1 is 'interruptible' and TaskType2 is 'non-interruptible'.
Start a remote desktop session to AW1-A.
- IP Address: 10.10.20.21
- Login User ID: BERLIN.ICM\pcceAdmin
- Password: C!sc0DevNet
Launch Firefox and select CCP Task Form from the bookmark bar or navigate to http://cce-aw-1-21.berlin.icm:8080/task.html
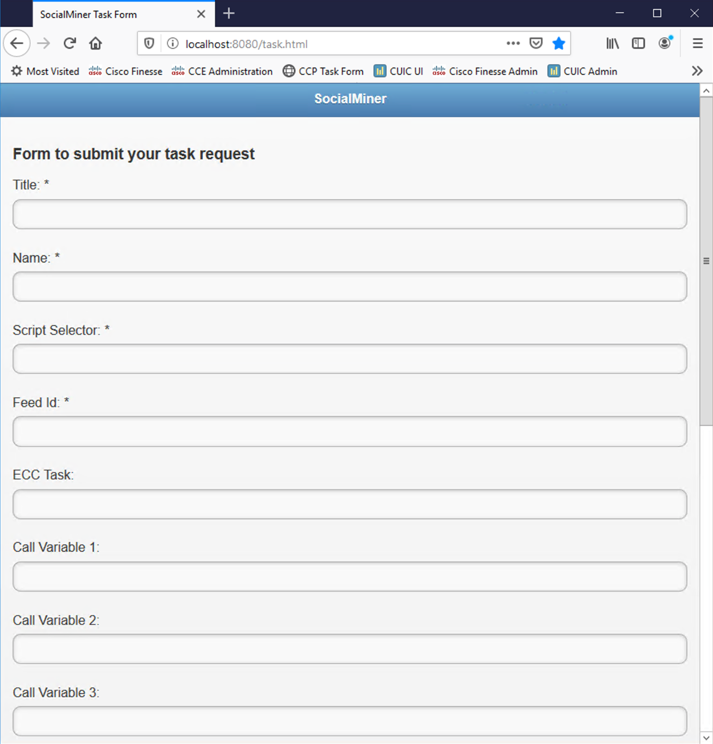
Fill out the fields according to the descriptions below:
Title and Name
The Title and Name fields are informational only but is still required. They can be populated as you wish.
Script Selector
There are currently two Script Selectors named
taskType1DNandtaskType2DNpre-configured in the Sandbox environment. These "routing" strings point to CCP within PCCE. You can review this configuration from the AWA-1 server:Log in to the PCCE Administration web interface (See the PCCE Administration section).
Select Overview > Call Settings > Route Settings > Dialed Number.

Select taskType1DN
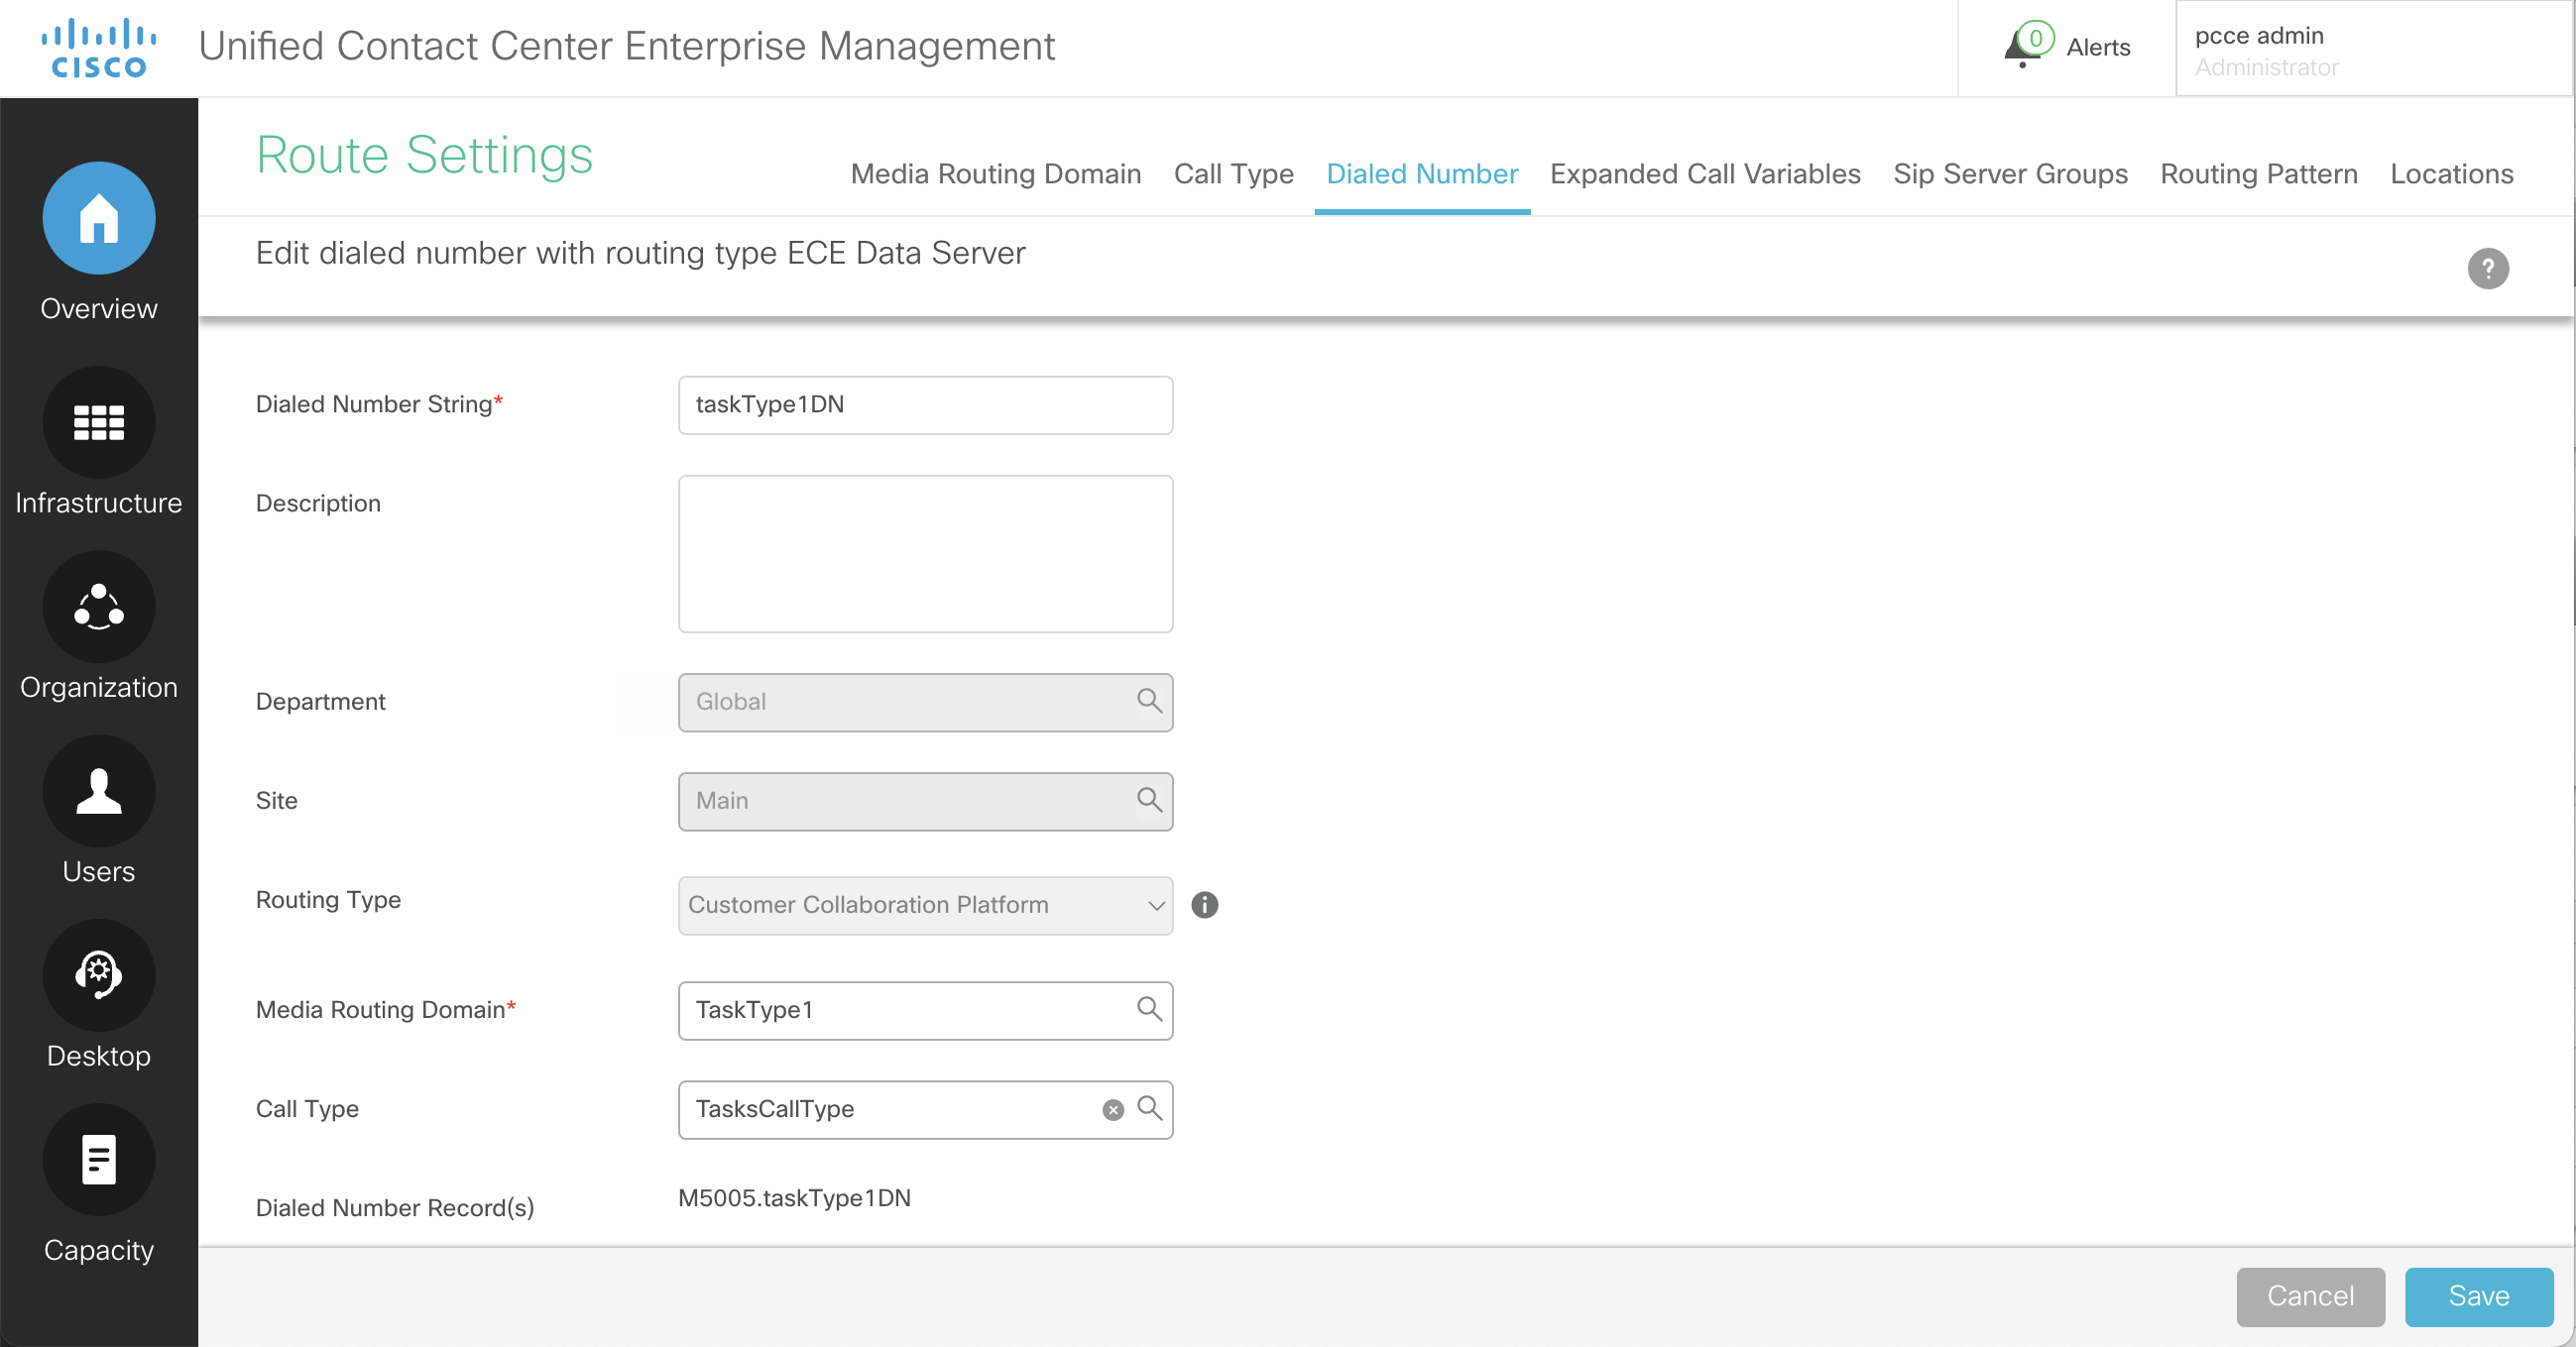
Note that the taskType1DN corresponds to TaskType1 Media Routing Domain. Similarly, tasktType2DN corresponds to TaskType2.
Feed ID
The Feed ID is required. It is the ID of the Task feed that is configured to process task contacts. Enter the number 100000.
Call Variables
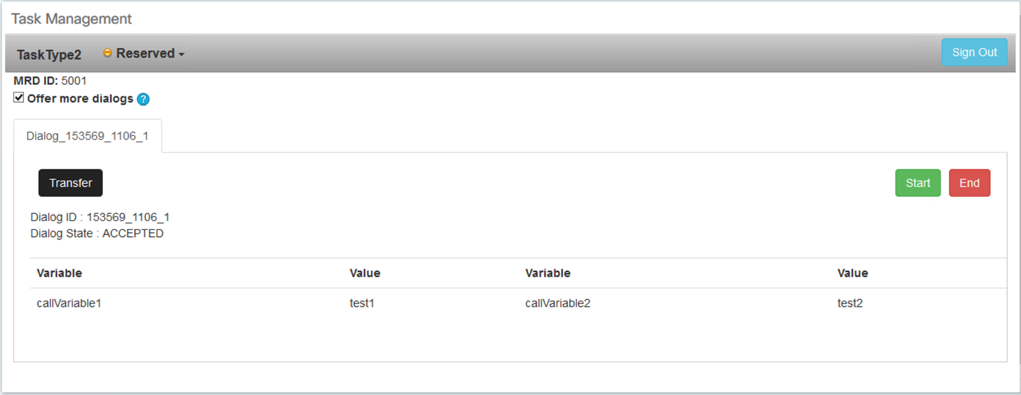
Optionally, enter the call variables. Note how the call variables may be utilized within the Finesse Gadget:
ECC Variable
Optionally, enter an ECC variable. By default, this sample uses the
user.test.taskECC variable. The sample can be modified to use an ECC variable configured in your deployment.
Click Submit Task at the bottom of the screen . Each time this step is performed, a task will be routed to the PCCE Finesse Agents queue.
Reviewing the Task Script
Start a remote desktop session to AW1-A.
- IP Address: 10.10.20.21
- Login User ID: BERLIN.ICM\pcceAdmin
- Password: C!sc0DevNet
Launch Script Editor by going to:
C:\ProgramData\Microsoft\Windows\Start Menu\Programs\Cisco Unified CCE Tools\Administration Tools\Script Editor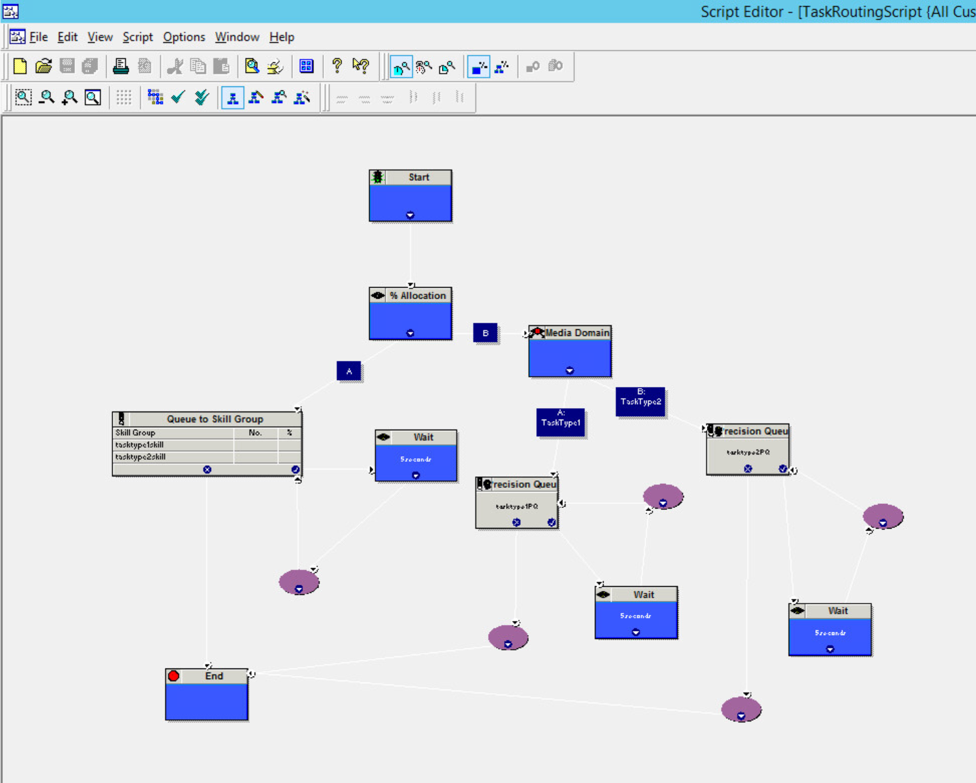
This basic script is provided for Skill Groups and Precision Queues. You can edit these scripts or create your own new scripts.
Notice that the box marked % Allocation, just after start, is configured for 50%.
Press F5 or select Script > Monitor Script.
Use the Customer Collaboration Platform Task Form to launch a task into the script using taskType2DN as the script selector.
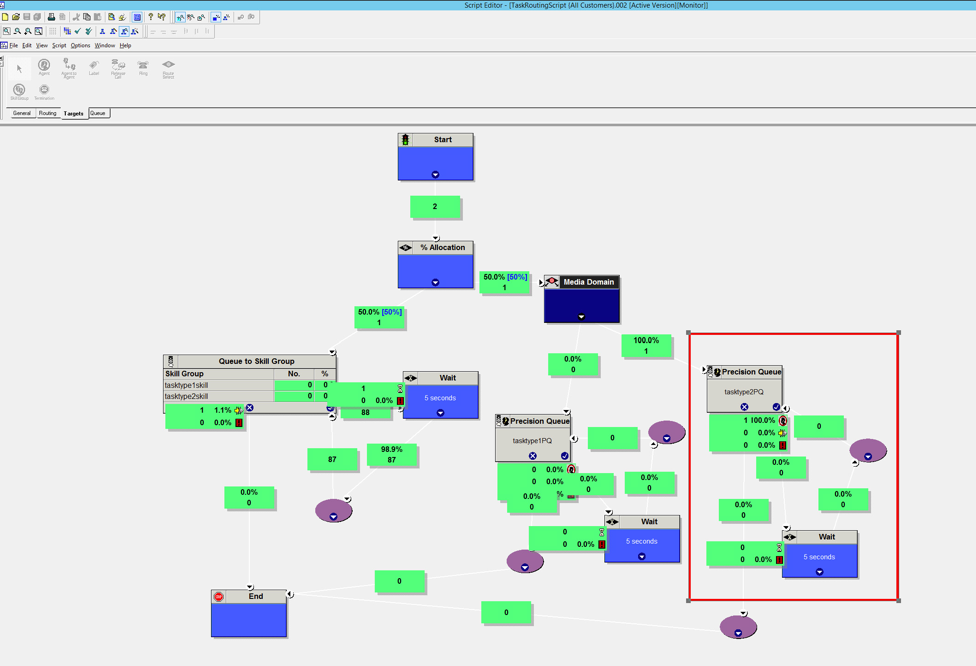
Notice that the task is in the queue for an agent until an agent accepts the task.
Explore the script editor and its functionality further as you desire.
Finesse Desktop
Login an SSO Agent to Cisco Finesse
Launch a web browser and navigate to https://fin-pub-a-50.berlin.icm:8445/desktop or remote desktop to AW1-A, launch Firefox and select 'Cisco Finesse' from the bookmark bar.
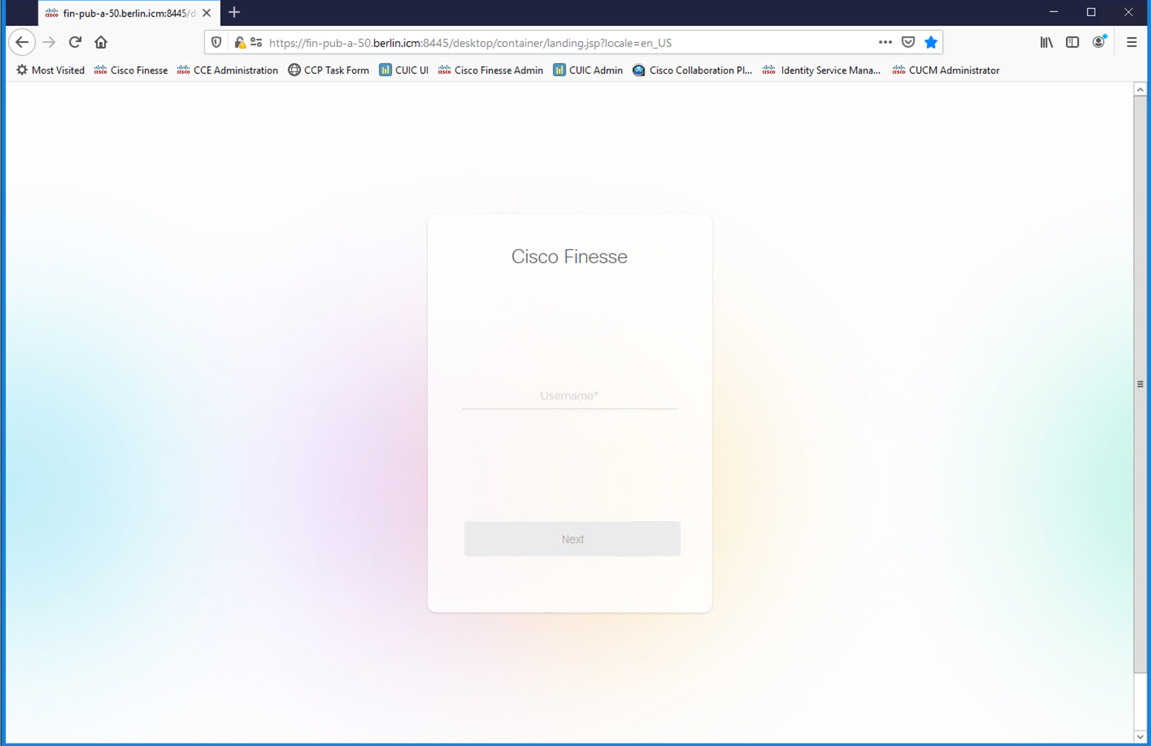
Use a predefined SSO agent or a SSO agent that you’ve created. Example:
- Username: agent3@berlin.icm
- Password: cisco123
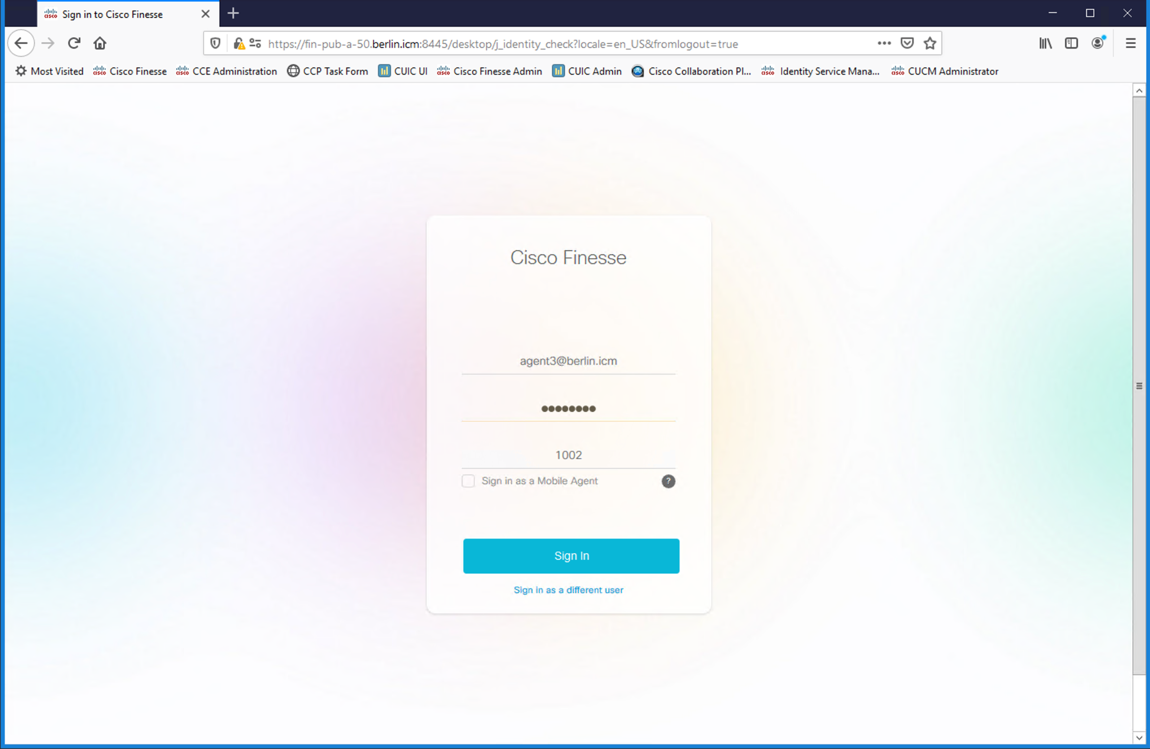
Login a non-SSO Agent to Cisco Finesse
Launch a web browser and navigate to https://fin-pub-a-50.berlin.icm:8445/desktop or remote desktop to AW1-A, launch Firefox and select 'Cisco Finesse' from the bookmark bar.

Use a predefined non-SSO agent or a non-SSO agent that you’ve created. Example:
- Username: agent1
- Password: cisco123
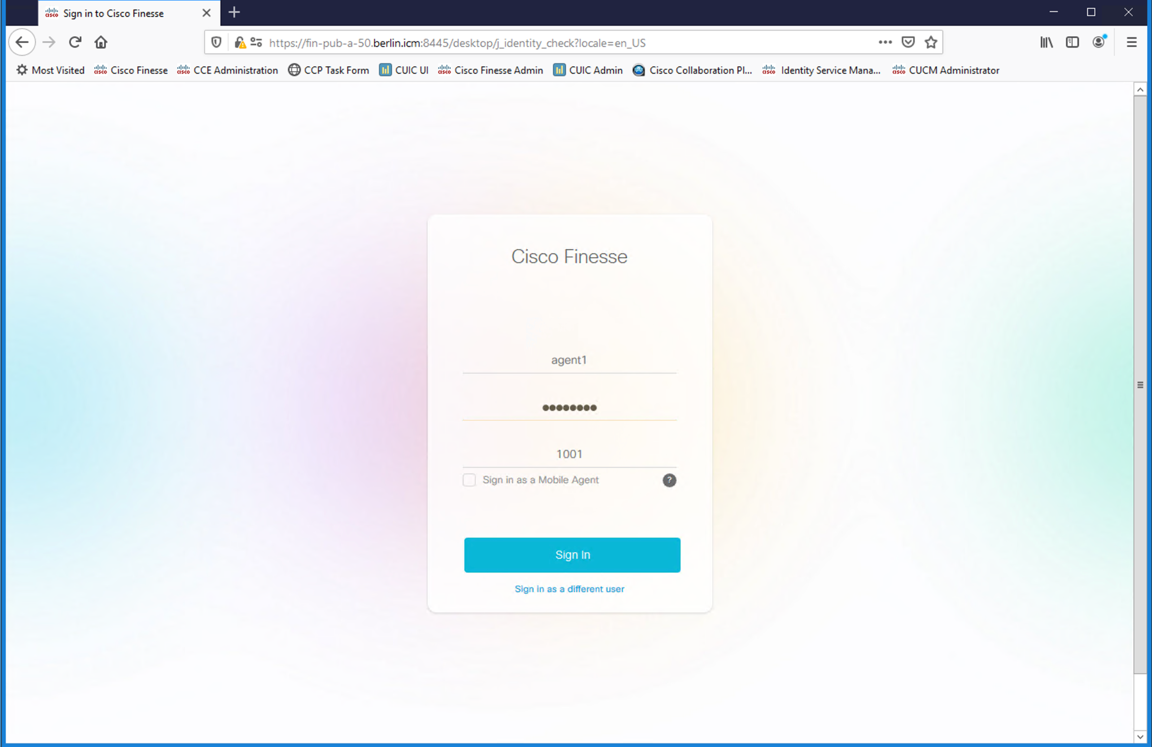
Voice Call to an Agent
The PCCE Sandbox provides the ability for a developer to generate voice traffic by placing a voice call to a queueing number, which would route the call to the Finesse agent desktop of an agent who is in 'Ready' state. As described in the Agent Extensions section, there’s an automated scripts that run upon start up of the AWA-1 server that register Cisco endpoint with the Unified Communications Manager. This script enables the use of extensions 1000 through 1009.
Regardless if your using an SSO or non-SSO agent, the process of receiving a voice call is the same. Note, however, that SSO and non-SSO agents are assigned different voice queues to demonstrate their functionality.
Login the agent on the Finesse Agent Desktop.

Change the agent’s state to 'Ready'.

Start a remote desktop session to AW1-A.
- IP Address: 10.10.20.21
- Login User ID: BERLIN.ICM\pcceAdmin
- Password: C!sc0DevNet
Launch a call to the Voice Queue by double clicking the MakeCall.bat file located on the AWA-1 Server’s desktop. see the Appendix if you would like to understand the flow of call creation or alter call parameters.
On the Finesse Agent Desktop, the agent’s state goes to Reserved and an incoming call notification will appear.
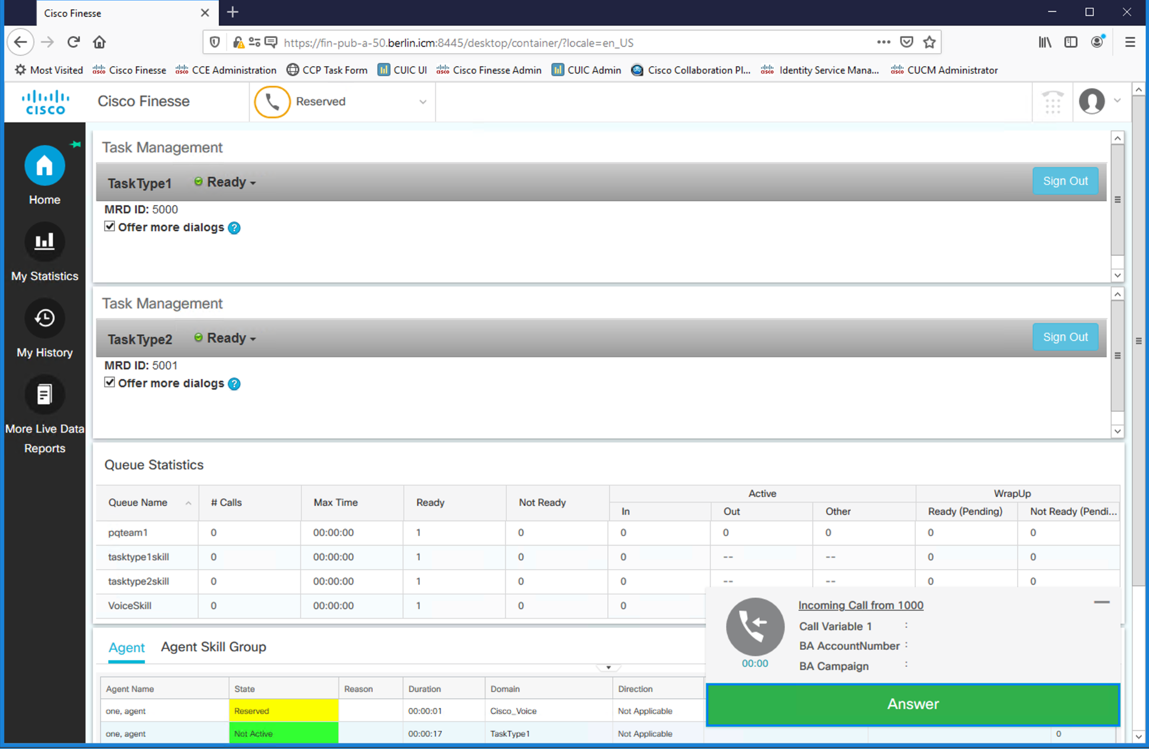
Answer the call by selecting the Answer button on the Finesse Desktop.
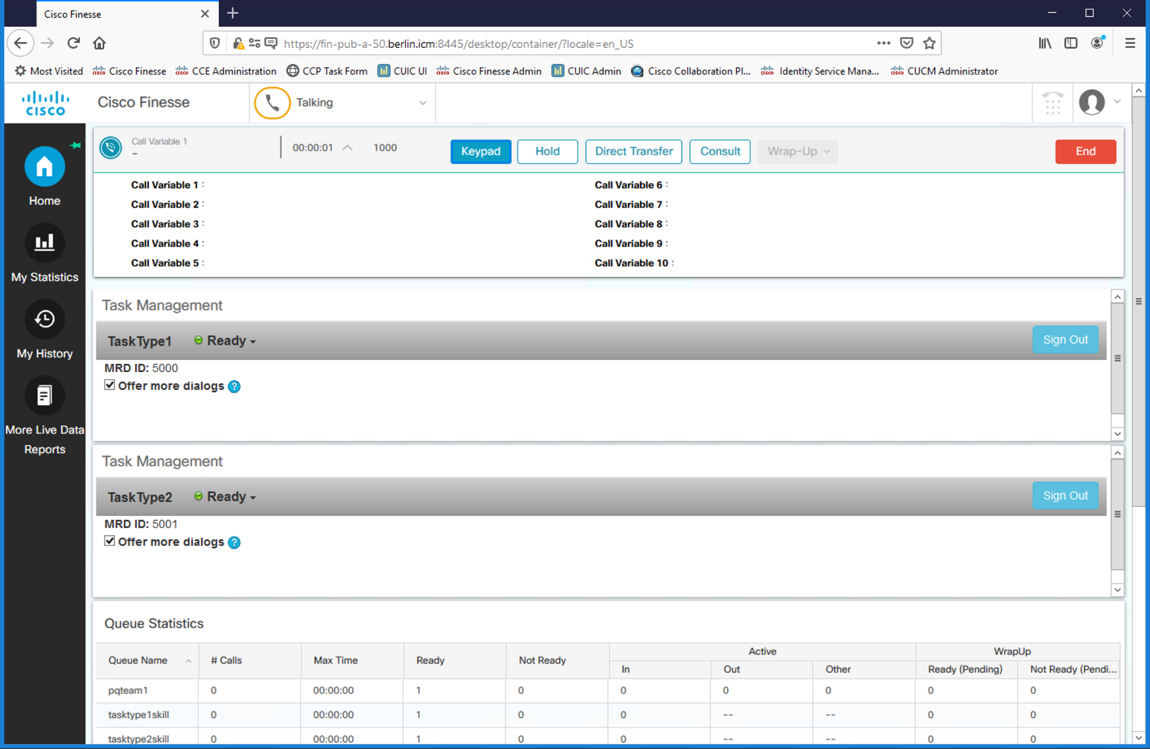
End the call by selecting the End button on the Finesse Agent Desktop or the call script will automatically terminate in 60 seconds.
Once the call is completed, the following statistics are observed on the CUCATT CLI.
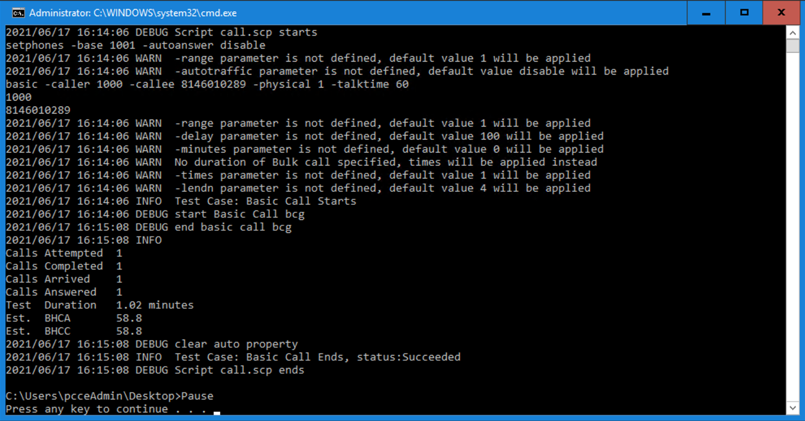
Route Task to an Agent
Regardless if your using an SSO or non-SSO agent, the process of signing into Task Management is the same. Note, however, that SSO and non-SSO agents are assigned different teams and task types to demonstrate their functionality.
The Finesse desktop layout is configured to display two TaskManagement gadgets, one for each preconfigured task type.
Login the agent on the Finesse Agent Desktop.

Select the ‘Sign In’ button under TaskType1
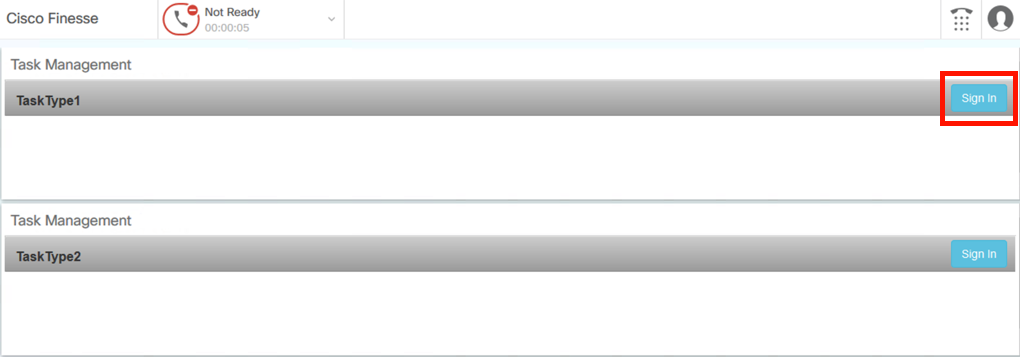
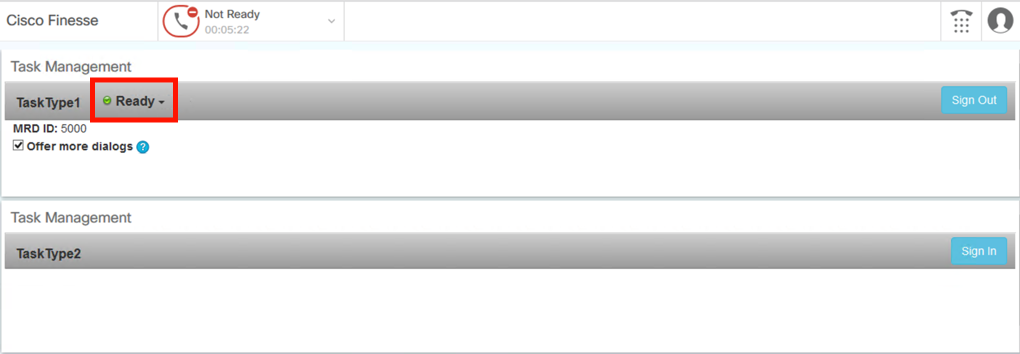
Press the down arrow next to "Not Ready" and select Ready:

The agent goes to a Ready state for TaskType1:
Use the Customer Collaboration Task Form (see the Task Form section) to generate tasks towards the agent task queues.
Accept the new task by clicking the ‘Accept’ Button. Notice that the Agent for TaskType1 goes into a reserved state and the green ‘Accept’ button appears.
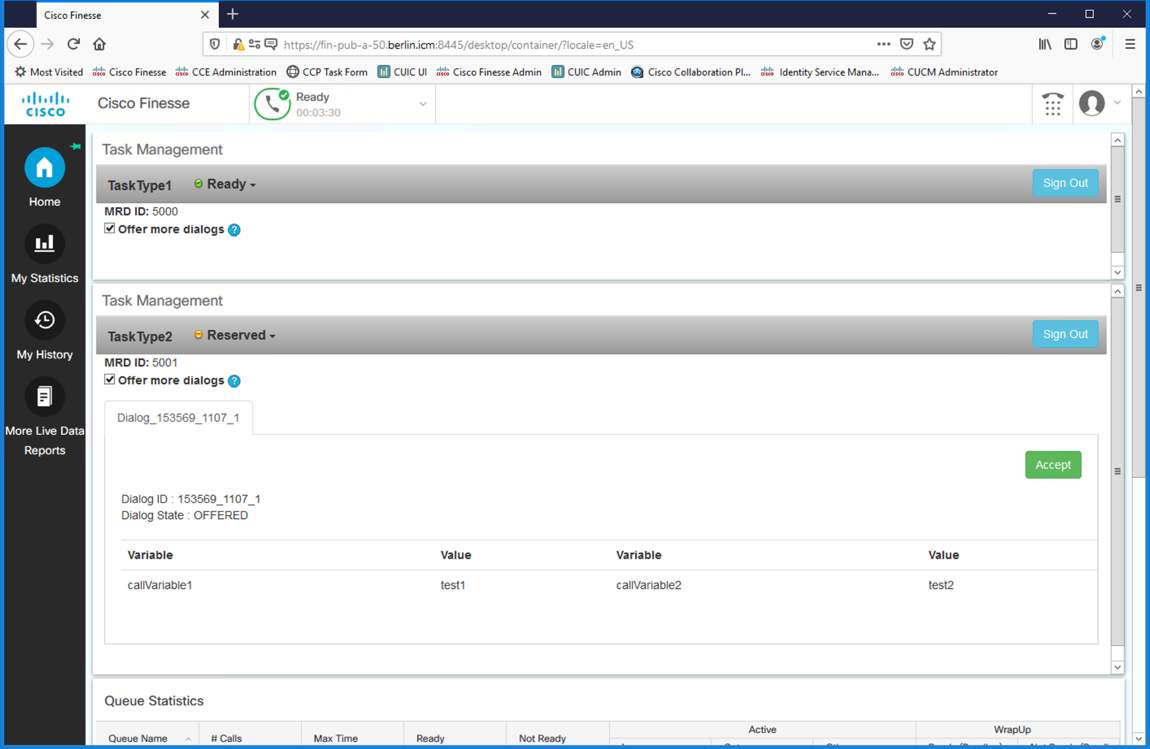
Handle the incoming tasks that arrive.
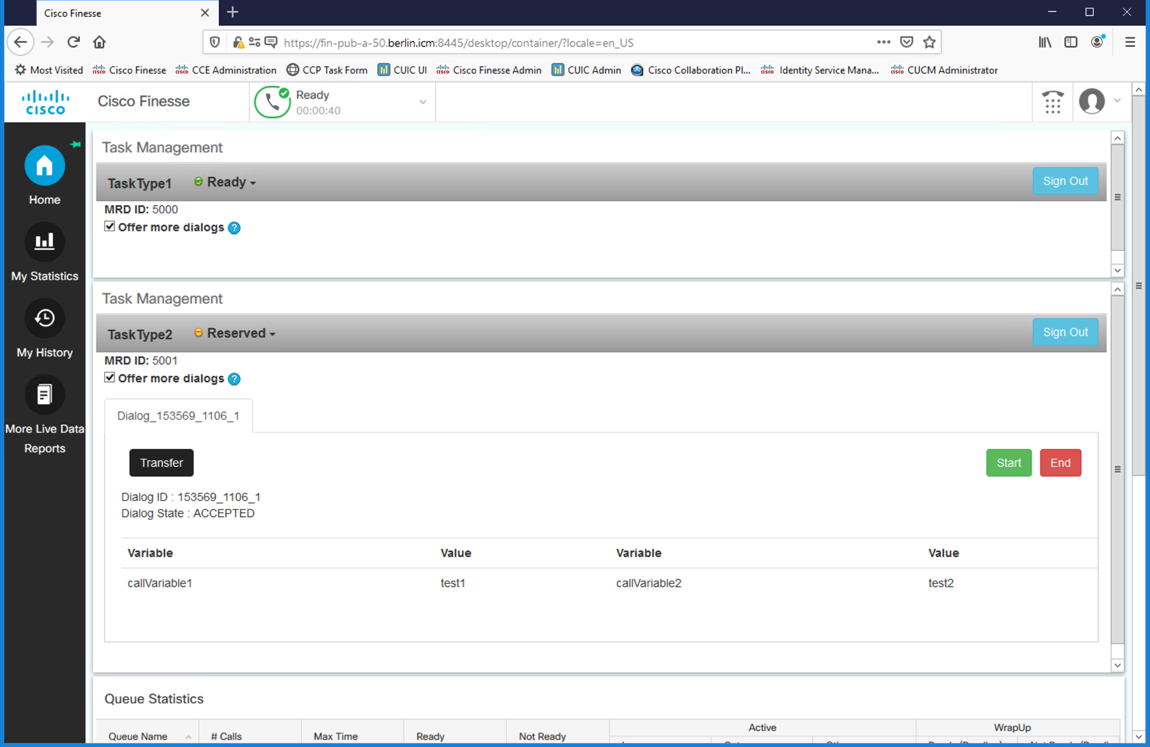
The available options are to Start, End, or Transfer the task. Once a task is started, it can be paused/resume, Wrap-up, Transferred, or ended. When transferring a task, you have the ability to transfer to another Script Selector.
To sign out, select Not Ready, uncheck "Offer more dialogs" and click Sign Out.
Repeat the steps for TaskType2 if desired.
Appendix
Call Manager Agent Registration
There is a script that runs on the AWA-1 server that registers simulated phones with CallManager using the CUCCATT utility application. This is an internal Cisco application that’s used to simulate phone calls. This process has been automated to avoid users from manually having to perform this task.
Using the Windows Task Scheduler, the script automatically runs upon the startup of the AW1-A server. Below are the details:
- The Windows Task Scheduler runs the batch file named
C:\StartScript\StartCUCATT.bat. StartCUCATT.batcallsC:\StartScript\StartCUCATT.ps1.StartCUCATT.ps1does the following:- Waits 500 Seconds to ensure CallManager successfully starts up.
- Launches the CUCATT.exe program with a configuration file that includes the lines to be registered.
- The results of the script are logged to C:\CUCATT-Start.log where results may be reviewed.
If agents are unable to be log in due to the device not being registered, you may run this script to re-register the devices or simply restart AW1-A.
Voice Calls
A voice call is routed to an agent by simply double clicking the MakeCall.bat file on the desktop of the AWA-1 server.

Below are the details of this batch file:
MakeCall.batcallsPowerShell C:\StartScript\makecall.ps1.makecall.ps1does the following:- Go to
C:\cucatt - Run
Cucatt.exe, the Cisco internal tool for making simulated calls, withcall.scpas the-scriptparameter.call.scpcontains the details of the call:- Disable auto answer for line
1001 - Make a call from line
1000to the routepoint of8146010289with a call duration of 60 seconds.
- Disable auto answer for line
Note: The length of the call can be changed by altering the –talktime parameter.
- Go to
Customer Collaboration Platform Task Injection
There is a script that runs on the AWA-1 server that injects tasks into the Customer Collaboration Platform with the Task Form. This process has been automated to avoid users from manually having to perform this task.
Using the Windows Task Scheduler, the script automatically runs upon the startup of the AW1-A server. Below are the details:
The Windows Task Scheduler runs the batch file named
C:\autoexec.bat.autoexec.batcallsC:\StartScript\TaskProxy.ps1.TaskProxy.ps1does the following:- Using Node, it launches
TaskProxy.js.
If agents are not receiving the tasks from the Task Form, you can simply restart AW1-A or manually restart it with the following steps:
- Using Node, it launches
Open a CMD window
- Click the 'Search/Magnifying glass' in the Windows menu bar and type in "cmd".
- Select Command Prompt. A command prompt will open
- Go to the SocialMinerTask Node directory by typing
cd C:\SocialMinerTask\html\node. - Start TaskProxyJS by typing
Node TaskProxy.js --host 10.10.20.60.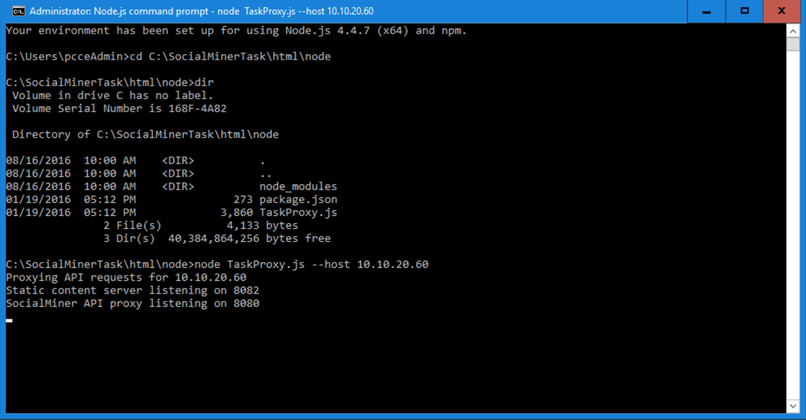
- Notice the APIs are now listening.
- You may minimize this window, but leave this process running during your testing.