Templates is a flexible and powerful mechanism in NSO which simplifies how changes can be made across the configuration data, for example across devices of different type. They also allow a declarative way to describe such manipulations.
Two types of Templates exist, device-templates and config-templates. The former is invoked as an action, where the latter is invoked either because of changes to some service data or through a programmatic API (e.g Java). For more information about device-templates, refer to: the section called “Device Templates” in NSO 5.7 User Guide. The rest of the text in this chapter mainly describes config-templates.
Note
config-templates are often called “Service Templates”, but this is only partly true. A config-template invoked through an API does not have to deal with NSO services.
When a template is used as part of a service implementation, thanks to NSO FASTMAP, NSO remembers the configuration changes made towards the devices and the template changes can for example be reverted.
There exist an API for applying config templates so they can replace large portions of boilerplate code when configuration data needs to be manipulated from a programming language.
config-templates gets loaded
as part of packages. The config-templates
are stored in XML files in the templates sub directory
of a package. config-templates can be used
to update any part of the configuration.
Config template terminology:
-
Config template: The use of templates in a programmatic way. Based on the same basic principles as the device-template with the distinction that a config template is part of the implementation (device-templates on the other hand, are dynamically created by the operator as needed, for example, in the CLI and stored in the configuration). config-templates gets loaded when NSO starts. If a NSO package has a
templatessub directory it gets scanned for files with the suffix '.xml' and those files gets loaded. With config-templates one can implement full services or abstract functionality. config-templates makes it possible to divide the work when implementing a service. One group may focus on the logic and the programming and another focus on the networking details declaring the modifications of devices in a template. -
Service template: A config-template connected to a service-point. These are services which are entirely implemented with a config-template. A service template is useful in cases when only a mapping of service instance data to device data is needed to implement the service, and no logic is involved. See the section called “Service Templates”.
-
Feature Template: A config-template used to configure a specific feature (for example acl) on a set of - different - devices. It is a convenient way of updating structured configuration data and can save lots of boiler plate code. Feature templates are normally applied from service code. See
$NCS_DIR/examples.ncs/service-provider/mpls-vpn/packages/l3vpn/templates/l3vpn-acl.xmlwhich is used in thel3vpnservice, in mpls-vpn example.
The typical way to design a template is to start with direct manipulation of devices until the desired result is reached or to write a device-template and apply it and watch the changes, correct it until the result is correct. This process can be performed in the NSO CLI or in the WebUI. Below will show how to do this in the CLI.
The process of defining a config-template is illustrated in two ways:
-
Define a device-template and convert it to a config-template
-
Define a config-template based on direct device configuration snippets.
both methods will result in the same config-template Example 120, “Created Config-template l3vpn-ce.xml” being constructed.
Note
The name of the config-template is the name
of the file without the extension .xml. All the template
names reside in the same namespace. A good practice is to name the
file:
<package name>-<feature>.xml
That way the name of the template will always be unique.
The idea is to start off by writing a device-template, apply it and inspect the changes to the devices, modify the template and do the same over again until the desired result is reached.
Create a device template l3vpn-ce, add some
settings to it and commit the changes:
admin@ncs(config)#devices template l3vpn-ce config ios:interface GigabitEthernet 0/1admin@ncs(config)#description "Link to PE"admin@ncs(config)#ip address primary address 10.1.1.1 mask 255.255.255.252
Apply the device-template to the ce0 device and check the changes by doing a dry run using the native out format of the device:
admin@ncs(config)#devices device ce0 apply-template template-name l3vpn-ceadmin@ncs(config)#commit dry-run outformat nativenative { device { name ce0 data interface GigabitEthernet0/1 description Link to PE ip address 10.1.1.1 255.255.255.252 exit } }
If you spot an error, revert the changes done by the template, add the missing configuration to the template and commit.
When you are satisfied with the result, save the device-template to a file:
admin@ncs(config)#
        show full-configuration devices template l3vpn-ce | display xml | save l3vpn-ce.xml
Pick up the file l3vpn-ce.xml in any editor.
Change the beginning of the file from:
<config xmlns="http://tail-f.com/ns/config/1.0">
  <devices xmlns="http://tail-f.com/ns/ncs">
  <template>
    <name>l3vpn-ce</name>
to:
<config-template xmlns="http://tail-f.com/ns/config/1.0">
  <devices xmlns="http://tail-f.com/ns/ncs">
    <device>
      <name>ce0</name>
Note the name of the device, it just serves as an example. The device name can be a static value, an XPath variable or the result of an XPath expression.
At the end the XML elements needs to be closed, change from:
    </template>
  </devices>
</config>
to:
    </device>
  </devices>
</config-template>
The final result should look like Example 120, “Created Config-template l3vpn-ce.xml”.
The idea is to make direct changes to the configuration and dry-run the changes to confirm the right commands are sent to the devices. From these changes a template can, as shown below. be constructed.
Make changes:
admin@ncs(config)#devices device ce0 config ios:interface GigabitEthernet 0/1admin@ncs(config)#description "Link to PE"admin@ncs(config)#ip address 10.1.1.1 255.255.255.252
Check that modifications of the network is the desired. Here is what is actually sent to the device by using the native format:
admin@ncs(config)# commit dry-run outformat native
native {
    device {
        name ce0
        data interface GigabitEthernet0/1
              description Link to PE
              ip address 10.1.1.1 255.255.255.252
             exit
    }
}
The same changes in the XML format serves as a good skeleton for a template. Save the modifications to a file:
admin@ncs(config)# commit dry-run outformat xml | save l3vpn-ce.xml
pick up the file l3vpn-ce.xml in any text editor. Remove
the leaf name result-xml. Insert the
template specific tag at the beginning of the file:
<config-template xmlns="http://tail-f.com/ns/config/1.0"
  <devices xmlns="http://tail-f.com/ns/ncs">
and to close the XML put at the end of the file:
  </devices>
</config-template>
The final result should look like Example 120, “Created Config-template l3vpn-ce.xml”.
<config-template xmlns="http://tail-f.com/ns/config/1.0">
  <devices xmlns="http://tail-f.com/ns/ncs">
    <device>
      <name>ce0</name>
        <interface xmlns="urn:ios">
          <GigabitEthernet>
            <name>0/1</name>
            <description>Link to PE</description>
            <ip>
              <address>
                <primary>
                  <address>10.1.1.1</address>
                  <mask>255.255.255.252</mask>
                </primary>
              </address>
            </ip>
          </GigabitEthernet>
        </interface>
    </device>
  </devices>
</config-template>
This above skeleton is now ready to be edited, have expressions introduced
instead of static values to make it more useful.
Look at
$NCS_DIR/examples.ncs/service-provider/mpls-vpn/packages/l3vpn/templates/l3vpn-ce.xml
to see how the above skeleton could be extended.
the section called “Service Templates”
Shows how Config-template is used as a service
template and
the section called “Templates applied from an API”
shows how a more complex Config-template is used from Java API.
A template is declared in accordance with the YANG data model. You just set and create node elements to build the desired structure. Or paraphrased, you simply declare the result.
A template can be defined across different vendors, but still in the same
template. Furthermore, the templates also allow for defining different
behaviour when applying the template. This is accomplished by
setting tags such as merge,
replace, delete, create or
nocreate
on relevant nodes in the template.
Note
The variables $DEVICE and $TEMPLATE_NAME are set internally by NSO. $DEVICE is set to the name of the current device. The variable $TEMPLATE_NAME is set to the name of the current template. None of these variables can be set by a user, it can however be used in a template as any other variable.
The variable $SCHEMA_OPAQUE is set internally if the template is registered for the servicepoint (the top node in the template has servicepoint attribute) and the corresponding ncs:servicepoint statement in the YANG model has tailf:opaque substatement. The variable is then set to the argument of the tailf:opaque statement for the corresponding schema path.
Each value in a template is stored as a string. This string value is converted to the actual value type of the YANG model when the template is applied.
If the value contains a pair of {...} the string between
the curly braces is treated as an XPath 1.0 expression. The
simplest form of an XPath expression is a plain XPath variable:
<config-template xmlns="http://tail-f.com/ns/config/1.0">
  <devices xmlns="http://tail-f.com/ns/ncs">
    <device>
      <name>{$CE}</name>
      ...
    </device>
  </devices>
</config-template>
Any value assigned to the variable CE, which can be done via the Java API, will be used when the template is applied:
...
TemplateVariables var = new TemplateVariables();
var.putQuoted("CE","ce0");
...
A value can contain any number of {...} and strings,
the total result will be the concatenation of all the strings and all
the XPath expressions.
<config-template xmlns="http://tail-f.com/ns/config/1.0">
  <devices xmlns="http://tail-f.com/ns/ncs">
    <device>
      <name>{$CE}</name>
      ...
      <config>
      <interface xmlns="urn:ios">
        <GigabitEthernet>
        ...
        <description>Link to PE / {$PE} - {$PE_INT_NAME}</description>
    </device>
  </devices>
</config-template>
This would for example, when applied, evaluate the XPath expressions
{$PE} and {$PE_INT_NAME} to "pe0" and
"GigabitEthernet0/0/0/3".
giving the
the total result of
<description>Link to PE / pe0 - GigabitEthernet0/0/0/3</description>
As the text between the {...} is an XPath 1.0 expression
we can select any reachable node:
/endpoint/ce/device
this selects a leaf node, device.
The value of the selected leaf will be used
to assign a new value where it is used when the template is
applied.
The result of a selection is internally converted to string representation. All concatenations are done on strings. When the string value is assigned to a leaf element a string to value conversion takes places in the context of the target node.
If the result of the selection is an empty node-set nothing is set.
NSO template engine supports a number of processing instructions to allow for more dynamic templates. The following table lists the available processing instructions.
| Syntax | Description |
|---|---|
<?set
|
Allows to assign new variables or manipulate existing variable value. If used to create a new variable, then the scope of visibility of this variable is limited to the parent tag of the processing instruction or the current processing instruction block. Specifically, if a new variable is defined inside a loop, then it is discarded at the end of each iteration. |
<?if {
|
Processing instruction block that allows conditional execution based on the boolean result of the expression. For the detailed description see the section called “Conditional Statements” |
<?foreach {
|
The expression must evaluate to a (possibly empty) XPath node-set. The template engine will then iterate over each node in the node-set by changing the XPath current context node to this node and evaluating all children tags within this context. For the detailed description see the section called “Loop Statements” |
<?for [
|
This processing instruction allows to iterate over the same set
of template tags by changing a variable value. The variable
visibility scope obeys the same rules as in the case of
set processing instruction, except the variable
value is carried over to the next iteration instead of being
discarded at the end of each iteration. The square brackets
indicate optional clauses, so only the condition expression is
mandatory. For the detailed description see
the section called “Loop Statements”
|
<?copy-tree {
|
This instruction is analogous to copy_tree function available
in the MAAPI API. The parameter is an XPath expression which
must evaluate to exactly one node in the data tree and indicates
the source path to copy from. The target path is defined by
the position of the copy-tree instruction in the
template within the current context.
|
<?set-context-node {
|
Allows to manipulate the current context node used to evaluate XPath expressions in the template. The expression is evaluated within the current XPath context and must evaluate to exactly one node in the data tree. |
<?set-root-node {
|
Allows to manipulate the root node of the XPath accessible
tree. This expression is evaluated in an XPath context where
the accessible tree is the entire datastore, which means that
it is possible to select a root node outside the current
accessible tree. The current context node remains unchanged.
Just like with the set-context-node instruction the
expression must evaluate to exactly one node in the data tree.
|
<?save-context
|
Store both the current context node and the root node of the
XPath accessible tree with name being
the key to access it later. It is possible to switch to this
context later using switch-context with the name.
Multiple contexts can be stored simultaneously under different
names. Using save-context with the same name multiple times will
result in the stored context being overwritten.
|
<?switch-context
|
Used to switch to a context stored using save-context
with the specified name. This means that both the current
context node and the root node of the XPath accessible tree will
be changed to the stored values. switch-context does
not remove the context from the storage and can be used as many
times as needed, however using it with a name that does not
exist in the storage would cause an error.
|
<?if-ned-id
|
If there are multiple versions of the same NED known or
expected to be loaded in the system, defining different
versions of the same namespace, this processing instruction
helps to resolve ambiguities in the schema between different
versions of the NEDs. The part of the template following this
processing instruction, and until matching
|
The variable value in both set and for processing
instructions is evaluated in the same way as the values within XML tags
in a template (see
the section called “Values in a template”).
So, it can be a mix of literal values and XPath expressions surrounded
by {...}.
The variable value is always stored as a string, so any XPath expression will be converted to literal using XPath string() function. Namely, if the expression results in an integer or a boolean, then the resulting value would be a string representation of the integer or boolean. If the expression results in a node-set, then the value of the variable is a concatenated string of values of nodes in this node-set.
It is important to keep in mind that while in some cases XPath converts
the literal to another type implicitly (for example, in an expression
{$x < 3} a possible value x='1' would be converted to
integer 1 implicitly), in other cases an explicit conversion is needed.
For example, in the following expression {$x > $y} if x='9'
and y='11', then the result of the expression is true due to alphabetic
order. In order to compare the values as numbers an explicit conversion
of at least one argument is required:
{number($x) > $y}.
When the evaluation of a template starts the XPath context node is set to the root of the service instance data that was created as described above.
Note
When a template is applied from an API, the context node can be specified. See the documentations for the API of your choice.
The root context node can also be changed from within template with
help of set-root-node processing instruction. It takes an
XPath expression as a parameter, and this expression is evaluated in a
special context, where the root node is the root of the datastore. This
makes it possible to change to a node outside the current evaluation
context. For example: <?set-root-node {/}?> changes
the accessible tree to the whole datastore. As with other processing
instruction, the effect of set-root-node only applies until
the closing parent tag.
Under certain criteria the evaluation context node is changed to make it easier to work with lists in the templates. To understand the evaluation of templates it is important to understand how and when the context node is changed.
The evaluation context will change if the value being set in the template is the key of a list, and the XPath expression evaluates to a node set. However if the expression evaluates to a value, the context will not change. To explain the algorithm above, let's look at the following example.
The device YANG model has the following snippet.
container vrf {
 list definition {
    key "name";
    leaf name {
      type string;
    }
  }
}
If the template looks like this:
<vrf xmlns="urn:ios" tags="merge">
  <definition>
    <name>{/vpn-service[name='volvo']/leg[node='branch']/name}</name>
    <rd>{as-number}:1</rd>
  </definition>
</vrf>
Since /vpn-service[name='volvo']/leg[node='branch']/name
evaluates to a
node, the evaluation context node will be changed to the parent of
that node.
I.e. /vpn-service[name='volvo']/leg[node='branch'].
This means that the second template parameter {as-number} will be relative
to the context change, i.e.
/vpn-service[name='volvo']/leg[node='branch']/as-number
In some cases it is not desirable to change the context. This can be achieved by forcing the XPath expression to be evaluated to a value rather than a node. If the template looks like this:
<vrf xmlns="urn:ios" tags="merge">
  <definition>
    <name>{string(/vpn-service[name='volvo']/leg[node='branch']/name)}</name>
    <rd>{as-number}:1</rd>
  </definition>
</vrf>
The XPath function string() is used within the first expression.
This evaluates to a value which means the context will remain unchanged.
This also means that the second template parameter
{as-number} will still be relative to what the context was
before, i.e. it remains unchanged.
Another way to write the latter example would be:
<vrf xmlns="urn:ios" tags="merge">
  <?set-root-node {.}?>
  <definition>
    <name>{/vpn-service[name='volvo']/leg[node='branch']/name}</name>
    <rd>{/as-number}:1</rd>
  </definition>
</vrf>
This example temporarily changes the accessible tree to the subtree under the current context node which makes it easier to write paths under the current node. The accessible tree is restored after the closing </vrf> tag.
It is also possible to change the current context node using the
processing instruction context. For example:
<?set-context-node {..}?> will change the context node
to the parent of the current context node.
Sometimes it is necessary to control which parts of a template that
should be evaluated. The if and elif processing
instructions make it possible to set a conditional statement that
controls if the sub-tree should be evaluated or not.
<policy-map xmlns="urn:ios" tags="merge">
  <name>{$POLICY_NAME}</name>
  <class>
    <name>{$CLASS_NAME}</name>
    <?if {qos-class/priority = 'realtime'}?>
      <priority-realtime>
        <percent>{$CLASS_BW}</percent>
      </priority-realtime>
    <?elif {qos-class/priority = 'critical'}?>
      <priority-critical>
        <percent>{$CLASS_BW}</percent>
      </priority-critical>
    <?else?>
      <bandwidth>
        <percent>{$CLASS_BW}</percent>
      </bandwidth>
    <?end?>
    <set>
      <ip>
        <dscp>{$CLASS_DSCP}</dscp>
      </ip>
    </set>
  </class>
</policy-map>
The template example above shows the use of the if,
elif and else processing instructions to select
between tags priority-realtime, priority-critical
and bandwidth.
The sub-tree containing the priority-realtime tag will only
be evaluated if the XPath statement, qos-class/priority, in the
if processing instruction evaluates to the string 'realtime'.
The subtree under the elif processing instruction will be
executed if the preceding if expression evaluated to
false, i.e. qos-class/priority is not equal to
the string 'realtime', and the XPath statement inside of the
elif processing instruction evaluates to the string 'critical'.
The subtree under the else processing instruction will be
executed when both the preceding if and elif
expressions evaluated to false, i.e.
qos-class/priority is neither equal to the string
'realtime' nor 'critical'.
The evaluation of the XPath statements used in the if
and elif processing instructions follow the XPath standard
for computing boolean values. In summary the conditional expression
will evaluate to false when:
-
The argument evaluates to an empty node set. As in the example above.
-
The value of the argument is either an empty string or numerically zero.
-
The argument evaluates to a boolean false, using an XPath function like not().
Sometimes statements in a sub-tree needs to be applied several times.
foreach and for processing instructions can
be used to accomplish this iteration.
<ip xmlns="urn:ios">
  <route>
    <vrf>
      <name>VPN{/vpn-number}</name>
      <?foreach {tunnel}?>
        <ip-route-forwarding-list>
          <prefix>{network}</prefix>
          <mask>{netmask}</mask>
          <forwarding-address>10.255.254.{(tunnel-number-1)*4+2}</forwarding-address>
        </ip-route-forwarding-list>
      <?end?>
    </vrf>
  </route>
</ip>
The template example above shows the use of the foreach
processing instruction to populate the list
ip-route-forwarding-list. If the result of the XPath
expression tunnel is a non-empty node-set then the sub-tree
containing ip-route-forwarding-list tag will be evaluated
for every node in that node-set.
For each iteration the initial context will be set to the node in
that iteration. The XPath function current() can
be used to retrieve that initial context.
There can be only one XPath statement in the foreach
processing instruction and the result needs to be a node-set, not a
simple value. It is however possible to use XPath union operator to
join multiple node-sets in a single expression:
{some-list-1 | some-leaf-list-2}
for is a processing instruction that allows to control
flow by means of changing a variable rather than changing context node.
For example, the following template snippet could be used to disable a
range of interfaces:
          <interface xmlns="urn:ios">
            <?for i=0; {$i < 4}; i={$i + 1}?>
              <FastEthernet>
                <name>0/{$i}</name>
                <shutdown/>
              </FastEthernet>
            <?end?>
          </interface>
In this example the for keyword is followed by three
semicolon-separated clauses with the following meaning:
-
The first clause is the initial step executed before the loop is entered the first time. The format of the clause is variable name followed by equal sign and an expression that combines literal string and XPath expressions surrounded by {}. This expression is evaluated in the same way as the XML tag contents in templates. This clause is optional.
-
The second clause is the progress condition. The loop will execute as long as this condition evaluates to true, using the same rules as the
ifprocessing instruction. The format of this clause is an XPath expression surrounded by {}. This clause is mandatory. -
The third clause is executed after each iteration. It has the same format as the first clause (variable assignment) and is optional.
When a device makes itself known to NSO it presents a list of capabilities, see: the section called “Capabilities, Modules and Revision Management” in NSO 5.7 User Guide, which includes what YANG modules that particular device support. Since each YANG module define a unique namespace, this information can be used in a Template. Hence, a Template may refer to many diverse devices, where only those pieces of the Template with a matching namespace will be applied for a particular device.
Templates allow for defining different
behaviour when applying the template.
This is accomplished by
setting tags, as an attribute. Existing tags are: merge,
replace, delete, create or
nocreate on relevant nodes in the template.
Tags mergemerge and nocreate are inherited to
their sub-nodes until a new tag is introduced. Tag delete
applies only to the current node and any children (except keys
specifying the list/leaf-list entry to delete) are ignored. Tags
create and replace are not inherited and
only apply to the node they are specified on. Children of the nodes
with create or replace tags have
merge behaviour.
-
merge: Merge with a node if it exists, otherwise create the node. This is the default operation if no operation is explicitly set.
...
<config tags="merge">
  <interface xmlns="urn:ios">
...
-
replace: Replace a node if it exists, otherwise create the node.
... <GigabitEthernet tags="replace"> <name>{link/interface-number}</name> <description tags="merge">Link to PE</description> ... -
create: Creates a node. The node can not already exist. An error is raised if the node exists.
... <GigabitEthernet tags="create"> <name>{link/interface-number}</name> <description tags="merge">Link to PE</description> ... -
nocreate: Merge with a node if it exists. If it does not exist, it will not be created.
... <GigabitEthernet tags="nocreate"> <name>{link/interface-number}</name> <description tags="merge">Link to PE</description> ... -
delete: Delete the node.
...
<GigabitEthernet tags="delete">
  <name>{link/interface-number}</name>
  <description tags="merge">Link to PE</description>
...
For ordered-by user lists and leaf-lists, the insert attribute can be used to specify where in the list, or leaf-list, the node should be inserted. You need to specify if the node should be inserted first or last in the node-set, or before or after a specific instance. For example, if you have a list of rules where order is important>
...
<rule insert="first">
  <name>{$FIRSTRULE}</name>
  ...
</rule>
...
<rule insert="last">
  <name>{$LASTRULE}</name>
  ...
</rule>
...
<rule insert="after" value={$FIRSTRULE}>
  <name>{$SECONDRULE}</name>
  ...
</rule>
...
<rule insert="before" value={$LASTRULE}>
  <name>{$SECONDTOLASTRULE}</name>
  ...
</rule>
...
It is not uncommon that there are multiple services managing the same ordered-by user list or leaf-list. The relative order of elements inserted by these services might not matter, but there are constraints on element positions that need to be fulfilled. Following the list of rules example, suppose that initially the list contains only the "deny-all" rule:
<rule>
  <ip>0.0.0.0</ip>
  <mask>0.0.0.0</mask>
  <action>deny</action>
</rule>
There are services that prepend permit rules to the beginning of the list using insert="first" operation. If there are two services creating one entry each, 10.0.0.0/8 and 192.168.0.0/24 respectively, then the resulting configuration looks like:
<rule>
  <ip>192.168.0.0</ip>
  <mask>255.255.255.0</mask>
  <action>permit</action>
</rule>
<rule>
  <ip>10.0.0.0</ip>
  <mask>255.0.0.0</mask>
  <action>permit</action>
</rule>
<rule>
  <ip>0.0.0.0</ip>
  <mask>0.0.0.0</mask>
  <action>deny</action>
</rule>
If we now try to check-sync the first service (10.0.0.0/8), then it will report out-of-sync, and re-deploying it would move the 10.0.0.0/8 rule first. But all we want is for the deny-all rule to be last. This is when guard attribute comes in handy. If both insert and guard attributes are specified on a list entry in template, then the template engine will first check whether the list entry already exists in the resulting configuration between the target position (as indicated by the insert attribute) and the position of an element indicated by the guard.
-
If the element exists and fulfills this constraint, then its position will be preserved. If a template list entry results in multiple configuration list entries, then all of them need to exist in the configuration in the same order as calculated by template, and all of them need to fulfill the guard constraint in order for their position to be preserved.
-
If the list entry/entries do not exist, are not in the same order or do not fulfill the constraint, then the list is reordered as instructed by the insert statement.
So, assuming the following data model in the example above
...
list rule {
  key "ip mask";
  ordered-by user;
  leaf ip {
    type inet:ipv4-address;
  }
  leaf mask {
    type inet:ipv4-address;
  }
  leaf action {
    type enumeration {
      enum permit;
      enum deny;
    }
    mandatory true;
  }
...
}
...
The template could look as following:
...
<rule insert="first" guard="0.0.0.0 0.0.0.0">
  <ip>{$IP}</ip>
  <mask>{$MASK}</mask>
  <action>permit</action>
</rule>
...
A guard can be specified literally (e.g.
guard="0.0.0.0 0.0.0.0" if "ip mask" is the key of the
list) or using an XPath expression (e.g.
guard="{$GUARDIP} {$GUARDMASK}"). If the guard evaluates
to a node-set consisting of multiple elements, then only the first
element in this node-set is considered as the guard. The constraint
defined by the guard is evaluated as follows:
-
If
insert="first", then the constraint is fulfilled if the element exists in the configuration before the element indicated by the guard. -
If
insert="last", then the constraint is fulfilled if the element exists in the configuration after the element indicated by the guard. -
If
insert="after", then the constraint is fulfilled if the element exists in the configuration before the element indicated by the guard, but after the element indicated by the key or value statement. -
If
insert="before", then the constraint is fulfilled if the element exists in the configuration after the element indicated by the guard, but before the element indicated by the key or value statement. -
If the guard evaluates to an empty node-set (i.e. the node indicated by the guard does not exist in the target configuration), then the constraint is not fulfilled.
Sometimes there is a need of some extra information when
applying templates in order to understand what is going on. When
applying or committing a template there is a cli pipe command
debug that
enables debug information:
admin@ncs(config)# commit dry-run | debug template
admin@ncs(config)# commit dry-run | debug xpath
debug template will output XPath expression
results from the template, under which context it is evaluated, what operation
is used and how it effects the configuration, for all
templates invoked. It can be narrowed down to only show
debugging information for a specific template:
admin@ncs(config)# commit dry-run | debug template l3vpn
debug xpath will output all XPath evaluations
for the transaction, and is not limited to the XPath
expressions inside templates.
Template and xpath debugging can be combined:
admin@ncs(config)# commit dry-run | debug template | debug xpath
Note
The example-snippets in this section are based on the
service template l3vpn which is described in
detail in the section called “Service Templates”.
The template itself can be found under
$NCS_DIR/examples.ncs/service-provider/simple-mpls-vpn.
Create the service as described in the README in the example
directory, to try it out yourself.
Using the cli pipe flag debug template when
committing a service which uses template(s) will give you
detailed information on what the template will do. Below are
selected snippets, with explanations, on output when
committing the l3vpn service template
with the debug flag. Some lines has been shortened to fit
the page.
admin@ncs(config)# commit dry-run | debug template
Evaluating "/endpoint/ce/device" (from file "l3vpn.xml", line 5)
Context node: /vpn/l3vpn[name='volvo']
Result:
For /vpn/l3vpn[name='volvo']/endpoint[id='c1']/ce, it evaluates to "ce0"
For /vpn/l3vpn[name='volvo']/endpoint[id='c2']/ce, it evaluates to "ce2"
Operation 'nocreate' on node /devices/device[name='ce0'] (from file "l3vpn.xml", line 5)
Node exists, continuing...
...
The output shows that a config-template is in play (as the
origin of the template is an xml-file
l3vpn.xml. It shows that
/endpoint/ce/device from line 5 is evaluated
under the context /vpn/l3vpn[name='volvo'], and
that it evaluates to 2 values, ce0 and
ce2, as /endpoint/ce/device is a
node set of 2 instances, c1 and
c2. Next, it shows that it will start with the
first node in the set, and perform a 'nocreate' operation,
and that the node exists.
Line 4-6 in the l3vpn.xml:
4  <device tags="nocreate" >
5   <name>{/endpoint/ce/device}</name>
6   <config tags="merge">
Continuing with the debug output:
Operation 'merge' on non-existing node: /devices/device[name='ce0']/.../description
(from file "l3vpn.xml", line 11)
Fetching literal "Link to PE" (from file "l3vpn.xml", line 11)
Setting /devices/device[name='ce0']/../description to "Link to PE"
Above it shows that the node description, which
did not exist beforehand, will be set to the value
Link to PE.
Line 11 in the l3vpn.xml:
11 <description tags="merge">Link to PE</description>
Continuing with the debug output:
Operation 'nocreate' on node /devices/device[name='pe2']
(from file "l3vpn.xml", line 52)
Node exists, continuing...
The device /devices/device[name='pe2'] does not support
namespace 'urn:ios' for node "interface" (from file "l3vpn.xml", line 69)
Further down in the output it is shown that the device
pe2 does not support configuration with
namespace urn:ios and therefore that part of
the template, and its siblings, will be skipped.
Line 69 in the l3vpn.xml:
69 <interface xmlns="urn:ios" tags="nocreate">
This was just selected extracts of the output; the real output shows each and every effect the template will have. As seen the debug command is very useful for the understanding on how a template is interpret by the system.
In addition to the debug command there are some other options
available which can be used in other scenarios.
To get the XPath selections right use the NSO CLI
show command
with the xpath display flag to find out the correct path
to an instance node. This shows the name of the key elements and
also the name space changes.
% show full-configuration devices device c0 config ios:interface  | display xpath
/devices/device[name='c0']/config/ios:interface/FastEthernet[name='1/0']
/devices/device[name='c0']/config/ios:interface/FastEthernet[name='1/1']
/devices/device[name='c0']/config/ios:interface/FastEthernet[name='1/2']
/devices/device[name='c0']/config/ios:interface/FastEthernet[name='2/1']
/devices/device[name='c0']/config/ios:interface/FastEthernet[name='2/2']
When using more complex expressions the ncs_cmd utility
can be used to experiment and to debug expressions.
ncs_cmd is used in a command shell. The command
does not print the result as XPath selections but is still
of great use when debugging XPath expressions.
The below example selects FastEthernet interface names on device c0:
$ ncs_cmd -c \
  "x /devices/device[name='c0']/config/ios:interface/FastEthernet/name"
/devices/device{c0}/config/interface/FastEthernet{1/0}/name [1/0]
/devices/device{c0}/config/interface/FastEthernet{1/1}/name [1/1]
/devices/device{c0}/config/interface/FastEthernet{1/2}/name [1/2]
/devices/device{c0}/config/interface/FastEthernet{2/1}/name [2/1]
/devices/device{c0}/config/interface/FastEthernet{2/2}/name [2/2]
To understand the XPath expressions when the template is applied the
xpath trace is a valuable tool. XPath trace can be enabled in the
NSO configuration file ncs.conf. In the examples it
is enabled by default.
In a terminal window one can follow the evaluation of XPath expressions in the log file:
$ tail -f logs/xpath.trace
The core function of NSO is the capability to map service models to device models. When the mapping is a pure function from service parameters to device parameters the template mechanism can be used to define this mapping in a declarative way. When the mapping includes calls to external systems, complex algorithms etc this can be expressed in programmatic mapping logic instead. NSO supports Java for defining Mapping Logic.
Templates can express the mapping in many cases and have the benefit of being expressed in a way network engineers think. Based on the concepts presented above you can look at using templates to specify service models and how the service models can be transformed to device configurations. This would be of limited use without FASTMAP. The template mechanism declaratively maps the service configuration to device configurations. But the NSO FASTMAP algorithm will enable NSO users to modify service instances and deleting service instances and FASTMAP in combination with the template definition will calculate and apply the minimum diff to apply the changes to the network.
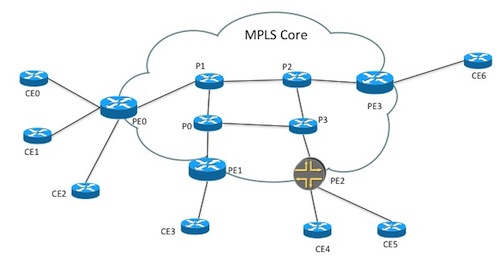
The example will illustrate this by setting up Layer3 VPNs in a service provider MPLS network. The example consists of Cisco ASR 9k core routers (P and PE) and Cisco IOS based CE routers, as shown in Figure 49, “The example network” All the code for the example can be found as a running example in:
$NCS_DIR/examples.ncs/service-provider/simple-mpls-vpn
Imagine the following service model:
list l3vpn {
 description "Layer3 VPN";

 key name;
 leaf name {
   tailf:info "Unique service id";
   tailf:cli-allow-range;
   type string;
 }

 uses ncs:service-data;
 ncs:servicepoint  "l3vpn-template";

 list endpoint {
   key "id";
   leaf id{
     tailf:info "Endpoint identifier";
     type string;
   }
   leaf as-number {
     description "AS used within all VRF of the VPN";
     tailf:info "MPLS VPN AS number.";
     mandatory true;
     type uint32;
   }
   container ce {
     leaf device {
       mandatory true;
       type leafref {
         path "/ncs:devices/ncs:device/ncs:name";
       }
     }
     container local {
       uses endpoint-grouping;
     }
     container link {
       uses endpoint-grouping;
     }
   }

   container pe {
     leaf device {
       mandatory true;
       type leafref {
         path "/ncs:devices/ncs:device/ncs:name";
       }
     }
     container link {
       uses endpoint-grouping;
     }
   }
 }

 grouping endpoint-grouping {
   leaf interface-name {
     tailf:info "Interface name. For example FastEthernet.";
     type string;
   }
   leaf interface-number {
     tailf:info "Interface number. For example 0 or 1/0";
     type string;
   }
   leaf ip-address {
     tailf:info "Local interface address.";
     type inet:ipv4-address;
   }
 }
Note the line containing the statement:
ncs:servicepoint "l3vpn-template";. A reference to
this servicepoint can be found in the corresponding template
that implements this service. As soon as this service data is manipulated,
the Template Engine will be invoked via this servicepoint in order
to apply the corresponding template.
The corresponding template that maps the service data to the device data is shown in Example 122, “Service to Device Model mapping using Templates”
Note
In order to save space, only some parts of the template will be shown here. Refer to the full example for the complete template.
In several places the template uses data from the service data-model, note the expressions enclosed in curly brackets in the listing below
The templates gets loaded from the templates
sub directory of packages.
T   1:<config-template xmlns="http://tail-f.com/ns/config/1.0"
T   2:  servicepoint="l3vpn-template">
T   3:  <devices xmlns="http://tail-f.com/ns/ncs">
T   4:    <?foreach {endpoint/ce}?>
T   5:      <device tags="nocreate">
T   6:        <name>{device}</name>
T   7:        <config tags="merge">
T   8:          <!-- CE template for Cisco IOS routers -->
T   9:          <interface xmlns="urn:ios">
T  10:            <?foreach {link}?>
T  11:              <GigabitEthernet tags="nocreate">
T  12:                <name>{interface-number}</name>
T  13:                <description tags="merge">Link to PE</description>
T  14:                <ip tags="merge">
T  15:                  <address>
T  16:                    <primary>
T  17:                      <address>{ip-address}</address>
T  18:                      <mask>255.255.255.252</mask>
T  19:                    </primary>
T  20:                  </address>
T  21:                </ip>
T  22:              </GigabitEthernet>
T  23:            <?end?>
T  24:            <?foreach {local}?>
T  25:              <GigabitEthernet tags="nocreate">
T  26:                <name>{interface-number}</name>
T  27:                <description tags="merge">Local network</description>
T  28:                <ip tags="merge">
T  29:                  <address>
T  30:                    <primary>
T  31:                      <address>{ip-address}</address>
T  32:                      <mask>255.255.255.0</mask>
T  33:                    </primary>
T  34:                  </address>
T  35:                </ip>
T  36:              </GigabitEthernet>
T  37:            <?end?>
T  38:          </interface>
T  39:          <router xmlns="urn:ios">
T  40:            <bgp>
T  41:              <as-no>{../as-number}</as-no>
T  42:              <neighbor>
T  43:                <id>{pe/link/ip-address}</id>
T  44:                <remote-as>100</remote-as>
T  45:                <activate/>
T  46:              </neighbor>
T  47:              <redistribute>
T  48:                <connected>
T  49:                </connected>
T  50:              </redistribute>
T  51:            </bgp>
T  52:          </router>
T  53:        </config>
T  54:      </device>
T  55:    <?end?>

          ...

T 181:  </devices>
T 182:</config-template>}
The template will have the same name as the file it was loaded from
except the .xml suffix. Note the attribute at
Line 'T 2': this template will be applied
when changes are made at servicepoint: l3vpn-template.
Or paraphrased: this template implements the service at
servicepoint l3vpn-template.
The service data used in this example is:
S 1:vpn l3vpn volvo
S 2:    endpoint c1
S 3:     as-number 65001
S 4:     ce device ce0
S 5:     ce local interface-name GigabitEthernet
S 6:     ce local interface-number 0/9
S 7:     ce local ip-address 192.168.0.1
S 8:     ce link interface-name GigabitEthernet
S 9:     ce link interface-number 0/2
S 10:    ce link ip-address 10.1.1.1
S 11:    pe device pe2
S 12:    pe link interface-name GigabitEthernet
S 13:    pe link interface-number 0/0/0/1
S 14:    pe link ip-address 10.1.1.2
S 15:   !
S 16:   endpoint c2
S 17:    as-number 65001
S 18:    ce device ce2
S 19:    ce local interface-name GigabitEthernet
S 20:    ce local interface-number 0/3
S 21:    ce local ip-address 192.168.1.1
S 22:    ce link interface-name GigabitEthernet
S 23:    ce link interface-number 0/1
S 24:    ce link ip-address 10.2.1.1
S 25:    pe device pe2
S 26:    pe link interface-name GigabitEthernet
S 27:    pe link interface-number 0/0/0/2
S 28:    pe link ip-address 10.2.1.2
S 28:}
The different lines in the template will be explained below.
-
Line 'T 4': This annotates the node with the tag
nocreate. No device nodes will be created, this tag is in effect until a new tag is introduced. No sub-nodes to the device node will be created either. Changes introduced by the template will only be applied to existing nodes.Further The XPath expression within curly brackets:
/endpoint/ceis an absolute path. The root of all paths is the service data at 'S 1':vpn l3vpn volvo. The XPath evaluation context is set to this root. Hence, 'T 4' will result in a node set consisting of the nodes at:vpn l3vpn volvo endpoint ce.The processing instruction
foreachwill make the template to be applied once for every node in the resulting node-set of the XPath expressionendpoint/ce. For every iteration the initial context will be set to each node in turn. -
Line 'T 5': The XPath expression within curly brackets:
deviceis relative path. This path is relative to the initial context.In this example, this node set will contain
ce0(line: 'S 4') andce2(line: 'S 18'), which means that the lines of the template, 'T 4' to 'T 49', will be applied to first the devicece0and secondly to the devicece2.As a side effect of the XPath expression at 'T 5', the evaluation context with be changed to its parent node (
ce). This will make it more convenient to use relative XPath expressions in the succeeding template. Read more about the XPath evaluation context in the section called “XPath Context in config-templates”. -
Line 'T 6': Change the way the template is applied by annotating the node
configwith the tagmerge. Existing nodes will be changed and if a node does not exist it will be created. -
Line 'T 8': Note then namespace attribute value
"urn:ios"of the nodeinterface. This will make sure that only devices modeled with this particular namespace will be affected by this part of the template. Hence, it is possible for one template to handle a multitude of devices from various manufacturers. -
Line 'T 9': Iterate over the nodes in the node-set resulting from the relative XPath expression
link.Note how you can use a relative XPath expression here since the evaluation context was changed at line 'T 5'.
-
Line 'T 10': Select the data at the relative XPath
interface-number. This selects the value0/2at 'S 9' for thece0node, and the value0/1at 'S 23' for thece2node.Note how you can use a relative XPath expression here since the evaluation context was changed at line 'T 5'.
When you have entered the Service configuration, you can check what
will be committed by doing a commit dry-run. Only some
pieces of the output is shown below:
admin@ncs(config)# commit dry-run outformat xml
result-xml <devices xmlns="http://tail-f.com/ns/ncs">
             <device>
               <name>ce0</name>
               <config>
                 <router xmlns="urn:ios">
                   <bgp>
                     <as-no>65001</as-no>
                     <neighbor>
                       <id>10.1.1.2</id>
                       <remote-as>100</remote-as>
                       <activate/>
                 ...
           <devices xmlns="http://tail-f.com/ns/ncs">
             <device>
               <name>ce2</name>
               <config>
                 <router xmlns="urn:ios">
                   <bgp>
                     <as-no>65001</as-no>
                     <neighbor>
                       <id>10.2.1.2</id>
                       <remote-as>100</remote-as>
...Service templates can define macros - named XML snippets that can be expanded in the template. The example template shown in Example 122, “Service to Device Model mapping using Templates” can also be written to define and use macros, as shown in Example 125, “Service Template using Macros”
M   1:<config-template xmlns="http://tail-f.com/ns/config/1.0"
M   2:  servicepoint="l3vpn-template">
M   3:    <?macro GbEth name='{interface-number}' mask='255.255.255.0' desc?>
M   4:    <GigabitEthernet tags="nocreate">
M   5:      <name>$name</name>
M   6:      <description tags="merge">$desc</description>
M   7:      <ip tags="merge">
M   8:        <address>
M   9:          <primary>
M  10:            <address>{ip-address}</address>
M  11:            <mask>$mask</mask>
M  12:          </primary>
M  13:        </address>
M  14:      </ip>
M  15:    </GigabitEthernet>
M  16:    <?endmacro?>
M  17:
M  18:    <?macro GbEthWithVrf name='{interface-number}'
M  19:        mask=255.255.255.252 desc forwarding?>
M  20:      <?expand GbEth name=$name desc='$desc' mask=$mask?>
M  21:      <GigabitEthernet tags="nocreate">
M  22:        <name>$name</name>
M  23:        <vrf tags="merge">
M  24:          <forwarding>$forwarding</forwarding>
M  25:        </vrf>
M  26:      </GigabitEthernet>
M  27:    <?endmacro?>
M  28:
M  29:  <devices xmlns="http://tail-f.com/ns/ncs">
M  30:    <?foreach {endpoint/ce}?>
M  31:      <device tags="nocreate">
M  32:        <name>{device}</name>
M  33:        <config tags="merge">
M  34:          <!-- CE template for Cisco IOS routers -->
M  35:          <interface xmlns="urn:ios">
M  36:            <?foreach {link}?>
M  37:              <?expand GbEth descr='Link to PE' mask='255.255.255.252'?>
M  38:            <?end?>
M  39:            <?foreach {local}?>
M  40:              <?expand GbEth descr='Local network'?>
M  41:            <?end?>
M  42:          </interface>

              ...

M  57:        </config>
M  58:      </device>
M  59:    <?end?>

          ...

M 185:  </devices>
M 186:</config-template>}
Macro definitions and usage should adhere to the following rules.
-
A macro should be a valid chunk of XML (or it could be a string without any XML markup). So, a macro cannot contain only start-tags or only end-tags, for example.
-
Each macro is defined between the
<?macro?>and<?endmacro?>processing-instructions, immediately following the<config-template>tag in the template. -
A macro definition takes a name and an optional list of parameters. The parameters can optionally have a default value.
In the example Example 125, “Service Template using Macros” a macro is defined at Line 'M 3':
<?macro GbEth name='{interface-number}' mask='255.255.255.0' desc?>Here,
GbEthis the name of the macro. And this macro takes three parameters,name, maskanddesc. The parametersnameandmaskhave default values, anddescdoes not. -
A macro can be expanded in another location in the template using the
<?expand?>processing-instruction. As shown in Line 'M 37' in the example, the<?expand?>instruction takes the name of the macro to expand, and an optional list of parameters and their values.The parameters in the macro definition are replaced with the values given during expansion. If a parameter is not given any value during expansion, the default value is used. If there is no default value in the definition, a value should be supplied for the parameter during expansion, and it is an error otherwise.
-
Macro definitions cannot be nested - that is, a macro definition cannot contain another macro definition. But a macro definition can have
<?expand?>instructions to expand another macro within this macro.The macro expansion and the parameter replacement work on just strings - there is no schema validation or xpath evaluation at this stage. A macro expansion just inserts the macro definition at the expansion site.
-
Macros can be defined in multiple files, and macros defined in the same package will be visible to all templates in that package. This means that a template file could have just the definitions of macros, and another file in the same package could use expand those macros.
When reporting errors, if the template uses macros, the line numbers
for the macro invocations are also included, so that the actual
location of the error can be traced. For example, an error message
could be something like service.xml:19:8 Invalid parameters for
processing instruction set. - this means that there was a macro
expansion on line 19 in service.xml and an error
occurred at line 8 in the file defining that macro.
Pre- and post-modification templates are applied before and after, respectively, applying the service template. The template displayed in Example 126, “Post Modification Template”, demonstrates how to define a post-modification callback using a template for the service template defined in Example 122, “Service to Device Model mapping using Templates”. Pre-modification templates are defined similarly but with the cbtype attribute set to pre-modification instead of post-modification. The $OPERATION variable is set internally by NSO in pre- and post-modification templates and contains the service operation, i.e., create, update or delete, that triggered the callback. The $OPERATION variable can be used together with template conditional statements (see the section called “Conditional Statements”) to apply different parts of the template depending on the triggering operation.
For more information on service pre- and post-modification callbacks, refer to the section called “ Pre and post hooks ”.
1: <config-template xmlns="http://tail-f.com/ns/config/1.0"
2:  servicepoint="l3vpn-template"
3:  cbtype="post-modification">
4:   <?if {$OPERATION = 'create'}?>
5:      <devices xmlns="http://tail-f.com/ns/ncs">
6:        <device>
7:          <name>{/device}</name>
8:          <config>

            ...

15:         </config>
16:       </device>
17:     </devices>
18:   <?else?>
19:     <?if {$OPERATION = 'update'}?>

         ...

21:     <?else?>
22:       <!-- $OPERATION = 'delete' -->

          ...

30:     <?end?>
31:   <?end?>
32: </config-template>
Note
The service's data is not available in the pre-or post-modification callbacks when $OPERATION = 'delete' since the service has been deleted already in the transaction context where the template is applied.
Note
Pre- and post-modification templates can only be used in normal services when the create callback is also implemented as a template, i.e. they cannot be used together with create callbacks implemented in Java or Python. Note that this limitation does not apply to nano services.
When a pure mapping of service instance data to device data is not enough and logic and algorithms are needed, a template based service is not sufficient to implement a service. The logic can be placed in Java code and the template can be applied from the Java code.
Just implement the Java code as any other Java service and apply the
template. The Template class for Java is defined in:
com.tailf.ncs.template.Template
A feature template is a config-template used to configure a specific feature. By using feature templates, the service code can be completely device-vendor agnostic. Feature templates is a nice way to decompose a problem into smaller, reusable, chunks.
In the example
$NCS_DIR/examples.ncs/service-provider/mpls-vpn
a l3vpn-acl template is used to create ACL entries for all service
specific match rules, and is applied from the Java service
code. Below you will find the
l3vpn-acl.xml as well as parts of
the Java logic which shows how the template variables are
set and then how the template is applied.
The l3vpn-acl template:
<config-template xmlns="http://tail-f.com/ns/config/1.0">
  <devices xmlns="http://tail-f.com/ns/ncs">
    <device tags="nocreate">
      <name>{$CE}</name>
      <config>
        <ip xmlns="urn:ios" tags="merge">
          <access-list>
            <extended>
              <ext-named-acl>
                <name>{$ACL_NAME}</name>
                <ext-access-nlist-rule>
                  <rule>permit {$PROTOCOL} {$SOURCE_IP_ADR}
                  {$SOURCE_WMASK} {$DEST_IP_ADR} {$DEST_WMASK}
                  range {$PORT_START} {$PORT_END}</rule>
                </ext-access-list-rule>
              </ext-named-acl>
            </extended>
          </access-list>
        </ip>
      </config>
    </device>
  </devices>
</config-template>
The setting of the variables and applying of the template from Java code:
private TemplateVariables setAclVars(NavuContainer match,
                                    String namePrefix)
    throws NavuException, UnknownHostException {
    TemplateVariables aclVar = new TemplateVariables();

    aclVar.putQuoted("ACL_NAME", namePrefix + "-" +
                                match.leaf("name").
                                   valueAsString());
    aclVar.putQuoted("PROTOCOL", match.leaf("protocol").
        valueAsString());
    aclVar.putQuoted("SOURCE_IP", match.leaf("source-ip").
            valueAsString());
    if ("any".equals(match.leaf("source-ip").valueAsString())) {
        aclVar.putQuoted("SOURCE_IP_ADR","any");
        aclVar.putQuoted("SOURCE_WMASK"," ");
    }
    else {
        aclVar.putQuoted("SOURCE_IP_ADR",
                getIPAddress(match.leaf("source-ip").
                        valueAsString()));
        aclVar.putQuoted("SOURCE_WMASK",
                prefixToWildcardMask(getIPPrefix(
                        match.leaf("source-ip").
                        valueAsString())));
    }
    if ("any".equals(match.leaf("destination-ip").
            valueAsString())) {
        aclVar.putQuoted("DEST_IP_ADR","any");
        aclVar.putQuoted("DEST_WMASK"," ");
    }
    else {
        aclVar.putQuoted("DEST_IP_ADR",
                getIPAddress(match.leaf("destination-ip").
                        valueAsString()));
        aclVar.putQuoted("DEST_WMASK",
                prefixToWildcardMask(getIPPrefix(
                        match.leaf("destination-ip").
                        valueAsString())));
    }
    aclVar.putQuoted("PORT_START", match.leaf("port-start").
            valueAsString());
    aclVar.putQuoted("PORT_END", match.leaf("port-end").
            valueAsString());
    return aclVar;
}
...
    TemplateVariables aclVar = setAclVars(match,namePrefix);
    aclTemplate.apply(service, aclVar);
...
There is a well-known mechanism to pass parameters to a template via API which is template variables. One limitation of this mechanism is that a variable can only hold one string value. However sometimes there is a need to pass not just one value, but a list, map or even more complex data structure from API to be accessible in the template.
One way to handle this is to use smaller templates with variables and invoke them repeatedly passing the parameters from the list one by one, or pair by pair in case of a map. However there are certain disadvantages with this approach. One of them is the performance: every invocation of the template from the API requires a context switch between the user application process and NSO core process, which can be costly. Another disadvantage is that the logic of the service is split between Java/Python code and the template, which makes it harder to write and understand such services.
An approach suggested in this section involves modelling the auxiliary data used by the service as operational data and populating it by the service code in Java or Python. After that the service callback passes control to the template that handles main service logic. Such auxiliary data would then be available to select by means of XPath, just like any other service input data.
There could be different approaches to modelling the auxiliary data. It can reside in the service tree as it is private to the service instance: either integrated in the existing data tree, or as a separate subtree under the service instance. It can also be located outside of the service instance, however it is important to keep in mind that operational data cannot be shared by multiple services because there is no refcounters or backpointers stored on operational data.
After the service is deployed, the auxiliary leafs remain in the
database which facilitates debugging because they can be seen via all
northbound interfaces. If this is not the intention, they can be hidden
with help of tailf:hidden statement. Because operational
data is also a part of FASTMAP diff, these values will be deleted when
the service is deleted and need to be recomputed when the service is
re-deployed. This also means that in most cases there should be no need
to write any additional code to clean up this data.
One example of a task that is hard to solve in the template itself using native XPath functions is converting a network prefix into a network mask or vice versa. Below is a snippet of data model that is part of a service input data and contains a list of interfaces along with IP addresses to be configured on those interfaces. If the format of the IP address on the input is an IP address with prefix but the device accepts an IP address with network mask instead, then we can use an auxiliary leaf mask to be able to convert prefix to the suitable format before the service template takes control.
list interface {
  key name;
  leaf name {
    type string;
  }
  leaf address {
    type tailf:ipv4-address-and-prefix-length;
    description
      "IP address with prefix in the following format, e.g.: 10.2.3.4/24";
  }
  leaf mask {
    config false;
    type inet:ipv4-address;
    description
      "Auxiliary data populated by service code, represents network mask
       corresponding to the prefix in the address field, e.g.: 255.255.255.0";
  }
}
The service code would need to populate the mask. It uses NAVU API in this example to do that, but if the list is known to be large it might be useful to use Maapi.setValues() instead to set the leafs in one go.
          for (NavuListEntry interface : interfaces) {
            String address = interface.leaf("address").valueAsString();
            String prefix = address.split("/")[1];
            String mask = prefixToNetMask(prefix);
            // sharedSet() does not take effect on operational data
            // using set() instead
            interface.leaf("mask").set(mask);
          }
          ...
          // TemplateVariables don't need to contain mask
          // it is passed via database
          TemplateVariables tv = new TemplateVariables();
          template.apply(service, tv);
The template would then do the following:
          <interface>
            <name>{/interface/name}</name>
            <ip-address>{substring-before(address, '/')}</ip-address>
            <ip-mask>{mask}</ip-mask>
          </interface>
One of the advantages of using templates is that they are validated against the currently loaded schema which allows to detect a lot of the errors at load time instead of run time. However, such strict validation may become a problem for developing generic, reusable templates that should run in different environment with different sets of NEDs and NED versions loaded. For example, loading fewer NED versions than the template is designed for may result in some elements not recognized, while loading more NED versions may introduce ambiguities.
In order to allow templates to be reusable while at the same time keep as many errors as possible detectable at load time, NSO supports a concept of supported-ned-ids. This is a set of ned-ids the package developer may declare in package-meta-data.xml file to indicate that the XML (both service and API) templates contained in this package were designed to support. This gives NSO a hint on how to interpret the template.
Namely, if a package declares a list of supported-ned-ids, then the templates in this package are interpreted as if no other ned-ids are loaded in the system. If such template is attempted to be applied to a device with ned-id outside the supported list, then a run-time error is generated because this ned-id was not considered when the template was loaded. This allows us to ignore ambiguities in the data model introduced by additional NEDs that were not considered during template development.
If a package declares a list of supported-ned-ids and the runtime system
does not have one or more declared NEDs loaded, then the template engine
uses so-called relaxed loading mode, which means it
ignores any unknown namespaces and <?if-ned-id?>
clauses containing exclusively unknown ned-ids assuming that these parts
of the template are not applicable in the current running system.
Because relaxed loading mode performs less strict validation and
potentially prevents some errors from being detected, the package
developer should always make sure to test in the system with all
supported ned-ids loaded, i.e. when the loading mode is
strict. The loading mode can be verified by looking
at the value of template-loading-mode leaf for the
corresponding package under /packages/package list.
If the package does not declare any supported-ned-ids, then the templates are loaded strictly in the full set of currently loaded ned-ids. This makes the package less reusable between different systems, but may still be desirable in environments where the package is intended to be used in a single or multiple identical runtime system fully under control of the package developer.