Webhooks
Meraki provides a way to send a webhook when an alert is triggered in the Meraki Dashboard.
The flow includes two sample payloads that can be used to test and explore the payload.
Here is an example payload received from a Meraki webhook. We just assign the entire object to the msg.payload
msg.payload = {
version: "0.1",
sharedSecret: "foo",
sentAt: "2019-07-19T06:20:39.656975Z",
organizationId: "00000001",
organizationName: "Miles Monitoring Inc.",
organizationUrl: "https://n1.meraki.com/o//manage/organization/overview",
networkId: "N_111111111111",
networkName: "Main Office",
networkUrl: "https://n1.meraki.com//n//manage/nodes/list",
alertId: "0000000000000000",
alertType: "Settings changed",
occurredAt: "2019-07-19T06:15:33.504142Z",
alertData: {
name: "Routing and DHCP",
url: "/manage/configure/switch_l3",
changes: {
createStaticRoute: {
label: "Added static route on SP-Warehouse",
newText: "10.10.10.0/24 -> 172.16.254.253",
changedBy: "Miles Meraki (Miles@Meraki.com)",
oldText: "",
ssidId: null
}
},
userId: "646829496481136255"
},
deviceSerial: "XXXX-XXXX-XXXX",
deviceMac: "00:00:00:aa:bb:cc",
deviceName: "Device Foo Bar",
deviceUrl: "https://n1.meraki.com//n//manage/nodes/new_list/000000000000"
};
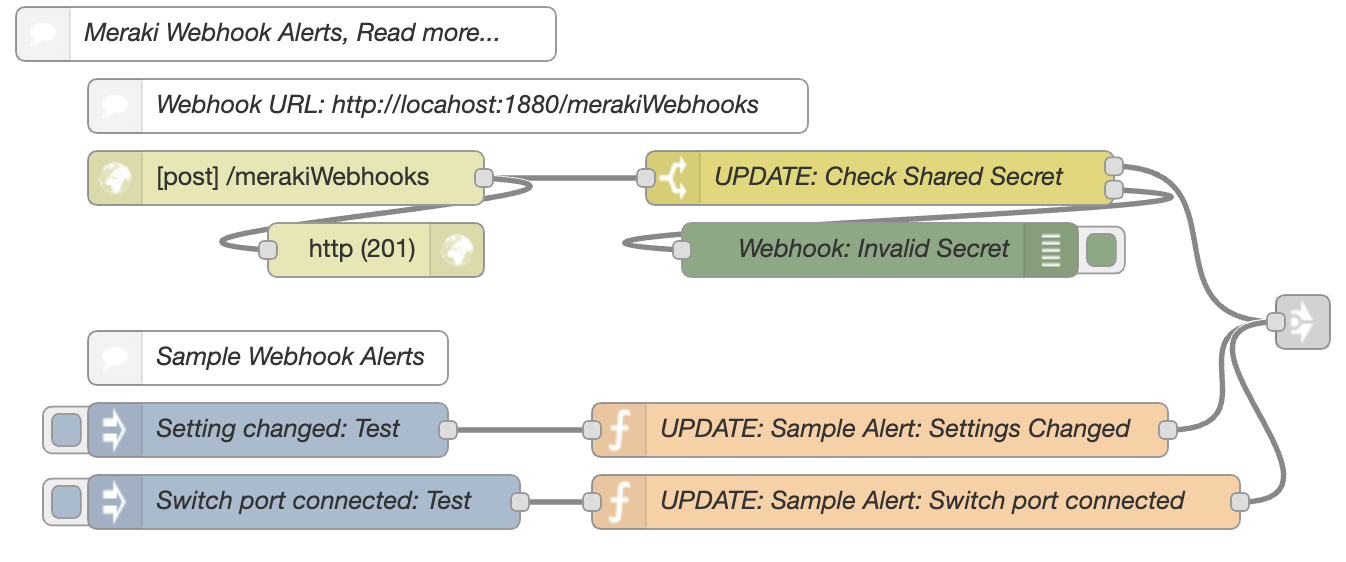
return msg;The basic concept is to create an API endpoint that accepts a POST HTTP request. We will name the path /merakiWebhooks in this example which creates a route of https://localhost:1880/merakiWebhooks to your Node-RED server.
Meraki requires a public facing HTTPS URL to send alerts. Please read the official Webhooks docs for more information.
Dev Tip: create a secure reverse-proxy by typing ssh -R 80:localhost:1880 serveo.net in the terminal. This free service will expose port 1880 to port 443 on a dynamic host.
$  ssh -R 80:localhost:1880 serveo.net
Forwarding HTTP traffic from https://miscui.serveo.net
Press g to start a GUI session and ctrl-c to quit.
Your Node-RED webhook URL will now be available at
https://miscui.serveo.net/merakiWebhooks in this example.
Workflows
By using the link nodes, we are able to join the output from our webhook data to different flows through-out our application. We then use a switch node to route the flow based on the msg.payload.alertType parameter.

Settings changed
This workflow will be triggerd upon the alertType of Settings changed. It then maps additional properties to the alert by initially calling the getOrganizationAdmins operation and storing the response to the flow state.
The payload of the Setting changed alert only contains the adminId. It would be helpful to get more info about the admin, such as a name and email before sending this data to some destination. To accomplish this, we merge the data with the alert payload.

Switch port connected
This workflow will trigger a dynamic API request using the Meraki node to collect extra details about the port that was just connected to.
To accomplish this, the batch and join nodes can be used to combine the two sets of data into an array of objects.


This output shows the array having 2 objects, one for the alert data and another for the switch port details.
