Getting Started with ServiceNow App Installation
This chapter describes the requirements and process for installing the ServiceNow App for Smart Bonding.
Installation Overview
Installation of the ServiceNow App can be divided into the following three phases:

- Installation: Install and configure the ServieNow App on the pre-production ServiceNow Instance. Cisco will provide the Username/Password. Cisco Smart Bonding engineers are available for questions.
- Testing: When the installation is complete, the partner development and case management teams will test the connection in coordination with the Cisco team.
- Go-Live: The ServiceNow App will be installed and configured on the production ServiceNow Instance. Cisco Smart Bonding and partner engineers will coordinate a production launch date/time. Additionally, they will perform a smoke test on production.
Scope
The scope of installing the ServiceNow App includes:
- Connecting one partner ServiceNow ITSM system to Cisco TAC via Cisco Smart Bonding.
- Exchanging Cases via this connection.
- Sending attachments to Cisco.
Partner Responsibilities
Partners are responsible for completing the following tasks according to project phase:
- Installation:
- Review the Installation Guide and adhere to the details described in the document.
- Review the Smart Bonding test plan.
- Install the ServiceNow App on the Partner SNOW/ITSM test system.
- Testing:
- Prepare for, participate in, and contribute to testing meetings with Cisco.
- Provide acceptance for Go-Live readiness when testing with Cisco is successfully completed.
- Go-Live:
- Install the ServiceNow App on the Partner SNOW/ITSM production system.
- Coordinate and confirm Go-Live plan and date with Cisco.
- Ensure all necessary modifications to production environments/equipment are complete prior to the Go-Live date.
- Participate in a Go-Live meeting with Cisco.
- Provide partner support and operations information to Cisco.
ServiceNow App Installation
Application Dependencies
To install the ServiceNow App for Smart Bonding, the partner must meet the following minimum requirements:
- ServiceNow ITSM Standard
- Username and Password (Provided by Cisco Smart Bonding team)
Obtaining the Application
Partners will use the following steps to obtain the ServiceNow App so it can be installed on the ServiceNow Instance. ServiceNow provides the latest version of these directions on the ServiceNow Store knowledgebase at https://store.servicenow.com/$appstore.do#!/store/help?article=KB0010019.
Browse to the ServiceNow Store.
Locate the application, Cisco Partner Smart Bonding.

Click the app.
Click Get.
Review any notifications in the popup window and click Continue.
Accept the website's "Terms of Use".
Click Get.
Installing the Store Application
Applications purchased from the ServiceNow Store are automatically added to the Application Manager. To activate the ServiceNow App in an Instance, you must install it from the Application Manager. ServiceNow provides the latest version of these directions on the ServiceNow store knowledgebase at https://store.servicenow.com/$appstore.do#!/store/help?article=KB0010027.
WARNING: If the partner customizes the app between versions, future upgrades for app might fail.
Use the following steps to activate the ServiceNow App.
Navigate to System Applications > All Available Applications > All.
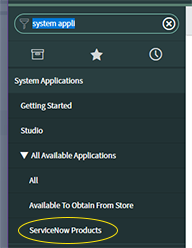
Use the filter criteria and search bar to find the application.
Search for the application by its name or ID.
Note: If you cannot find an application, you might have to request it from the ServiceNow Store. Visit the ServiceNow Store to view all available apps and for information about submitting requests to the store.
- Click Install.
- In the Application Installation dialog box, review the application dependencies. If dependent plugins and applications will be installed, are currently installed, or need to be installed, they will be listed in this dialog box.
Note: Any necessary plugins or applications must be installed before the ServiceNow App can be installed.
- Click Install, if any dependent plugins and/or applications need to be installed.
Upgrading the ServiceNow App
Cisco will inform partners when new versions of the app are released. Partners will need to use the following steps to install the latest version.
- Log in to the Instance.
- Navigate to System Application > Application.
- Click on the Update tab.
- Locate the Cisco Partner Smart Bonding application from the list.
- Click Update.
Note: Existing workflow activity will not be affected by the Upgrade process.
WARNING: If the partner customizes the app between versions, future upgrades for app might fail.
Configuration Instructions
Use the steps in the following processes to configure the application.
WARNING: If the partner customizes the app between versions, future upgrades for app might fail.
First, create a service account user for use with the app in both Stage and Production ServiceNow instances. Grant this user these roles, which are explained in the Roles and Access section:
- ITIL
- x_caci_plss.plss_admin
- x_caci_plss.plss_maint
- x_caci_plss.codes_read
- x_caci_plss.codes_write
- x_caci_plss.write
- x_caci_plss.read
- x_caci_plss.plss_task_read
- x_caci_plss.plss_task_write
Second, set the system properties for the app on the Cisco Task Properties page using the information in the System Properties section.
Lastly, populate the Technology Codes for the first time using the instructions in Fetch TSP Codes
Roles and Access
Partners must have someone assigned to the following roles for ServiceNow installation, configuration, and use of app features. These roles should be assigned to groups of people (preferred, so there is continual coverage) or individual users (generally avoided) to optimize the use of the application.
| Role Name | Role Description | Suggested Groups |
|---|---|---|
| System Administrator (admin) | Install application; Maintain application logs; Assign roles to groups/individuals; Configure system properties | ITSM administrators |
| PLSS Maintenance (x_caci_plss.plss_maint) | Allow access to Scripted Rest APIs | ITSM administrators |
| PLSS Administrator (x_caci_plss.plss_admin) | Full read and write access to all app tables | ITSM administrators |
| PLSS-Write (x_caci_plss.write) | Write access to all app tables | Cisco Service Account |
| PLSS-Read (x_caci_plss.read) | Read access to all app tables | Users who need to open/update Cisco tasks |
| PLSS Codes-Write (x_caci_plss.codes_write) | Write access to the app codes table | Cisco Service Account |
| PLSS Codes-Read (x_caci_plss.codes_read) | Read access to the app codes table | Users who need to open/update Cisco tasks |
| PLSS Task-Write (x_caci_plss.plss_task_write) | Write access to app tasks | Users who need to open/update Cisco tasks |
| PLSS Task-Read (x_caci_plss.plss_task_read) | Read access to app tasks | Cisco Service Account |
| ITIL | Read/write Access to Partner Tickets | Users who need to open/update Cisco tasks |
System Properties
The following ServiceNow system properties must be configured according to the following criteria:
Connection Properties
| Backend Name | Properties Page Description | Value |
|---|---|---|
| x_caci_plss.okta.production.token.endpoint | Authentication Token Endpoint for Production | https://id.cisco.com/oauth2/default/v1/token |
| x_caci_plss.okta.token.endpoint | Authentication Token Endpoint for Stage | https://int-id.cisco.com/oauth2/default/v1/token |
| x_caci_plss.okta.production.tac.endpoint | Production Cisco TAC Endpoint (PUSH) | https://ciscoprod.sb.xylem.cisco.com/sb-partner-oauth-proxy-api/http/v1/push/call |
| x_caci_plss.okta.production.pull.tac.endpoint | Production Cisco TAC Endpoint (PULL) | https://ciscoprod.sb.xylem.cisco.com/sb-partner-oauth-proxy-api/rest/v1/pull/call) |
| x_caci_plss.okta.stage.tac.endpoint | Stage Cisco TAC Endpoint (PUSH) | https://ciscostage.sbnprd.xylem.cisco.com/sb-partner-oauth-proxy-api/http/v1/push/call |
| x_caci_plss.okta.stage.pull.tac.endpoint | Stage Cisco TAC Endpoint (PULL) | https://ciscostage.sbnprd.xylem.cisco.com/sb-partner-oauth-proxy-api/http/v1/pull/call |
| x_caci_plss.okta.production.tsp.endpoint | Production Technology Codes Endpoint | https://ciscoprod.sb.xylem.cisco.com/sb-partner-oauth-proxy-api/tsp/api/v1/xylem/tspcodes |
| x_caci_plss.okta.stage.tsp.endpoint | Stage Technology Codes Endpoint | https://ciscostage.sbnprd.xylem.cisco.com/sb-partner-oauth-proxy-api/tsp/api/v1/xylem/tspcodes |
| x_caci_plss.data.update.approach | Method for Transmitting Updates from Cisco (PUSH or PULL) | PUSH |
Stage Integration Properties
| Backend Name | Properties Page Description | Provided By |
|---|---|---|
| x_caci_plss.customer.stage.instance.name | Name of Partner's Stage Instance - must match gs.getProperty("instance_name") | Partner |
| x_caci_plss.stage.username | Cisco-provided username to access Cisco TAC in Stage | Cisco |
| x_caci_plss.stage.password | Cisco-provided password to access Cisco TAC in Stage | Cisco |
| x_caci_plss.plss.stage.service.account | User ID for the Cisco Service Account in Partner's Stage Instance | Partner |
| x_caci_plss.plss.stage.service.account.sysid | Sys ID for the Cisco Service Account in Partner's Stage Instance | Partner |
Production Integration Properties
| Backend Name | Properties Page Description | Provided By |
|---|---|---|
| x_caci_plss.customer.prod.instance.name | Name of Partner's Production Instance - must match gs.getProperty("instance_name") | Partner |
| x_caci_plss.production.username | Cisco-provided username to access Cisco TAC in Production | Cisco |
| x_caci_plss.production.password | Cisco-provided password to access Cisco TAC in Production | Cisco |
| x_caci_plss.plss.production.service.account | User ID for the Cisco Service Account in Partner's Production Instance | Partner |
| x_caci_plss.plss.production.service.account.sysid | Sys ID for the Cisco Service Account in Partner's Production Instance | Partner |
Incident Record Properties
| Backend Name | Properties Page Description | Default Value |
|---|---|---|
| x_caci_plss.table.incident | Enable Cisco Task functionality for the Incident table | Yes |
| x_caci_plss.ticket.state.table | Table from which ticket states are pulled | State |
| x_caci_plss.state.new | Number Value for state with Label "New" | 1 |
| x_caci_plss.state.in.progress | Number Value for state with Label "In Progress" | 2 |
| x_caci_plss.state.on.hold | Number Value for state with Label "On Hold" | 3 |
| x_caci_plss.state.resolved | Number Value for state with Label "Resolved" | 6 |
| x_caci_plss.state.closed | Number Value for state with Label "Closed" | 7 |
| x_caci_plss.state.cancelled | Number Value for state with Label "Cancelled" | 8 |
Requested Item Record Properties
| Backend Name | Properties Page Description | Default Value |
|---|---|---|
| x_caci_plss.table.sc_req_item | Enable Cisco Task functionality for the Requested Item table | |
| x_caci_plss.requested_item.state.new | Number Value for state with Label "New" or "Open" | 1 |
| x_caci_plss.requested_item.state.work.in.progress | Number Value for state with Label "In Progress" | 2 |
| x_caci_plss.requested_item.state.on.hold | Number Value for state with Label "On Hold" or "Pending" | -5 |
| x_caci_plss.requested_item.state.closed.complete | Number Value for state with Label "Closed Complete" | 3 |
| x_caci_plss.requested_item.state.closed.incomplete | Number Value for state with Label "Closed Incomplete" | 4 |
Incident Task Record Properties
| Backend Name | Properties Page Description | Default Value |
|---|---|---|
| x_caci_plss.table.incident_task | Cisco Task functionality will be activated for Incident Task Table | |
| x_caci_plss.incident_task.state.open | SNumber Value for state with Label "New" or "Open" | 1 |
| x_caci_plss.incident_task.state.work.in.progress | Number Value for state with Label "In Progress" or "Work in Progress" | 2 |
| x_caci_plss.incident_task.state.pending | Number Value for state with Label "On Hold" or "Pending" | -5 |
| x_caci_plss.incident_task.state.closed.complete | Number Value for state with Label "Closed Complete" | 3 |
| x_caci_plss.incident_task.state.closed.incomplete | Number Value for state with Label "Closed Incomplete" or "Cancelled" | 4 |
Priority Field Properties
| Backend Name | Properties Page Description | Default Value |
|---|---|---|
| x_caci_plss.priority.planning | Number Value for priority level with Label "Planning (5 - Planning)" | 5 |
| x_caci_plss.priority.low | Number Value for priority level with Label "Low (4 - Low)" | 4 |
| x_caci_plss.priority.moderate | Number Value for priority level with Label "Moderate (3 - Moderate)" | 3 |
| x_caci_plss.priority.high | Number Value for priority level with Label "High (2 - High)" | 2 |
| x_caci_plss.priority.critical | Number Value for priority level with Label "Critical (1 - Critical)" | 1 |
Cisco Task Properties
| Backend Name | Properties Page Description | Default Value |
|---|---|---|
| x_caci_plss.response.cisco.task | Display the "3rd Party Information" tab in the Cisco Task form | Yes |
| x_caci_plss.work.notes.plss.to.partner | Work notes from the Cisco Task are copied to the work notes of the Parent Ticket | Yes |
| x_caci_plss.work.notes.parent.to.plss.task | Work notes from the Parent Record are copied to the related Cisco Task | Yes |
| x_caci_plss.end.customer.information | End Customer's details from the Parent Ticket are copied into the Cisco Task and sent to Cisco | Yes |
| x_caci_plss.partner.information | Assignee information from the Parent Ticket is copied into the Cisco Task and sent to Cisco | Yes |
| x_caci_plss.copy.attachment.to.parent | Attachments in the Cisco Task are copied to the Parent Ticket | Yes |
| x_caci_plss.email.cisco.task | Disable Email Notifications for Cisco Tasks | No |
| x_caci_plss.plss.roles.ticket.response | Role(s) required for a user to view the Ticket Response field on the Cisco Task form (Comma Separated) | |
| x_caci_plss.schedule.sys_id | Sys ID of the schedule used to calculate Business Duration in the Cisco Task (optional) | |
| x_caci_plss.cisco.ccoid | Default CCOID to use for Entitlement in Cisco Tasks (optional) | |
| x_caci_plss.language | If set to FALSE, cases will route to Cisco's Global TAC teams. If local language support is required, select TRUE and users will be able to select their language preference on a case-by-case basis, allowing cases to route to the local language TAC | False |
| x_caci_plss.webex.enabled | Enable engineers to launch a Webex Virtual Room with Cisco TAC Engineer. Partners must already have Webex messenger capabilities to leverage this communication preference with Cisco TAC. | ENABLED |
Fetch TSP Codes
When installing the ServiceNow app for the first time, execute a manual sync for populating technology codes. When this is done, the ServiceNow app will poll for new codes regularly, by default. Use the following steps to execute a manual sync: 1. Browse to Cisco Partner Smart Bonding > Source Code and Scripts > Scheduled Job. 2. Search for Trigger:14e67d2e1b40ca5063bf97d7b04bcbc8. 3. Open the Record. 4. Click Execute Now. 5. Browse to Cisco Partner Smart Bonding > Administration > Technology Codes to verify the tables is being populated.
Note: This job pulls data from Smart Bonding and queries against existing ServiceNow “Technology Codes” data. It might take up to five (5) minutes to run, depending on ServiceNow, Smart Bonding, and Network performance.
Testing the ServiceNow App
Use the following procedures to test the Use Cases for the Cisco Partner app.
Use Case 1 - Create Cisco TAC Case from ServiceNow Cisco Task
- Select an Incident.
- Click Create Cisco Task
Note: If the Create Cisco Task action does not appear, there is either already an existing Cisco Task afor this incident in which case the View Cisco Task button appears, or the Incident is not In Progress state yet.
To proceed with testing this use case, select a different Incident without a Cisco Task, or create a new incident from scratch.
- When prompted to create the Cisco case, click OK. You will automatically be redirected to the Cisco Task you created. The incident you were working on will also be updated as part of this process.
Note: Caller and Short description fields are required to create Cisco Tasks.
- Populate the appropriate fields for your request to Cisco.
Note: Not all fields are required for all Cisco requests. When you click the Send to TAC button, a list of minimum mandatory fields will be presented. The fields will default to Mandatory on the form.
- Click Send to TAC.
- When prompted to create the TAC case, click OK.
Note: There are numerous mandatory fields, depending on the type of TAC case created. The list of mandatory fields will present in the alert and fields will default to Mandatory on the form.
When the TAC case is created, Smart Bonding will send a return payload with the TAC number to ServiceNow, which will be associated to the appropriate Cisco case, via scripted REST API.
Note: If the TAC case is not created, it is likely due to one of the following reasons:
- Invalid Username/Password configured to connect ServiceNow to Smart Bonding (Sending the payload results in failure).
- Invalid Username/Password configured to connect Smart Bonding to ServiceNow (Receiving the return payload results in failure).
- Associated incident number already exists in the TAC environment (Consult Cisco contact to confirm).
Use Case 2 - Update Cisco TAC Case from ServiceNow Cisco Task
- Browse to the desired Cisco task.
- Update the appropriate fields.
- Click Update..
Note: You can also right-click on the header to access the Context menu, and click Save.
- When the Cisco task has been updated, a payload will be sent to Smart Bonding.
- When the Cisco case has been updated, a response will be posted to the work notes regarding the success or failure of the sent payload.
Note: If the TAC case is not updated, it is likely due to one of the following reasons:
- Invalid Username/Password configured to connect ServiceNow to Smart Bonding (Sending the payload results in failure).
- Invalid Username/Password configured ot connect Smart Bonding to ServiceNow (Receiving the return payload results in failure).
- Associated incident number already exists in the TAC environment (Consult Cisco contact to confirm).
Use Case 3 - Update ServiceNow Cisco Task from ServiceNow Incident
- Open an incident related to a Cisco Task.
- Update any of the following fields:
- Impact
- Urgency
- Priority
- State
- Assigned to
- Assignment group
- Comments
- Work notes
- Caller
- Verify that the Cisco Task is updated.
- Verify that the TAC Case is also updated.
- The business rule is a simple update GlideRecord.
- Updating the incident will update the Cisco Task and send an update to Smart Bonding.
Use Case 4 - Update ServiceNow Incident from ServiceNow Cisco Task
- Open a Cisco Task that is related to an Incident.
- Update the comments and work notes with different values.
- Verify that the Incident work notes are also updated in the associated Incident.
- The business rule for Cisco Tasks is to only update work notes for Incidents; this behavior can be changed by using the System Properties (listed in this document).
Use Case 5 - Update ServiceNow Cisco Task from Cisco TAC
Any updates made in the Cisco TAC ticket will reflect on the Cisco Task in ServiceNow, including state changes, notes, and Cisco Engineer contact information.
- This sends a payload directly to the scripted REST API
- In the event of a failure, it is likely due to:
- No matching Cisco Task in Customer environment.
- Pointing to the wrong environment (e.g., prod vs. dev), thus the user/name password is incorrect.
- Incorrect service account username/password due to expiration or change.
- ServiceAccount does not have the appropriate roles as identified in the configuration document.
- Steps within TAC are not in the scope of this document.