This documentation corresponds to an older version of the product, is no longer updated, and may contain outdated information.
Please access the latest versions from https://cisco-tailf.gitbook.io/nso-docs and update your bookmarks. OK
Services provide the foundation for managing the configuration of a network. But this is not the only aspect of network automation. A holistic solution must also consider various verification procedures, one-time actions, monitoring, and so on. This is quite different from managing configuration. NSO helps you implement such automation use-cases through a generic application framework.
This chapter explores the concept of services as more general NSO applications. It gives an overview of the mechanisms for orchestrating network automation tasks that require more than just configuration provisioning.
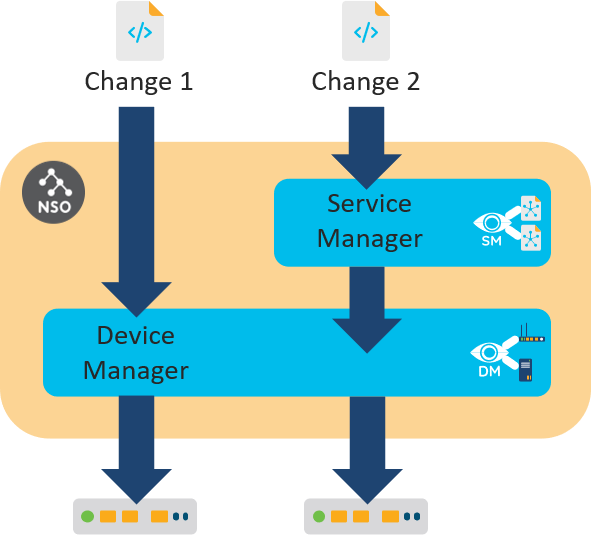
You have seen two different ways in which you can make a configuration change on a network device. With the first, you make changes directly on the NSO copy of the device configuration. The Device Manager picks up the changes and propagates them to the affected devices.
The purpose of the Device Manager is to manage different devices in a uniform way. The Device Manager uses the Network Element Drivers (NEDs) to abstract away the different protocols and APIs towards the devices. The NED contains a YANG data model for a supported device. So, each device type requires an appropriate NED package that allows the Device Manager to handle all devices in the same, YANG-model-based way.
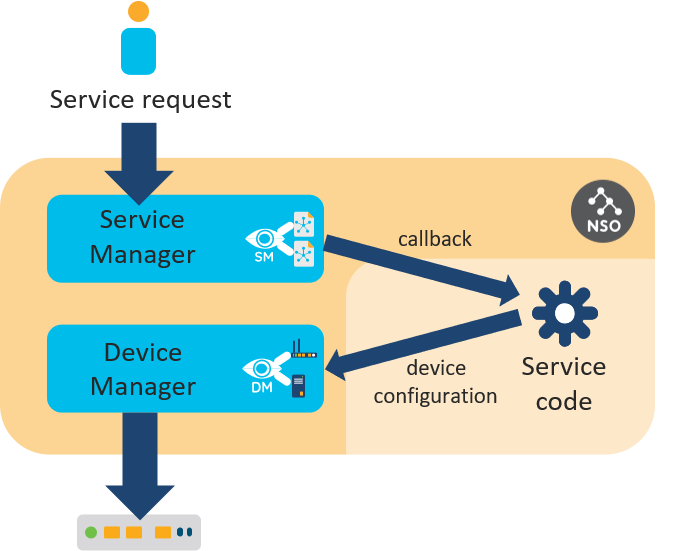
The second way to make configuration changes is through services. Here, the Service Manager adds a layer on top of the Device Manager to process the service request and enlists the help of service-aware applications to generate the device changes. The following figure illustrates the difference between the two approaches.
The Device Manager and the Service Manager are tightly integrated into one transactional engine, using the CDB to store data. Another thing the two managers have in common is packages. Like Device Manager uses NED packages to support specific devices, Service Manager relies on service packages to provide an application-specific mapping for each service type.
But a network application can consist of more than just a configuration recipe. For example, an integrated service test action can verify the initial provisioning and simplify troubleshooting if issues arise. A simple test might run the ping command to verify connectivity. Or an application could only monitor the network and not produce any configuration at all. That is why NSO actually uses an approach where an application chooses what custom code to execute for specific NSO events.
NSO allows augmenting the base functionality of the system
by delegating certain functions to applications.
As the communication must happen on demand, NSO implements a
system of callbacks. Usually, the application code registers the required
callbacks on start-up, then NSO can invoke each callback as needed.
A prime example is a Python service, which registers the
cb_create() function as a service callback
that NSO uses to construct the actual configuration.
In a Python service skeleton, callback registration happens
inside a class Main, found in
main.py:
class Main(ncs.application.Application):
    def setup(self):
        # Service callbacks require a registration for a 'service point',
        # as specified in the corresponding data model.
        #
        self.register_service('my-svc-servicepoint', ServiceCallbacks)
In this code, the register_service() method
registers the ServiceCallbacks class to receive
callbacks for a service. The first argument defines which service that is.
In theory, a single class could even handle service callbacks for
multiple services but that is not a common practice.
On the other hand, it is also possible that no code registered a callback for a given service. This is quite often a result of misspelling or a bug in the code that causes application code to crash. In these situations, NSO presents an error if you try to use the service:
Error: no registration found for callpoint my-svc-servicepoint/service_create of type=external
This error refers to a concept of a service point. Service points are declared in the service YANG model and allow NSO to distinguish ordinary data from services. They instruct NSO to invoke FASTMAP and the service callbacks when a service instance is being provisioned. That means the service skeleton YANG file also contains a service point definition, such as the following:
list my-svc {
  description "This is an RFS skeleton service";

  uses ncs:service-data;
  ncs:servicepoint my-svc-servicepoint;
}
Service point therefore links the definition in the model with
custom code. Some methods in the code will have names starting with
“cb_”, for instance the cb_create()
method, letting you know quickly that they are an implementation of a
callback.
NSO implements additional callbacks for each service point, that may be required in some specific circumstances. Most of these callbacks perform work outside of the automatic change tracking, so you need to consider that before using them. See the section called “Service Callbacks” for more details.
As well as services, other extensibility options in NSO also rely on callbacks and call points, a generalized version of a service point. Two notable examples are validation callbacks, to implement additional validation logic to that supported by YANG, and custom actions. In the section called “Overview of Extension Points” you will find a comprehensive list and an overview of when to use each.
In summary, you implement custom behavior in NSO by providing the following three parts:
-
A YANG model directing NSO to use callbacks, such as service point for services
-
Registration of callbacks, telling NSO to call into your code at a given point
-
The implementation of each callback with your custom logic
This way, an application in NSO can implement all the required functionality for a given use-case (configuration management and otherwise) by registering the right callbacks.
The most common way to implement non-configuration automation in NSO is using actions. An action represents a task or an operation that a user of the system can invoke on demand, such as downloading a file, resetting a device, or performing some test.
Like configuration elements, actions must also be defined in
the YANG model.
Each action is described by the action YANG statement that
specifies what are its inputs and outputs, if any. Inputs allow a user of
the action to provide additional information to the action invocation,
while outputs provide information to the caller.
Actions are a form of a Remote Procedure Call (RPC) and have historically
evolved from NETCONF RPCs. It's therefore unsurprising that with NSO
you implement both in a similar manner.
Let's look at an example action definition:
action my-test {
  tailf:actionpoint my-test-action;
  input {
    leaf test-string {
      type string;
    }
  }
  output {
    leaf has-nso {
      type boolean;
    }
  }
}
The first thing to notice in the code is that, just like services
use a service point, actions use an action point.
It is denoted by the tailf:actionpoint statement and tells
NSO to execute a callback registered to this name. As discussed, the
callback mechanism allows you to provide custom action implementation.
Correspondingly, your code needs to register a callback to this
action point, by calling the register_action(),
as demonstrated here:
def setup(self):
    self.register_action('my-test-action', MyTestAction)
The MyTestAction class, referenced in the
call, is responsible for implementing the actual action logic
and should inherit from the ncs.dp.Action base
class. The base class will take care of calling the
cb_action() class method when users initiate the
action. The cb_action() is where you put your own
code. The following code shows a trivial implementation of an action,
that checks whether its input contains the string “NSO”:
class MyTestAction(Action):
    @Action.action
    def cb_action(self, uinfo, name, kp, input, output, trans):
        self.log.info('Action invoked: ', name)
        output.has_nso = 'NSO' in input.test_string
The input and output
arguments contain input and output data, respectively, which matches
the definition in the action YANG model. The example shows the value
of a simple Python in string check that is assigned to an
output value.
The name argument has the name of the called
action (such as “my-test”), to help you distinguish which
action was called in the case where you would register the same class
for multiple actions. Similarly, an action may be defined on a list item
and the kp argument contains the full keypath (a tuple)
to an instance where it was called.
Finally, the uinfo contains information on the
user invoking the action and the trans argument
represents a transaction, that you can use to access data other
than input.
This transaction is read-only, as configuration changes should normally
be done through services instead. Still, the action may need some data
from NSO, such as an IP address of a device, which you can access
by using trans with the
ncs.maagic.get_root() function and navigate
to the relevant information.
Note
If, for any reason, your action requires a new, read-write transaction, please also read through NSO Concurrency Model to learn about the possible pitfalls.
Further details and the format of the arguments can be found in the NSO Python API reference.
The last thing to note in the above action code definition is
the use of the decorator @Action.action.
Its purpose is to set up the function arguments correctly, so variables
such as input and output behave
like other Python Maagic objects. This is no different from services,
where decorators are required for the same reason.
-
No previous NSO or netsim processes are running. Use the ncs --stop and ncs-netsim stop commands to stop them if necessary.
-
NSO local install with a fresh runtime directory has been created by the ncs-setup --dest ~/nso-lab-rundir or similar command.
-
The environment variable
NSO_RUNDIRpoints to this runtime directory, such as set by the export NSO_RUNDIR=~/nso-lab-rundir command. It enables the below commands to work as-is, without additional substitution needed.
One of the most common uses of NSO actions is automating network and service tests but they are also a good choice for any other non-configuration task. Being able to quickly answer questions, such as how many network ports are available (unused) or how many devices currently reside in a given subnet, can greatly simplify the network planning process. Coding these computations as actions in NSO makes them accessible on-demand to a wider audience.
For this scenario, you will create a new package for the action, however actions can also be placed into existing packages. A common example is adding a self-test action to a service package.
First, navigate to the packages
subdirectory:
$ cd $NSO_RUNDIR/packagesCreate a package skeleton with the
ncs-make-package command and the
--action-example option.
Name the package “count-devices”, like so:
$ ncs-make-package --service-skeleton python --action-example count-devicesThis command created a YANG module file, where you will place a
custom action definition. In a text or code editor open the
count-devices.yang file, located inside
count-devices/src/yang/.
This file already contains an example action which you will remove.
Find the following line (after module imports):
description
Delete this line and all the lines following it, to the very end of the file. The file should now resemble the following:
module count-devices {

  namespace "http://example.com/count-devices";
  prefix count-devices;

  import ietf-inet-types {
    prefix inet;
  }
  import tailf-common {
    prefix tailf;
  }
  import tailf-ncs {
    prefix ncs;
}To model an action, you can use the action YANG
statement. It is part of the YANG standard from version 1.1 onward,
requiring you to also define yang-version 1.1 in the YANG
model.
So, add the following line at the start of the module,
right before namespace statement:
yang-version 1.1;Note that in YANG version 1.0, actions used the NSO-specific
tailf:action extension, which you may still find in some
YANG models.
Now, go to the end of the file and add a custom-actions
container with the count-devices action, using the
count-devices-action action point. The input is an IP
subnet and output the number of devices managed by NSO in this
subnet.
  container custom-actions {
    action count-devices {
      tailf:actionpoint count-devices-action;
      input {
        leaf in-subnet {
          type inet:ipv4-prefix;
        }
      }
      output {
        leaf result {
          type uint16;
        }
      }
    }
  }
Also, add the closing bracket for module at the end:
}
Remember to finally save the file, which should now be similar to the following:
module count-devices {

  yang-version 1.1;
  namespace "http://example.com/count-devices";
  prefix count-devices;

  import ietf-inet-types {
    prefix inet;
  }
  import tailf-common {
    prefix tailf;
  }
  import tailf-ncs {
    prefix ncs;
  }

  container custom-actions {
    action count-devices {
      tailf:actionpoint count-devices-action;
      input {
        leaf in-subnet {
          type inet:ipv4-prefix;
        }
      }
      output {
        leaf result {
          type uint16;
        }
      }
    }
  }
}The action code is implemented in a dedicated class, that you
will put in a separate file. Using an editor, create a new, empty file
count_devices_action.py in the
count-devices/python/count_devices/ subdirectory.
At the start of the file, import the packages that you will need
later on and define the action class with the
cb_action() method:
from ipaddress import IPv4Address, IPv4Network
import socket
import ncs
from ncs.dp import Action

class CountDevicesAction(Action):
    @Action.action
    def cb_action(self, uinfo, name, kp, input, output, trans):
Then initialize the count variable to 0
and construct a reference to the NSO data root,
since it is not part of the method arguments:
        count = 0
        root = ncs.maagic.get_root(trans)
Using the root variable, you can iterate
through the devices managed by NSO and find their (IPv4) address:
        for device in root.devices.device:
            address = socket.gethostbyname(device.address)
If the IP address comes from the specified subnet, increment the count:
            if IPv4Address(address) in IPv4Network(input.in_subnet):
                count = count + 1
Lastly, assign the count to the result:
output.result = count
Your custom Python code is ready; however, you still need to
link it to the count-devices action.
Open the main.py from the same directory in a text
or code editor and delete all the content already in there.
Next, create a class called Main that
inherits from the ncs.application.Application
base class. Add a single class method setup()
that takes no additional arguments.
import ncs

class Main(ncs.application.Application):
    def setup(self):
Inside the setup() method call the
register_action() as follows:
self.register_action('count-devices-action', CountDevicesAction)This line instructs NSO to use the
CountDevicesAction class to handle invocations
of the count-devices-action action point. Also import the
CountDevicesAction class from the
count_devices_action module.
The complete main.py file should then be
similar to the following:
import ncs
from count_devices_action import CountDevicesAction

class Main(ncs.application.Application):
    def setup(self):
self.register_action('count-devices-action', CountDevicesAction)With all of the code ready, you are one step away from testing the new action, but to do that, you will need to add some devices to NSO. So, first add a couple of simulated routers to the NSO instance:
$ cd $NCS_DIR/examples.ncs/getting-started/developing-with-ncs/0-router-network$ cp ncs-cdb/ncs_init.xml $NSO_RUNDIR/ncs-cdb/$ cp -a packages/router $NSO_RUNDIR/packages/Before the packages can be loaded, you must compile them:
$ cd $NSO_RUNDIR$ make -C packages/router/src && make -C packages/count-devices/src
make: Entering directory 'packages/router/src'
< ... output omitted ... >
make: Leaving directory 'packages/router/src'
make: Entering directory 'packages/count-devices/src'
mkdir -p ../load-dir
mkdir -p java/src//
bin/ncsc `ls count-devices-ann.yang > /dev/null 2>&1 && echo "-a count-devices-ann.yang"` \
-c -o ../load-dir/count-devices.fxs yang/count-devices.yang
make: Leaving directory 'packages/count-devices/src'You can start the NSO now and connect to the CLI:
$ ncs --with-package-reload && ncs_cli -C -u adminFinally, invoke the action:
$ admin@ncs# custom-actions count-devices in-subnet 127.0.0.0/16
result 3
You can use the show devices list command to
verify that the result is correct. You can alter the address of any
device and see how it affects the result. You can even use a hostname,
such as localhost.
NSO supports a number of extension points for custom callbacks.
-
Type: Service
Supported in: Python, Java, Erlang
YANG extension:
ncs:servicepointTransforms a list or container into a model for service instances. When configuration of a service instance changes, NSO invokes Service Manager and FASTMAP, which may call service create and similar callbacks. See Developing a Simple Service for an introduction.
-
Type: Action
Supported in: Python, Java, Erlang
YANG extension:
tailf:actionpointDefines callbacks when an action or RPC is invoked. See the section called “Actions” for an introduction.
-
Type: Validation
Supported in: Python, Java, Erlang
YANG extension:
tailf:validateDefines callbacks for additional validation of data when the provided YANG functionality, such as
mustanduniquestatements, is insufficient. See the respective API documentation for examples; the section called “ValidationPoint handler” (Python), the section called “Validation Callbacks” (Java) and Embedded Erlang applications (Erlang). -
Type: Data Provider
Supported in: Java, Python (low-level API with experimental high-level API), Erlang
YANG extension:
tailf:callpointDefines callbacks for transparently accessing external data (data not stored in the CDB) or callbacks for special processing of data nodes (transforms, set and transaction hooks). Requires careful implementation and understanding of transaction intricacies. Rarely used in NSO.
Each extension point in the list has a corresponding YANG extension that defines to which part of the data model the callbacks apply, as well as the individual name of the call point. The name is required during callback registration and helps distinguish between multiple uses of the extension. Each extension generally specifies multiple callbacks, however, you often need to implement only the main one, e.g. create for services or action for actions.
In addition, NSO supports some specific callbacks from internal systems, such as the transaction or the authorization engine, but these have very narrow use and are in general not recommended.
Services and actions are examples of something that happens directly as a result of a user (or other northbound agent) request. That is, a user takes an active role in starting service instantiation or invoking an action. Contrast this to a change that happens in the network and requires the orchestration system to take some action. In this latter case, the system monitors the notifications that the network generates, such as losing a link, and responds to the new data.
NSO provides out-of-the-box support for automation of not only notifications but also changes to the operational and configuration data, using the concept of kickers. With kickers, you can watch for a particular change to occur in the system and invoke a custom action that handles the change.
The kicker system is further described in Kicker .
Services, actions, and other features all rely on callback
registration.
In Python code, the class responsible for registration derives from the
ncs.application.Application. This allows NSO
to manage the application code as appropriate, such as starting and
stopping in response to NSO events. These events include package
load or unload and NSO start or stop events.
While the Python package skeleton names the derived class
Main, you can choose a different name if you also
update the package-meta-data.xml file accordingly.
This file defines a component with the name of the Python class to use:
<ncs-package xmlns="http://tail-f.com/ns/ncs-packages">
  < ... output omitted ... >

  <component>
    <name>main</name>
    <application>
      <python-class-name>dns_config.main.Main</python-class-name>
    </application>
  </component>
</ncs-package>
When starting the package, NSO reads the class name from
package-meta-data.xml, starts the Python interpreter,
and instantiates a class instance.
The base Application class takes care of
establishing communication with the NSO process and calling the
setup and teardown methods.
The two methods are a good place to do application-specific initialization
and cleanup, along with any callback registrations you require.
The communication between the application process and NSO happens through a dedicated control socket, as described in the section called “IPC ports” in Administration Guide. This setup prevents a faulty application to bring down the whole system along with it and enables NSO to support different application environments.
In fact, NSO can manage applications written in Java or
Erlang in addition to those in Python.
If you replace the python-class-name element of a component
with java-class-name in the
package-meta-data.xml file, NSO will instead
try to run the specified Java class in the managed Java VM.
If you wanted to, you could implement all of the same services and actions
in Java, too. For example, see the section called “Service Actions”
to compare Python and Java code.
Regardless of the programming language you use, the high-level approach to automation with NSO does not change, registering and implementing callbacks as part of your network application. Of course, the actual function calls (the API) and other specifics differ for each language. The NSO Python VM, The NSO Java VM, and Embedded Erlang applications, cover the details. Even so, the concepts of actions, services, and YANG modeling remain the same. As you have seen, everything in NSO is ultimately tied to the YANG model, making YANG knowledge such a valuable skill for any NSO developer.
As your NSO application evolves, you will create newer versions of your application package, which will replace the existing one. If the application becomes sufficiently complex, you might even split it across multiple packages.
When you replace a package, NSO must redeploy the application code and potentially replace the package-provided part of the YANG schema. For the latter, NSO can perform the data migration for you, as long as the schema is backward compatible. This process is documented in the section called “Automatic Schema Upgrades and Downgrades” and is automatic when you request reload of the package with packages reload or a similar command.
If your schema changes are not backward compatible, you can implement
a data migration procedure, which NSO invokes when upgrading
the schema. Among other things, this allows you to reuse and migrate
the data that is no longer present in the new schema.
You can specify the migration procedure as part of the
package-meta-data.xml file, using a component
of the upgrade type.
See the section called “The upgrade component” (Python) and
examples.ncs/getting-started/developing-with-ncs/14-upgrade-service
example (Java) for details.
Note that changing the schema in any way requires you to recompile
the .fxs files in the package, which is typically
done by running make in the package's
src folder.
However, if the schema does not change, you can request that only
the application code and templates be redeployed by using the
packages package my-pkg
redeploy command.