This documentation corresponds to an older version of the product, is no longer updated, and may contain outdated information.
Please access the latest versions from https://cisco-tailf.gitbook.io/nso-docs and update your bookmarks. OK
A Network Element Driver (NED) represents a key NSO component that allows NSO to communicate southbound with network devices. The device YANG models contained in the Network Element Drivers (NEDs) enable NSO to store device configurations in the CDB and expose a uniform API to the network for automation. The YANG models can cover only a tiny subset of the device or all of the device. Typically, the YANG models contained in a NED represent the subset of the device's configuration data, state data, Remote Procedure Calls, and notifications to be managed using NSO.
This guide provides information on NED development, focusing on building your own NED package. For a general introduction to NEDs, Cisco-provided NEDs, and NED administration, refer to the NED Administration in Administration Guide.
A NED package allows NSO to manage a network device of a specific type. NEDs typically contain YANG models and the code, specifying how NSO should configure and retrieve status. When developing your own NED, there are four categories supported by NSO.
-
A NETCONF NED is used with the NSO's built-in NETCONF client and requires no code. Only YANG models. This NED is suitable for devices that strictly follow the specification for the NETCONF protocol and YANG mappings to NETCONF targeting a standardized machine-to-machine interface.
-
CLI NED targeted devices that use a Cisco-style CLI as a human-to-machine configuration interface. Various YANG extensions are used to annotate the YANG model representation of the device together with code converting data between NSO and device formats.
-
A generic NED is typically used to communicate with non-CLI devices, such as devices using protocols like REST, TL1, Corba, SOAP, RESTCONF, or gNMI as a configuration interface. Even NETCONF-enabled devices often require a generic NED to function properly with NSO.
-
NSO's built-in SNMP client can manage SNMP devices by supplying NSO with the MIBs, with some additional declarative annotations and code to handle the communication to the device. Usually, this legacy protocol is used to read state data. Albeit limited, NSO has support for configuring devices using SNMP.
In summary, the NETCONF and SNMP NEDs use built-in NSO clients; the CLI NED is model-driven, whereas the generic NED requires a Java program to translate operations toward the device.
NSO differentiates between managed devices that can handle transactions and devices that can not. This discussion applies regardless of NED type, i.e., NETCONF, SNMP, CLI, or Generic.
NEDs for devices that cannot handle abort must indicate so in the reply of
the newConnection() method indicating that the NED
wants a reverse diff in case of an abort. Thus, NSO has two different ways to
abort a transaction towards a NED, invoke the abort()
method with or without a generated reverse diff.
For non-transactional devices, we have no other way of trying out a proposed configuration change than to send the change to the device and see what happens.
The table below shows the seven different data-related callbacks that could or must be implemented by all NEDs. It also differentiates between 4 different types of devices and what the NED must do in each callback for the different types of devices.
| Non transactional devices | Transactional devices | Transactional devices with confirmed commit | Fully capable NETCONF server |
|---|---|---|---|
| SNMP, Cisco IOS, NETCONF devices with startup+running | Devices that can abort, NETCONF devices without confirmed commit | Cisco XR type of devices | ConfD, Junos |
| INITIALIZE The initialize phase is used to initialize an transaction. For instance if locking or other transaction preparations are necessary they should be performed here. This callback is not mandatory to implement if no NED specific transaction preparations are needed. | |||
| initialize(). NED code shall make the device go into config mode (if applicable) and lock (if applicable). | initialize(). NED code shall start a transaction on the device. | initialize(). NED code shall do the equivalent of configure exclusive. | Built in, NSO will lock. |
| UNINITIALIZE If the transaction is not completed and the NED has done INITIALIZE this method is called to undo the transaction preparations, that is restoring the NED to the state before INITIALIZE. This callback is not mandatory to implement if no NED specific preparations was performed in INITIALIZE. | |||
| uninitialize(). NED code shall unlock (if applicable). | uninitialize(). NED code shall abort the transaction. | uninitialize(). NED code shall abort the transaction. | Built in, NSO will unlock. |
| PREPARE In the prepare phase, the NEDs get exposed to all the changes that are destined for each managed device handled by each NED. It is the responsibility of the NED to determine the outcome here. If the NED replies successfully from the prepare phase, NSO assumes the device will be able to go through with the proposed configuration change. | |||
| prepare(Data). NED code shall send all data to the device. | prepare(Data). NED code shall add Data to the transaction and validate. | prepare(Data). NED code shall add Data to the transaction and validate. | Built in, NSO will edit-config towards the candidate, validate and commit confirmed with a timeout. |
ABORT
If any participants in the transaction reject the proposed
changes, all NEDs will be invoked in the abort() method for
each managed device the NED handles. It is the responsibility of
the NED to make sure that whatever was done in the PREPARE phase
is undone. For NEDs that indicate as reply in
newConnection() that they want the reverse
diff, they will get the reverse data as a parameter here.
|
|||
| abort(ReverseData | null) Either do the equivalent of copy startup to running, or apply the ReverseData to the device. | abort(ReverseData | null). Abort the transaction | abort(ReverseData | null). Abort the transaction | Built in, discard-changes and close. |
| COMMIT Once all NEDs that get invoked in commit(Timeout) reply ok, the transaction is permanently committed to the system. The NED may still reject the change in COMMIT. If any NED reject the COMMIT, all participants will be invoked in REVERT, NEDs that support confirmed commit with a timeout, Cisco XR, may choose to use the provided timeout to make REVERT easy to implement. | |||
| commit(Timeout). Do nothing | commit(Timeout). Commit the transaction. | commit(Timeout). Execute commit confirmed [Timeout] on the device. | Built in, commit confirmed with the timeout. |
| REVERT This state is reached if any NED reports failure in the COMMIT phase. Similar to the ABORT state, the reverse diff is supplied to the NED if the NED has asked for that. | |||
| revert(ReverseData | null) Either do the equivalent of copy startup to running, or apply the ReverseData to the device. | revert(ReverseData | null) Either do the equivalent of copy startup to running, or apply the ReverseData to the device. | revert(ReverseData | null). discard-changes | Built in, discard-changes and close. |
| PERSIST This state is reached at the end of a successful transaction. Here it's responsibility of the NED to make sure that if the device reboots, the changes are still there. | |||
| persist() Either do the equivalent of copy running to startup or nothing. | persist() Either do the equivalent of copy running to startup or nothing. | persist(). confirm. | Built in, commit confirm. |
The following state diagram depicts the different states the NED code goes through in the life of a transaction.

NED transaction states
Creating and installing a NETCONF NED consists of the following steps:
-
Make the device YANG data models available to NSO
-
Build the NED package from the YANG data models using NSO tools
-
Install the NED with NSO
-
Configure the device connection and notification events in NSO
Creating a NETCONF NED that uses the built-in NSO NETCONF client can be a pleasant experience with devices and nodes that strictly follow the specification for the NETCONF protocol and YANG mappings to NETCONF. If the device does not, the smooth sailing will quickly come to a halt, and you are recommended to visit the NED Administration in Administration Guide and get help from the Cisco NSO NED team who can diagnose, develop and maintain NEDs that bypass misbehaving devices special quirks.
Before NSO can manage a NETCONF-capable device, a corresponding NETCONF NED needs to be loaded. While no code needs to be written for such NED, it must contain YANG data models for this kind of device. While in some cases, the YANG models may be provided by the device's vendor, devices that implement RFC 6022 YANG Module for NETCONF Monitoring can provide their YANG models using the functionality described in this RFC.
The NSO example under
$NCS_DIR/examples.ncs/development-guide/ned-development/netconf-ned
implements two shell scripts that use different tools to build a NETCONF NED
from a simulated hardware chassis system controller device.
The netconf-console NETCONF client tool is a
Python script that can be used for test, debug, and simple client
duties. For example, making the device YANG models available to NSO using
the NETCONF IETF RFC 6022 get-schema operation to download
YANG modules and the RFC 6241get operation, where the device
implements the RFC 7895 YANG module library to provide information about
all the YANG modules used by the NETCONF server. Type
netconf-console -h for documentation.
Once the required YANG models are downloaded or copied from the device, the ncs-make-package bash script tool can be used to create and build, for example, the NETCONF NED package. See ncs-make-package(1) in Manual Pages and ncs-make-package -h for documentation.
The demo.sh script in the netconf-ned example
uses the netconf-console and ncs-make-package
combination to create, build, and install the NETCONF NED. When you know beforehand which
models you need from the device, you often begin with this approach when encountering
a new NETCONF device.
The NETCONF NED builder uses the functionality of the two previous tools to assist the NSO developer onboard NETCONF devices by fetching the YANG models from a device and building a NETCONF NED using CLI commands as a frontend.
The demo_nb.sh script in the netconf-ned example
uses the NSO CLI NETCONF NED builder commands to create, build, and install the
NETCONF NED.This tool can be beneficial for a device where the YANG models are required
to cover the dependencies of the must-have models. Also, devices known to have behaved
well with previous versions can benefit from using this tool and its selection profile
and production packaging features.
For a demo of the steps below, see README in the $NCS_DIR/examples.ncs/development-guide/ned-development/netconf-ned
example and run the demo.sh script.
List the YANG version 1.0 models the device supports using NETCONF hello message.
$ netconf-console --port $DEVICE_NETCONF_PORT --hello | grep "module="
<capability>http://tail-f.com/ns/aaa/1.1?module=tailf-aaa&revision=2023-04-13</capability>
<capability>http://tail-f.com/ns/common/query?module=tailf-common-query&revision=2017-12-15</capability>
<capability>http://tail-f.com/ns/confd-progress?module=tailf-confd-progress&revision=2020-06-29</capability>
...
<capability>urn:ietf:params:xml:ns:yang:ietf-yang-metadata?module=ietf-yang-metadata&revision=2016-08-05</capability>
<capability>urn:ietf:params:xml:ns:yang:ietf-yang-types?module=ietf-yang-types&revision=2013-07-15</capability>List the YANG version 1.1 models supported by the device from the device yang-library.
$ netconf-console --port=$DEVICE_NETCONF_PORT --get -x /yang-library/module-set/module/name
<?xml version="1.0" encoding="UTF-8"?>
<rpc-reply xmlns="urn:ietf:params:xml:ns:netconf:base:1.0" message-id="1">
  <data>
    <yang-library xmlns="urn:ietf:params:xml:ns:yang:ietf-yang-library">
      <module-set>
        <name>common</name>
        <module>
          <name>iana-crypt-hash</name>
        </module>
        <module>
          <name>ietf-hardware</name>
        </module>
        <module>
          <name>ietf-netconf</name>
        </module>
        <module>
          <name>ietf-netconf-acm</name>
        </module>
        <module>
        ...
        <module>
          <name>tailf-yang-patch</name>
        </module>
        <module>
          <name>timestamp-hardware</name>
        </module>
      </module-set>
    </yang-library>
  </data>
</rpc-reply>
The ietf-hardware.yang model is of interest to manage the
device hardware. Use the netconf-console NETCONF
get-schema operation to get the ietf-hardware.yang model.
$ netconf-console --port=$DEVICE_NETCONF_PORT \
  --get-schema=ietf-hardware > dev-yang/ietf-hardware.yang
The ietf-hardware.yang import a few YANG models.
$ cat dev-yang/ietf-hardware.yang | grep import
<import ietf-inet-types {
import ietf-yang-types {
import iana-hardware {
Two of the imported YANG models are shipped with NSO.
$ find ${NCS_DIR} \
  \( -name "ietf-inet-types.yang" -o -name "ietf-yang-types.yang" -o -name "iana-hardware.yang" \)
/path/to/nso/src/ncs/builtin_yang/ietf-inet-types.yang
/path/to/nso/src/ncs/builtin_yang/ietf-yang-types.yang
Use the netconf-console NETCONF get-schema operation to get the iana-hardware.yang module.
$ netconf-console --port=$DEVICE_NETCONF_PORT --get-schema=iana-hardware > \
  dev-yang/iana-hardware.yang
The timestamp-hardware.yang module augments a node onto the ietf-hardware.yang model. This is not visible in the YANG library. Therefore, information on the augment dependency must be available, or all
YANG models must be downloaded and checked for imports and augments of the ietf-hardware.yang model to make use of the augmented node(s).
$ netconf-console --port=$DEVICE_NETCONF_PORT --get-schema=timestamp-hardware > \
dev-yang/timestamp-hardware.yangCreate and build the NETCONF NED package from the device YANG models using the ncs-make-package script.
$ ncs-make-package --netconf-ned dev-yang --dest nso-rundir/packages/devsim --build \
  --verbose --no-test --no-java --no-netsim --no-python --no-template --vendor "Tail-f" \
  --package-version "1.0" devsim
If you make any changes to, for example, the YANG models after creating the package above, you can rebuild the package using make -C nso-rundir/packages/devsim all.
Start NSO. NSO will load the new package. If the package was loaded previously, use the --with-package-reload option. See ncs(1) in Manual Pages for details. If NSO is already running, use the packages reload CLI command.
$ ncs --cd ./nso-rundirAs communication with the devices being managed by NSO requires authentication, a custom authentication group will likely need to be created with mapping between the NSO user and the remote device username and password, SSH public-key authentication, or external authentication. The example used here has a 1-1 mapping between the NSO admin user and the ConfD-enabled simulated device admin user for both username and password.
In the example below, the device name is set to hw0, and as the device here runs on the
same host as NSO, the NETCONF interface IP address is 127.0.0.1 while the port is set to 12022 to
not collide with the NSO northbound NETCONF port.
The standard NETCONF port, 830, is used for production.
The default authentication group, as shown above, is used.
$ncs_cli -u admin -C#configEntering configuration mode terminal (config)#devices device hw0 address 127.0.0.1 port 12022 authgroup default(config-device-hw0)#devices device hw0 trace pretty(config-device-hw0)#state admin-state unlocked(config-device-hw0)#device-type netconf ned-id devsim-nc-1.0(config-device-hw0)#commitCommit complete.
Fetch the public SSH host key from the device and sync the configuration covered by the ietf-hardware.yang from the device.
$ncs_cli -u admin -C#devices fetch-ssh-host-keysfetch-result { device hw0 result updated fingerprint { algorithm ssh-ed25519 value 00:11:22:33:44:55:66:77:88:99:aa:bb:cc:dd:ee:ff } } #device device hw0 sync-fromresult true
NSO can now configure the device, state data can be read, actions can be executed, and
notifications can be received. See the
$NCS_DIR/examples.ncs/development-guide/ned-development/netconf-ned/demo.sh
example script for a demo.
For a demo of the steps below, see README in the $NCS_DIR/examples.ncs/development-guide/ned-development/netconf-ned
example and run the demo_nb.sh script.
As communication with the devices being managed by NSO requires authentication, a custom authentication group will likely need to be created with mapping between the NSO user and the remote device username and password, SSH public-key authentication, or external authentication.
The example used here has a 1-1 mapping between the NSO admin user and the ConfD-enabled simulated device admin user for both username and password.
admin@ncs# show running-config devices authgroups group
devices authgroups group default
 umap admin
  remote-name     admin
  remote-password $9$xrr1xtyI/8l9xm9GxPqwzcEbQ6oaK7k5RHm96Hkgysg=
 !
 umap oper
  remote-name     oper
  remote-password $9$Pr2BRIHRSWOW2v85PvRGvU7DNehWL1hcP3t1+cIgaoE=
 !
!
In the example below, the device name is set to hw0, and as the device
here runs on the same host as NSO, the NETCONF interface IP address is 127.0.0.1
while the port is set to 12022 to not collide with the NSO northbound NETCONF port.
The standard NETCONF port, 830, is used for production.
The default authentication group, as shown above, is used.
#configEntering configuration mode terminal (config)#devices device hw0 address 127.0.0.1 port 12022 authgroup default(config-device-hw0)#devices device hw0 trace pretty(config-device-hw0)#state admin-state unlocked(config-device-hw0)#device-type netconf ned-id netconf(config-device-hw0)#commit
Note
A temporary NED identity is configured to netconf as the NED package has not yet been
built. It will be changed to match the NETCONF NED package NED ID once the package is installed.
The generic netconf ned-id allows NSO to connect to the device for basic NETCONF
operations, such as get and get-schema for listing and
downloading YANG models from the device.
Create a NETCONF NED Builder project called hardware for the device, here named hw0.
#devtools true#config(config)#netconf-ned-builder project hardware 1.0 device hw0 local-user admin vendor Tail-f(config)#commit(config)#end#show netconf-ned-builder project hardwarenetconf-ned-builder project hardware 1.0 download-cache-path /path/to/nso/examples.ncs/development-guide/ned-development/netconf-ned/nso-rundir/ state/netconf-ned-builder/cache/hardware-nc-1.0 ned-directory-path /path/to/nso/examples.ncs/development-guide/ned-development/netconf-ned/nso-rundir/ state/netconf-ned-builder/hardware-nc-1.0
The NETCONF NED Builder is a developer tool that must be enabled first through the devtools true command. The NETCONF NED Builder feature is not expected to be used by the end users of NSO.
The cache directory above is where additional YANG and YANG annotation files can be added in addition to the ones download from the device. Files added need to be configured with the NED builder to be included with the project, as described below.
The project argument for the netconf-ned-builder command requires both
the project name and a version number for the NED being built. A version number
often picked is the version number of the device software version to match the NED to the
device software it is tested with. NSO uses the project name and version number to
create the NED name, here hardware-nc-1.0. The device's name is linked to
the device name configured for the device connection.
Note
This step is not required if the device supports the NETCONF get-schema operation
and all YANG modules can be retrieved from the device.. Otherwise,
you copy the YANG models to the state/netconf-ned-builder/cache/hardware-nc-1.0
directory for use with the device.
After downloading the YANG data models and before building the NED with the NED
builder, you need to register the YANG module with the NSO NED builder. For example,
if you want to include a dummy.yang module with the NED, you first
copy it to the cache directory and then, for example, create an XML file for use with the
ncs_loadcommand to update the NSO CDB operational datastore:
$cp dummy.yang $NCS_DIR/examples.ncs/development-guide/ned-development/netconf-ned/\ nso-rundir/state/netconf-ned-builder/cache/hardware-nc-1.0/$cat dummy.xml<config xmlns="http://tail-f.com/ns/config/1.0"> <netconf-ned-builder xmlns="http://tail-f.com/ns/ncs/netconf-ned-builder"> <project> <family-name>hardware</family-name> <major-version>1.0</major-version> <module> <name>dummy</name> <revision>2023-11-10</revision> <location>NETCONF</location> <status>selected downloaded</status> </module> </project> </netconf-ned-builder> </config> $ncs_load -O -m -l dummy.xml$ncs_cli -u admin -C#devtools true#show netconf-ned-builder project hardware 1.0 module dummy 2023-11-10SELECT BUILD BUILD NAME REVISION NAMESPACE FEATURE LOCATION STATUS ----------------------------------------------------------------------- dummy 2023-11-10 - - [ NETCONF ] selected,downloaded
In some situations, you want to annotate the YANG data models that were downloaded from the device. For example, when an encrypted string is stored on the device, the encrypted value that is stored on the device will differ from the value stored in NSO if the two initialization vectors differ.
Say you have a YANG data model:
module dummy {
  namespace "urn:dummy";
  prefix dummy;

  revision 2023-11-10 {
    description
      "Initial revision.";
  }

  grouping my-grouping {
    container my-container {
      leaf my-encrypted-password {
        type tailf:aes-cfb-128-encrypted-string;
      }
    }
  }
}
And create a YANG annotation module:
module dummy-ann {
  namespace "urn:dummy-ann";
  prefix dummy-ann;

  import tailf-common {
    prefix tailf;
  }
  tailf:annotate-module "dummy" {
    tailf:annotate-statement "grouping[name='my-grouping']" {
      tailf:annotate-statement "container[name='my-container']" {
        tailf:annotate-statement "leaf[name=' my-encrypted-password']" {
          tailf:ned-ignore-compare-config;
        }
      }
    }
  }
}
After downloading the YANG data models and before building the NED with the NED
builder, you need to register the dummy-ann.yang annotation module,
as was done above with the XML file for the dummy.yang module.
If the device supports get-schema requests, the device can be contacted directly
to download the YANG data models. The hardware system example returns the below YANG source
files when the NETCONF get-schema operation is issued to the device from NSO. Only
a subset of the list is shown.
$ncs_cli -u admin -C#devtools true#devices fetch-ssh-host-keysfetch-result { device hw0 result updated fingerprint { algorithm ssh-ed25519 value 00:11:22:33:44:55:66:77:88:99:aa:bb:cc:dd:ee:ff } } #netconf-ned-builder project hardware 1.0 fetch-module-list#show netconf-ned-builder project hardware 1.0 modulemodule iana-crypt-hash 2014-08-06 namespace urn:ietf:params:xml:ns:yang:iana-crypt-hash feature [ crypt-hash-md5 crypt-hash-sha-256 crypt-hash-sha-512 ] location [ NETCONF ] module iana-hardware 2018-03-13 namespace urn:ietf:params:xml:ns:yang:iana-hardware location [ NETCONF ] module ietf-datastores 2018-02-14 namespace urn:ietf:params:xml:ns:yang:ietf-datastores location [ NETCONF ] module ietf-hardware 2018-03-13 namespace urn:ietf:params:xml:ns:yang:ietf-hardware location [ NETCONF ] module ietf-inet-types 2013-07-15 namespace urn:ietf:params:xml:ns:yang:ietf-inet-types location [ NETCONF ] module ietf-interfaces 2018-02-20 namespace urn:ietf:params:xml:ns:yang:ietf-interfaces feature [ arbitrary-names if-mib pre-provisioning ] location [ NETCONF ] module ietf-ip 2018-02-22 namespace urn:ietf:params:xml:ns:yang:ietf-ip feature [ ipv4-non-contiguous-netmasks ipv6-privacy-autoconf ] location [ NETCONF ] module ietf-netconf 2011-06-01 namespace urn:ietf:params:xml:ns:netconf:base:1.0 feature [ candidate confirmed-commit rollback-on-error validate xpath ] location [ NETCONF ] module ietf-netconf-acm 2018-02-14 namespace urn:ietf:params:xml:ns:yang:ietf-netconf-acm location [ NETCONF ] module ietf-netconf-monitoring 2010-10-04 namespace urn:ietf:params:xml:ns:yang:ietf-netconf-monitoring location [ NETCONF ] ... module ietf-yang-types 2013-07-15 namespace urn:ietf:params:xml:ns:yang:ietf-yang-types location [ NETCONF ] module tailf-aaa 2023-04-13 namespace http://tail-f.com/ns/aaa/1.1 location [ NETCONF ] module tailf-acm 2013-03-07 namespace http://tail-f.com/yang/acm location [ NETCONF ] module tailf-common 2023-10-16 namespace http://tail-f.com/yang/common location [ NETCONF ] ... module timestamp-hardware 2023-11-10 namespace urn:example:timestamp-hardware location [ NETCONF ]
The fetch-ssh-host-key command fetches the public SSH host key from the
device to set up NETCONF over SSH. The fetch-module-list command will
look for existing YANG modules in the download-cache-path folder, YANG version
1.0 models in the device NETCONF hello message, and issue a
get operation to look for YANG version 1.1 models in the device
yang-library. The get-schema operation fetches the
YANG modules over NETCONF and puts them in the download-cache-path folder.
After the list of YANG modules is fetched, the retrieved list of modules can be shown. Select the ones you want to download and include in the NETCONF NED.
When you select a module with dependencies on other modules, the modules dependent on are
automatically selected, such as those
listed below for the ietf-hardware module including iana-hardware
ietf-inet-types and ietf-yang-types.
To select all available modules, use the wild card for both fields. Use the
deselect command to exclude modules previously included from the build.
$ncs_cli -u admin -C#devtools true#netconf-ned-builder project hardware 1.0 module ietf-hardware 2018-03-13 select#netconf-ned-builder project hardware 1.0 module timestamp-hardware 2023-11-10 select#show netconf-ned-builder project hardware 1.0 module statusNAME REVISION STATUS ----------------------------------------------------- iana-hardware 2018-03-13 selected,downloaded ietf-hardware 2018-03-13 selected,downloaded ietf-inet-types 2013-07-15 selected,pending ietf-yang-types 2013-07-15 selected,pending timestamp-hardware 2023-11-10 selected,pending Waiting for NSO to download the selected YANG models (see demo-nb.sh for details) NAME REVISION STATUS ----------------------------------------------------- iana-hardware 2018-03-13 selected,downloaded ietf-hardware 2018-03-13 selected,downloaded ietf-inet-types 2013-07-15 selected,downloaded ietf-yang-types 2013-07-15 selected,downloaded timestamp-hardware 2023-11-10 selected,downloaded
Before diving into more details, the principles of selecting the modules for inclusion in the NED are crucial steps in building the NED and deserve to be highlighted.
The best practice recommendation is to select only the modules necessary to perform the tasks for the given NSO deployment to reduce memory consumption, for example, for the sync-from command, and improve upgrade wall-clock performance.
For example, suppose the aim of the NSO installation is exclusively to manage BGP on the device, and the necessary configuration is defined in a separate module. In that case, only this module and its dependencies need to be selected. If several services are running within the NSO deployment, it will be necessary to include more data models in the single NED that may serve one or many devices. However, if the NSO installation is used to, for example, take a full backup of the device's configuration, all device modules need to be included with the NED.
Selecting a module will also require selecting the module's dependencies, namely, modules imported by the selected modules, modules that augment the selected modules with the required functionality, and modules known to deviate from the selected module in the device's implementation.
Avoid selecting YANG modules that overlap where, for example, configuring one leaf will update another. Including both will cause NSO to get out-of-sync with the device after a NETCONF edit-config operation, forcing time-consuming sync operations.
An NSO NED is a package containing the device YANG data models. The NED package must first be built, then installed with NSO, and finally, the package must be loaded for NSO to communicate with the device via NETCONF using the device YANG data models as the schema for what to configure, state to read, etc.
After the files have been downloaded from the device, they must be built before being used.
The following example shows how to build a NED for the hw0 device.
# devtools true #netconf-ned-builder project hardware 1.0 build-ned#show netconf-ned-builder project hardware 1.0 build-statusbuild-status success #show netconf-ned-builder project hardware 1.0 module build-warning% No entries found. #show netconf-ned-builder project hardware 1.0 module build-error% No entries found. #unhide debug#show netconf-ned-builder project hardware 1.0 compiler-output% No entries found.
Note
Build errors can be found in the build-error leaf under the module list
entry. If there are errors in the build, resolve the issues in the YANG models,
update them and their revision on the device, and download them from the device or
place the YANG models in the cache as described earlier.
Warnings after building the NED can be found in the build-warning leaf
under the module list entry. It is good practice to clean up build warnings in your
YANG models.
A build error example:
#netconf-ned-builder project cisco-iosxr 6.6 build-nedError: Failed to compile NED bundle #show netconf-ned-builder project cisco-iosxr 6.6 build-statusbuild-status error #show netconf-ned-builder project cisco-iosxr 6.6 module build-errormodule openconfig-telemetry 2016-02-04 build-error at line 700: <error message>
The full compiler output for debugging purposes can be found in the compiler-output
leaf under the project list entry. The compiler-output leaf is hidden by
hide-group debug and may be accessed in the CLI using the unhide debug
command if the hide-group is configured in ncs.conf. Example
ncs.conf config:
<hide-group>
    <name>debug</name>
</hide-group>
For the ncs.conf configuration change to take effect, it must be either reloaded or NSO restarted. A reload using the ncs_cmd tool:
$ ncs_cmd -c reloadAs the compilation will halt if an error is found in a YANG data model, it can be helpful to first check all YANG data models at once using a shell script plus the NSO yanger tool.
$ls -1check.sh yang # directory with my YANG modules $cat check.sh#!/bin/sh for f in yang/*.yang do $NCS_DIR/bin/yanger -p yang $f done
As an alternative to debugging the NED building issues inside an NSO CLI session, the make-development-ned action creates a development version of NED, which can be used to debug and fix the issue in the YANG module.
$ncs_cli -u admin -C#devtools true(config)#netconf-ned-builder project hardware 1.0 make-development-ned in-directory /tmpned-path /tmp/hardware-nc-1.0 (config)#end#exit$cd /tmp/hardware-nc-1.0/src$make clean all
YANG data models that do not compile due to YANG RFC compliance issues can either
be updated in the cache folder directly or in the device and re-uploaded again through
get-schema operation by removing them from the cache folder and repeating the previous process
to rebuild the NED. The YANG modules can be deselected from the build if
they are not needed for your use case.
Note
Having device vendors update their YANG models to comply with the NETCONF and YANG standards can be time-consuming. Visit the NED Administration in Administration Guide and get help from the Cisco NSO NED team, who can diagnose, develop and maintain NEDs that bypass misbehaving device's special quirks.
A successfully built NED may be exported as a tar file using the export-ned action.
The tar file name is constructed according to the below naming convention.
ncs-<ncs-version>-<ned-family>-nc-<ned-version>.tar.gz
The user chooses the directory the file needs to be created in. The user must have write access to the directory. I.e., configure the NSO user with the same uid (id -u) as the non-root user:
$id -u501 $ncs_cli -u admin -C#devtools true#config(config)#aaa authentication users user admin uid 501(config-user-admin)#commitCommit complete. (config-user-admin)#end#netconf-ned-builder project hardware 1.0 export-ned to-directory \ /path/to/nso/examples.ncs/development-guide/ned-development/netconf-ned/nso-rundir/packagestar-file /path/to/nso/examples.ncs/development-guide/ned-development/netconf-ned/ nso-rundir/packages/ncs-6.2-hardware-nc-1.0.tar.gz
When the NED package has been copied to the NSO run-time packages directory, the NED package can be loaded by NSO.
#packages reload>>>> System upgrade is starting. >>>> Sessions in configure mode must exit to operational mode. >>>> No configuration changes can be performed until upgrade has completed. >>>> System upgrade has completed successfully. reload-result { package hardware-nc-1.0 result true } #show packages | nomorepackages package hardware-nc-1.0 package-version 1.0 description "Generated by NETCONF NED builder" ncs-min-version [ 6.2 ] directory ./state/packages-in-use/1/hardware-nc-1.0 component hardware ned netconf ned-id hardware-nc-1.0 ned device vendor Tail-f oper-status up
When the NETCONF NED has been built for the hw0 device, the
ned-id for hw0 needs to be updated before the NED can
be used to manage the device.
$ncs_cli -u admin -C#show packages package hardware-nc-1.0 component hardware ned netconf ned-idned netconf ned-id hardware-nc-1.0 #config(config)#devices device hw0 device-type netconf ned-id hardware-nc-1.0(config-device-hw0)#commitCommit complete. (config-device-hw0)#end#devices device hw0 sync-fromresult true #show running-config devices device hw0 config | nomoredevices device hw0 config hardware component carbon class module parent slot-1-4-1 parent-rel-pos 1040100 alias dummy asset-id dummy uri [ urn:dummy ] ! hardware component carbon-port-4 class port parent carbon parent-rel-pos 1040104 alias dummy-port asset-id dummy uri [ urn:dummy ] ! ...
NSO can now configure the device, state data can be read, actions can be executed,
and notifications can be received. See the
$NCS_DIR/examples.ncs/development-guide/ned-development/netconf-ned/demo-nb.sh
example script for a demo.
Installed NED packages can be removed from NSO by deleting them from
the NSO project's packages folder and then deleting the device and the
NETCONF NED project through the NSO CLI. To uninstall a NED built for
the device hw0:
$ncs_cli -C -u admin#devtools true#config(config)#no netconf-ned-builder project hardware 1.0(config)#commitCommit complete. (config)#end#packages reloadError: The following modules will be deleted by upgrade: hardware-nc-1.0: iana-hardware hardware-nc-1.0: ietf-hardware hardware-nc-1.0: hardware-nc hardware-nc-1.0: hardware-nc-1.0 If this is intended, proceed with 'force' parameter. #packages reload force>>>> System upgrade is starting. >>>> Sessions in configure mode must exit to operational mode. >>>> No configuration changes can be performed until upgrade has completed. >>>> System upgrade has completed successfully.
The CLI NED is a model-driven way to CLI script towards all Cisco like device. Some Java code is necessary for handling the corner cases a human-to-machine interface presents. The NSO CLI NED southbound of NSO shares a Cisco-style CLI engine with the northbound NSO CLI interface, and the CLI engine can thus run in both directions, producing CLI southbound and interpreting CLI data coming from southbound while presenting a CLI interface northbound. It is helpful to keep this in mind when learning and working with CLI NEDs.
-
A sequence of Cisco CLI commands can be turned into the equivalent manipulation of the internal XML tree that represents the configuration inside NSO.
A YANG model, annotated appropriately, will produce a Cisco CLI. The user can enter Cisco commands, and NSO will parse the Cisco CLI commands using the annotated YANG model and change the internal XML tree accordingly. Thus, this is the CLI parser and interpreter. Model-driven.
-
The reverse operation is also possible. Given two different XML trees, each representing a configuration state, in the netsim/ConfD case and NSO's northbound CLI interface, it represents the configuration of a single device, i.e., the device using ConfD as a management framework. In contrast, the NSO case represents the entire network configuration and can generate the list of Cisco commands going from one XML tree to another.
NSO uses this technology to generate CLI commands southbound when we manage Cisco-like devices.
It will become clear later in the examples how the CLI engine runs in forward and reverse mode. The key point though, is that the Cisco CLI NED Java programmer doesn't have to understand and parse the structure of the CLI, this is entirely done by the NSO CLI engine.
To implement a CLI NED, the following components are required:
-
A YANG data model that describes the CLI. An important development tool here is netsim (ConfD), the Tail-f on-device management toolkit. For NSO to manage a CLI device, it needs a YANG file with exactly the right annotations to produce precisely the managed device's CLI. A few examples exist in the NSO NED evaluation collection with annotated YANG models that render different Cisco CLI variants.
See, for example,
$NCS_DIR/packages/neds/dell-ftosand$NCS_DIR/packages/neds/cisco-nx. Look fortailf:cli-*extensions in the NEDsrc/yangdirectory YANG models.Thus, to create annotated YANG files for a device with a Cisco-like CLI, the work procedure is to run netsim (ConfD) and write a YANG file which renders the correct CLI.
Furthermore, this YANG model must declare an identity with
ned:cli-ned-idas a base. -
It is important to note that a NED only needs to cover certain aspects of the device. To have NSO manage a device with a Cisco-like CLI you do not have to model the entire device, only the commands intended to be used need be covered. When the show() callback issues its "show running-config [toptag]" command, and the device replies with data that is fed to NSO, NSO will ignore all command dump output that the loaded YANG models do not cover.
Thus, whichever Cisco-like device we wish to manage, we must first have YANG models from NSO that cover all aspects of the device we want to use. Once we have a YANG model, we load it into NSO and modify the example CLI NED class to return the NedCapability list of the device.
-
The NED code gets to see all data from and to the device. If it's impossible or too hard to get the YANG model exactly right for all commands, a last resort is to let the NED code modify the data inline.
-
The next thing required is a Java class that implements the NED. This is typically not a lot of code, and the existing example NED Java classes are easily extended and modified to fit other needs. The most important point of the Java NED class code is that the code can be oblivious to the CLI commands sent and received.
Java CLI NED code must implement the CliNed
interface.
-
NedConnectionBase.java. See
$NCS_DIR/java/jar/ncs-src.jar. Use jar xf ncs-src.jar to extract the JAR file. Look forsrc/com/tailf/ned/NedConnectionBase.java. -
NedCliBase.java. See
$NCS_DIR/java/jar/ncs-src.jar. Use jar xf ncs-src.jar to extract the JAR file. Look forsrc/com/tailf/ned/NedCliBase.java.
Thus, the Java NED class has the following responsibilities.
-
It must implement the identification callbacks, i.e
modules(),type(), andidentity() -
It must implement the connection related callback methods
newConnection(),isConnection()andreconnect()NSO will invoke the
newConnection()when it requires a connection to a managed device. ThenewConnection()method is responsible for connecting to the device, figuring out exactly what type of device it is, and returning an array ofNedCapabilityobjects.public class NedCapability { public String str; public String uri; public String module; public String features; public String revision; public String deviations; ....This is very much in line with how a NETCONF connect works and how the NETCONF client and server exchange hello messages.
-
Finally the NED code must implement a series of data methods. For example the method
void prepare(NedWorker w, String data)get aStringobject which is the set of Cisco CLI commands it shall send to the device.In the other direction, when NSO wants to collect data from the device, it will invoke
void show(NedWorker w,
                                           String toptag)
for each tag found at the top of data model(s) loaded for that device. For example if the NED gets invoked withshow(w, "interface")it's responsibility is to invoke the relevant show configuration command for "interface", i.eshow running-config interfaceover the connection to the device, and then dumbly reply with all data the device replies with. NSO will parse the output data and feed it into its internal XML trees.NSO can order the
showPartial()to collect part of the data if the NED announces the capabilityhttp://tail-f.com/ns/ncs-ned/show-partial?path-format=FORMATin which FORMAT is of the followings:-
key-path: support regular instance keypath format
-
top-tag: support top tags under the /devices/device/config tree
-
cmd-path-full: support Cisco's CLI edit path with instances
-
path-modes-only: support Cisco CLI mode path
-
cmd-path-modes-only-existing: same as
path-mode-onlybut NSO only supplies the path mode of existing nodes.
-
The idea is to write a YANG data model and feed that into the NSO CLI engine such that the resulting CLI mimics that of the device to manage. This is fairly straightforward once you have understood how the different constructs in YANG are mapped into CLI commands. The data model usually needs to be annotated with specific Tail-f CLI extension to tailor exactly how the CLI is rendered.
This chapter will describe how the general principles work and give a number of cook book style examples of how certain CLI constructs are modeled.
The CLI NED is primarily designed to be used with devices that has a CLI that is similar to the CLIs on a typical Cisco box (i.e. IOS, XR, NX-OS etc). However, if the CLI follows the same principles but with a slightly different syntax, it may still be possible to use a CLI NED if some of the differences are handled by the Java part of the CLI NED. This chapter will describe how this can be done.
Lets start with the basic data model to CLI mapping. YANG consists of three major elements: containers, lists, and leaves. For example
container interface {
list ethernet {
    key id;

    leaf id {
    type uint16 {
        range "0..66";
    }
    }

    leaf description {
    type string {
        length "1..80";
    }
    }

    leaf mtu {
    type uint16 {
        range "64..18000";
    }
    }
}
}
The basic rendering of the constructs are as follows. Containers are rendered as command prefixes which can be stacked at any depth. Leaves are rendered as commands that takes one parameter. Lists are rendered as submodes, where the key of the list is rendered as a submode parameter. The example above would result in the command
interface ethernet ID
for entering the interface ethernet submode. Interface is a container and is rendered as a prefix, ethernet is a list and is rendered as a submode. Two additional commands would be available in the submode
description WORD
mtu INTEGER<64-18000>
A typical configuration with two interfaces could look like this
interface ethernet 0
description "customer a"
mtu 1400
!
interface ethernet 1
description "customer b"
mtu 1500
!
Note that it makes sense to add help texts to the data model since these texts will be visible in the NSO and help the user see the mapping between the J-style CLI in the NSO and the CLI on the target device. The data model above may look like the following with proper help texts.
container interface {
tailf:info "Configure interfaces";

list ethernet {
    tailf:info "FastEthernet IEEE 802.3";
    key id;

    leaf id {
    type uint16 {
        range "0..66";
        tailf:info "<0-66>;;FastEthernet interface number";
    }

    leaf description {
    type string {
        length "1..80";
        tailf:info "LINE;;Up to 80 characters describing this interface";
    }
    }

    leaf mtu {
    type uint16 {
        range "64..18000";
        tailf:info "<64-18000>;;MTU size in bytes";
    }
    }
}
}
I will generally not include the help texts in the examples below to save some space but they should be present in a production data model.
The basic rendering suffice in many cases but is also not enough in many situations. What follows is a list of ways to annotate the data model in order to make the CLI engine mimic a device.
Sometimes you want a number of instances (a list) but do not want a submode. For example
container dns {
leaf domain {
    type string;
}
list server {
    ordered-by user;
    tailf:cli-suppress-mode;
    key ip;

    leaf ip {
    type inet:ipv4-address;
    }
}
}
The above would result in the commands
dns domain WORD
dns server IPAddress
A typical show-config output may look like:
dns domain tail-f.com
dns server 192.168.1.42
dns server 8.8.8.8
Sometimes you want a submode to be created without having a list instance, for example a submode called aaa where all aaa configuration is located.
This is done by using the tailf:cli-add-mode extension. For example:
container aaa {
    tailf:info "AAA view";
    tailf:cli-add-mode;
    tailf:cli-full-command;

    ...
}
This would result in the command aaa for entering the container. However, sometimes the CLI requires that a certain set of elements are also set when entering the submode, but without being a list. For example the police rules inside a policy map in the Cisco 7200.
container police {
    // To cover also the syntax where cir, bc and be
    // doesn't have to be explicitly specified
    tailf:info "Police";
    tailf:cli-add-mode;
    tailf:cli-mode-name "config-pmap-c-police";
    tailf:cli-incomplete-command;
    tailf:cli-compact-syntax;
    tailf:cli-sequence-commands {
        tailf:cli-reset-siblings;
    }
    leaf cir {
        tailf:info "Committed information rate";
        tailf:cli-hide-in-submode;
        type uint32 {
            range "8000..2000000000";
            tailf:info "<8000-2000000000>;;Bits per second";
        }
    }
    leaf bc {
        tailf:info "Conform burst";
        tailf:cli-hide-in-submode;
        type uint32 {
            range "1000..512000000";
            tailf:info "<1000-512000000>;;Burst bytes";
        }
    }
    leaf be {
        tailf:info "Excess burst";
        tailf:cli-hide-in-submode;
        type uint32 {
            range "1000..512000000";
            tailf:info "<1000-512000000>;;Burst bytes";
        }
    }
    leaf conform-action {
        tailf:cli-break-sequence-commands;
        tailf:info "action when rate is less than conform burst";
        type police-action-type;
    }
    leaf exceed-action {
        tailf:info "action when rate is within conform and "+
            "conform + exceed burst";
        type police-action-type;
    }
    leaf violate-action {
        tailf:info "action when rate is greater than conform + "+
            "exceed burst";
        type police-action-type;
    }
}
Here the leaves with the annotation tailf:cli-hide-in-submode is not present as commands once the submode has been entered, but are instead only available as options the police command when entering the police submode.
Often a command is defined as taking multiple parameters in a typical Cisco CLI. This is achieved in the data model by using the annotations tailf:cli-sequence-commands, tailf:cli-compact-syntax, tailf:cli-drop-node-name and possibly tailf:cli-reset-siblings.
For example:
container udld-timeout {
    tailf:info "LACP unidirectional-detection timer";
    tailf:cli-sequence-commands {
        tailf:cli-reset-all-siblings;
    }
    tailf:cli-compact-syntax;
    leaf "timeout-type" {
        tailf:cli-drop-node-name;
        type enumeration {
            enum fast {
                tailf:info "in unit of milli-seconds";
            }
            enum slow {
                tailf:info "in unit of seconds";
            }
        }
    }
    leaf "milli" {
        tailf:cli-drop-node-name;
        when "../timeout-type = 'fast'" {
            tailf:dependency "../timeout-type";
        }
        type uint16 {
            range "100..1000";
            tailf:info "<100-1000>;;timeout in unit of "
                +"milli-seconds";
        }
    }
    leaf "secs" {
        tailf:cli-drop-node-name;
        when "../timeout-type = 'slow'" {
            tailf:dependency "../timeout-type";
        }
        type uint16 {
            range "1..60";
            tailf:info "<1-60>;;timeout in unit of seconds";
        }
    }}
This results in the command
udld-timeout [fast <millisecs> | slow <secs> ]
The tailf:cli-sequence-commands annotation tells the CLI engine to process the leaves in sequence. The tailf:cli-reset-siblings tells the CLI to reset all leaves in the container if one is set. This is necessary in order to ensure that no lingering config remains from a previous invocation of the command where more parameters were configured. The tailf:cli-drop-node-name tells the CLI that the leaf name shouldn't be specified. The tailf:cli-compact-syntax annotation tells the CLI that the leaves should be formatted on one line, i.e. as
udld-timeout fast 1000
as opposed to
uldl-timeout fast
uldl-timeout 1000
without the annotation. When constructs are used to control if the numerical value should be the milli or the secs leaf.
This command could also be written using a choice construct as
container udld-timeout {
tailf:cli-sequence-command;
choice  udld-timeout-choice {
    case fast-case {
    leaf fast {
        tailf:info "in unit of milli-seconds";
        type empty;
    }
    leaf milli {
        tailf:cli-drop-node-name;
        must "../fast" { tailf:dependency "../fast"; }
        type uint16 {
            range "100..1000";
            tailf:info "<100-1000>;;timeout in unit of "
                +"milli-seconds";
        }
        mandatory true;
    }
    }
    case slow-case {
    leaf slow {
        tailf:info "in unit of milli-seconds";
        type empty;
    }
    leaf "secs" {
        must "../slow" { tailf:dependency "../slow"; }
        tailf:cli-drop-node-name;
        type uint16 {
            range "1..60";
            tailf:info "<1-60>;;timeout in unit of seconds";
        }
        mandatory true;
    }
    }
}
}
Sometimes the tailf:cli-incomplete-command is used to ensure that all parameters are configured. The cli-incomplete-command only applies to the C- and I-style CLI. To ensure that prior leaves in a container is also configured when the configuration is written using J-style or Netconf proper 'must' declarations should be used.
Another example is this where tailf:cli-optional-in-sequence is used
list pool {
    tailf:cli-remove-before-change;
    tailf:cli-suppress-mode;
    tailf:cli-sequence-commands {
        tailf:cli-reset-all-siblings;
    }
    tailf:cli-compact-syntax;
    tailf:cli-incomplete-command;
    key name;
    leaf name {
        type string {
            length "1..31";
            tailf:info "WORD<length:1-31>  Pool Name or Pool Group";
        }
    }
    leaf ipstart {
        mandatory true;
        tailf:cli-incomplete-command;
        tailf:cli-drop-node-name;
        type inet:ipv4-address {
            tailf:info "A.B.C.D;;Start IP Address of NAT pool";
        }
    }
    leaf ipend {
        mandatory true;
        tailf:cli-incomplete-command;
        tailf:cli-drop-node-name;
        type inet:ipv4-address {
            tailf:info "A.B.C.D;;End IP Address of NAT pool";
        }
    }
    leaf netmask {
        mandatory true;
        tailf:info "Configure Mask for Pool";
        type string {
            tailf:info "/nn or A.B.C.D;;Configure Mask for Pool";
        }
    }

    leaf gateway {
        tailf:info "Gateway IP";
        tailf:cli-optional-in-sequence;
        type inet:ipv4-address {
            tailf:info "A.B.C.D;;Gateway IP";
        }
    }
    leaf ha-group-ip {
        tailf:info "HA Group ID";
        tailf:cli-optional-in-sequence;
        type uint16 {
            range "1..31";
            tailf:info "<1-31>;;HA Group ID 1 to 31";
        }
    }
    leaf ha-use-all-ports {
        tailf:info "Specify this if services using this NAT pool "
            +"are transaction based (immediate aging)";
        tailf:cli-optional-in-sequence;
        type empty;
        when "../ha-group-ip" {
            tailf:dependency "../ha-group-ip";
        }
    }
    leaf vrid {
        tailf:info "VRRP vrid";
        tailf:cli-optional-in-sequence;
        when "not(../ha-group-ip)" {
            tailf:dependency "../ha-group-ip";
        }
        type uint16 {
            range "1..31";
            tailf:info "<1-31>;;VRRP vrid 1 to 31";
        }
    }

    leaf ip-rr {
        tailf:info "Use IP address round-robin behavior";
        type empty;
    }
}
The tailf:cli-optional-in-sequence means that the parameters should be processed in sequence but a parameter can be skipped. However, if a parameter is specified then only parameters later in the container can follow it.
It is also possible to have some parameters in sequence initially in the container, and then the rest in any order. This is indicated by the tailf:cli-break-sequence command. For example:
list address {
    key ip;
    tailf:cli-suppress-mode;
    tailf:info "Set the IP address of an interface";
    tailf:cli-sequence-commands {
        tailf:cli-reset-all-siblings;
    }
    tailf:cli-compact-syntax;
    leaf ip {
        tailf:cli-drop-node-name;
        type inet:ipv6-prefix;
    }
    leaf link-local {
        type empty;
        tailf:info "Configure an IPv6 link local address";
        tailf:cli-break-sequence-commands;
    }
    leaf anycast {
        type empty;
        tailf:info "Configure an IPv6 anycast address";
        tailf:cli-break-sequence-commands;
    }
}
where it is possible to write
ip 1.1.1.1 link-local anycast
as well as
ip 1.1.1.1 anycast link-local
Sometimes a command for entering a submode has parameters that are not really key values, i.e. not part of the instance identifier, but still needs to be given when entering the submode. For example
list service-group {
    tailf:info "Service Group";
    tailf:cli-remove-before-change;
    key "name";
    leaf name {
        type string {
            length "1..63";
            tailf:info "NAME<length:1-63>;;SLB Service Name";
        }
    }
    leaf tcpudp {
        mandatory true;
        tailf:cli-drop-node-name;
        tailf:cli-hide-in-submode;
        type enumeration {
            enum tcp { tailf:info "TCP LB service"; }
            enum udp { tailf:info "UDP LB service"; }
        }
    }

    leaf backup-server-event-log {
        tailf:info "Send log info on back up server events";
        tailf:cli-full-command;
        type empty;
    }
    leaf extended-stats {
        tailf:info "Send log info on back up server events";
        tailf:cli-full-command;
        type empty;
    }
    ...
}
In this case the tcpudp is a non-key leaf that needs to be specified as a parameter when entering the service-group submode. Once in the submode the commands backup-server-event-log and extended-stats are present. Leaves with the tailf:cli-hide-in-submode attribute are given after the last key, in the sequence they appear in the list.
It is also possible to allow leaf values to be entered in between key elements. For example:
list community {
    tailf:info "Define a community who can access the SNMP engine";
    key "read remote";
    tailf:cli-suppress-mode;
    tailf:cli-compact-syntax;
    tailf:cli-reset-container;
    leaf read {
        tailf:cli-expose-key-name;
        tailf:info "read only community";
        type string {
            length "1..31";
            tailf:info "WORD<length:1-31>;;SNMPv1/v2c community string";
        }
    }
    leaf remote {
        tailf:cli-expose-key-name;
        tailf:info "Specify a remote SNMP entity to which the user belongs";
        type string {
            length "1..31";
            tailf:info "Hostname or A.B.C.D;;IP address of remote SNMP "
                +"entity(length: 1-31)";
        }
    }

    leaf oid {
        tailf:info "specific the oid"; // SIC
        tailf:cli-prefix-key {
            tailf:cli-before-key 2;
        }
        type string {
            length "1..31";
            tailf:info "WORD<length:1-31>;;The oid qvalue";
        }
    }

    leaf mask {
        tailf:cli-drop-node-name;
        type string {
            tailf:info "/nn or A.B.C.D;;The mask";
        }
    }
}
Here we have a list that is not mapped to a submode. It has two keys, read and remote, an an optional oid that can be specified before the remote key. Finally after the last key an optional mask parameter can be specified. The use of the tailf:cli-expose-key-name means that the key names should be part of the command, which they are not by default. The above construct results in the commands
community read WORD [oid WORD] remote HOSTNAME [/nn or A.B.C.D]
The tailf:cli-reset-container attribute means that all leaves in the container will be reset if any leaf is given.
Some devices requires that a setting is removed before it can be changed, for example the service-group list above. This is indicated with the tailf:cli-remove-before-change annotation. It can be used both on lists and on leaves. A leaf example:
leaf source-ip {
    tailf:cli-remove-before-change;
    tailf:cli-no-value-on-delete;
    tailf:cli-full-command;
    type inet:ipv6-address {
        tailf:info "X:X::X:X;;Source IPv6 address used by DNS";
    }
}
This means that the diff sent to the device will contain first a no source-ip command, followed by a new source-ip command to set the new value.
The data model also use the tailf:cli-no-value-on-delete annotation which means that the leaf value should not be present in the no command. With the annotation a diff to modify the source ip from 1.1.1.1 to 2.2.2.2 would look like
no source-ip
source-ip 2.2.2.2
and without the annotation as
no source-ip 1.1.1.1
source-ip 2.2.2.2
By default a diff for an ordered-by user list contains information about where a new item should be inserted. This is typically not supported by the device. Instead the commands (diff) to send the device needs to remove all items following the new item, and then reinsert the items in the proper order. This behavior is controlled using the tailf:cli-long-obu-diff annotation. For example
list access-list {
    tailf:info "Configure Access List";
    tailf:cli-suppress-mode;
    key id;
    leaf id {
        type uint16 {
            range "1..199";
        }
    }
    list rules {
        ordered-by user;
        tailf:cli-suppress-mode;
        tailf:cli-drop-node-name;
        tailf:cli-show-long-obu-diffs;
        key "txt";
        leaf txt {
            tailf:cli-multi-word-key;
            type string;
        }
    }
}
Suppose we have the access list
access-list 90 permit host 10.34.97.124
access-list 90 permit host 172.16.4.224
and we want to change this to
access-list 90 permit host 10.34.97.124
access-list 90 permit host 10.34.94.109
access-list 90 permit host 172.16.4.224
we would generate the diff
no access-list 90 permit host 172.16.4.224
access-list 90 permit host 10.34.94.109
access-list 90 permit host 172.16.4.224
with the tailf:cli-long-obu-diff. Without the annotation the diff would be
# after permit host 10.34.97.124
access-list 90 permit host 10.34.94.109
Often in a config when a leaf is set to its default value it is not displayed by the 'show running-config' command, but we still need to set it explicitly. Suppose we have the leaf 'state'. By default the value is 'active'.
leaf  state {
    tailf:info "Activate/Block the user(s)";
    type enumeration {
        enum active {
            tailf:info "Activate/Block the user(s)";
        }
        enum block {
            tailf:info "Activate/Block the user(s)";
        }
    }
    default "active";
}
If the device state is 'block' and we cant to set it to 'active', i.e. the default value. The default behavior is to send
no state block
to the device. This will not work. The correct command sequence should be
state active
The way to achieve this is to do the following.
leaf  state {
    tailf:info "Activate/Block the user(s)";
    type enumeration {
        enum active {
            tailf:info "Activate/Block the user(s)";
        }
        enum block {
            tailf:info "Activate/Block the user(s)";
        }
    }
    default "active";
    tailf:cli-trim-default;
    tailf:cli-show-with-default;
}
This way a value for 'state' will always be generated. This may seem unintuitive but the reason this works comes from how the diff is calculated. When generating the diff the target configuration and the desired configuration is compared (per line). The target config will be
state block
and the desired config will be
state active
This will be interpreted as a leaf value change and the resulting diff will be to set the new value, i.e. active.
However, without the 'cli-show-with-default' option the desired config will be an empty line, i.e. no value set. When we compare the two lines we get
(current config)
state block
(desired config)
<empty>
This will result in the command to remove the configured leaf, i.e.
state block
which does not work.
What you see in the C-style CLI when you do 'show configuration' is the commands needed to go from the running config to the configuration you have in your current session. It usually corresponds to the command you have just issued in your CLI session, but not always.
The output is actually generated by comparing the two configurations, i.e. the running config and your current uncommitted configration. It is done by running 'show running-config' on both the running config and your uncommitted config, and then comparing the output line by line. Each line is complemented by some meta information which makes it possible to generate a better diff.
For example, if you modify a leaf value, say set the mtu to 1400 and the previous value was 1500. The two configs will then be
interface FastEthernet0/0/1     interface FastEthernet0/0/1
mtu 1500                        mtu 1400
!                               !
When we compare these configs the first line are the same -> no action but we remember that we have entered the FastEthernet0/0/1 submode. The second line differ in the value (the meta information associated with the lines have the path and the value). When we analyze the two lines we determine that a value_set has occurred. The default action when the value has been changed is to output the command for setting the new value, i.e. mtu 1500. However, we also need to reposition to the current submode. If this is the first line we are outputting in the submode we need to issue the command
interface FastEthernet0/0/1
before issuing the mtu 1500 command.
Similarly, suppose a value has been removed, i.e. mtu used to be set but it is no longer present
interface FastEthernet0/0/1     interface FastEthernet0/0/1
!                                 mtu 1400
                                !
As before, the first lines are equivalent, but the second line has ! in the new config, and mtu 1400 in the running config. This is analyzed as being a delete and the commands
interface FastEthernet0/0/1
    no mtu 1400
are generated.
There are tweaks to this behavior. For example, some machines does not like the no command to include the old value but want instead the command
no mtu
We can instruct the CLI diff engine to behave in this way by using the YANG annotation tailf:cli-no-value-on-delete;
leaf mtu {
tailf:cli-no-value-on-delete;
type uint16;
}
It is also possible to tell the CLI engine to not include the element name in the delete operation. For example the command
aaa local-user password cipher "C>9=UF*^V/'Q=^Q`MAF4<1!!"
but the command to delete the password is
no aaa local-user password
The data model for this would be
// aaa local-user
container password {
    tailf:info "Set password";
    tailf:cli-flatten-container;
    leaf cipher {
        tailf:cli-no-value-on-delete;
        tailf:cli-no-name-on-delete;
        type string {
            tailf:info "STRING<1-16>/<24>;;The UNENCRYPTED/"
                +"ENCRYPTED password string";
        }
    }
}It is often necessary to do some minor modifications to the Java part of a CLI NED. There are mainly four functions that needs to be modified: connect, show, applyConfig, enter/exit config mode.
The CLI NED code should do a few things when the connect callback is invoked.
-
Set up a connection to the device (usually ssh).
-
If necessary send a secondary password to enter exec mode. Typically a Cisco IOS like CLI requires the user to give the enable command followed by a password.
-
Verify that it is the right kind of device and respond to NSO with a list of capabilities. This is usually done by running the show version command, or equivalent, and parsing the output.
-
Configure the CLI session on the device to not use pagination. This is normally done by setting the screen length to 0 (or infinity or disable). Optionally it may also fiddle with the idle time.
Some modifications may be needed in this section if the commands for the above differ from the Cisco IOS style.
The NSO will invoke the show() callback multiple times, one time for each top-level tag in the data model. Some devices have support for displaying just parts of the configuration, others do not.
For a device that cannot display only parts of a config the recommended strategy is to wait for a show() invocation with a well known top tag and send the entire config at that point. If, if you know that the data model has a top tag called interface then you can use code like:
public void show(NedWorker worker, String toptag)
    throws NedException, IOException {
    session.setTracer(worker);
    try {
        int i;

        if (toptag.equals("interface")) {
            session.print("show running-config | exclude able-management\n");
            ...
        } else {
            worker.showCliResponse("");
        }
    } catch (...) { ... }
}
From the point of NSO it is perfectly ok to send the entire config as a response to one of the requested toptags, and to send an empty response otherwise.
Often some filtering is required of the output from the device. For example, perhaps part of the configuration should not be sent to NSO, or some keywords replaced with other. Here follows some examples:
Some devices start the output from show running-config with a short header, and some add a footer. Common headers are Current configuration: and a footer may be end or return. In the example below we strip out a header and remove a footer.
if (toptag.equals("interface")) {
    session.print("show running-config | exclude able-management\n");
    session.expect("show running-config | exclude able-management");

    String res = session.expect(".*#");

    i = res.indexOf("Current configuration :");
    if (i >= 0) {
        int n = res.indexOf("\n", i);
        res = res.substring(n+1);
    }

    i = res.lastIndexOf("\nend");
    if (i >= 0) {
        res = res.substring(0,i);
    }

    worker.showCliResponse(res);
} else {
    // only respond to first toptag since the A10
    // cannot show different parts of the config.
    worker.showCliResponse("");
}
Also, you may choose to only model part of a device configuration in which case you can strip out the parts that you have not modelled. For example stripping out the snmp configuration:
if (toptag.equals("context")) {
    session.print("show configuration\n");
    session.expect("show configuration");

    String res = session.expect(".*\\[.*\\]#");

    snmp = res.indexOf("\nsnmp");
    home = res.indexOf("\nsession-home");
    port = res.indexOf("\nport");
    tunnel = res.indexOf("\ntunnel");

    if (snmp >= 0) {
        res = res.substring(0,snmp)+res.substring(home,port)+
        res.substring(tunnel);
    } else if (port >= 0) {
        res = res.substring(0,port)+res.substring(tunnel);
    }

    worker.showCliResponse(res);
} else {
    // only respond to first toptag since the STOKEOS
    // cannot show different parts of the config.
    worker.showCliResponse("");
}Sometimes a device generates non-parsable commands in the output from show running-config. For example, some A10 devices adds a keyword cpu-process at the end of the ip route command, i.e.
ip route 10.40.0.0 /14 10.16.156.65 cpu-process
but it does not accept this keyword when a route is configured. The solution is to simply strip the keyword before sending the config to NSO, and to not include the keyword in the data model for the device. Code to do this may look like:
if (toptag.equals("interface")) {
    session.print("show running-config | exclude able-management\n");
    session.expect("show running-config | exclude able-management");

    String res = session.expect(".*#");

    // look for the string cpu-process and remove it
    i = res.indexOf(" cpu-process");
    while (i >= 0) {
        res = res.substring(0,i)+res.substring(i+12);
        i = res.indexOf(" cpu-process");
    }

    worker.showCliResponse(res);
} else {
    // only respond to first toptag since the A10
    // cannot show different parts of the config.
    worker.showCliResponse("");
}Sometimes a device has some other names for delete than the standard no command found in a typical Cisco CLI. NSO will only generate no commands when, for example, an element does not exist (i.e. no shutdown for an interface), but the device may need undo instead. This can be dealt with as a simple transformation of the configuration before sending it to NSO. For example:
if (toptag.equals("aaa")) {
    session.print("display current-config\n");
    session.expect("display current-config");

    String res = session.expect("return");

    session.expect(".*>");

    // split into lines, and process each line
    lines = res.split("\n");

    for(i=0 ; i < lines.length ; i++) {
        int c;
        // delete the version information, not really config
        if (lines[i].indexOf("version ") == 1) {
        lines[i] = "";
        }
        else if (lines[i].indexOf("undo ") >= 0) {
            lines[i] = lines[i].replaceAll("undo ", "no ");
        }
    }

    worker.showCliResponse(join(lines, "\n"));
} else {
    // only respond to first toptag since the H3C
    // cannot show different parts of the config.
    // (well almost)
    worker.showCliResponse("");
}
Another example is the following situation. A device has a configuration for port trunk permit vlan 1-3 and may at the same time have disallow some vlans using the command no port trunk permit vlan 4-6. Since we cannot use a no container in the config, we instead add a disallow container, and then rely on the Java-code to do some processing, e.g.:
container disallow {
    container port {
    tailf:info "The port of mux-vlan";
        container trunk {
            tailf:info "Specify current Trunk port's "
                +"characteristics";
            container permit {
                tailf:info "allowed VLANs";
                leaf-list vlan {
                    tailf:info "allowed VLAN";
                    tailf:cli-range-list-syntax;
                    type uint16 {
                        range "1..4094";
                    }
                }
            }
        }
    }
}
And in the Java show() code:
if (toptag.equals("aaa")) {
    session.print("display current-config\n");
    session.expect("display current-config");

    String res = session.expect("return");

    session.expect(".*>");

    // process each line
    lines = res.split("\n");

    for(i=0 ; i < lines.length ; i++) {
        int c;
        if (lines[i].indexOf("no port") >= 0) {
            lines[i] = lines[i].replaceAll("no ", "disallow ");
        }
    }

    worker.showCliResponse(join(lines, "\n"));
} else {
    // only respond to first toptag since the H3C
    // cannot show different parts of the config.
    // (well almost)
    worker.showCliResponse("");
}
A similar transformation needs to take place when the NSO sends a configuration change to the device. A more detailed discussion about apply config modifications follow later but the corresponding code would in this case be:
lines = data.split("\n");
for (i=0 ; i < lines.length ; i++) {
    if (lines[i].indexOf("disallow port ") == 0) {
        lines[i] = lines[i].replace("disallow ", "undo ");
    }
}If the way a device quotes strings differ from the way it can be modelled in NSO it can be handled in the Java code. For example, one device does not quote encrypted password strings which may contain odd characters like the command character !. Java code to deal with this may look like:
if (toptag.equals("aaa")) {
    session.print("display current-config\n");
    session.expect("display current-config");

    String res = session.expect("return");

    session.expect(".*>");

    // process each line
    lines = res.split("\n");
    for(i=0 ; i < lines.length ; i++) {
        if ((c=lines[i].indexOf("cipher ")) >= 0) {
            String line = lines[i];
            String pass = line.substring(c+7);
            String rest;
            int s = pass.indexOf(" ");
            if (s >= 0) {
                rest = pass.substring(s);
                pass = pass.substring(0,s);
            } else {
                s = pass.indexOf("\r");
                if (s >= 0) {
                    rest = pass.substring(s);
                    pass = pass.substring(0,s);
                }
                else {
                    rest = "";
                }
            }
            // find cipher string and quote it
            lines[i] = line.substring(0,c+7)+quote(pass)+rest;
        }
    }

    worker.showCliResponse(join(lines, "\n"));
} else {
    worker.showCliResponse("");
}
And similarly dequoting when applying a configuration.
lines = data.split("\n");
for (i=0 ; i < lines.length ; i++) {
    if ((c=lines[i].indexOf("cipher ")) >= 0) {
        String line = lines[i];
        String pass = line.substring(c+7);
        String rest;
        int s = pass.indexOf(" ");
        if (s >= 0) {
            rest = pass.substring(s);
            pass = pass.substring(0,s);
        } else {
            s = pass.indexOf("\r");
            if (s >= 0) {
                rest = pass.substring(s);
                pass = pass.substring(0,s);
            }
            else {
                rest = "";
            }
        }
        // find cipher string and quote it
        lines[i] = line.substring(0,c+7)+dequote(pass)+rest;
    }
}NSO will send configuration to the device in three different callbacks: prepare(), abort(), and revert(). The Java code should issue these commands to the device but some processing of the commands may be necessary. Also, the ongoing CLI session needs to enter configure mode, issue the commands, and then exit configure mode. Some processing may be needed if the device has different keywords, or different quoting, as described under the "Displaying the configuration of a device" section above.
For example, if a device uses undo in place of no then the code may look like this, where data is the string of commands received from NSO:
lines = data.split("\n");
for (i=0 ; i < lines.length ; i++) {
    if (lines[i].indexOf("no ") == 0) {
        lines[i] = lines[i].replace("no ", "undo ");
    }
}
This relies on the fact that NSO will not have any indentation in the commands sent to the device (as opposed to the indentation usually present in the output from show running-config).
The typical Cisco CLI has two major modes, operational mode and configure mode. In addition, the configure mode has submodes. For example, interfaces are configured in a submode that is entered by giving the command interface <InterfaceType> <Number>. Exiting a submode, i.e. giving the exit command, leaves you in the parent mode. Submodes can also be embedded in other submodes.
In a typical Cisco CLI, you do not necessary have to exit a submode in order to execute a command in a parent mode. In fact, the output of the command show running-config hardly contains any exit commands. Instead there is an exclamation mark, !, to indicate that a submode is done, which is only a comment. The config is formatted to rely on the fact that if a command isn't found in the current submode, the CLI engine searches for the command in its parent mode.
Another interesting mapping problem is how to interpret the no command when multiple leaves are given on a command line. Consider the model:
container foo {
  tailf:cli-compact-syntax;
  tailf:cli-sequence-commands;
  presence true;
  leaf a {
    type string;
  }
  leaf b {
    type string;
  }
  leaf c {
    type string;
  }
}
It corresponds to the command syntax foo [a <word> [b <word> [c <word>]]], i.e. the following commands are valid:
foo
foo a <word>
foo a <word> b <word>
foo a <word> b <word> c <word>
Now what does it mean to write no foo a <word> b <word> c <word>? It could mean that only the c leaf should be removed, or it could mean that all leaves should be removed, and it may also mean that the foo container should be removed.
There is no clear principle here and no one right solution. The annotations are therefore necessary to help the diff engine figure out what to actually send to the device.
The full set of annotations can be found in tailf_yang_cli_extensions(5) in Manual Pages . All annotation YANG extension are not applicable in an NSO context, but most are. The most commonly used annotations are (in alphabetical order):
Used for adding a submode in a container. The default rendering engine maps a container as a command prefix, and a list node as a submode. However, sometimes entering a submode does not require the user to give a specific instance. In these cases you can use the tailf:cli-add-mode on a container:
container system {
  tailf:info "For system events.";
  container "default" {
    tailf:cli-add-mode;
    tailf:cli-mode-name "cfg-acct-mlist";
    tailf:cli-delete-when-empty;
    presence true;
    container start-stop {
      tailf:info "Record start and stop without waiting";
      leaf group {
        tailf:info "Use Server-group";
        type aaa-group-type;
      }
    }
  }
}
In this example, the tailf:cli-add-mode annotations tells the CLI engine to render the default container as a submode, in other words there will be a command system default for entering the default container as a submode. All further commands will use that context as base. In the example above, the default container will only contain one command start-stop group, rendered from the start-stop container (rendered as a prefix) and the group leaf.
Tells the parser that the list name is allowed to be joined together with the first key, i.e. written without space in between. This is used to render, for example, the interface FastEthernet command where the list is FastEthernet and the key is the interface name. In a typical Cisco CLI they are allowed to be written both as interface FastEthernet 1 and as interface FastEthernet1.
list FastEthernet {
  tailf:info "FastEthernet IEEE 802.3";
  tailf:cli-allow-join-with-key {
    tailf:cli-display-joined;
  }
  tailf:cli-mode-name "config-if";
  key name;
  leaf name {
    type string {
    pattern "[0-9]+.*";
    tailf:info "<0-66>/<0-128>;;FastEthernet interface number";
  }
}
In the above example, the tailf:cli-display-joined substatement is used to tell the command renderer that it should display a list item using the format without space.
This tells the parser that a leaf value is allowed to be written without space between the leaf name and the value. This is typically the case when referring to an interface. For example:
leaf FastEthernet {
  tailf:info "FastEthernet IEEE 802.3";
  tailf:cli-allow-join-with-value {
    tailf:cli-display-joined;
  }
  type string;
  tailf:non-strict-leafref {
    path "/ios:interface/ios:FastEthernet/ios:name";
  }
}
In the example above, a leaf FastEthernet is used to point to an existing interface. The command is allowed to be written both as FastEthernet 1 and as FastEthernet1, when referring to FastEthernet interface 1. The substatements say which is the preferred format when rendering the command.
Normally, keys come before other leaves when a list command is used, and this is required in YANG. However, this is not always the case in Cisco style CLIs. For example the route-map command where the name and sequence numbers are the keys, but the leaf operation (permit or deny) is given in between the first and the second key. The tailf:cli-prefix-key annotation tells the parser to expect a given leaf before the keys, but the substatement tailf:cli-before-key <N> can be used to specify that the leaf should occur in between two keys. For example:
list route-map {
  tailf:info "Route map tag";
  tailf:cli-mode-name "config-route-map";
  tailf:cli-compact-syntax;
  tailf:cli-full-command;
  key "name sequence";
  leaf name {
    type string {
      tailf:info "WORD;;Route map tag";
    }
  }
  // route-map * #
  leaf sequence {
    tailf:cli-drop-node-name;
    type uint16 {
      tailf:info "<0-65535>;;Sequence to insert to/delete from "
        +"existing route-map entry";
      range "0..65535";
    }
  }
  // route-map * permit
  // route-map * deny
  leaf operation {
    tailf:cli-drop-node-name;
    tailf:cli-prefix-key {
      tailf:cli-before-key 2;
    }
    type enumeration {
      enum deny {
        tailf:code-name "op_deny";
        tailf:info "Route map denies set operations";
      }
      enum permit {
        tailf:code-name "op_internet";
        tailf:info "Route map permits set operations";
      }
    }
    default permit;
  }
}
A lot of things are going on in the example above, in addition to the tailf:cli-prefix-key and tailf:cli-before-key annotations. The tailf:cli-drop-node-name annotation tells the parser to ignore the name of the leaf (to not accept that as input, or render it when displaying the configuration).
This tells the parser to render a leaf of type boolean as no <leaf> and <leaf> instead of the default <leaf> false and <leaf> true. The other alternative to this is to use a leaf of type empty and the tailf:cli-show-no annotation. The difference is subtle. A leaf with tailf:cli-boolean-no would not be displayed unless explicitly configured to either true or false, whereas a type empty leaf with tailf:cli-show-no would always be displayed if not set. For example:
leaf keepalive {
  tailf:info "Enable keepalive";
  tailf:cli-boolean-no;
  type boolean;
}
In the above example the keepalive leaf is set to true when the command keepalive is given, and to false when no keepalive is given. The well known shutdown command, on the other hand, is modeled as a type empty leaf with the tailf:cli-show-no annotation:
leaf shutdown {
  // Note: default to "no shutdown" in order to be able to bring if up.
  tailf:info "Shutdown the selected interface";
  tailf:cli-full-command;
  tailf:cli-show-no;
  type empty;
}These annotations are used to tell the CLI to only accept leaves in a container in the same order as they appears in the data model. This is typically required when the leaf names are hidden using the tailf:cli-drop-node-name annotation. It is very common in the Cisco CLI that commands accept multiple parameters, and such commands must be mapped to setting of multiple leaves in the data model. For example the aggregate-address command in the router bgp submode:
// router bgp * / aggregate-address
container aggregate-address {
  tailf:info "Configure BGP aggregate entries";
  tailf:cli-compact-syntax;
  tailf:cli-sequence-commands {
    tailf:cli-reset-all-siblings;
  }
  leaf address {
    tailf:cli-drop-node-name;
    type inet:ipv4-address {
      tailf:info "A.B.C.D;;Aggregate address";
    }
  }
  leaf mask {
    tailf:cli-drop-node-name;
    type inet:ipv4-address {
      tailf:info "A.B.C.D;;Aggregate mask";
    }
  }
  leaf advertise-map {
    tailf:cli-break-sequence-commands;
    tailf:info "Set condition to advertise attribute";
    type string {
      tailf:info "WORD;;Route map to control attribute "
      +"advertisement";
    }
  }
  leaf as-set {
    tailf:info "Generate AS set path information";
    type empty;
  }
  leaf attribute-map {
    type string {
      tailf:info "WORD;;Route map for parameter control";
    }
  }
  leaf as-override {
    tailf:info "Override matching AS-number while sending update";
    type empty;
  }
  leaf route-map {
    type string {
      tailf:info "WORD;;Route map for parameter control";
    }
  }
  leaf summary-only {
    tailf:info "Filter more specific routes from updates";
    type empty;
  }
  leaf suppress-map {
    tailf:info "Conditionally filter more specific routes from "
    +"updates";
    type string {
      tailf:info "WORD;;Route map for suppression";
    }
  }
}
In the above example the tailf:cli-sequence-commands annotation tells the parser to require the leaves in the aggregate-address container to be entered in the same order as in the data model, i.e. first address then mask. Since these leaves also have the tailf:cli-drop-node-name annotation, it would be impossible for the parser to know which leaf to map the values to, unless the order of appearance was used. The tailf:cli-break-sequence-commands annotation on the advertise-map leaf tells the parser that from that leaf and onward the ordering is no longer important and the leaves can be entered in any order (and leaves can be skipped).
Two other annotations are often used in combination with tailf:cli-sequence-commands; tailf:cli-reset-all-siblings and tailf:cli-compact-syntax. The first tells the parser that all leaves should be reset when any leaf is entered, i.e. if the user first gives the command:
aggregate-address 1.1.1.1 255.255.255.0 as-set summary-only
This would result in the leaves address, mask, as-set, and summary-only being set in the configuration. However, if the user then entered:
aggregate-address 1.1.1.1 255.255.255.0 as-set
The assumed result of this is that summary-only is no longer configured, ie that all leaves in the container is zeroed out when the command is entered again. The tailf:cli-compact-syntax annotation tells the CLI engine to render all leaves in the rendered on a separate line.
aggregate-address 1.1.1.1
aggregate-address 255.255.255.0
aggregate-address as-set
aggregate-address summary-only
The above will be rendered on one line (compact-syntax) as:
aggregate-address 1.1.1.1 255.255.255.0 as-set summary-only
Tells the parser that this particular leaf should be allowed to be entered in case insensitive format. The reason this is needed is that some devices display a command in one case, and other display the same command in a different case. Normally command parsing is case sensitive. For example:
leaf dhcp {
  tailf:info "Default Gateway obtained from DHCP";
  tailf:cli-case-insensitive;
  type empty;
}This annotation tells the CLI engine to render all leaves in the container on one command line, i.e. instead of the default rendering where each leaf is rendered on a separate line
aggregate-address 1.1.1.1
aggregate-address 255.255.255.0
aggregate-address as-set
aggregate-address summary-only
it should be rendered on one line (compact-syntax) as
aggregate-address 1.1.1.1 255.255.255.0 as-set summary-only
Deleting items in the data base is tricky when using the Cisco CLI syntax. The reason is that no <command> is open to multiple interpretations in many cases, for example when multiple leaves are set in one command, or a presence container is set in addition to a leaf. For example:
container dampening {
  tailf:info "Enable event dampening";
  presence "true";
  leaf dampening-time {
    tailf:cli-drop-node-name;
    tailf:cli-delete-container-on-delete;
    tailf:info "<1-30>;;Half-life time for penalty";
    type uint16 {
      range 1..30;
    }
  }
}
This data model allows both the dampening command and the command dampening 10. When the command no dampening 10 is issued, should both the dampening container and the leaf be removed, or only the leaf? The tailf:cli-delete-container-on-delete tells the CLI engine to also delete the container when the leaf is removed.
This annotation tells the CLI engine to remove a list entry or a presence container when all content of the container or list instance has been removed. For example:
container access-class {
  tailf:info "Filter connections based on an IP access list";
  tailf:cli-compact-syntax;
  tailf:cli-sequence-commands;
  tailf:cli-reset-container;
  tailf:cli-flatten-container;
  list access-list {
    tailf:cli-drop-node-name;
    tailf:cli-compact-syntax;
    tailf:cli-reset-container;
    tailf:cli-suppress-mode;
    tailf:cli-delete-when-empty;
    key direction;
    leaf direction {
      type enumeration {
        enum "in" {
          tailf:info "Filter incoming connections";
        }
        enum "out" {
          tailf:info "Filter outgoing connections";
        }
      }
    }
    leaf access-list {
      tailf:cli-drop-node-name;
      tailf:cli-prefix-key;
      type exp-ip-acl-type;
      mandatory true;
    }
    leaf vrf-also {
      tailf:info "Same access list is applied for all VRFs";
      type empty;
    }
  }
}
In this case, the tailf:cli-delete-when-empty annotation tells the CLI engine to remove an access-list instance when it doesn't have neither an access-list nor a vrf-also child.
This annotations tells the CLI engine that there is a dependency between the current account when generating diff commands to send to the device, or when rendering the show configuration command output. It can have two different substatements: tailf:cli-trigger-on-set and tailf:cli-trigger-on-all.
Without substatements, it should be thought of as similar to a leaf-ref, i.e. if the dependency target is delete, first perform any modifications to this leaf. For example the redistribute ospf submode in router bgp:
// router bgp * / redistribute ospf *
list ospf {
  tailf:info "Open Shortest Path First (OSPF)";
  tailf:cli-suppress-mode;
  tailf:cli-delete-when-empty;
  tailf:cli-compact-syntax;
  key id;
  leaf id {
    type uint16 {
      tailf:info "<1-65535>;;Process ID";
      range "1..65535";
    }
  }
  list vrf {
    tailf:info "VPN Routing/Forwarding Instance";
    tailf:cli-suppress-mode;
    tailf:cli-delete-when-empty;
    tailf:cli-compact-syntax;
    tailf:cli-diff-dependency "/ios:ip/ios:vrf";
    tailf:cli-diff-dependency "/ios:vrf/ios:definition";
    key name;
    leaf name {
      type string {
        tailf:info "WORD;;VPN Routing/Forwarding Instance (VRF) name";
      }
    }
  }
}
The tailf:cli-diff-dependency "/ios:ip/ios:vrf" tells the engine that if the ip vrf part of the configuration is deleted, then first display any changes to this part. This can be used when the device requires a certain ordering of the commands.
If the tailf:cli-trigger-on-all substatement is used, then it means that the target will always be displayed before the current node. Normally the order in the YANG file is used, but and it might not even be possible if they are embedded in a container.
The tailf:cli-trigger-on-set tells the engine that the ordering should be taken into account when this leaf is set and some other leaf is deleted. The other leaf should then be deleted before this is set. Suppose you have this data model:
list b {
  key "id";
  leaf id {
    type string;
  }
  leaf name {
    type string;
  }
  leaf y {
    type string;
  }
}
list a {
  key id;
  leaf id {
    tailf:cli-diff-dependency "/c[id=current()/../id]" {
      tailf:cli-trigger-on-set;
    }
    tailf:cli-diff-dependency "/b[id=current()/../id]";
    type string;
  }
}
list c {
  key id;
  leaf id {
    tailf:cli-diff-dependency "/a[id=current()/../id]" {
      tailf:cli-trigger-on-set;
    }
    tailf:cli-diff-dependency "/b[id=current()/../id]";
    type string;
  }
}
Then the tailf:cli-diff-dependency "/b[id=current()/../id]" tells the CLI that before b list instance is delete, the c instance with the same name needs to be changed.
tailf:cli-diff-dependency "/a[id=current()/../id]" {
  tailf:cli-trigger-on-set;
}
This annotation, on the other hand, says that before this instance is created any changes to the a instance with the same name needs to be displayed.
Suppose you have the configuration:
b foo
!
a foo
!
Then created c foo and deleted a foo, it should be displayed as:
no a foo
c foo
If you then deleted c foo and created a foo, it should be rendered as:
no c foo
a foo
That is, in the reverse order.
This annotation is used to disambiguate parsing. This is sometimes necessary when tailf:cli-drop-node-name is used. For example:
container authentication {
  tailf:info "Authentication";
  choice auth {
    leaf word {
      tailf:cli-drop-node-name;
      tailf:cli-disallow-value "md5|text";
      type string {
        tailf:info "WORD;;Plain text authentication string "
        +"(8 chars max)";
      }
    }
    container md5 {
      tailf:info "Use MD5 authentication";
      leaf key-chain {
        tailf:info "Set key chain";
        type string {
          tailf:info "WORD;;Name of key-chain";
        }
      }
    }
  }
}
when the command authentication md5... is entered the CLI parser cannot determine if the leaf word should be set to the value "md5" of if the leaf md5 should be set. By adding the tailf:cli-disallow-value annotation you can tell the CLI parser that certain regular expressions are not valid values. An alternative would be to add a restriction to the string type of word but this is much more difficult since restrictions can only be used to specify allowed values, not disallowed values.
See the description of tailf:cli-allow-join-with-value and tailf:cli-allow-join-with-key.
This annotation can be used on a presence container and tells the CLI engine that the container should be displayed as a separate command, even when a leaf in the container is set. The default rendering does not do this. For example:
container ntp {
  tailf:info "Configure NTP";
  // interface * / ntp broadcast
  container broadcast {
    tailf:info "Configure NTP broadcast service";
    //tailf:cli-display-separated;
    presence true;
    container client {
      tailf:info "Listen to NTP broadcasts";
      tailf:cli-full-command;
      presence true;
    }
  }
}
If both broadcast and client are created in the configuration then this will be displayed as:
ntp broadcast
ntp broadcast client
When the tailf:cli-display-separated annotation is used. If the annotation isn't present then it would only be displayed as:
ntp broadcast client
The creation of the broadcast container would be implied.
This might be the most used annotation of them all. It can be used for multiple purposes. Primarily it tells the CLI engine that the node name should be ignored, which is typically needed when there is no corresponding leaf name in the command, typically when a command requires multiple parameters:
container exec-timeout {
  tailf:info "Set the EXEC timeout";
  tailf:cli-sequence-commands;
  tailf:cli-compact-syntax;
  leaf minutes {
    tailf:info "<0-35791>;;Timeout in minutes";
    tailf:cli-drop-node-name;
    type uint32;
  }
  leaf seconds {
    tailf:info "<0-2147483>;;Timeout in seconds";
    tailf:cli-drop-node-name;
    type uint32;
  }
}
However, it can also be used to introduce ambiguity, or a choice in the parse tree if you like. Suppose you need to support these commands:
// interface * / vrf forwarding
// interface * / ip vrf forwarding
choice vrf-choice {
  container ip-vrf {
    tailf:cli-no-keyword;
    tailf:cli-drop-node-name;
    container ip {
      container vrf {
        leaf forwarding {
          tailf:info "Configure forwarding table";
          type string {
            tailf:info "WORD;;VRF name";
          }
          tailf:non-strict-leafref {
            path "/ios:ip/ios:vrf/ios:name";
          }
        }
     }
  }
}
container vrf {
  tailf:info "VPN Routing/Forwarding parameters on the interface";
  // interface * / vrf forwarding
  leaf forwarding {
    tailf:info "Configure forwarding table";
    type string {
      tailf:info "WORD;;VRF name";
    }
    tailf:non-strict-leafref {
      path "/ios:vrf/ios:definition/ios:name";
    }
  }
}

// interface * / ip
container ip {
  tailf:info "Interface Internet Protocol config commands";
}
In the above case when the parser see the beginning of the command ip, it can interpret it as either entering the interface */vrf-choice/ip-vrf/ip/vrf config tree, or the interface */ip tree since the tokens consumed are the same in both branches. When the parser sees a tailf:cli-drop-node-name in the parse tree, it will try to match the current token stream to that parse tree, and if that fails backtrack and try other paths.
Tells the CLI engine to add an explicit exit command in the current submode. Normally, a submode does not have exit commands for leaving a submode, instead it is implied by the following command residing in a parent mode. However, to avoid ambiguity it is sometimes necessary. For example, in the address-family submode:
container address-family {
  tailf:info "Enter Address Family command mode";
  container ipv6 {
    tailf:info "Address family";
    container unicast {
      tailf:cli-add-mode;
      tailf:cli-mode-name "config-router-af";
      tailf:info "Address Family Modifier";
      tailf:cli-full-command;
      tailf:cli-exit-command "exit-address-family" {
        tailf:info "Exit from Address Family configuration "
        +"mode";
      }
    }
  }
}This tells the CLI engine to render explicit exit commands instead of the default ! when leaving a submode. The annotation is inherited by all submodes. For example:
container interface {
  tailf:info "Configure interfaces";
  tailf:cli-diff-dependency "/ios:vrf";
  tailf:cli-explicit-exit;
  // interface Loopback
  list Loopback {
    tailf:info "Loopback interface";
    tailf:cli-allow-join-with-key {
      tailf:cli-display-joined;
    }
    tailf:cli-mode-name "config-if";
    tailf:cli-suppress-key-abbreviation;
    // tailf:cli-full-command;
    key name;
    leaf name {
      type string {
        pattern "([0-9\.])+";
        tailf:info "<0-2147483647>;;Loopback interface number";
      }
    }
    uses interface-common-grouping;
  }
}
Without the tailf:cli-explicit-exit annotation, the edit sequences sent to the NED device will contain ! at the end of a mode, and rely on the next command to move from one submode to some other place in the CLI. This is the way the Cisco CLI usually works. However, it may cause problems if the next edit command is also a valid command in the current submode. Using tailf:cli-explicit-exit gets around this problem.
By default the key leaf names are not shown in the CLI, but sometimes you want them to be visible, for example:
// ip explicit-path name *
list explicit-path {
  tailf:info "Configure explicit-path";
  tailf:cli-mode-name "cfg-ip-expl-path";
  key name;
  leaf name {
    tailf:info "Specify explicit path by name";
    tailf:cli-expose-key-name;
    type string {
      tailf:info "WORD;;Enter name";
    }
  }
}By default a leaf-list is rendered as a single line with the elements enclosed by [ and ]. If you want the values to be listed on one line this is the annotation to use. For example:
// class-map * / match cos
leaf-list cos {
  tailf:info "IEEE 802.1Q/ISL class of service/user priority values";
  tailf:cli-flat-list-syntax;
  type uint16 {
    range "0..7";
    tailf:info "<0-7>;;Enter up to 4 class-of-service values"+
    " separated by white-spaces";
  }
}This annotation is a bit tricky. It tells the CLI engine that the container should be allowed to co-exist with leaves on the same command line, i.e. flattened. Normally, once the parser has entered a container it will not exit. However, if the container is flattened, the container will be exited once all leaves in the container have been entered. Also, a flattened container will be displayed together with sibling leaves on the same command line (provided the surrounding container has tailf:cli-compact-syntax).
Suppose you want to model the command limit [inbound <int16> <int16>] [outbound <int16> <int16>] mtu <uint16>. In other word the inbound and outbound settings are optional, but if you give inbound you have to specify two 16-bit integers, and you can always specify mtu.
container foo {
  tailf:cli-compact-syntax;
  container inbound {
    tailf:cli-compact-syntax;
    tailf:cli-sequence-commands;
    tailf:cli-flatten-container;
    leaf a {
      tailf:cli-drop-node-name;
      type uint16;
    }
    leaf b {
      tailf:cli-drop-node-name;
      type uint16;
    }
  }
  container outbound {
    tailf:cli-compact-syntax;
    tailf:cli-sequence-commands;
    tailf:cli-flatten-container;
    leaf a {
      tailf:cli-drop-node-name;
      type uint16;
    }
    leaf b {
      tailf:cli-drop-node-name;
      type uint16;
    }
  }
  leaf mtu {
    type uint16;
  }
}
In the above example the tailf:cli-flatten-container tells the parser that it should exit the outbound/inbound container once both values have been entered. Without the annotation it would not be possible to exit the container once it has been entered. It would be possible to have the command foo inbound 1 3 or foo outbound 1 2 but not both at the same time, and not the final mtu leaf. The tailf:cli-compact-syntax annotation tells the renderer to display all leaves on the same line. If it wasn't used the line setting foo inbound 1 2 outbound 3 4 mtu 1500 would be displayed as:
foo inbound 1
foo inbound 2
foo outbound 3
foo outbound 4
foo mtu 1500
The annotation tailf:cli-sequence-commands tells the CLI that the user has to enter the leaves inside the container in the specified order. Without this annotation it would not be possible to drop the names of the leaves and still have a deterministic parser. With the annotation, the parser knows that for the command foo inbound 1 2, leaf a should be assigned the value 1 and leaf b the value 2.
Another example:
container htest {
  tailf:cli-add-mode;
  container param {
    tailf:cli-hide-in-submode;
    tailf:cli-flatten-container;
    tailf:cli-compact-syntax;
    leaf a {
      type uint16;
    }
    leaf b {
      type uint16;
    }
  }
  leaf mtu {
    type uint16;
  }
}
The above model results in the command htest param a <uint16> b <uint16> for entering the submode. Once the submode has been entered, the command mtu <uint16> is available. Without the tailf:cli-flatten-container annotation it wouldn't be possible to use the tailf:cli-hide-in-submode annotation to attach the leaves to the command for entering the submode.
This annotation tells the parser to not accept any more input beyond this element. By default the parser will allow setting of multiple leaves in the same command, and both enter a submode and set leaf values in the submode. In most cases, it doesn't matter that the parser accepts commands that are not actually generated by the device in the output of show running-config. It is however needed to avoid ambiguity, or just to make the NSO CLI for the device more user friendly.
container transceiver {
  tailf:info "Select from transceiver configuration commands";
  container "type" {
    tailf:info "type keyword";
    // transceiver type all
    container all {
      tailf:cli-add-mode;
      tailf:cli-mode-name "config-xcvr-type";
      tailf:cli-full-command;
      // transceiver type all / monitoring
        container monitoring {
        tailf:info "Enable/disable monitoring";
        presence true;
        leaf interval {
          tailf:info "Set interval for monitoring";
          type uint16 {
            tailf:info "<300-3600>;;Time interval for monitoring "+
            "transceiver in seconds";
            range "300..3600";
          }
        }
      }
    }
  }
}
In the above example it is possible to have the command transceiver type all for entering a submode, and then give the command monitor [interval <300-3600>]. If the tailf:cli-full-command annotation had not been used, the following would also have been a valid command: transceiver type all monitor [interval <300-3600>]. In the above example it doesn't make a difference as far as being able to parse the configuration on a device. The device will never show the oneline command syntax, but always display it as two lines, one for entering the submode and one for setting the monitor interval.
This annotation tells the CLI parser that no further arguments should be accepted for this path when the path is traversed as an argument to the no command.
Example of use:
// event manager applet * / action * info
container info {
  tailf:info "Obtain system specific information";
  // event manager applet * / action info type
  container "type" {
    tailf:info "Type of information to obtain";
    tailf:cli-full-no;
    container snmp {
      tailf:info "SNMP information";
      // event manager applet * / action info type snmp var
      container var {
        tailf:info "Trap variable";
        tailf:cli-compact-syntax;
        tailf:cli-sequence-commands;
        tailf:cli-reset-container;
        leaf variable-name {
          tailf:cli-drop-node-name;
          tailf:cli-incomplete-command;
          type string {
            tailf:info "WORD;;Trap variable name";
          }
        }
      }
    }
  }
}In some cases you need to give some parameters for entering a submode, but the submode cannot be modeled as a list, or the parameters should not be modeled as a key element of the list, but rather behaves as a leaf. In these cases you model the parameter as a leaf and use the tailf:cli-hide-in-submode annotation. It has two purposes, the leaf is displayed as part of the command for entering the submode when rendering the config, and the leaf is not available as a command in the submode.
For example:
// event manager applet *
list applet {
  tailf:info "Register an Event Manager applet";
  tailf:cli-mode-name "config-applet";
  tailf:cli-exit-command "exit" {
    tailf:info "Exit from Event Manager applet configuration submode";
  }
  key name;
  leaf name {
    type string {
      tailf:info "WORD;;Name of the Event Manager applet";
    }
  }
  // event manager applet * authorization
  leaf authorization {
    tailf:info "Specify an authorization type for the applet";
    tailf:cli-hide-in-submode;
    type enumeration {
      enum bypass {
        tailf:info "EEM aaa authorization type bypass";
      }
    }
  }
  // event manager applet * class
  leaf class {
    tailf:info "Specify a class for the applet";
    tailf:cli-hide-in-submode;
    type string {
      tailf:info "Class A-Z | default - default class";
      pattern "[A-Z]|default";
    }
  }
  // event manager applet * trap
  leaf trap {
    tailf:info "Generate an SNMP trap when applet is triggered.";
    tailf:cli-hide-in-submode;
    type empty;
  }
}
In the example above the key to the list is the name leaf, but in order to enter the submode the user may also give the arguments event manager applet <name> [authorization bypass] [class <word>] [trap]. It is clear that these leaves are not keys to the list since giving the same name but different authorization, class or trap argument does not result in a new applet instance.
Tells the CLI that it should not be possible to hit cr after the current element. This is usually the case when a command takes multiple parameters, for example, given the following data model:
container foo {
  tailf:cli-compact-syntax;
  tailf:cli-sequence-commands;
  presence true;
  leaf a {
    type string;
  }
  leaf b {
    type string;
  }
  leaf c {
    type string;
  }
}
The valid commands are foo [a <word> [b <word> [c <word>]]]. If it however should be foo a <word> b <word> [c <word>], i.e. the parameters a and b are mandatory, and c is optional, then the tailf:cli-incomplete-command annotation should be used as follows:
container foo {
  tailf:cli-compact-syntax;
  tailf:cli-sequence-commands;
  tailf:cli-incomplete-command;
  presence true;
  leaf a {
    tailf:cli-incomplete-command;
    type string;
  }
  leaf b {
    type string;
  }
  leaf c {
    type string;
  }
}
In other words, the command is incomplete after entering just foo, and also after entering foo a <word>, but not after foo a <word> b <word> or foo a <word> b <word> c <word>.
This annotation is similar to the tailf:cli-incomplete-command above, but applies to no commands. Sometimes you want to prevent the user from entering a generic no command. Suppose you have the data model:
container foo {
  tailf:cli-compact-syntax;
  tailf:cli-sequence-commands;
  tailf:cli-incomplete-command;
  presence true;
  leaf a {
    tailf:cli-incomplete-command;
    type string;
  }
  leaf b {
    type string;
  }
  leaf c {
    type string;
  }
}
Then it would be valid to write any of the following:
no foo
no foo a <word>
no foo a <word> b <word>
no foo a <word> b <word> c <word>
If you only want the last version of this to be a valid command, then you can use tailf:cli-incomplete-no to enforce this. For example:
container foo {
  tailf:cli-compact-syntax;
  tailf:cli-sequence-commands;
  tailf:cli-incomplete-command;
  tailf:cli-incomplete-no;
  presence true;
  leaf a {
    tailf:cli-incomplete-command;
    tailf:cli-incomplete-no;
    type string;
  }
  leaf b {
    tailf:cli-incomplete-no;
    type string;
  }
  leaf c {
    type string;
  }
}The default rendering of a leaf-list element is as a command taking a list of values enclosed in square brackets. Given the following element:
// class-map * / source-address
container source-address {
  tailf:info "Source address";
  leaf-list mac {
    tailf:info "MAC address";
    type string {
      tailf:info "H.H.H;;MAC address";
    }
  }
}
This would result in the command source-address mac [ H.H.H... H.H.H ], instead of the desired source-address mac H.H.H. Given the configuration:
source-address {
  mac [ 1410.9fd8.8999 a110.9fd8.8999 bb10.9fd8.8999 ]
}
It should be rendered as:
source-address mac 1410.9fd8.8999
source-address mac a110.9fd8.8999
source-address mac bb10.9fd8.8999
This is achieved by adding the tailf:cli-list-syntax annotation. For example:
// class-map * / source-address
container source-address {
  tailf:info "Source address";
  leaf-list mac {
    tailf:info "MAC address";
    tailf:cli-list-syntax;
    type string {
      tailf:info "H.H.H;;MAC address";
    }
  }
}
An alternative would be to model this as a list, i.e.:
// class-map * / source-address
container source-address {
  tailf:info "Source address";
  list mac {
    tailf:info "MAC address";
    tailf:cli-suppress-mode;
    key address;
    leaf address {
      type string {
        tailf:info "H.H.H;;MAC address";
      }
    }
  }
}
In many cases, this may be the better choice. Notice how the tailf:cli-suppress-mode annotation is used to prevent the list from being rendered as a submode.
This annotation is not really needed when writing a NED. It is used to tell the CLI which prompt to use when in the submode. Without specific instructions, the CLI will invent a prompt based on the name of the submode container/list and the list instance. If a specific prompt is desired this annotation can be used. For example:
container transceiver {
  tailf:info "Select from transceiver configuration commands";
  container "type" {
    tailf:info "type keyword";
    // transceiver type all
    container all {
      tailf:cli-add-mode;
      tailf:cli-mode-name "config-xcvr-type";
      tailf:cli-full-command;
      // transceiver type all / monitoring
      container monitoring {
        tailf:info "Enable/disable monitoring";
        presence true;
        leaf interval {
          tailf:info "Set interval for monitoring";
          type uint16 {
            tailf:info "<300-3600>;;Time interval for monitoring "+
            "transceiver in seconds";
            range "300..3600";
          }
        }
      }
    }
  }
}This annotation is used to indicate that a leaf should accept multiple tokens, and concatenate them. By default, only a single token is accepted as value to a leaf. If spaces are required then the value needs to be quoted. If this isn't desired the tailf:cli-multi-value annotation can be used to tell the parser that a leaf should accept multiple tokens. A common example of this is the description command. It is modeled as:
// event manager applet * / description
leaf "description" {
  tailf:info "Add or modify an applet description";
  tailf:cli-full-command;
  tailf:cli-multi-value;
  type string {
    tailf:info "LINE;;description";
  }
}
In the above example the description command will take all tokens to the end of the line, concatenate them with a space, and use that for leaf value. The tailf:cli-full-command annotation is used to tell the parser that no other command following this can be entered on the same command line. The parser would not be able to determine when the argument to this command ended and the next command commenced anyway.
By default all key values consists of a single parser token, i.e. a string without spaces, or a quoted string. If multiple tokens should be accepted for a single key element, without quotes, then the tailf:cli-multi-word-key annotation can be used. The sub-annotation tailf:cli-max-words can be used to tell the parser that at most a fixed number of words should be allowed for the key. For example:
container permit {
  tailf:info "Specify community to accept";
  presence "Specify community to accept";
  list permit-list {
    tailf:cli-suppress-mode;
    tailf:cli-delete-when-empty;
    tailf:cli-drop-node-name;
    key expr;
    leaf expr {
      tailf:cli-multi-word-key {
        tailf:cli-max-words 10;
      }
      type string {
        tailf:info "LINE;;An ordered list as a regular-expression";
      }
    }
  }
}
The tailf:cli-max-words annotation can be used to allow more things to be entered on the same command line.
When generating delete commands towards the device, the default behaviour is to simply add "no" in front of the line you are trying to remove. However, this is not always allowed. In some cases only parts of the command is allowed. For example, suppose you have the data model:
container ospf {
  tailf:info "OSPF routes Administrative distance";
  leaf external {
    tailf:info "External routes";
    type uint32 {
      range "1.. 255";
      tailf:info "<1-255>;;Distance for external routes";
    }
    tailf:cli-suppress-no;
    tailf:cli-no-value-on-delete;
    tailf:cli-no-name-on-delete;
  }
  leaf inter-area {
    tailf:info "Inter-area routes";
    type uint32 {
      range "1.. 255";
      tailf:info "<1-255>;;Distance for inter-area routes";
    }
    tailf:cli-suppress-no;
    tailf:cli-no-name-on-delete;
    tailf:cli-no-value-on-delete;
  }
  leaf intra-area {
    tailf:info "Intra-area routes";
    type uint32 {
      range "1.. 255";
      tailf:info "<1-255>;;Distance for intra-area routes";
    }
    tailf:cli-suppress-no;
    tailf:cli-no-name-on-delete;
    tailf:cli-no-value-on-delete;
  }
}
If the old configuration has the configuration ospf external 3 inter-area 4 intra-area 1 then the default behaviour would be to send no ospf external 3 inter-area 4 intra-area 1 but this would generate an error. Instead, the device simply wants no ospf. This is then achieved by adding tailf:cli-no-name-on-delete (telling the CLI engine to remove the element name from the no line), and tailf:cli-no-value-on-delete (telling the CLI engine to strip the leaf value from the command line to be sent).
This annotation is used in combination with tailf:cli-sequence-commands. It tells the parser that a leaf in the sequence isn't mandatory. Suppose you have the data model:
container foo {
  tailf:cli-compact-syntax;
  tailf:cli-sequence-commands;
  presence true;
  leaf a {
    tailf:cli-incomplete-command;
    type string;
  }
  leaf b {
    tailf:cli-incomplete-command;
    type string;
  }
  leaf c {
    type string;
  }
}
If you want the command to behave as foo a <word> [b <word>] c <word>, it means that the leaves a and c are required and b is optional. If b is to be entered it must be entered after a and before c. This would be achieved by adding tailf:cli-optional-in-sequence in b.
container foo {
  tailf:cli-compact-syntax;
  tailf:cli-sequence-commands;
  presence true;
  leaf a {
    tailf:cli-incomplete-command;
    type string;
  }
  leaf b {
    tailf:cli-incomplete-command;
    tailf:cli-optional-in-sequence;
    type string;
  }
  leaf c {
    type string;
  }
}
A live example of this from the cisco-ios data model is:
// voice translation-rule * / rule *
list rule {
  tailf:info "Translation rule";
  tailf:cli-suppress-mode;
  tailf:cli-delete-when-empty;
  tailf:cli-incomplete-command;
  tailf:cli-compact-syntax;
  tailf:cli-sequence-commands {
    tailf:cli-reset-all-siblings;
  }
  ordered-by "user";
  key tag;
  leaf tag {
    type uint8 {
      tailf:info "<1-15>;;Translation rule tag";
      range "1..15";
    }
  }
  leaf reject {
    tailf:info "Call block rule";
    tailf:cli-optional-in-sequence;
    type empty;
  }
  leaf "pattern" {
  tailf:cli-drop-node-name;
  tailf:cli-full-command;
  tailf:cli-multi-value;
  type string {
    tailf:info "WORD;;Matching pattern";
    }
  }
}This annotation is used when the key element of a list isn't the first value that you give when setting a list element (for example when entering a submode). This is similar to tailf:cli-hide-in-submode, except it allows the leaf values to be entered in between key elements. In the example below the match leaf is entered before giving the filter id.
container radius {
  tailf:info "RADIUS server configuration command";
  // radius filter *
  list filter {
    tailf:info "Packet filter configuration";
    key id;
    leaf id {
      type string {
      tailf:info "WORD;;Name of the filter (max 31 characters, longer will "
      +"be rejected";
    }
  }
  leaf match {
    tailf:cli-drop-node-name;
    tailf:cli-prefix-key;
    type enumeration {
      enum match-all {
        tailf:info "Filter if all of the attributes matches";
      }
      enum match-any {
        tailf:info "Filter if any of the attributes matches";
      }
    }
  }
}
It is also possible to have a sub-annotation to tailf:cli-prefix-key that specifies that the leaf should occur before a certain key position. For example:
list route-map {
  tailf:info "Route map tag";
  tailf:cli-mode-name "config-route-map";
  tailf:cli-compact-syntax;
  tailf:cli-full-command;
  key "name sequence";
  leaf name {
    type string {
      tailf:info "WORD;;Route map tag";
    }
  }
  // route-map * #
  leaf sequence {
    tailf:cli-drop-node-name;
    type uint16 {
      tailf:info "<0-65535>;;Sequence to insert to/delete from "
      +"existing route-map entry";
      range "0..65535";
    }
  }
  // route-map * permit
  // route-map * deny
  leaf operation {
    tailf:cli-drop-node-name;
    tailf:cli-prefix-key {
      tailf:cli-before-key 2;
    }
    type enumeration {
      enum deny {
        tailf:code-name "op_deny";
        tailf:info "Route map denies set operations";
      }
      enum permit {
        tailf:code-name "op_internet";
        tailf:info "Route map permits set operations";
      }
    }
    default permit;
  }
  // route-map * / description
  leaf "description" {
    tailf:info "Route-map comment";
    tailf:cli-multi-value;
    type string {
      tailf:info "LINE;;Comment up to 100 characters";
      length "0..100";
    }
  }
}
The keys for this list are name and sequence, but in between you need to specify deny or permit. This is not a key since you cannot have two different list instances with the same name and sequence number, but differ in deny and permit.
This annotation is used to group together list instances, or values in a leaf-list into ranges. The type of the value are not restricted to integer only. It works with a string also, and it is possible to have a value like this: 1-5, t1, t2.
// spanning-tree vlans-root
container vlans-root {
  tailf:cli-drop-node-name;
  list vlan {
    tailf:info "VLAN Switch Spanning Tree";
    tailf:cli-range-list-syntax;
    tailf:cli-suppress-mode;
    tailf:cli-delete-when-empty;
    key id;
    leaf id {
      type uint16 {
        tailf:info "WORD;;vlan range, example: 1,3-5,7,9-11";
        range "1..4096";
      }
    }
  }
}
What will exist in the database is separate instances, i.e. if the configuration is vlan 1,3-5,7,9-11 this will result in the database having the instances 1,3,4,5,7,9,10, and 11. Similarly, to create these instances on the device, the command generated by NSO will be vlan 1,3-5,7,9-11. Without this annotation NSO would generate unique commands for each instance, i.e.:
vlan 1
vlan 2
vlan 3
vlan 5
vlan 7
...
Same thing for leaf-lists:
leaf-list vlan {
  tailf:info "Range of vlans to add to the instance mapping";
  tailf:cli-range-list-syntax;
  type uint16 {
    tailf:info "LINE;;vlan range ex: 1-65, 72, 300 -200";
  }
}Some settings needs to be unset before they can be set. This can be accommodated by using the tailf:cli-remove-before-change annotation. An example of such a leaf is:
// ip vrf * / rd
leaf rd {
  tailf:info "Specify Route Distinguisher";
  tailf:cli-full-command;
  tailf:cli-remove-before-change;
  type rd-type;
}
You are not allowed to define a new route distinguisher before removing the old.
This annotation is used on leaf-lists to tell the CLI engine that the entire list should be written and not just the additions or subtractions, which is the default behaviour for leaf-lists. For example:
// controller * / channel-group
list channel-group {
  tailf:info "Specify the timeslots to channel-group "+
  "mapping for an interface";
  tailf:cli-suppress-mode;
  tailf:cli-delete-when-empty;
  key number;
  leaf number {
    type uint8 {
      range "0..30";
    }
  }
  leaf-list timeslots {
    tailf:cli-replace-all;
    tailf:cli-range-list-syntax;
    type uint16;
  }
}
The timeslots leaf is changed by writing the entire range value. The default would be to generate commands for adding and deleting values from the range.
This annotation is a sub-annotation to tailf:cli-sequence-commands. The problem it addresses is what should happen when a command that takes multiple parameters is run a second time. Consider the data model:
container foo {
  tailf:cli-compact-syntax;
  tailf:cli-sequence-commands {
    tailf:cli-reset-siblings;
  }
  presence true;
  leaf a {
    type string;
  }
  leaf b {
    type string;
  }
  leaf c {
    type string;
  }
}
You are allowed to enter any of the below commands:
foo
foo a <word>
foo a <word> b <word>
foo a <word> b <word> c <word>
If you first enter the command foo a 1 b 2 c 3, what will be stored in the database is foo being present, the leaf a having the value 1, the leaf b having the value 2 and the leaf c having the value 3.
Now, if the command foo a 3 is executed, it will set the value of leaf a to 3, but will leave leaf b and c as they were before. This is probably not the way the device works. In most cases it expects the leaves b and c to be unset. The annotation tailf:cli-reset-siblings tells the CLI engine that all siblings covered by the tailf:cli-sequence-commands should be reset.
Another similar case is when you have some leaves covered by the command sequencing, and some not. For example:
container foo {
  tailf:cli-compact-syntax;
  tailf:cli-sequence-commands {
    tailf:cli-reset-all-siblings;
  }
  presence true;
  leaf a {
    type string;
  }
  leaf b {
    tailf:cli-break-sequence-commands;
    type string;
  }
  leaf c {
    type string;
  }
}
The above model will allow the user to enter the b and c leaves in any order, as long as leaf a is entered first. The annotation tailf:cli-reset-siblings will reset the leaves up to the tailf:cli-break-sequence-commands. The tailf:cli-reset-all-siblings tells the CLI engine to reset all siblings, also those outside the command sequencing.
This annotation can be used on both containers/lists and on leaves, but has slightly different meaning. When used on a container it means that whenever the container is entered, all leaves in it are reset.
If used on a leaf it should be understood as whenever that leaf is set all other leaves in the container are reset. For example:
// license udi
container udi {
  tailf:cli-compact-syntax;
  tailf:cli-sequence-commands;
  tailf:cli-reset-container;
  leaf pid {
    type string;
  }
  leaf sn {
    type string;
  }
}
container ietf {
  tailf:info "IETF graceful restart";
  container helper {
    tailf:info "helper support";
    presence "helper support";
    leaf disable {
      tailf:cli-reset-container;
      tailf:cli-delete-container-on-delete;
      tailf:info "disable helper support";
      type empty;
    }
    leaf strict-lsa-checking {
    tailf:info "enable helper strict LSA checking";
    type empty;
  }
}Changes to lists that has the ordered-by "user" annotation are shown as insert, delete, and move operations. However, most devices do not support such operations on the lists. In these cases, if you want to insert an element in the middle of a list, you need to first delete all elements following the insertion point, add the new element, and then add all the elements you deleted. The tailf:cli-show-long-obu-diffs tells the CLI engine to do exactly this. For example:
list foo {
  ordered-by user;
  tailf:cli-show-long-obu-diffs;
  tailf:cli-suppress-mode;
  key id;
  leaf id {
    type string;
  }
}
If the old configuration is:
foo a
foo b
foo c
foo d
The desired configuration is:
foo a
foo b
foo e
foo c
foo d
NSO will send the following to the device:
no foo c
no foo d
foo e
foo c
foo d
An example from the cisco-ios model is:
// ip access-list extended *
container extended {
  tailf:info "Extended Access List";
  tailf:cli-incomplete-command;
  list ext-named-acl {
    tailf:cli-drop-node-name;
    tailf:cli-full-command;
    tailf:cli-mode-name "config-ext-nacl";
    key name;
    leaf name {
      type ext-acl-type;
    }
    list ext-access-list-rule {
      tailf:cli-suppress-mode;
      tailf:cli-delete-when-empty;
      tailf:cli-drop-node-name;
      tailf:cli-compact-syntax;
      tailf:cli-show-long-obu-diffs;
      ordered-by user;
      key rule;
      leaf rule {
        tailf:cli-drop-node-name;
        tailf:cli-multi-word-key;
        type string {
          tailf:info "deny;;Specify packets to reject\n"+
          "permit;;Specify packets to forwards\n"+
          "remark;;Access list entry comment";
          pattern "(permit.*)|(deny.*)|(no.*)|(remark.*)|([0-9]+.*)";
        }
      }
    }
  }
}One common CLI behaviour is to not only show when something is configured, but also when it isn't configured by displaying it as no <command>. You can tell the CLI engine that you want this behaviour by using the tailf:cli-show-no annotation. It can be used both on leaves and on presence containers. For example:
// ipv6 cef
container cef {
  tailf:info "Cisco Express Forwarding";
  tailf:cli-display-separated;
  tailf:cli-show-no;
  presence true;
}
and
// interface * / shutdown
leaf shutdown {
  // Note: default to "no shutdown" in order to be able to bring if up.
  tailf:info "Shutdown the selected interface";
  tailf:cli-full-command;
  tailf:cli-show-no;
  type empty;
}
However, this is a much more subtle behaviour than one may think and it is not obvious when the tailf:cli-show-no and the tailf:cli-boolean-no should be used. For example, it would also be possible to model the shutdown leaf a boolean value, i.e.:
// interface * / shutdown
leaf shutdown {
  tailf:cli-boolean-no;
  type boolean;
}
The problem with the above is that when a new interface is created, say a vlan interface, the shutdown leaf would not be set to anything and you would not send anything to the device. With the cli-show-no definition you would send no shutdown since the shutdown leaf would not be defined when a new interface vlan instance is created.
The boolean version can be tweaked to behave in a similar way using the default annotation and tailf:cli-show-with-default, i.e.:
// interface * / shutdown
leaf shutdown {
  tailf:cli-show-with-default;
  tailf:cli-boolean-no;
  type boolean;
  default "false";
}
The problem with this is that if you explicitly configure the leaf to false in NSO, you will send no shutdown to the device (which is fine), but if you then read the config from the device it will not display no shutdown since it now has its default setting. This will lead to an out-of-sync situation in NSO. NSO thinks the value should be set to false (which is different from the leaf not being set), whereas the device report the value as being unset.
The whole situation comes from the fact that NSO and the device treat default values differently. NSO considers a leaf as either being set or not set. If a leaf is set to it's default value, it is still considered as set. A leaf must be explicitly deleted in order for it to become unset. Whereas a typical Cisco device considers a leaf unset if you set it to its default value.
This tells the CLI engine to render a leaf not only when it is actually set, but also when it has its default value. For example:
leaf "input" {
  tailf:cli-boolean-no;
  tailf:cli-show-with-default;
  tailf:cli-full-command;
  type boolean;
  default true;
}Tells the CLI that it should not be possible to delete all lists instances, i.e. the command no foo is not allowed, it needs to be no foo <instance>. For example:
list class-map {
  tailf:info "Configure QoS Class Map";
  tailf:cli-mode-name "config-cmap";
  tailf:cli-suppress-list-no;
  tailf:cli-delete-when-empty;
  tailf:cli-no-key-completion;
  tailf:cli-sequence-commands;
  tailf:cli-full-command;
  // class-map *
  key name;
  leaf name {
    tailf:cli-disallow-value "type|match-any|match-all";
    type string {
      tailf:info "WORD;;class-map name";
    }
  }
}By default all lists are rendered as submodes. This can be suppressed using the tailf:cli-suppress-mode annotation. For example, the data model:
list foo {
  key id;
  leaf id {
    type string;
  }
  leaf mtu {
    type uint16;
  }
}
If you have the configuration:
foo a {
  mtu 1400;
}
foo b {
  mtu 1500;
}
It would be rendered as:
foo a
mtu 1400
!
foo b
mtu 1500
!
However, if you add tailf:cli-suppress-mode:
list foo {
  tailf:cli-suppress-mode;
  key id;
  leaf id {
    type string;
  }
  leaf mtu {
    type uint16;
  }
}
It will be rendered as:
foo a mtu 1400
foo b mtu 1500
The format string is used when parsing a key value and when generating a key value for an existing configuration. The key items are numbered from 1-N and the format string should indicate how they are related by using $(X) (where X is the key number). For example:
list interface {
  tailf:cli-key-format "$(1)/$(2)/$(3):$(4)";
  key "chassis slot subslot number";
  leaf chassis {
    type uint8 {
      range "1 .. 4";
    }
  }
  leaf slot {
    type uint8 {
      range "1 .. 16";
    }
  }
  leaf subslot {
    type uint8 {
      range "1 .. 48";
    }
  }
  leaf number {
    type uint8 {
      range "1 .. 255";
    }
  }
}
It will be rendered as:
interface 1/2/3:4
When generating configuration diffs delete all contents of a container or list before deleting the node. For example:
list foo {
  tailf:cli-recursive-delete;
  key "id"";
  leaf id {
    type string;
  }
  leaf a {
    type uint8;
  }
  leaf b {
    type uint8;
  }
  leaf c {
    type uint8;
  }
}
It will be rendered as:
# show full
foo bar
 a 1
 b 2
 c 3
!
# ex
# no foo bar
# show configuration
foo bar
 no a 1
 no b 2
 no c 3
!
no foo bar
#
Specifies that the CLI should not auto-render 'no' commands for this element. An element with this annotation will not appear in the completion list to the 'no' command. For example:
list foo {
  tailf:cli-recursive-delete;
  key "id"";
  leaf id {
    type string;
  }
  leaf a {
    type uint8;
  }
  leaf b {
    tailf:cli-suppress-no;
    type uint8;
  }
  leaf c {
    type uint8;
  }
}
It will be rendered as:
(config-foo-bar)# no ?
Possible completions:
  a
  c
  ---
The problem with the above is that the diff will still generate the no. To avoid it, you must use the tailf:cli-no-value-on-delete and tailf:cli-no-name-on-delete.
(config-foo-bar)# no ?
Possible completions:
  a
  c
  ---
  service   Modify use of network based services
(config-foo-bar)# ex
(config)# no foo bar
(config)# show config
foo bar
 no a 1
 no b 2
 no c 3
!
no foo bar
(config)#
Do not display value if it is same as default. Please note that this annotation works only in case of with-defaults basic-mode capability set to 'explicit' and the value is explicitly set by the user to the default value. For example:
list foo {
  key "id"";
  leaf id {
    type string;
  }
  leaf a {
    type uint8;
    default 1;
  }
  leaf b {
    tailf:cli-trim-default;
    type uint8;
    default 2;
  }
}
It will be rendered as:
(config)# foo bar
(config-foo-bar)# a ?
Possible completions:
  <unsignedByte>[1]
(config-foo-bar)# a 2 b ?
Possible completions:
  <unsignedByte>[2]
(config-foo-bar)# a 2 b 3
(config-foo-bar)# commit
Commit complete.
(config-foo-bar)# show full
foo bar
 a 2
 b 3
!
(config-foo-bar)# a 1 b 2
(config-foo-bar)# commit
Commit complete.
(config-foo-bar)# show full
foo bar
 a 1
!
Embed no in front of the element name instead of at the beginning of the line. For example:
list foo {
 key "id";
 leaf id {
  type string;
 }
 leaf a {
  type uint8;
 }
 container x {
  leaf b {
   type uint8;
   tailf:cli-embed-no-on-delete;
  }
 }
}
It will be rendered as:
(config-foo-bar)# show full
foo bar
 a 1
 x b 3
!
(config-foo-bar)# no x
(config-foo-bar)# show conf
foo bar
 x no b 3
!
Means that the non-integer key should allow range expressions. Can be used in key leafs only. The key must support a range format. The range applies only for matching existing instances. For example:
list interface {
  key name;
  leaf name {
    type string;
    tailf:cli-allow-range;
  }
  leaf number {
    type uint32;
  }
}
It will be rendered as:
(config)# interface eth0-100 number 90
Error: no matching instances found
(config)# interface
Possible completions:
  <name:string>  eth0  eth1  eth2  eth3  eth4  eth5  range
(config)# interface eth0-3 number 100
(config-interface-eth0-3)# ex
(config)# interface eth4-5 number 200
(config-interface-eth4-5)# commit
Commit complete.
(config-interface-eth4-5)# ex
(config)# do show running-config interface
interface eth0
 number 100
!
interface eth1
 number 100
!
interface eth2
 number 100
!
interface eth3
 number 100
!
interface eth4
 number 200
!
interface eth5
 number 200
!
Specifies that this node is case-sensitive. If applied to a container or a list, any nodes below will also be case-sensitive. For example:
list foo {
  tailf:cli-case-sensitive;
  key "id";
  leaf id {
    type string;
  }
  leaf a {
    type string;
  }
}
It will be rendered as:
(config)# foo bar a test
(config-foo-bar)# ex
(config)# commit
Commit complete.
(config)# do show running-config foo
foo bar
 a test
!
(config)# foo bar a Test
(config-foo-bar)# ex
(config)# foo Bar a TEST
(config-foo-Bar)# commit
Commit complete.
(config-foo-Bar)# ex
(config)# do show running-config foo
foo Bar
 a TEST
!
foo bar
 a Test
!
When used force the CLI to display namespace prefix of all children. For example:
list foo {
  tailf:cli-expose-ns-prefix;
  key "id"";
  leaf id {
    type string;
  }
  leaf a {
    type uint8;
  }
  leaf b {
    type uint8;
  }
  leaf c {
    type uint8;
  }
}
It will be rendered as:
(config)# foo bar
(config-foo-bar)# ?
Possible completions:
  example:a
  example:b
  example:c
  ---
Enforces the CLI engine to generate 'insert' comments when displaying configuration changes of ordered-by user lists. Should not be used together with tailf:cli-show-long-obu-diffs. For example:
  container policy {
    list policy-list {
      tailf:cli-drop-node-name;
      tailf:cli-show-obu-comments;
      ordered-by user;
      key policyid;
      leaf policyid {
        type uint32 {
          tailf:info "policyid;;Policy ID.";
        }
      }
      leaf-list srcintf {
        tailf:cli-flat-list-syntax {
          tailf:cli-replace-all;
        }
        type string;
      }
      leaf-list srcaddr {
        tailf:cli-flat-list-syntax {
          tailf:cli-replace-all;
        }
        type string;
      }
      leaf-list dstaddr {
        tailf:cli-flat-list-syntax {
          tailf:cli-replace-all;
        }
        type string;
      }
      leaf action {
        type enumeration {
          enum accept {
          tailf:info "Action accept.";
          }
          enum deny {
          tailf:info "Action deny.";
          }
      }
It will be rendered as:
admin@ncs(config-policy-4)# commit dry-run outformat cli
...
                   policy {
                       policy-list 1 {
  -                        action accept;
  +                        action deny;
                       }
  +                    # after policy-list 3
  +                    policy-list 4 {
  +                        srcintf aaa;
  +                        srcaddr bbb;
  +                        dstaddr ccc;
  +                    }
                   }
               }
           }
       }
}Tells the CLI to automatically enter multi-line mode when prompting the user for a value to this leaf. The user must type <CR> to enter in the multiline mode. For example:
leaf message {
  tailf:cli-multi-line-prompt;
  type string;
}
If configured on the same line, no prompt will appear and it will be rendered as:
(config)# message aaa
If <CR> typed, it will be rendered as:
(config)# message
(<string>) (aaa):
[Multiline mode, exit with ctrl-D.]
> Lorem ipsum dolor sit amet, consectetuer adipiscing elit.
> Aenean commodo ligula eget dolor. Aenean massa.
> Cum sociis natoque penatibus et magnis dis parturient montes,
> nascetur ridiculus mus. Donec quam felis, ultricies nec,
>  pellentesque eu, pretium quis, sem.
>
(config)# commit
Commit complete.
ubuntu(config)# do show running-config message
message "Lorem ipsum dolor sit amet, consectetuer adipiscing elit. \nAenean
commodo ligula eget dolor. Aenean massa. \nCum sociis natoque penatibus et
magnis dis parturient montes, \nnascetur ridiculus mus. Donec quam felis,
ultricies nec,\n pellentesque eu, pretium quis, sem. \n"
(config)#
This statement specifies that the data node should be implemented as a link to another data node, called the target data node. This means that whenever the node is modified, the system modifies the target data node instead, and whenever the data node is read, the system returns the value of target data node. Note that if the data node is a leaf, the target node MUST also be a leaf, and if the data node is a leaf-list,the target node MUST also be a leaf-list. The argument is an XPath absolute location path. If the target lies within lists, all keys must be specified. A key either has a value, or is a reference to a key in the path of the source node, using the function current() as starting point for an XPath location path. For example:
container foo {
  list bar {
   key id;
   leaf id {
     type uint32;
   }
   leaf a {
    type uint32;
   }
   leaf b {
     tailf:link "/example:foo/example:bar[id=current()/../id]/example:a";
     type uint32;
   }
 }
}
It will be rendered as:
(config)# foo bar 1
ubuntu(config-bar-1)# ?
Possible completions:
  a
  b
  ---
  commit     Commit current set of changes
  describe   Display transparent command information
  exit       Exit from current mode
  help       Provide help information
  no         Negate a command or set its defaults
  pwd        Display current mode path
  top        Exit to top level and optionally run command
(config-bar-1)# b 100
(config-bar-1)# show config
foo bar 1
 b 100
!
(config-bar-1)# commit
Commit complete.
(config-bar-1)# show full
foo bar 1
 a 100
 b 100
!
(config-bar-1)# a 20
(config-bar-1)# commit
Commit complete.
(config-bar-1)# show full
foo bar 1
 a 20
 b 20
!
As described in previous sections, the CLI NEDs are almost programming free. The NSO CLI engine takes care of parsing the stream of characters that come from "show running-config [toptag]" and also automatically produce the sequence of CLI commands required to take the system from one state to another.
A generic NED is required when we want to manage a device that neither speaks NETCONF or SNMP, nor can be modeled so that ConfD - loaded with those models - gets a CLI that looks almost/exactly like the CLI of the managed device. For example devices that have other proprietary CLIs, devices that can only be configured over other protocols such as REST, Corba, XML-RPC, SOAP, other proprietary XML solutions, etc.
In a manner similar to the CLI NED, the Generic NED needs to be able to connect to the device, return the capabilities, perform changes to the device and finally, grab the entire configuration of the device.
The interface that a Generic NED has to implement is very similar to the interface of a CLI NED. The main differences are:
-
When NSO has calculated a diff for a specific managed device, it will for CLI NEDS also calculate the exact set of CLI commands to send to the device, according to the YANG models loaded for the device. In the case of a generic NED, NSO will instead send an array of operations to perform towards the device in the form of DOM manipulations. The generic NED class will receive an array of
NedEditOpobjects. EachNedEditOpobject contains:-
The operation to perform, i.e CREATED, DELETED, VALUE_SET etc.
-
The keypath to the object in case.
-
An optional value
-
-
When NSO wants to sync the configuration from the device to NSO, the CLI NED only has to issue a series of "show running-config [toptag]" commands and reply with the output received from the device. A generic NED has to do more work. It is given a transaction handler, which it must attach to over the Maapi interface. Then the NED code must - by some means - retrieve the entire configuration and write into the supplied transaction, again using the Maapi interface.
Once the generic NED is implemented, all other functions in NSO work precisely in same manner as with NETCONF and CLI NED devices. NSO still has the capability to run network wide transactions. The caveat is that to abort a transaction towards a device that doesn't support transactions, we calculate the reverse diff and send it to the device, i.e. we automatically calculate the undo operations.
Another complication with generic NEDs is how the NED class shall
authenticate towards the managed device. This depends entirely on the
protocol between the NED class and the managed device. If SSH is used to
a proprietary CLI, the existing authgroup structure in NSO can be used
as is. However, if some other authentication
data is needed, it is up the generic NED implementer to augment
the authgroups in tailf-ncs.yang accordingly.
We must also configure a managed device, indicating that it's configuration is handled by a specific generic NED. Below we see that the NED with identity "xmlrpc" is handling this device.
admin@ncs# show running-config devices device x1

address   127.0.0.1
port      12023
authgroup default
device-type generic ned-id xmlrpc
state admin-state unlocked
...
The example examples.ncs/generic-ned/xmlrpc-device in
the NSO examples collection implements a generic NED that speaks
XML-RPC to 3 HTTP servers. The HTTP servers run the apache XML-RPC server
code and the NED code manipulates the 3 HTTP servers using a number
of predefined XML RPC calls.
A good starting point when we wish to implement a new generic NED
is the ncs-make-package --generic-ned-skeleton ...
command, that be used to generate a skeleton package for a generic
NED.
$ ncs-make-package --generic-ned-skeleton abc --build$ ncs-setup --ned-package abc --dest ncs$ cd ncs$ ncs -c ncs.conf$ ncs_cli -C -u adminadmin@ncs# show packages package abc
packages package abc
package-version 1.0
description "Skeleton for a generic NED"
ncs-min-version [ 3.3 ]
component MyDevice
callback java-class-name [ com.example.abc.abcNed ]
ned generic ned-id abc
ned device vendor "Acme abc"
...
oper-status up
A generic NED always requires more work than a CLI NED. The generic NED
needs to know how to map arrays of
NedEditOp objects into the equivalent reconfiguration
operations on the device. Depending on the protocol and configuration
capabilities of the device, this may be arbitrarily difficult.
Regardless of the device, we must always write a YANG model that describes
the device. The array of NedEditOp objects that the
generic NED code gets exposed to is relative the YANG model that we
have written for the device. Again, this model doesn't necessarily have
to cover all aspects of the device.
Often a useful technique with generic NEDs can be to write a pyang plugin
to generate code for the generic NED. Again, depending on the device it
may be possible to generate Java code from a pyang plugin that covers
most or all aspects of mapping an array of
NedEditOp objects into the equivalent
reconfiguration commands for the device.
Pyang is an extensible and open source YANG parser (written by Tail-f)
available
at http://www.yang-central.org. pyang is also part of the NSO
release. A number of plugins are shipped in the NSO release, for example
$NCS_DIR/lib/pyang/pyang/plugins/tree.py is a good
plugin to start with if we wish to
write our own plugin.
$NCS_DIR/examples.ncs/generic-ned/xmlrpc-device is a
good example to start with if we wish to write a generic NED. It
manages a set of devices over the XML-RPC protocol.
In this example we have:
-
Defined a fictious YANG model for the device.
-
Implemented an XML-RPC server exporting a set of RPCs to manipulate that fictious data model. The XML-RPC server runs the apache
org.apache.xmlrpc.server.XmlRpcServerJava package. -
Implemented a Generic NED which acts as an XML-RPC client speaking HTTP to the XML-RPC servers.
The example is self contained, and we can, using the NED code, manipulate these XML-RPC servers in a manner similar to all other managed devices.
$ cd $NCS_DIR/generic-ned/xmlrpc-device$ make all start$ ncs_cli -C -u adminadmin@ncs# devices sync-from
sync-result {
device r1
result true
}
sync-result {
device r2
result true
}
sync-result {
device r3
result true
}admin@ncs# show running-config devices r1 config
ios:interface eth0
macaddr 84:2b:2b:9e:af:0a
ipv4-address 192.168.1.129
ipv4-mask 255.255.255.0
status Up
mtu 1500
alias 0
ipv4-address 192.168.1.130
ipv4-mask 255.255.255.0
!
alias 1
ipv4-address 192.168.1.131
ipv4-mask 255.255.255.0
!
speed 100
txqueuelen 1000
!
As it was mentioned earlier the NedEditOp objects are
relative to the YANG model of the device, and they are to be translated
into the equivalent reconfiguration operations on the device.
Applying reconfiguration operations may only be valid in a certain order.
For Generic NEDs NSO provides a feature to ensure dependency
rules being obeyed when generating a diff to commit. It controls the order
of operations delivered in the NedEditOp array. The
feature is activated by adding the following option to
package-meta-data.xml:
<option>
  <name>ordered-diff</name>
</option>
When the ordered-diff flag is set the
NedEditOp objects follow YANG schema order and
consider dependencies between leaf nodes.
Dependencies can be defined using leafrefs and the
tailf:cli-diff-after,
tailf:cli-diff-create-after,
tailf:cli-diff-modify-after,
tailf:cli-diff-set-after,
tailf:cli-diff-delete-after YANG
extensions.
Read more about the above YANG extensions in the Tail-f CLI YANG
extensions man page.
A device we wish to manage using a NED usually has a not just configuration data that we wish to manipulate from NSO, but the device usually has a set of commands that do not relate to configuration.
The commands on the device we wish to be able to invoke from NSO must be modelled as actions. We model this as actions, and compile it using a special ncsc command to compile NED data models that do not directly relate to configuration data on the device.
The NSO example
$NCS_DIR/examples.ncs/generic-ned/xmlrpc-device
contains an example where the managed device, a fictious XML-RPC
device contains a YANG snippet :
container commands {
  tailf:action idle-timeout {
    tailf:actionpoint ncsinternal {
      tailf:internal;
    }
    input {
      leaf time {
        type int32;
      }
    }
    output {
      leaf result {
        type string;
      }
    }
  }
}
When that action YANG is imported into NSO it ends up under the managed device. We can invoke the action on the device as:
admin@ncs# devices device r1 config ios:commands idle-timeout time 55result OK
The NED code is obviously involved here. All NEDs must always implement:
void command(NedWorker w, String cmdName, ConfXMLParam[] params)
    throws NedException, IOException;
The command() method gets invoked in the
NED, the code must then execute the command. The input parameters
in the params parameter correspond to
the data provided in the action.
The command() method must reply with
another array of ConfXMLParam objects.
public void command(NedWorker worker, String cmdname, ConfXMLParam[] p)
    throws NedException, IOException {
    session.setTracer(worker);
    if (cmdname.compareTo("idle-timeout") == 0) {
            worker.commandResponse(new ConfXMLParam[]{
               new ConfXMLParamValue(new interfaces(),
                                     "result",
                                      new ConfBuf("OK"))
        });
 }
The above code is fake, on a real device, the job of the
command() method is to establish a
connection to the device, invoke the command, parse the output
and finally reply with an ConfXMLParam array.
The purpose of implementing NED commands is usually that we want to expose device commands to the programmatic APIs in the NSO DOM tree.
NSO can use SNMP to configure a managed device, under certain circumstances. SNMP in general is not suitable for configuration, and it is important to understand why:
-
In SNMP, the size of a SET request, which is used to write to a device, is limited to what fits into one UDP packet. This means that a large configuration change must be split into many packets. Each such packet contains some parameters to set, and each such packet is applied on its own by the device. If one SET request out of many fails, there is no abort command to undo the already applied changes, meaning that rollback is very difficult.
-
The data modelling language used in SNMP, SMIv2, does not distinguish between configuration objects and other writable objects. This means that it is not possible to retrieve only the configuration from a device without explicit, exact knowledge of all objects in all MIBs supported by the device.
-
SNMP supports only two basic operations, read and write. There is no protocol support for creating or deleting data. Such operations must be modeled in the MIBs, explicitly.
-
SMIv2 has limited support for semantic constraints in the data model. This means that it is difficult to know if a certain configuration will apply cleanly on a device. If it doesn't, rollback is tricky, as explained above.
-
Because of all of the above, ordering of SET requests becomes very important. If a device refuses to create some object A before another B, an SNMP manager must make sure to create B before creating A. It is also common that objects cannot be modified without first making them disabled or inactive. There is no standard way to do this, so again, different data models do this in different ways.
Despite all this, if a device can be configured over SNMP, NSO can use its built-in multilingual SNMP manager to communicate with the device. However, in order to solve the problems mentioned above, the MIBs supported by the device need to be carefully annotated with some additional information that instruct NSO on how to write configuration data to the device. This additional information is described in detail below.
To add a device, the following steps need to be followed. They are described in more details in the following sections.
-
Collect (a subset of) the MIBs supported by the device.
-
Optionally annotate the MIBs with annotations to instruct NSO on how to talk to the device, for example ordering dependencies that are not explicitly modeled in the MIB. This step is not required.
-
Compile the MIBs and load them into NSO.
-
Configure NSO with the address and authentication parameter for the SNMP devices.
-
Optionally configure a named MIB group in NSO with the MIBs supported by the device, and configure the managed device in NSO to use this MIB group. If this step is not done, NSO assumes the device implements all MIBs known to NSO.
(See the Makefile
snmp-ned/basic/packages/ex-snmp-ned/src/Makefile,
for an example of the below description.) Make sure that
you have all MIBs available, including import dependencies
and that they contain no errors.
The ncsc --ncs-compile-mib-bundle compiler
is used to compile MIBs and MIB annotation files into NSO load
files. Assuming a directory with input MIB files (and optional
MIB annotation files) exist, the following command compiles
all the MIBs in device-models and writes
the output to ncs-device-model-dir.
$ ncsc --ncs-compile-mib-bundle device-models \
  --ncs-device-dir ./ncs-device-model-dir
The compilation steps performed by the ncsc --ncs-compile-mib-bundle are elaborated below::
-
Transform the MIBs into YANG according to the IETF standardized mapping (https://www.ietf.org/rfc/rfc6643.txt). The IETF defined mapping makes all MIB objects read-only over NETCONF.
-
Generate YANG deviations from the MIB, this basically makes SMIv2
read-writeobjects YANGconfig trueas a YANG deviation. -
Include the optional MIB annotations.
-
Merge the read-only YANG from step 1 with the read-write deviation from step 2.
-
Compile the merged YANG files into NSO load format.
These steps are illustrated in the Figure below:
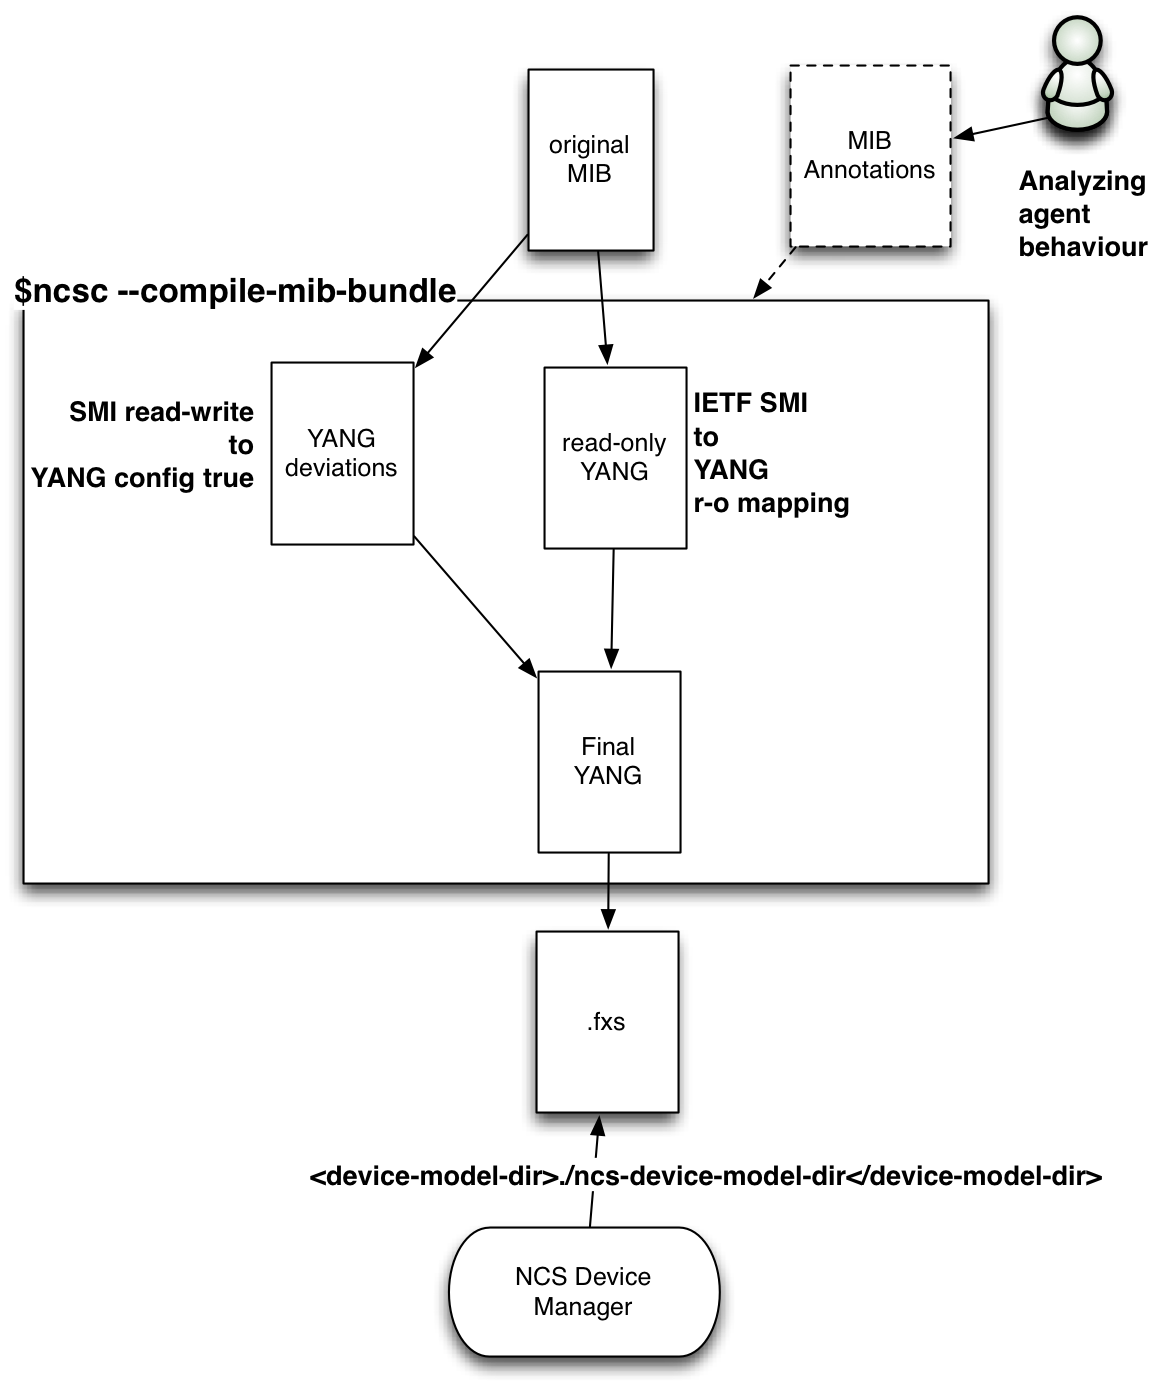 |
SNMP NED Compile Steps
Finally make sure that the NSO configuration file points to the correct device model directory:
<device-model-dir>./ncs-device-model-dir</device-model-dir>
Each managed device is configured with a name, IP address and port (161 by default), and the SNMP version to use (v1, v2c, or v3).
admin@host# show running-config devices device r3

address 127.0.0.1
port    2503
device-type snmp version v3 snmp-authgroup my-authgroup
state admin-state unlocked
In order to minimize the necessary configuration, the
authentication group concept (see
the section called “Authentication Groups” in User Guide)
is used also for
SNMP. A configured managed device of type snmp
refers to an SNMP authgroup. An SNMP authgroup contains
community strings for SNMP v1 and v2c, and USM parameters for
SNMP v3.
admin@host# show running-config devices authgroups snmp-group my-authgroup

devices authgroups snmp-group my-authgroup
default-map community-name public
umap admin
usm remote-name admin
usm security-level auth-priv
usm auth md5 remote-password $4$wIo7Yd068FRwhYYI0d4IDw==
usm priv des remote-password $4$wIo7Yd068FRwhYYI0d4IDw==
!
!
In the example above, when NSO needs to speak to the device "r3", it sees that the device is of type snmp, and that SNMP v3 should be used, with authentication parameters from the SNMP authgroup "my-authgroup". This authgroup maps the local NSO user "admin" to the USM user "admin", with explicit remote passwords given. These passwords will be localized for each SNMP engine that NSO communicates with. While the passwords above are shown encrypted, when you enter them in the CLI you write them in clear-text. Note also that the remote engine id is not configured; NSO performs a discovery process to find it automatically.
No NSO user other than "admin" is mapped by the authgroup "my-authgroup" for SNMP v3.
With SNMP, there is no standardized, generic way for an SNMP manager to learn which MIBs an SNMP agent implements. By default, NSO assumes that an SNMP device implements all MIBs known to NSO, i.e., all MIBs that have been compiled with the ncsc --ncs-compile-mib-bundle command. This works just fine if all SNMP devices NSO manages are of the same type, and implement the same set of MIBs. But if NSO is configured to manage many different SNMP devices, some other mechanism is needed.
In NSO, this problem is solved by using MIB groups. A MIB group is a named collection of MIB module names. A managed SNMP device can refer to one or more MIB groups. For example, below two MIB groups are defined:
admin@ncs# show running-config devices mib-group

devices mib-group basic
mib-module [ BASIC-CONFIG-MIB BASIC-TC ]
!
devices mib-group snmp
mib-module [ SNMP* ]
!
The wildcard '*' can be used only at the end of a string; it is thus used to define a prefix of a MIB module name. So the string "SNMP*" matches all loaded standard SNMP modules, such as SNMPv2-MIB, SNMP-TARGET-MIB etc.
An SNMP device can then be configured to refer to one or more of the MIB groups:
admin@ncs# show running-config devices device r3 device-type snmp

devices device r3
device-type snmp version v3
device-type snmp snmp-authgroup default
device-type snmp mib-group [ basic snmp ]
!Most annotations for MIB objects are used to instruct NSO on how to split a large transaction into suitable SNMP SET requests. This step is not necessary for a default integration. But when for example ordering dependencies in the MIB is discovered it is better to add this as annotations and let NSO handle the ordering rather then leaving it to the CLI user or Java programmer.
In some cases, NSO can automatically understand when rows in a table must be created or deleted before rows in some other table. Specifically, NSO understands that if a table B has an INDEX object in table A (i.e., B sparsely augments A), then rows in table B must be created after rows in table B, and vice versa for deletions. NSO also understand that if table B AUGMENTS table A, then a row in table A must be created before any column in B is modified.
However, in some MIBs, table dependencies cannot be detected
automatically. In this case, these tables must be annotated
with a sort-priority. By default, all rows
have sort-priority 0. If table A has a lower sort-priority
than table B, then rows in table A are created before rows in
table B.
In some tables, existing rows cannot be modified unless the
row is inactivated. Once inactive, the row can be modified,
and then activated again. Unfortunately, there is no formal
way to declare this is SMIv2, so these tables must be
annotated with two statements;
ned-set-before-row-modification and
ned-modification-dependent. The
former is used to instruct NSO which column and which value is
used to inactivate a row, and the latter is used on each
column that requires the row to be inactivated before
modification.
ned-modification-dependent can be used
in the same table as
ned-set-before-row-modification, or in
a table that augments or sparsely augments the table with
ned-set-before-row-modification.
By default, NSO treats a writable SMIv2 object as configuration, except if the object is of type RowStatus. Any writable object that does not represent configuration must be listed in a MIB annotation file when the MIB is compiled, with the "operational" modifier.
When NSO retrieves data from an SNMP device, e.g., when doing
a sync from-device, it uses the GET-NEXT request
to scan the table for available rows. When doing the
GET-NEXT, NSO must ask for an accessible column. If the row
has a column of type RowStatus, NSO uses this column.
Otherwise, if the one of the INDEX objects are accessible, it
uses this object. Otherwise, if table has been annotated with
ned-accessible-column, this column is
used. And, as a last resort, NSO does not indicate any column
in the first GET-NEXT request, and uses the column returned
from the device in subsequent requests. If the table has
"holes" for this column, i.e., the column is not instantiated
in all rows, NSO will not detect those rows.
NSO can automatically create and delete table rows for tables that use the RowStatus TEXTUAL-CONVENTION, defined in RFC 2580.
It is pretty common to mix configuration objects with non-configuration objects in MIBs. Specifically, it is quite common that rows are created automatically by the device, but then some columns in the row are treated as configuration data. In this case, the application programmer must tell NSO to sync from the device before attempting to modify the configuration columns, in order to let NSO learn which rows exist on the device.
Some SNMP agents require a certain order of row deletions and
creations. By default, the SNMP NED send all creates before
deletes. The annotation ned-delete-before-create
can be used on a table entry in order to send row deletions
before row creations, for that table.
Sometimes rows in some SNMP agents cannot be modified once
created. Such rows can be marked with the annotation
ned-recreate-when-modified. This makes the SNMP
NED to first delete the row, and then immediately recreate it
with the new values.
A good starting point for understanding annotations is to look at
the example in examples.ncs/snmp-ned directory.
The BASIC-CONFIG-MIB mib has a table where rows can be modified if
the bscActAdminState is set to locked. In order to
have NSO do this automatically when modifying entries rather
then leaving it to users an annotation file can be created. See
the BASIC-CONFIG-MIB.miba which contains the following:
## NCS Annotation module for BASIC-CONFIG-MIB

bscActAdminState  ned-set-before-row-modification = locked
bscActFlow        ned-modification-dependent
This tells NSO that before modifying the
bscActFlow column set the
bscActAdminState to locked and restore the
previous value after committing the set operation.
All MIB annotations for a particular MIB are written to a file
with the file suffix .miba.
See
mib_annotations(5) in Manual Pages
for details.
Make sure that the MIB annotation file is put into the directory where all the MIB files are which is given as input to the ncsc --ncs-compile-mib-bundle command
NSO can manage SNMP devices within transactions, a transaction can span Cisco devices, NETCONF devices and SNMP devices. If a transaction fails NSO will generate the reverse operation to the SNMP device.
The basic features of the SNMP will be illustrated below by using the
examples.ncs/snmp-ned example. First try to connect
to all SNMP devices:
admin@ncs# devices connect

connect-result {
  device r1
  result true
  info (admin) Connected to r1 - 127.0.0.1:2501
}
connect-result {
  device r2
  result true
  info (admin) Connected to r2 - 127.0.0.1:2502
}
connect-result {
  device r3
  result true
  info (admin) Connected to r3 - 127.0.0.1:2503
}
When NSO executes the connect request for SNMP devices it performs a get-next request with 1.1 as var-bind. When working with the SNMP NED it is helpful to turn on the NED tracing:
$ ncs_cli -C -u adminadmin@ncs configadmin@ncs(config)# devices global-settings trace pretty trace-dir .admin@ncs(config)# commitCommit complete.
This creates a trace-file named ned-devicename.trace. The trace for the ncs connect action looks like:
$ more ned-r1.trace
get-next-request reqid=2
  1.1
get-response reqid=2
  1.3.6.1.2.1.1.1.0=Tail-f ConfD agent - 1
When looking at SNMP trace files it is useful to have the OBJECT-DESCRIPTOR rather than the OBJECT-IDENTIFIER. To do this, pipe the trace file to the smixlate tool:
$ more ned-r1.trace | smixlate $NCS_DIR/src/ncs/snmp/mibs/SNMPv2-MIB.mib

get-next-request reqid=2
  1.1
get-response reqid=2
  sysDescr.0=Tail-f ConfD agent - 1
You can access the data in the SNMP systems directly (read-only and read-write objects):
admin@ncs# show devices device live-status

ncs live-device r1
live-status SNMPv2-MIB system sysDescr "Tail-f ConfD agent - 1"
live-status SNMPv2-MIB system sysObjectID 1.3.6.1.4.1.24961
live-status SNMPv2-MIB system sysUpTime 596197
live-status SNMPv2-MIB system sysContact ""
live-status SNMPv2-MIB system sysName ""
...
NSO can synchronize all writable objects into CDB:
admin@ncs# devices sync-from
sync-result {
  device r1
  result true
...
admin@ncs# show running-config devices device r1 config r:SNMPv2-MIB
devices device r1
config
system
sysContact ""
sysName ""
sysLocation ""
!
snmp
snmpEnableAuthenTraps disabled;
!
All the standard features of NSO with transactions and roll-backs will work with SNMP devices. The sequence below shows how to enable authentication traps for all devices as one transaction. If any device fails, NSO will automatically rollback the others. At the end of the CLI sequence a manual rollback is shown:
admin@ncs# configadmin@ncs(config)# devices device r1-3 config r:SNMPv2-MIB snmp snmpEnableAuthenTraps enabledadmin@ncs(config)# commitCommit complete.
admin@ncs(config)# top rollback configurationadmin@ncs(config)# commit dry-run outformat clicli devices {
device r1 {
config {
r:SNMPv2-MIB {
snmp {
- snmpEnableAuthenTraps enabled;
+ snmpEnableAuthenTraps disabled;
}
}
}
}
device r2 {
config {
r:SNMPv2-MIB {
snmp {
- snmpEnableAuthenTraps enabled;
+ snmpEnableAuthenTraps disabled;
}
}
}
}
device r3 {
config {
r:SNMPv2-MIB {
snmp {
- snmpEnableAuthenTraps enabled;
+ snmpEnableAuthenTraps disabled;
}
}
}
}
}admin@ncs(config)# commitCommit complete.
NED devices have runtime data, statistics. The first part in
being able to collect non-configuration data from a NED
device is to model the statistics data we wish to gather.
In normal YANG files, it is common to have the runtime data
nested inside the configuration data. In gathering runtime data for
NED devices we have chosen to separate configuration data and
runtime data. In the case of the archetypical CLI device, the
show running-config ... and friends are used to
display the running configuration of the device whereas other different
show ... commands are used to display
runtime data, for example show interfaces,
show routes. Different commands for different
types of routers/switches and in particular, different tabular
output format for different device types.
To expose runtime data from a NED controlled device, regardless of whether it's a CLI NED or a Generic NED, we need to do two things:
-
Write YANG models for the aspects of runtime data we wish to expose northbound in NSO.
-
Write Java NED code that is responsible for collecting that data.
The NSO NED for the Avaya 4k device contains a data model for some real statistics for the Avaya router and also the accompanying Java NED code. Let's start to take a look at the YANG model for the stats portion, we have:
module tailf-ned-avaya-4k-stats {
  namespace 'http://tail-f.com/ned/avaya-4k-stats';
  prefix avaya4k-stats;

  import tailf-common {
    prefix tailf;
  }
  import ietf-inet-types {
    prefix inet;
  }

  import ietf-yang-types {
    prefix yang;
  }

  container stats {
    config false;
    container interface {
      list gigabitEthernet {
        key "num port";
        tailf:cli-key-format "$1/$2";

        leaf num {
          type uint16;
        }

        leaf port {
          type uint16;
        }

        leaf in-packets-per-second {
          type uint64;
        }

        leaf out-packets-per-second {
          type uint64;
        }

        leaf in-octets-per-second {
          type uint64;
        }

        leaf out-octets-per-second {
          type uint64;
        }

        leaf in-octets {
          type uint64;
        }

        leaf out-octets {
          type uint64;
        }

        leaf in-packets {
          type uint64;
        }

        leaf out-packets {
          type uint64;
        }
      }
    }
  }
}
It's a config false; list of
counters per interface. We compile the NED stats module
with the --ncs-compile-module flag
or with the
--ncs-compile-bundle flag.
It's the same non-config module that contains
both runtime data as well as commands and rpcs.
$ ncsc --ncs-compile-module avaya4k-stats.yang \
    --ncs-device-dir <dir>
The config false; data from a module
that has been compiled with the
--ncs-compile-module flag will end
up mounted under /devices/device/live-status
tree. Thus running
the NED towards a real router we have:
admin@ncs# show devices device r1 live-status interfaces

live-status {
    interface gigabitEthernet1/1 {
        in-packets-per-second   234;
        out-packets-per-second  177;
        in-octets-per-second   4567;
        out-octets-per-second  3561;
        in-octets             12666;
        out-octets            16888;
        in-packets             7892;
        out-packets            2892;
     }
        ............
It is the responsibility of the NED code to populate the data in the live device tree. Whenever a northbound agent tries to read any data in the live device tree for a NED device, the NED code is invoked.
The NED code implements an interface called,
NedConnection
This interface contains:
void showStatsPath(NedWorker w, int th, ConfPath path)
        throws NedException, IOException;
This interface method is invoked by NSO in the NED. The
Java code must return what is requested, but it may also return more.
The Java code always needs to signal errors by invoking
NedWorker.error() and success by invoking
NedWorker.showStatsPathResponse(). The
latter function indicates what is returned, and also how
long it shall be cached inside NSO.
The reason for this design, is that it is common for
many show commands to work on for example
an entire interface, or some other item in the managed device.
Say that the NSO operator (or maapi code) invokes:
admin@host> show status devices device r1 live-status  \
     interface gigabitEthernet1/1/1 out-octets
out-octets 340;
requesting a single leaf, the NED Java code can decide to
execute any arbitrary show command towards
the managed device, parse the output and populate as much
data as it wants. The Java code also decides how long time
NSO shall cache the data.
-
When the
showStatsPath()is invoked, the NED should indicate the state/value of the node indicated by the path (i.e. if a leaf was requested, the NED should write the value of this leaf to the provided transaction handler (th) using MAAPI, or indicate its absence as described below; if a list entry or a presence container was requested then the NED should indicate presence or absence of the element, if the whole list is requested then the NED should populate the keys for this list). Often requesting such data from the actual device will give the NED more data than specifically requested, in which case the worker is free to write other values as well. The NED is not limited to populating the subtree indicated by the path, it may also write values outside this subtree. NSO will then not request those paths but read them directly from the transaction. Different timeouts can be provided for different paths.If a leaf does not have a value, or does not exist, the NED can indicate this by returning a TTL for the path to the leaf, without setting the value in the provided transaction. This has changed from earlier versions of NSO. The same applies for optional containers and list entries. If the NED populates the keys for a certain list (both when it is requested to do so or when it decided to do so because it has received this data from the device), it should set the TTL value for the list itself to indicate the time the set of keys should be considered up to date. It may choose to provide different TTL values for some or all list entries, but it is not required to do so.
One important task when implementing a NED of any type is to make it mimic the devices handling of default values as close as possible. Network equipment can typically deal with default values in many different ways.
Some devices display default values on leafs even if they have not been explicitly set. Others use trimming, meaning that if a leaf is set to its default value it will be 'unset' and disappear from the devices configuration dump.
It is the responsibility of the NED to make the NSO aware of how the device handles default values. This is done by registering a special NED Capability entry with the NSO. Two modes are currently supported by the NSO: "trim" and "report-all".
This is the typical behavior of a Cisco IOS device. The simple YANG code snippet below illustrates the behavior. A container with a boolean leaf. Its default value is true.
container aaa {
  leaf enabled {
    default true;
    type boolean;
  }
}
Try setting the leaf to true in NSO and commit. Then compare the configuration:
$ ncs_cli -C -u admin
admin@ncs# config
admin@ncs(config)# devices device a0 config aaa enabled true
admin@ncs(config)# commit
Commit complete.
admin@ncs(config)# top devices device a0 compare-config
diff
devices {
device a0 {
config {
aaa {
- enabled;
}
}
}
}The result shows that the configurations differ. The reason is that the device does not display the value of the leaf 'enabled'. It has been trimmed since it has its default value. The NSO is now out of sync with the device.
To solve this issue, make the NED tell the NSO that the device is trimming default values. Register an extra NED Capability entry in the Java code.
NedCapability capas[] = new NedCapability[2];
capas[0] = new NedCapability(
"",
"urn:ios",
"tailf-ned-cisco-ios",
"",
"2015-01-01",
"");
capas[1] = new NedCapability(
"urn:ietf:params:netconf:capability:" +
"with-defaults:1.0?basic-mode=trim", // Set mode to trim
"urn:ietf:params:netconf:capability:" +
"with-defaults:1.0",
"",
"",
"",
"");Now, try the same operation again:
$ ncs_cli -C -u admin
admin@ncs# config
admin@ncs(config)# devices device a0 config aaa enabled true
admin@ncs(config)# commit
Commit complete.
admin@ncs(config)# top devices device a0 compare-config
admin@ncs(config)#
The NSO is now in sync with the device.
Some devices display default values for leafs even if they have not been explicitly set. The simple YANG code below will be used to illustrate this behavior. A list containing a key and a leaf with a default value.
list interface {
key id;
leaf id {
type string;
}
leaf treshold {
default 20;
type uint8;
}
}Try creating a new list entry in NSO and commit. Then compare the configuration:
$ ncs_cli -C -u admin
admin@ncs# config
admin@ncs(config)# devices device a0 config interface myinterface
admin@ncs(config)# commit
admin@ncs(config)# top devices device a0 compare-config
diff
devices {
device a0 {
config {
interface myinterface {
+ treshold 20;
}
}
}
}The result shows that the configurations differ. The NSO is out of sync. This is because the device displays the default value of the 'threshold' leaf even if it has not been explicitly set through the NSO.
To solve this issue, make the NED tell the NSO that the device is reporting all default values. Register an extra NED Capability entry in the Java code.
NedCapability capas[] = new NedCapability[2];
capas[0] = new NedCapability(
"",
"urn:abc",
"tailf-ned-abc",
"",
"2015-01-01",
"");
capas[1] = new NedCapability(
"urn:ietf:params:netconf:capability:" +
"with-defaults:1.0?basic-mode=report-all", // Set mode to report-all
"urn:ietf:params:netconf:capability:" +
"with-defaults:1.0",
"",
"",
"",
"");
Now, try the same operation again:
$ ncs_cli -C -u admin
admin@ncs# config
admin@ncs(config)# devices device a0 config interface myinterface
admin@ncs(config)# commit
Commit complete.
admin@ncs(config)# top devices device a0 compare-config
admin@ncs(config)#
The NSO is now in sync with the device.
The possibility to do a dry-run on a transaction is a feature in NSO that allows to examine the changes to be pushed out to the managed devices in the network. The output can be produced in different formats, namely cli, xml and native. In order to produce dry-run in the native output format NSO needs to know the exact syntax used by the device, and the task of converting the commands or operations produced by the NSO into the device-specific output belongs the corresponding NED. This is the purpose of the prepareDry() callback in the NED interface.
In order to be able to invoke a callback an instance of the NED object needs to be created first. There are two ways to instantiate a NED:
-
newConnection()callback that tells the NED to establish connection to the device which can later be used to perform any action such as show configuration, apply changes or view operational data as well as produce dry-run output. -
Optional
initNoConnect()callback that tells the NED to create an instance that would not need to communicate with the device, and hence must not establish a connection or otherwise communicate with the device. This instance will only be used to calculate dry-run output. It is possible for a NED to reject the initNoConnect() request if it is not able to calculate the dry-run output without establishing a connection to the device, for example if a NED is capable of managing devices with different flavors of syntax and it is not known at the moment which syntax is used by this particular device.
The following state diagram displays NED states specific to dry-run scenario.

NED dry-run states
Each managed device in NSO has a device type, which informs NSO how to communicate with the device. The device type is one of netconf, snmp, cli, or generic. In addition, a special ned-id identifier is needed.
NSO uses a technique
called YANG Schema Mount, where all the
data models from a device are mounted into the
/devices tree in NSO. Each set of mounted data
models is completely separated from the others (they are
confined to a "mount jail"). This makes it possible to load
different versions of the same YANG module for different
devices. The functionality is called Common Data Models (CDM).
In most cases, there are many devices running the same software version in the network managed by NSO, thus using the exact same set of YANG modules. With CDM, all YANG modules for a certain device (or family of devices) are contained in a NED package (or just NED for short). If the YANG modules on the device are updated in a backwards compatible way, the NED is also updated.
However, if the YANG modules on the device are updated in an incompatible way in a new version of the device's software, it might be necessary to create a new NED package for the new set of modules. Without CDM, this would not be possible, since there would be two different packages that contained different versions of the same YANG module.
When a NED is being built, its YANG modules are compiled to be
mounted into the NSO YANG model. This is done by
device compilation of the device's YANG
modules, and is performed via the ncsc tool
provided by NSO.
The ned-id identifier is a YANG identity, which must be
derived from one of the pre-defined identities in
$NCS_DIR/src/ned/yang/tailf-ncs-ned.yang.
A YANG model for devices handled by NED code needs to extend the base identity and provide a new identity that can be configured.
import tailf-ncs-ned {
prefix ned;
}
identity cisco-ios {
base ned:cli-ned-id;
}The Java NED code registers the identity it handles with NSO.
Similar to how we import device models for NETCONF based devices,we use the
ncsc --ncs-compile-bundle command to import YANG models
for NED handled devices.
Once we have imported such a YANG model into NSO, we can configure managed device in NSO to be handled by the appropriate NED handler (which is user Java code, more on that later)
admin@ncs# show running config devices device r1
address 127.0.0.1
port 2025
authgroup default
device-type cli ned-id cisco-ios
state admin-state unlocked
...When NSO needs to communicate southbound towards a managed device which is not of type NETCONF, it will look for a NED that has registered with the name of the identity, in the case above, the string "ios".
Thus before NSO attempts to connect to a NED device, before it tries to sync,
or manipulate the configuration of the device, a user based Java NED code
must have registered with the NSO service manager indicating which Java
class is responsible for the NED with the string of the identity, in this
case the string "ios". This happens automatically when the NSO java VM gets
a instantiate-component request for a NSO package component of
type ned.
The component java class myNed needs to implement
either of the interfaces NedGeneric or
NedCli. Both interfaces require the NED class to
implement the following:
// should return "cli" or "generic" String type(); // Which YANG modules are covered by the class String [] modules(); // Which identity is implemented by the class String identity();
The above three callbacks are used by the NSO Java VM to connect the NED
Java class with NSO. They are called at when the NSO Java VM receives the
instantiate-component request.
The underlying NedMux will start a number of threads, and invoke the registered class with other data callbacks as transactions execute.
NSO has supported Junos devices from early on. The legacy Junos NED is NETCONF-based, but as Junos devices did not provide YANG modules in the past, complex NSO machinery translated Juniper's XML Schema Description (XSD) files into a single YANG module. This was an attempt to aggregate several Juniper device modules/versions.
Juniper nowadays provides YANG modules for Junos devices. Junos YANG
modules can be downloaded from the device and used directly in NSO
with the new juniper-junos_nc-gen NED.
By downloading the YANG modules using
juniper-junos_nc-gen NED tools and rebuilding the
NED, the NED can provide full coverage immediately when the device is
updated instead of waiting for a new legacy NED release.
This guide describes how to replace the legacy
juniper-junos NED and migrate NSO applications
to the juniper-junos_nc-gen NED using the NSO
MPLS VPN example from the NSO examples collection as a reference.
Prepare the example:
-
Add the
juniper-junosandjuniper-junos_nc-genNED packages to the example. -
Configure the connection to the Junos device.
-
Add the MPLS VPN service configuration to the simulated network, including the Junos device using the legacy
juniper-junosNED.
Adapting the service to the juniper-junos_nc-gen NED:
-
Un-deploy MPLS VPN service instances with no-networking.
-
Delete Junos device config with no-networking.
-
Set the Junos device to NETCONF/YANG compliant mode.
-
Switch the ned-id for the Junos device to the
juniper-junos_nc-genNED package. -
Download the compliant YANG models, build, and reload the
juniper-junos_nc-genNED package. -
Sync from the Junos device to get the compliant Junos device config.
-
Update the MPLS VPN service to handle the difference between the non-compliant and compliant configurations belonging to the service.
-
Re-deploy the MPLS VPN service instances with no-networking to make the MPLS VPN service instances own the device configuration again.
Note
If applying the steps for this example on a production system, you should first take a backup using the ncs-backup tool before proceeding.
This guide uses the MPLS VPN example in Python from the NSO
example set under
$NCS_DIR/examples.ncs/getting-started/developing-with-ncs/17-mpls-vpn-python
to demonstrate porting an existing application to use the
juniper-junos_nc-gen NED. The simulated Junos
device is replaced with a Junos vMX 21.1R1.11 container, but other
NETCONF/YANG-compliant Junos versions also work.
The first step is to add the latest juniper-junos
and juniper-junos_nc-gen NED packages to the
example's package directory. The NED tar-balls must be available and
downloaded from your
https://software.cisco.com/download/home account
to the 17-mpls-vpn-python example directory.
Replace the NSO_VERSION and NED_VERSION
variables with the versions you use:
$cd $NCS_DIR/examples.ncs/getting-started/developing-with-ncs/17-mpls-vpn-python$cp ./ncs-NSO_VERSION-juniper-junos-NED_VERSION.tar.gz packages/$cd packages$tar xfz ../ncs-NSO_VERSION-juniper-junos_nc-NED_VERSION.tar.gz$cd -
Build and start the example:
$ make all start
Replace the netsim device connection configuration in NSO with
the configuration for connecting to the Junos device. Adjust the
USER_NAME, PASSWORD, and
HOST_NAME/IP_ADDR variables and the timeouts as required
for the Junos device you are using with this example:
$ncs_cli -u admin -Cadmin@ncs#configadmin@ncs(config)#devices authgroups group juniper umap admin remote-name USER_NAME \ remote-password PASSWORDadmin@ncs(config)#devices device pe2 authgroup juniper address HOST_NAME/IP_ADDR port 830admin@ncs(config)#devices device pe2 connect-timeout 240admin@ncs(config)#devices device pe2 read-timeout 240admin@ncs(config)#devices device pe2 write-timeout 240admin@ncs(config)#commitadmin@ncs(config)#endadmin@ncs#exit
Open a CLI terminal or use NETCONF on the Junos device to verify that
the rfc-compliant and yang-compliant modes
are not yet enabled. Examples:
$ssh USER_NAME@HOST_NAME/IP_ADDRjunos>configurejunos#show system services netconfssh;
Or:
$ netconf-console -s plain -u USER_NAME -p PASSWORD --host=HOST_NAME/IP_ADDR \
--port=830 --get-config
--subtree-filter=-<<<'<configuration xmlns="http://xml.juniper.net/xnm/1.1/xnm">
<system>
<services>
<netconf/>
</services>
</system>
</configuration>'
<rpc-reply xmlns:junos="http://xml.juniper.net/junos/21.1R0/junos"
xmlns="urn:ietf:params:xml:ns:netconf:base:1.0" message-id="1">
<data>
<configuration xmlns="http://xml.juniper.net/xnm/1.1/xnm">
<system>
<services>
<netconf>
<ssh>
</ssh>
</netconf>
</services>
</system>
</configuration>
</data>
</rpc-reply>
The rfc-compliant and yang-compliant nodes
must not be enabled yet for the legacy Junos NED to work. If enabled,
delete in the Junos CLI or using NETCONF. A netconf-console example:
$ netconf-console -s plain -u USER_NAME -p PASSWORD --host=HOST_NAME/IP_ADDR --port=830
--db=candidate
--edit-config=- <<<'<configuration xmlns="http://xml.juniper.net/xnm/1.1/xnm"
xmlns:nc="urn:ietf:params:xml:ns:netconf:base:1.0">
<system>
<services>
<netconf>
<rfc-compliant nc:operation="remove"/>
<yang-compliant nc:operation="remove"/>
</netconf>
</services>
</system>
</configuration>'
$ netconf-console -s plain -u USER_NAME -p PASSWORD --host=HOST_NAME/IP_ADDR \
--port=830 --commit
Back to the NSO CLI to upgrade the legacy
juniper-junos NED to the latest version:
$ncs_cli -u admin -Cadmin@ncs#configadmin@ncs(config)#devices device pe2 ssh fetch-host-keysadmin@ncs(config)#devices device pe2 migrate new-ned-id juniper-junos-nc-NED_VERSIONadmin@ncs(config)#devices sync-fromadmin@ncs(config)#end
Turn off autowizard and complete-on-space
to make it possible to paste configs:
admin@ncs#autowizard falseadmin@ncs#complete-on-space false
The example service config for two MPLS VPNs where the endpoints have
been selected to pass through the PE node PE2,
which is a Junos device:
vpn l3vpn ikea as-number 65101 endpoint branch-office1 ce-device ce1 ce-interface GigabitEthernet0/11 ip-network 10.7.7.0/24 bandwidth 6000000 ! endpoint branch-office2 ce-device ce4 ce-interface GigabitEthernet0/18 ip-network 10.8.8.0/24 bandwidth 300000 ! endpoint main-office ce-device ce0 ce-interface GigabitEthernet0/11 ip-network 10.10.1.0/24 bandwidth 12000000 ! qos qos-policy GOLD ! vpn l3vpn spotify as-number 65202 endpoint branch-office1 ce-device ce5 ce-interface GigabitEthernet0/1 ip-network 10.2.3.0/24 bandwidth 10000000 ! endpoint branch-office2 ce-device ce3 ce-interface GigabitEthernet0/4 ip-network 10.4.5.0/24 bandwidth 20000000 ! endpoint main-office ce-device ce2 ce-interface GigabitEthernet0/8 ip-network 10.0.1.0/24 bandwidth 40000000 ! qos qos-policy GOLD !
To verify that the traffic passes through PE2:
admin@ncs(config)# commit dry-run outformat native
Toward the end of this lengthy output, observe that some config
changes are going to the PE2 device using the
http://xml.juniper.net/xnm/1.1/xnm legacy namespace:
device {
name pe2
data <rpc xmlns="urn:ietf:params:xml:ns:netconf:base:1.0" message-id="1">
<edit-config xmlns:nc="urn:ietf:params:xml:ns:netconf:base:1.0">
<target>
<candidate/>
</target>
<test-option>test-then-set</test-option>
<error-option>rollback-on-error</error-option>
<with-inactive xmlns="http://tail-f.com/ns/netconf/inactive/1.0"/>
<config>
<configuration xmlns="http://xml.juniper.net/xnm/1.1/xnm">
<interfaces>
<interface>
<name>xe-0/0/2</name>
<unit>
<name>102</name>
<description>Link to CE / ce5 - GigabitEthernet0/1</description>
<family>
<inet>
<address>
<name>192.168.1.22/30</name>
</address>
</inet>
</family>
<vlan-id>102</vlan-id>
</unit>
</interface>
</interfaces>
...Looks good. Commit to the network:
admin@ncs(config)# commit
Now that the service's configuration is in place using the legacy
juniper-junos NED to configure the PE2
Junos device, proceed and switch to using the
juniper-junos_nc-gen NED with PE2
instead. The service template and Python code will need a few
adaptations.
To keep the NSO service meta-data information intact when
bringing up the service with the new
juniper-junos_nc-gen NED, first
un-deploy the service instances in NSO, only
keeping the configuration on the devices:
admin@ncs(config)# vpn l3vpn * un-deploy no-networking
First, save the legacy Junos non-compliant mode device configuration to later diff against the compliant mode config:
admin@ncs(config)# show full-configuration devices device pe2 config \
configuration | display xml | save legacy.xmlDelete the PE2 configuration in NSO to prepare for retrieving it from the device in a NETCONF/YANG compliant format using the new NED:
admin@ncs(config)#no devices device pe2 configadmin@ncs(config)#commit no-networkingadmin@ncs(config)#endadmin@ncs#exit
Using the Junos CLI:
$ssh USER_NAME@HOST_NAME/IP_ADDRjunos>configurejunos#set system services netconf rfc-compliantjunos#set system services netconf yang-compliantjunos#show system services netconfssh; rfc-compliant; ÿang-compliant; junos#commit
Or using the NSO netconf-console tool:
$ netconf-console -s plain -u USER_NAME -p PASSWORD --host=HOST_NAME/IP_ADDR --port=830 \
--db=candidate
--edit-config=- <<<'<configuration xmlns="http://xml.juniper.net/xnm/1.1/xnm">
<system>
<services>
<netconf>
<rfc-compliant/>
<yang-compliant/>
</netconf>
</services>
</system>
</configuration>'
$ netconf-console -s plain -u USER_NAME -p PASSWORD --host=HOST_NAME/IP_ADDR --port=830 \
--commit
$ncs_cli -u admin -Cadmin@ncs#configadmin@ncs(config)#devices device pe2 device-type generic ned-id juniper-junos_nc-gen-1.0admin@ncs(config)#commitadmin@ncs(config)#end
The juniper-junos_nc-gen NED is delivered
without YANG modules, enabling populating it with device-specific
YANG modules. The YANG modules are retrieved directly from the
Junos device:
$ncs_cli -u admin -Cadmin@ncs#devices device pe2 connectadmin@ncs#devices device pe2 rpc rpc-get-modules get-modulesadmin@ncs#exit
See the juniper-junos_nc-gen
README for more options and details.
Build the YANG modules retrieved from the Junos device with the
juniper-junos_nc-gen NED:
$ make -C packages/juniper-junos_nc-gen-1.0/src
Reload the packages to load the
juniper-junos_nc-gen NED with the added YANG
modules:
$ncs_cli -u admin -Cadmin@ncs#packages reload
admin@ncs# devices device pe2 sync-from
The service must be updated to handle the difference between the Junos device's non-compliant and compliant configuration. The NSO service uses Python code to configure the Junos device using a service template. One way to find the required updates to the template and code is to check the difference between the non-compliant and compliant configurations for the parts covered by the template.
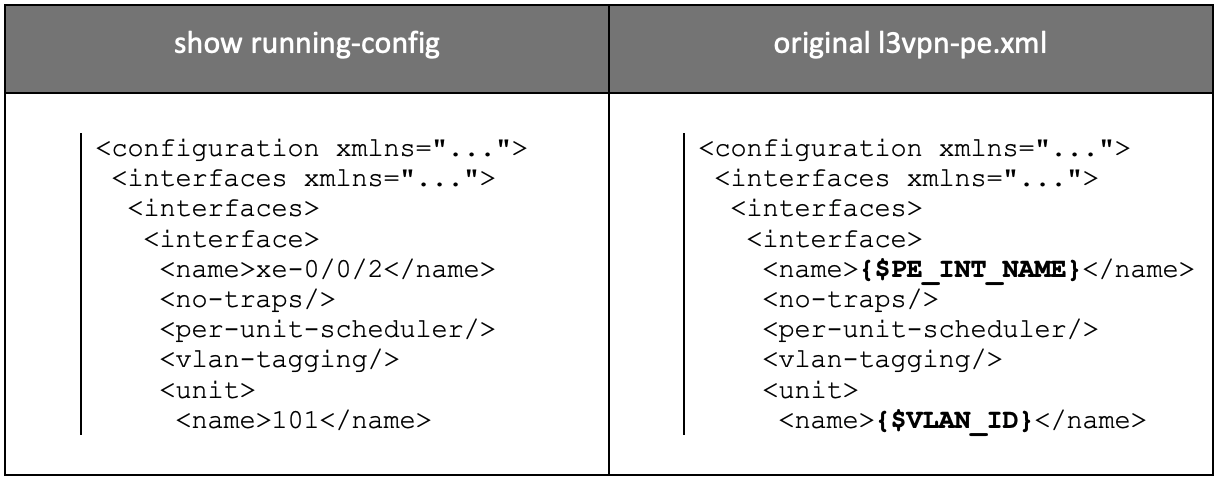 |
Side by side, running config on the left, template on the right.
Checking the
packages/l3vpn/templates/l3vpn-pe.xml service
template Junos device part under the legacy
http://xml.juniper.net/xnm/1.1/xnm namespace, you can
observe that it configures interfaces,
routing-instances, policy-options, and
class-of-service.
You can save the NETCONF/YANG compliant Junos device configuration
and diff it against the non-compliant configuration from the
previously stored legacy.xml file:
admin@ncs# show running-config devices device pe2 config configuration \
| display xml | save new.xml
Examining the difference between the configuration in the
legacy.xml and new.xml files
for the parts covered by the service template:
-
There is no longer a single namespace covering all configurations. The configuration is now divided into multiple YANG modules with a namespace for each.
-
The
/configuration/policy-options/policy-statement/then/communitynode choice identity is no longer provided with a leaf namedkey1. Instead, the leaf name ischoice-ident, and achoice-valueleaf is set. -
The
/configuration/class-of-service/interfaces/interface/unit/shaping-rate/rateleaf format has changed from using anint32value to a string with either no suffix, or a "k", "m" or "g" suffix. This differs from the other devices controlled by the template, so a new templateBW_SUFFIXvariable set from the Python code is needed.
To enable the template to handle a Junos device in NETCONF/YANG
compliant mode, add the following to the
packages/l3vpn/templates/l3vpn-pe.xml service
template:
</interfaces>
</class-of-service>
</configuration>
+
+ <configuration xmlns="http://yang.juniper.net/junos/conf/root" tags="merge">
+ <interfaces xmlns="http://yang.juniper.net/junos/conf/interfaces">
+ <interface>
+ <name>{$PE_INT_NAME}</name>
+ <no-traps/>
+ <vlan-tagging/>
+ <per-unit-scheduler/>
+ <unit>
+ <name>{$VLAN_ID}</name>
+ <description>Link to CE / {$CE} - {$CE_INT_NAME}</description>
+ <vlan-id>{$VLAN_ID}</vlan-id>
+ <family>
+ <inet>
+ <address>
+ <name>{$LINK_PE_ADR}/{$LINK_PREFIX}</name>
+ </address>
+ </inet>
+ </family>
+ </unit>
+ </interface>
+ </interfaces>
+ <routing-instances xmlns="http://yang.juniper.net/junos/conf/routing-instances">
+ <instance>
+ <name>{/name}</name>
+ <instance-type>vrf</instance-type>
+ <interface>
+ <name>{$PE_INT_NAME}.{$VLAN_ID}</name>
+ </interface>
+ <route-distinguisher>
+ <rd-type>{/as-number}:1</rd-type>
+ </route-distinguisher>
+ <vrf-import>{/name}-IMP</vrf-import>
+ <vrf-export>{/name}-EXP</vrf-export>
+ <vrf-table-label>
+ </vrf-table-label>
+ <protocols>
+ <bgp>
+ <group>
+ <name>{/name}</name>
+ <local-address>{$LINK_PE_ADR}</local-address>
+ <peer-as>{/as-number}</peer-as>
+ <local-as>
+ <as-number>100</as-number>
+ </local-as>
+ <neighbor>
+ <name>{$LINK_CE_ADR}</name>
+ </neighbor>
+ </group>
+ </bgp>
+ </protocols>
+ </instance>
+ </routing-instances>
+ <policy-options xmlns="http://yang.juniper.net/junos/conf/policy-options">
+ <policy-statement>
+ <name>{/name}-EXP</name>
+ <from>
+ <protocol>bgp</protocol>
+ </from>
+ <then>
+ <community>
+ <choice-ident>add</choice-ident>
+ <choice-value/>
+ <community-name>{/name}-comm-exp</community-name>
+ </community>
+ <accept/>
+ </then>
+ </policy-statement>
+ <policy-statement>
+ <name>{/name}-IMP</name>
+ <from>
+ <protocol>bgp</protocol>
+ <community>{/name}-comm-imp</community>
+ </from>
+ <then>
+ <accept/>
+ </then>
+ </policy-statement>
+ <community>
+ <name>{/name}-comm-imp</name>
+ <members>target:{/as-number}:1</members>
+ </community>
+ <community>
+ <name>{/name}-comm-exp</name>
+ <members>target:{/as-number}:1</members>
+ </community>
+ </policy-options>
+ <class-of-service xmlns="http://yang.juniper.net/junos/conf/class-of-service">
+ <interfaces>
+ <interface>
+ <name>{$PE_INT_NAME}</name>
+ <unit>
+ <name>{$VLAN_ID}</name>
+ <shaping-rate>
+ <rate>{$BW_SUFFIX}</rate>
+ </shaping-rate>
+ </unit>
+ </interface>
+ </interfaces>
+ </class-of-service>
+ </configuration>
</config>
</device>
</devices>
The Python file changes to handle the new BW_SUFFIX
variable to generate a string with a suffix instead of an
int32:
# of the service. These functions can be useful e.g. for
# allocations that should be stored and existing also when the
# service instance is removed.
+
+ @staticmethod
+ def int32_to_numeric_suffix_str(val):
+ for suffix in ["", "k", "m", "g", ""]:
+ suffix_val = int(val / 1000)
+ if suffix_val * 1000 != val:
+ return str(val) + suffix
+ val = suffix_val
+
@ncs.application.Service.create
def cb_create(self, tctx, root, service, proplist):
# The create() callback is invoked inside NCS FASTMAP and mustCode that uses the function and set the string to the service template:
tv.add('LOCAL_CE_NET', getIpAddress(endpoint.ip_network))
tv.add('CE_MASK', getNetMask(endpoint.ip_network))
+ tv.add('BW_SUFFIX', self.int32_to_numeric_suffix_str(endpoint.bandwidth))
tv.add('BW', endpoint.bandwidth)
tmpl = ncs.template.Template(service)
tmpl.apply('l3vpn-pe', tv)After making the changes to the service template and Python code, reload the updated package(s):
$ncs_cli -u admin -Cadmin@ncs#packages reload
The service instances need to be re-deployed to own the device configuration again:
admin@ncs# vpn l3vpn * re-deploy no-networkingThe service is now in sync with the device configuration stored in NSO CDB:
admin@ncs# vpn l3vpn * check-sync
vpn l3vpn ikea check-sync
in-sync true
vpn l3vpn spotify check-sync
in-sync trueWhen re-deploying the service instances, any issues with the added service template section for the compliant Junos device configuration, such as the added namespaces and nodes, are discovered.
As there is no validation for the rate leaf string with a suffix in the Junos device model, no errors are discovered if it is provided in the wrong format until updating the Junos device. Comparing the device configuration in NSO with the configuration on the device shows such inconsistencies without having to test the configuration with the device:
admin@ncs# devices device pe2 compare-configIf there are issues, correct them and redo the re-deploy no-networking for the service instances.
When all issues have been resolved, the service configuration is in sync with the device configuration, and the NSO CDB device configuration matches to the configuration on the Junos device:
$ncs_cli -u admin -Cadmin@ncs#vpn l3vpn * re-deploy
The NSO service instances are now in sync with the configuration
on the Junos device using the
juniper-junos_nc-gen NED.