This documentation corresponds to an older version of the product, is no longer updated, and may contain outdated information.
Please access the latest versions from https://cisco-tailf.gitbook.io/nso-docs and update your bookmarks. OK
Throughout this section we will use the
examples.ncs/service-provider/mpls-vpn
example. The example network consists of Cisco ASR 9k and
Juniper core routers (P and PE) and Cisco IOS based CE routers.
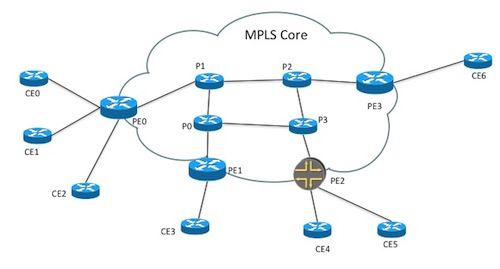 |
NSO Example network
The NSO device manager is the centre of NSO. The device manager maintains a flat list of all managed devices. NSO keeps the primary copy of the configuration for each managed device in CDB. Whenever a configuration change is done to the list of device configuration primary copies, the device manager will partition this "network configuration change" into the corresponding changes for the actual managed devices. The device manager passes on the required changes to the NEDs, Network Element Drivers. A NED needs to be installed for every type of device OS, like Cisco IOS NED, Cisco XR NED, Juniper JUNOS NED etc. The NEDs communicate through the native device protocol southbound. The NEDs falls into the following categories:
-
NETCONF capable device. The Device Manager will produce NETCONF
edit-configRPC operations for each participating device. -
SNMP device. The Device Manager translates the changes made to the configuration into the corresponding SNMP SET PDUs
-
Device with Cisco CLI. The device has a CLI with the same structure as Cisco IOS or XR routers. The Device Manager and a CLI NED is used to produce the correct sequence of CLI commands which reflects the changes made to the configuration.
-
Other devices Devices which do not fit into any of the above mentioned categories a corresponding Generic NED is invoked. Generic NEDs are used for proprietary protocols like REST and for CLI flavours that are not resembling IOS or XR. The Device Manager will inform the Generic NED about the made changes and the NED will translate these to the appropriate operations toward the device.
NSO orchestrates an atomic transaction that has the very desirable characteristic of either the transaction as a whole ends up on all participating devices and in the NSO primary copy, or alternatively the whole transaction is aborted and all changes are automatically rolled-back.
The architecture of the NETCONF protocol is the enabling technology making it possible to push out configuration changes to managed devices and then in the case of other errors, roll back changes. Devices that do not support NETCONF, i.e., devices that do not have transactional capabilities can also participate, however depending on the device, error recovery may not be as good as it is for a proper NETCONF enabled device.
In order to understand the main idea behind the NSO device manager it is necessary to understand the NSO data model and how NSO incorporates the YANG data models from the different managed devices.
The NEDs will publish YANG data models even for non-NETCONF devices. In case of SNMP the YANG models are generated from the MIBs. For JunOS devices the JunOS NED generates a YANG from the JunOS XML Schema. For Schema-less devices like CLI devices the NED developer writes YANG models corresponding to the CLI structure. The result of this is the device manager and NSO CDB has YANG data models for all devices independent of underlying protocol.
The central part of the NSO YANG model,
in the file tailf-ncs-devices.yang,
has the following structure:
submodule tailf-ncs-devices {
  belongs-to tailf-ncs {
    prefix ncs;
  }
  ...
  container devices {
    ......
    list device {
      key name;

      description
        "This list contains all devices managed by NCS.";

      leaf name {
        type string;
        description
          "A string uniquely identifying the managed device.";
      }

      leaf address {
        type inet:host;
        mandatory true;
        description
          "IP address or host name for the management interface on
           the device.";
      }
      leaf port {
        type inet:port-number;
        description
          "Port for the management interface on the device.  If this leaf
           is not configured, NCS will use a default value based on the
           type of device.  For example, a NETCONF device uses port 830,
           a CLI device over SSH uses port 22, and a SNMP device uses
           port 161.";
      }
      ....
      leaf authgroup {
        ....
      }
      container device-type {
      .......
      container config {
         ...
      }
  }
}
Each managed device is uniquely identified by its name, which is
a free form text string. This is typically the DNS name of
the managed device but could equally well be the string format
of the IP address of the managed device or anything else.
Furthermore, each managed device has a mandatory address/port
pair that together with the authgroup leaf provides
information to NSO how to connect and authenticate over
SSH/NETCONF to the device. Each device also has a mandatory
parameter device-type that specifies which
southbound protocol to use for communication with the device.
The following device types are available:
-
NETCONF
-
CLI - a corresponding CLI NED is needed to communicate with the device. This requires YANG models with the appropriate annotations for the device CLI.
-
SNMP - The device speaks SNMP, preferably in read-write mode.
-
Generic NED - a corresponding Generic NED is needed to communicate with the device. This requires YANG models and Java code.
The NSO CLI command below lists the NED types for the devices in the example network.
ncs(config)# show full-configuration devices device device-type
devices device ce0
 device-type cli ned-id cisco-ios-cli-3.8
!
...
devices device p0
 device-type cli ned-id cisco-iosxr-cli-3.5
!
devices device p1
 device-type cli ned-id cisco-iosxr-cli-3.5
!
...
devices device pe2
 device-type netconf ned-id juniper-junos-nc-3.0
!
The empty container /ncs:devices/device/config is used
as a mount point for the YANG models from the different managed
devices.
As previously mentioned, NSO needs the following information in order to manage a device:
-
The IP/Port of the device and authentication information.
-
Some or all of the YANG data models for the device.
In the example setup, the address and authentication information is provided in the NSO database (CDB) initialization file. There are many different ways to add new managed devices. Actually, all of the NSO northbound interfaces can be used to manipulate the set of managed devices. This will be further described later.
Once NSO has started you can inspect the meta information for the managed devices through the NSO CLI. This is an example session:
ncs(config)# show full-configuration devices device
devices device ce0
 address   127.0.0.1
 port      10022
 ssh host-key ssh-dss
 ...
 authgroup default
 device-type cli ned-id cisco-ios-cli-3.8
 state admin-state unlocked
 config
 ...
 !
!
devices device ce1
 address   127.0.0.1
 port      10023
 ssh host-key ssh-dss
...
 !
 authgroup default
 device-type cli ned-id cisco-ios-cli-3.8
 state admin-state unlocked
 config
 ...
 !
!
Or alternatively, this information could be retrieved from the NSO northbound NETCONF interface by running the simple Python based netconf-console program towards the NSO NETCONF server.
$ netconf-console --get-config -x "/devices/device[name='ce0']"
<?xml version="1.0" encoding="UTF-8"?>
<rpc-reply xmlns="urn:ietf:params:xml:ns:netconf:base:1.0" message-id="1">
  <data>
    <devices xmlns="http://tail-f.com/ns/ncs">
      <device>
        <name>ce0</name>
        <address>127.0.0.1</address>
        <port>10022</port>
        <ssh>
          <host-key>
            <algorithm>ssh-dss</algorithm>

            ...

        <authgroup>default</authgroup>
        <device-type>
          <cli>
          <ned-id xmlns:cisco-ios-cli-3.8="http://tail-f.com/ns/ned-id/cisco-ios-cli-3.8">
            cisco-ios-cli-3.8:cisco-ios-cli-3.8
          </ned-id>
          </cli>
        </device-type>
        <state>
          <admin-state>unlocked</admin-state>
        </state>
        <config>

        ...

        </config>
      </device>
    </devices>
  </data>
</rpc-reply>
All devices in Example 2, “Show device configuration in NSO CLI”
and Example 3, “Show device configuration in NETCONF” have
/devices/device/state/admin-state set to unlocked,
this will be described later in this chapter.
In order to communicate with a managed device, a NED for that device type needs to be loaded by NSO. A NED contains the YANG model for the device and corresponding driver code to talk CLI, REST, SNMP, etc. NEDs are distributed as packages.
ncs# show packages
packages package cisco-ios-cli-3.8
 package-version 3.8.0.1
 description     "NED package for Cisco IOS"
 ncs-min-version [ 3.2.2 3.3 3.4 ]
 directory       ./state/packages-in-use/1/cisco-ios-cli-3.8
 component IOSDp2
  callback java-class-name [ com.tailf.packages.ned.ios.IOSDp2 ]
 component IOSDp
  callback java-class-name [ com.tailf.packages.ned.ios.IOSDp ]
 component cisco-ios
  ned cli ned-id  cisco-ios-cli-3.8
  ned cli java-class-name com.tailf.packages.ned.ios.IOSNedCli
  ned device vendor Cisco
 ...
 oper-status up
packages package cisco-iosxr-cli-3.5
 package-version 3.5.0.7
 description     "NED package for Cisco IOS XR"
 ncs-min-version [ 3.2.2 3.3 ]
 directory       ./state/packages-in-use/1/cisco-iosxr-cli-3.5
 component cisco-ios-xr
  ned cli ned-id  cisco-iosxr-cli-3.5
  ned cli java-class-name com.tailf.packages.ned.iosxr.IosxrNedCli
  ned device vendor Cisco
 ...
 oper-status up
packages package juniper-junos-nc-3.0
 package-version 3.0.14.2
 description     "NED package for all JunOS based Juniper routers"
 ncs-min-version [ 3.0.0.1 3.1 3.2 3.3 3.4 ]
 directory       ./state/packages-in-use/1/juniper-junos-nc-3.0
 component junos
  ned netconf ned-id juniper-junos-nc-3.0
  ned device vendor Juniper
 oper-status up
 ...
The CLI command in Example 4, “Installed Packages”
shows all the loaded packages. NSO loads
packages at startup and can reload packages at run-time. By
default the packages reside in the packages
directory in the NSO run-time directory.
$ls -l $NCS_DIR/examples.ncs/service-provider/mpls-vpntotal 160 ... drwxr-xr-x 8 stefan staff 272 Oct 1 16:57 packages ... $ls -l $NCS_DIR/examples.ncs/service-provider/mpls-vpn/packagestotal 24 cisco-ios cisco-iosxr juniper-junos ...
Once you have access to the network information for a managed device, its IP address and authentication information, as well as the data models of the device, you can actually manage the device from NSO.
You start the ncs daemon in a terminal like:
% ncs
Which is the same as, NSO loads it config from a ncs.conf file
% ncs -c ./ncs.conf
During development it is sometimes convenient to run ncs in the foreground as:
% ncs -c ./ncs.conf --foregound --verboseOnce the daemon is running you can issue the command:
% ncs --status
vsn: 7.1
SMP support: yes, using 8 threads
Using epoll: yes
available modules: backplane,netconf,cdb,cli,snmp,webui
...
... lots of output
To get more information about options to ncs do:
% ncs --help
The ncs --status command produces a lengthy list describing for example which YANG modules are loaded in the system. This is a valuable debug tool.
The same information is also available in the NSO CLI (and thus through all available northbound interfaces, including Maapi for Java programmers)
ncs# show ncs-state
ncs-state version 7.1
ncs-state smp number-of-threads 8
ncs-state epoll true
ncs-state daemon-status started
...When the NSO daemon is running and has been initialized with IP/Port and authentication information as well as imported all modules you can start to manage devices through NSO.
NSO provides the ability to synchronize the configuration to or from the device. If you know that the device has the correct configuration you can choose to synchronize from a managed device whereas if you know NSO has the correct device configuration and the device is incorrect, you can choose to synchronize from NSO to the device.
In the normal case, the configuration on the device and the copy of the configuration inside NSO should be identical.
In a cold start situation like in the mpls-vpn example, where NSO is empty and there are network devices to talk to, it makes sense to synchronize from the devices. You can choose to synchronize from one device at a time or from all devices at once. Here is a CLI session to illustrate this.
ncs(config)#devices sync-fromsync-result { device ce0 result true } sync-result { device ce1 result true } sync-result { device ce2 result true ... ncs(config)#show full-configuration devices device ce0devices device ce0 ... config no ios:service pad no ios:ip domain-lookup no ios:ip http secure-server ios:ip source-route ios:interface GigabitEthernet0/1 exit ios:interface GigabitEthernet0/10 exit ios:interface GigabitEthernet0/11 exit ... [ok][2010-04-13 16:29:15]
The command devices sync-from, in Example 5, “Synchronize from Devices”, is an action that is defined in the NSO data model. It is important to understand the model-driven nature of NSO. All devices are modeled in YANG, network services like MPLS VPN are also modeled in YANG, and the same is true for NSO itself. Anything that can be performed over the NSO CLI or any north-bound is defined in the YANG files. The NSO YANG files are located here:
$ls $NCS_DIR/src/ncs/yang/
All packages comes with YANG files as well. For example the
directory packages/cisco-ios/src/yang/
contains the YANG definition of an IOS device.
The tailf-ncs.yang is the main part of the NSO
YANG data model. The file mode tailf-ncs.yang
includes all parts of the model from different files.
The actions sync-from and sync-to
are modeled in the file tailf-ncs-devices.yang.
The sync action(s) are defined as:
  grouping sync-from-output {
    list sync-result {
      key device;
      leaf device {
        type leafref {
          path "/devices/device/name";
        }
      }
      uses sync-result;
    }
  }

  grouping sync-result {
    description
      "Common result data from a 'sync' action.";

    choice outformat {
      leaf result {
        type boolean;
      }
      anyxml result-xml;
      leaf cli {
        tailf:cli-preformatted;
        type string;
      }
    }
    leaf info {
      type string;
      description
        "If present, contains additional information about the result.";
    }
  }

  ...

  container devices {

    ...

    tailf:action sync-from {
      description
        "Synchronize the configuration by pulling from all unlocked
         devices.";
      tailf:info "Synchronize the config by pulling from the devices";
      tailf:actionpoint ncsinternal {
        tailf:internal;
      }
      input {
        leaf suppress-positive-result {
          type empty;
          description
            "Use this additional parameter to only return
             devices that failed to sync.";
        }
        container dry-run {
          presence "";
          leaf outformat {
            type outformat2;
            description
              "Report what would be done towards CDB, without
               actually doing anything.";
          }
        }
      }
      output {
        uses sync-from-output;
      }
    }

    ...

    tailf:action sync-to {
      ...
    }

    ...

    list device {
      description
        "This list contains all devices managed by NCS.";

      key name;

      leaf name {
        description "A string uniquely identifying the managed device";
        type string;
      }

      ...

      tailf:action sync-from {
        description
          "Synchronize the configuration by pulling from the device.";
        tailf:info "Synchronize the config by pulling from the device";
        tailf:actionpoint ncsinternal {
          tailf:internal;
        }
        input {
          container dry-run {
            presence "";
            leaf outformat {
              type outformat2;
              description
                "Report what would be done towards CDB, without
                 actually doing anything.";
            }
          }
        }
        output {
          uses sync-result;
        }
      }
      tailf:action sync-to {

      ...
Synchronizing from NSO to the device is common when a device has been configured out-of-band. NSO has no means to enforce that devices are not directly reconfigured behind the scenes of NSO; however, once a out-of-band configuration has been performed, NSO has the ability to detect the fact. When this happens it may (or may not, depending on the situation at hand) make sense to synchronize from NSO to the device, i.e. undo the rogue reconfigurations.
The command to do that is:
ncs# devices device ce0 sync-to
result true
A dry-run option is available for the
action sync-to.
ncs# devices device ce0 sync-to dry-run
data {
    ...
}
This makes it possible to investigate the changes before they are transmitted to the devices.
It is possible to synchronize a part of the configuration (a certain subtree) from the device using the partial-sync-from action located under /devices. While it it primarily intended to be used by service developers as described in the section called “Partial Sync” in Development Guide, it is also possible to use directly from the NSO CLI (or any other northbound interface). Example 7, “Example of running partial-sync-from action via CLI” illustrates using this action via CLI, using "router" device from examples.ncs/getting-started/developing-with-ncs/0-router-network.
$ncs_cli -C -u adminncs#devices partial-sync-from path [ \ /devices/device[name='ex0']/config/r:sys/interfaces/interface[name='eth0'] \ /devices/device[name='ex1']/config/r:sys/dns/server ]sync-result { device ex0 result true } sync-result { device ex1 result true } ncs#show running-config devices device ex0..1 configdevices device ex0 config r:sys interfaces interface eth0 unit 0 enabled ! unit 1 enabled ! unit 2 enabled description "My Vlan" vlan-id 18 ! ! ! ! devices device ex1 config r:sys dns server 10.2.3.4 ! ! !
It is now possible to configure several devices through the NSO inside the same network transaction. To illustrate this start the NSO CLI from a terminal application.
$ncs_cli -C -u adminncs#configEntering configuration mode terminal ncs(config)#devices device pe1 config cisco-ios-xr:snmp-server \ community public ROncs(config-config)#topncs(config)#devices device ce0 config ios:snmp-server community public ROncs(config-config)#devices device pe2 config junos:configuration \ snmp community public view ROncs(config-community-public)#topncs(config)#show configurationdevices device ce0 config ios:snmp-server community public RO ! ! devices device pe1 config cisco-ios-xr:snmp-server community public RO ! ! devices device pe2 config ! first junos:configuration snmp community public view RO ! ! ! ncs(config)#commit dry-run outformat nativenative { device { name ce0 data snmp-server community public RO } device { name pe1 data snmp-server community public RO } device { name pe2 data <rpc xmlns="urn:ietf:params:xml:ns:netconf:base:1.0" message-id="1"> <edit-config xmlns:nc="urn:ietf:params:xml:ns:netconf:base:1.0"> <target> <candidate/> </target> <test-option>test-then-set</test-option> <error-option>rollback-on-error</error-option> <config> <configuration xmlns="http://xml.juniper.net/xnm/1.1/xnm"> <snmp> <community> <name>public</name> <view>RO</view> </community> </snmp> </configuration> </config> </edit-config> </rpc> } } ncs(config)#commit
The Example 8, “Configure Devices” illustrates a multi host transaction. In the same transaction three hosts were re-configured. Had one of them failed, or been non-operational, the transaction as a whole would have failed.
As seen from the output of the command commit dry-run outformat native, NSO generates the native CLI and NETCONF commands which will be sent to each device when the transaction is committed.
Since the /devices/device/config path contains
different models depending on the augmented device model NSO
uses the data model prefix in the CLI names; ios,
cisco-ios-xr and junos.
Different data models might use the same name for elements
and the prefix avoids name clashes.
NSO uses different underlying techniques to implement the atomic transactional behaviour in case of any error. NETCONF devices are straight-forward using confirmed commit. For CLI devices like IOS NSO calculates the reverse diff to restore the configuration to the state before the transaction was applied.
Each managed device needs to be configured with the IP address and the port where the CLI, NETCONF server etc of the managed device listens for incoming requests.
Connections are established on demand as they are needed. It is possible to explicitly establish connections, but that functionality is mostly there for troubleshooting connection establishment. We can for example do:
ncs# devices connect
connect-result {
    device ce0
    result true
    info (admin) Connected to ce0 - 127.0.0.1:10022
}
connect-result {
    device ce1
    result true
    info (admin) Connected to ce1 - 127.0.0.1:10023
}
...
We were able to connect to all managed devices. It is also possible to explicitly attempt to test connections to individual managed devices:
ncs# devices device ce0 connect
result true
info (admin) Connected to ce0 - 127.0.0.1:10022
Established connections are typically not closed right away when not needed, but rather pooled according to the rules described in the section called “Device Session Pooling”. This applies to NETCONF sessions as well as sessions established by CLI or generic NEDs via a connection-oriented protocol. In addition to session pooling, underlying SSH connections for NETCONF devices are also reused. Note that a single NETCONF session occupies one SSH channel inside an SSH connection, so multiple NETCONF sessions can co-exist in a single connection. When an SSH connection has been idle (no SSH channels open) for 2 minutes, the SSH connection is closed. If a new connection is needed later, a connection is established on demand.
There are three configuration parameters which can be used to
control the connection establishment, connect-timeout,
read-timeout and write-timeout.
In the NSO data model file tailf-ncs-devices.yang
these timeouts are modeled as:
submodule tailf-ncs-devices {
  ...
  container devices {
    ...
    grouping timeouts {
      description
        "Timeouts used when communicating with a managed device.";

      leaf connect-timeout {
        type uint32;
        units "seconds";
        description
          "The timeout in seconds for new connections to managed
           devices.";
      }
      leaf read-timeout {
        type uint32;
        units "seconds";
        description
          "The timeout in seconds used when reading data from a
           managed device.";
      }
      leaf write-timeout {
        type uint32;
        units "seconds";
        description
          "The timeout in seconds used when writing data to a
           managed device.";
      }
    }
    ...
    container global-settings {
      ...
      uses timeouts {
        description
          "These timeouts can be overridden per device.";

        refine connect-timeout {
          default 20;
        }
        refine read-timeout {
          default 20;
        }
        refine write-timeout {
          default 20;
        }
      }
      ....
Thus to change these parameters (globally for all managed devices) you do:
ncs(config)#devices global-settings connect-timeout 30ncs(config)#devices global-settings read-timeout 30ncs(config)#commit
Or, to use a profile:
ncs(config)#devices profiles profile slow-devices connect-timeout 60ncs(config-profile-slow-devices)#read-timeout 60ncs(config-profile-slow-devices)#write-timeout 60ncs(config-profile-slow-devices)#commitncs(config)#devices device ce3 device-profile slow-devicesncs(config-device-ce3)#commit
When NSO connects to a managed device, it requires authentication information for that device. The authgroups are modeled in the NSO data model:
submodule tailf-ncs-devices {
  ...
  container devices {
    ...

    container authgroups {
      description
        "Named authgroups are used to decide how to map a local NCS user to
         remote authentication credentials on a managed device.

         The list 'group' is used for NETCONF and CLI managed devices.

         The list 'snmp-group' is used for SNMP managed devices.";

      list group {
        key name;

        description
          "When NCS connects to a managed device, it locates the
           authgroup configured for that device.  Then NCS looks up
           the local NCS user name in the 'umap' list.  If an entry is
           found, the credentials configured is used when
           authenticating to the managed device.

           If no entry is found in the 'umap' list, the credentials
           configured in 'default-map' are used.

           If no 'default-map' has been configured, and the local NCS
           user name is not found in the 'umap' list, the connection
           to the managed device fails.";

        grouping remote-user-remote-auth {
          description
            "Remote authentication credentials.";

          choice login-credentials {
            mandatory true;
            case stored {
              choice remote-user {
                mandatory true;
                leaf same-user {
                  type empty;
                  description
                    "If this leaf exists, the name of the local NCS user is used
                     as the remote user name.";
                }
                leaf remote-name {
                  type string;
                  description
                    "Remote user name.";
                }
              }

              choice remote-auth {
                mandatory true;
                leaf same-pass {
                  type empty;
                  description
                    "If this leaf exists, the password used by the local user
                     when logging in to NCS is used as the remote password.";
                }
                leaf remote-password {
                  type tailf:aes-256-cfb-128-encrypted-string;
                  description
                    "Remote password.";
                }
                case public-key {
                  uses public-key-auth;
                }
              }
              leaf remote-secondary-password {
                type tailf:aes-256-cfb-128-encrypted-string;
                description
                  "Some CLI based devices require a second
                   additional password to enter config mode";
              }
            }
            case callback {
              leaf callback-node {
                description
                  "Invoke a standalone action to retrieve login credentials for
                  managed devices on the 'callback-node' instance.

                  The 'action-name' action is invoked on the callback node that
                  is specified by an instance identifer.";
                mandatory true;
                type instance-identifier;
              }
              leaf action-name {
                description
                  "The action to call when a notification is received.

                  The action must use 'authgroup-callback-input-params'
                  grouping for input and 'authgroup-callback-output-params'
                  grouping for output from tailf-ncs-devices.yang.";
                type yang:yang-identifier;
                mandatory true;
                tailf:validate ncs {
                   tailf:internal;
                   tailf:dependency "../callback-node";
                }
              }
            }
          }
        }

        grouping mfa-grouping {
          container mfa {
            presence "MFA";
            description
              "Settings for handling multi-factor authentication towards
               the device";
            leaf executable {
              description "Path to the external executable handling MFA";
              type string;
              mandatory true;
            }
            leaf opaque {
              description
                "Opaque data for the external MFA executable.
                 This string will be base64 encoded and passed to the MFA
                 executable along with other parameters";
              type string;
            }
          }
        }

        leaf name {
          type string;
          description
            "The name of the authgroup.";
        }

        container default-map {
          presence "Map unknown users";
          description
            "If an authgroup has a default-map, it is used if a local
             NCS user is not found in the umap list.";
          tailf:info "Remote authentication parameters for users not in umap";
          uses remote-user-remote-auth;
          uses mfa-grouping;
        }

        list umap {
          key local-user;
          description
            "The umap is a list with the local NCS user name as key.
             It maps the local NCS user name to remote authentication
             credentials.";
          tailf:info "Map NCS users to remote authentication parameters";
          leaf local-user {
            type string;
            description
              "The local NCS user name.";
          }
          uses remote-user-remote-auth;
          uses mfa-grouping;
        }
      }
Each managed device must refer to a named authgroup. The purpose of an authgroup is to map local users to remote users together with the relevant SSH authentication information.
Southbound authentication can be done in two ways. One is to configure stored user and credential components as shown in Example 10, “Configured authgroup” and Example 11, “authgroup default-map”. The other way is to configure a callback to retrieve user and credentials on demand as shown in Example 13, “authgroup-callback”.
ncs(config)# show full-configuration devices authgroups
devices authgroups group default
 umap admin
  remote-name     admin
  remote-password $4$wIo7Yd068FRwhYYI0d4IDw==
 !
 umap oper
  remote-name     oper
  remote-password $4$zp4zerM68FRwhYYI0d4IDw==
 !
!
devices authgroups snmp-group default
 default-map community-name public
 umap admin
  usm remote-name admin
  usm security-level auth-priv
  usm auth md5 remote-password $4$wIo7Yd068FRwhYYI0d4IDw==
  usm priv des remote-password $4$wIo7Yd068FRwhYYI0d4IDw==
 !
!
In Example 10, “Configured authgroup”
in the authgroup named default the two local users
oper and admin shall use the remote users name
oper and admin respectively with identical
passwords.
Inside an authgroup, all local users need to be enumerated.
Each local user name must have credentials configured which should
be used for the remote host.
In centralized AAA environments this is usually a bad strategy.
You may also choose to instantiate a default-map.
If you do that it probably only makes sense to specify
the same user name/password pair should be used remotely as the
pair that was used to log into NSO.
ncs(config)#devices authgroups group default default-map same-user same-passncs(config-group-default)#commitCommit complete. ncs(config-group-default)#topncs(config)#show full-configuration devices authgroupsdevices authgroups group default default-map same-user default-map same-pass umap admin remote-name admin remote-password $4$wIo7Yd068FRwhYYI0d4IDw== ! umap oper remote-name oper remote-password $4$zp4zerM68FRwhYYI0d4IDw== ! ! devices authgroups snmp-group default default-map community-name public umap admin usm remote-name admin usm security-level auth-priv usm auth md5 remote-password $4$wIo7Yd068FRwhYYI0d4IDw== usm priv des remote-password $4$wIo7Yd068FRwhYYI0d4IDw== ! !
In Example 10, “Configured authgroup”
only two users admin and oper were
configured.
If the default-map in
Example 11, “authgroup default-map” is
configured all local users not found in the umap list
will end up in the default-map.
For example if user rocky logs in
to NSO with password "secret". Since NSO has a built-in SSH server
and also a built-in HTTPS server, NSO will be able to pick up the
clear text passwords and can then reuse the same password when NSO
attempts to establish southbound SSH connections.
The user rocky will end up in the
default-map and when NSO attempts to propagate
rocky's changes towards the managed devices, NSO will use the
remote user name rocky with whatever password
rocky used to log into NSO.
Authenticating southbound using stored configuration has two main components to define remote user and remote credentials. This is defined by the authgroup. As for southbound user, there exist two options, the same user logged in to NSO or another user, as specified in the authgroup. As for the credentials, there are three options.
-
Regular password.
-
Public key. This means that a private key, either from a file in the user's SSH key directory, or one that is configured in the /ssh/private-key list in the NSO configuration, is used for authentication. Refer to the section called “Publickey Authentication” for the details of how the private key is selected.
-
Finally, an interesting option is to use the 'same-pass' option. Since NSO runs its own SSH server and its own SSL server, NSO can pick up the password of a user in clear text. Hence, if the 'same-pass' option is chosen for an authgroup, NSO will reuse the same password when attempting to connect southbound to a managed device.
NSO can connect to a device that is using multi-factor
authentication. For this, the authgroup must be configured
with an executable for handling the keyboard-interactive part, and
optionally some opaque data that is passed to the executable. ie., the
/devices/authgroups/group/umap/mfa/executable and
/devices/authgroups/group/umap/mfa/opaque (or under
default-map for users that are not in umap) must
be configured.
The prompts from the SSH server (including the password prompt and
any additional challenge prompts) are passed to the stdin
of the executable along with some other relevant data. The executable
must write a single line to it's stdout as the reply
to the prompt. This is the reply that NSO sends to the SSH server.
admin@ncs(config)#devices authgroups group mfa umap adminadmin@ncs(config-umap-admin)#remote-name admin remote-password(<AES encrypted string>):*********admin@ncs(config-umap-admin)#mfa executable ./handle_mfa.py opaque foobaradmin@ncs(config-umap-admin)#commitCommit complete.
For example, with the above configured for the authgroup, if the
user admin is trying to login to the device
dev0 with password admin,
this is the line that is sent to the stdin of the
handle_mfa.py script:
[ZGV2MA==;YWRtaW4=;YWRtaW4=;Zm9vYmFy;;;YWRtaW5AbG9jYWxob3N0J3MgcGFzc3dvcmQ6IA==;]
The input to the script is the device, username, password, opaque data and the name, instruction and prompt from the SSH server. All these fields are base64 encoded, and separated by semi-colon (';'). So, the above line sent to the script is in effect:
[dev0;admin;admin;foobar;;;admin@localhost's password:;]
This small Python program can be used to implement this keyboard-interactive authentication towards a device.
      #!/usr/bin/env python3
      import base64
      line = input()
      (device, user, passwd, opaque, name, instr, prompt, _) = map(
              lambda x: base64.b64decode(x).decode('utf-8'),
              line.strip('[]').split(';'))
      if prompt == "admin@localhost's password: ":
          print(passwd)
      elif prompt == "Enter SMS passcode:":
          print("secretSMScode")
      else:
          print("2")
This script will thus be invoked with the above fields for every prompt from the server, and the corresponding output from the script will be sent as the reply to the server.
In case of authenticating southbound using a callback, remote user and
remote credentials are obtained by an action invocation. The action is
defined by the callback-node and action-name as in
Example 13, “authgroup-callback” and
supported credentials are remote password and optionally a secondary
password for the provided local user, authgroup and device.
With remote passwords, you may encounter issues if you use special characters,
such as quotes (") and backslash (\) in your
password. See the section called “Configure mode” for recommendations
on how to avoid running into password issues.
ncs(config)#devices authgroups group default umap operncs(config-umap-oper)#callback-node /callback action-name auth-cbncs(config-group-oper)#commitCommit complete. ncs(config-group-oper)#topncs(config)#show full-configuration devices authgroupsdevices authgroups group default default-map same-user default-map same-pass umap admin remote-name admin remote-password $4$wIo7Yd068FRwhYYI0d4IDw== ! umap oper callback-node /callback action-name auth-cb ! ! devices authgroups snmp-group default default-map community-name public umap admin usm remote-name admin usm security-level auth-priv usm auth md5 remote-password $4$wIo7Yd068FRwhYYI0d4IDw== usm priv des remote-password $4$wIo7Yd068FRwhYYI0d4IDw== ! !
module authgroup-callback {
  namespace "http://com/example/authgroup-callback";
  prefix authgroup-callback;

  import tailf-common {
    prefix tailf;
  }

  import tailf-ncs {
    prefix ncs;
  }

  container callback {
    description
      "Example callback that defines an action to retrieve
       remote authentication credentials";
    tailf:action auth-cb {
      tailf:actionpoint auth-cb-point;
      input {
        uses ncs:authgroup-callback-input-params;
      }
      output {
        uses ncs:authgroup-callback-output-params;
      }
    }
  }
}
In Example 13, “authgroup-callback”,
configuration for the umap entry of the oper user is changed
to use a callback to retrieve southbound authentication credentials.
Thus, NSO is going to invoke the action auth-cb
defined in the callback-node callback.
The callback-node is of type instance-identifier and
refers to the container called callback defined in
Example 14, “authgroup-callback.yang”, which
includes an action defined by action-name auth-cb and
uses groupings authgroup-callback-input-params and
authgroup-callback-output-params for input and output
parameters respectively.
In Example 13, “authgroup-callback”,
authgroup-callback module was loaded in NSO within an
example package. Package development and action callbacks are not
described here but more can be read in
Package Development
in Development Guide,
the section called “DP API” in Development Guide and
Python API Overview
in Development Guide.
Authentication groups and the functionality it brings comes with some limitations on where and how it is used.
-
Callback option that enables authgroup-callback feature is not applicable for members of snmp-group list.
-
Generic devices that implement own authentication scheme are not using any mapping or callback functionality provided by Authgroups.
-
Cluster nodes use their own Authgroups and mapping model thus functionality differ, e.g callback option is not applicable.
Opening a session towards a managed device is potentially time and resource consuming. Also, the probability that a recently accessed device is still subject to further request is reasonably high. These are motives for having a managed devices session pool in NSO.
The NSO device session pool is by default active and normally needs no maintenance. However under certain circumstances there might be of interest to modify its behaviour. Examples can be when some device type has characteristics that makes session pooling undesired, or when connections to a specific device is very costly and therefore the time that open sessions can stay in the pool should increase.
Note
Changes from the default configuration of the NSO session pool should only be performed when absolutely necessary and when all effects of the change are understood.
NSO presents operational data that represent the current state of the session pool. To visualize this we use the CLI to connect to NSO and force connection to all known devices:
$ncs_cli -C -u adminadmin connected from 127.0.0.1 using console on ncs ncs#devices connect suppress-positive-result
We can now list all open sessions in the session-pool. But note that this is a live pool. Sessions will only remain open for a certain amount of time, the idle-time.
ncs# show devices session-pool
        DEVICE            MAX        IDLE
DEVICE  TYPE    SESSIONS  SESSIONS   TIME
-------------------------------------------
ce0     cli     1         unlimited  30
ce1     cli     1         unlimited  30
ce2     cli     1         unlimited  30
ce3     cli     1         unlimited  30
ce4     cli     1         unlimited  30
ce5     cli     1         unlimited  30
pe0     cli     1         unlimited  30
pe1     cli     1         unlimited  30
pe2     cli     1         unlimited  30
In addition to the idle-time for sessions we can also see the type of device, current number of pooled sessions and maximum number of pooled session.
We can close pooled sessions for specific devices.
ncs#devices session-pool pooled-device pe0 closencs#devices session-pool pooled-device pe1 closencs#devices session-pool pooled-device pe2 closencs#show devices session-poolDEVICE MAX IDLE DEVICE TYPE SESSIONS SESSIONS TIME ------------------------------------------- ce0 cli 1 unlimited 30 ce1 cli 1 unlimited 30 ce2 cli 1 unlimited 30 ce3 cli 1 unlimited 30 ce4 cli 1 unlimited 30 ce5 cli 1 unlimited 30
And we can close all pooled sessions in the session pool.
ncs#devices session-pool closencs#show devices session-pool% No entries found.
The session pool configuration is found in the tailf-ncs-devices.yang submodel. The following part of the YANG device-profile-parameters grouping controls how the session pool is configured:
grouping device-profile-parameters {

  ...

    container session-pool {
      tailf:info "Control how sessions to related devices can be pooled.";
      description
        "NCS uses NED sessions when performing transactions, actions
         etc towards a device. When such a task is completed the NED
         session can either be closed or pooled.

         Pooling a NED session means that the session to the
         device is kept open for a configurable amount of
         time. During this time the session can be re-used for a new
         task. Thus the pooling concept exists to reduce the number
         of new connections needed towards a device that is often
         used.

         By default NCS uses pooling for all device types except
         SNMP. Normally there is no need to change the default
         values.";

      leaf max-sessions {
        type union {
          type enumeration {
            enum unlimited;
          }
          type uint32;
        }
        description
          "Controls the maximum number of open sessions in the pool for
           a specific device. When this threshold is exceeded the oldest
           session in the pool will be closed.
           A Zero value will imply that pooling is disabled for
           this specific device. The label 'unlimited' implies that no
           upper limit exists for this specific device";
      }

      leaf idle-time {
        tailf:info
          "The maximum time that a session is kept open in the pool";
        type uint32 {
          range "1 .. max";
        }
        units "seconds";
        description
          "The maximum time that a session is kept open in the pool.
           If the session is not requested and used before the
           idle-time has expired, the session is closed.
           If no idle-time is set the default is 30 seconds.";
      }
    }
  }
}
This grouping can be found in the NSO model under
/ncs:devices/global-settings/session-pool,
/ncs:devices/profiles/profile/session-pool and
/ncs:devices/device/session-pool to be able to
control session pooling for all devices, a group of devices and
a specific device respectively.
In addition under
/ncs:devices/global-settings/session-pool/default
it is possible to control the global max size of the session
pool, as defined by the following yang snippet:
container global-settings {
  tailf:info "Global settings for all managed devices.";
  description
    "Global settings for all managed devices. Some of these
     settings can be overridden per managed device.";

  uses device-profile-parameters {

    ...

    augment session-pool {
      leaf pool-max-sessions {
        type union {
          type enumeration {
            enum unlimited;
          }
          type uint32;
        }
        description
          "Controls the grand total session count in the pool.
           Independently on how different devices are pooled the grand
           total session count can never exceed this value.
           A Zero value will imply that pooling is disabled for all devices.
           The label 'unlimited' implies that no upper limit exists for
           the number open sessions in the pool";
      }
    }
  }
}
Lets illustrate the possibilities with an example configuration of the session pool:
ncs#configurencs(config)#devices global-settings session-pool idle-time 100ncs(config)#devices profiles profile small session-pool max-sessions 3ncs(config-profile-small)#topncs(config)#devices device ce* device-profile smallncs(config-device-ce*)#topncs(config)#devices device pe0 session-pool max-sessions 0ncs(config-device-pe0)#topncs(config)#commitCommit complete. ncs(config)#exit
In the above configuration the default idle-time is set to 100
seconds for all devices. A device profile called small is
defined which contains a max-session value of 3 sessions, this
profile is set on all ce* devices. The devices pe0 has a
max-sessions 0 which implies that this device cannot be pooled.
Lets connect all devices and see what happens in the session pool:
ncs#devices connect suppress-positive-resultncs#show devices session-poolDEVICE MAX IDLE DEVICE TYPE SESSIONS SESSIONS TIME ------------------------------------------- ce0 cli 1 3 100 ce1 cli 1 3 100 ce2 cli 1 3 100 ce3 cli 1 3 100 ce4 cli 1 3 100 ce5 cli 1 3 100 pe1 cli 1 unlimited 100 pe2 cli 1 unlimited 100
Now we set an upper limit to the maximum number of sessions in the pool. Setting the value to 4 is too small for a real situation but serves the purpose of illustration:
ncs#configurencs(config)#devices global-settings session-pool pool-max-sessions 4ncs(config)#commitCommit complete. ncs(config)#exit
The number of open sessions in the pool will be adjusted accordingly:
ncs# show devices session-pool
        DEVICE            MAX        IDLE
DEVICE  TYPE    SESSIONS  SESSIONS   TIME
-------------------------------------------
ce4     cli     1         3          100
ce5     cli     1         3          100
pe1     cli     1         unlimited  100
pe2 cli 1 unlimited 100Some devices only allow a small number of concurrent sessions, in the extreme case it only allows one (for example through a terminal server). For this reason NSO can limit the number of concurrent sessions to a device and make operations wait if the maximum number of sessions has been reached.
In other situations, we need to limit the number of concurrent connect attempts made by NSO. For example, the devices managed by NSO talk to the same server for authentication which can only handle a limited number of connections at a time.
The configuration for session limits is found in the tailf-ncs-devices.yang submodel. The following part of the YANG device-profile-parameters grouping controls how the session limits are configured:
grouping device-profile-parameters {

  ...

    container session-limits {
      tailf:info "Parameters for limiting concurrent access to the device.";
      leaf max-sessions {
        type union {
          type enumeration {
            enum unlimited;
          }
          type uint32 {
            range "1..max";
          }
        }
        default unlimited;
        description
          "Puts a limit to the total number of concurrent sessions
           allowed for the device. The label 'unlimited' implies that no
           upper limit exists for this device.";
      }
    }

  ...

  }
This grouping can be found in the NSO model under
/ncs:devices/global-settings/session-limits,
/ncs:devices/profiles/profile/session-limits and
/ncs:devices/device/session-limits to be able to
control session limits for all devices, a group of devices and
a specific device respectively.
In addition under
/ncs:devices/global-settings/session-limits
it is possible to control the number of concurrent connect
attempts allowed and the maximum time to wait for a device
being available to connect.
container global-settings {
  tailf:info "Global settings for all managed devices.";
  description
    "Global settings for all managed devices. Some of these
     settings can be overridden per managed device.";

  uses device-profile-parameters {

  ...

    augment session-limits {
      description
        "Parameters for limiting concurrent access to devices.";
      container connect-rate {
        leaf burst {
          type union {
            type enumeration {
              enum unlimited;
            }
            type uint32 {
              range "1..max";
            }
          }
          default unlimited;
          description
            "The number of concurrent connect attempts allowed.
             For example, the devices managed by NSO talk to the same
             server for authentication which can only handle a limited
             number of connections at a time. Then we can limit
             the concurrency of connect attempts with this setting.";
        }
      }
      leaf max-wait-time {
        tailf:info
          "Max time in seconds to wait for device to be available.";
        type union {
          type enumeration {
            enum unlimited;
          }
          type uint32 {
            range "0..max";
          }
        }
        units "seconds";
        default 10;
        description
          "Max time in seconds to wait for a device being available
           to connect. When the maximum time is reached an error
           is returned. Setting this to 0 means that the error is
           returned immediately.";
      }
    }

  ...

}It is possible to turn on and off NED traffic tracing. This is often a good way to troubleshoot problems. In order to understand the trace output, a basic prerequisite is a good understanding of the native device interface. For NETCONF devices an understanding NETCONF RPC is a prerequisite. Similarly for CLI NEDs, a good understanding of the CLI capabilities of the managed devices is required.
To turn on southbound traffic tracing, we need to enable the feature
and we must also configure a directory where we want the
trace output to be written.
It is possible to have the trace output in two different formats,
pretty and raw. The format of the data
depends on the type of the managed device. For NETCONF devices,
the pretty mode indents all the XML data
for enhanced readability and the raw mode
does not. Sometimes when the XML is broken, raw mode
is required to see all the data received. Tracing in
raw mode will also signal to the corresponding NED to
log more verbose tracing information.
To enable tracing do:
ncs(config)#devices global-settings trace raw trace-dir .logsncs(config)#commit
The trace setting only affect new NED connections, so to ensure that we get any tracing data, we can do:
ncs(config)# devices disconnectThe above command terminates all existing connections.
At this point if you execute a transaction towards one or several devices and then view the trace data.
ncs(config)# do file show logs/ned-cisco-ios-ce0.trace
>> 8-Oct-2014::18:23:18.512 CLI CONNECT to ce0-127.0.0.1:10022 as admin (Trace=true)

  *** output 8-Oct-2014::18:23:18.514 ***
-- SSH connecting to host: 127.0.0.1:10022 --
-- SSH initializing session --

  *** input 8-Oct-2014::18:23:18.547 ***

admin connected from 127.0.0.1 using ssh on ncs
...
ce0(config)#
  *** output 8-Oct-2014::18:23:19.428 ***
snmp-server community topsecret RW
It is possible to clear all existing trace files through the command
ncs(config)# devices clear-traceFinally, it is worth mentioning the trace functionality does not come for free. It is fairly costly to have the trace turned on. Also, there exists no trace log wrapping functionality.
When managing large networks with NSO a good strategy is to consider the NSO copy of the network configuration to be the main primary copy. All device configuration changes must go through NSO and all other device re-configurations are considered rogue.
NSO does not contain any functionality which disallows rogue re-configurations of managed devices, however it does contain a mechanism whereby it is a very cheap operation to discover if one or several devices have been configured out-of-band.
The underlying mechanism for the cheap check-sync is to compare time-stamps, transaction-ids, hash-sums, etc depending on what the device supports. This in order not to have to read the full configuration to check if the NSO copy is in sync.
The transaction ids are store in CDB and can be viewed as:
ncs# show devices device state last-transaction-id
NAME  LAST TRANSACTION ID
----------------------------------------
ce0   ef3bbd344ef94b3fecec5cb93ac7458c
ce1   48e91db163e294bf5c3978d154922c9
ce2   48e91db163e294bf5c3978d154922c9
ce3   48e91db163e294bf5c3978d154922c9
ce4   48e91db163e294bf5c3978d154922c9
ce5   48e91db163e294bf5c3978d154922c9
ce6   48e91db163e294bf5c3978d154922c9
ce7   48e91db163e294bf5c3978d154922c9
ce8   48e91db163e294bf5c3978d154922c9
p0    -
p1    -
p2    -
p3    -
pe0   -
pe1   -
pe2   1412-581909-661436
pe3   -
Some of the devices does not have a transaction-id, this is the case where the NED has not implemented the cheap check-sync mechanism. Although it is called transaction-id, the underlying value in the device can be anything to detect a config change, like for example a time-stamp.
To actually check for consistency, we execute:
ncs# devices check-sync
sync-result {
    device ce0
    result in-sync
}
...
sync-result {
    device p1
    result unsupported
}
...
Or alternatively for all (or a subset) managed devices,
ncs# devices device ce0..3 check-sync
devices device ce0 check-sync
    result in-sync
devices device ce1 check-sync
    result in-sync
devices device ce2 check-sync
    result in-sync
devices device ce3 check-sync
    result in-sync
The following YANG grouping is used for the return value from
the check-sync command:
grouping check-sync-result {
    description
      "Common result data from a 'check-sync' action.";

    leaf result {
      type enumeration {
        enum unknown {
          description
            "NCS have no record, probably because no
             sync actions have been executed towards the device.
             This is the initial state for a device.";
        }
        enum locked {
          tailf:code-name 'sync_locked';
          description
            "The device is administratively locked, meaning that NCS
             cannot talk to it.";
        }
        enum in-sync {
          tailf:code-name 'in-sync-result';
          description
            "The configuration on the device is in sync with NCS.";
        }
        enum out-of-sync {
          description
            "The device configuration is known to be out of sync, i.e.,
             it has been reconfigured out of band.";
        }
        enum unsupported {
          description
            "The device doesn't support the tailf-netconf-monitoring
             module.";
        }
        enum error {
          description
            "An error occurred when NCS tried to check the sync status.
             The leaf 'info' contains additional information.";
        }
      }
    }
  }
In the previous section we described how we can easily check
if a managed device is in sync.
If the device is not in sync, we are interested to know what the
difference is. The CLI sequence below shows how to modify
ce0 out of band using the ncs-netsim tool.
Finally the sequence shows how to do an explicit configuration
comparison.
$ncs-netsim cli-i ce0admin connected from 127.0.0.1 using console on ncs ce0>enablece0#configureEnter configuration commands, one per line. End with CNTL/Z. ce0(config)#snmp-server community foobar RWce0(config)#exitce0#exit$ncs_cli -C -u adminadmin connected from 127.0.0.1 using console on ncs ncs#devices device ce0 check-syncresult out-of-sync info got: 290fa2b49608df9975c9912e4306110 expected: ef3bbd344ef94b3fecec5cb93ac7458c ncs#devices device ce0 compare-configdiff devices { device ce0 { config { ios:snmp-server { + community foobar { + RW; + } } } } }
The diff in the above output should be interpreted as: what needs to be done in NSO to become in sync with the device.
Previously in Example 5, “Synchronize from Devices” NSO was brought in sync with the devices by fetching configuration from the devices. In this case where the device has a rogue re-configuration NSO has the correct configuration. In such cases you want to to reset the device configuration to what is store inside NSO.
When you decide to reset the configuration with the copy
kept in NSO use the option dry-run in conjunction
with sync-to and inspect what will be sent to the device:
ncs# devices device ce0 sync-to dry-run
data
      no snmp-server community foobar RW
ncs#
As this is the desired data to send to the device a sync-to
can now safely be performed.
ncs# devices device ce0 sync-to
result true
ncs#
The device configuration should now be in sync with the copy in NSO
and compare-config ought to yield an empty output:
ncs# devices device ce0 compare-config
ncs#There exists several ways to initialize new devices. The two common ways are to initialize a device from another existing device or to use device-templates.
For example another CE router has been added to our example
network. You want to base the configuration of that host on the
configuration of the managed device ce0 which
has a valid configuration:
ncs(config)# show full-configuration devices device ce0
devices device ce0
 address   127.0.0.1
 port      10022
 ssh host-key ssh-dss
  key-data "AAAAB3NzaC1kc3MAAACBAO9tkTdZgAqJMz8m...
 !
 authgroup default
 device-type cli ned-id cisco-ios-cli-3.8
 state admin-state unlocked
 config
  no ios:service pad
  no ios:ip domain-lookup
  no ios:ip http secure-server
  ios:ip source-route
  ios:interface GigabitEthernet0/1
  exit
  ios:interface GigabitEthernet0/10
  exit
  ios:interface GigabitEthernet0/11
  exit
  ios:interface GigabitEthernet0/12
  exit
  ios:interface GigabitEthernet0/13
  exit
  ios:interface GigabitEthernet0/14
  exit
....
If the configuration is accurate you can create a new managed device based on that configuration as:
ncs(config)#devices device ce9 address 127.0.0.1 port 10031ncs(config-device-ce9)#device-type cli ned-id cisco-ios-cli-3.8ncs(config-device-ce9)#authgroup defaultncs(config-device-ce9)#instantiate-from-other-device device-name ce0ncs(config-device-ce9)#topncs(config)#show configurationdevices device ce9 address 127.0.0.1 port 10031 authgroup default device-type cli ned-id cisco-ios-cli-3.8 config no ios:service pad no ios:ip domain-lookup no ios:ip http secure-server ios:ip source-route ios:interface GigabitEthernet0/1 exit .... ncs(config)#commitCommit complete.
In Example 15, “Instantiate device from other”
the commands first creates the new managed device,
ce9 and
then populates the configuration of the new device based on the
configuration of ce0.
This new configuration might not be entirely correct, you can modify any configuration before committing it.
The above concludes the instantiation of a new managed device. The new device configuration is committed and NSO returned OK without the device existing in the network (netsim). Try force a sync to the device:
ncs(config)# devices device ce9 sync-to
result false
info Device ce9 is southbound locked
The device is southbound locked, this is a mode
which is used where you can reconfigure a device, but any changes
done to it are never sent to the managed device. This will be
thoroughly described in the next section. Devices are by
default created southbound locked. Default values are not shown
if not explicitly requested:
(config)# show full-configuration devices device ce9 state | details
devices device ce9
 state admin-state southbound-locked
!An other alternative to instantiating a device from the actual working configuration of another device is to have a number of named device templates which manipulates the configuration.
The template tree looks like:
submodule tailf-ncs-devices {
  namespace "http://tail-f.com/ns/ncs";
  ...
container devices {
    ........
    list template {
      description
        "This list is used to define named template configurations that
         can be used to either instantiate the configuration for new
         devices, or to apply snippets of configurations to existing
         devices.
         ...
         ";

      key name;
      leaf name {
        description "The name of a specific template configuration";
        type string;
      }
      list ned-id {
        key id;
        leaf id {
          type identityref {
            base ned:ned-id;
          }
        }
        container config {
          tailf:mount-point ncs-template-config;
          tailf:cli-add-mode;
          tailf:cli-expose-ns-prefix;
          description
            "This container is augmented with data models from the devices.";
        }
      }
    }
The tree for device templates is generated from all device
YANG models. All constrains are removed and the data type
of all leafs is changed to string
A device template is created by setting the desired data in the configuration. The created device template is stored in NSO CDB.
ncs(config)#devices template ce-initialize ned-id cisco-ios-cli-3.8 configncs(config-config)#no ios:service padncs(config-config)#no ios:ip domain-lookupncs(config-config)#ios:ip dns serverncs(config-config)#no ios:ip http serverncs(config-config)#no ios:ip http secure-serverncs(config-config)#ios:ip source-route truencs(config-config)#ios:interface GigabitEthernet 0/1ncs(config- GigabitEthernet-0/1)#exitncs(config-config)#ios:interface GigabitEthernet 0/2ncs(config- GigabitEthernet-0/2)#exitncs(config-config)#ios:interface GigabitEthernet 0/3ncs(config- GigabitEthernet-0/3)#exitncs(config-config)#ios:interface Loopback 0ncs(config-Loopback-0)#exitncs(config-config)#ios:snmp-server community public ROncs(config-community-public)#exitncs(config-config)#ios:snmp-server trap-source GigabitEthernet 0/2ncs(config-config)#topncs(config)#commit
The device template created in Example 16, “Create ce-initialize template” can now be used to initialize single devices or device groups, the section called “Device Groups”
In the following CLI session a new device ce10 is created:
ncs(config)#devices device ce10 address 127.0.0.1 port 10032ncs(config-device-ce10)#device-type cli ned-id cisco-ios-cli-3.8ncs(config-device-ce10)#authgroup defaultncs(config-device-ce10)#topncs(config)#commit
Initialize the newly created device ce10
with the device template ce-initialize:
ncs(config)# devices device ce10 apply-template template-name ce-initialize
apply-template-result {
    device ce10
    result no-capabilities
    info No capabilities found for device: ce10. Has a sync-from the device
         been performed?
}
When initializing devices NSO does not have any knowledge about
the capabilities of the device, no connect has been done. This
can be overridden by the option accept-empty-capabilities
ncs(config)# devices device ce10 \
apply-template template-name ce-initialize accept-empty-capabilities
apply-template-result {
    device ce10
    result ok
}
Inspect the changes made by the template ce-initialize
ncs(config)# show configuration
devices device ce10
 config
  ios:ip dns server
  ios:interface GigabitEthernet0/1
  exit
  ios:interface GigabitEthernet0/2
  exit
  ios:interface GigabitEthernet0/3
  exit
  ios:interface Loopback0
  exit
  ios:snmp-server community public RO
  ios:snmp-server trap-source GigabitEthernet0/2
 !
!Note
This section shows how Device-templates can be used to create and change device configuration. See Templates in Development Guide for other ways of using templates.
device-templates are part of the
NSO configuration. device-templates are created
and changed in the tree /devices/template/config
the same way as any other configuration data and are affected
by rollbacks and upgrades. Device-templates
can only manipulate configuration data in the
/devices/device/config tree i.e. only device data.
The $NCS_DIR/examples.ncs/service-provider/mpls-vpn example
comes with a pre-populated template for SNMP settings.
ncs(config)# show full-configuration devices template
devices template snmp1
 ned-id cisco-ios-cli-3.8
  config
   ios:snmp-server community {$COMMUNITY}
    RO
   !
  !
 !
 ned-id cisco-iosxr-cli-3.5
  config
   cisco-ios-xr:snmp-server community {$COMMUNITY}
    RO
   !
  !
 !
 ned-id juniper-junos-nc-3.0
  config
   junos:configuration snmp community {$COMMUNITY}
    authorization read-only
   !
  !
 !
!
Note
The variable $DEVICE is used internally by NSO and can not be used in a template.
Templates can be created like any configuration data and use the CLI tab completion to navigate. Variables can be used instead of hard-coded values. In the template above the community string is a variable. The template can cover several device-types/NEDs, by making use of the namespace information. This will make sure that only devices modeled with this particular namespace will be affected by this part of the template. Hence, it is possible for one template to handle a multitude of devices from various manufacturers.
A template can be applied to a device, a device-group and a range of devices. It can be used as shown in the section called “By Template” to create the day zero config for a newly created device.
Applying the snmp1 template, providing a value for the
COMMUNITY template variable:
ncs(config)#devices device ce2 apply-template template-name \ snmp1 variable { name COMMUNITY value 'FUZBAR' }ncs(config)#show configurationdevices device ce2 config ios:snmp-server community FUZBAR RO ! ! ncs(config)#commit dry-run outformat nativenative { device { name ce2 data snmp-server community FUZBAR RO } } ncs(config)#commitCommit complete.
The result of applying the template:
ncs(config)# show full-configuration devices device ce2 config\
   ios:snmp-server
devices device ce2
 config
  ios:snmp-server community FUZBAR RO
 !
!
The default operation for templates is to merge the
configuration. Tags can be added to templates to have the template
merge, replace, delete,
create or nocreate configuration.
A tag is inherited to its sub-nodes until a new tag is introduced.
-
merge: Merge with a node if it exists, otherwise create the node. This is the default operation if no operation is explicitly set.
-
replace: Replace a node if it exists, otherwise create the node.
-
create: Creates a node. The node can not already exist.
-
nocreate: Merge with a node if it exists. If it does not exist, it will not be created.
Example on how to set a tag:
ncs(config)# tag add devices template snmp1 ned-id cisco-ios-cli-3.8 config\
 ios:snmp-server community {$COMMUNITY} replace
Displaying Tags information::
ncs(config)# show configuration
devices template snmp1
 ned-id cisco-ios-cli-3.8
  config
   ! Tags: replace
   ios:snmp-server community {$COMMUNITY}
   !
  !
 !
!
By adding the CLI pipe flag debug template when
applying a template, the CLI will output detailed
information on what is happening when the template is being
applied:
ncs(config)# devices device ce2 apply-template template-name \
      snmp1 variable { name COMMUNITY value 'FUZBAR' } | debug template
Operation 'merge' on existing node: /devices/device[name='ce2']
The device /devices/device[name='ce2'] does not support
namespace 'http://tail-f.com/ned/cisco-ios-xr' for node "'snmp-server'"
Skipping...
The device /devices/device[name='ce2'] does not support
namespace 'http://xml.juniper.net/xnm/1.1/xnm' for node "configuration"
Skipping...
Variable $COMMUNITY is set to "FUZBAR"
Operation 'merge' on non-existing node:
/devices/device[name='ce2']/config/ios:snmp-server/community[name='FUZBAR']
Operation 'merge' on non-existing node:
/devices/device[name='ce2']/config/ios:snmp-server/community[name='FUZBAR']/RO
NSO differentiates between oper state and admin state for
a managed device. Oper state is the actual state of the device.
We have chosen to implement a very simple oper state model.
A managed device oper state is either enabled or disabled.
Oper state can be mapped to an alarm for the device.
If the device is disabled, we may have additional error information.
For example the ce9 device created from another device
and ce10 created with a device
template in the previous section is disabled, no connection
has been established with the device,
so its state is completely unknown:
ncs# show devices device ce9 state oper-state
state oper-state disabled
Or slight more interesting, CLI usage:
ncs#show devices device state oper-stateOPER NAME STATE ---------------- ce0 enabled ce1 enabled ce10 disabled ce2 enabled ce3 enabled ce4 enabled ce5 enabled ce6 enabled ce7 enabled ce8 enabled ce9 disabled p0 enabled p1 enabled p2 enabled p3 enabled pe0 enabled pe1 enabled pe2 enabled pe3 enabled ncs#show devices device ce0..9 state oper-stateOPER NAME STATE ---------------- ce0 enabled ce1 enabled ce2 enabled ce3 enabled ce4 enabled ce5 enabled ce6 enabled ce7 enabled ce8 enabled ce9 disabled
If you manually stop a managed device, for example
ce0, NSO doesn't immediately indicate that.
NSO may have an active SSH connection to the device, but the device
may voluntarily choose to close its end of that (idle) SSH connection.
Thus the fact that a socket from the device to NSO is closed by the
managed device doesn't indicate anything.
The only certain method NSO has to decide a managed device is
non-operational - from the point of view of NSO - is NSO cannot
SSH connect to it. If you manually stop managed device
ce0, you still have:
$ncs-netsim stop ce0DEVICE ce0 STOPPED $ncs_cli -C -u adminncs#show devices device ce0 state oper-statestate oper-state enabled
NSO cannot draw any conclusions from the fact that a managed device
closed its end of the SSH connection. It may have done so because
it decided to time out an idle SSH connection. Whereas if NSO
tried to initiate any operations towards the dead device, the
device will be marked as oper state disabled:
ncs(config)#devices device ce0 config ios:snmp-server contact joe@acme.comncs(config-config)#commitAborted: Failed to connect to device ce0: connection refused: Connection refused ncs(config-config)# *** ALARM connection-failure: Failed to connect to device ce0: connection refused: Connection refused
Now, NSO has failed to connect to it, NSO knows that
ce0 is dead:
ncs# show devices device ce0 state oper-state
state oper-state disabled
This concludes the oper state discussion. Next state to be illustrated is the admin state. The admin state is what the operator configures, this is the desired state of the managed device.
In tailf-ncs.yang we have the following configuration
definition for admin state:
submodule tailf-ncs-devices {
  ....

  typedef admin-state {
    type enumeration {
      enum locked {
        description
          "When a device is administratively locked, it is not possible
           to modify its configuration, and no changes are ever
           pushed to the device.";
      }
      enum unlocked {
        description
          "Device is assumed to be operational.
           All changes are attempted to be sent southbound.";
      }
      enum southbound-locked {
        description
          "It is possible to configure the device, but
           no changes are sent to the device. Useful admin mode
           when pre provisioning devices. This is the default
           when a new device is created.";
      }
      enum config-locked {
        description
          "It is possible to send live-status commands or RPCs
           but it is not possible to modify the configuration
           of the device.";
      }
    }
  }

  ....
  container devices {
     ....
     container state {
        ....
        leaf admin-state {
          type admin-state;
          default southbound-locked;
        }

        leaf admin-state-description {
          type string;
          description
            "Reason for the admin state.";

        }
In Example 17, “tailf-ncs-devices.yang - Admin state” you can see the four different admin states for a managed device as defined in the YANG model.
-
locked- This means that all changes to the device are forbidden. Any transaction which attempts to manipulate the configuration of the device will fail. It is still possible to read the configuration of the device. -
unlocked-This is the state a device is set into when the device is operational. All changes to the device are attempted to be sent southbound. -
southbound-locked- This is the default value. It means that it is possible to manipulate the configuration of the device but changes done to the device configuration are never pushed to the device. This mode is useful during e.g. pre-provisioning, or when we instantiate new devices. -
config-locked- This means that any transaction which attempts to manipulate the configuration of the device will fail. It is still possible read the configuration of the device and send live-status commands or RPCs.
NSO manages a set of devices which are given to NSO through any means like CLI, inventory system integration through XML APIs, or configuration files at startup. The list of devices to manage in an overall integrated network management solution is shared between different tools and therefore it is important to keep an authoritative database of this and share it between different tools including NSO. The purpose of this part is to identify the source of the population of managed devices. The source attribute should indicate the source of the managed device like "inventory", "manual", "EMS".
submodule tailf-ncs-devices {
  ...
      container source {
        tailf:info "How the device was added to NCS";
        leaf added-by-user {
          type string;
        }
        leaf context {
          type string;
        }
        leaf when {
          type yang:date-and-time;
        }
        leaf from-ip {
          type inet:ip-address;
        }
        leaf source {
          type string;
          reference "TMF518 NRB Network Resource Basics";
        }
      }
These attributes should be automatically set by the integration towards the inventory source rather then manipulated manually.
-
added-by-user- Identify the user which loaded the managed device. -
contextin what context was the device loaded. -
when- when the device was added to NSO. -
from-ip- from which IP the load activity was run.. -
source- identify the source of the managed device such as the inventory system name or the name of the source file.
The NETCONF protocol mandates that the first thing both the
server and the client has to do is to send its list of NETCONF
capabilities in the <hello> message. A capability
indicates what the peer can actually do. For example the
validate:1.0 indicates that the server can validate a
proposed configuration change, whereas the capability
http://acme.com/if indicates the device
implements the http://acme.com proprietary
capability.
The NEDs report the capabilities for the devices at connection time. The NEDs also load the YANG modules for NSO. For a NETCONF/YANG device all this is straight-forward, for non NETCONF devices the NEDs does the translation.
The capabilities announced by a device also contain the YANG version 1 modules supported. In addition to this, YANG version 1.1 modules are advertised in the YANG library module on the device. NSO checks both the capabilities and the YANG library to find out which YANG modules a device supports.
The capabilities and modules detected by NSO are available
in two different lists, /devices/device/capability
and devices/device/module. The capability
list contains all capabilities announced and all YANG modules in
the YANG library. The module list contains all YANG
modules announced that are also supported by the NED in NSO.
ncs#show devices device ce0 capabilitycapability urn:ietf:params:netconf:capability:with-defaults:1.0?basic-mode=trim capability urn:ios revision 2015-03-16 module tailf-ned-cisco-ios capability urn:ios-stats revision 2015-03-16 module tailf-ned-cisco-ios-stats ncs#show devices device ce0 capability moduleNAME REVISION FEATURE DEVIATION ----------------------------------------------------------- tailf-ned-cisco-ios 2015-03-16 - - tailf-ned-cisco-ios-stats 2015-03-16 - -
NSO can be used to handle all or some of the YANG configuration modules for a device. A device may announce several modules through its capability list which NSO ignores. NSO will only handle the YANG modules for a device which are loaded (and compiled through ncsc --ncs-compile-bundle) or ncsc --ncs-compile-module) all other modules for the device are ignored. If you require a situation where NSO is entirely responsible for a device so that complete device backup/configurations are stored in NSO you must ensure NSO indeed has support for all modules for the device. It is not possible to automate this process since a capability URI doesn't necessary indicate actual configuration.
When a device is added to NSO its NED id must be set.
For a NETCONF device, it is possible to configure the generic
NETCONF NED id netconf (defined in the YANG module
tailf-ncs-ned). If this NED id is configured, we can then ask
NSO to connect to the device and then check the
capability list to see which modules this device
implements.
ncs(config)#devices device foo address 127.0.0.1 port 12033 authgroup defaultncs(config-device-foo)#device-type netconf ned-id netconfncs(config-device-foo)#state admin-state unlockedncs(config-device-foo)#commitCommit complete. ncs(config-device-foo)#exitncs(config)#exitncs#devices fetch-ssh-host-keys device foofetch-result { device foo result updated fingerprint { algorithm ssh-rsa value 14:3c:79:87:69:8e:e2:f0:6d:43:07:8c:89:41:fd:7f } } ncs#devices device foo connectresult true info (admin) Connected to foo - 127.0.0.1:12033 ncs#show devices device foo capabilitycapability :candidate:1.0 capability :confirmed-commit:1.0 ... capability http://xml.juniper.net/xnm/1.1/xnm module junos capability urn:ietf:params:xml:ns:yang:ietf-yang-types revision 2013-07-15 module ietf-yang-types capability urn:juniper-rpc module junos-rpc ...
We can also check which modules the loaded NEDs supports. Then we can pick the most suitable NED and configure the device with this NED id.
ncs#show devices ned-idsID NAME REVISION -------------------------------------------------------------- cisco-ios-xr-v2 tailf-ned-cisco-ios-xr - tailf-ned-cisco-ios-xr-stats - lsa-netconf netconf snmp alu-sr-cli-3.4 tailf-ned-alu-sr - tailf-ned-alu-sr-stats - cisco-ios-cli-3.8 tailf-ned-cisco-ios - tailf-ned-cisco-ios-stats - cisco-iosxr-cli-3.5 tailf-ned-cisco-ios-xr - tailf-ned-cisco-ios-xr-stats - juniper-junos-nc-3.0 junos - junos-rpc - ncs#configEntering configuration mode terminal ncs(config)#devices device foo device-type netconf ned-id juniper-junos-nc-3.0ncs(config-device-foo)#commitCommit complete.
NSO works best if the managed devices support the NETCONF candidate configuration datastore. However, NSO reads the capabilities of each managed devices and executes different sequences of NETCONF commands towards different types of devices.
For implementations of the NETCONF protocol that do not support the candidate datastore, and in particular devices that do not support NETCONF commit with a timeout, NSO tries to do the best of the situation.
NSO divides devices in the following groups.
-
start_trans_running - This mode is used for devices that support the Tail-f proprietary transaction extension defined by
http://tail-f.com/ns/netconf/transactions/1.0. Read more on this in the Tail-f ConfD user guide. In principle it's a means to - over the NETCONF interface - control transaction processing towards the running data store. This may be more efficient than going through the candidate data store. The downside is that it is Tail-f proprietary non-standardized technology. -
lock_candidate - This mode is used for devices that support the candidate data store but disallow direct writes to the running data store.
-
lock_reset_candidate - This mode is used for devices that support the candidate data and also allow direct writes to the running data store. This is the default mode for Tail-f ConfD NETCONF server. Since the running data store is configurable, we must, prior to each configuration attempt, copy all of running to the candidate. (ConfD has optimized this particular usage pattern, so this is a very cheap operation for ConfD)
-
startup - This mode is used for devices that have writable running, no candidate but do support the startup data store. This is the typical mode for Cisco like devices.
-
running-only - This mode is used for devices that only support writable running.
-
NED - The transaction is controlled by a Network Element Driver. The exact transaction mode depends on the type of the NED.
Which category NSO chooses for a managed device depends on which NETCONF capabilities the devices sends to NSO in its NETCONF hello message. You can see in the CLI what NSO has decided for a device as in:
ncs#show devices device ce0 state transaction-modestate transaction-mode ned ncs#show devices device pe2 state transaction-modestate transaction-mode lock-candidate
NSO talking to ConfD device running in its standard configuration, thus lock-reset-candidate
Another important discriminator between managed devices is whether they support the confirmed commit with a timeout capability, i.e. the confirmed-commit:1.0 standard NETCONF capability. If a device supports this capability, NSO utilizes it. This is the case with for example Juniper routers.
If a managed device does not support this capability, NSO attempts to the best it can.
This is how NSO handles common failure scenarios:
-
The operator aborts the transaction, or NSO looses the SSH connection to another managed device which is also participating in the same network transaction.
If the device does support the confirmed-commit capability, NSO aborts the outstanding yet-uncommitted transaction simply by closing the SSH connection.
When the device does not support the confirmed-commit capability, NSO has the reverse diff and simply sends the precise undo information to the device instead.
-
The device rejects the transaction in the first place, i.e. the NSO attempt to modify its running data store. This is an easy case since NSO then simply aborts the transaction as a whole in the initial
commit confirmed [time]attempt. -
NSO looses SSH connectivity to the device during the timeout period. This is a real error case and the configuration is now in an unknown state. NSO will abort the entire transaction, but the configuration of the failing managed device is now probably in error. The correct procedure once network connectivity has been restored to the device is to sync it in direction from NSO to the device. The NSO copy of the device configuration will be what was configured prior to the failed transaction.
Thus, even if not all participating devices have first class NETCONF server implementations, NSO will attempt to fake the confirmed-commit capability.
When the managed device defines top level NETCONF RPCs or alternatively define tailf:action points inside the YANG model, these RPCs and actions are also imported into the data model that resides in NSO.
For example the Juniper NED comes with a set of JunOS RPCs
defined in:
$NCS_DIR/packages/neds/juniper-junos/src/yang/junos-rpc.yang
module junos-rpc {
  ...
  rpc request-package-add {
  ...
  rpc request-reboot {
  ...
  rpc get-software-information {
  ...
  rpc ping {
Thus, since all RPCs and actions from the devices are accessible through the NSO data model, these actions are also accessible through all NSO northbound APIs, REST, JAVA MAAPI etc. Hence it is possible to - from user scripts/code - invoke actions and RPCs on all managed devices. The RPCs are augmented below an RPC container:
ncs(config)#devices device pe2 rpc rpc-Possible completions: rpc-get-software-information rpc-idle-timeout rpc-ping \ rpc-request-package-add rpc-request-reboot ncs(config)#devices device pe2 rpc \ rpc-get-software-information get-software-information brief
In the simulated environment of the mpls-vpn example these RPCs might not have been implemented.
The NSO device manager has a concept of groups of devices. A group is nothing more than a named group of devices. What makes this interesting is that we can invoke several different actions on the group, thus implicitly invoking the the action on all members in the group. This is especially interesting for the apply-template action.
The definition of device groups reside at the same layer in the NSO data model as the device list, thus we have:
submodule tailf-ncs-devices {
  namespace "http://tail-f.com/ns/ncs";
  ...
  container devices {
     .....
    list device {
     ...
     }
    list device-group {
      key name;
      leaf name {
        type string;
      }
      description
        "A named group of devices, some actions can be
         applied to an entire  group of devices, for example
         apply-template, and the sync actions.";
      leaf-list device-name {
        type leafref {
          path "/devices/device/name";
        }
      }
      leaf-list device-group {
        type leafref {
          path "/devices/device-group/name";
        }
        description
          "A list of device groups contained in this device group.

           Recursive definitions are not valid.";
      }
      leaf-list member {
        type leafref {
          path "/devices/device/name";
        }
        config false;
        description
          "The current members of the device-group.  This is a flat list
           of all the devices in the group.";
      }
      uses connect-grouping ;
      uses sync-grouping;
      uses check-sync-grouping;
      uses apply-template-grouping;
    }
  }
}
The MPLS VPN example comes with a couple of pre-defined device-groups:
ncs(config)# show full-configuration devices device-group
devices device-group C
 device-name [ ce0 ce1 ce3 ce4 ce5 ce6 ce7 ce8 ]
!
devices device-group P
 device-name [ p0 p1 p2 p3 ]
!
devices device-group PE
 device-name [ pe0 pe1 pe2 pe3 ]
!
Device groups are created like below:
ncs(config)#devices device-group my-group device-name ce0ncs(config-device-group-my-group)#device-name pePossible completions: pe0 pe1 pe2 pe3 ncs(config-device-group-my-group)#device-name pe0ncs(config-device-group-my-group)#device-name p0ncs(config-device-group-my-group)#commit
Device-groups can reference other device-groups. There is a an
operational attribute that flattens all members in the
group. The CLI sequence below adds the PE group to my-group. Then
it shows the configuration of that group followed by the status
for this group. The status for the group contains a
members attribute that lists all device members.
ncs(config-device-group-my-group)#device-group PEncs(config-device-group-my-group)#commitncs(config)#show full-configuration devices device-group my-groupdevices device-group my-group device-name [ ce0 p0 pe0 ] device-group [ PE ] ! ncs(config)#exitncs#show devices device-group my-groupNAME MEMBER INDETERMINATES CRITICALS MAJORS MINORS WARNINGS ------------------------------------------------------------------------------------------- my-group [ ce0 p0 pe0 pe1 pe2 pe3 ] 0 0 1 0 0
Once you have a group, you can sync and check-sync the entire group.
ncs# devices device-group C sync-toHowever, what make device groups really interesting is the ability to apply a template to a group. You can use the pre-populated templates to apply SNMP settings to device-groups.
ncs(config)#devices device-group C apply-template \ template-name snmp1 variable { name COMMUNITY value 'cinderella' }ncs(config)#show configurationdevices device ce0 config ios:snmp-server community cinderella RO ! ! devices device ce1 config ios:snmp-server community cinderella RO ! ! ... ncs(config)#commit
Policies allows you to specify network wide constraints that always must be true. If someone tries to apply a configuration change over any northbound interface that would evaluate to false the configuration change is rejected by NSO. Policies can be of type warning means that it is possible to override them, or error which cannot be overridden.
Assume you would like to enforce all CE routers to have a
Gigabit interface 0/1.
ncs(config)#policy rule gb-one-zeroncs(config-rule-gb-one-zero)#foreach /ncs:devices/device[starts-with(name,'ce')]/configncs(config-rule-gb-one-zero)#expr ios:interface/ios:GigabitEthernet[ios:name='0/1']ncs(config-rule-gb-one-zero)#warning-message "{../name} should have 0/1 interface"ncs(config-rule-gb-one-zero)#commitzork(config-rule-gb-one-zero)# top zork(config)# ! ncs(config)#show full-configuration policypolicy rule gb-one-zero foreach /ncs:devices/device[starts-with(name,'ce')]/config expr ios:interface/ios:GigabitEthernet[ios:name='0/1'] warning-message "{../name} should have 0/1 interface" ! ncs(config)#no devices device ce0 config ios:interface GigabitEthernet 0/1ncs(config)#validateValidation completed with warnings: ce0 should have 0/1 interface ncs(config)#no devices device ce1 config ios:interface GigabitEthernet 0/1ncs(config)#validateValidation completed with warnings: ce1 should have 0/1 interface ce0 should have 0/1 interface ncs(config)#commitThe following warnings were generated: ce1 should have 0/1 interface ce0 should have 0/1 interface Proceed? [yes,no]yesCommit complete.
As seen in Example 21, “Policies”
a policy rule has (an optional) for each statement and a mandatory
expression and error-message. The foreach statement
evaluates to a node set, the expression is then evaluated on each
node. So in this example the expression would be evaluated for every
device in NSO which begins with ce. The name variable in the
warning-message refers to a leaf available from the for-each node-set.
Validation is always performed at commit but can also be requested interactively.
Note any configuration can be activated or deactivated. This means that in order to temporarily turn off a certain policy you can deactivate it. Note also that if the configuration was changed by any other means than NSO by local tools to the device like a CLI, a devices sync-from operation might fail if the device configuration violates the policy.
One of the strengths of NSO is the concept of "network wide
transactions". When you commit data to NSO that spans multiple
devices in the /ncs:devices/device tree, NSO will -
within the NSO transaction - commit the data on all devices or
none, keeping the network consistent with CDB. The NSO
transaction doesn't return until all participants have acknowledged the
proposed configuration change. The downside of this is that the slowest
device in each transaction limits the overall transactional throughput
in NSO. Such things as out of sync checks, network latency,
calculation of changes sent southbound or device deficiencies all
affects the throughput.
Typically when automation software north of NSO generates network change requests it may very well be the case more requests arrive than what can be handled. In NSO deployments scenarios where you wish to have higher transactional throughput than what is possible using "network wide transactions", you can use the commit queue instead. The goal of the commit queue is to increase the transactional throughput of NSO while keeping an eventual consistency view of the database. With the commit queue, NSO will compute the configuration change for each participating device, put it in an outbound queue item and immediately return. The queue is then independently run.
Another use case where you can use the commit queue is when you wish to push a configuration change to a set of devices and don't care about whether all devices accept the change or not. You do not want the default behavior for transactions which is to reject the transaction as a whole if one or more participating devices fail to process its part of the transaction.
An example of the above could be you wish to set a new NTP server on all managed devices in our entire network, if one or more devices currently are non operational, you still want to push out the change. You also want the change automatically pushed to the non operational devices once they go live again.
The big upside of this scheme is that the transactional throughput through NSO is considerably higher. Also transient devices are handled better. The downsides are:
-
If a device rejects the proposed change, NSO and the device are now out of sync until any error recovery is performed. Whenever this happens, an NSO alarm (called commit-through-queue-failed) is generated.
-
While a transaction remains in the queue, i.e it has been accepted for delivery by NSO but is not yet delivered, the view of the network in NSO is not (yet) correct. Eventually though, the queued item will be delivered, thus achieving eventual consistency.
To facilitate the two use cases of the commit queue the outbound queue item can be either in an atomic or non-atomic mode.
In atomic mode the outbound queue item will push all configuration changes concurrently once there are no intersecting devices ahead in the queue. If any device rejects the proposed change, all device configuration changes in the queue item will be rejected as a whole, leaving the network in a consistent state. The atomic mode also allows for automatic error recovery to be performed by NSO.
In the non-atomic mode the outbound queue item will push configuration changes for a device whenever all occurrences of it is completed or it doesn't exist ahead in the queue. The drawback to this mode is that there are no automatic error recovery that can be performed by NSO.
In the following sequences the simulates device ce0 is stopped to illustrate the commit queue. This can be achieved by the following sequence including returning to the NSO CLI config mode:
$ncs-netsim stop ce0DEVICE ce0 STOPPED $ncs_cli -C -u adminadmin connected from 127.0.0.1 using console on ncs ncs#config
By default the commit queue is turned off. You can configure
NSO to run a transaction, device or device group through
the commit queue in a number of different ways, either
by providing a flag to the commit command as:
ncs(config)#commit commit-queuePossible completions: async Commit through commit queue and return immediately bypass Bypass commit-queue when queue is enabled by default sync Commit through commit queue and wait for reply ncs(config)# commit commit-queueasync
or by configuring NSO to always run all transactions through the commit queue as in:
ncs(config)#devices global-settings commit-queue enabled-by-default[false,true] (false):truencs(config)#commit
or by configuring a number of devices to run through the commit queue as default:
ncs(config)#devices device ce0..2 commit-queue enabled-by-default[false,true] (false):truencs(config)#commit
When enabling the commit queue as default on a per device/device group basis, a NSO transaction will compute the configuration change for each participating device, put the devices enabled for the commit queue in the outbound queue and then proceed with the normal transaction behaviour for those devices not commit queue enabled. The transaction will still be successfully committed even if some of the devices added to the outbound queue will fail. If the transaction fails in the validation phase the entire transaction will be aborted, including the configuration change for those devices added to commit queue. If the transaction fails after the validation phase, the configuration change for the devices in the commit queue will still be delivered.
Do some change and commit through the commit queue:
ncs(config)#devices device ce0..2 config ios:snmp-server \ trap-source GigabitEthernet 0/1ncs(config-config)#commitcommit-queue-id 9494446997 Commit complete. ncs(config-config)# *** ALARM connection-failure: Failed to connect to device ce0: connection refused: Connection refused
In Example 22, “Commit through Commit Queue”
the commit affected three devices, ce0,
ce1 and ce2. If you immediately
would have launched yet another transaction, as in:
ncs(config)#devices device ce0 config ios:interface GigabitEthernet 0/25ncs(config-if)#commitcommit-queue-id 9494530158 Commit complete. ncs(config-if)# *** ALARM commit-through-queue-blocked: Commit Queue item 9494530158 is blocked because qitem 9494446997 cannot connect to ce0
the second one, manipulating an interface of ce2,
that transaction would have been queued instead of immediately launched.
The idea here is to queue entire transactions that touch any device
which has anything queued ahead in the queue.
Each transaction committed through the queues becomes a queue item. A queue item has an id number. A bigger number means that its scheduled later. Each queue item waits for something to happen. A queue item is in either of three states.
-
waiting - The queue item is waiting for other queue items to finish. This is because the waiting queue item has participating devices that are part of other queue items, ahead in the queue. It is waiting for a set of devices, to not occur ahead of itself in the queue.
-
executing - The queue item is currently being processed. Multiple queue item can run currently as long as they don't share any managed devices. Transient errors might be present. These errors occur when NSO fails to communicate with some of the devices. The errors are shown in the leaf-list
transient-errors. Retries will take place at intervals specified in/ncs:devices/global-settings/commit-queue/retry-timeout. Examples of transient errors are connection failures and that the changes are rejected due to the device being locked. Transient errors are potentially bad, since the queue might grow if new items are added, waiting for the same device. -
locked - This queue item is locked and will not be processed until it has been unlocked, see the action
/ncs:devices/commit-queue/queue-item/unlock. A locked queue item will block all subsequent queue items which are using any device in the locked queue item.
You can view the queue in the CLI. There are three different view modes, summary, normal and detailed. Depending on the output, both the summary and the normal look good:
ncs# show devices commit-queue | notab
devices commit-queue queue-item 9494446997
 age              144
 status           executing
 kilo-bytes-size  1
 devices          [ ce0 ce1 ce2 ]
 transient-errors [ ce0 ]
 is-atomic        true
devices commit-queue queue-item 9494530158
 age              61
 status           blocked
 kilo-bytes-size  1
 devices          [ ce0 ]
 waiting-for      [ ce0 ]
 is-atomic        true
The age field indicated how many seconds a queue item has been in the queue.
You can also view the queue items in detailed mode:
ncs# show devices commit-queue queue-item 9494530158 details | notab
devices commit-queue queue-item 9494530158
 age             278
 status          blocked
 kilo-bytes-size 1
 devices         [ ce0 ]
 waiting-for     [ ce0 ]
 is-atomic       true
 modification ce0
  data       <interface xmlns="urn:ios">
               <GigabitEthernet>
                 <name>0/25</name>
               </GigabitEthernet>
             </interface>

  local-user admin
The queue items are stored persistently, thus if NSO is stopped and restarted, the queue remains the same. Similarly, if NSO runs in HA (High Availability) mode, the queue items are replicated, ensuring the queue is processed even in case of failover.
Note
The commit queue is disabled when both HA is enabled, and its HA role
is none, i.e., not primary or secondary.
See the section called “Mode of operation” in Administration Guide for more
details.
A number of useful actions are available to manipulate the queue:
-
devices commit-queue add-lock device [ ... ] This adds a fictive queue-item to the commit-queue. Any queue item, affecting the same devices, which is entering the commit-queue will have to wait for this lock item to be unlocked or deleted. If no devices are specified, all devices in NSO are locked.
-
devices commit-queue clear This action clears the entire queue. All devices present in the commit queue will after this action has executed be out of sync. The
clearaction is a rather blunt tool and is not recommended to be used in any normal use case. -
devices commit-queue prune device [ ... ] This action prunes all specified devices from all queue items in the commit queue. The affected devices will, after this action has been executed, be out of sync. Devices which are currently being committed to will not be pruned, unless the
forceoption is used. Atomic queue items will not be affected, unless all devices in it are pruned.The
forceoption will brutally kill an ongoing commit. This could leave the device in a bad state. It is not recommended in any normal use case. -
devices commit-queue set-atomic-behaviour atomic [ true,false ] This actions sets the atomic behaviour of all queue items. If these are set to false, the devices contained in these queue items can start executing if the same devices in other non-atomic queue items ahead of it in the queue are completed. If set to true, the atomic integrity of these queue items are preserved.
-
devices commit-queue wait-until-empty This action waits until the commit queue is empty. Default is to wait
infinity. Atimeoutcan be specified to wait for a number of seconds. The result is empty if the queue is empty or timeout if there are still items in the queue to become processed. -
devices commit-queue queue-item [ id ] lock This action puts a lock on an existing queue item. A locked queue item will not start executing until it has been unlocked.
-
devices commit-queue queue-item [ id ] unlock This action unlocks a locked queue item. Unlocking a queue item which is not locked is silently ignored.
-
devices commit-queue queue-item [ id ] delete This action deletes a queue item from the queue. If other queue items are waiting for this (deleted) item, they will all automatically start to run. The devices of the deleted queue item will, after the action has executed, by out of sync if they haven't start executing. Any error-option set for the queue item will also be disregarded.
The
forceoption will brutally kill an ongoing commit. This could leave the device in a bad state. It is not recommended in any normal use case. -
devices commit-queue queue-item [ id ] prune device [ ... ] This action prunes the specified devices from the queue item. Devices which are currently being committed to will not be pruned, unless the
forceoption is used. Atomic queue items will not be affected, unless all devices in it are pruned.The
forceoption will brutally kill an ongoing commit. This could leave the device in a bad state. It is not recommended in any normal use case. -
devices commit-queue queue-item [ id ] set-atomic-behaviour atomic [ true,false ] This action sets the atomic behaviour of this queue item. If this is set to false, the devices contained in this queue item can start executing if the same devices in other non-atomic queue items ahead of it in the queue are completed. If set to true, the atomic integrity of the queue item is preserved.
-
devices commit-queue queue-item [ id ] wait-until-completed This action waits until the queue item is completed. Default is to wait
infinity. Atimeoutcan be specified to wait for a number of seconds. The result is completed if the queue item is completed or timeout if the timer expired before the queue item was completed. -
devices commit-queue queue-item [ id ] retry This action retries devices with transient errors instead of waiting for the automatic retry attempt. The
deviceoption will let you specify the devices to retry.
A typical use scenario is where one or more devices are not operational.
In Example 23, “Viewing queue items”,
there are two queue items, waiting for device ce0
to come alive. ce0 is listed as a transient error,
and this is blocking the entire queue.
Actually, whenever a queue item is blocked because another
item ahead of it cannot connect to a specific managed device, an
alarm is generated:
ncs# show alarms alarm-list alarm ce0 commit-through-queue-blocked
alarms alarm-list alarm ce0 commit-through-queue-blocked /devices/device[name='ce0'] 9494530158
 is-cleared              false
 last-status-change      2015-02-09T16:48:17.915+00:00
 last-perceived-severity warning
 last-alarm-text         "Commit queue item 9494530158 is blocked because item 9494446997 cannot connect to ce0"
 status-change 2015-02-09T16:48:17.915+00:00
  received-time      2015-02-09T16:48:17.915+00:00
  perceived-severity warning
alarm-text "Commit queue item 9494530158 is blocked because item 9494446997 cannot connect to ce0"-
Block other affecting device
ce0from entering the commit-queue:ncs(config)#
devices commit-queue add-lock device [ ce0 ] block-otherscommit-queue-id 9577950918 ncs#show devices commit-queue | notabdevices commit-queue queue-item 9494446997 age 1444 status executing kilo-bytes-size 1 devices [ ce0 ce1 ce2 ] transient-errors [ ce0 ] is-atomic true devices commit-queue queue-item 9494530158 age 1361 status blocked kilo-bytes-size 1 devices [ ce0 ] waiting-for [ ce0 ] is-atomic true devices commit-queue queue-item 9577950918 age 55 status locked kilo-bytes-size 1 devices [ ce0 ] waiting-for [ ce0 ] is-atomic trueNow queue item
9577950918is blocking other items usingce0from entering the queue. -
Prune the usage of device
ce0from all queue items in the commit-queue:ncs(config)#
devices commit-queue set-atomic-behaviour atomic falsencs(config)#devices commit-queue prune device [ ce0 ]num-affected-queue-items 2 num-deleted-queue-items 1 ncs(config)#show devices commit-queue | notabdevices commit-queue queue-item 9577950918 age 102 status locked kilo-bytes-size 1 devices [ ce0 ] is-atomic trueThe lock will be in the queue until it has been deleted or unlocked. Queue items affecting other devices are still allowed entering the queue.
-
Fix the problem with device
ce0, remove the lock item and sync from the device:ncs(config)#
devices commit-queue queue-item 9577950918 deletencs(config)#devices device ce0 sync-fromresult true
In an LSA cluster each remote NSO has its own commit queue. When committing through the commit queue on the upper node NSO will automatically create queue items on the lower nodes where the devices in the transaction resides. The progress of the lower node queue items are monitored through a queue item on the upper node. The remote NSO is treated itself as a device in the queue item and the remote queue items and devices are opaque to user of the upper node.
ncs(config)#show configurationvpn l3vpn volvo as-number 65101 endpoint branch-office1 ce-device ce1 ce-interface GigabitEthernet0/11 ip-network 10.7.7.0/24 bandwidth 6000000 ! endpoint main-office ce-device ce0 ce-interface GigabitEthernet0/11 ip-network 10.10.1.0/24 bandwidth 12000000 ! ! ncs(config-if)#commit commit-queue asynccommit-queue-id 9494530158 ncs#show devices commit-queue | notabdevices commit-queue queue-item 9494446997 age 60 status executing kilo-bytes-size 1 devices [ lsa-nso2 lsa-nso3 ] is-atomic true ncs#show devices commit-queue | notabdevices commit-queue queue-item 9494446997 age 66 status executing kilo-bytes-size 1 devices [ lsa-nso2 ] completed [ lsa-nso3 ] is-atomic true ncs#show devices commit-queue% No entries found.
Warning
Generally it is not recommended to interfere with the queue items of the lower nodes that have been created by an upper NSO. This can cause the upper queue item to not synchronize with the lower ones correctly.
To be able to track the commit queue on the lower cluster
nodes, NSO uses the built-in stream
ncs-events that generates northbound notifications
for internal events. This stream is required if running the
commit queue in a clustered scenario. It is enabled in
ncs.conf:
<stream>
  <name>ncs-events</name>
  <description>NCS event according to tailf-ncs-devices.yang</description>
  <replay-support>true</replay-support>
  <builtin-replay-store>
    <enabled>true</enabled>
    <dir>./state</dir>
    <max-size>S10M</max-size>
    <max-files>50</max-files>
  </builtin-replay-store>
</stream>
In addition the commit queue needs to be enabled in the
cluster configuration.
ncs(config)#cluster commit-queue enabledncs(config)#commit
For more detailed information on how to set up clustering, see LSA Overview in Layered Service Architecture.
The goal of the commit queue is to increase the transactional throughput of NSO while keeping an eventual consistency view of the database. This means no matter if changes committed through the commit queue originate as pure device changes or as the effect of service manipulations the effects on the network should eventually be the same as if performed without a commit queue no matter if they succeed or not. This should be applicable to a single NSO node as well as NSO nodes in an LSA cluster.
Depending on the selected error-option
NSO will store the reverse of the original transaction
to be able to undo the transaction changes and get back
to the previous state. This data is stored in the
/ncs:devices/commit-queue/completed tree
from where it can be viewed and invoked with the
rollback action. When invoked the data will
be removed.
ncs# show devices commit-queue completed | notab
devices commit-queue completed queue-item 9494446997
 when      2015-02-09T16:48:17.915+00:00
 succeeded false
 devices   [ ce0 ce1 ce2 ]
 failed ce0
  reason "Failed to connect to device ce0: closed"
devices commit-queue completed queue-item 9494530158
 when      2015-02-09T16:48:17.915+00:00
 succeeded false
 devices   [ ce0 ]
 failed ce0
  reason "Deleted by user"
The error option can be configured under
/ncs:devices/global-settings/commit-queue/error-option.
Possible values are: continue-on-error,
rollback-on-error and
stop-on-error. The
continue-on-error value means that the
commit queue will continue on errors. No rollback data will be
created. The rollback-on-error value means that
the commit queue item will roll back on errors. The commit queue
will place a lock on the failed queue item, thus blocking
other queue items with overlapping devices to be executed.
The rollback action will then automatically be
invoked when the queue item has finished its execution.
The lock will be removed as part of the rollback.
The stop-on-error means that the commit
queue will place a lock on the failed queue item, thus blocking
other queue items with overlapping devices to be executed.
The lock must then either manually be released when the error
is fixed or the rollback action under
/devices/commit-queue/completed be invoked.
The rollback action is as:
ncs(config)# devices commit-queue completed queue-item 9494446997 rollback
The error option can also be given as a commit parameter.
Note
To guarantee service integrity NSO checks for overlapping service or device modifications against the items in the commit queue and returns an error if such exists. If a service instance does a shared set on the same data as a service instance in the queue actually changed, the reference count will be increased but no actual change is pushed to the device(s). This will give a false positive that the change is actually deployed in the network. The rollback-on-error and stop-on-error error options will automatically create a queue lock on the involved services and devices to prevent such a case.
In a clustered environment, different parts of the resulting configuration change set will end up on different lower nodes. This means on some nodes the queue item could succeed and on others it could not.
The error option in a cluster environment will originate on the upper node. The reverse of the original transaction will be committed on this node and propagated through the cluster down to the lower nodes. The net effect of this is the state of the network will be the same as before the original change.
Note
As the error option in a cluster environment will originate on the upper node, any configuration on the lower nodes will be meaningless.
When NSO is recovering from a failed commit, the
rollback data of the failed queue items in the cluster, is
applied and committed through the commit queue. In the
rollback the no-networking flag will be set on the commits
towards the failed lower nodes or devices to get CDB
consistent with the network. Towards the successful nodes or
devices the commit is done as before. This is what the
rollback action in
/ncs:devices/commit-queue/completed/queue-item
does.
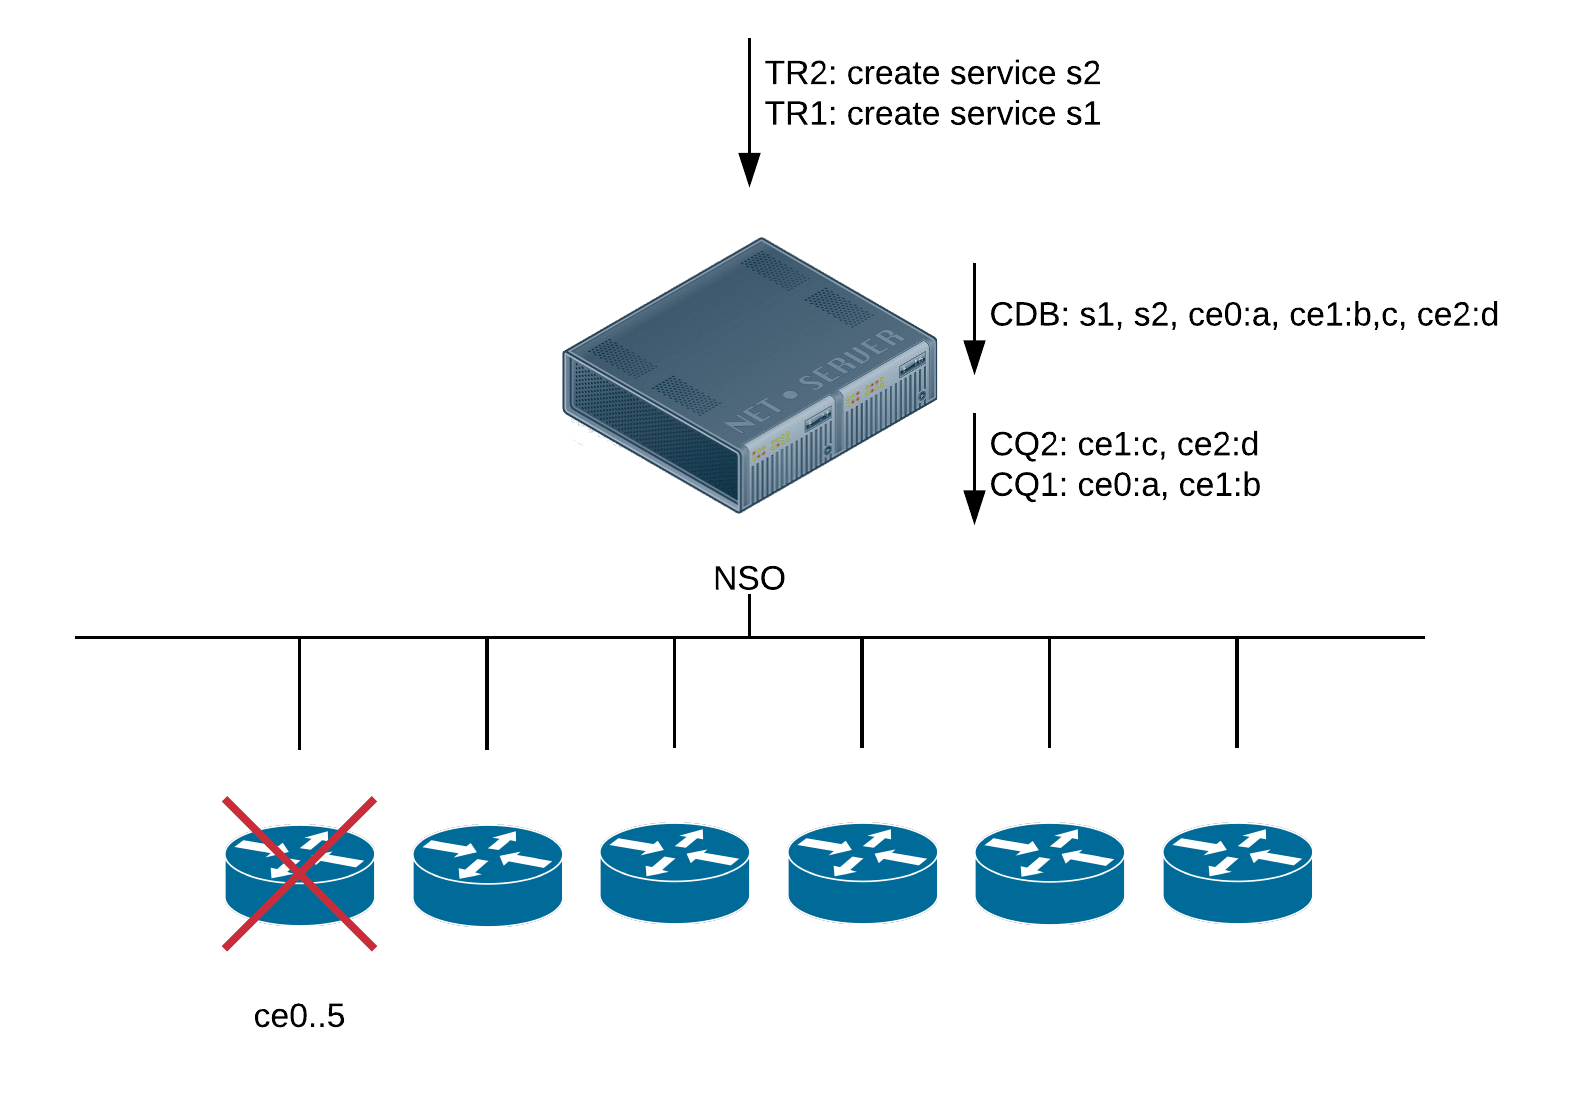 |
-
TR1; service s1 creates ce0:a and ce1:b. The nodes a and b are created in CDB. In the changes of the queue item, CQ1, a and b are created.
-
TR2; service s2 creates ce1:c and ce2:d. The nodes c and d are created in CDB. In the changes of the queue item, CQ2, c and d are created.
-
The queue item from TR1, CQ1, starts to execute. The node a cannot be created on the device. The node b was created on the device but that change is reverted as a failed to be created.
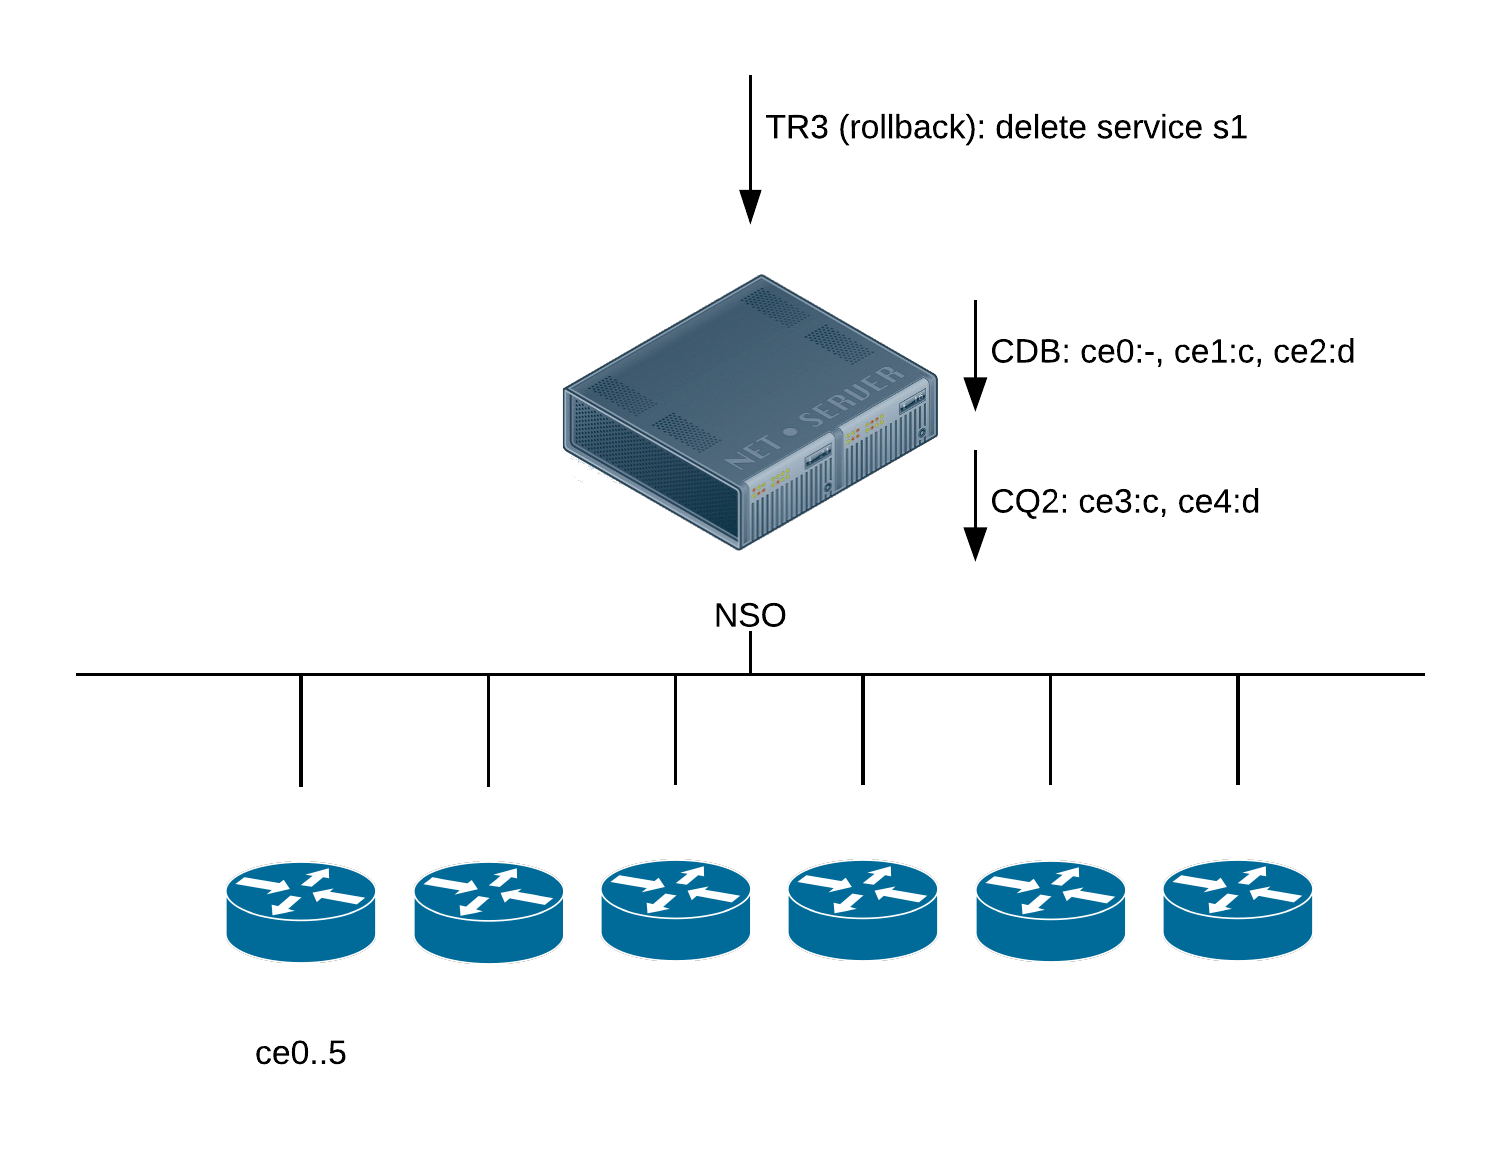 |
-
The reverse of TR1, rollback of CQ1, TR3, is committed.
-
TR3; service s1 is applied with the old parameters. Thus the effect of TR1 is reverted. Nothing needs to be pushed towards the network, so no queue item is created.
-
TR2; as the queue item from TR2, CQ2, is not the same service instance and has no overlapping data on the ce1 device, this queue item executes as normal.
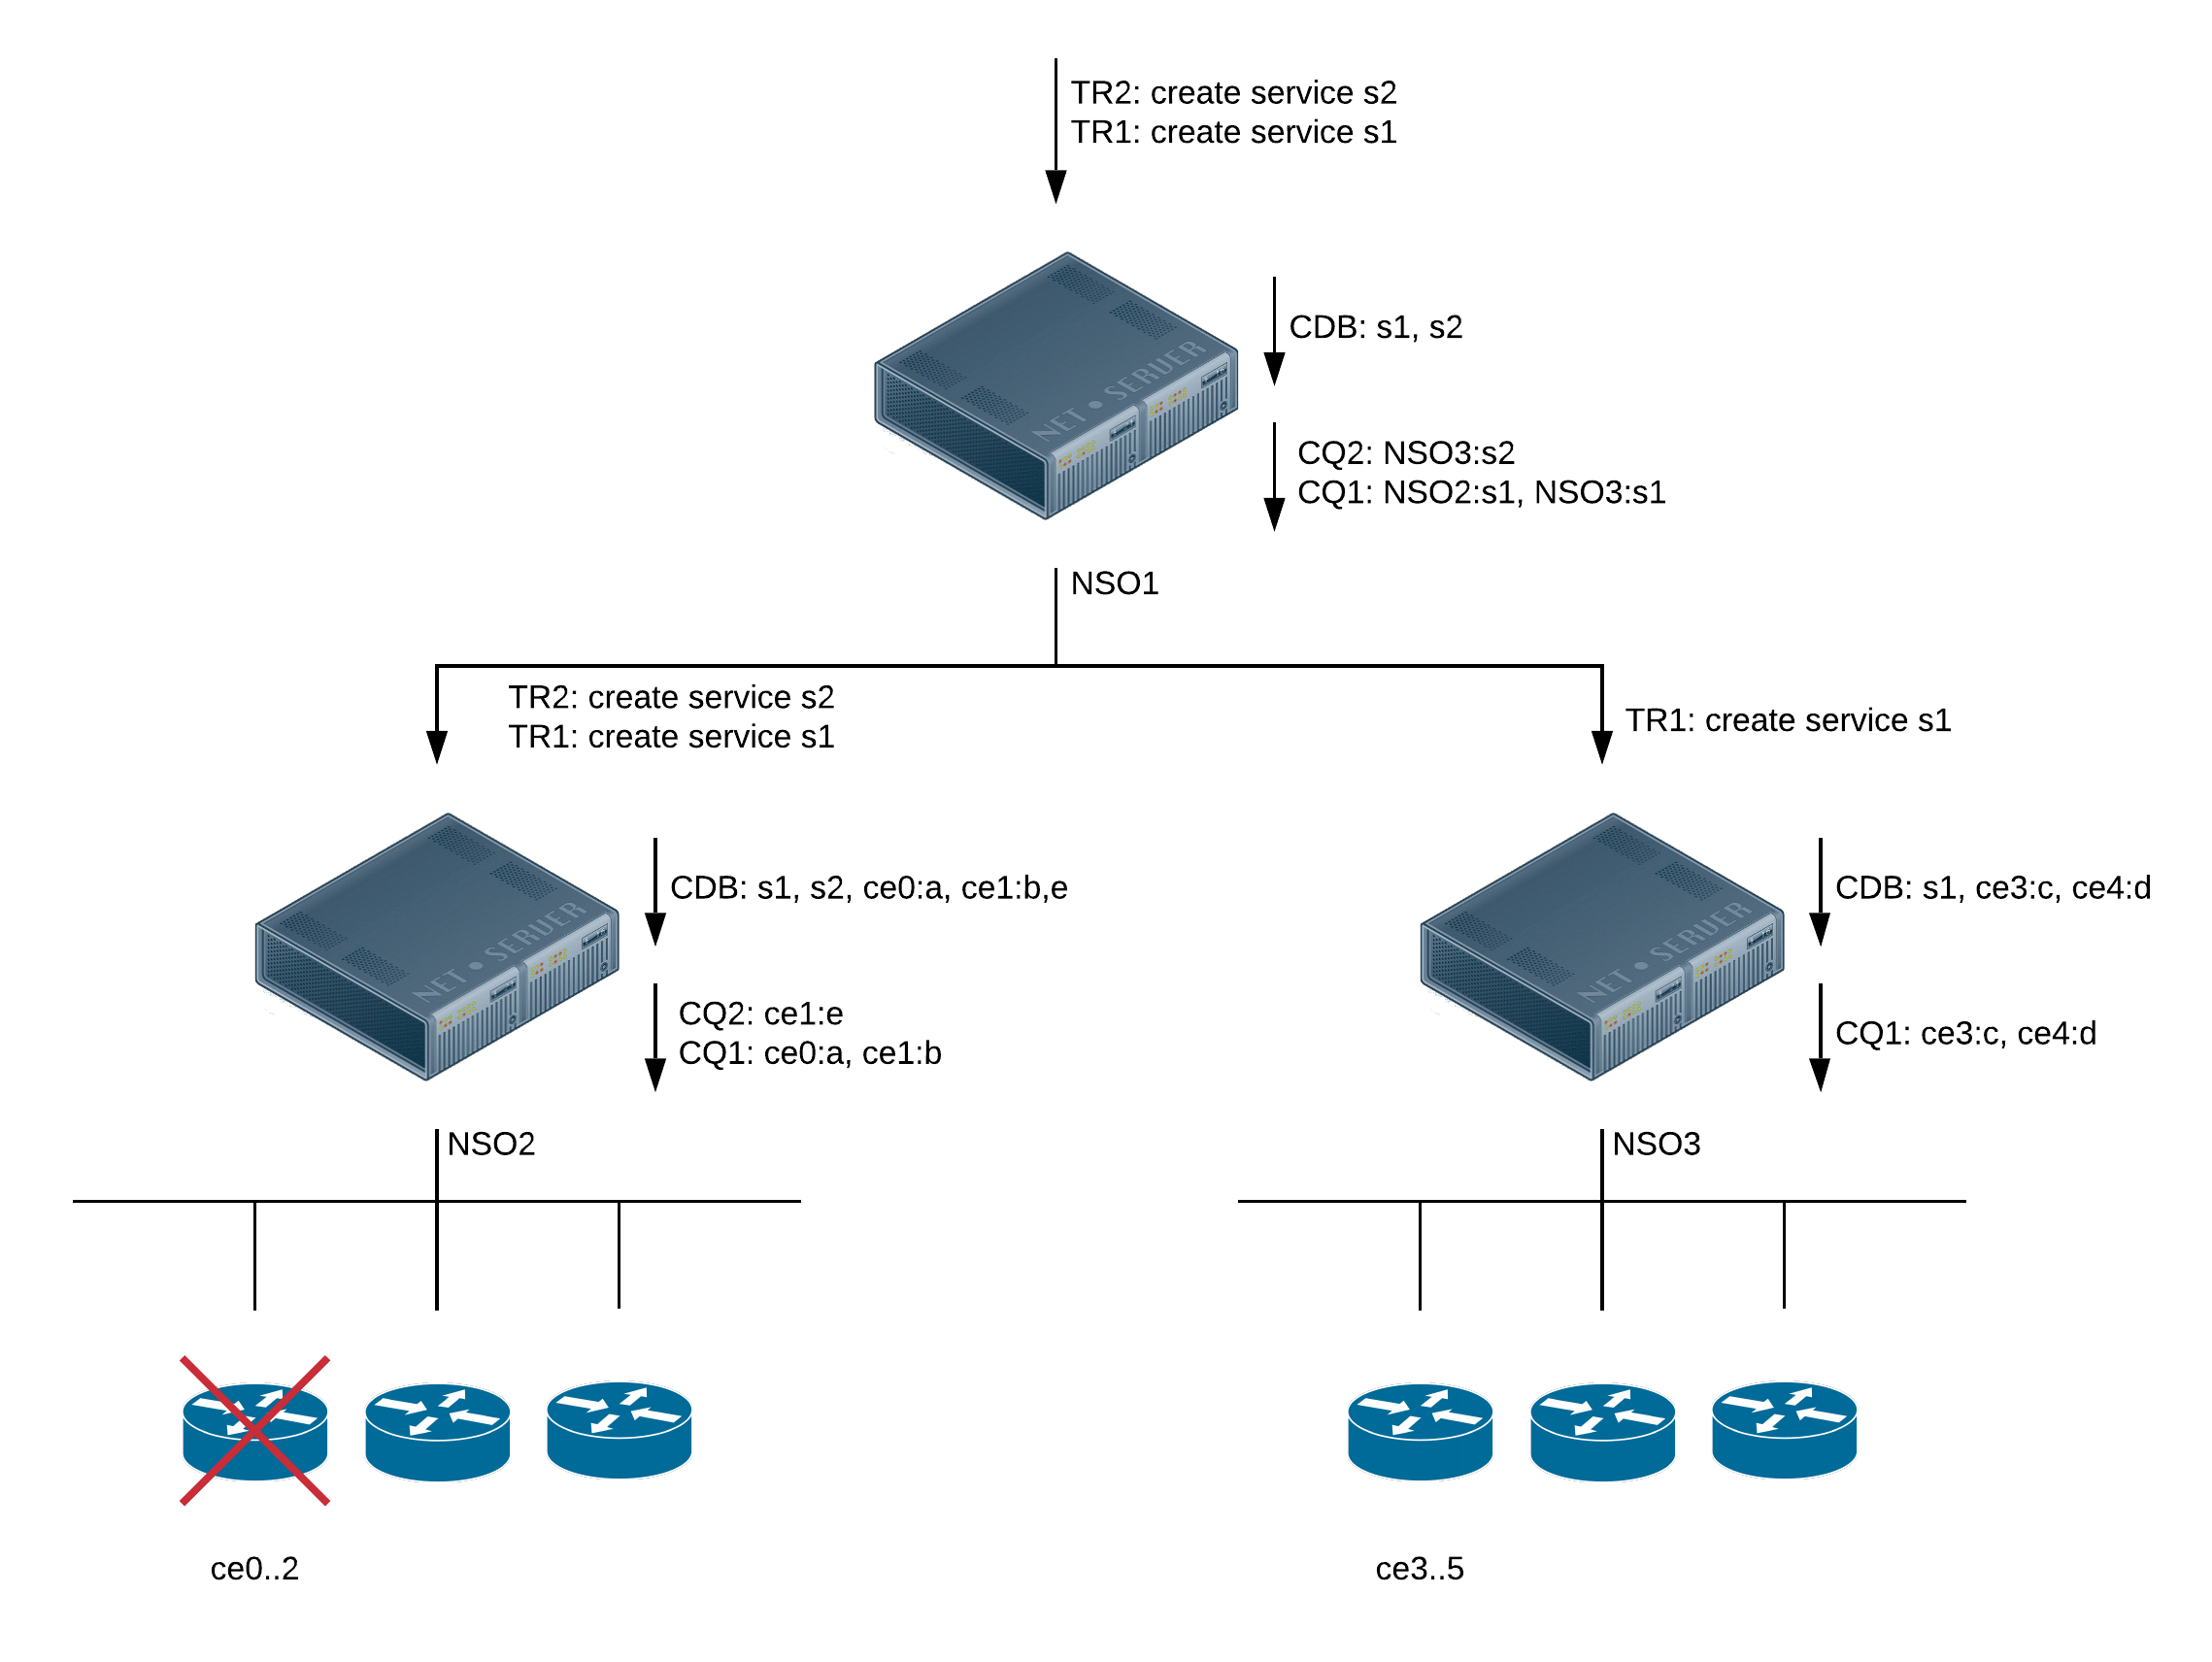 |
-
NSO1:TR1; service s1 dispatches the service to NSO2 and NSO3 through the queue item NSO1:CQ1. In the changes of NSO1:CQ1, NSO2:s1 and NSO3:s1 are created.
-
NSO1:TR2; service s2 dispatches the service to NSO2 through the queue item NSO1:CQ2. In the changes of NSO1:CQ2, NSO2:s2 is created.
-
The queue item from NSO2:TR1, NSO2:CQ1, starts to execute. The node a cannot be created on the device. The node b was created on the device but that change is reverted as a failed to be created.
-
The queue item from NSO3:TR1, NSO3:CQ1, starts to execute. The changes in the queue item is committed successfully to the network.
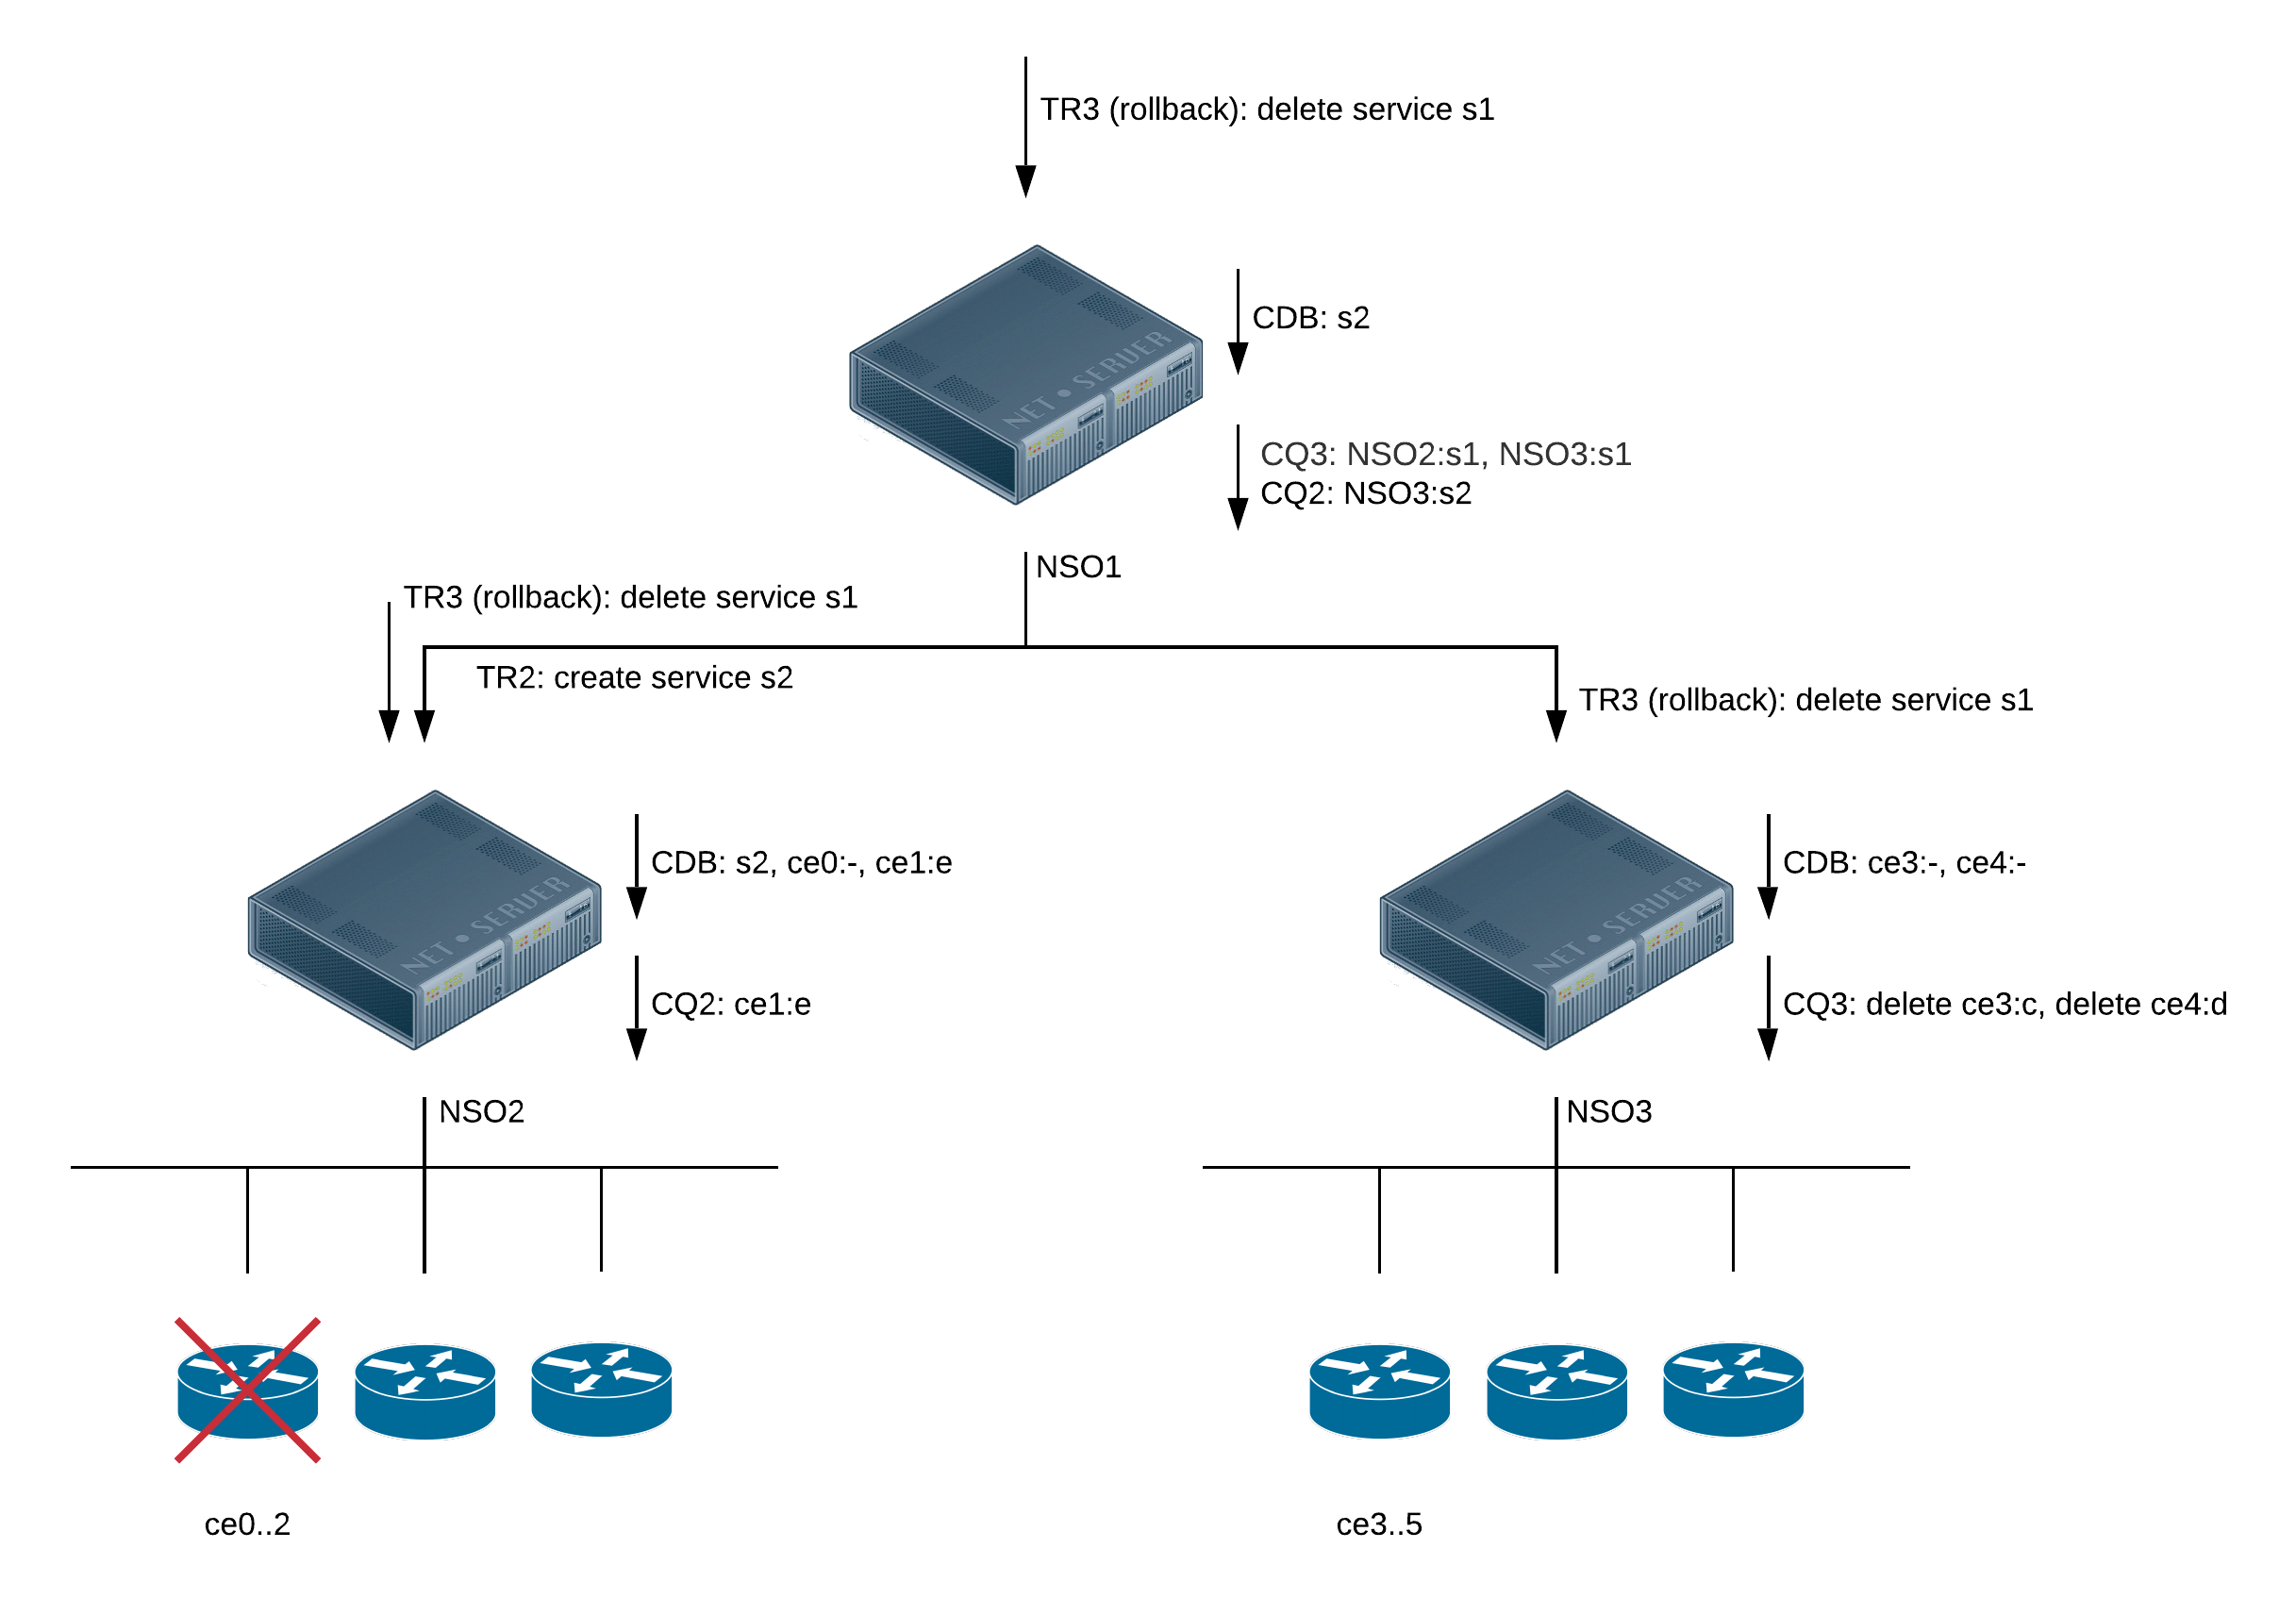 |
-
The reverse of TR1, rollback of CQ1, TR3, is committed on all nodes part of TR1 that failed.
-
NSO2:TR3; service s1 is applied with the old parameters. Thus the effect of NSO2:TR1 is reverted. Nothing needs to be pushed towards the network, so no queue item is created.
-
NSO1:TR3; service s1 is applied with the old parameters. Thus the effect of NSO1:TR1 is reverted. A queue item is created to push the transaction changes to the lower nodes that didn't fail.
-
NSO3:TR3; service s1 is applied with the old parameters. Thus the effect of NSO3:TR1 is reverted. Since the changes in the queue item NSO3:CQ1 was successfully committed to the network a new queue item NSO3:CQ3 is created to revert those changes.
If for some reason the rollback transaction would fail there are, depending on the failure, different techniques to reconcile the services involved:
-
Make sure the commit queue is blocked to not interfere with the error recovery procedure. Do a sync-from on the non-completed device(s) and then re-deploy the failed service(s) with the
reconcileoption to reconcile original data, i.e., take control of that data. This option acknowledges other services controlling the same data. The reference count will indicate how many services control the data. Release any queue lock that was created. -
Make sure the commit queue is blocked to not interfere with the error recovery procedure. Use un-deploy with the no-networking option on the service and then do sync-from on the non-completed device(s). Make sure the error is fixed and then re-deploy the failed service(s) with the
reconcileoption. Release any queue lock that was created.
As the goal of the commit queue is to increase the transactional throughput of NSO it means that we need to calculate the configuration change towards the device(s) outside of the transaction lock. To calculate a configuration change NSO needs a pre-commit running and a running view of the database. The key enabler to support this in the commit queue is to allow different views of the database to live beyond the commit. In NSO this is implemented by keeping a snapshot database of the configuration tree for devices and store configuration changes towards this snapshot database on a per device basis. The snapshot database is updated when a device in the queue has been processed. This snapshot database is stored on disk for persistence (the S.cdb file in the ncs-cdb directory).
The snapshot database could be populated in two ways. This is
controlled by the /ncs-config/cdb/snapshot/pre-populate
setting in the ncs.conf file. The
parameter controls if the snapshot database should be
pre-populated during upgrade or not. Switching this on
or off implies different trade-offs.
If set to false, NSO is optimized for the
default transaction behaviour. The snapshot database is
populated in a lazy manner (when a device is committed through
the commit queue for the first time after an upgrade). The
drawback is that this commit will suffer performance wise,
which is especially true for devices with large configurations.
Subsequent commits on the same device will not have the same
penalty.
If true, NSO is optimized for systems using
the commit queue extensively. This will lead to better
performance when committing using the commit queue with no
additional penalty for the first time commits. The drawbacks
are that the time to do upgrades will increase and also an
almost twofold increase of NSO memory consumption.
The NSO device manager has built-in support for the NETCONF Call Home client protocol operations over SSH as defined in RFC 8071.
With NETCONF SSH Call Home, the NETCONF client listens for TCP
connection requests from NETCONF servers. The SSH client
protocol is started when the connection is accepted.
The SSH client validates the server's presented host key with
credentials stored in NSO. If no matching host key is
found the TCP connection is closed immediately. Otherwise the
SSH connection is established, and NSO is enabled to
communicate with the device. The SSH connection is kept open
until the devices itself terminates the connection, a NSO
user disconnects the device, or the idle connection timeout is
triggered (configurable in the ncs.conf
file).
NSO will generate an asynchronous notification event whenever there is a connection request. An application can subscribe to these events and, for example, add an unknown device to the device tree with the information provided, or invoke actions on the device if it is known.
If an SSH connection is established, any outstanding configuration in the commit queue for the device will be pushed. Any notification stream for the device will also be reconnected.
NETCONF Call Home is enabled and configured under
/ncs-config/netconf-call-home in the
ncs.conf file. By default NETCONF Call Home
is disabled.
A device can be connected through the NETCONF Call Home client
only if /devices/device/state/admin-state is set to
call-home. This state prevents any southbound
communication to the device unless the connection has already
been established through the NETCONF Call Home client protocol.
The NSO device manager has built-in support for device notifications. Notifications are a means for the managed devices to send structured data asynchronously to the manager. NSO has native support for NETCONF event notifications (see RFC 5277) but could also receive notifications from other protocols implemented by the Network Element Drivers.
Notifications can be utilized in various different use case scenarios - It can be used to populate alarms in the Alarm manager, collect certain types of errors over time, build a network wide audit log, react on configuration changes etc.
The basic mode of operation is the manager subscribes to one or more named notification channels which are announced by the managed device. The manager keeps an open SSH channel towards the managed device, and then, the managed device may asynchronously send structured XML data on the ssh channel.
The notification support in NSO is usable as is without any further programming. However, NSO cannot understand any semantics contained inside the received XML messages, thus for example a notification with a content of "Clear Alarm 456" cannot be processed by NSO without any additional programming.
When you add programs to interpret and act upon notifications, make sure that resulting operations are idempotent. This means that they should be able to be called any number of times while guaranteeing that side effects only occur once. The reason for this is that, for example, replaying notifications can sometimes mean that your program will handle the same notifications multiple times.
In the tailf-ncs.yang data model you find a YANG
data model which can be used to:
-
Setup subscriptions. A subscription is configuration data from the point of view of NSO, thus if NSO is restarted, all configured subscriptions are automatically resumed.
-
Inspect which named streams a managed device publishes.
-
View all received notifications.
Note
Notifications must be defined at the top level of a YANG module. NSO does currently not support defining notifications inside lists or containers as specified in section 7.16 in RFC 7950.
In this section we will use the
examples.ncs/web-server-farm/basic
example.
Let's dive into an example session with the NSO CLI. In the NSO example collection, the webserver publish two NETCONF notification structures, indicating what they intend to send to any interested listeners. They all have the YANG module:
module notif {
  namespace "http://router.com/notif";
  prefix notif;

  import ietf-inet-types {
    prefix inet;
  }


  notification startUp {
    leaf node-id {
      type string;
    }
  }

  notification linkUp {
    leaf ifName {
      type string;
      mandatory true;
    }
    leaf extraId {
      type string;
    }
    list linkProperty {
      max-elements 64;
      leaf newlyAdded {
        type empty;
      }
      leaf flags {
        type uint32;
        default 0;
      }
      list extensions {
        max-elements 64;
        leaf name {
          type uint32;
          mandatory true;
        }
        leaf value {
          type uint32;
          mandatory true;
        }
      }
    }

    list address {
      key ip;
      leaf ip {
        type inet:ipv4-address;
      }
      leaf mask {
        type inet:ipv4-address;
      }
    }

    leaf-list iface-flags {
      type enumeration {
        enum UP;
        enum DOWN;
        enum BROADCAST;
        enum RUNNING;
        enum MULTICAST;
        enum LOOPBACK;
      }
    }
  }


  notification linkDown {
    leaf ifName {
      type string;
      mandatory true;
    }
  }
}
Follow the instructions in the README file if you want to run the example: build the example, start netsim, start ncs.
admin@ncs# show devices device pe2 notifications stream | notab
notifications stream NETCONF
 description    "default NETCONF event stream"
 replay-support false
notifications stream tailf-audit
 description    "Tailf Commit Audit events"
 replay-support true
notifications stream interface
 description              "Example notifications"
 replay-support           true
 replay-log-creation-time 2014-10-14T11:21:12+00:00
 replay-log-aged-time     2014-10-14T11:53:19.649207+00:00
The above shows how we can inspect - as status data - which named streams the managed device publishes. Each stream also has some associated data. The data model for that looks like:
module tailf-ncs {
  namespace "http://tail-f.com/ns/ncs";
  ...
  container devices {
     list device {
       ....
       container notifications {
          ....

          list stream {
             description "A list of the notification streams
                          provided by the device. NCS reads this list in
                          real time";

             config false;
             key name;
             leaf name {
               description "The name of the the stream";
               type string;
             }
             leaf description {
               description "A textual description of the stream";
               type string;
             }
             leaf replay-support {
               description "An indication of whether or not event replay
                            is available on this stream.";
               type boolean;
             }
             leaf replay-log-creation-time {
               description "The timestamp of the creation of the log
                           used to support the replay function on
                           this stream.
                           Note that this might be earlier then
                           the earliest available
                           notification in the log.  This object
                           is updated if the log resets
                           for some reason.";

               type yang:date-and-time;
             }
             leaf replay-log-aged-time {
               description "The timestamp of the last notification
                            aged out of the log";
               type yang:date-and-time;
             }
           }
Let's setup a subscription for the stream called interface. The subscriptions are NSO configuration data, thus to create a subscription we need to enter configuration mode:
admin@ncs(config)# devices device www0..2 notifications \
      subscription mysub stream interface
admin@ncs(config-subscription-mysub)# commit
The above, created subscriptions for the interface stream on all web servers, i.e managed devices, www0, www1 and www2. Each subscription must have an associated stream to it, this is however not the key for an NSO notification, the key is a free form text string. This is since we can have multiple subscriptions to the same stream. More on this later when we describe the filter that can be associated to a subscription. Once the notifications start to arrive, they are read by NSO and stored in stable storage as CDB operational data. they are stored under each managed device - and we can view them as:
admin@ncs# show devices device notifications | notab
devices device www0
 notifications subscription mysub
  local-user admin
  status     running
 notifications stream NETCONF
  description    "default NETCONF event stream"
  replay-support false
 notifications stream tailf-audit
  description    "Tailf Commit Audit events"
  replay-support true
 notifications stream interface
  description              "Example notifications"
  replay-support           true
  replay-log-creation-time 2014-10-14T11:21:12+00:00
  replay-log-aged-time     2014-10-14T11:56:45.755964+00:00
 notifications notification-name startUp
  uri http://router.com/notif
 notifications notification-name linkUp
  uri http://router.com/notif
 notifications notification-name linkDown
  uri http://router.com/notif
 notifications received-notifications notification 2014-10-14T11:54:43.692371+00:00 0
  user          admin
  subscription  mysub
  stream        interface
  received-time 2014-10-14T11:54:43.695191+00:00
  data linkUp ifName eth2
  data linkUp linkProperty
   newlyAdded
   flags      42
   extensions
    name  1
    value 3
   extensions
    name  2
    value 4668
  data linkUp address 192.168.128.55
   mask 255.255.255.0
Each received notification has some associated meta data, such as the time the event was received by NSO, which subscription and which stream is associated to the the notification and also which user created the subscription.
It is fairly instructive to inspect the XML that goes on the wire when we create a subscription and then also receive the first notification. We can do:
ncs(config)#devices global-settings trace pretty trace-dir ./logsncs(config)#commitncs(config)#devices disconnectncs(config)#devices device pe2 notifications \ subscription foo stream interfacencs(config-subscription-foo)#topncs(config)#exitncs#file show ./logs/netconf-pe2.trace<<<<in 14-Oct-2014::13:59:52.295 device=pe2 session-id=14 <notification xmlns="urn:ietf:params:xml:ns:netconf:notification:1.0"> <eventTime>2014-10-14T11:58:51.816077+00:00</eventTime> <linkUp xmlns="http://router.com/notif"> <ifName>eth2</ifName> <linkProperty> <newlyAdded/> <flags>42</flags> <extensions> <name>1</name> <value>3</value> </extensions> <extensions> <name>2</name> <value>4668</value> </extensions> </linkProperty> <address> <ip>192.168.128.55</ip> <mask>255.255.255.0</mask> </address> </linkUp> </notification> .........
Thus, once the subscription has been configured, NSO continuously receives, and stored in CDB oper persistent storage, the notifications sent from the managed device. The notifications are stored in a circular buffer, to set the size of the buffer, we can do:
ncs(config)#devices device www0 notifications \ received-notifications max-size 100admin@ncs(config-device-www0)#commit
The default value is 200. Once the size of the circular buffer is exceeded, the oldes notification is removed.
A running subscription can be in either of three states. The YANG model has:
module tailf-ncs {
  namespace "http://tail-f.com/ns/ncs";
  ...
  container devices {
     list device {
       ....
       container notifications {
          ....
          list subscription {
             .....
            leaf status {
            description "Is this subscription currently running";
            config false;
            type enumeration {
              enum running {
                description "The subscription is established and we should
                             be receiving notifications";
              }
              enum connecting {
                description "Attempting to establish the subscription";
              }
              enum failed {
                description
                "The subscription has failed, unless the failure is
                 in the connection establishing, i.e connect() failed
                 there will be no automatic re-connect";
              }
            }
          }
If a subscription is in the failed state, an optional failure-reason field indicates the reason for the failure. If a subscription fails due to, not being able to connect to the managed device or if the managed device closed its end of the SSH socket, NSO will attempt to automatically reconnect. The re-connect attempt interval is configurable.
ncs# show devices device notifications subscription
             LOCAL           FAILURE  ERROR
NAME  NAME   USER   STATUS   REASON   INFO
---------------------------------------------
www0  foo    admin  running  -        -
      mysub  admin  running  -        -
www1  mysub  admin  running  -        -
www2  mysub  admin  running  -        -
SNMP Notifications (v1, v2c, v3) can be received by NSO and acted upon. The SNMP receiver is a stand-alone process and by default all notifications are ignored. IP addresses must be opted in and a handler must be defined to take actions on certain notifications. This can be used to for example listen to configuration change notifications and trigger a log action or a resync for example
This actions are programmed in Java, see the SNMP Notification Receiver in Development Guide in Development Guide how to do this.
NSO is able to configure inactive parameters on the devices that support inactive configuration. Currently these devices include Juniper devices and devices that announce 'http://tail-f.com/ns/netconf/inactive/1.0' capability. NSO itself implements 'http://tail-f.com/ns/netconf/inactive/1.0' capability which is formally defined in tailf-netconf-inactive YANG module.
To recap, a node that is marked as inactive exists in the datastore, but is not used by the server. The nodes announced as inactive by the device will also be inactive in the device's configuration in NSO, and activating/deactivating a node in NSO will push the corresponding change to the device. This also means that in order for NSO to be able to manage inactive configuration both /ncs-config/enable-inactive and /ncs-config/netconf-north-bound/capabilities/inactive need to be enabled in ncs.conf.
If the inactive feature is disabled in ncs.conf, NSO will still be able to manage devices that have inactive configuration in their datastore, but the inactive attribute will be ignored, so the data will appear as active in NSO and it would not be possible for NSO to activate/deactivate such nodes in the device.