Install EFM
An important component of EFM is the broker. The EFM broker is a software component that reliably routes messages between clients by providing publish-subscribe and request-reply message exchange with guaranteed QoS delivery.
EFM Brokers can be connected to each other to enable message routing between EFM nodes. This kind of connection is initiated by the EFM node that wants to send information upstream, and is called the "upstream connection".
To get started, install EFM on a Linux machine or a Cisco gateway. This also starts the EFM broker. Then create the upstream connection.
Option 1: Install EFM on Linux
Install EFM on a Linux machine.
Use the following command to start the EFM broker process:
/opt/cisco/kinetic/efm_server/bin/daemon.sh start
Wait a few seconds for the broker to start. Make sure the server status is Started with a process pid. Note: Do NOT start the broker process using “sudo” or as the “root” user.

Option 2: Install EFM on a gateway
You can also install the EFM IOx app on a Cisco gateway.
DCM can push this app to one or more gateways from the Kinetic cloud.
Upload the app to your Cisco Kinetic organization.
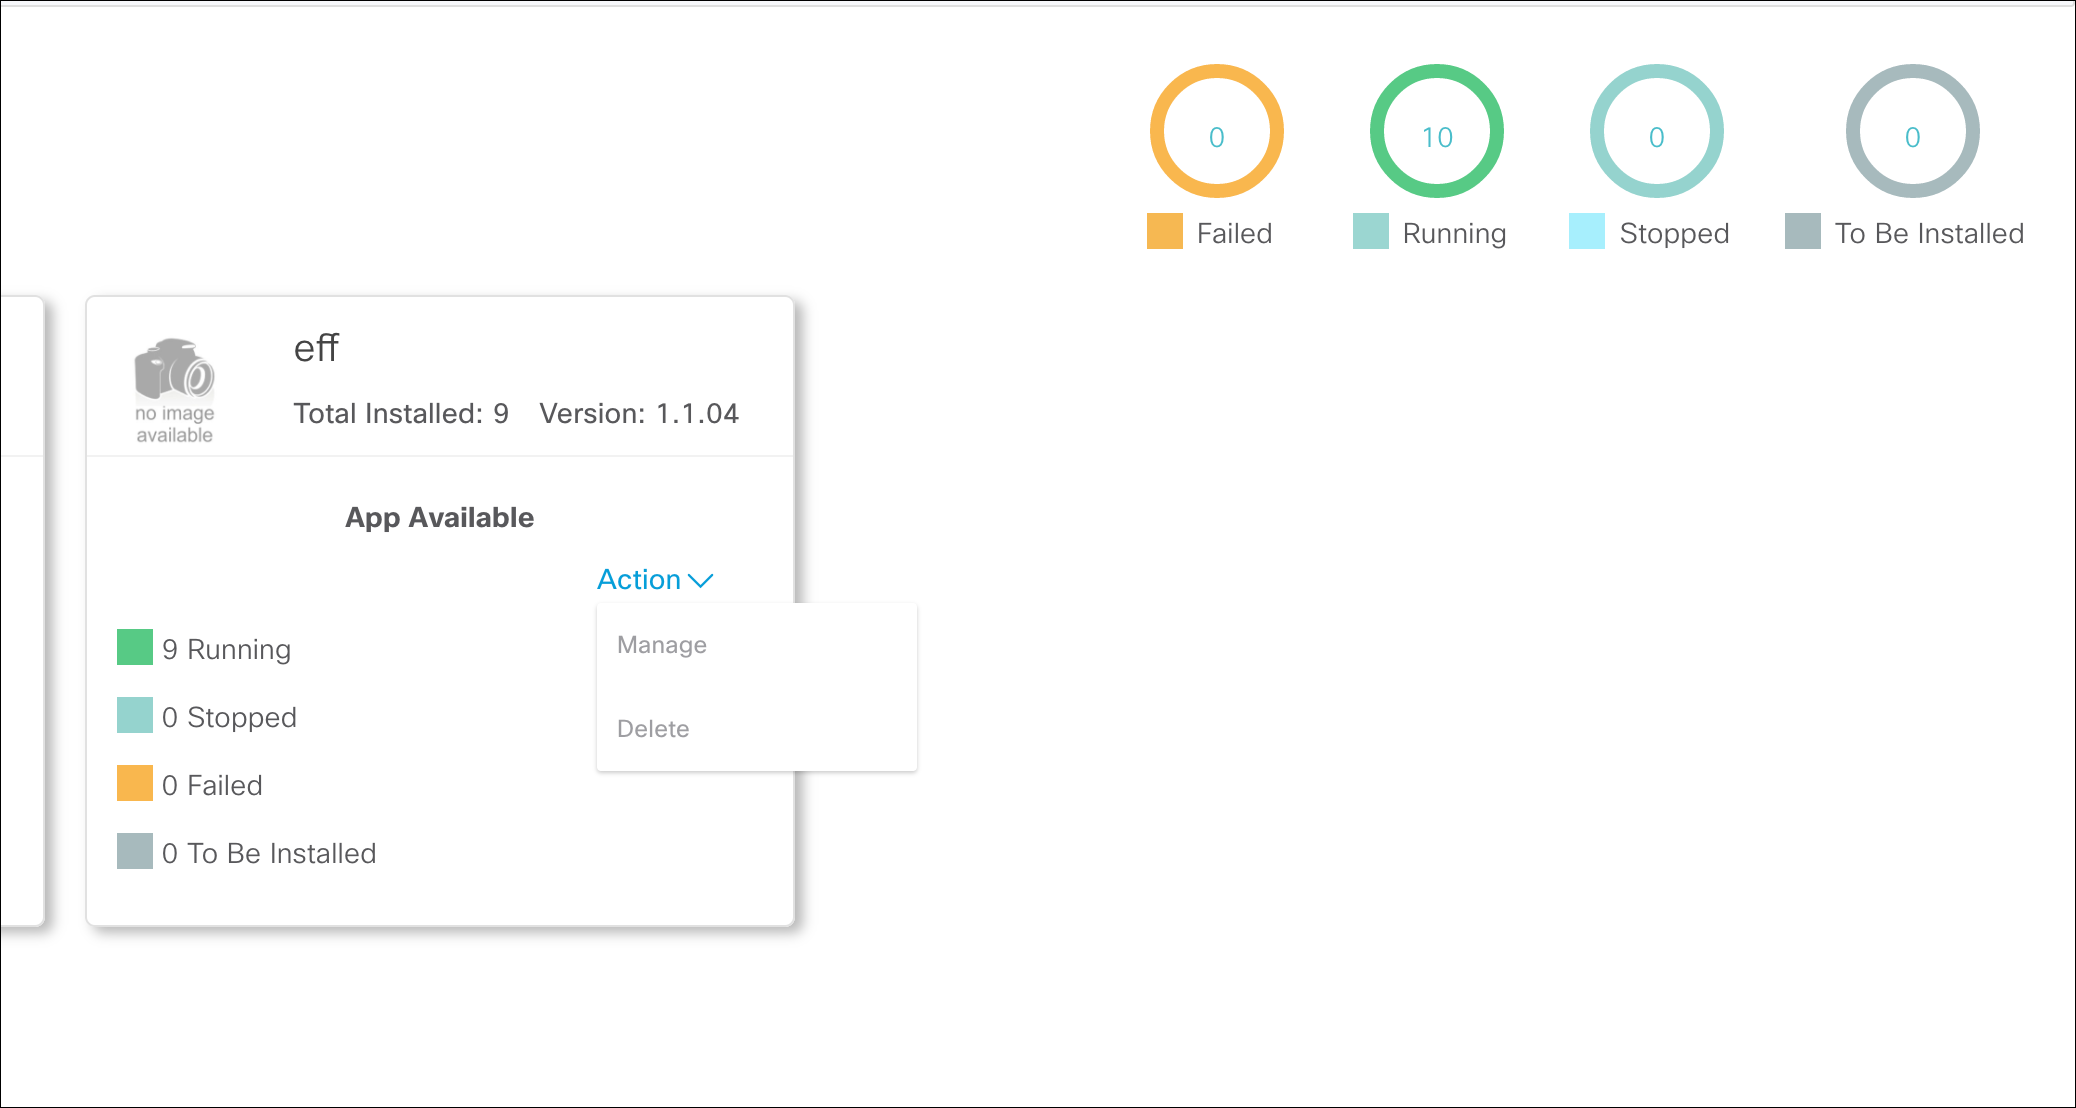
Once uploaded, the EFM app is ready to be installed on the Cisco IR8x9 gateways.
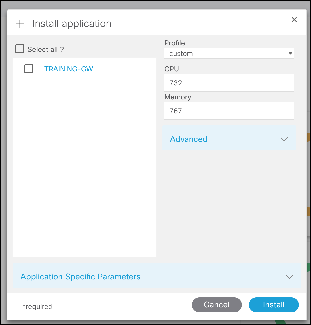
Click Install, select the gateways and use the custom profile to install it. At least 256MB disk space is required.
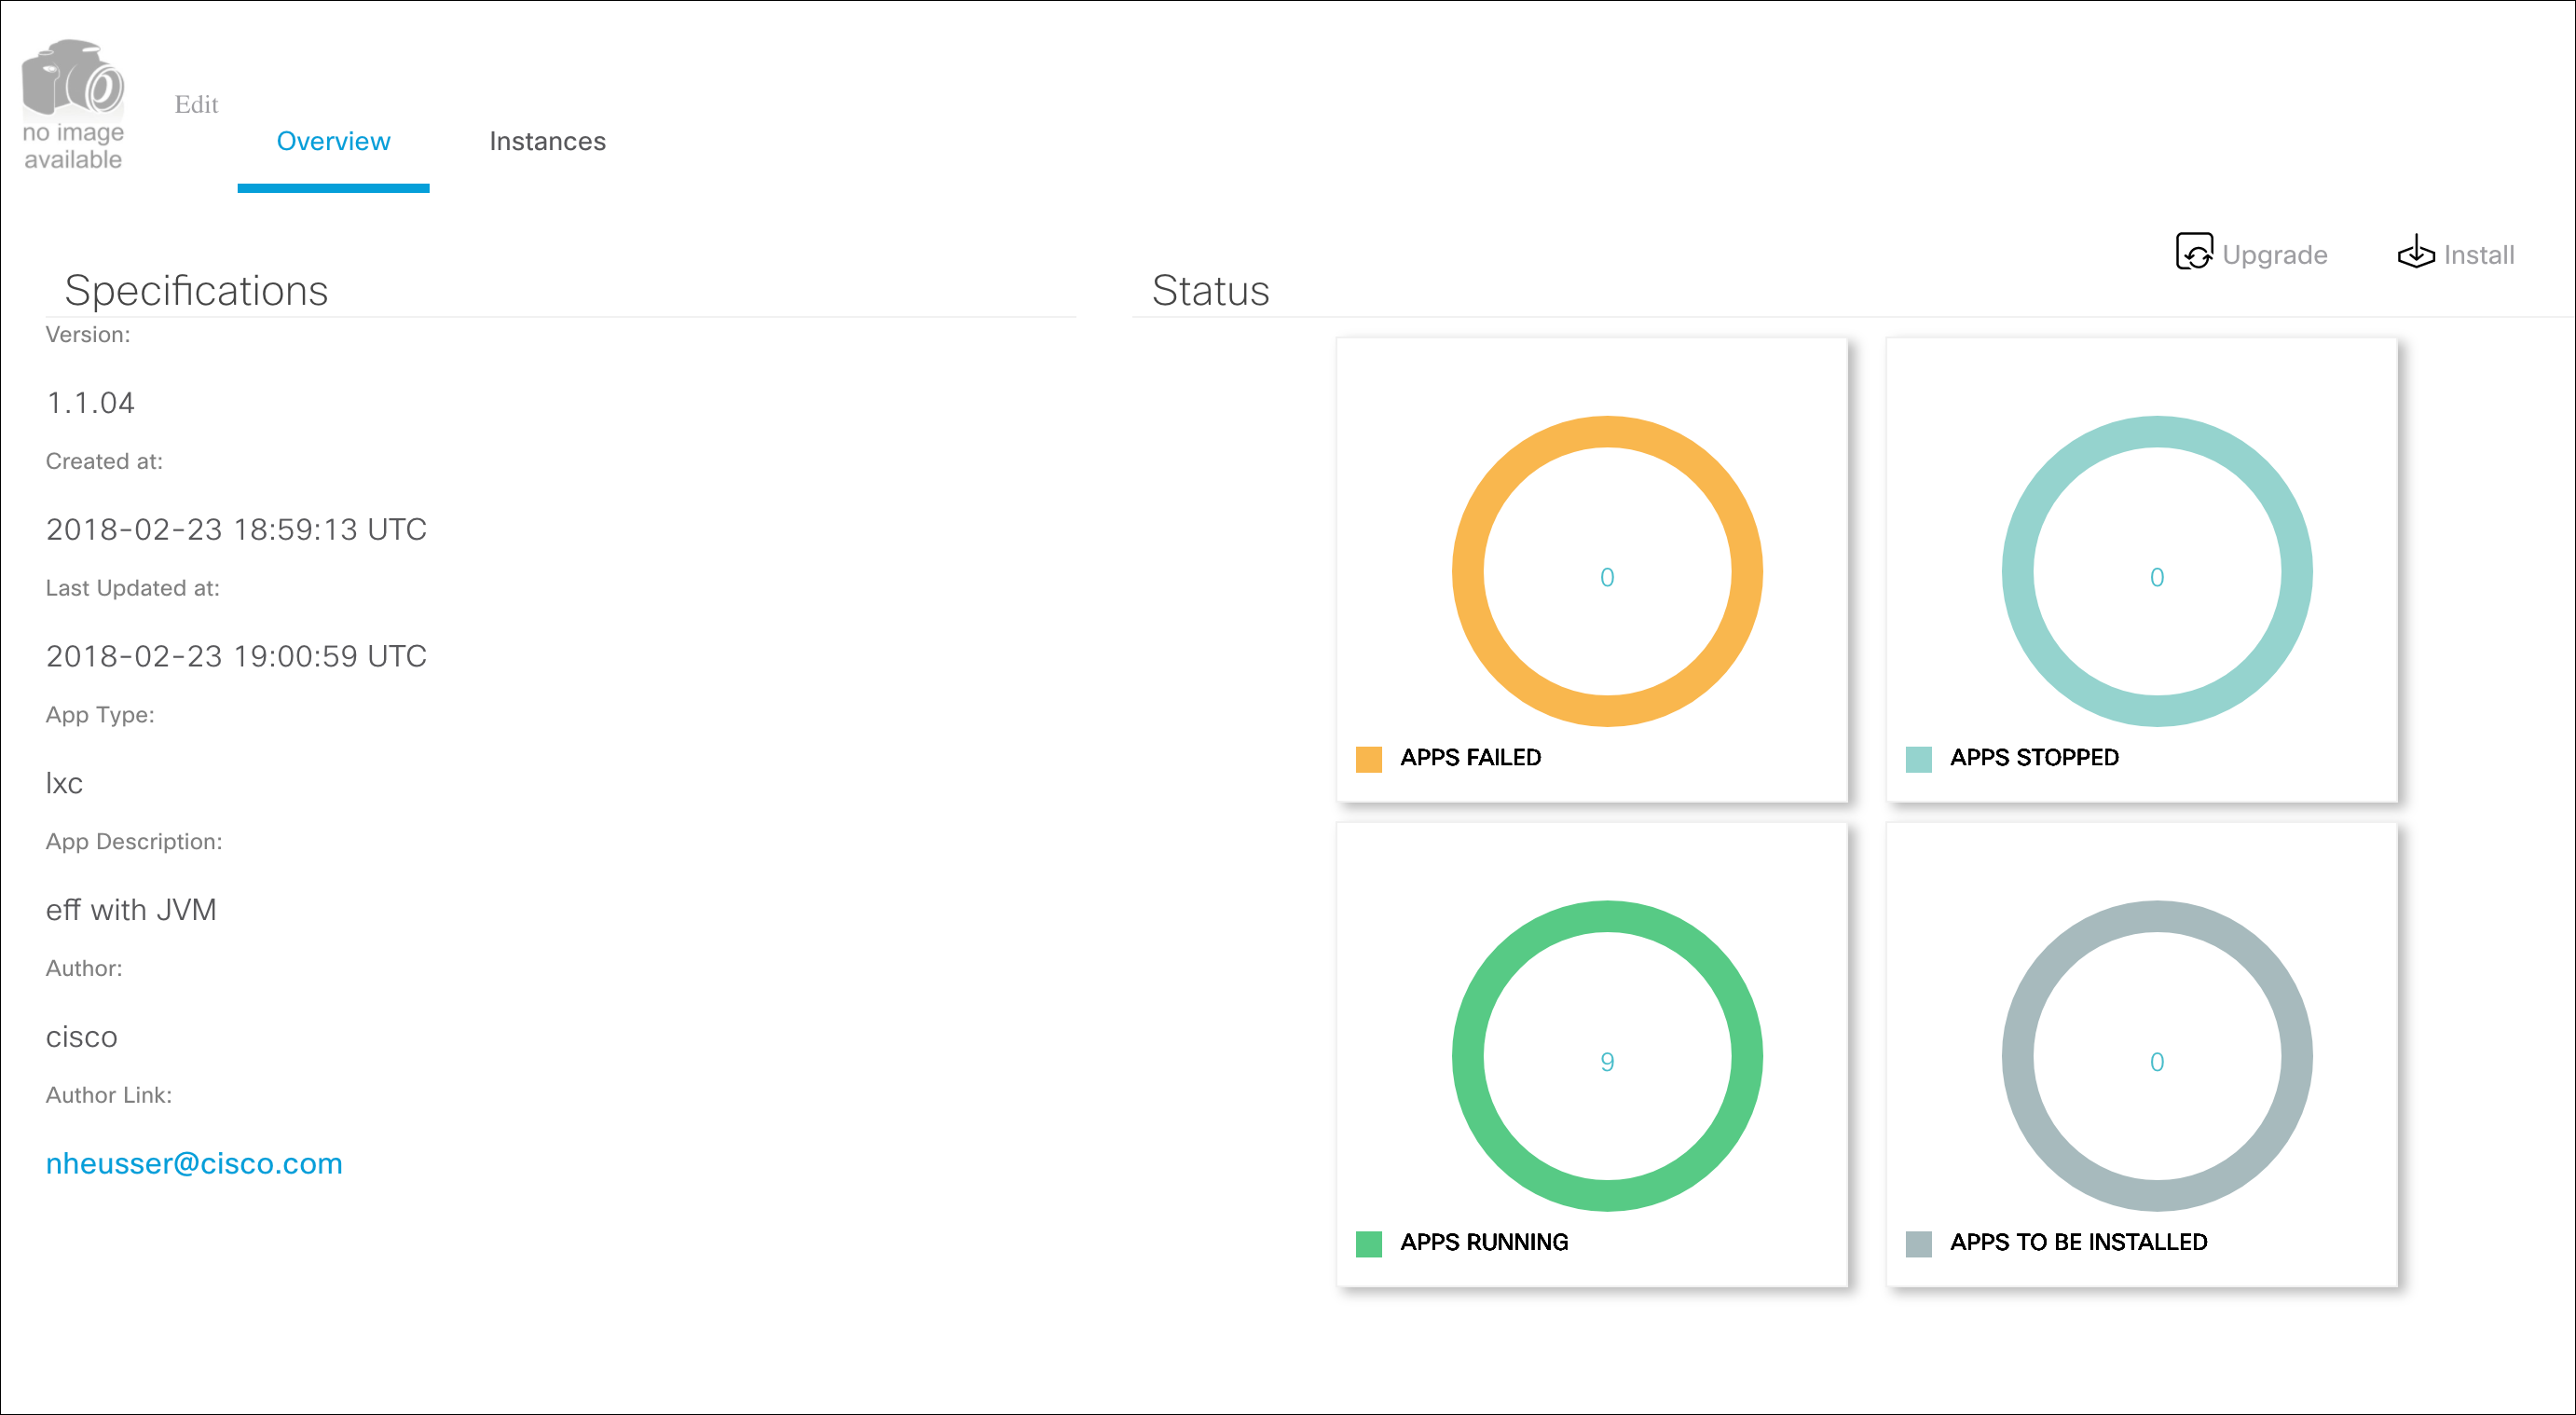
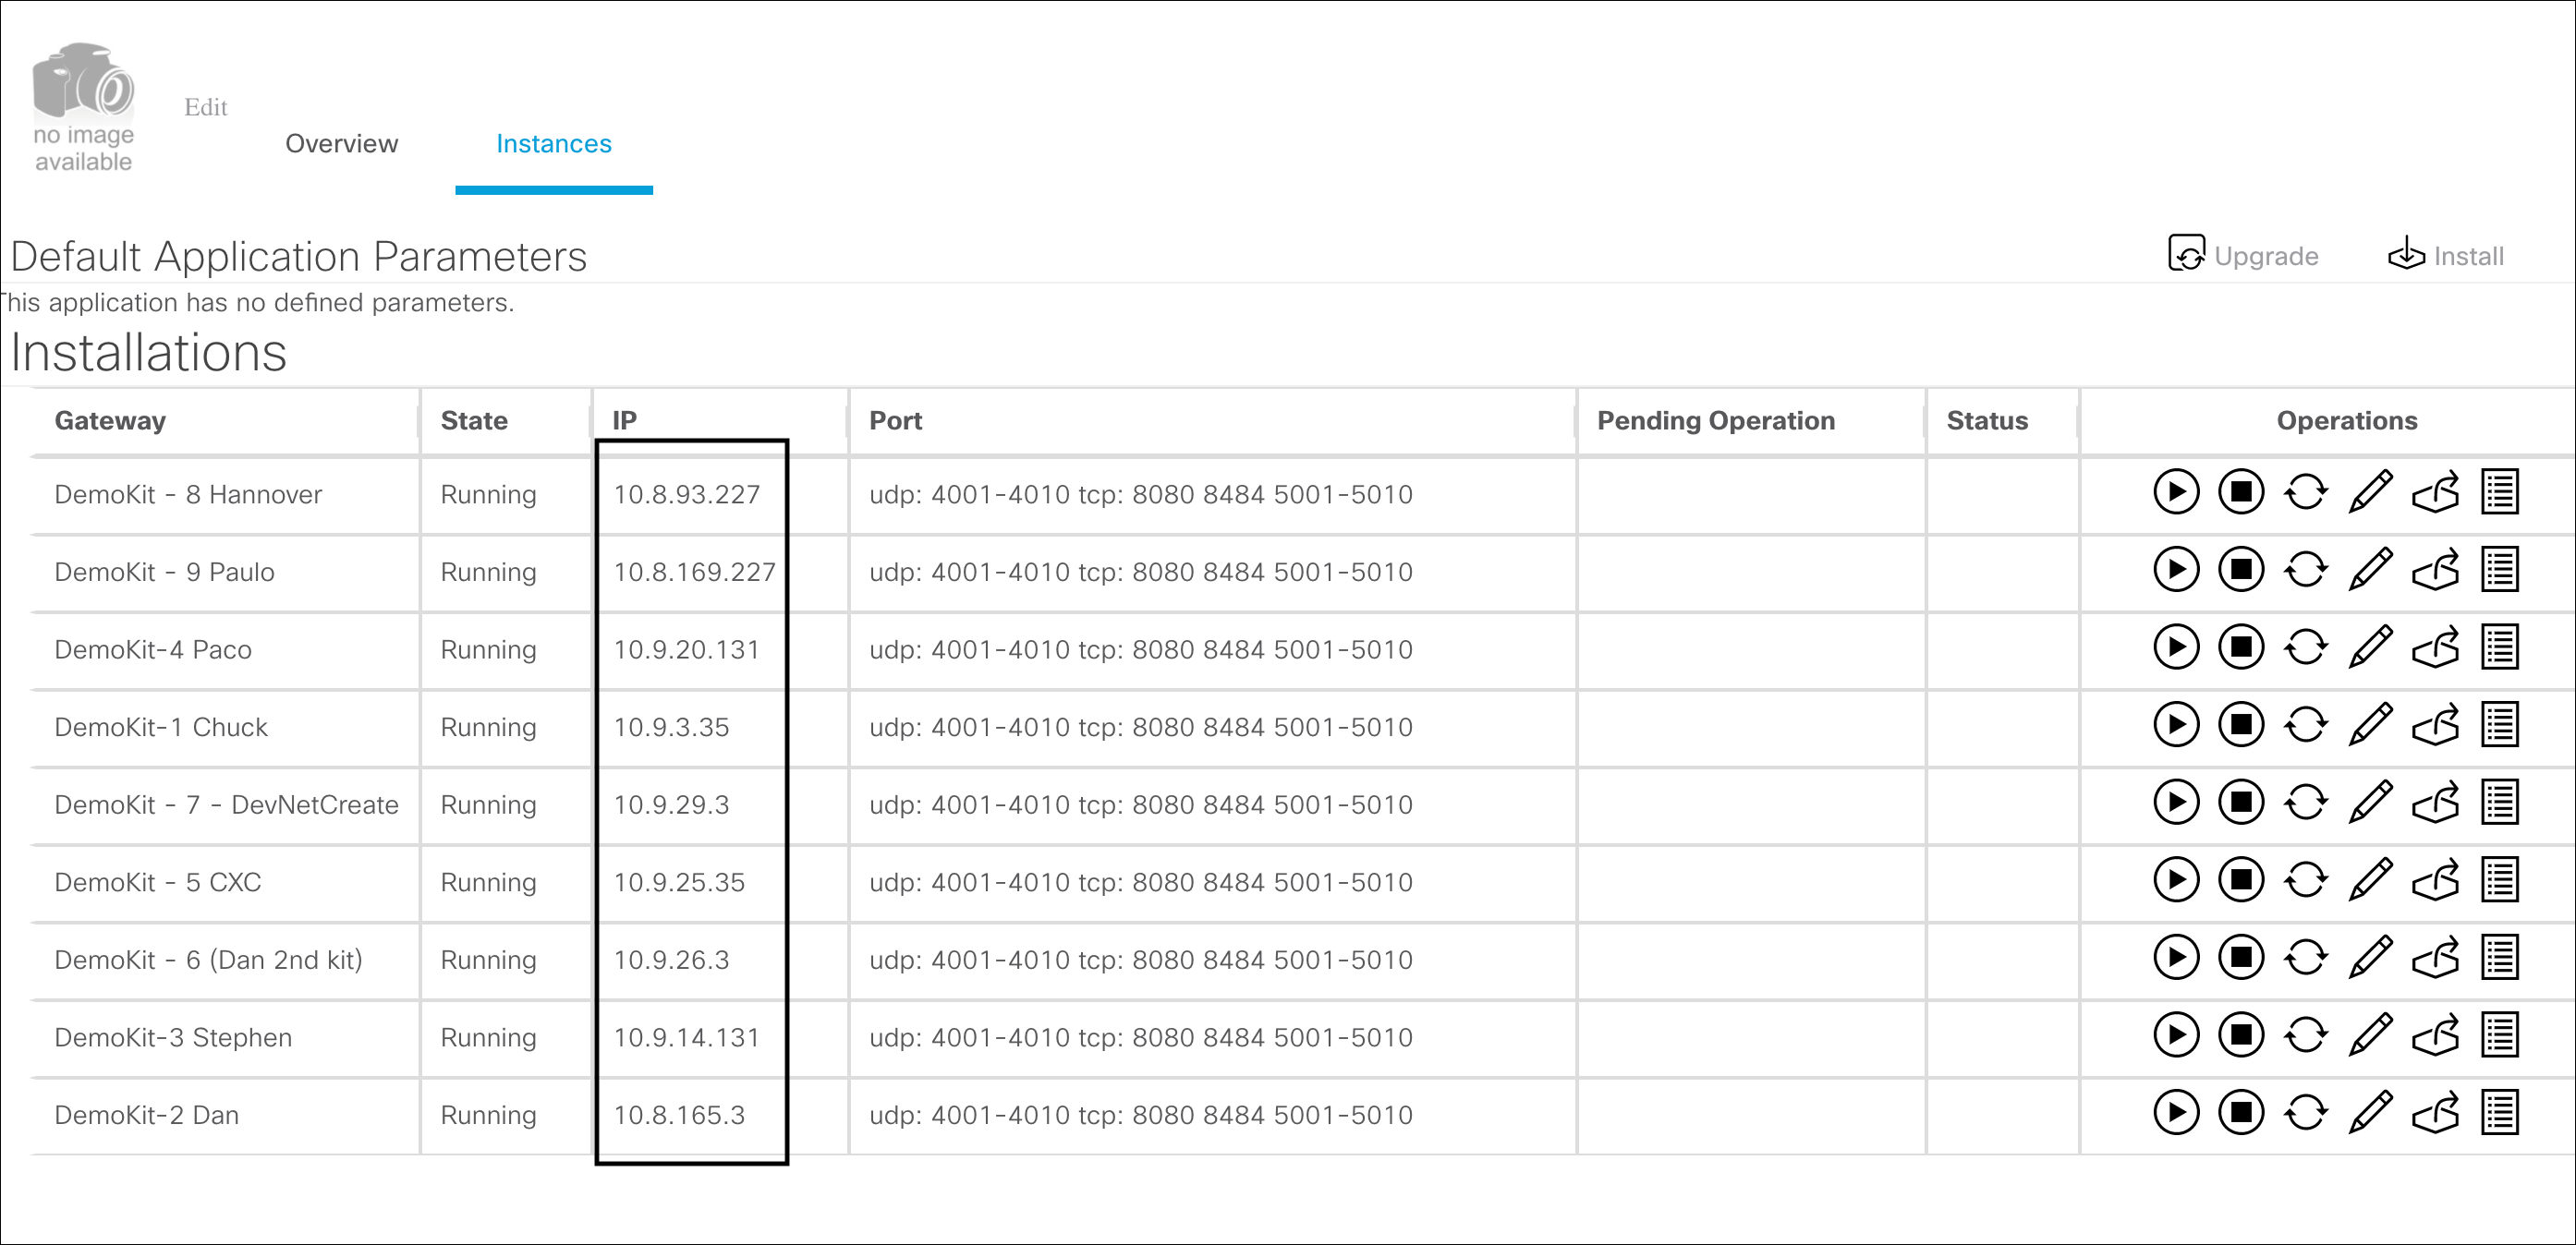
Once installed, you will see the running instances of the EFM app:
Now EFM app on a Gateway has access to all IP / Serial devices behind it.
Configure the SSL certificate
Configuring the SSL certificate to allow secure inbound connections on the EFM IOx app.
This is a necessary step for the message broker to allow incoming secure connections is to properly install the SSL certificate files and modify the broker configuration file server.json.
The process described below only works on versions 1.1 and greater due to internal file structure are different and the configuration files are not located in the data partition of the application container.
Generate a self-signed certificate
For some environments, the use of a self-signed certificate is sufficient. For production, the user can obtain certificates and install them on the EFM system.
In the following installation description, we refer to the server key file as key.pemand the server certificate file to be server.pem
On any posix compliant system with an openssl installation, the following command will generate a key file and a corresponding self signed certificate:
openssl req -nodes -x509 -days 365 -newkey rsa:2048 -out server.pem -keyout key.pem -subj "/C=US/ST=CA/L=San Francisco"
Configure EFF for inbound HTTPS connections
There are two ways to modify the EFF application configuration, the first using the Local Manager UI and the second is the ioxclient. The ioxclient allows for automation through scripting if needed.
Option 1: Installing and Configuring Self-Signed Key and Certificate using the Local manager
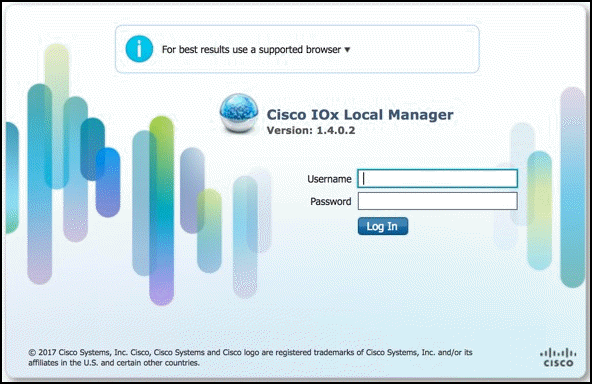
Connect via a web browser to the IOx router to the defined port for the Cisco IOx Local Manager.
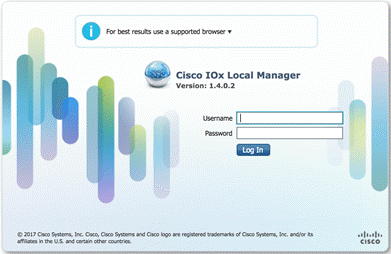
For usage of the local manager UI you have to use a browser to connect to the IOx device using the https connection to the port 8443. You have to log into the UI using the required credentials and the
Once logged in, the interface should show the Applications by selecting the Applications tab.
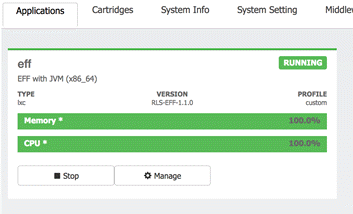
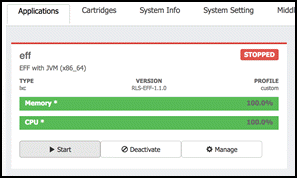
The EFM application is assumed to be installed and running, before we can make changes to the broker configuration file we must first stop the application. Simply select Stop in the Local Manager UI.
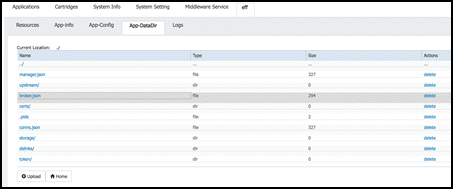
After the application has stopped, select the application name “eff” in the tabs. This will expose additional tabs underneath to allow for more functions. Select the “App-DataDir” tab.
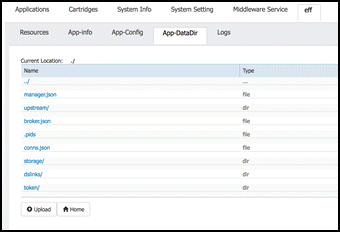
This application directory App-DataDir contains all configuration files and installed links.
First upload the server certificate by selection of the Upload button below the file list. Enter the target path certs/server.pem into the Path edit field of the pop up window. Pay attention not to forget the folder name in the path. Then hit the browse button in the pop up window and select the server certificate file in your local file system. After selecting of the Ok button the Local Manager will create a folder named certs in the application directory and should have put the server certificate server.pem into that folder.
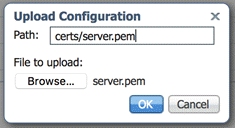
In the next step, we upload the server key file the same way as we uploaded the certificate. Select the upload button a second time and enter certs/key.pem into the target path edit field this time. Then select the Browse button and select the server key file in your local file system. After selection of the Ok button the local manager should have added the key file into the certs, too.

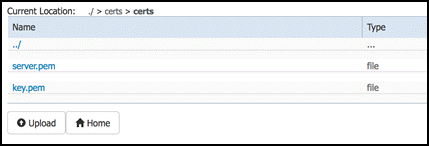
To verify the files have been uploaded, you may check the content of the certs folder by selecting the certs folder in the UI. But don’t forget to get back to the application directory for the next steps. The certs folder should look like in the next screen shot.
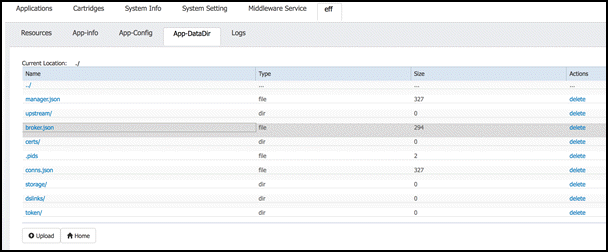
We need to modify the existing broker.json configuration file by downloading, editing and replacing the existing file. To download the configuration file broker.json, select it in the file list and store it locally our your computer.
Now modify it with an editor of your choice. Take care the file should still be a plain ASCII file with a valid json contents after editing. The following green marked elements needed to be modified in the configuration file.
- In the https section, the value of enabled must be set to
- In the https section, add the name of the certificate file “certName”: “server.pem”
- In the https section, add the name of the key file “certKeyName”: “key.pem”
After the modification, the configuration file should look like the following (pay attention to maintain the JSON formatting!):
{

  "http": {

    "enabled": true,

    "host": "0.0.0.0",

    "port": 8080

  },

  "https": {

    "enabled": true,

    "host": "0.0.0.0",

    "port": 8484,

  "certName": "server.pem",

  "certKeyName": "key.pem"

  },

  "log_level": "info",

  "allowAllLinks": true,

  "maxQueue": 1024,

  "defaultPermission": null,

  "storage": {

    "path": "."

  }

}
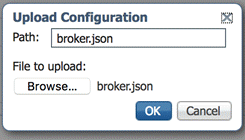
To upload the modified configuration file, we first need to delete the original file since the Local Manager does not allow to overwrite an existing file. Therefore we must first select the delete option on the rightside of the broker.json config file to delete the file on the device.
Now you may upload the modified configuration file from your local file system by selecting the Upload button below the file list one more time. Enter broker.json into the Path: field. Then select your modified configuration file by selecting the Browse button. Hit Ok and the modified configuration file should show up in the file list.
Now we start the application by select the Applications main management tab and the Start button for the eff application.
The broker will now start and in addition to TCP port 8080, will now listen port 8484. Port TCP 8080 and 8484 correspond to http and https connections respectively. To verify that the broker is listening, you may check that the configuration is work correctly by downloading the broker log file broker.log from the Logs tab inside the eff management tab. There should now be a second log info line starting the HTTPS server additionally to the HTTP server.
2017-11-08 10:08:45 INFO [server] - HTTP server bound to 0.0.0.0:8080

2017-11-08 10:08:45 INFO [server] - HTTPS server bound to 0.0.0.0:8484
Option 2: Installing and Configuring Self-Signed Key and Certificate using the ioxclient
The EFM application is assumed to be installed and running, before we can make changes to the broker configuration file we must first stop the application. To stop the application type:
ioxclient application stop eff
In the next step, we upload the server key file the same way as we uploaded the certificate. Select the uploadbutton a second time and enter certs/key.pem into the target path edit field this time.
Start by uploading the server certificate file using the ioxclient command:
ioxclient application appdata upload eff server.pem certs/server.pem
Next, we upload the server key file using:
ioxclient application appdata upload eff key.pem certs/key.pem
We need to modify the existing broker.json configuration file by downloading, editing and replacing the existing file. To download the configuration file broker.json, select it in the file list and store it locally our your computer.
ioxclient applicationappdata view eff broker.json
Now modify it with an editor of your choice. Take care the file should still be a plain ASCII file with a valid json contents after editing. The following green marked elements needed to be modified in the configuration file.
- In the https section, the value of enabled must be set to
- In the https section, add the name of the certificate file “certName”: “server.pem”
- In the https section, add the name of the key file “certKeyName”: “key.pem”
After the modification, the configuration file should look like the following (pay attention to maintain the JSON formatting!):
{

  "http": {

    "enabled": true,

    "host": "0.0.0.0",

    "port": 8080

  },

  "https": {

    "enabled": true,

    "host": "0.0.0.0",

    "port": 8484,

  "certName": "server.pem",

  "certKeyName": "key.pem"

  },

  "log_level": "info",

  "allowAllLinks": true,

  "maxQueue": 1024,

  "defaultPermission": null,

  "storage": {

    "path": "."

  }

}
To upload the modified configuration file, we first need to delete the original file since the ioxclient does not allow to overwrite an existing file.
ioxclient applicationappdata delete eff broker.json
Now you may upload the modified configuration file from your local file system:
ioxclient applicationappdata upload eff broker.json broker.json
Now we start the application:
ioxclient application start eff
The broker will now start and in addition to TCP port 8080, will now listen port 8484. Port TCP 8080 and 8484 correspond to http and https connections respectively. To verify that the broker is listening, you may check that the configuration is work correctly by downloading the broker log file broker.log from the Logs tab inside the eff management tab. There should now be a second log info line starting the HTTPS server additionally to the HTTP server.
ioxclient application logs download broker.log
2017-11-08 10:08:45 INFO [server] - HTTP server bound to 0.0.0.0:8080

2017-11-08 10:08:45 INFO [server] - HTTPS server bound to 0.0.0.0:8484
Remarks
To reach the HTTPS port from outside the device you need to add an appreciate NAT entry into the IOS NAT table.
For this example, assuming address 192.168.101.6 is the outside address:
ip nat inside source static tcp 192.168.101.6 40000 interface Vlan1 8080
ip nat inside source static tcp 192.168.101.6 40001 interface Vlan1 8484
Manage the EFM app
Once an application is deployed and running, use the EFM System Administrator tool to configure the new message broker and links by creating a new uplink connection to the router’s outside address.
Note: The EFM System Administrator is currently only supported on Linux.
See the Kinetic EFM: IOx Components Installation Guide for more information.
Create the Upstream Connection
Option 1: Linux or Windows
Use a web browser to open the EFM Admin page at https://BrokerIP:8443/efm-admin.
Go to the menu Brokers > Management > upstream > Add Upstream Connection.
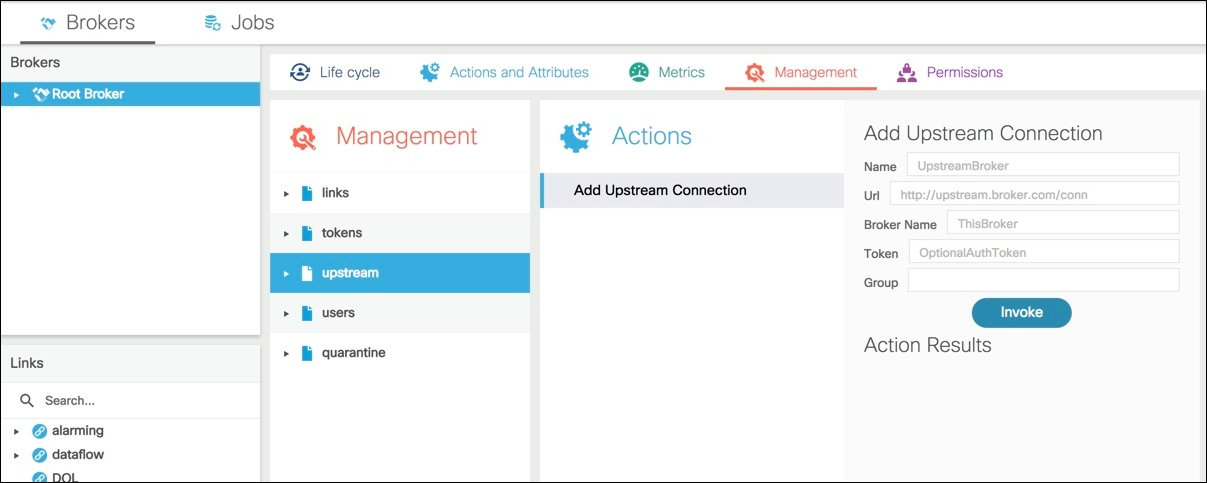
Enter the following settings:
- Name: —Enter a meaningful name for the connection
- URL—Enter https://UpstreamBrokerIP:8443/conn. Note: If the upstream broker is http, then change URL to http://UpstreamBrokerIP:8080/conn)
- BrokerName—Enter a meaningful name for the broker
- Token and Group are optional.
Click Invoke to create the connection.
The connection should now show up under the Root Broker.

Option 2: IOx
Summary
The IOx EFM Broker is not initially configured for any upstream connection and only listens on port 8080 (http) for incoming connections. Complete the following steps to make sure the incoming connection is ready:
IR829/IR809
- For the IR809/IR829 it is recommended setting the EFM Application Ethernet ports to IOx-NAT so restarts of the application do not change the IP Address. In addition, unless the DHCP Pool for the IOX GuestOS is globally routable, a NAT statement needs to be defined to reach the specific ports for the IOx GuestOS and in particular for the EFM inbound broker listening ports (for example 8080 for http and 8484 for https).
- On any other node, usually the next node upstream, it is necessary to define a broker to broker communication to the EFM IOx broker.
IE4000
NAT statements are not applicable since the IP Address is defined by the following commands in the switch configuration:
iox

 host ip address 10.228.219.200 255.255.255.128 vlan 1

 host ip default-gateway 10.228.219.129
Solution
Deployment questions
- Is there a large number of edge hosts that need to connect to an upstream node?
- For security reasons we recommend using https connections, but will the edge node certificates be installed on the IOx edge node to support this?
- All communications are expected to be outbound?
We are not saying not to configure the NAT statement for inbound connections or installing the certificates to support inbound https connections. But there may be use cases where it does not justify the effort to reduce time or man hours for the task.
As alternative to installing the self-signed certificates and defining the NAT statements for inbound connections, it is possible to install a file that defines the upstream broker connection under the App-DataDir/upstream folder.
Using the ioxclient, it is possible to script the installation of the upstream connection or connections file(s).
Notes:
- For each upstream broker connection, a unique file is created in the App-DataDir/upstream folder.
- Remember that the node names defined in the connection must be unique. Therefore at least the edge node name must change for each connection to the same upstream broker.
- The process described below only works on versions 1.1 and greater due to internal file structure are different and the configuration files are not located in the data partition of the application container.
Generating the upstream connection definition file
For every broker to broker connection in the EFM we need to define the following atttributes:
The Upstream broker name on this connection
In the EFM and DSA IoT architecture, the broker names defined in a connection are not unique to the node, but only used per connection. They must be unique names between the same brokers.
The Local Broker name on this connection
The URL to be used for the upstream connection. All broker to broker URL must end in “/conn”. For example, https://192.168.24.101:443/conn.
The URL can use a numeric IP address. The current EFM IOx package does not contain an
/etc/resolv.confor obtain it from the GuestOS and therefore cannot use DNS for name resolution.Define if the connection is enabled at startup. True for enabled, false for disabled.
A text file needs to be created with these attributes in the following format (in a single line). The name of the file is the same as the Upstream broker name for consistency. Replace the following placeholders:
with Upstream broker name on this connection with Local Broker name on this connection with the upstream broker URL, including the port and terminating in “/conn”.
{"name": "<upstreamName>", "brokerName": "<localName>", "url": "<upstreamURL>", "enabled": true}
For example:
File name: efmFogNode
{"name": "efmFogNode", "brokerName": "efmIR829edge", "url": "https://192.168.14.101:443/conn", "enabled": true}
Uploading the upstream broker connection file
There are two ways to modify the EFF application configuration, the first using the Local Manager UI and the second is the ioxclient. The ioxclient allows for automation through scripting if needed.
Option 1: Installing and upstream broker connection file using the Local manager
Connect via a web browser to the IOx router to the defined port for the Cisco IOx Local Manager.
For usage of the local manager UI you have to use a browser to connect to the IOx device using the https connection to the port 8443. You have to log into the UI using the required credentials and the
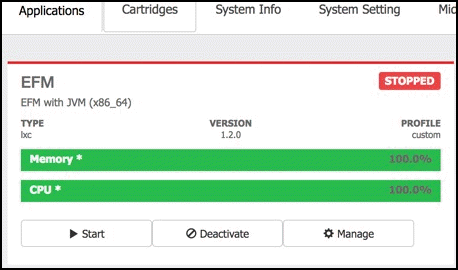
Once logged in, the interface should show the Applications by selecting the Applications tab.
The EFM application is assumed to be installed and running, before we can make changes to the broker configuration file we must first stop the application. Simply select Stop in the Local Manager UI.
After the application has stopped, select the application name “efm” in the tabs. This will expose additional tabs underneath to allow for more functions. Select the “App-DataDir” tab.
This application directory App-DataDir contains all configuration files and installed links.
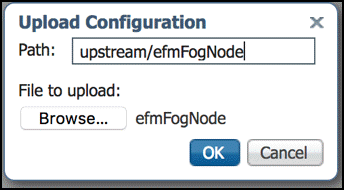
First upload the server certificate by selection of the Upload button below the file list. Enter the target path upload/efmFogNode into the Path edit field of the pop up window. Pay attention not to forget the folder name in the path. Then hit the browse button in the pop up window and select the server certificate file in your local file system. After selecting of the Ok button the Local Manager will create a folder named efmFogNode in the upload directory.
To verify the files have been uploaded, you may check the content of the upload folder by selecting the upstream folder in the UI.
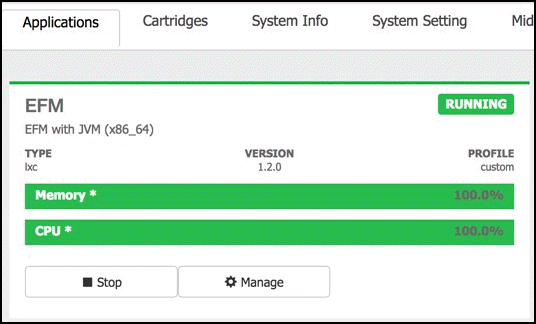
Now we start the application by select the Applications main management tab and the Start button for the eff application.
The broker will now start and try to connect the upstream broker as defined in the upstream file efmFogNode.
To verify that the broker is connected or connecting to the upstream broker, you may check the broker log file broker.log from the Logs tab inside the EFM management tab. There should line indicating that it was successfully connected to the upstream broker. An alternative is using the EFM System Administrator, selecting the upstream broker in the Brokers pane and expanding to see if the edge broker is shown underneath.
2017-12-19 21:07:11 INFO [upstream] - Successfully connected to the upstream broker 'efmFogNode'
Option 2: Installing and upstream broker connection file using the ioxclient
The EFM application is assumed to be installed and running, before we can make changes to the broker configuration file we must first stop the application. To stop the application type:
ioxclient application stop EFM
Upload the upstream broker connection file using the ioxclient command:
ioxclient application appdata upload EFM efmFogNode upstream/efmFogNode
Now we start the application:
ioxclient application start EFM
To verify that the broker is connected or connecting to the upstream broker, you may check using the Local Manager the broker log file broker.log from the Logs tab inside the EFM management tab. There should line indicating that it was successfully connected to the upstream broker. An alternative is using the EFM System Administrator, selecting the upstream broker in the Brokers pane and expanding to see if the edge broker is shown underneath.
2017-12-19 21:07:11 INFO [upstream] - Successfully connected to the upstream broker 'efmFogNode'