Converting Custom Images to QCOW2
This page has step-by-step instructions to convert VM disk images into QCOW2 format which is the required format to import VM images into CML.
VM disk images come in different formats. Common examples are: - QCOW2, the native disk format understood by Qemu - VMDK, the native VMware disk format - VHF, the native Microsoft Hyper-V disk format - OVA/OVF: a container used by virtualization products like VMware ESXi / vSphere which typically contains VMDK disk images - VDI: native disk format of VirtualBox - “raw” disks, just the unstructured bits of a hard drive
There is more, but the above covers the most common ones. The good news is that all of these disk formats can be converted into QCOW2 so that CML can import and use them. The steps are usually quite similar, the difference is whether the disk is stored in a container file or already available as a separate file.
Required Tools
The tools required to convert a disk image to QCOW2 format are:
Archive tools (unzip, tar, …) - the selection depends on which file format the VM comes wrapped into
Conversion tools (qemu-img) - this is the “swiss army knife” for conversion of all disk Images
The good news is that all these tools are readily available inside a CML installation. If there’s a need for a more exotic archive format, then that’s typically only an “apt install” away.
Environment
As said, the tools are available on the CML controller and therefore, it’s the easiest to do the conversion process on the CML controller. The examples assume that shell access to the CML controller is available.
Archives and containers
If the VM distribution file is an archive, either a zip, tar or similar file, then it needs to be unwrapped first. How exactly this is done depends on the file itself.
The file command helps to identify the files in case it’s not clear what they actually are:
$ file librenms-ubuntu-22.04-amd64-vmware-disk1.vmdk
librenms-ubuntu-22.04-amd64-vmware-disk1.vmdk: VMware4 disk image
$ file some-qemu-disk.qcow2
some-qemu-disk.qcow2: QEMU QCOW2 Image (v3), 42949672960 bytes
$ file librenms-ubuntu-22.04-amd64-vmware.ova
librenms-ubuntu-22.04-amd64-vmware.ova: POSIX tar archive
$ file somefile.zip
somefile.zip: Zip archive data, at least v2.0 to extract, compression method=store
If it’s a container then the contents of that container / archive must be extracted first before disk conversion can be done.
Example
To illustrate the conversion process, we will convert and import an example node type into CML. LibreNMS is available for download as an OVA and can be used to illustrate the steps.
Procedure
Log into CML via a shell, either via Cockpit → Terminal or via SSH (if enabled)
Create a directory and change into it to keep things together:
$ cd
$ mkdir disk-conversion
$ cd disk-conversion
This is not strictly necessary, but it helps to keep things organized.
From the LibreNMS home page, navigate to “Downloads” and click on the “OVA Images” link in the “Virtual Machines” section. The curl the link to the “librenms-ubuntu-22.04-amd64-vmware.ova” release (the name might be different). Note that this is an OVA suitable for VMware deployment.
Download the image to the CML server:
$ curl -LO https://github.com/librenms/packer-builds/releases/download/23.11.0/librenms-ubuntu-22.04-amd64-vmware.ova
Untar the archive to get the actual files (Note that the actual command here depends on the container type and might not be needed at all if you download, e.g., a VMDK directly), as a result, you will see multiple files:
$ tar xvf *.ova
librenms-ubuntu-22.04-amd64-vmware.ovf
librenms-ubuntu-22.04-amd64-vmware.mf
librenms-ubuntu-22.04-amd64-vmware-disk1.vmdk
$ ll -h
total 4.0G
drwxrwxr-x 2 sysadmin sysadmin 4.0K Jun 26 11:17 ./
drwxr-xr-x 5 sysadmin sysadmin 4.0K Jun 26 11:17 ../
-rw-r--r-- 1 sysadmin sysadmin 2.0G Nov 19  2023 librenms-ubuntu-22.04-amd64-vmware-disk1.vmdk
-rw-r--r-- 1 sysadmin sysadmin  233 Nov 19  2023 librenms-ubuntu-22.04-amd64-vmware.mf
-rw-rw-r-- 1 sysadmin sysadmin 2.0G Jun 26 09:49 librenms-ubuntu-22.04-amd64-vmware.ova
-rw-r--r-- 1 sysadmin sysadmin 6.0K Nov 19  2023 librenms-ubuntu-22.04-amd64-vmware.ovf
sysadmin@cml-controller:~/librenms$
The file we are interested in is the one ending in “vmdk”.
(optional) We can now check some information of this disk file. It’s good to know what the disk size actually is (it’s usually much larger than the file itself):
$ qemu-img info librenms-ubuntu-22.04-amd64-vmware-disk1.vmdk
image: librenms-ubuntu-22.04-amd64-vmware-disk1.vmdk
file format: vmdk
virtual size: 40 GiB (42949672960 bytes)
disk size: 1.96 GiB
cluster_size: 65536
Format specific information:
   cid: 26630901
   parent cid: 4294967295
   create type: streamOptimized
   extents:
      [0]:
            compressed: true
            virtual size: 42949672960
            filename: librenms-ubuntu-22.04-amd64-vmware-disk1.vmdk
            cluster size: 65536
            format:
In this case, the disk size is 40GB whereas the image size itself is only 2GB. Compression and optimization is usually turned on for disks inside of OVA images (“streamOptimized”).
The actual conversion can now start. This may take a bit of time. Also ensure that there’s enough disk space available to store both files, the source and the destination!
$ qemu-img convert -pc -O qcow2 librenms-ubuntu-22.04-amd64-vmware-disk1.vmdk librenms.qcow2
   (100.00/100%)
$ ll -h *.qcow2 *.vmdk
-rw-r--r-- 1 sysadmin sysadmin 2.0G Nov 19  2023 librenms-ubuntu-22.04-amd64-vmware-disk1.vmdk
-rw-r--r-- 1 sysadmin sysadmin 2.0G Jun 26 11:26 librenms.qcow2
The used flags are:
-p to show progress
-c to compress the result again (this is fine since CML uses linked clones anyway)
-O qcow2 to indicate the target format
the source disk (the VMDK)
the destination disk name (the disk that is created as the result of the conversion)
The qemu-img tool is usually pretty good at detecting the source disk format. If it does not, then the source disk format can also be specified by using the -f fmt flag. The formats understood are available from the –help text towards the bottom of the output.
After conversion is done, the resulting disk image file can be moved into the CML server drop folder to make it available to the UI when creating an image definition in CML. sudo is required for this:
$ sudo mv librenms.qcow2 /var/local/virl2/dropfolder/
[sudo] password for sysadmin:
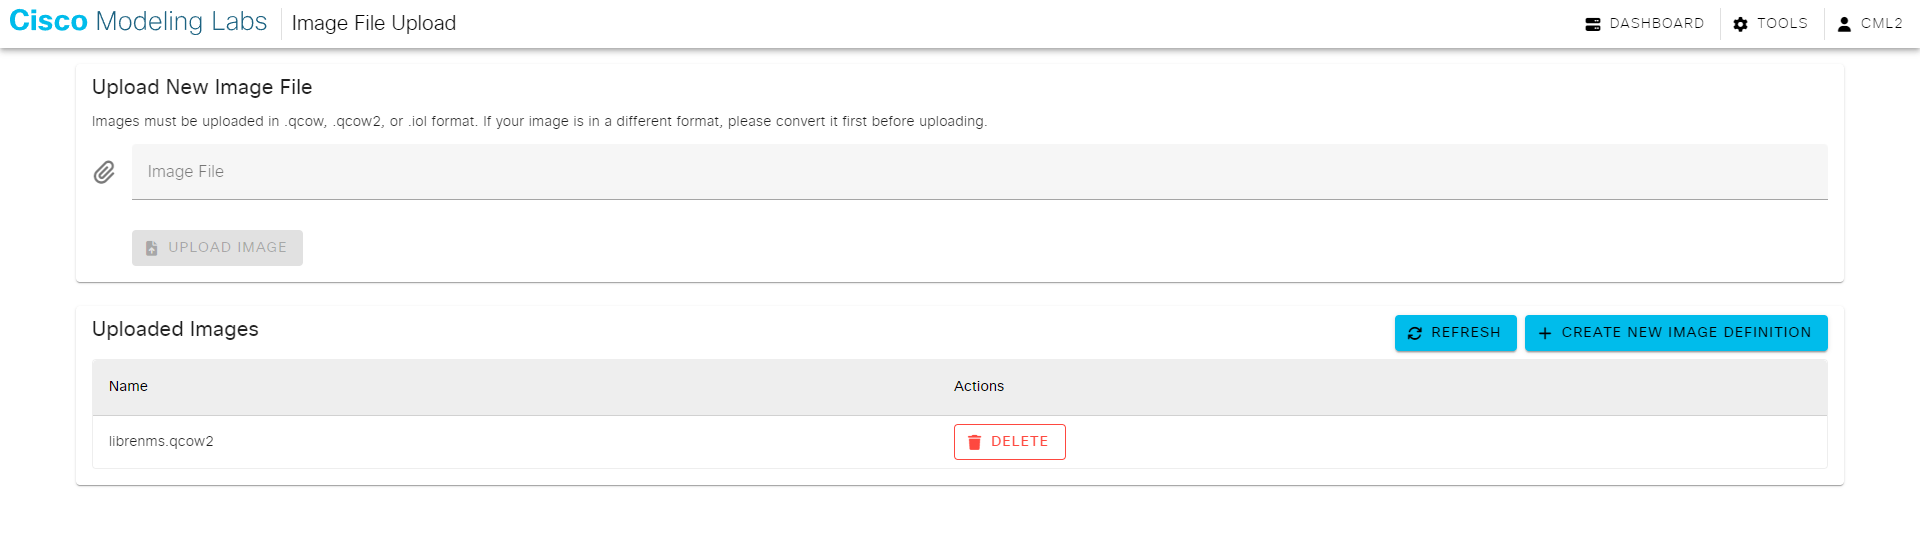
Navigating to Tools → Node and image definitions → Image definitions → Manage will show the newly available file.
To clean up, remove the directory that was created for the conversion:
$ cd
$ rm disk-conversion/*
$ rmdir disk-conversion
$ # can also do "rm -rf disk-conversion" which is a bit more dangerous
At this point, a new CML image definition can be created.
Caution
When creating a node and / or image definition, ensure that the disk size specified there is at a minimum as big as the one of the actual disk. In the example given, the disk size is shown as 40GB. This means that the disk size in the definition can be 40GB, or 64GB (better go somewhat bigger) but it can NOT be 32GB.
Specifying a disk to have bigger size is not a problem, shrinking it to a smaller one is a problem and will lead to non-working nodes.